CHAPTER 13
The Background
What we are looking for in a dramatic set is an imaginative sub stitute. Keep in mind, directors produce illusions. However basic the set materials really are, the end result can appear to the audience as the real thing.
Gerald Millerson, Author
The background is much more than whatever happens to appear behind the subject. It directly affects the success of the program, so it needs to be carefully designed and controlled.
Key Terms
■ Aspect ratio: Most televisions have an aspect ratio of 16:9 (HDTV) although some are still at 4:3 (SD). It is important to keep the aspect ratio in mind when designing sets so that they fit the screen.
■ Chroma-key: Utilizing a production switcher, the director can replace a specific color (usually blue or green) with another image source (still image, live video, prerecorded material, etc.).
■ Cyclorama (cyc): The cyclorama serves as a general-purpose detail-less background. It can be neutral, colored with lights, or without light (black).
■ High angle: When the camera is positioned higher than the subject.
■ Low angle: When the camera is positioned lower than the subject.
■ Virtual set: These sets use a blue or green seamless background, chroma-keying the computer-generated set into the scene. Most virtual sets employ sophisticated tracking computer software that monitors the camera’s movements so that as it zooms, tilts, pans, or moves in any other way, the background moves in a corresponding way.
13.1 THE IMPORTANCE OF THE BACKGROUND
Video programs are shot in an extremely wide range of locations: people’s homes, offices, factories, rooms, halls, public buildings, studios, out in the streets, and wide-open spaces. Where you shoot the program may be vital (contextually relevant) to what you want to tell your audience, or it can be merely incidental.
Surroundings have a considerable influence on how we feel about what we are seeing and hearing. It is not just a matter of choosing a background that looks appropriate or attractive. The background we choose for our action, and the way we shoot it, can affect how persuasively points are communicated to our audience. It is one thing to see a person standing on a street corner, recommending a type of medicine, and another when we see that same person wearing a white lab coat in a laboratory. The surroundings have swayed our reactions, yet they have nothing to do with the true quality of the product.
The camera cannot avoid being selective. For example, if a video camera is taken to an offshore oil rig, depending on which parts of the structure are shot, a very different view of life on the rig can be expressed. The final emphasis could be on its huge geometric structure, the isolation of this group of workers in treacherous seas, or it might appear as a scene of endless noise and tense activity. In the end, it is the shot selection and editing that will portray the concept of life on a rig to the audience. The result may be a fair cross section of life there, or it could be overselective. Much depends on the point of view the director adopts.
BACKGROUNDS (SETS) ARE A MATTER OF TASTE
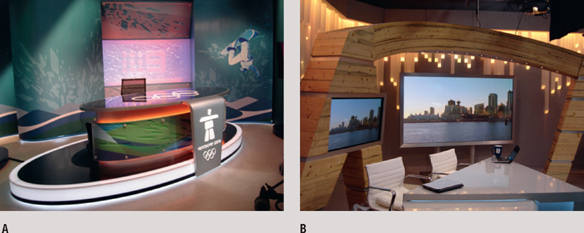
FIGURE 13.1
Set designs can be incredibly varied. Sets A and B are from different networks in Australia and sets C and D are from two different Japanese networks.
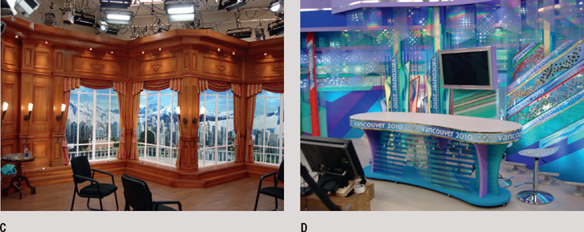
Television show set designs differ greatly from country to country and even network to network. The following photographs are a study of some of the design choices that were made by two different country’s networks who covered a recent Olympics. These sets were photographed in the International Broadcast Center during the games (Figure 13.1).
The detail in HD is remarkable, which has implications for set design and lighting. On a recent HD project we noticed the slightest scratches or dust on the set. We kept the art department busy between takes just keeping the set wiped off and touched up.
Phil Cooke, Director
13.2 REAL AND UNREAL BACKGROUNDS
Most audiences are not concerned about whether the background is real or an illusion. They usually don’t care if it is a real location or computer-generated. It is the effect that counts. However, it is worth remembering that backgrounds can be derived in a number of ways:
■ Use of actual place. The action is really shot in the Sahara desert.
■ Use of substitute. The action is shot in a convenient location that looks sufficiently like part of the Sahara desert.
■ Use of a set. The action is shot in a studio that has been built to resemble the real thing.
■ Suggested location. The camera shows location shots of the Eiffel Tower (part of a still photo), intercut with shots of someone standing against a brick wall. Thanks to the sound of traffic and other sound effects, the viewer assumes that the action was shot in Paris.
■ Virtual set. Using software, a person can be inserted into a separate background image.
13.3 SET COMPONENTS
There are many different types of set components used for television productions. Here are some of the most common:
■ Standard set unit: Used instead of an interior or exterior walls. A flat is a good example of a standard set unit (Figure 13.2).
■ Hanging unit: Basically, any background that is supported by hanging on a wall, a lighting grid, or another overhead support. These include curtains, rolls of background paper, and canvas (Figure 13.3).
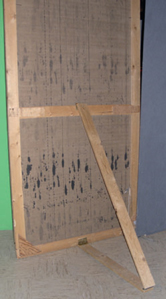
FIGURE 13.2
These flats, or standard set units, are the back of the walls of the set. The first flat is a very simple single flat. The second photo shows a more complex flat wall.
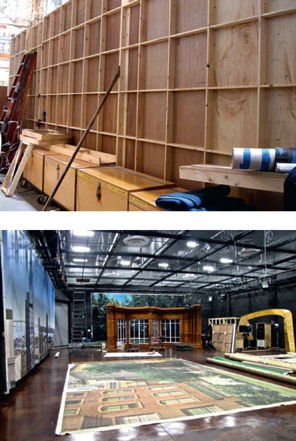
FIGURE 13.3
There is a cityscape hanging backing (background) on the wall on the left, one behind the set in the middle, and another background laying on the floor, waiting to be hung.
■ Platforms: Used to elevate the talent or set.
■ Set pieces: Usually are three-dimensional objects used on a set. Examples of set pieces would include modular set systems, steps, and pillars.
■ Floor treatment: Includes rugs, wood, rubber tiles, paint, and so on (Figure 13.4).
■ Stage props: The furniture on the set. These would include news desks, chairs, couches, and tables.
■ Set dressings: Set decorations are used to create the character of the set. They can establish the mood and style of the production. The dressings can include fireplaces, lamps, plants, pictures, or draperies (Figures 13.5, 13.6, and 13.7).
■ Hand properties (props): Any items that are touched and handled by the talent during the production. These could include a pen, dishes, a cell phone, or silverware. The choices made in each of these component categories fit together to send the audience a specific message about the characters and the time period the story is taking place in.
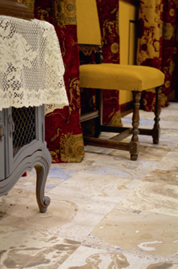
FIGURE 13.4
This marble flooring is paper that was painted to look like marble.
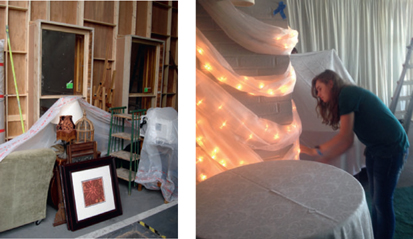
FIGURE 13.5
These set dressings will be used to establish the character of the set. The second photo shows a set being dressed.
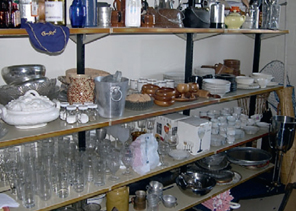
FIGURE 13.6
Prop room showing the various props available for use in a production.
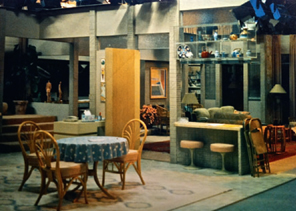
FIGURE 13.7
The set pieces, the dressings, and the props give an authenticity to the time period during which this story takes place.
(Photo by Doug Smart)
SET DESIGN SOFTWARE
A number of companies have created software that can assist a set designer in the process of creating and visualizing how the final set will look. One of the most popular types of 3D modeling software, SketchUp, offers a free version for noncommercial use. Once the set is designed, you can look at it from different angles to see what the camera would see. You can even place modeled actors or commentators into the set to see if it works for your production (Figure 13.8).
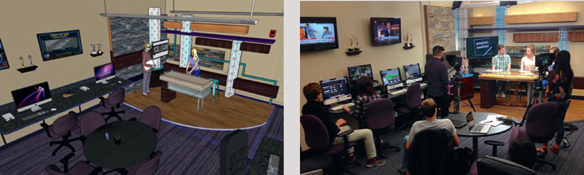
FIGURE 13.8
Modeling software can assist set designers in creating a set.
(Design by Sarah Owens)
13.4 THE NEUTRAL BACKGROUND
There are times when we want the background to provide totally neutral surroundings for the action. In the extreme, this background could be just a blank white (limbo) or black (cameo) area, because we are concentrating on the performers. However, we usually want something more interesting to look at than a plain area of tone, and television solved this problem by creating the neutral setting, a background that is visually attractive but does not actually remind us of any specific style, period, or place.
Basically, neutral backgrounds are usually made with scenic units, positioned in front of a cyclorama or cyc (pronounced “sike”). A cyclorama is a curved wall that is used as a background for a television production. This curved wall suggests unlimited space when seen through the camera. The cyc provides an extremely useful general-purpose background surface for studios of all sizes. The cyclorama can be the basis of a wide range of program backgrounds from the mundane to the spectacular. It can be built to fit the project—anything from a few feet long to a complete wall around the studio (Figure 13.9).
Soft cycs are usually made from cloth, and hard cycs can be made out of wood, metal, or fiberglass. Soft cycs are typically white and are generally made of scrim. This way, lights can be projected on them from the front or back. Hard cycs are traditionally painted a chroma-key color, green or blue.
13.5 ECONOMICAL SETS
People working on a tight budget and with limited storage facilities will have little opportunity to build much scenery. But that does not need to be a major limitation; it is possible to develop attractive sets, simply and economically, by using just a few multipurpose set units in front of a cyclorama or a background wall (Figure 13.10).
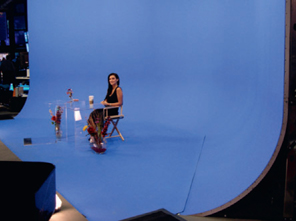
FIGURE 13.9
The cyclorama (cyc) serves as a general-purpose detail-less background. It can be neutral, colored with lights, without light (black), or video can be inserted into a blue cyclorama (like the one pictured), providing a virtual set. Note that it curves between the wall and the floor. Because corners are difficult to light and look like corners, the cyc is used so that it can be effectively treated as a virtual set.
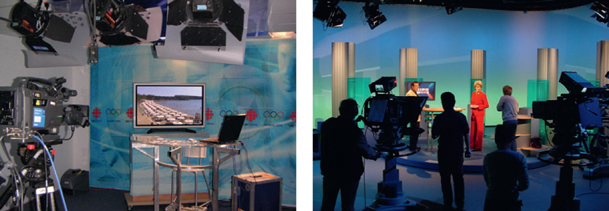
FIGURE 13.10
When designed well, simple economical sets can be quite effective.
■ Lighting alone can significantly change the appearance of a background, whether it is a plain wall or a cyc. You can light the set evenly, shade it (bottom-lit from a cyc light), light it in blobs or dapples, project shadows or patterns on it, or use plain or blended color areas.
■ An open set can be created by carefully grouping a few pieces of furniture in front of the wall. Even a few items—such as a couch, a low table, a table lamp, potted plants, a screen, a chair, and a stand lamp—can suggest a complete room.
■ Flats can be created by stretching cloth or other material over a wood frame.
13.6 SEMIPERMANENT SETS
Set design has become more complex over the years. Sets incorporate technology, special lighting, monitors, and areas for keying graphics (Figure 13.11). Dramatic sets are being built with such detail that they have become incredibly complex. Most complex sets are installed semipermanently (Figure 13.12).
They are complicated enough that it is not worth installing and uninstalling them on a regular basis, until they need to be updated or the show is canceled. This means that they are built into the studio, bolted to the floor, and probably connected to the ceiling. When studio space is available, it saves a lot of time to have a set sitting waiting to be used. A regular show can be shot quickly, without all of the setup time.
A “permanent” or “semipermanent” set has the following advantages:
■ most of the set is assembled, ready to be used;
■ the set can be dressed and left in place (various props and furnishings);
■ lamps, both set illumination and on-set lights, usually have already been hung and adjusted and then left in position.
When a studio regularly produces a specific program, it may have a permanent set installed, such as a kitchen, a laboratory, an office, a lounge, or a news desk layout, designed to fit the productions.
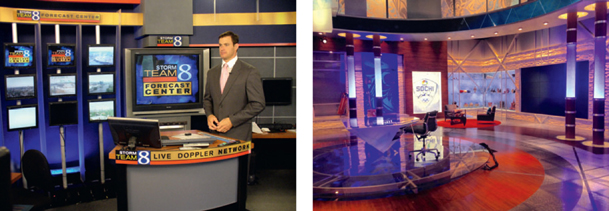
FIGURE 13.11
Sets have become more complex over the years, loaded with technology and multiple surfaces.
(TV-8 Photo by Jon Greenhoe)
FIGURE 13.12
A semipermanent dramatic set can be highly detailed.
13.7 CHROMA-KEY SETS
Chroma-keying is one of the most used techniques in television production. It has endless potential in creating backgrounds and as special effects (Figures 13.13 and 13.14).
Wherever a chosen keying color (usually green) appears in the shot, it is possible to insert a second source (the background), which can be video or a still shot. Chroma-key replaces the blue or green area (determined by the user) with the corresponding section of the second source. This keying technique can be created by using a production switcher in a multicamera production or with a nonlinear editing system equipped with the appropriate software.
Chroma-keying makes it possible for a person to appear as though they are standing in front of a real location such as a castle, a field, the seashore, or a town square—all done inside a studio. If done well, this technique can be convincing and effective with the audience.
When utilizing the chroma-key technique, the entire background does not need to be keyed out. Instead, any part of the background or foreground may be chroma-keyed as long as the appropriate keying color is used. Because the image can be as large as the key color, it offers an economical method of providing an impressive giant display screen in a shot (Figure 13.15).
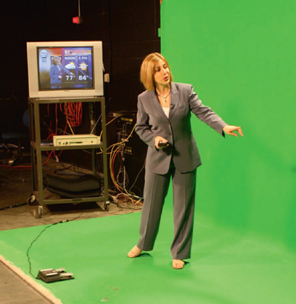
FIGURE 13.13
Television stations use green chroma-key background for weather reports. Note the final combined image on the monitor behind the talent. The foot pedal in front of the talent is used to change background images. The talent is looking at another monitor (not shown in the photo) to know where to point.
(Photo by Josh Taber)
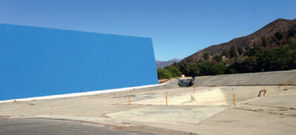
FIGURE 13.14
This large outside blue wall is used for television and filmmaking at Universal Studios. Note the water tank area in front of the wall so that boats can be filmed, keying in unique backgrounds.

FIGURE 13.15
The first image shows the set with a section that can be keyed out in blue. The second image is the external video shot. The third image shows what the viewers would see. Any appropriately colored portion of the set can be chroma-keyed.
(Photo courtesy of Tyler Young)
13.8 VIRTUAL SETS
The use of virtual sets continues to grow. This sophisticated type of chroma-key is changing the way sets are designed in many studios (Figures 13.16 and 13.17).
Although in the beginning the cost can be quite significant to set up a virtual set system integrated with cameras, the cost of quickly changing to many different kinds of sets can pay for itself in the long run. Studio space requirements and construction times are reduced with the use of these sets. Virtual sets use a blue or green seamless background and chroma-key the computer-generated set into the scene. Most virtual sets employ sophisticated tracking computer software that monitors the camera’s movements so that as it zooms, tilts, pans, or moves in any other way, the background moves in a corresponding way. This system automatically adjusts the background with each shot change, changing the background size and angle to simulate a real set.
13.9 OUTSIDE/BACK-LOT SETS
Building an outdoors back-lot set requires quite a financial commitment in both building the set and maintaining it. It is far beyond the small-budget project. However, these sets can be rented and do offer flexibility. The nice thing about them is that, if designed effectively, they can be reused. The outdoor set shown in Figure 13.18 was built decades ago and has been used in many different films and television productions through the years. These sets can be decorated to fit the time era, and most viewers do not realize that the set is the same location that was used for earlier shows.
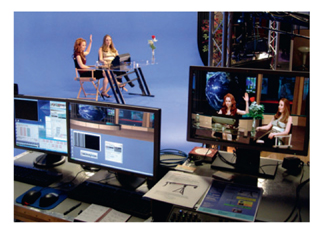
FIGURE 13.16
The women sitting on the blue cyc are being shot by a camera that is connected to the virtual set computer located in the foreground of this photo. Notice on the middle monitor that the computer-generated set is visible. In the monitor on the right, you can see the combined virtual set and keyed talent.
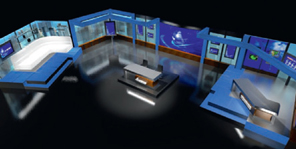
FIGURE 13.17
Computer-generated virtual sets can become quite complex, allowing a camera to pan around a studio set.
(Photo courtesy of Fifteenhundred)
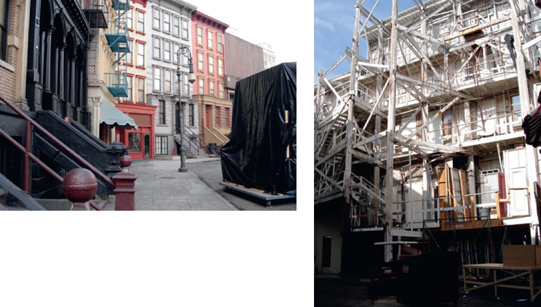
FIGURE 13.18
The buildings and street in the first photograph are part of a set used in a network television production. The second photo shows the back of the same set. Notice that the back has been designed so that actors can appear in windows or move in and out of doors.
13.10 THE LOCATION
Location backgrounds bring context to the production (Figure 13.19). They help establish the scene for the audience. They can also make the production look real and genuine in a way that it may be hard to imitate in a studio. They usually bring a credibility and urgency to the production. However, anytime the production is moved out of the studio, a little control is lost in audio, lighting, and maybe even camera placement. If it is an outside location, weather may be an issue.
However, unless the image on screen is of a famous place, all the audience knows about the location is what they are shown. It is possible to go to an exotic place and shoot someone leaning against a tree that looks just like one back home. If you are on location, make good use of it.
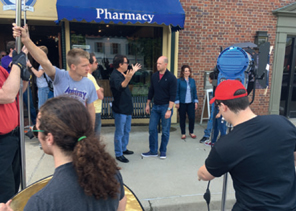
FIGURE 13.19
Real locations can make a production look genuine in a way that is difficult to imitate in the studio.
13.11 WATCH THE BACKGROUND
In the “busyness” of shooting a production, it is easy to overlook things in the background that can become a distraction in the final image. At the time, they are accepted as part of the scene or not even noticed. In the final production, they distract the audience’s attention. Even major films often have a microphone sneaking into the shot at the top of the picture or a shadow of the camera crew or prominent lighting cables, in spite of the filmmakers’ vigilance (Figure 13.20).
Here are some reminders of typical gaffes that can spoil the image:
Windows can be the cause of embarrassment when shooting interiors. A large patch of sky in the shot can create problems. Even if the interior is exposed properly, this bright blank area still grabs the audience’s attention. Although corrective filters can be used to compensate for the high color temperature of the daylight, its intensity can easily overwhelm the interior illumination and prevent the camera from getting a good tonal balance. In addition, if the audience has a good view of what is going on outside the window, there is always the chance that they will find this more intriguing than the real subject. The simple remedy is to keep the window out of shot, or close the shades.
Reflecting surfaces in the background are difficult to avoid. But glass, plastic, and even highly polished furniture can be troublesome. They can even reflect the camera and its crew. So instead of admiring the gleaming new automobile, the audience watches the interesting reflections in its door panel. Worse still, shiny surfaces reflect lamps. If a camera light is being used, its beam will bounce straight back into the lens. When the camera is moved, the blob of light will move along with the camera.
While low-intensity reflections can give sparkle and life to a surface, strong light reflections are a pain, both technically and artistically. Apart from avoiding shooting straight-on at these surfaces or keeping them out of shot, the quick solution is to change the camera’s location, cover up the reflections (position something or someone so that the highlight is not reflected), or angle the surface.
Flashing signs, prominent posters, direction signs, and billboards are among the visual diversions that can easily ruin a shot. They are all part of the scene, but if a dramatic situation is taking place any where near an animated advertising sign, do not be surprised if part of the audience’s attention is elsewhere.
Even if you are shooting in a busy spot, it is often possible to find a quiet corner where there are not too many interruptions. Avoid including a door or busy throughway in the background or similar busy areas with a continually changing stream of people. People staring at the camera and bystanders watching (particularly the hand-waving types) are a regular problem, and there is little you can do except try as much as possible to keep them out of the shot.
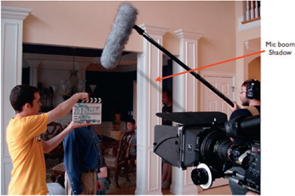
FIGURE 13.20
Boom pole shadows can be a real challenge on a set.
13.12 FOREGROUND PIECES
Objects can be deliberately positioned in the foreground of an image to improve its composition, to increase the impression of distance, or simply to hide something in the scene.
Many exterior shots have foliage hanging into the top of the frame. It is almost a visual cliché. But the camera operator has done this because the picture looks more complete, and it gives a better sense of scale than if there was just a blank open sky. With this “frame,” the picture tends to look more balanced and no longer bottom heavy. When there does not happen to be an overhanging tree to shoot past, a piece of a tree branch can always be held above the lens. If this positively impacts the look of the picture, do it, and your audience will never know.
Although the television’s picture itself usually has a fixed horizontal aspect ratio (4:3 or 16:9), a foreground window, an arch, or a similar opening can provide a border that alters the apparent shape of the picture.
By carefully framing foreground objects, it is possible to hide things in the background that would be distracting to the audience. They might ruin the shot in some other way. For example, if a historical drama is being reenacted, it is convenient, to say the least, if a carefully positioned gatepost, bush, or even a person in the foreground hides the modern signs and power lines. Foreground pieces can also add depth to a limited background (Figure 13.21). Create depth by shooting through objects, such as a bookshelf, a fence, or flowers. Usually the foreground is kept slightly out of focus to draw the audience’s attention to the primary subject. However, the foreground can also help bring context to the image if something in the foreground adds information to the scene.
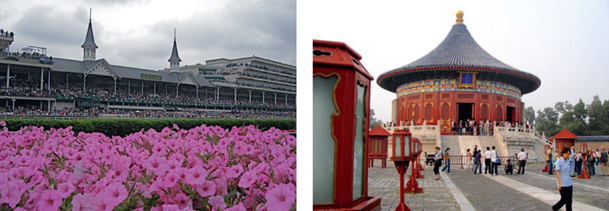
FIGURE 13.21
Foreground subjects add depth to the images.
13.13 VERSIONS OF “REALITY”
The camera does not tell the truth. It interprets. Each aspect of the picture and the sound influences how members of the audience respond to what they see and hear. A slight change in the camera position can entirely alter the picture’s impact. If the sun comes out, what was once a drab, threatening block of building can transform into an attractive, interesting piece of architecture (Figure 13.22). In the winter, we see a dull-looking street planted with stark, leafless trees. In spring, it becomes a charming avenue, where sidewalks are dappled with shade.
A location can be shot so that the audience envies its inhabitants or pities them for having to live there. It can appear like a fine place or an eyesore. It’s all a matter of what the director chooses to include and omit, what is emphasized, and what is suppressed.
As the camera moves around the scene, it can dwell on busy purposeful bustle as people go to work, or it can linger on those who appear to be lounging around with nothing to do. (In reality, they might be waiting for a bus, but at the moment the camera captures them, they are “aimlessly inactive.”) The director can suggest spaciousness by shooting with a wide-angle lens. Use a telephoto (narrow-angle) lens instead, and the same streets can look congested.
In most cities, one can find litter, decay, and graffiti, but conversely, there will be signs of prosperity, attractive buildings, green spaces, fountains, wild life, things that are amus ing, others that are touching. How the images are selected and related will significantly influence how the viewing audience interprets the scene.
13.14 WHAT CAN WE DO ABOUT THE BACKGROUND?
If the director is shooting in a studio and the background is unsatisfactory for any reason, he or she can usually improve it in some way or other. But what can be done when on location, if the background proves to be unworkable?
When you and your production team are guests in someone’s home, the answer may be disappoint ingly little. So much depends on the people involved and the director’s diplomacy. If the hosts are not accustomed to television production, they will probably be disturbed at suggestions that things need to be moved around to any extent.
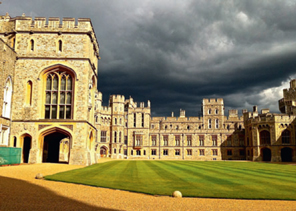
FIGURE 13.22
Sunlight, especially at sunset (often called the golden hour) can transform a scene into an attractive, interesting image.
They may even feel uncomfortable if they are not sitting in their customary chair. There is little point to making suggestions that will jeopardize an interview. However, there are various changes that can be made unobtrusively to improve matters:
■ Natural lighting can be used, rather than introducing lights. The person being interviewed will probably feel more at ease. However, it may not be possible to get good images without adding some television lighting.
■ Although a room’s tones cannot necessarily be changed, it may be possible to bounce the lights off a light-toned surface to prevent them from appearing too bright (by using a barn door, flag, or partial diffuser). Perhaps a little illumination may be added to dark corners.
■ If there are reflections in glass-fronted pictures or cabinets, and the lights and camera cannot be moved to avoid them, slightly angling the frame or furniture may cure the dilemma. A wall picture or mirror can often be tilted up or down by wedging something behind it. To keep the camera from appearing in a glass bookcase behind the talent, it may be possible to slightly open its doors.
■ Closing, or partly closing, the room’s curtains may help you to adjust the lighting balance in a room.
■ If you are shooting a corridor or hallway, it can help if doors in a side wall are opened enough to let extra light in.
■ Even if you are shooting in daylight, it may provide more interesting images if the table lamps or other lights in the room are turned on (Figure 13.23).
■ It may even be possible to conceal low-powered lamps behind furniture or wall angles to illuminate distant parts of the room; but be careful that they do not overlight or even burn nearby surfaces.
FIGURE 13.23
Using the existing lights to supplement other lighting can add to the color and impact of the image.
13.15 REARRANGING THE BACKGROUND
Most of the time, the director will be able to alter the background to achieve the best possible scene. Again, this has to be done diplomatically, but if the director is able to gain the host’s confidence, and the director seems to know what he or she is doing, there should be no difficulties. The simplest changes usually involve moving around what is already there to avoid any unnecessary distractions or unwanted glares in the picture.
It is important to look at the background of any location to make sure that nothing is growing from the talent’s head, or balancing on it, and that no vertical or horizontal lines cut through the center of the head or across the shoulders. These visual accidents can make the picture look contrived or comic (Figure 13.24).
There are a number of quick, inexpensive, and simple steps you can take to adjust the background for the camera:
■ rearrange the furniture;
■ replace furniture with other pieces from near-by rooms;
■ add or remove rugs;
■ hide a doorway with a folding screen;
■ attach display posters to the walls;
■ position indoor plants (e.g. ferns) to break up the background.
When shooting outside, there are relatively few things that you can do to cheaply and easily change the background.
13.16 PARTIAL SETTINGS
Using a partial setting is a strategy for convincing your audience that a modest setting is not only the real thing but is much more extensive than it actually is. Yet the cost and effort involved are minimal (Figure 13.25).
If the camera does not move, it can only see a limited amount of the scene in a medium or CU. With partial settings, it is important to concentrate on building up a section of the scene that is just large enough to fit the camera’s shot and no more. Within the scene, enough features are included to allow the audience to interpret where the action is supposed to be taking place.
Do not underrate this idea. It has been used successfully in film and television for many years. The result does not need to look amateurish. Add the associated sound effects and the combined image can be indistinguishable from the real thing.
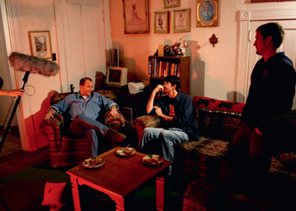
FIGURE 13.24
People’s homes are designed to be comfortable and to be lived in; they are not designed for television. Whenever going into a home with a camera, it is common to have to move some furniture, pictures hanging on the wall, rugs, and knickknacks in order to create an image that works on television.
(Photo by Luke Wertz)
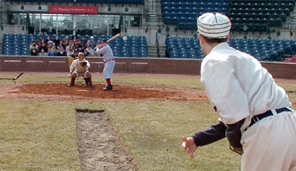
FIGURE 13.25
By putting the crowd in just the right place, repositioning the camera so that the crowd is directly behind the batter and catcher, and zooming in the lens to a close-up or medium shot, you will convince viewers that the baseball stadium was filled with a cheering audience.
13.17 TYPICAL EXAMPLES OF PARTIAL SETTINGS
■ An instant store can be created by putting the appropriate type of merchandise on a fore ground table (the “counter”), an advertisement or two on the back wall, and a shelf behind the salesperson, who could be holding a product.
■ Sometimes even a single feature in the picture can suggest an environment. A stained-glass window and organ music create a church interior. (The window could even be projected.)
■ A convincing “room” can be created in a studio with just a couple of flats or screens and a chair. Add an extra item or two, such as a side table with a potted plant and a picture, and the scene begins to take on its own character. If a curtain is hung on one of the walls, a window is assumed to be there. Whether it is interpreted as being someone’s home or a waiting room, for instance, largely depends on the way people in the scene behave. If the talent is lying back, casually dressed, reading a paper, it is obviously the person’s home. If the talent is wearing outdoor attire, sitting upright, and anxious, he or she is waiting for something.
■ Replace the plant with a computer and the picture with a framed certificate and, magically, the setting has become an office.
On location, the same concept is still useful—restrict the shot and change the background. Suppose you are shooting a nineteenth-century drama in which somebody visits a lawyer. You find a house exterior of about the right time period, but the rest of the street is obviously busy and modern. Fortunately, all you need is a shot of the house doorway with the appropriate business sign attached to it, and the picture will explain itself to the viewing audience. Have the actor go up to the door or pretend to leave the house, and the audience will immediately accept the location as the lawyer’s office. You need only to replace the sounds of modern traffic noise with horse-drawn vehicles, and the period illusion is complete. With a little care and imagination, locations can be created from a minimum of scenery and work.
It is incredible how seemingly trivial techniques can give a totally convincing effect on camera:
■ The camera rhythmically tilting up and down sells the illusion of a ship at sea.
■ The wafting breeze may really be the result of an assistant waving a piece of board.
■ The shuddering camera accompanied by things falling to the ground (pulled by unseen fishing line) implies an explosion or an earthquake. A hanging lamp swings alarmingly—tugged by an out-of-shot line.
■ The flickering flames of a nearby fire come from a stick of cloth strips waved in front of a ground lamp.
These are just a few examples of how a little ingenuity can apparently achieve the impossible and create a strong impression in your audience’s minds.
13.18 FACING REALITY
It is one thing to have dreams about creating a program, but it is a different matter to turn them into reality. Among the problems facing all directors are the inevitable limitations of budget and facilities. Some of the things you need may not even be available.
When faced with such problems it is tempting to think small, to cut back on ambition and do a simpler version. Do not immediately abandon your ideas. Instead, ask yourself if there is another way of tackling the situation to get virtually the same effect. How can you get around the difficulty?
Look for imaginative substitutes. Keep in mind that directors produce illusions. However basic the materials really are, the end result can appear to be the real thing (Figure 13.26).
As an example, let’s look at an actual scene that was broadcast. The scene was the banquet hall of an ancient castle. The king sat on a throne at one end of a long table, eating from golden dishes. That was the illusion.
What was reality? Two small foreground flags on wooden floor stands masked the edges of the shot so that no one could see the rest of the small studio. The “wooden table” was created from painted boards placed on sawhorses. The far “stone wall” was photographic wallpaper adhered to a flat (slightly sprayed black in order to age it). The “throne” was an old wooden armchair with a red drape thrown over it. The “gold dishes” were sprayed plastic plates. A “window” was painted, black on white, and stuck to the “stone wall.” But no one in the audience could recognize all of this in the LS. Of course, the scene would not have worked for CUs, but under patchy lighting, it was perceived as it was intended to be—the banquet hall of an ancient castle.
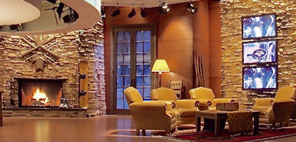
FIGURE 13.26
Sometimes ingenuity needs to be used instead of reality. A fireplace was desired for the set shown here, but it was impossible to have a working fireplace in the building in this specific situation, and the heat would be a problem. So, an HD monitor (with a video of fire) was used inside the fireplace to substitute for the fire.
(Photo courtesy of LDG/NBC)
John DeCuir, Jr., Production Designer
Why is design important?
I would like to think that what separates the design professional from other ways of life is that we are constantly on the lookout for the new idea, a better way to, say, package or construct our work. For better or worse, we seem to be dedicated to a life of rolling over those “idea rocks,” never too sure what just might crawl out.
Let me suggest that whatever profession you choose, you will inadvertently have to take up the design challenge. Almost everyone does, from the sushi chef arranging slices of raw fish to the architect building his building. Designing is like breathing; we all do it. It is simply that the athlete (the professional designer) works at it a little harder than the rest of us.
Therefore, knowledge of how the design process works will help any young professional. Knowing the fundamentals of design becomes even more critical as your career choices get closer to the applied and media arts, such as film, television, theater, and photojournalism, to mention only a few.
What advice do you have for the beginning designer?
■ Develop a reasoned passion for doing what you do. Unless you have a reasoned passion for what you do with your life (professionally, of course), chances are you will not be very good at it. So my first suggestion is that the young professional develop a “rationale” for the importance of their work. This work logic, ethic, passion is critical for your own self-respect and self-worth. It is also a vital ingredient to fuel the fire that keeps you on track in times of distress.
■ Skill management—Develop a working set of professional tools that have proven value. Here are a few of the tools you might wish to consider investing your time in developing.
a. Master the technology of your craft. Whether the task is to make an evening meal, create a video program, or build a skyscraper, each of these tasks has a sophisticated range of technical skills that must be mastered. It is safe to assume that the technical knowledge we employ can make or break a project. In judging the value of a new idea, always consider the skill level of the person who has created it.

FIGURE 13.27
John DeCuir, Jr., Production Designer.
b. Apply storytelling techniques to your project. Understanding the narrative of your project will insure you are able to communicate its value both to the client, the world, and, most importantly, to yourself. The professional simply can’t design effectively unless he or she can communicate a project’s narrative, tell its back-story, and define the theme. All these “story tools” help establish clear decision-making guideposts for the designer and communicate a project’s value to its audience.
c. Understand and respect the project environment. You can’t design well unless you first understand, then respect, then influence, then reshape the environmental issues surrounding a project. As an example, in a program scene, everything from the religious beliefs of the next-door neighbor, to the objects on the dresser, to the snow falling outside create a contiguous “design biosphere.” This biosphere or “story ecosystem” must be allowed to impact each and every choice the designer makes. Essential in this process is how the interaction of two elements creates a third new idea and how the new idea and its component parts all need to exist in a harmonious framework.
What are the challenges that you have to deal with as a designer?
As referenced earlier, the most important challenge you will face is to maintain a high state of energy and enthusiasm for your work. You will make some mistakes with this as your mantra and many times rush in where wise men fear to tread, but most importantly you will never stop looking for a better way. Following this, here are some other challenges to consider:
■ A critical challenge is to eliminate contradictions in the concept phase of a project. Many times bad ideas lay dormant and hidden in the concept phase of a project. Early on, these bad ideas and misdirected notions have to be eliminated— I emphasize early on. Early conceptual errors inevitably lead to predictable failures.
The challenge is resolved by recycling, refining, and remodeling emerging ideas through a series of tests. Fortunately, only simple tools are needed to do this. They are the sketchpad, pencil (with a very large eraser), spreadsheet, cardboard, knife, and that old dependable pot of rubber cement that holds ideas temporarily together (and I emphasize temporary). Used with skill, the correct application of these simple tools will seriously improve a project’s chances of becoming a quality project, on time and on budget.
■ The challenge of maintaining a balanced attack. To create a quality solution, the designer must balance issues of budget, time, and quality. As money becomes less available, time may have to expand. If a super emphasis is placed on quality, then perhaps both time and budget will need to expand. When deadlines are shortened, budgets may have to be increased, and perhaps quality (at some acceptable level) will need to be sacrificed. Balancing these three factors at every step in the development process is one of the young professional’s great challenges.
■ Managing the client–designer relationship. The designer must earn the client’s respect so that he or she can operate in a professional atmosphere. However, this is not a one-way street. The client has equal responsibilities. When a person agrees to go under the knife, they implicitly acknowledge that they have a lot of respect for the skill and the decision-making abilities of the surgeon. The designer’s challenge is to earn a similar level of respect in his dealings with the client.
Naturally, an inexperienced designer has a more difficult time in gaining this respect, as it requires an established track record. As such, the portfolio is a critical tool in the young designer’s arsenal. While his or her projects may be hypothetical, if they demonstrate skill and good design, many employers will be willing to take a chance with a young professional. In addition to school, one must be apprenticed to a professional. The concept of internship with a practicing professional is essential to building the experience that will eventually earn a client’s respect and trust.
John DeCuir, Jr., designs sets for television series as well as major motion pictures.