CHAPTER 7
The Camera
Perhaps it sounds ridiculous, but the best thing that young film-makers should do is to get hold of a camera and shoot and make a movie of any kind at all.
Stanley Kubrick, Director
Camera operators need to know their camera so well that they don’t need to “think” about it technically. That knowledge allows them to spend their time shooting creatively in a way that effectively communicates.
Key Terms
■ Aperture: The opening of the iris (see iris).
■ CCD: This charged-coupled device is an image sensor used in most video cameras.
■ CMOS: This complementary metal-oxide semiconductor image sensor has less power consumption, saving energy for longer shooting times.
■ Depth of field: The distance between the nearest and farthest objects in focus.
■ Digital zoom: Zooming is achieved by progressively reading out a smaller and smaller area of the same digitally constructed image. The image progressively deteriorates as the digital zoom is zoomed in.
■ Dolly: This platform with wheels is used to smoothly move a camera during a shot toward or away from the talent. Dolly also refers to a movement of the camera closer to, or further away from, the subject.
■ DSLR: Digital Single Lens Reflex still camera with video capabilities.
■ f-stop: The measurement of the size of the aperture.
■ Focal length: An optical measurement; the distance between the optical center of the lens and the image sensor, when you are focused at a great distance such as infinity; it is measured in millimeters (mm) or inches.
■ Handheld camera: A camera that is held by a person and not supported by any type of camera mount.
■ Iris: The diaphragm of the lens that is adjustable. This diaphragm is adjusted open or closed based on the amount of light needed to capture a quality image.
■ Jib: A counterbalanced arm that fits onto a tripod that allows the camera to move up, down, and around.
■ Normal lens: The type of lens that portrays the scene approximately the same way a human eye might see it.
■ Optical zoom: The optical zoom uses a lens to maintain a high-quality image throughout its zoom range.
■ Prime lens: A lens that has a fixed-focal length.
■ Telephoto lens: Gives a magnified view of the scene, making it appear closer.
■ Tripod: A camera mount that is a three-legged stand with independently extendable legs.
■ Truck: The truck, trucking, or tracking shot is when the camera and mount move sideways with the subject.
■ Viewfinder: Monitors the camera’s picture. This allows the camera operator to focus, zoom, and frame the image.
■ Wide-angle lens: Shows a greater area of the scene.
■ Zoom lens: A lens that has a variable focal length.
7.1 A VARIETY OF CAMERAS
Video cameras today come in a wide variety of shapes and sizes that suit all kinds of different situations. They range from units that fit in a pocket to cameras that are so heavy that they can take a couple of people to lift them (Figure 7.1). Historically there were consumer, industrial, and professional cameras. Many of those monikers have merged, with small, previously thought of as “consumer,” cameras now being used in the professional workplace (Figure 7.2). Traditionally, for a multicamera production, high-cost cameras were used that required camera control units (CCU). Today’s multicamera systems allow many types of cameras to be used in professional situations, including low-cost cameras. The right camera depends on how the end production is going to be used. What was considered a professional quality camera 10 years ago has been dwarfed by the quality of small, low-cost high-definition pocket-sized cameras available today. Television and film competitions are being won by directors who are using cameras that can be purchased at a local electronics store. That was unheard of in the 1990s. So now, no one can blame the lack of quality on his or her camera gear because almost anyone can afford the equipment. For all of the cool technological advancements, keep in mind that the important thing is to know how to visually tell a story.
Most productions are created with a camera that is a stand-alone unit; they are known as single-camera productions. Single-camera productions are generally edited together during postproduction (Figure 7.3). The second major type of production is a multicamera production, where two or more cameras are used with a switcher selecting the image to be shown to the viewer, otherwise known as “live editing.” We will be covering both of these types of production in more detail in a later chapter.
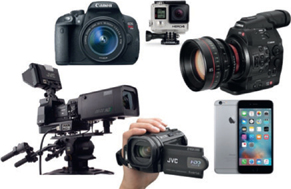
FIGURE 7.1
Video cameras come in all different shapes and sizes.
(Photos courtesy of Canon, Apple, JVC, and GoPro)

FIGURE 7.2
Traditionally thought of as consumer cameras, small HD cameras, such as the GoProshown, are now being used by television networks for specialty shots. These HD cameras have gained popularity as a camera that can be connected to anything. For a relatively low cost, this type of high-quality little camera, with a 170 wide-angle lens and waterproof case, records to an SD card. The photo on the right was shot with this camera.
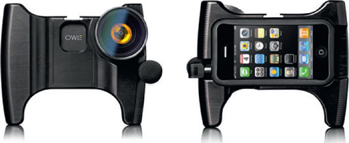
FIGURE 7.3
With their high-resolution sensors and HD or 4K capabilities, mobile phones have become the most popular video cameras. The phone shown here is attached to an OWLE camera grip that includes tripod/light mounts, a professional mic, and an add-on wide-angle lens. One of the main advantages of these phones is that the video can be immediately edited on the phone and then transmitted back to a news station, client, or directly onto a website … right from the phone.
7.2 CAMERACRAFT
Most video cameras are easy to operate at the basic level. Designers have gone to a lot of trouble to make controls simple to use. The consumer-oriented cameras have been so automated that all one needs to do to get a decent image is to point them at the subject and press the record button. When shooting for fun, that’s fine. So why make camerawork any more complicated?
It really depends on whether you plan to use the camera as a creative tool. The weakness of automatic controls is that the camera is only designed to make technical judgments. Many times these technical decisions are something of a compromise. The camera cannot make artistic choices of any kind. Auto-circuitry can help the camera operator avoid poor-quality video images, but it cannot be relied on to produce attractive and meaningful images. Communicating visually will always depend on how you use the camera and the choices you make.
Obviously, good production is much more than just getting the shot. It begins with the way the camera is controlled. It is not just a matter of getting a sharp image but of selecting which parts of the scene are to be sharp and which are to be presented in soft focus. It involves carefully selecting the best angle and arranging the framing for maximum impact, as well as deciding what is to be included in the shot and what is to be left out. It is the art of adjusting the image tones by careful exposure. Automatic camera circuitry can help, parti cularly when shooting under difficult conditions, and can save the camera operator from having to worry about technicalities. However, automatic circuitry cannot create meaningful images. Let’s take a look at the parts of a few professional cameras (Figures 7.4 and 7.5).
ENG/EFP Camera Components
■ This type of viewfinder is generally called an electronic news gathering (ENG) or electronic field production (EFP) viewfinder. It is a small monitor designed to be placed next to the camera operator’s eye.
■ The manual zoom control lens ring allows the camera operator to zoom in and out manually.
■ The power zoom rocker switch, located on the side of the lens, allows the camera operator to electronically zoom the lens. The speed of the zoom may vary, depending on the switch pressure.
■ The focus control ring on a lens allows the camera operator to turn the ring manually to obtain the optimal focus.
■ The lens aperture control ring allows the camera operator to adjust the lens iris manually to control exposure.
■ The white and black balance controls the circuitry in the camera that uses white or black to balance the color settings of the camera.
■ The filter wheel includes a number of filters that can be used to correct the color in daylight, tungsten, and fluorescent lighting situations.
■ Clip-on camera batteries allow the camera operator to carry multiple batteries.
■ Although at this point it is not common, some cameras are equipped with a built-in wireless microphone and antennas.
■ On-camera shotgun microphones are useful for picking up NAT but often pick up camera and operator noises.
■ Lens shades protect the lens elements from picking up light distortions from the sun or a bright light.
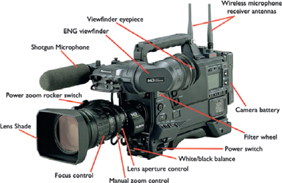
FIGURE 7.4
Video camera designs vary, but these are some of the common parts found in a professional ENG camera.
(Photo courtesy of Panasonic)

FIGURE 7.5
Parts of a high-quality (4K) camera.
(Photo courtesy of Red)
Stationary/Studio Camera Components (Figure 7.6)
■ The “studio” viewfinder (VF) monitors the camera’s picture. This allows the camera operator to focus, zoom, and frame the image.
■ The tripod head (pan head) enables the camera to tilt and pan smoothly. Variable friction controls (drag) steady these movements. The head can also be locked off in a fixed position.
■ One or two tripod arms (or panning bars/ handles) attached to the pan head allow the operator to accurately pan, tilt, and control the camera.
■ The tripod, or camera mount can take various forms such as a tripod, pedestal, or jib.
■ The zoom control (Servo zoom) and focus controls allow the camera operator to zoom and focus the lens from behind the camera.
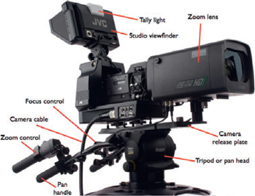
FIGURE 7.6
This type of camera system is generally used in studio or remote production settings where the camera is stationary.
(Photo courtesy of JVC)
7.3 MAIN CAMERA FEATURES
Every camera is different. Some offer an incredible number of options and adjustments while others have limited adjustment possibilities. The instruction manual issued with the camera gives details and specifications of the specific model you are using. Table 7.1 presents a list of typical features often offered.
THE DSLR (PROS AND CONS)
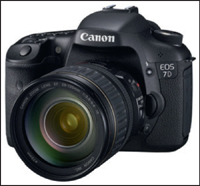
FIGURE 7.7
The DSLR camera has become very popular with documentary videographers and low-budget filmmakers.
(Photo courtesy of Canon)
Digital Single Lens Reflex cameras (DSLR) have become a formidable force in the video world today. While they were originally designed as a still camera that has some video capability, directors are using them to shoot corporate videos, commercials, television network shows, and even feature films. Some camera models’ high megapixel sensors and 1080p quality, combined with their small size and lower cost, make them a cost-effective option in video production. However, there are positives and negatives about the current class of DSLR cameras. While they are continually improving, the current models are good for some projects and not a good camera for other projects. Here are some of the pros and cons:
Advantages:
■ Low cost: When compared with video cameras with similar image quality, the DSLR is very cost effective.
■ The large sensor in some DSLRs provides incredible images as well as very shallow depth of field.
■ Weight: Its light weight makes it easier to move around.
■ Low profile: When shooting documentaries, the camera is less obvious.
■ Low light: DSLRs can shoot in very low light situations and still maintain their quality.
■ Interchangeability of lenses … there are a lot of different lens options.
■ Image quality can run from HD to 4K.
Disadvantages:
■ Recording time: Maximum continuous recording time ranges between 12-30 minutes. While the camera can be immediately restarted, this does create some recording limitations in some situations.
■ Audio: While audio has improved on DSLRs, they generally use automatic gain control (AGC), unbalanced inputs, and no phantom power. All of these factors mean that most people record their audio on a separate high-quality audio device and then sync it later. Many of the DSLRs do not include a headphone input to allow you to monitor the audio quality.
■ Stability: Due to their small size, DSLRs are usually handheld, not shoulder mounted. This is not a great design for stability while recording motion. Most camera operators use a shoulder-mounted support when handholding them.
■ Time code: The lack of time code can create some problems when attempting to sync audio in the postproduction process.
■ Quality: In order to obtain the 1080 image from their sensor, some models use a type of line skipping when capturing the image. While this type of down-resing reduces the amount of processing for the camera, it can cause some serious aliasing issues, which causes problems when shooting highly detailed patterns.
Other DSLR issues:
■ The terms used on a still camera are not the same as the terms on a video camera. For example, still cameras use “ISO” while video cameras use “gain.”
■ There are very limited video controls on a DSLR compared with a prosumer or professional video camera. This can limit the camera operator’s ability to adjust blacks or other fine-tune adjustments.
■ The DSLR does not always look professional if you are working for a client. Compared with a typical size professional camera, they may look amateurish.
Table 7.1 Camera features
| Gain control | Circuitry that manually or automatically adjusts the overall picture brightness and contrast. Gain control is reduced during bright shots and often increased under low light conditions. Increasing the sensor gain can deteriorate the video image. Note: Gain control adjusts the sensor sensitivity and is not the same thing as the aperture that controls the lens opening. |
| Auto-black | After capping the lens to exclude all light, this switch automatically sets the camera’s circuitry to produce a standard black reference level. |
| Auto-focus | Automatically adjusts the lens focus for maximum sharpness. When shooting through foreground objects, focusing selectively, or if anything is likely to move between the camera and your subject, the camera should be switched to manual focusing. Autofocus is usually a consumer camera option that is rarely part of a high-end professional camera. |
| Auto-iris | This device automatically adjusts the lens aperture (f-stop) to suit the prevailing light levels (light intensities). By doing so, it prevents the image from being very over- or underexposed (washed out or murky). Since an auto-iris cannot handle a multitude of lights, manual aperture is used when total control over the image is needed. |
| White balance or auto-white | This control automatically adjusts the camera circuits’ color-balance to suit the color quality of the prevailing light and ensure that white surfaces are accurately reproduced as neutral. |
| Black-stretch or gamma adjustment | Some cameras include an operator-controlled circuit adjustment to make shadow detail clearer and improve tonal gradation in darker picture tones. With a higher gamma setting such as 1.0, picture tones are more contrasty, coarse, and dramatic. A lower gamma setting such as a 0.4 provides subtler, flatter tonal quality. These adjustments should be made while utilizing a waveform monitor. |
| Color correction filters or filter wheel | Since sunlight and tungsten have different color qualities, filters are used to assist in obtaining the best color quality. These filters are often fitted inside the video camera, just behind the lens on a filter wheel. Alternatively, an appropriate filter may be fitted on the front of the lens. Typical correction filters include daylight (5600), artificial/tungsten light (3200), and fluorescent light (4700). The filter wheel may also include or combine neutral-density (ND) filters to improve exposure. |
| Macro | Most zoom lenses have a macro position. This allows the lens to focus on very close objects—much closer than the lens’s normal minimum focused distance. |
| Image stabilizer | This system compensates for accidental camera shake. |
| Shutter speed | To avoid movement blur and improve detail in fast action, a much briefer exposure rate than the normal 1/60 sec (PAL 1/50) is needed. A variable high-speed electronic shutter (settings from, e.g. 1/125 to 1/400 sec) reduces blur considerably but needs higher light levels. |
7.4 LENSES
Engraved on the front of almost every lens are two important numbers:
■ The lens’s focal length—or in the case of zoom lenses, its range of focal lengths. This gives you a clue to the variations in shot sizes the lens will provide.
■ The lens’s largest aperture or f-stop (e.g. f /2)—the smaller this f-stop number, the larger the lens’s maximum aperture, so the better its performance under dim lighting (low-light) conditions (Figure 7.8).
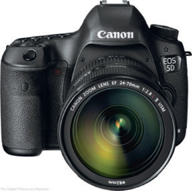
FIGURE 7.8
Lenses have essential information usually engraved on them. This specific lens has its focal length (24–70mm) and its largest aperture (1:2.8). These specifications show that it is a zoom lens that can shoot in fairly low light.
(Photo courtesy of Canon)
There are two fundamental types of lenses on video cameras:
■ Prime lens (also known as a fixed or primary lens), which has a specific (unchangeable) focal length. Prime lenses have become specialty items, primarily used by filmmakers, digital filmmakers, and in special use situations such as security or scientific research.
■ Zoom lens, which has a variable focal length. Zoom lenses are by far the most popular lens on cameras because of their ability to move easily from wide-angle to telephoto focal lengths.
7.5 FOCAL LENGTH AND LENS ANGLE
The term focal length is simply an optical measurement—the distance between the optical center of the lens and the image sensor when you are focused at a great distance, such as infinity. It is generally measured in millimeters (mm).
A lens designed to have a long focal length (long focus) is called a telephoto lens. The subject is magnified and appears much closer than normal, but you can only see a smaller part of the scene. Depth and distance can look unnaturally compressed in the shot.
When the lens has a short focal length (short focus), it is called a wide-angle lens. It takes in much more of the scene but now subjects will look much farther away; depth and distance appear exaggerated. The exact coverage of any lens depends on its focal length relative to the size of the camera’s sensor (Figures 7.9, 7.10, and 7.11).

FIGURE 7.9
A lens designed to have a long focal length is called a telephoto lens. When the lens has a short focal length, this wide-angle lens takes in correspondingly more of the scene.
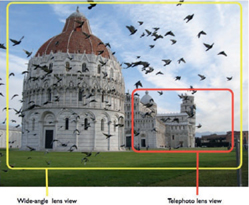
FIGURE 7.10
The various shots that can be obtained by different lenses. The wide-angle and telephoto shots can be taken while standing in one place and exchanging lenses.

FIGURE 7.11
This mobile phone app, Artemis, uses the phone’s internal video camera to show the various lenses that can be used to shoot a scene. The image can then be saved for future use.
7.6 THE PRIME OR FIXED LENS
The prime lens, which stands for primary lens, is a fixed-focal length lens. Only the iris (diaphragm) within the lens barrel is adjustable. Changing its aperture (f-stop) varies the lens’s image brightness.
If a video camera with a single fixed lens is being used and a closer or more distant shot of the subject is needed, the camera operator has to move the camera nearer or farther from the subject. The alternative is to have a selection of prime lenses of various focal lengths to choose from (Figure 7.12).
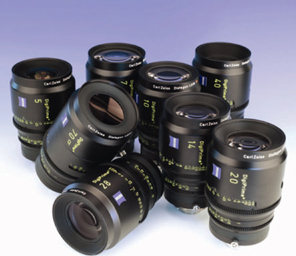
FIGURE 7.12
This set of prime lenses allows the camera operator to utilize a wide variety of focal lengths.
(Photo courtesy of Zeiss/BandPro)
7.7 THE ZOOM LENS
A zoom lens is a variable focal length lens. It allows the camera operator to zoom in and zoom out on a subject without moving the camera forward or backward. The zoom lens enables the camera operator to select any coverage within its range. Most video and television cameras come with optical zoom lenses. An optical zoom uses a lens to magnify the image and send it to the image sensor. The optical zoom retains the original quality of the camera’s sensor (Figure 7.13).
An increasing number of consumer video cameras are fitted with a lens system that has a digital zoom. A camera might, for instance, have a 20X optical zoom and 100X digital zoom. While the optical zoom system should give a consist ently high-quality image throughout its zoom range, the digital zoom is achieved by reading out a smaller and smaller area of the image sensor. This means that when using a digital zoom, the quality of the image progressively deteriorates as it is zoomed in because fewer of the original picture’s pixels are being spread across the television screen.
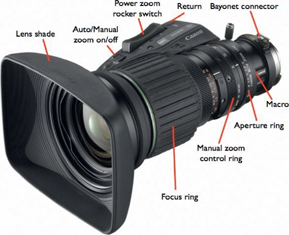
FIGURE 7.13
The zoom lens.
(Photo courtesy of Canon)
When the camera operator wants to get a “closer” shot of the subject or is trying to avoid something at the edge of the picture coming into the shot, it is obviously a lot easier to zoom in than to move the camera, particularly when using a tripod. In fact, many people simply stand wherever it is convenient and zoom in or out to vary the size of the shot. However, the focal length of the lens does not just determine the image size. It also affects the following factors:
■ How much of the scene is sharp. The longer the telephoto used, the less amount of depth of field (the distance between the nearest and farthest objects in focus).
■ How prominent the background is in closer shots. The background is magnified at the same time as the foreground subject. Instead of zooming, if the camera were moved closer to the subject, the background size would be different from the zoom shot (see Figure 7.14).
■ How hard it is to focus. The longer the telephoto, the smaller the depth of field.
■ Camera shake. The longer the telephoto, the more the operator’s shake is magnified. The wider the shot, the less amount of shake.
■ The accuracy of shapes (geometry). Lenses can easily distort shapes. For example, when a very wide-angle lens is tilted up at a tall building, the building will distort, looking as though it is going to fall (Figure 7.15).
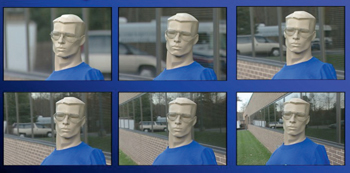
FIGURE 7.14
The background changes in size are due to the lens used. Note that the first photo was shot with a telephoto lens and the last shot was taken with a wide-angle lens. The camera had to be moved closer to the subject for each shot as the lenses became wider so that the subject would stay the same approximate size.
(Photo by K. Brown)
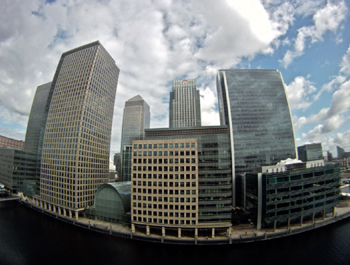
FIGURE 7.15
Wide-angle lenses can distort shapes.
As you can see, the zoom lens needs to be used with care, although amateurs do ignore such distortions and varying perspective. The zooming action, too, can be overused, producing distracting and amateurish effects.
7.8 THE APERTURE OF THE LENS
When the aperture (size of the opening in the lens) is fully opened (probably around f /1.4), it lets the most light into the camera. Its minimum opening, when “stopped down” (under very bright lighting), may be f /22. Remember, the smaller the opening, the bigger the number. Some irises can be stopped down until the picture fades out altogether. When a camera operator alters the aperture of the lens, two things happen simultaneously:
■ The aperture changes the brightness of the lens image falling onto the chip, altering the picture’s exposure (Figure 7.16).
■ The aperture modifies the depth of field, affecting the sharpness of anything nearer and farther than the actual focused distance (Figures 7.17 and 7.18).
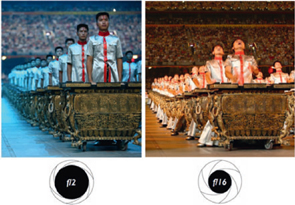
FIGURE 7.16
The lens aperture is adjustable in this illustration from a maximum of f /2 to a minimum of f /16. The larger the aperture (opening), the smaller the f-number (such as f /2) and the shallower the depth of field. Less light is needed in this situation. The smaller the lens aperture, the larger the f-number (such as f /16) and the larger the depth of field. More light is needed to shoot at higher-number f-stops.
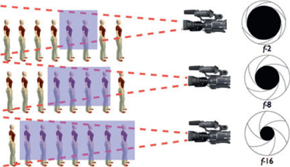
FIGURE 7.17
By adjusting the aperture (f-stop), the camera operator can increase or decrease the depth of field. The larger the f-stop number, the larger the depth of field.

FIGURE 7.18
This screenshot is from an app called pCAM. The software helps the director or cameraperson calculate the correct lens, depth of field, and settings.
(Photo by David Eubank)
You have three options when selecting the lens aperture:
■ Choose an f-stop to suit the exposure. Adjust the lens aperture to give a properly exposed picture so that you can see tonal gradation and details clearly in the subject. If there is insufficient light, you may need to add additional lighting. If there is too much light, so that the shot is overexposed, the lighting on the subject may need to be reduced. Reduce the lens aperture (stop down) or add a neutral-density (ND) filter.
■ Choose an f-stop that gives a specific depth of field. People usually concentrate on getting the exposure right and accept whatever depth of field results. However, there will be times, especially in CUs, when it is not possible to get the entire subject in sharp focus; in other words, there is insufficient depth of field. Then it is necessary to reduce the aperture and increase the amount of light going into the camera until the exposure is right. The camera operator may want a shallow depth of field so that only the subject itself is sharply defined. Or deep focus can be used, in which everything in shot appears clear-cut.
■ Settle on an f-stop that averages the lighting situation. There may be times when the camera operator has little or no control over the amount of light on the scene or when the camera needs to move around under varying light conditions. In these situations, there may be little choice but to adjust the lens aperture manually for the best average exposure or to switch on the camera’s automatic iris control and accept whatever depth of field results.
7.9 LENS ACCESSORIES
There are three sometimes neglected accessories that fit onto the lens: the lens cap, the UV filter, and the lens hood:
■ Lens cap: This protective plastic cover clips onto the front of the lens and keeps grime from accumulating on the front surface of the protection filter (UV) or the lens surface.
■ The clear or UV filter: A clear filter is usually kept on the front of the lens to protect the front lens element from damage.
■ The lens hood (sun shade): This is a shield fitted around the end of the lens. When there is a strong light source just out of shot ahead of the camera, it shields off stray light rays that could otherwise interreflect within internal lens elements.
7.10 THE IMAGE SENSOR
The type of image sensor in a camera greatly affects the quality of the image in its resolution (definition), picture defects, and limitations.
There are several types and sizes of image sensors. These chips typically include hundreds of thousands of tiny independent cells (called pixels or elements). Each cell develops an electrical charge according to the strength of the light that falls on it. The result is an overall pattern of electrical charges that corresponds to the light and shade in the lens image.
There are significant advantages and disadvantages of these different sensors. The quarter-inch sensors are inexpensive but generally are in focus from CU to infinity. That means the camera operator has limited creative ability because everything is in focus. The larger the chips, the more ability the camera operator has to selectively focus on the subjects, isolating some with a shallow depth of field while using wide focus in other situations. Of course, the largest sensors are also more expensive and are found in the most expensive cameras.
7.11 GAIN: SENSOR SENSITIVITY
All camera systems must have a certain amount of light to produce good, clear pictures. How much will depend on camera design and how light or dark the surroundings are. However, what if the surroundings are not bright enough for you to get good images? You have two options. You must either adjust the camera or improve the lighting.
The simplest solution is to open up the lens aperture to let more of the available light through to the image sensor, up to the maximum lens-stop available (e.g. f /1.4). But then the depth of the field becomes shallower, which may make focusing difficult for CUs.
Another possible solution where there is insufficient light is to increase the video gain (video amplification) in the camera. Although the image sensor itself still lacks light, this electronic boost will strengthen the picture signal. Most cameras include two or three manual positions, and some have an automatic gain. A 6-dB increase will double the gain, and a 12-dB increase will quadruple it. A 6-dB boost would give you acceptable quality images in low light levels. A high gain of 12 dB would allow you to obtain a recognizable image, but the quality of the image may be poor. It is best to keep gain to a minimum wherever possible because it increases picture noise (grain) and the picture sharpness deteriorates. However, there will be times when high image technical quality is less important than getting the right shot (Figure 7.19).
7.12 THE VIEWFINDER
There are basically three types of viewfinders for cameras: an ENG/EFP viewfinder, a studio viewfinder, and a swing-out LCD screen.
Camcorders generally use the ENG/EFP viewfinder. This viewfinder contains a small television (typically 1.5 inches in diameter) with a magnifying lens that enlarges the image to be viewed by the camera operator. With its flexible cup eyepiece held up against one eye, all ambient light is shielded from its picture so that the camera operator cannot only compose the shot but also gets a good idea of exposure and relative tonal values (Figure 7.20).

FIGURE 7.19
Camera operators often need to shoot in low light (photo on left). One way to increase the detail is to increase the video gain. However, the more the gain is adjusted, the more the image deteriorates in quality (photo on right).
When the camera is working from a fixed viewpoint or mounted on a dolly, it is possible to use a larger viewfinder that is called a studio monitor. This larger monitor is easier to watch for sustained periods, compared with an eyepiece continually held up to the eye (Figure 7.21).
■ LCD swing-out viewfinder. An increasing number of video cameras are fitted with a foldout rectangular LCD screen (liquid crystal display), which is typically 2.5 to 3.5 inches wide and shows the shot in color. It is lightweight and conveniently folds flat against the camera body when out of use. However, stray light falling onto the screen can degrade its image, making it more difficult for the camera operator to focus and to judge picture quality (Figure 7.22).
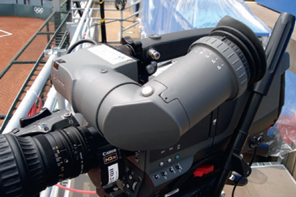
FIGURE 7.20
This camera operator is using the ENG viewfinder to view the image.
Like all television monitors, viewfinders have brightness, contrast, and focus (sharpness) adjustments. Some of the newer viewfinders have a setting that assists the camera operator in focusing (called focus assist). Remember, viewfinder adjustments do not affect the camera’s video image in any way.
The viewfinder on a camcorder not only shows the video image being shot, but it can also be switched so that the camera operator sees a replay of the newly shot images. Camera operators can check for any faults in camerawork, performance, or continuity and can then reshoot the sequence if necessary.
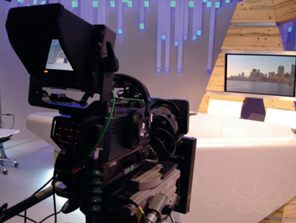
FIGURE 7.21
This camera utilizes a studio viewfinder.
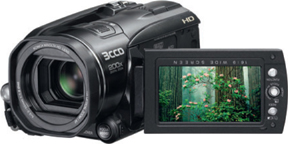
FIGURE 7.22
LED swing-out monitors are appearing on many cameras.
7.13 AUDIO
Most portable video cameras include a microphone intended for environmental (natural) sound pickup (Figure 7.23). It may be built in or removable. A cover over the mic reduces low-pitched wind rumble.
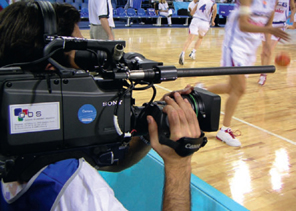
FIGURE 7.23
Microphones attached to the camera are generally used to pick up environmental sounds.
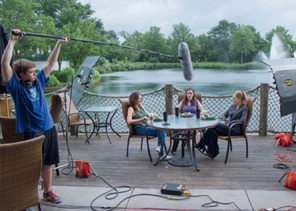
FIGURE 7.24
A microphone on a “boom” pole is often used to get the mic physically closer to the talent (presenter).
To position the microphone more effectively, it is sometimes attached to a telescopic “boom pole,” which can be extended to reach out in front of the camera. The use of this type of microphone generally requires the use of a boom operator (Figure 7.24).
An audio monitor earphone/headphone jack enables the camera operator or audio person to monitor the microphone sound pickup during the recording. Audio needs to be assessed continually for quality, balance, background, and other factors. Often background noises that seemed low to the ear during the recording prove obtrusive on the soundtrack.
An external mic socket on the camera is generally included on professional model cameras so that a separate microphone can be used for better sound quality and more accurate mic positioning.
7.14 HANDLING THE CAMERA
Pictures that are shaky, bounce around, or lean to one side are a pain to watch. So it is worth that extra care to make sure that camera shots are steady and carefully controlled. There may be times when the audience’s attention is so riveted to exciting action on the screen that they are unconcerned if the picture does weave from side to side or move about. But don’t rely on it! Particularly when there is little movement in the shot, an unsteady picture can be distracting and irritating to watch. As a general rule, the camera should be held perfectly still, mounted to a camera support, unless the camera operator is deliberately panning it (turning it to one side) or tilting it (pointing it up or down) for a good reason.
So what stops us from holding the camera steady? There are a number of difficulties. Even “lightweight” cameras grow heavier with time. Muscles tire. Body movements (breathing, heartbeat) can cause camera movement. Wind can buffet the camera. The camera operator may be shooting from an unsteady position, such as a moving car or a rocking boat. On top of all that, if a telephoto lens is being used, any sort of camera shake will be considerably exaggerated.
7.15 SUPPORTING THE CAMERA
There are three basic ways to support a camera:
■ Use the camera operator’s body. With practice, cameras can be handheld successfully. Depending on the camera’s design, a handheld camera may be steadied against the camera operator’s head or shoulder while he or she looks through the viewfinder eyepiece.
■ Use some type of body support. A number of body supports are available for cameras of different sizes. They add a mechanical support of some type to give the camera added stability (see Figure 7.25).
■ Attach it to a camera mount. The camera can be attached to a camera mount of some type (monopod, tripod) with a screw socket in its base. A quickrelease plate may be fastened to the bottom of the camera, allowing it to be removed quickly.
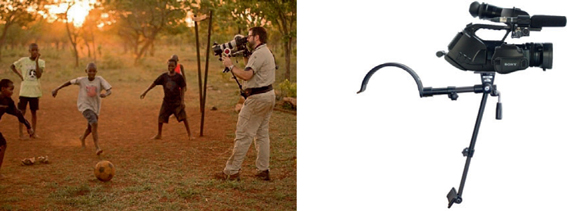
FIGURE 7.25
A body brace helps to firmly support the camera.
(Photo courtesy of Phil Putnam)
7.16 HANDHELD CAMERAS
When the decision is made to have the operator hold the camera by hand, it is usually because the camera has to be mobile, able to change positions quickly. This method is most commonly used by news crews, for documentaries, at sports events, or for shooting music videos. In all of these situations, the camera generally needs to move around to follow the action (Figure 7.26).
Some of the more lightweight consumer and lower-end professional cameras can be held in one hand. They are not large enough to be shoulder mounted. A camera operator can maintain steadiness fairly easily for short periods of time. However, over longer periods, even lightweight cameras can become difficult to hold steady.
Larger cameras are designed to be shoulder mounted. The body of the camera rests on the camera operator’s right shoulder. The operator places his or her right hand through a support loop on the side of the lens. This way, the operator’s fingers are free to control the zoom rocker (servo zoom) switch while the thumb presses the record/pause switch. The camera operator’s left hand adjusts the manual zoom ring, the focusing ring, and the lens aperture (Figure 7.27).
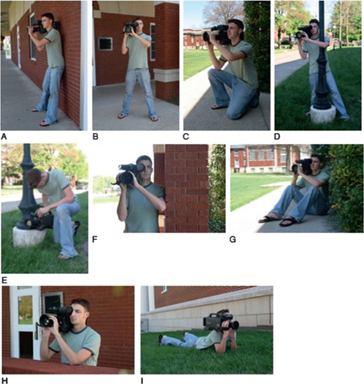
FIGURE 7.26
Keeping the handheld camera steady takes practice. Here are some techniques to handhold a camera: (A) Rest your back against a wall. (B) Bracing the legs apart provides a better foundation for the camera. (C) Kneel, with an elbow resting on one leg. (D) Rest your body against a post. (E) Lean the camera against something solid. (F) Lean your side against a wall. (G) Sit down, with your elbows on your knees. (H) Rest your elbows on a low wall, fence, railings, car, or some other stationary object. (I) Rest your elbows on the ground.
(Photos by Josh Taber)
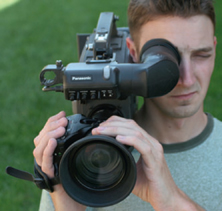
FIGURE 7.27
The shoulder-mounted handheld camera is steadied by the right hand, positioned through the strap on the zoom lens. That same right hand also operates the record button and the zoom rocker (servo zoom) switch. The left hand is used to focus and adjust the aperture.
(Photos by Josh Taber)
The secret to good camera control with a handheld camera is to adopt a comfortable, well-balanced position, with legs apart and slightly bent and elbows tucked in on the sides. Grip the camera firmly but not too tightly, or your muscles will tire and cause camera shake. Enhance steadiness by resting your elbows against your body or something really secure. This may be a wall, a fence, or perhaps a nearby car (see Figure 7.26).
The comfort and success of handholding a camera depends largely on the camera operator’s stamina and how long he or she will be using the camera. Standing with upraised arms supporting a shoulder-mounted camera can be very tiring, so several body braces and shoulder harnesses are available that help the camera operator to keep the camera steady when shooting for long periods.
7.17 THE PAN HEAD (PANNING HEAD OR TRIPOD HEAD)
Many of the camera mounts include a pan head. If the camera were attached directly onto a mount, it would be rigid, unable to move around to follow the action. Pan heads enable the camera operator to swivel the camera from side to side (pan) and tilt it up and down. The tripod head can also lock in either or both directions (Figure 7.28).
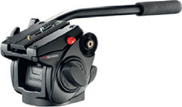
FIGURE 7.28
The tripod head (pan head) allows the camera to pan and tilt.
(Photo courtesy of Manfrotto)
7.18 USING A TRIPOD
The tripod is the most commonly used camera support. It offers a compact, convenient method of holding a camera steady, provided it is used properly. It has three legs of independently adjustable length that are spread apart to provide a stable base for the camera (Figure 7.29). However, tripods are certainly not foolproof. In fact, precautions need to be taken in order to avoid possible disaster, so here are some useful tips:
■ Ideally, the tripod should be set up before the camera is attached to make sure that it is stable.
■ To prevent the feet from slipping, tripods normally have either rubber pads for smooth ground or spikes (screw-out or retractable) for rough surfaces. (Be sure, though, not to use spikes when they are likely to damage the floor surface.)
■ If the ground is uneven, such as on rocks or a staircase, the tripod legs can be adjusted to different lengths so that the camera remains level when panned around. Many tripods are fitted with bubble levels to help level the camera.
■ Tripods fitted with a camera tend to be top-heavy, so always make sure that the tripod’s legs are fully spread and that it is resting on a firm surface.
■ There are several techniques for improving a tripod’s stability. The simplest is to add a central weight, such as a sandbag, hung by rope or chain beneath the tripod’s center. The legs can be tied to spikes in the ground. Or use a folding device known as a “spreader” to provide a portable base (Figure 7.30).
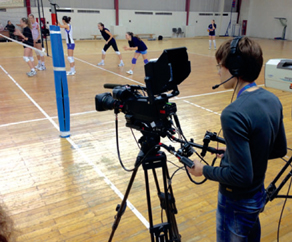
FIGURE 7.29
A tripod is a simple three-legged stand with independently extendable legs that can be set up on rough, uneven ground.
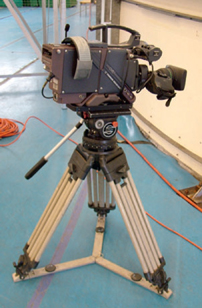
FIGURE 7.30
The tripod uses a “spreader” to give more stabilization. Note that the camera operator also moved the camera low when not in use. This gives the camera a lower center of gravity, making it more difficult to knock it over.
7.19 THE MONOPOD
The monopod is an easily carried, lightweight mounting. It consists of a single collapsible metal tube of adjustable length that screws to the camera base. This extendable tube can be set to any convenient length. The monopod can provide a firm support for the camera, yet allows the operator to move it around rapidly for a new viewpoint. These are particularly helpful when working in tight conditions or when you don’t have time to set-up a normal tripod due to time constraints. Some monopods, such as the one shown in Figure 7.31, include small feet at the bottom to give added stability.
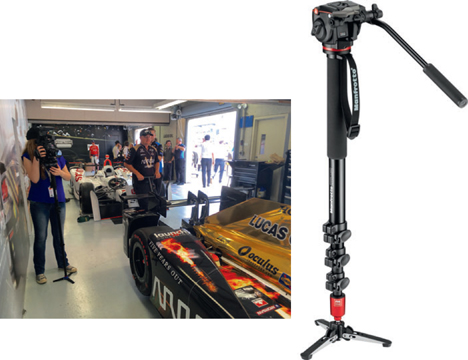
FIGURE 7.31
The monopod.
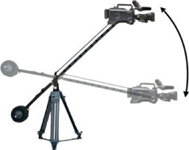
FIGURE 7.32
A jib allows the operator to move the camera to high and low angles very quickly.
7.20 JIB ARMS
Jibs provide a wide variation in camera heights and allow a sweeping camera action in almost any direction. The long jib arm (boom) is counterbalanced on a central column. This column is generally supported on a tripod or camera pedestal. The video camera is fixed into a cradle at the far end of the jib, remotely controlled by the camera operator who stands beside the mounting, watching an attached picture monitor. There is a wide range of jib designs, from the lightweight mountings used with smaller cameras with a maximum camera height of 6 feet to heavy-duty jibs that will reach up to 40 feet.
The jib has a variety of operational advantages. It can reach over obstructions that would bring a rolling tripod or pedestal to a halt. It can take level shots of action that occur high above the floor while other mounts working on the floor level can only shoot the subject from a low angle. Whether an operator can turn and raise/lower the jib while on shot and keep the moving subjects in focus and in a well-composed picture will depend on the operator’s skills— and a bit of luck (Figures 7.32, 7.33, and 7.34).
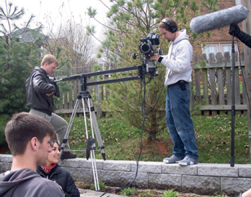
FIGURE 7.33
This small, relatively inexpensive jib arm fits onto a standard video tripod. It also folds up into a travel case.

FIGURE 7.34
Large jibs require skilled talent.
7.21 CAMERA SLIDER
A camera slider includes a movable mechanism that is attached to a camera. The moving mechanism allows the camera to slide along the length of a set of tracks. This camera motion provides a short tracking motion for your camera, offering moving instead of static shots (Figure 7.35).
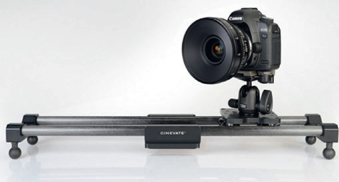
FIGURE 7.35
Camera sliders have gained popularity as a low-cost tracking option.
(Photo courtesy of Cinevate Duzi)
7.22 SPECIALTY CAMERA MOUNTS
There is a specialty camera mount for about any application you can think of. There are clamp mounts that allow you to clamp the camera mount to a door, screw mounts that allow you to screw the mount into a tree, car mounts, and they go on and on. Figures 7.36 and 7.37 illustrate some of the more popular camera mounts.
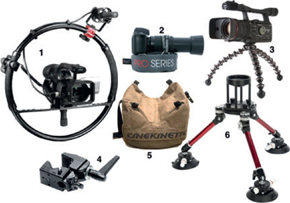
FIGURE 7.36
Some of the most popular camera mounts: (1) The “Fig Rig” was designed to hold a camera steadily during extreme movement; (2) small bean bag; (3) the Gorillapod’s legs can be twisted around to hold a camera securely in place; (4) camera clamp; (5) large bean bag; and (6) a suction cup camera car mount.
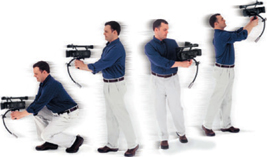
FIGURE 7.37
Smaller cameras can be supported by a handheld steady device like this Steadicam. However, larger cameras must be steadied by a device that includes a body brace.
(Photo courtesy of Steadicam/Tiffen)
The main theme you will find running through this book is that it’s the result that matters, not how you get it. The camera needs to be firmly supported. The audience does not know or care whether the camera operator is using a tripod or resting the camera against a post. A moving shot can be taken from a car, the back of a motorcycle, a hospital trolley, a wheelchair, or even a skateboard or skis. It is the result that counts, although some methods are a lot safer and more convenient than others.
7.23 CAMERA CARE
It’s easy to endanger video equipment, especially when shooting on location. Although some units are rugged and almost foolproof, others are easily damaged. A moment’s oversight can put the equipment out of action altogether—a camera momentarily rested on the ground, a spilled drink, the jolts, and vibration of a traveling vehicle. It takes just a moment to protect the camera with a water proof cover (rain hood) against wind-blown dust and grit, sea-spray, or rain (Figure 7.38). Extreme cold, heat, or moisture can create problems too. A car’s trunk can become an oven in the hot sun. High humidity can wreak havoc with videotape recorders.
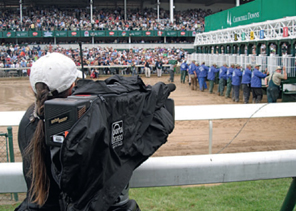
FIGURE 7.38
Weather gear protects the camera from the elements.
(Photo by Josh Taber)
Moving from a cold exterior to warm surroundings is liable to result in condensation (dew) on or in the lens. Wrapping the equipment (even in a plastic bag) may help fight the condensation (Figure 7.38).
Keith Brown, Videographer
What do you like about shooting?
The camera is a tool that allows me to be a storyteller. Whether a concept has been storyboarded or is just simple notes on a napkin, it’s the art of turning that concept into something that conveys a visual message. It comes through previsualization, collaboration with other crew members, and deciding how to manipulate the camera to tell that story. What focal length will best illustrate this point, how does depth of field contribute or distract, what do I include or exclude from the frame?
It’s the art of allowing viewers to experience the feelings I had at that particular moment, showing them more than just what the experience was factually. It’s the challenge of eliciting the same emotional response to an event or story that I had as the camera operator.
There’s also the joy of the unexpected moment when light, subject, and movement combined with framing, lens selection, creative use of white balance, and being in the right place at the right time all come together to create something magical.

FIGURE 7.39
Keith Brown, Videographer.
What are the features that you believe are essential for professional production?
Quality—quality camera work, lighting, audio, scripting when applicable.
A complete understanding of the production:
1. What’s the age group? This helps determine the style and approach of your presentation.
2. How familiar are they with the topic? This might determine how much background information you have to give.
3. Why are they watching or listening to your program? This determines what information you need to provide.
4. Do they all speak the same language—both literally and figuratively?
5. Will they answer a call to action, or is the presentation purely informative?
6. How long can you hold their attention?
7. What’s the walk away? What’s the main thing you want the audience to remember?
8. What’s the best way to deliver the message—live, on a DVD, over the web, or some other method?
What kind of support do you use for your camera (mainly tripod?), or do you primarily handhold it? Why?
The style of the show obviously dictates whether it’s shot handheld or on a tripod. Shooting pace, setting (is there even room for a tripod or is one allowed?), and the feeling one’s trying to convey all come into play.
There are dozens of reasons or situations that help determine the choice; these are a few.
A tripod is employed:
1. if it’s a slower-paced show;
2. if shots are held longer;
3. for scenic shots;
4. if long focal lengths are used;
5. in a traditional interview situation.
Handheld is employed for:
1. a faster pace;
2. mobility;
3. movement;
4. walking and talking (without a Steadicam, unfortunately);
5. intensity;
6. run and gun filming.
What advice would you give someone about caring for a camera?
1. Always have a filter on the lens. Start with a UV or Skylight, screwed on or in a mattebox.
2. Learn how to properly clean filters.
3. Keep it in the case when not shooting, especially when traveling.
4. Develop a strategy for keeping track of batteries and recording media, and stick to it so you’re never caught guessing. That includes offloading and backing up footage.
5. Learn everything you can about the camera to get the most out of it.
What are the challenges you deal with when shooting?
1. Humidity—Plan on extra time if you’re going from a cold to warm environment. Putting the camera in a plastic bag helps because condensation will transfer to the bag instead of the camera.
2. Air travel—Depending on the size of the aircraft, if your camera travels in a soft case, you might have to hand-carry the camera on board. Checking baggage is becoming more expensive, which sometimes determines the amount of gear taken.
3. Audio—Shooting interviews requires good location planning. When will grass be cut, is there any construction in the area, is there any possible interference with wireless signals, what do surrounding offices sound like, are we close to an airport, how loud are the crickets, is the road noise a problem?
4. Lighting—Do I have enough in my lighting package to do the job, or do I need to rent equipment? What time of day does the shoot occur and how long will it take? What are the power considerations?
5. What size crew can I expect to work with?
Keith Brown is a videographer who travels around the world shooting short documentaries that highlight world issues for a nonprofit organization.