CHAPTER 16
Editing
If editing is done well, it will be largely unnoticed by the viewing audience. Editing is both an art and a science; learning some of the rules will enhance your ability to edit, but using editing to tell well-crafted stories takes practice to learn.
Kathy Bruner, Producer and Teacher
Editing is the process in which the material that has been shot is blended together to tell an effective and engaging story. However, editing has a much more subtle role to play than a simple piecing-together process. It is the technique of selecting and arranging shots; choosing their order, their duration, and the ways in which they are to be joined together. Editing is where graphics, music, sound effects, and special effects are added to the footage shot earlier. It has a significant influence on the viewers’ reactions to what they see and hear. Skilled editing makes a major contribution to the effectiveness of any production. Poor editing can leave the audience confused or, worse, bored. The mechanics of editing are simple enough, but the subtle effects of the editor’s choices require time and experience to master.
Key Terms
■ Clip: A video segment or shot (usually considered one uninterrupted roll of the camera).
■ Cover shot: A video clip that is used to cover an edit so that the viewers do not know that the edit occurred. It can be used to cover continuity errors or sometimes show a parallel action.
■ Continuity: The process in which attention is paid to the repetition of the visual and aural details within a scene, to ensure that a seamless performance can be maintained throughout multiple takes. For example, at exactly what point in the scene (and with which hand) did the actor take a sip from his coffee cup? When something in the scene is not consistent, it is called a continuity error.
■ Cut: The “cut” or “take” is the most common transition in editing. It is an instantaneous switch from one shot to the next that implies that the action is taking place in “real time.”
■ Cutaway shot: Used to cover edits when the edit being made is likely to result in a “jump cut” or other break in continuity. Generally it is a shot of something outside of the current frame (such as a reaction shot).
■ Dissolve: An editing transition effect created by fading out one image while fading in the next image. The dissolve generally implies a passage of time and/or a change in geographic location.
■ DVE (Digital Video Effect): Any effect, such as a dissolve, a fade or wipe, that is created digitally, rather than mechanically.
■ Fade: A gradual change (dissolve) between black and a video image.
■ Jump cut: A jarring transition that is created when two shots are cut together that are too similar in size, angle, and subject matter.
■ Linear editing: The copying, or dubbing, of segments from the master tape to another tape in sequential order.
■ Logging: Loggers view the footage and write down the scene/take numbers, the length of each shot, the time code, and descriptions of each shot in order for the editor to be able to find the shots quickly and efficiently.
■ Timeline: The timeline is the portion of the graphical interface of a nonlinear editing system, which usually appears at the bottom of the computer screen, where the editor will position the program’s video segments.
■ Trim: To cut frames off a shot to make it shorter.
■ Voiceover: Commentary or narration over video.
■ Wipe: A novel transition between two video images that can have many different shapes and can have a hard- or soft-edge transition.
16.1 EDITING GOALS
While I am cutting a show, I am always trying to determine what was in the director’s mind. But if I have been successful, I will be able to present the director with some unexpected surprises. My goal is to make the show better than it was in the script and even better than the director hoped for.
Lance Luckey, Emmy-Winning Editor
Basically, editing or postproduction is the process of combining individual shots in a specific order. It has several purposes:
■ To assemble material in a sequential fashion. Remember, the shooting order will almost always differ from the running order.
■ To correct mistakes by editing them out or by covering them with other footage.
■ To create, enhance, embellish, and bring to life images and events that were once captured live. Tools such as visual effects, sound effects, and music can enhance the quality of the storytelling, resulting in a more dynamic impact on the audience.
16.2 SHOOTING ORDER VERSUS RUNNING ORDER
During the production process, when possible, events are usually shot in the order that is most convenient or practical, and then the takes are joined together during the editing process so that they appear consecutive. The eventual “running order” may be very different from the order in which the scenes were shot (the “shooting order”). Some of the various shooting situations follow:
■ Sometimes the action is shot from start to finish, such as might occur if you are shooting someone who is blowing a glass vase. Programs shot in front of an audience, such as a sitcom, are shot in running order so that the audience can follow the plot without becoming confused.
■ The action or scene may be repeated so that it can be shot from various angles.
■ All of the scenes that take place at one location may be shot before going on to the next location, although the script may indicate that there are several other scenes at other locations in between them.
■ A series of similar subjects may be shot that have reached different stages. For example, shots of various newborn foals, yearlings, colts, and aging horses can be edited together to imply the life cycle of a specific horse.
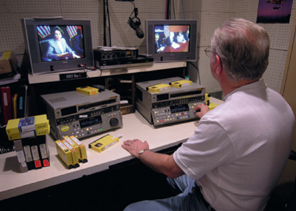
FIGURE 16.1
Linear editing—copying the contents of one tape to another tape, one clip after another linearly— is still used on a limited basis. Although the use of linear editors has been significantly reduced, segments of the industry, such as news, still use them.
(Photo by Jon Greenhoe)
16.3 EDITING VIDEO AND AUDIO
Linear Editing
Linear editing is the process of “dubbing” or copying the master tape to another tape in a sequential order (Figure 16.1). This worked well for editors until the director or client wanted significant changes to be made in the middle of a tape. With a linear tape, that usually meant that the whole project had to be entirely re-edited, which was incredibly time-consuming and frustrating. Linear systems are generally made up of a “playback” and a “record” video decks along with an edit controller. Most of the television industry is edited on a nonlinear system.
Nonlinear Editing
Today the majority of video and television programs are edited on a nonlinear editing system. Nonlinear editing is the process whereby the recorded video is stored on a computer hard drive. Then the footage can be arranged or rearranged, special effects can be added, and the audio and graphics can be adjusted using the computer’s editing software. Nonlinear editing systems make it easy to make changes, moving clips around until approved by the director or client. Once the edited project is complete, it can be exported to whatever medium is desired.
16.4 LOGGING
An often-neglected important aspect of the production process is logging the recorded material. Logging saves time during the actual editing process because the logging can be completed before the edit session (Figures 16.2 and 16.3).
After logging the footage, the editor can then just capture the specific clips that will be used in the program instead of taking time to search through all of the clips. By capturing only the specific clips instead of all of the footage, logging also saves hard drive space. Generally some type of log sheet is used on which notes can be written, including time code (the specific address where the footage is located), scene/take numbers, and the length of each shot. The notes may also include a description of the shot and other comments like “very good,” “blurry,” and so on. Logging can be simple notes on a piece of paper or can be based on computer logging software. An advantage to some of the logging software is that it can work with the editing software by importing the edit decisions automatically into the computer.
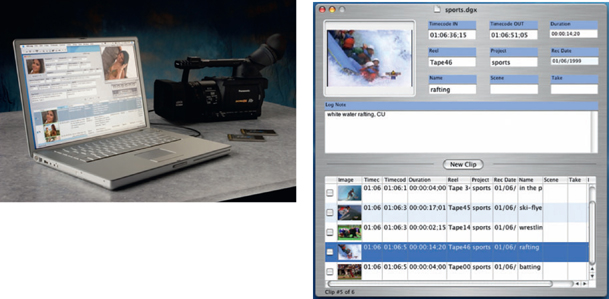
FIGURE 16.2
Logging can be done on paper or utilizing software. Here a drive or camera can be connected directly into the computer to capture still frames from each clip and automatically import time code ins and outs. The screenshot shows the stored thumbnail frame, duration, and description.
(Photos courtesy of Imagine Products)
Shots can be identified for the log a number of different ways:
■ visually (“FS as he gets into the car”);
■ by shooting a “slate” (clapboard) before each shot, containing the shot number and details (or an inverted board, at the end of shots);
■ by time code, a continuous time-signal through out the tape that assigns a unique address to each frame of the recording.

FIGURE 16.3
Sample of a log sheet.
(Courtesy of the Avanti Group)
16.5 AN OVERVIEW OF THE NONLINEAR PROCESS
■ Step 1. Capture the footage into the computer.
■ Step 2. Trim (clean up) each video segment or clip, deleting unwanted video frames.
■ Step 3. Place the clips into the timeline. The timeline usually includes multiple tracks of video, audio, and graphics. This timeline allows the editor to view the production and arrange the segments to fit the script’s running order (Figure 16.4).
■ Step 4. Add video special effects and transitions. Nonlinear edit systems allow all kinds of effects such as ripple, slow/fast-motion, and color correction. Transitions include dissolves, cuts, an d a variety of wipes.
■ Step 5. Insert additional audio, if desired, at this point. Audio effects may be used to “sweeten” the sound. Music or voiceovers may be added at different points in the project (Figure 16.5).
■ Step 6. Export the final program to the distribution medium.
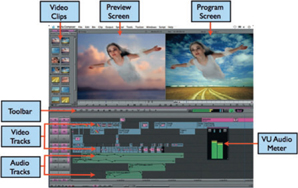
FIGURE 16.4
Screen shot showing the composition page of an editor. The program monitor allows the editor to see the program or to trim a clip to the desired length. The video clip bin is usually where video clips are stored that are to be used in the program. At the bottom is the timeline. This specific editor has two audio tracks and one video track in the timeline.
(Photo courtesy of Avid)
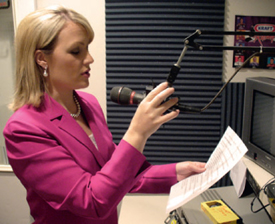
FIGURE 16.5
The talent is doing a voiceover in an edit suite for a news story at a local news station.
(Photo by Jon Greenhoe)
HABITS OF A HIGHLY EFFECTIVE EDITOR
1. Schedule enough time to make a good edit. Quality editing takes time. Be realistic, and then add a little extra pad of time. It is always better to be done a little early than late. Plus, you can always use a little more time to refine the edit.
2. Get a little distance from the project occasionally. It is easy to become emotionally involved with a specific element of the project. Take a break from it; when you come back, your perspective may have changed. Ask others for their opinions; there is a good chance that they will see things that you didn’t see.
3. Know the priority of your editing elements. While continuity and the 180-degree rule are important, the most important elements are the emotion and story. If you lose those two elements, you lose the production.
4. Keep a copy of each edited version. Each time you make changes to the project, keep the original. That way you have something to go back to if you run into problems.
5. Focus on the shots you have. By the time you sit down to edit, it is time to get the best project you can possibly get from the footage you have recorded. You may even have to forget about the script.
(Adapted from Mark Kerin’s Six Habits of Highly Effective Editors.)
16.6 EDITING EQUIPMENT
Editing equipment has drastically changed over the last two decades. Where once a minimal edit system required two editing decks, two monitors, and an edit controller (see Figure 16.1), today the equipment can be as simple as a camcorder and a computer with one of the editing software packages installed. Even some mobile phones include video editing software (Figures 16.6 and 16.7).
Higher-level edit suites may contain multiple types of input devices using a variety of different connectors, such as serial digital interface (SDI) to transport the data at a much faster speed. They may also include multiple edit screens, speakers, an audio mixing board, and other tools (Figure 16.8). Video can be imported into the computer from a camcorder, deck, or a memory storage device (Figure 16.9).
16.7 ORGANIZATION
Editing provides ways of correcting and improving the final production:
■ sequences that are uninteresting, irrelevant, or repetitious can be removed or shortened;
■ errors can be corrected by omitting faulty sections and inserting retakes;
■ the overall duration of the project can be adjusted.
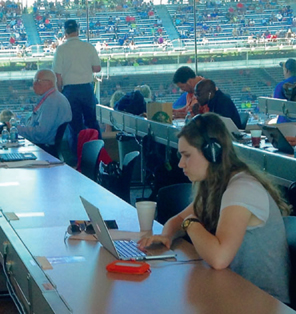
FIGURE 16.6
Portable nonlinear equipment makes it easy to edit while on
the road. This shooter/editor for Sports Illustrated is editing
video in the Indy 500 newsroom on her laptop.
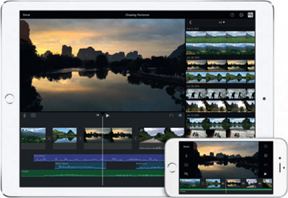
FIGURE 16.7
Simple video editors are available on mobile phones and tablets.
(Photo courtesy of Apple)
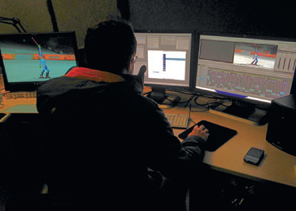
FIGURE 16.8
Larger edit suites usually offer more options during the editing, a variety of input devices, and multiple screens.
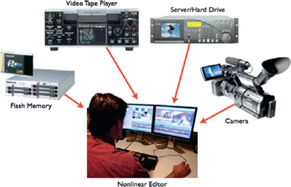
FIGURE 16.9
Many different devices can be used to input video into a nonlinear editor.
EDITING THE PROJECT
16.8 EDITING BEGINS
Editing begins with sorting through the available material and doing the following:
1. Selecting the required shots.
2. Deciding on the order and duration of each shot.
3. Deciding on the edit point (when one shot is to end and the next is to begin).
4. Deciding on the proper type of transition between shots.
5. Creating smooth, seamless video and audio continuity.
Let’s look at these points in more detail.
16.9 SELECTING THE SHOTS
It is a normal practice to shoot more than can be used. This is referred to as the “shooting ratio”; only one-tenth or one-twentieth of the total material shot might actually be used in the final edited version. That is partly because you can’t always take the time to check results while shooting and partly to give more choice during editing.
Because the video can be immediately checked for quality, the director usually knows when the needed material has been shot. When the shooting is finally complete, it is time to review the footage. Generally, the following is found:
■ good shots that can easily be used;
■ shots that cannot be used because of defects or errors of various types;
■ repeated shots (retakes to achieve the best version);
■ JIC shots (shots taken “just-in-case” they might be useful as cutaways or insert shots/pickups during editing).
So the first stage of editing is to sort out what is available to use and what is not needed. Once the shots are chosen, the next step is to decide on the order in which they will be presented.
16.10 THE ORDER OF SHOTS
To edit successfully, the editor needs to imagine being in the position of the audience. The viewers are seeing a succession of shots, one after another, for the first time. As each shot appears, the viewers must interpret it and relate it to previous shots, progressively building up ideas about what they are seeing.
In most cases, the shots will be shown in chronological order. If the shots jump around in time or place, the result can be extremely confusing. (Even the idea of “flashbacks” only works as long as the audience understands what is going on.)
When a series of brief shots are cut together at a fast pace, the program will appear to the audience to be exciting, urgent, or confusing. A slow cutting rhythm using shots of longer duration will appear to be more gentle, restful, thought ful, sad, and so on.
16.11 WHERE SHOULD THE EDITS BE MADE?
The moment chosen to be the edit point can affect how smoothly one shot leads to another. If the first shows a man walking up to a door to open it, and the second shot is a CU of him grasping the handle, the editor usually has to make sure of the following:
■ there is no missing action (his arm hasn’t moved yet, but his hand is on the handle in the CU);
■ no action has been duplicated (his hand takes hold of the handle in the first shot, then reaches out and grasps it again in the CU);
■ there is no overextended action (his hand takes the handle in the first shot and holds it and is still seen holding it, waiting to turn it, in the second shot).
Most editors believe that the cut should occur during a movement. The smoothness can vary with the situation, but here we are talking about the finer points of the editing art.
There are occasions when we deliberately “lose time” by omitting part of the action. For instance, a woman gets out of a car, and a moment later we see her coming into a room. We have not watched her through all the irrelevant action of going into the house and climbing the stairs. This technique of screen time (cinematic time) tightens up the pace of the production and leaves out potentially boring bits or ones that are irrelevant to the story, when the audience’s interest could wane. Provided the audience knows what to expect and understands what is going on, this technique is an effective way of getting on with the story without wasting time.
Similarly, it is possible to extend time, creating a dramatic impact. We see some one set the timer on a bomb, cut to people in the next room, cut to the villain’s expression, cut to the street outside, cut to him or her looking around, cut back to the timer ticking down, and so on, building up tension in a much longer period of time than it would really have taken for the timer to tick down and explode the bomb.
SPECIAL EFFECTS
Most nonlinear edit systems include a number of special effects that can be used to enhance the project. However, directors and editors must be careful to use them appropriately. Overuse of special effects is often the sign of an amateur production. Here is a brief list of some typical effects:
■ Freeze frame. Stopping movement in the picture and holding a still frame.
■ Strobe. Displaying the action as a series of still images flashed onto the screen at a variable rate.
■ Reverse action. Running the action in reverse.
■ Fast or slow-motion. Running the action at a faster or slower speed than normal.
■ Time-lapse. Shooting still frames at regular intervals. When played back at normal speed, the effect is of greatly sped-up motion.
16.12 TRANSITIONS
Figure 16.10 shows the most common methods of changing from one shot to another:
■ Cut: The cut or take is the most common, general-purpose transition. It is an instantaneous switch from one shot to another. It is important to note that the cut usually indicates to the audience that the action is taking place in “real time.”
■ Dissolve: The dissolve is an effect produced by fading out one picture while fading in another. It is a quiet, restful transition, considered to be “softer” than a cut. A dissolve usually suggests the passing of time or a change of location.
■ Wipe: The wipe is a stylized transition that can have many different shapes. While it is occasionally effective, it can be easily overused and quickly become the sign of an amateur.
■ Fade: A fade is a gradual change (dissolve) between black and a video image, or vice versa. For example, at the end of a program, there is usually a “fade to black.” A slow fade suggests the peaceful end of action. A fast fade is rather like a “gentle cut,” used to conclude a scene.
COMMON TRANSITIONS
(A) The cut (or take) is an instantaneous switch from one shot to another.
(B) The dissolve is an effect produced by fading out one image while fading in another.
(C) A fade is a dissolve transition to or from black.
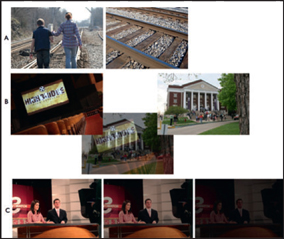
FIGURE 16.10
While the cut usually shows real time, dissolves and wipes imply a change of time or location.
(Photos by Josh Taber)
16.13 CONTINUITY
Let’s say we are watching a dramatic television show. As the director switches from one camera to the next, we notice that in the CU, the talent’s hair is askew, whereas in the second camera’s MS, the talent’s hair is perfect. Cutting between the two shots in the editing room exposes a continuity error. If we see a series of shots that are supposed to show the same action from different angles, we do not expect to see radical changes in the appearance of things in the various images (Figure 16.11). In other words, we expect continuity. Continuity in film or video means that during the shooting process, careful attention is given to all the details of a scene, both aural and visual, so that when the different shots from different takes are assembled, the result is a seamless portrayal that appears to have been shot all at the same time.
The only way to achieve good continuity is to pay attention to detail. On most crews this responsibility is often shared between the director and the script supervisor. However, maintaining continuity is ultimately the director’s responsibility. It is easy to overlook differences when concentrating on the action and the hundred and one other things that arise during production. If there are any doubts, there is a lot to be said for reviewing the recording to look at previous shots of the scene before continuing. The most efficient way to “make your day” (finish your day’s shooting on time) is to pay close attention to continuity while you are shooting the scene.
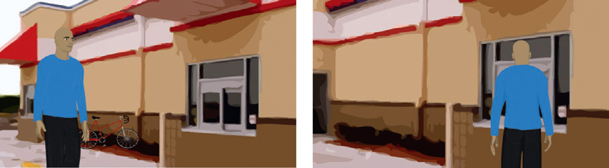
FIGURE 16.11
Continuity errors frequently occur in films. These two shots could not be used together since the bicycle is missing in the second photo.
16.14 GOOD EDITING TECHNIQUES
If editing is done well, the audience does not notice it but is absorbed in its effect. During an exciting scene, for example, when the duration of shots is made shorter and shorter as the tension grows, the audience is only conscious of growing agitation and fast-moving action (Figure 16.12).
There are certain established principles in the way one edits, and although like all “rules” they may be occasionally disregarded, they have been created out of experience. Here are a few of the most common:
■ Avoid cutting between shots of extremely different size of the same subject (CU to LS). It is jolting for the audience (Figure 16.13).
■ Do not cut between shots that are similar or even matching (frontal CU of one person to a frontal CU of a second person); it will look as though person A has “morphed” into person B.
■ Do not cut between two shots of the same size (CU to CU) of the same subject. This lack of “cutting distance” results in creating a jump cut.
■ If two subjects are going in the same direction (chasing, following), have them both going across the screen in the same direction. If their screen directions are opposite, it suggests that they are meeting or parting.
■ If an object is traveling in one direction (such as left to right) across the screen in a shot, it must continue traveling in the same direction (left to right) in subsequent shots. Otherwise, it will appear that the object has “turned around” and is going back the way it came. If the object exits the screen frame right in the first shot, it must enter the next shot from frame left in order to maintain proper “screen direction.”
■ Avoid cutting between still (static) shots and moving images (panning, tilting, zooming, etc.), except for a specific purpose.
■ If you have to break the continuity of action (deliberately or unavoidably), introduce a cutaway shot. But try to ensure that this relates meaningfully to the main action. During a boxing match, a cutaway to an excited spectator can help build the tension.

FIGURE 16.12
Tension can be increased by quicker cutting. Here an increasing cutting rate is combined with closer and closer shots.
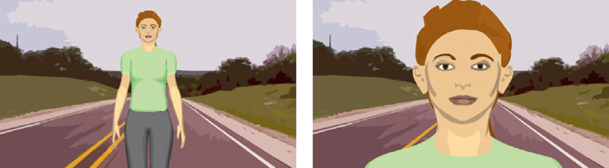
FIGURE 16.13
It can be jolting for the audience if an editor cuts between shots of extremely different sizes of the same subject.
16.15 ANTICIPATING EDITING
It does not matter how good the video images are; if they have not been shot with editing in mind, you may not be able to use them. Here are some of the issues to think about when shooting:
■ Include “masters” or cover shots (LS) of action wherever possible to show the overall view of the action.
■ Always leave several seconds of head and tail at the start and finish of each shot. Do not begin recording just as the action is beginning or the talent is about to speak, and do not stop just as the action finishes. A little extra footage at the beginning and end of each shot will allow more flexible editing (effects such as dissolves and wipes require more frames than simple cuts require, so you’ll need that extra footage in post).
■ Include potential cutaway shots that can be used to cover edits when any sequence is shortened or lengthened. These could include such things as crowd shots, LS, reaction shots, and people walking by.
■ Keep “cute shots” to a minimum, unless they can really be integrated into the program. These might include subjects such as reflections, silhouettes against the sunset, animals or children at play, and footsteps in the sand. They take up valuable time and may have minimal use in effective storytelling. However, there are times when beauty shots have their place, such as an establishing shot.
■ Try to anticipate continuity. Every element you include in your frame increases the potential for continuity errors. Do you really need 30 extras in your party scene to tell your story effectively, or can you get the same result with only 15?
■ Where there is going to be commentary or narration over the video (voiceover), allow for this in the length and pace of takes. For example, avoid inappropriately choppy editing that results from shots being too brief. If possible, having your script supervisor read the narration or commentary during the filming of the scene will help ensure that your shots are the proper length for editing.
■ Plan to include LS, MS, and CUs of action to provide additional editing options (referred to as “coverage”) (Figure 16.14).
■ Remember that environmental noises can provide valuable bridging sound between shots when editing. They can be recorded as a wild track (nonsync sound). Always get a minimum of a minute’s worth of “location audio” before you wrap your location. This could be the sound of birds in the trees outdoors or simply the “room tone” (all rooms have one) from the interior room in which you are shooting.
■ Where possible, include features in shots that will provide the audience with the context of the event. This helps viewers to identify the specific location (landmarks, street names). Too often, the walls and bushes behind closer shots could be anywhere.
■ Wherever possible, use a slate at the start of each shot. If this is not possible, the talent or camera operator can do a “voice slate,” calling out the shot number on camera so that the editor knows where it goes in the final production.
■ Remember that edits should be motivated. There should be a reason for the edit. This reason could be physical, such as movement by the talent, or someone new entering the scene, or it could be emotional, such as a moment of high drama, tension, or comedy, but every edit should be motivated by something that helps to tell the story. The fact that “this shot has been on for a few seconds now, so let’s change it” is NOT a valid motivation to make an edit.
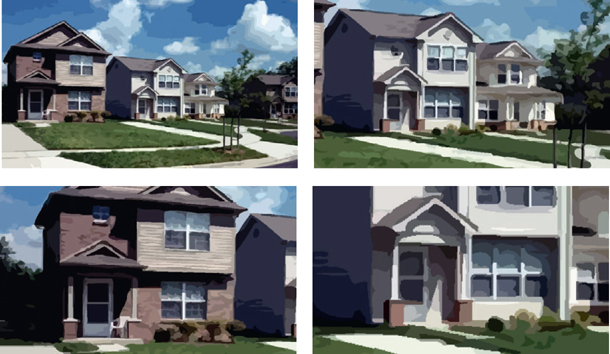
FIGURE 16.14
Plan to include long shots, medium shots, and close-up shots of the scene to provide plenty of editing options.
Brock Smith, Editor
Why do you like editing? What do you like about it?
In essence, it’s the biggest payoff. After months of preproduction, preparations, and on-set work, it’s the editor that gets to see a multitude of talents all converge to form the final product. Not only that, they get to bend and twist scenes ever-so-slightly to push or pull the audience as necessary and drive the story forward.
What do you think makes a good editor (person)?
Editing is one of the rare jobs where being OCD should be on the application. Attention to detail is as crucial as a sense of timing, and you have to be self-motivated. Finally, never get too attached to your ideas, as they will most likely be changed five times before you are finished.
How do you decide where edits are made?
I get asked this a lot, and it’s a hard question because there isn’t a cut and dried answer like “2.5 seconds into every shot.” For a start, aspiring editors may enjoy Walter Murch’s book In the Blink of an Eye. His theory is that after a person has absorbed a certain amount of information, they blink. In other words, an editor decides how much information to feed a person’s mind before “blinking” (cutting) to something else.
How do you organize yourself to edit a program together?
1. Clean and remove all distractions from your workspace.
2. Back up EVERYTHING. Twice.
3. Dissect each scene by camera, reel, take, etc. and place them into appropriate bins or folders.
4. Keep your timelines clean, eliminating all extra sound effects or footage that you are not using.
5. Lots of coffee and patience.

FIGURE 16.15
Brock Smith, Editor.
What are some of the challenges you face as an editor … editing for someone else?
When 8 terabytes of footage and a 6-inch notebook are first dropped off, it’s easy to get freaked out. This is where self-motivation comes in; you have to focus on each individual scene rather than the project as a whole until you get past the rough cut. Each scene has to become its own short film in a way, with a beginning, middle, and end.
Editing for someone else is new every time. Each person is different, but you quickly adapt to his or her style and expectations. And, generally, the genre of the film helps determine an edit style.
Brock Smith is the owner of a small postproduction facility. He is a multiple Emmy Award winner who edits shows for television as well as short and feature films.