Performing Code Analysis
Earlier in this book you learned about Common Language Specification, learning that it is a set of common rules and guidelines about writing code that can be shared across different .NET languages favoring interoperability and that is considered well designed for the .NET Framework. In some cases it can be hard ensuring that all your code is CLS-compliant, especially when you have large projects with tons of lines of code. To help you write better and CLS-compliant code, Microsoft produced a code analysis tool named FxCop that analyzes compiled assemblies for non-CLS-compliant code and that reports suggestions and solutions for solving errors. Although free, FxCop is an external tool and is bound to developers using Visual Studio editions such as Express or Professional.
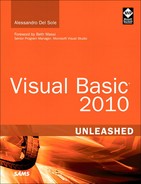
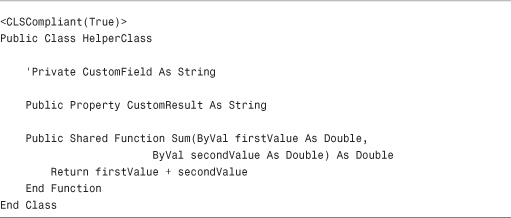
Fortunately, the Ultimate edition offers an integrated version of the code analysis tool that you can invoke on your project or solution directly within the IDE; moreover you can customize the code analysis process by setting specific rules. Before examining available rules, it is a good idea to create a simple project for demonstrating how code analysis works, so create a new class library project in Visual Basic 2010. When the code editor is ready, rename the Class1 file to HelperClass and write the code shown in Listing 58.1, which attempts defining a CLS-compliant class but that makes several violations to the Microsoft rules, for which I give an explanation for solving later in this section.
Listing 58.1 Writing a Simple non-CLS-Compliant Class Library
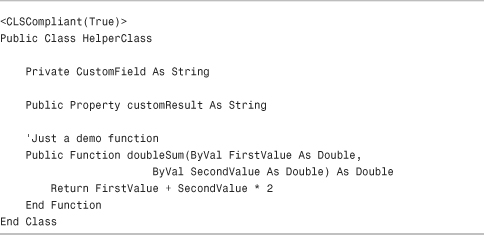
For rules, it is worth mentioning that Microsoft divides guidelines in writing code into the rules summarized in Table 58.1.
Table 58.1 Microsoft Code Analysis Rules
Performing code analysis does not require all the mentioned rules to be checked. You can specify only a subset of preferred rules or specify the complete set. To specify the rules sets involved in the code analysis, follow these steps:
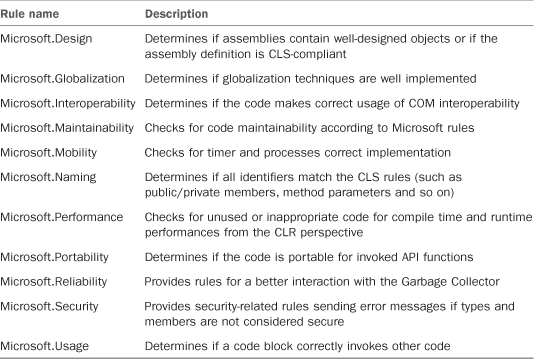
1. Open My Project and click on the Code Analysis tab. Figure 58.1 shows how the designer looks
Figure 58.1 The Code Analysis designer.
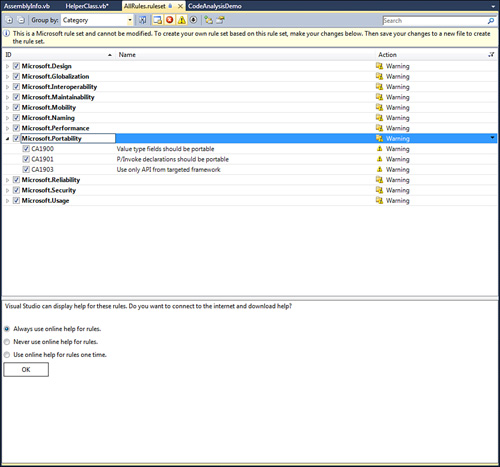
2. Expand the Run This Rule Set combo box. You get a list of available rule sets with an accurate description for each set. By default, the offered set of rules is Microsoft Minimum Recommended Rules. Replace it by selecting Microsoft All Rules that includes all sets listed in Table 58.1 and that is the most accurate. To get detailed information on each rule set, simply click Open. Figure 58.2 shows how you can browse rules available in the selected set, getting summary information for each rule, and specifying how you want to get help on violations (for example, online or offline)
Figure 58.2 Browsing rule sets.
3. Select the Analyze, Run Code Analysis command and wait for a few seconds until the building and code analysis process is completed. When ready, Visual Studio shows a report listing all violations to coding rules encountered in the project. The report is shown in Figure 58.3.
Figure 58.3 Report from the code analysis tool.
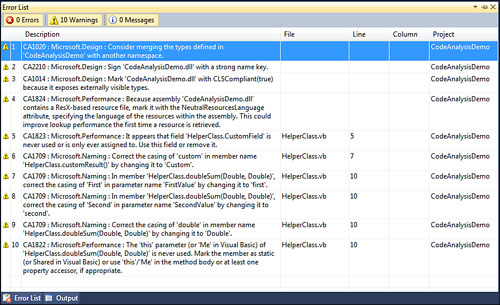
Each violation message includes the violation ID and a description that can help you fix the error. In most cases violations are interpreted by the IDE as warnings, but in the code analysis designer you can modify this behavior by setting what violations must be notified as breaking errors. Also notice how assembly-level violations do not include the line of code to be fixed, whereas code-level violations do. In this case you simply double-click the error message to be immediately redirected to the line of code to be fixed.
At this point we can begin fixing violations. It is worth mentioning that there can be situations in which violations cannot be fixed due to particular scenarios. For example, the first violation in our example (CA1020) indicates that we should merge the current type into an existing namespace, because a well-formed namespace contains at least five members. Due to our demo scenario, we can ignore this violation that is nonbreaking. The next error message (CA2210) indicates that the assembly must be signed with a strong name. I described strong names in Chapter 53, “Understanding the Global Assembly Cache,” so follow those instructions to add a strong name file to the library. I named the strong name file as TestCode.pfx providing the TestCode password. The next violation (CA1014) requires the assembly to be marked as CLS-compliant. To accomplish this, click the Show All Files button in Solution Explorer, expand My Project and add the following line to the AssemblyInfo.vb file:
<Assembly: CLSCompliant(True)>
The next violation (CA1824) indicates that a neutral-language resource should be supplied to the assembly. Because you have the AssemblyInfo.vb file already open, write the following line:
<Assembly: NeutralResourcesLanguageAttribute("en-US")>
You could also set this property via the Assembly Information dialog from the Application tab in My Project. With this step, all assembly level violations were fixed. Now it’s time to solve code-level violations. The CA1823 violation suggests that there is a field named CustomField that is never used and that, because of this, should be removed to improve performance. Now, remove the following line of code:
Private CustomField As String
The next step is to solve three CA1709 violations that are all about members naming. We need to replace the first letter of the doubleSum method with the uppercase and the first letter of both arguments with lowercase. This is translated in code as follows:
![]()
There is also another naming convention violation to be fixed on the customResult property that must be replaced with CustomResult. The last required fix is on performance (CA1822 violation). The code analysis tool determines that the DoubleSum method never invokes the class constructor; therefore, it suggests to mark the method as Shared or to invoke the constructor. In this particular situation the method can be marked as Shared like this:
![]()
In this particular case we do not need an instance method. For your convenience all edits are available in Listing 58.2 (except for assembly level edits).
Listing 58.2 Fixing Errors Reported by the Code Analysis Tool
If you now run the code analysis tool again, you notice that only the CA1020 design rule is still reported (the one on merging types into an existing namespace that we decided not to fix due to our particular scenario). The code analysis tool is a helpful instrument, especially if you are a libraries developer. Microsoft has a Code Analysis Team with a blog where you can find interesting information: http://blogs.msdn.com/fxcop. Also remember that you can easily retrieve detailed information on violation errors and fixes directly from within Visual Studio.