![]()
Do you ever feel that software development is too complicated? If you’re building business applications already, do you feel frustrated by the amount of time that it takes to build an application? Or if you’ve never built a modern-day web application, does the thought of doing so frighten you? If you’re starting from scratch, where exactly do you begin? And are you really confident that you can build a robust application that meets the expectations of your users and isn’t susceptible to “falling over” or getting hacked?
If any of this sounds familiar, LightSwitch will come as a breath of fresh air. It’s a rapid software development tool that helps you to work faster, better, and smarter. It allows you to build data-centric business applications that can run on the desktop or on the web.
But despite LightSwitch’s simplicity, there’s no need to compromise on functionality. You can build applications with all the features that you’d expect to find in a typical business application, and this book will show you exactly how.
The first chapter teaches you the core LightSwitch principles that will help you throughout the rest of this book. The key topics that you’ll cover in this chapter include
- The three-tier architecture that LightSwitch uses
- How LightSwitch uses a model-centric architecture, and applies the MVVM pattern
- What exactly happens when you build and compile a LightSwitch application
Let’s begin by taking a look at LightSwitch’s architecture.
Understanding LightSwitch’s Architecture
In keeping with best practices, LightSwitch applications consist of three layers. This architecture enforces the logical separation of your application and provides better maintainability and scalability. The biggest advantage is that it allows Microsoft to rewrite or replace entire layers in response to changes in requirements or technology. Every time you create a new application, LightSwitch creates multiple projects in your LightSwitch solution. Each project is designed to run on a specific layer in this architecture.
This automation of the project layout itself is a major timesaver. If you built an application without LightSwitch, you could spend days on getting the architecture correct.
Figure 1-1 illustrates the parts that make up a LightSwitch application. It highlights the way that applications are separated into data, logic, and presentation layers. It also illustrates how the layers communicate with each other.
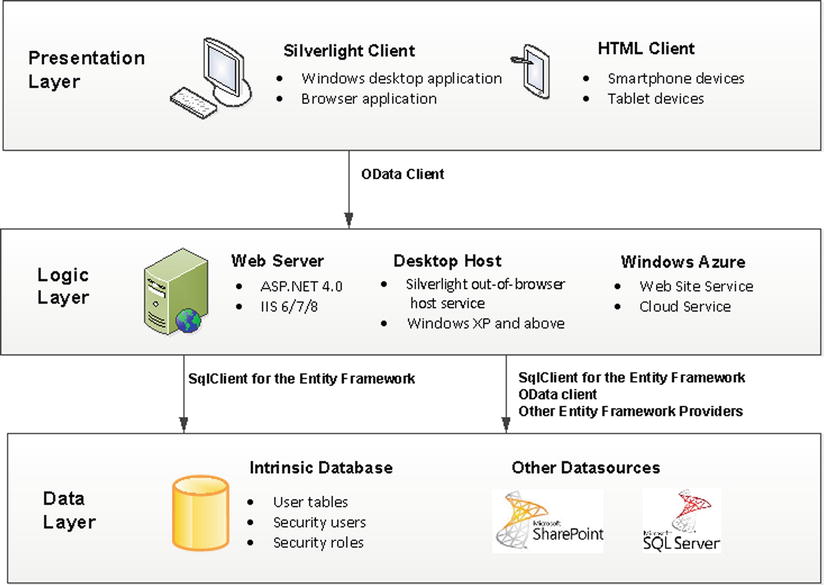
Figure 1-1. LightSwitch’s architecture
The Data Layer
LightSwitch’s architecture defines a separate logical data layer. This means that LightSwitch stores your data separately from the rest of your application, and allows you to run the data-storage processes on a platform that’s separate from the rest of your application.
The advantage of this data independence is that it doesn’t tie you to a specific database or datasource. If you’re not happy with using Microsoft SQL Server, for example, you can more easily configure your application to store its data in Oracle instead.
Delegating the responsibility of data storage to a separate layer also improves scalability and performance. It allows you to take advantage of database-engine features such as mirroring, clustering, and indexes, and you can also upgrade your database engine without affecting the rest of your application.
In practical terms, LightSwitch allows you to read and write data from SQL Server, SQL Azure, SharePoint, and many other data sources. In fact, your data-storage options are almost limitless. This is because you can connect to almost any data source by creating your own custom RIA (Rich Internet Applications) service.
A special database that LightSwitch uses is the Intrinsic (or Application Data) database. LightSwitch uses this database to store the tables that you create through the built-in table designer.
LightSwitch allows you to define users and to apply security access control. To manage your users and roles, it uses the ASP.NET SQL membership provider. This membership provider relies on database tables and, by default, LightSwitch adds these tables to your Intrinsic database.
During design time, LightSwitch hosts your Intrinsic database using LocalDB (the successor to Microsoft SQL Server Express). But when you deploy your application, you can host your Intrinsic database on any version of SQL Server 2005 or above.
The Logic Layer
LightSwitch’s architecture defines a separate logic layer that contains application services. A big advantage of this separation is that it allows Microsoft to rewrite parts of LightSwitch without impacting either the client or data tiers.
The application services are responsible for carrying out business rules, validation, and data access. LightSwitch creates a Data Service for each data source in your application and exposes it through an OData end point at the logic layer boundary. OData is a data-access protocol, which you’ll learn more about in Chapter 10.
When your LightSwitch client needs to access some data, it doesn’t communicate directly with your underlying database or data store. Instead, it accesses data by making an OData call to the data service that’s hosted in your logic layer.
There are three places where you can host your application services. The most common place is through an ASP.NET application that’s hosted on an IIS (Internet Information Services) server. But you can also host your application services on Windows Azure, or you can host the services on the client workstation in the case of a desktop application.
Note that the word layer describes the logical separation of your application, whereas tier refers to the physical place where you deploy a layer. Therefore, later chapters in this book use the term 'middle tier' to describe the machine that hosts your logic layer’s end point.
Data-retrieval process
The data service exposes operations that return data to the client. By default, these operations include queries that return all records in a table or single records that are filtered by a primary key value. LightSwitch also exposes the queries you create as OData methods.
Figure 1-2 illustrates a typical data operation. When the LightSwitch UI requires data, it calls a query operation on the data service. In this example, the query operation refers to a search query that we’ve created ourselves to allow users to search for customers by surname. This query allows the client to supply an argument to define the surname to search for.
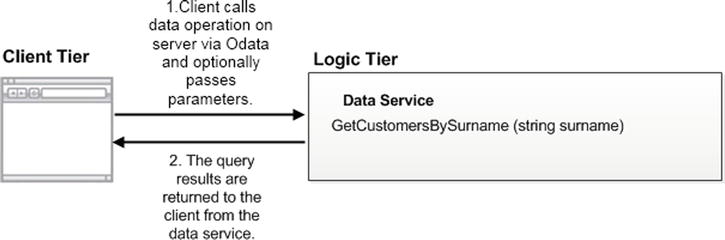
Figure 1-2. Calling a query that returns customers filtered by surname
When the data service executes the query, it passes through the Query Pipeline. This opens up various phases where you could inject your own custom code. During the pre-processing phase, for example, you can tailor the results of a query by adding extra filter conditions using LINQ (Language Integrated Query) code.
Data-saving process
The data service provides an operation called SaveChanges. As the name suggests, this method starts the process that saves any updated data. Let’s see how this save process works.
At the very beginning (before SaveChanges is called), the client calls a query that returns an initial set of data. The client caches this data using an object called a Change Set. This object maintains a record of any records that the user adds, updates, or deletes.
When the user clicks on the save button, the LightSwitch client calls the SaveChanges operation and supplies the Change Set. Before the data service commits the changes to the database (or underlying data store such as SharePoint), the processing enters the Save Pipeline.
Just like the Query Pipeline, the Save Pipeline provides places where you intercept the save operation by writing custom code. For example, you can prevent certain users from updating data by including code in the Save Pipeline.
Another feature of LightSwitch is that it prevents users from overwriting changes that have been made by other users. If LightSwitch detects a conflicting data change, it won’t allow the save operation to succeed. Instead, it shows what the current and proposed values are and allows the user to choose what to do.
LightSwitch also maintains the consistency of your data by applying all updates inside a transaction. For example, any proposed change to a parent record won’t be applied if an update to a child record fails.
Without LightSwitch, you could spend ages writing this type of boring, repetitive boilerplate code. This is an ideal example of how LightSwitch can help you save time.
The Presentation Layer
The presentation layer is the part of LightSwitch that runs on the user’s computer or device. This layer actually performs a lot of work. It shows data to the user, allows data entry to happen, and controls all other tasks that relate to human interaction.
Importantly, it also performs business logic such as data validation, keeps track of data changes, and interacts with the Data Services in the logic layer.
You can build your user interface (or client) by using either Silverlight or HTML. In fact, the choice isn’t mutually exclusive. You can include both Silverlight and HTML clients in a single LightSwitch application.
Silverlight Client
The advantage of Silverlight is that it provides a rich experience for both developers and end users. You can configure your project so that your application runs as a desktop application or from within a web browser. You can easily switch your application type by clicking a radio button that you’ll find in the properties of your LightSwitch project.
An advantage of Silverlight is that it’s easier to write code that runs on the client. You can use strongly typed C# or Visual Basic (VB) code and use .NET language features such as LINQ to query your data.
Desktop applications allow you to use COM automation to integrate with the applications that are installed on your end user’s machine. This allows you to export the results of data grids to Excel and to automate Office applications such as Word, Excel, and Outlook. LightSwitch hosts your desktop applications using the Silverlight out-of-browser host service (sllauncher.exe). It configures your application with elevated permissions to give it access to features such as Export to Excel, COM-based automation, and greater access to the file system.
LightSwitch web applications are hosted by the Silverlight runtime that’s installed in your user’s web browser. Silverlight browser applications execute inside a sandbox, and access to features such as Export to Excel is prohibited. Silverlight also restricts access to certain parts of the file system.
You can customize the appearance of a Silverlight application by applying a Shell and a Theme. A Shell controls the location of all of the major UI elements in your application. It also contains the logic that logs users in to your application, and it generates and activates the screens that LightSwitch displays.
Themes define a set of styles that specify the fonts and colors that your application uses. Unlike Shells, Themes apply presentational changes that are much more subtle. Themes are usually designed to work with a specific shell, but it’s entirely possible for you to mix and match different Shells and Themes.
Themes and Shells allow you to apply a consistent look and feel throughout your entire application. New developers often struggle to set control attributes (such as fonts and colors) because many of these attributes are designed to be controlled by a Theme, rather than set for each individual control. LightSwitch applies good practice by encouraging you to apply style settings at an application level.
You can set the Shell and Theme for each application through the properties pane of your project. (See Chapter 3.) The two default shells that ship with LightSwitch are called Standard and Cosmopolitan. Figure 1-3 illustrates the same application, but with different Shells applied.
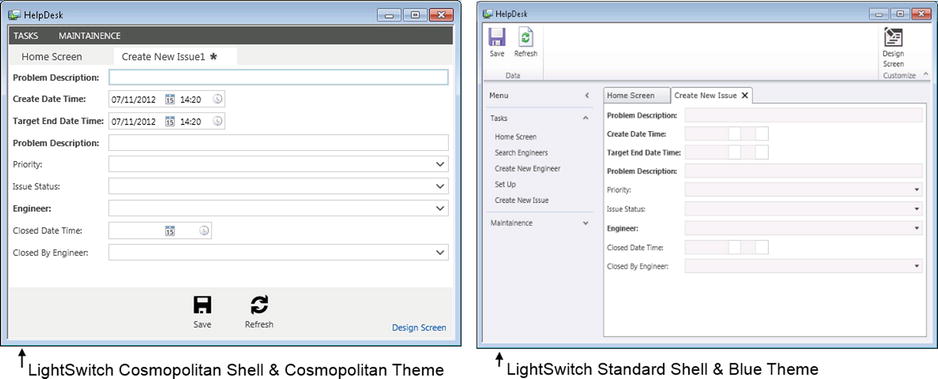
Figure 1-3. The Cosmopolitan Shell (on the left) and the Standard Shell (on the right)
If you don’t like the Shells or Themes that LightSwitch provides, you can choose to write your own. (This is covered in Chapter 13.)
Understanding Silverlight Screens
A Screen represents a piece of user interface that allows users to view or enter data (just like a Form in an Access application, or a Web Form in an ASP.NET application).
Developers create screens with prebuilt functions by using Templates. For example, there are templates that allow you to create search, editable grid, and data entry screens. You can also create your own screen templates—this is yet another extensibility point that LightSwitch offers.
Users can open multiple screens in a Silverlight LightSwitch application, but there can be only one single active screen at any time.
Each screen contains an object called a Data Workspace that is responsible for fetching and managing data. The Data Workspace manages the state of the data in the Change Set that is submitted to the Data Service on the logic tier when the user initiates a save.
Because each screen contains its own Data Workspace, the data changes that a user makes in one screen won’t be visible in other screens. You can’t share data changes between screens because each screen maintains an independent view of the data.
When you’re writing Screen code, you’ll need some way to reference objects such as data, controls, or screen parameters. LightSwitch exposes these objects through a Screen Object, and you’ll learn how to use this in Chapter 7.
HTML Client
The HTML client is new to LightSwitch 2012. This client is highly recommended for applications that run on mobile or touch-screen devices.
The advantage of using the HTML client is that your application will work on a wider range of devices. In comparison, a Silverlight application that runs in a browser requires the user to install the Silverlight runtime. This isn’t always possible, particularly on mobile devices or on locked-down corporate environments.
You can customize your HTML interface by using JavaScript and CSS (Cascading Style Sheets). The advantage is that if you have experience of writing web applications, you can very easily reuse your existing skills.
A disadvantage is that HTML clients are less rich in functionality, and you can’t perform COM-related tasks such as automating Microsoft Office. The need to write JavaScript code may also be a disadvantage. Although language choice is largely a matter of taste, many traditional developers find it easier to use a strongly typed .NET language, rather than JavaScript.
Unlike the Silverlight client, the HTML client uses a single document interface. The Silverlight client allows users to open multiple screens and to work on multiple tasks at the same time. In comparison, the HTML client allows users to carry out only one task at a time. Therefore, a key technical difference is that each HTML application contains only one Data Workspace, rather than a separate Data Workspace for each screen.
Introducing the Model-Centric Architecture
LightSwitch’s model-centric architecture is a brilliant piece of software engineering. It means that your LightSwitch application (data items, screens, queries) is defined and saved in XML files that are named with an LSML extension. When you run your LightSwitch application, the LightSwitch runtime processes this XML data and transforms it into a working application.
As a very loose analogy, think of the LightSwitch runtime as a copy of Microsoft Word. Using this analogy, your LightSwitch application would be a Microsoft Word document. In the same way that Word opens Word documents and makes them readable and editable, the LightSwitch runtime opens LightSwitch applications and makes them functional.
The advantage of this architecture is that LightSwitch isn’t strongly tied to any specific technology. If Microsoft wants LightSwitch to run on a different platform or device, they can do this by simply writing a new runtime.
Building Your Application
Figure 1-4 shows the parts that make up a LightSwitch application, from design time through to run time. LightSwitch solutions consist of three projects: the Client, Common, and Server projects. These are shown as columns in the diagram. To further explain what happens, let’s begin at the bottom.
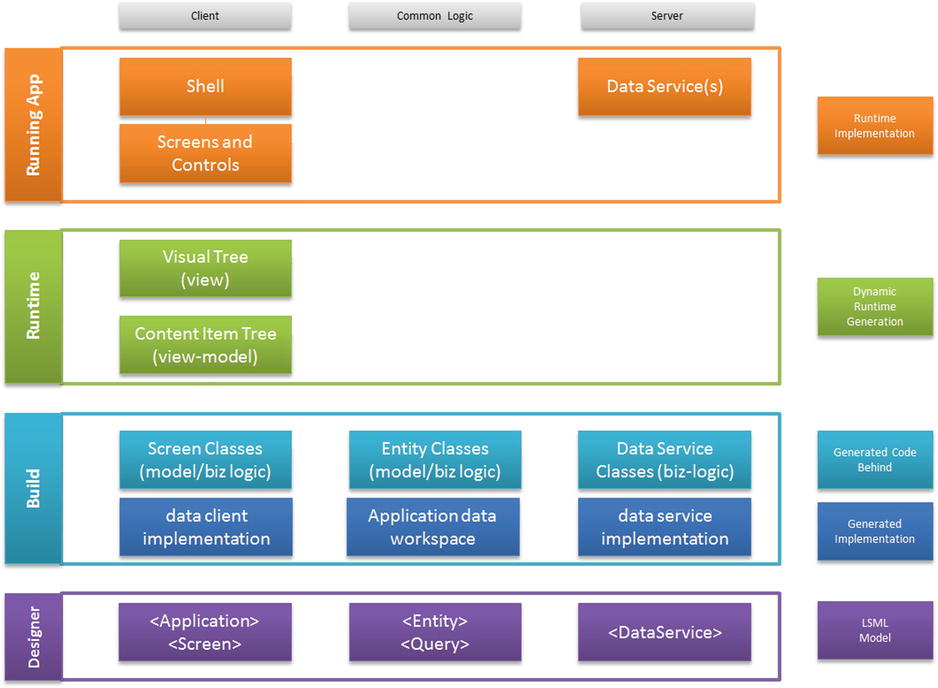
Figure 1-4. LightSwitch build process
As part of the model-centric architecture, LightSwitch constructs your applications from building blocks. Think of these as XML representations of the objects that are available in the LightSwitch designer. Let’s say that you add a data source to your application. When you do this, LightSwitch expresses your data source as an XML element within the LSML file in your Server project. When you’ve finished in Visual Studio, your application will be defined entirely in XML, and this is known as the LSML Model.
When you build your application, LightSwitch compiles the .NET code that’s present in your application. This includes the user code that you’ve written, in addition to the classes that LightSwitch autogenerates to support your application. The autogenerated code includes the DataWorkspace classes and Screen object classes. These are core API objects that allow you to access your data through code.
The interesting thing about the LightSwitch clients is that they don’t contain any UI that’s specific to your application. Instead, the LightSwitch runtime dynamically generates your screens and UI at runtime.
In the case of the Silverlight client, the LightSwitch runtime composes the screens, controls, and shell using the Managed Extensibility Framework (MEF). This dynamic generation prevents you from customizing your Silverlight application by hand-crafting the Extensible Application Markup Language (XAML). This is something that experienced Silverlight developers might be interested in doing. If you want to build your own UI elements using XAML, you can do so by creating your own custom controls (as you’ll see in Chapter 11).
In the case of the HTML client, you can customize the HTML that’s shown to the user by writing JavaScript that generates custom HTML.
![]() Note You can create a LightSwitch project in C# or VB.NET. However, you can’t change a project from one language to the other after it has been created.
Note You can create a LightSwitch project in C# or VB.NET. However, you can’t change a project from one language to the other after it has been created.
Understanding the Model-View-ViewModel Pattern
LightSwitch applications follow a design pattern called Model-View-ViewModel, or M-V-VM (also known simply as MVVM). This pattern was developed by John Gossman (a technical architect at Microsoft) and is commonly used by Silverlight developers.
MVVM keeps the presentation, logic, and data elements of your application logically distinct. This pattern helps you produce applications that are cleaner, more maintainable, and more testable.
The Model part of MVVM refers to the conceptual representation of your data. The entities and queries that you define in your application make up the model.
At runtime, LightSwitch constructs a screen layout by interpreting the LSML model. The screen layout consists of a tree of content items, which can represent data items, lists, commands, or parent items. A content item at runtime represents the View Model element of MVVM. The View Model controls the client-side business logic (for example, validation) and also manages data access.
In the case of the Silverlight client, the LightSwitch runtime builds the visual tree, which contains the actual tree of Silverlight controls that are presented on screen. These Silverlight controls make up the View part of MVVM. Views are designed only to display data—nothing more.
In the case of the HTML client, LightSwitch binds HTML controls (the view) to content items that are implemented through JavaScript.
Because views are designed only to display data, it allows you to easily change the control that’s bound to a data item. (See Figure 1-5.) This is one of the most striking characteristics of the MVVM pattern.
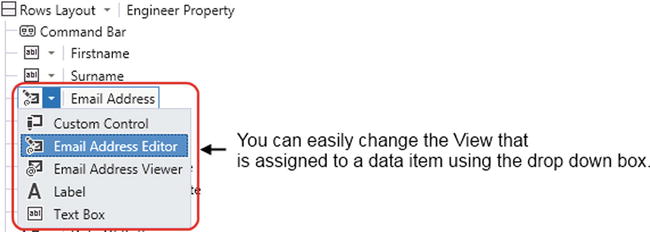
Figure 1-5. Changing the views that are bound to a data item
Examining LightSwitch Projects
When you open a project in LightSwitch, you can view your project in one of two ways: Logical View or File View. The default view that LightSwitch presents is the Logical View. This basic view organizes your project into various folders such as Data Sources, Entities, and Screens. The Logical View enables you to add and edit items such as screens, queries, and data sources.
File View allows you to see and work on the individual projects that make up your LightSwitch solution. Importantly, it allows you to add references to external dynamic-link libraries (DLLs) and to add your own custom code files.
A button in Solution Explorer allows you to switch between these two views. (See Figure 1-6.) In File View, some files might be hidden by default. Click on the Show All Files button to view all items.
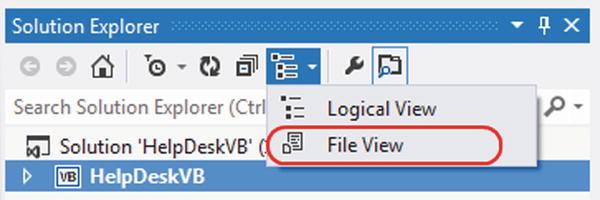
Figure 1-6. Switching to File View
EXERCISE 1.1 – EXAMINING LIGHTSWITCH’S SOLUTION STRUCTURE
Start LightSwitch and create a new project. Notice how Solution Explorer shows two folders: Data Sources and Screens. Now switch to File View and examine the underlying projects and files. From Visual Studio’s Build menu, select the Build Solution option. After Visual Studio builds your project, use Windows Explorer to view your project files. Notice how LightSwitch generates your build output into a folder called Bin. Notice how this folder contains a subfolder called Data that contains your design-time Intrinsic database.
After you complete Exercise 1.1, the contents of Solution Explorer will appear as shown in Figure 1-7.
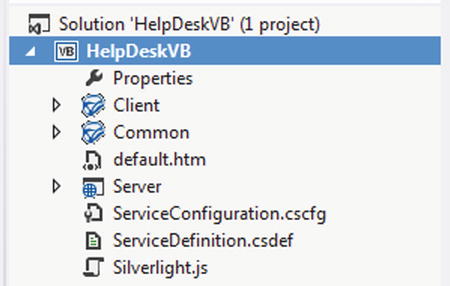
Figure 1-7. File View of Project
Notice the Client, Server, and Common projects that make up your solution.
The Client project contains the Silverlight client project, the Server project contains the ASP.NET code that runs on the server, and the Common project contains the logic that runs on both the client and server. Custom validation code is an example of something that belongs in the Common project. This is because LightSwitch executes the same code on both the presentation and logic tiers. In keeping with good practice, LightSwitch validates data on the client to provide instantaneous feedback to the user. It then revalidates on the server to ensure security.
If you create an HTML client project (as discussed in Chapter 8), your project will contain two projects: a Server project, and an HTML Client project. In this scenario, the HTML Client project contains the content that runs on the user’s browser. If you add an HTML client to an existing LightSwitch project, LightSwitch no longer uses the code that’s in your Common project. Instead, it adds the shared code into the Server project and adds links to the shared code files from the Client project.
![]() Tip Logical View doesn’t allow you to organize your screens, queries, and tables into subfolders. If you’re working on a large project, you can keep your project organized by naming the objects that you want to group together with a common prefix.
Tip Logical View doesn’t allow you to organize your screens, queries, and tables into subfolders. If you’re working on a large project, you can keep your project organized by naming the objects that you want to group together with a common prefix.
Reducing Project Sizes
Even the smallest LightSwitch project consumes over 180 MBs in hard disk space. The large project sizes make it difficult to back up, share, or email your LightSwitch projects.
If you want to reduce the amount of space your projects take up on disk, you can safely delete the contents of the ClientBin and ServerBin folders. This will reclaim around 130 MBs of space. LightSwitch re-creates these contents when you next compile your application, so there’s no need to worry about permanently damaging your project.
Summary
LightSwitch is a rapid development tool that’s built with modern technologies, well-known patterns, and best practices. It allows you to easily build data-centric applications that run on the desktop and on the web. LightSwitch applications employ a three-layer architecture and apply the MVVM software design pattern.
LightSwitch relies on a special database called the Intrinsic database. This database stores the tables that you create inside LightSwitch, as well as the login details for your users.
The LightSwitch client application doesn’t talk directly with your data sources. Instead, it accesses data by communicating with the logic layer via the OData protocol.
At the logic layer, LightSwitch creates a Data Service for each data source in your application. The data service exposes methods that allow your client to access and update data. When the data service updates or retrieves data for the client, the server-side data operation passes through either the Save or Query Pipelines. These pipelines expose points where you can inject your own custom code.
You can develop LightSwitch user interfaces by using a Silverlight or HTML client. The benefits of a Silverlight client are that it provides a richer experience and can run as a desktop application. The advantage of a desktop application is that it can interact with desktop applications such as Outlook and Word. Silverlight browser applications are unable to do this. The benefits of an HTML application are that it doesn’t require the Silverlight runtime and can therefore run on a far wider range of devices. HTML applications are ideal for applications that you want to run on mobile or tablet devices.
LightSwitch uses a Data Workspace object to access data. For each data source, the client caches its working data in an object called a Change Set. In the case of the Silverlight client, each screen has its own Data Workspace; therefore, data changes cannot be shared across screens. The HTML client works differently—in this case, all screens share the same data workspace.
In a Silverlight application, Shells and Themes allow you to re-clothe or skin your application. Changing the Shell allows you to radically change the appearance of your application, whereas changing the Theme allows you to apply more subtle changes, such as changing the font colors and sizes.
LightSwitch solutions consist of three projects. You can see these by switching your solution into File View. This view allows you to add custom classes and references to other .NET assemblies.
LightSwitch applications are defined using XML building blocks, and this XML content is persisted in files with an LSML extension. When you build your application, your LightSwitch clients don’t contain any UI that’s specific to your application. Instead, LightSwitch autogenerates your application’s UI at runtime by interpreting your LSML model.
LightSwitch applies the MVVM pattern throughout your application. A big advantage of this pattern is that it keeps everything logically distinct and allows you to easily change the controls that are bound to data items.