

© 2000 by Chris Woodhouse, all rights reserved
Fundamental Print Control
Timing Print Exposures
Expose for the highlights
The amount of light reaching a photographic emulsion must be controlled in order to ensure the right exposure. Exposing the film in the camera is typically done with a combination of lens aperture and shutter timing. The lens aperture, also called ‘f/stop’, controls the light intensity, and the shutter timing, also called ‘speed’, controls the duration of the exposure. The f/stop settings are designed to either half or double the light intensity. The shutter speed settings are designed to either half or double the exposure duration. This is accomplished by following a geometric series for both aperture and time. The ‘film exposure control’ table in fig.2 shows an example of typical settings used in modern cameras and lenses. Therefore, an f/stop adjustment in one direction can be offset by a shutter speed adjustment in the opposite direction. Experienced photographers are very comfortable with this convenient method of film exposure control and refer to both, aperture and shutter settings, as f/stops or simply, ‘stops’.
In the darkroom, the need for exposure control remains. Splitting this responsibility between the enlarging lens aperture and the darkroom timer is a logical adaptation of the film exposure control. However, the functional requirement for a darkroom timer is different from that of a camera shutter, since the typical timing durations are much longer.
Film exposure durations are normally very short, fractions of a second, where typical enlarging times vary from about 10 to 60 seconds. Long exposure times are best handled with a clock type device which functions as a ‘count down’. Some popular mechanical timers, matching this requirement, are available. More accurate, electronic models with additional features are also on the market. Some professional enlargers go as far as featuring a shutter in the light path. This gives an increased accuracy, but is only required for short exposure times.
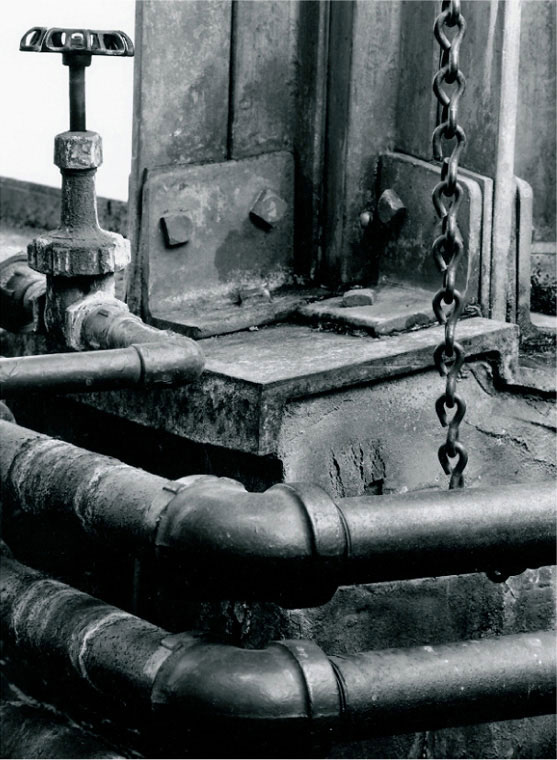
fig.1 This image of old and worn piping was taken in the Botanical Garden on Belle Isle, just south of Detroit, Michigan USA. The final print exposure and the print manipulation were determined by the f/stop timing method.
Arithmetic (Traditional) Timing
A typical traditional printing session is simplified in the following example. The enlarging lens aperture is set to f/8 or f/11 to maximize image quality and allow for reasonable printing times. The printer estimates from experience that the printing time will be around 25 seconds for the chosen enlargement. Typically, a 5 to 7-step test strip, with 5-second intervals, is prepared to evaluate the effect of different exposure times. A sample of such a test strip is shown in fig.3 and was used to test exposures of 10, 15, 20, 25, 30, 35 and 40 seconds. The test strip is then analyzed and the proper exposure time is chosen. In this example, a time of less than 20 seconds would be about right, and the printer may estimate and settle on an exposure time of 18 seconds. Now, a so-called ‘base exposure’ time is established. This sequence may be repeated for different areas of interest, for example textured highlights and open shadows. If they deviate from the base exposure, dodging and burning may be required to optimize exposure locally.

fig.2 The film exposure is controlled with the taking lens aperture and the shutter timing. Both sequences are geometric and not arithmetic in nature for good reason. The print exposure can be controlled in the same way with the enlarger lens aperture and a darkroom timer.

fig.3 a traditional test strip in 5-s increments (arithmetic series)

fig.4 an f/stop test strip in 1/3-stop increments (geometric series)

fig.5a A simple analog f/stop dial, from 8 to 64 seconds in 1/3, 1/6 and 1/12-stop increments, can be made and attached to any analog timer.
fig.5b Here the f/stop clock dial was enlarged and temporarily taped to an already existing ‘GraLab 300’ timer.
This is a reasonable approach to printing, but it does not utilize some of the benefits of geometric, or f/stop timing. In the traditional, arithmetic timing method, uniform time increments produce unequal changes of exposure. As seen in fig.3, the difference between the first two steps is 1/2 stop, or 50%. However, the difference between the last two steps is only 14%, or slightly more than a 1/6 stop. Therefore, arithmetic timing methods provide too great of a difference in the light steps and too little of a difference in the dark steps of a test strip. This makes it difficult to estimate an accurate base exposure time for the print.
Geometric (f/stop) Timing
My involvement with geometric printing began when I met a fellow photographer and printer in the UK. He convinced me to give it a try. It did not take long to realize the major benefits of this very logical technique. After a small learning curve and the typical discomfort with any unfamiliar technique, geometric timing has now become the standard in my darkroom. It provides any darkroom practitioner with robust print control and the ability to predict repeatable results with confidence. I will explain the benefits of geometric timing in the chronological order of a typical printing session from the test strip, through the exposure adjustment for a work print, to the fine tuning with dodging and burning, but first some general notes.
Considering the typical design of darkroom timers, it is understandable why arithmetic timing has been the predominant method of exposing photographic paper. Nevertheless, it is worth considering geometric timing not just for film exposure but also for print exposure, because it has significant advantages when it comes to test strips, print control, repeatability and record keeping. Since lens aperture markings also follow a geometric progression, geometric timing is often referred to as ‘f/stop timing’.
Fig.5 provides an analog version of an f/stop timing sequence, which helps to illustrate the effect. It is a continuation of the well-known camera shutter speed doublings from 8 up to 64 seconds, and it is subdivided first into 1/3 then 1/6 and finally 1/12 stop. These ranges were selected because times below 8 seconds are difficult to control with an analog timer, and times well above one minute are too time consuming for a practical darkroom session. Increments down to 1/12 stop are used, because that is about the smallest appreciable exposure increment. Anything less is really hard to make out. For normal paper grades, between grade 2 and 3, enlarging time differences of a 1/3 stop (~20%) are significant in tonal value, 1/6 stop (~10%) can easily be seen and differences of a 1/12 stop (~5%) are minute, but still clearly visible, if viewed next to each other. Smaller increments may be of use for paper grades 4 and 5 but are rarely required. The analog dial clearly shows how f/stop timing fractions increase with printing time. Fixed increments of time have a larger effect on short exposure times and a smaller effect on long exposure times.
The numerical f/stop timing table in fig.6 is a more convenient way to determine precise printing times than the previous analog table. It also includes dodging and burning times as small as 1/6-stop increments. It can be used with any darkroom timer, but a larger version may be required to see it clearly in the dark. Base exposure times are selected from the timing table and all deviations are recorded in stops, or fractions thereof. This is done for test strips, work prints and all fine-tuning of the final print, including the dodging and burning operations. Now, let’s get started.
1. The Test Strip
Assuming a typical printing session, select the following timing steps in 1/3-stop increments from the timing table: 8, 10.1, 12.7, 16, 20.2, 25.4 and 32 seconds. The resulting test strip is shown in fig.4. Please note that the range of exposure time is almost identical to the arithmetic test strip. However, a comparison between the two test strips reveals that the geometrically spaced f/stop version is much easier to interpret. There is more separation in the light areas and still clear differences in the dark areas of the test strip. After evaluation of the test strip, it can be determined that the right exposure time must be between 16 and 20.2 seconds. A center value of 18.0 seconds may be selected, or another test strip with finer increments may be prepared.
2. The Work Print
The next step is to create a well-exposed work print, at full size and exposed at the optimum base time. This base time is usually the right exposure time to render the textured highlights at the desired tonal value. In this example, the first full sheet was exposed at 18.0 seconds, developed and evaluated. I found this print just slightly too light and decided to increase the exposure by a 1/12 stop to 19.0 seconds, knowing that this would darken the print only marginally. I ended up with the almost same result as in the traditional timing method, but this time with much more confidence and control.

fig.6 The f/stop timing table, including adjustments for dodging and burning. Determine the base print exposure time, rendering significant print highlights to your satisfaction, and find this ‘base exposure’ in the center column. Base exposure times are listed in 1 stop (black), 1/3 stop (dark gray), 1/6 stop (light gray) and 1/12 stop increments. After adjusting overall print contrast, rendering significant print shadows as desired, find related dodging and burning times in 1/6 stop increments left and right to the base exposure to fine-tune the print.
Example: Assuming a base exposure time of 19.0s, exposure is held back locally for 2.1s to dodge an area for a 1/6 stop, and a 4.9s exposure is added locally to apply a 1/3 stop burn-in. Base exposure time and f/stop modifications are entered into the print record for future use. The exposure time must be modified if print parameters or materials change, but dodging and burning is relative to the exposure time, and consequently, the f/stop modifications are consistent.
In a typical printing session, the print contrast would now be adjusted to render the important shadows at the desired tonal values, but this is covered in the next chapter. To simplify things for now, I will, therefore, assume that we already have the proper print contrast at grade 2. Consequently, we have at present a well-exposed work print with a base print exposure time of 19.0 seconds and good overall print contrast. A work print like this is the necessary foundation to successfully plan all subsequent print manipulations, with the intention to further optimize the image.
3. Dodging and Burning
Fine-tuning all of the tonal values, through dodging and burning, only takes place once the right base image exposure and good overall contrast have been found. I recommend to test strip the desired exposure times for all other areas of importance within the image and then to record them all as deviations from the base exposure time in units of f/stop fractions. The table in fig.6 provides dodging and burning times in relation to several base times.
In this case, I found it advantageous to dodge the center of the print for a 1/6 stop, or as read from the table, for the last 2.1 seconds of the base exposure time and recorded it as (-1/6) on a printing map. The final printing map is shown in fig.7 for your reference. A stubborn upper left hand corner needed an additional 1-stop burn-in (+1) to reveal the first light gray. According to the table, this was equivalent to 19.0 seconds. The top, left and right edges needed an additional 1/3 stop (+1/3) and the timer was set to 4.9 seconds to achieve that exposure. A minor adjustment for the bottom edge of 1/6 stop (+1/6) concluded the session, and the lead picture shows the final image.
The final printing map will be stored with the negative and can be used for future enlarging at any scale. A new base exposure time must be found, when a new enlarging scale becomes necessary, but the f/stop differences for dodging and burning always remain the same. This printing map will also remain useful even if materials for paper, filters and chemicals have been replaced or have aged. It will also be easier to turn excessive burn-in times into shorter times at larger lens apertures in order to avoid reciprocity failures.
Traditional printing has standard edge-burning times, such as 3 seconds, as an example. This can be a relatively large amount for a small print with short base exposure times, and it can be a very short time for a large print with a relatively long base exposure time. Adding a 1/3 stop to the edges is a far more consistent way to work.
Some experienced printers have adopted the practice of using percentages of the base exposure time for all dodging and burning procedures. This approach is not as consistent but very similar to f/stop timing, and these printers should have little or no trouble switching to f/stop printing, because they are already halfway there.
f/stop timing has several advantages over traditional timing.
1. test strips have even exposure increments
2. straightforward test analysis at any time, aperture or magnification setting
3. print records are independent of equipment or materials
Hardware Requirements
You do not need any additional equipment to give f/stop timing a try. With the tables provided in this chapter and your current darkroom setup, you have everything needed to get started with this logical way to print. Any timer can be controlled to perform f/stop timing, especially when the exposure times are longer than 20 seconds.
Nevertheless, if you do not have a decent darkroom timer yet and if your budget allows, then go out and trade a bit of money for a lot of convenience and time saved, by investing in a good f/stop timer. There are only a few electronic f/stop timers available on the market. They usually provide f/stop and linear timing with a digital display. Some come with memory features to record the sequence of a more involved printing session.
Conclusion
In this chapter, it was shown that altering the print exposure time in an f/stop sequence is a logical adaptation of film exposure control. You are using it with your camera because it works. Why not use it in the darkroom too?
Two significant advantages are obvious. First, test strips become more meaningful, with even exposure increments between the strips, which allow straightforward analysis at any time, aperture or magnification setting. Second, printing records can be used for different paper sizes and materials without a change. After a little experience with the technique, it becomes second nature to visualize the effect of, say, a 1/3-stop print exposure, without worrying about the actual time. This is particularly useful for burning down critical areas or when working at different magnifications and apertures. Several well-known printers record image exposures in f/stops to describe their printing maps. Using f/stop timing makes printing easier, more flexible, and simpler to create meaningful printing records for future darkroom sessions.

fig.7 Dodging and burning is recorded in f/stop deviations on the printing map. This map is stored with the negative for future enlarging at any scale.
Paper and Print Contrast
Control the shadows with contrast
Print contrast is the optical density difference between the highlights and the shadows of a photographic print. In other words, the brighter the highlights and the darker the shadows, the higher the overall print contrast. Since highlight density is most effectively controlled through print exposure, shadow density is best controlled by adjusting print contrast. To make this effort possible, most photographic papers are manufactured in various grades of paper contrast.
Tailoring print contrast by selecting the appropriate paper contrast does not just compensate for less than ideally exposed or developed negatives, but it also accommodates different subject brightness ranges, and it can ingeniously facilitate creativity. After selecting the proper print exposure for the highlights, correctly pairing paper and negative contrast is the second step towards optimizing a print’s appearance. A high-contrast negative must be equivalently compensated with a low-contrast paper and vice versa, otherwise shadows will be too dark and hide important detail, or they will be too flat and leave the whole print without punch. But before selecting the right paper contrast, the practitioner must first choose between fixed- or variable-contrast papers.
Fixed-Contrast Paper
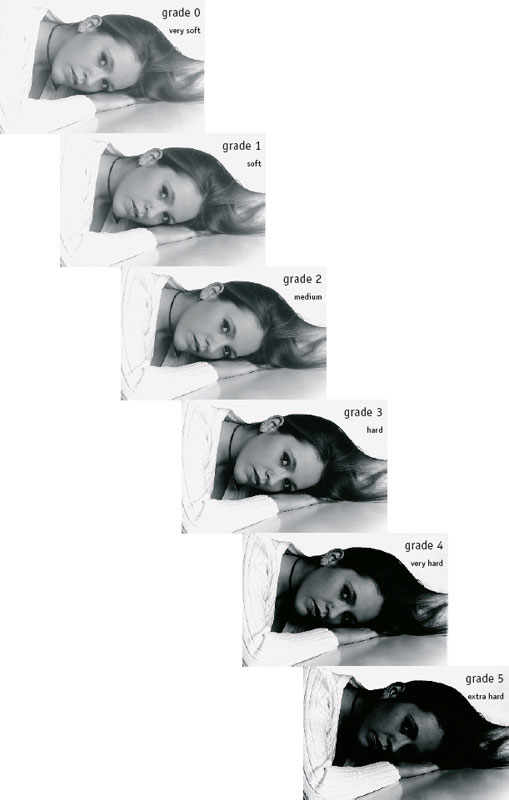
Some photographic papers are still offered as fixed-contrast papers. These more traditional papers come in up to six grades, numbered from ‘0’ to ‘5’ to identify the paper’s approximate contrast, with increasing numbers symbolizing increasing contrast (see fig.1). Grade 2 is the ‘normal’ or medium-contrast paper, and is ideally suited for medium-contrast negatives. Soft papers, grade 0 and 1, produce low-contrast prints from medium-contrast negatives and medium-contrast prints from high-contrast negatives. Hard papers, grade 3 to 5, produce medium-contrast prints from low-contrast negatives and high-contrast prints from medium-contrast negatives. For economic reasons, many fixed-contrast papers are only obtainable in two or three grades, with availability focusing on the more popular grades 1 to 3. What follows is a brief applicability guide to using fixed-contrast papers:
Grade o (very soft): This extra low-contrast paper is used for negatives with excessively high-contrast or to create special low-contrast effects.
Grade 1 (soft): A well exposed but overdeveloped negative, or a negative of a high-contrast scene will print well on this low-contrast paper.
Grade 2 (medium): A well exposed and developed negative of a normal scene with an average subject brightness range will print well on this medium-contrast paper.
Grade 3 (hard): A slightly underexposed or underdeveloped negative, or a negative of a low-contrast scene, will print well on this higher-contrast paper. Some consider this to be their normal grade.
Grade 4 (very hard): An underexposed and underdeveloped negative, or a negative of a very low-contrast scene, will print best on this paper.
Grade 5 (extra hard): This extra high-contrast paper is used for negatives with extremely low-contrast or to create special high-contrast effects.
Unfortunately, paper manufacturers never agreed on a standard for these numeric values. A grade-2 paper made by one manufacturer may have as much, or more, contrast than a grade-3 paper made by another. Paper contrast may also vary between different papers from the same manufacturer. One can only rely on the fact that a higher number of the same paper will give more contrast, while a lower number will give less.
Experienced printers, specializing in only one type of subject and exercising tight process control, may get away with keeping just one or two grades in stock. Others may have to have all grades at hand in order to be prepared for varying negative contrast needs. The contrast of fixed-contrast papers can be modified within reason by using special developers and other darkroom techniques, but essentially, and as the name implies, the contrast for these papers is fixed. This fact may evolve to a significant hurdle for the discriminating printer, when it comes to fine-tuning print contrast in order to optimize print quality.
(image © 1998 by Paul Kessel, all rights reserved)
fig.1 After proper highlight density is determined through exposure tests (here for the tip of the elbow), appropriate shadow density is then controlled by adjusting print contrast. To make this effort possible, photographic papers are manufactured in up to six grades, numbered from ‘0’ to ‘5’, with increasing numbers symbolizing increasing contrast. In this example, a print contrast somewhere between grade 2 and 3 would be ideal.
Variable-Contrast (VC) Paper
Most papers offered today are only available as variable-contrast papers. These papers are coated with a mixture of two or three separate emulsions. All components of the mixed emulsion are sensitive to blue light but vary in sensitivity to green light. When variable-contrast papers are exposed to blue light, all components react and contribute similarly to the final image. This creates a high-contrast image because of the immediate additive density effect produced by the different components. On the other hand, when variable-contrast papers are exposed to green light, only the highly green-sensitive component reacts initially, while the other components contribute with increasing green-light intensity. This creates a low-contrast image because of the delayed additive density effect produced by the different components. By varying the ratio of blue to green light exposure, any and every intermediate paper contrast from ‘very soft’ to ‘extra hard’ can be obtained within the same sheet of paper. This offers tremendous flexibility, enhanced technical control and new creative opportunities.

fig.2 The contrast of fixed-contrast papers can be modified with special developers or darkroom techniques but is essentially fixed with relatively rough increments (left). This can be a significant hurdle when it comes to fine-tuning print contrast and optimizing print quality. The contrast spacing of variable-contrast paper is much smoother, when used with filter sets (middle), and totally stepless contrast changes can be obtained with color or VC enlargers.
The task of controlling the blue-to-green light ratio can be achieved through several methods. The simplest system is a set of twelve specially designed filters, which are available from most major paper manufacturers. These sets approximate the traditional contrast grades from ‘0’ to ‘5’, in 1/2-grade increments and often offer one extra filter, extending the contrast range even further. Another, more sophisticated, approach is to calibrate a color enlarger, utilizing the yellow and magenta filter adjustments, or to use a purpose-built variable-contrast enlarger head. Fig.2 illustrates the relatively rough contrast spacing of fixed-contrast paper (left). The contrast spacing of variable-contrast paper is much smoother, when used with filter sets (middle), and totally stepless contrast changes can be obtained with color or VC enlargers. The practical application of variable-contrast papers is shown throughout the rest of the book, but for more detailed technical information, see the first few chapters in ‘Advanced Print Control’.
The proponents of fixed-contrast papers claim for them to offer superior image quality. This was certainly true decades ago, when variable-contrast papers were still going through significant technical development and improvements. Today, this claim is hard to substantiate. The proponents of variable-contrast papers claim to save money by not having to buy several boxes of paper, while also reducing darkroom complexity and inventory. Cost reduction is an odd argument for variable-contrast papers, since the cost of paper purely depends on the number of sheets used. However, the initial investment and the darkroom complexity is indeed less, since one can get all grades from only one box of paper. In addition, as paper does degrade over time, it is a benefit to quickly work through a box of paper and replenish it with fresh materials, rather than frequently being left with outdated sheets of the less popular grades.
Considering the overwhelming benefits, it is hardly a surprise that variable-contrast papers are by far the most popular choice to optimize image contrast and create high-quality prints. The advantages of variable contrast paper over graded paper have made it the prime choice for many photographers today. The ability to get all paper grades from one box of paper, and even one sheet, has reduced darkroom complexity and provided creative controls not otherwise available with graded papers.
Basics of Photographic Printing
A fundamental but thorough approach
The students of my photography class and I had started our second day in the darkroom. We had just developed contact sheets from previously processed film and were about to select a negative to learn basic photographic printing. The negative I proposed had never been printed before, and therefore, it was a bit of an experience for all of us. Most instructors shy away from using a ‘new’ negative in this situation. They feel that exploring the potential of a negative and teaching basic printing at the same time may conflict. It may also generate confusion and may lose the educational value, which comes with a prepared and well-organized session. I cannot disagree with that viewpoint, but I feel confident enough to believe that a structured operating sequence will tackle any negative. This particular negative did not seem to contain any unusual challenges.

Photographic printing is primarily art and only secondarily science. Turning the negative film image into a well-balanced positive print, with a full range of tones and compelling contrast, can be time-consuming and occasionally frustrating, unless a well thought-out printing sequence is considered. Optimizing a print by trial and error is rarely satisfying and often leads to only mediocre results. A structured printing technique, on the other hand, will quickly reveal the potential of a negative. The method described here is a valuable technique for beginning and more experienced printers alike, and with individual modifications, it is used by many printers today. I have been taught this structured technique by master printers such as John Sexton and Howard Bond, who use it themselves. It works well in almost all cases but should be viewed as, and understood to be, a guideline and not a law. Use the technique to get started, but feel free to modify it, in order to develop your personal printing style.
The picture was taken in downtown Detroit at the old and abandoned railway station, which once was a beautiful example of early 20th century architecture. Unfortunately, it is now a ruin, fenced in and boarded up to prevent unwanted entrance. The city of Detroit is concerned about the structural integrity of the building. Nonetheless, it is refuge to some homeless people. The inside of the building shows clear signs of vandalism and decades of decay, but the former beauty is still visible to the trained photographic eye. The image was taken with a Hasselblad 501C and a Carl Zeiss Planar 2.8/80 at f/11 with an exposure time of 1/2 second on TMax-100. It was then developed normally in Xtol 1+1 for 8 minutes.
Before we get started, let me share my thoughts about electronic darkroom aids. I use an electronic f/stop timer and find it extremely useful. I also own a practical darkroom lightmeter, but it is only used to get the base exposure and contrast within the ‘ball park’. Highly sophisticated darkroom meters, which promise quality one-off prints, only add their own set of challenges. On the other hand, one simple test strip provides invaluable information throughout the entire print session and takes relatively little effort. I prefer to determine the optimum print exposure and contrast, while comparing a properly made test strip to others that are just too light, dark, soft or hard. I feel uncomfortable blindly trusting a machine, which dictates a one-and-only setting, without ever getting a chance to evaluate alternatives. We are well advised not to replace skill with technology, otherwise crafts-manship will deteriorate. Producing a truly fine print demands the manual ‘exploration’ of the whole negative. Especially beginners are better off investing the time to improve their skills, rather than compensating for the lack thereof with overly sophisticated technology. Otherwise, they will develop a dependency that will undoubtably condemn them, and their prints, to an undeserved mediocrity. Fine-art printing is a skill, patiently acquired by training, not just another repetitive process that would benefit from complete automation.
Use f/stop timing and make a series of test strips to determine the optimum highlight exposure. Then, expose a full-sheet test print to check and adjust the global contrast.
The result is the first work print, having the best exposure and contrast to render significant high-lights and shadows as intended. It becomes the basis for all subsequent image manipulations to optimize the print.
Expose for the Highlights
The old axiom for preparing high-quality negatives is ‘expose for the shadows and develop for the highlights’. It is still valid today. Having learned from the last two chapters, we will modify this rule for preparing high-quality prints to ‘expose for the highlights and control the shadows with contrast’.
Our first test strip in fig.1 is made for the highlights only. In this example, the model’s top is the most prominent and important highlight in this image, which is why this area of the print was chosen for the test strip. With this test, we will only concentrate on the proper exposure for the highlights. Grade 2, a slightly soft default contrast for diffusion enlargers, was used. The beginning, and sometimes even the experienced, printer has a difficult time to keep from judging the contrast in the first test strip as well. We will resist all temptation to make any evaluation about contrast in the first test strip and wait for a full sheet to do so. For now, all we are interested in is getting the best exposure time for the delicate highlights.

fig.1 The test strip shows the same area of the image with increasing exposure from right to left to determine highlight exposure.
The test strip shows increasing exposure times from the right at 14.3 s to the left at 28.5 s, in 1/6-stop increments at a constant aperture of f/11. This group of students felt that the model’s top was slightly too light in step 5 (22.6 s) and slightly too dark in adjacent step 6 (25.4 s). We consulted the f/stop timing chart and settled for an exposure time of 24.0 s, while still ignoring the shadows.
Control the Shadows with Contrast
Proper global contrast can only be appropriately evaluated on a full sheet exposure. Consequently, we exposed a full sheet, still using grade 2, now that we had the correct highlight exposure.
I prefer to conduct exposure and contrast evaluations under fairly dim incandescent light. A 100-watt bulb about 2 m (6 feet) away will do fine. Fluorescent light is too strong and will most likely result in prints that are too dark under normal lighting conditions.
Our first full sheet in fig.2 was declared to be too dull and too weak in the shadows. It needed a bit more contrast. Another sheet, fig.3, was exposed at grade 2.5, but the exposure was kept constant to maintain highlight exposure. The 1/2-grade increase in contrast made a significant difference and any further increase would have turned some of the shadows, in the dark clothing, into black without texture. The global contrast was now fine, but further work was necessary.

fig.2 This is the first full-sheet test print with proper exposure to the highlights. The overall contrast of grade 2 is too weak.

fig.3 Here the contrast has been raised to grade 2.5, adding more strength to the shadows, but now, the light wall above the model’s head is too distracting.
Direct the Viewer’s Eye
The human eye and brain have a tendency to look at the brighter areas of the image first. We can create a far more expressive print if we can control the viewer’s eye. This can be accomplished by highlighting the areas of interest and tuning areas with less information value down. Dodging and burning are the basic techniques to do so.
The light wall above the model’s head in fig.3 is drawing too much undeserved attention. The viewer is most likely distracted by it and may even look there first. We would like the viewer to start his visual journey with the model, which is the main feature of this image.
In fig.4 and fig.5, an attempt was made to dim the distracting part of the wall down. Fig.4 received the base exposure of 24.0 s at grade 2.5 and an additional exposure of 1/3 stop (6.2 s) to the upper wall by using a burning card. Fig.5 received a similar treatment, but this time the additional exposure to the wall was 2/3 stop (14.1 s). Two things are worth mentioning at this point. I don’t perform these burn tests on a full sheet but do it with smaller pieces in the areas of interest, and I usually perform at least two, so I can establish a trend. This shows us that the right side of the wall was about right in tonality, but the left side was still too bright. From the two samples, I estimated that an additional 1/3 stop was required on the left to match the tonality across the top wall.

fig.4 The top wall is burned-in for an additional 1/3 stop.
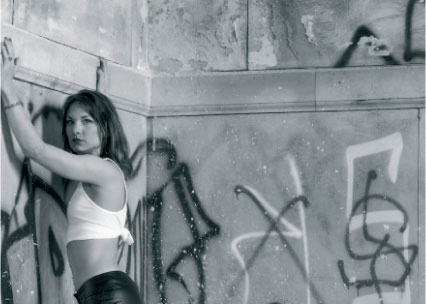
fig.5 The top wall is burned-in for an additional 2/3 stop.


fig.7 the final image prior to toning
The face of the model seemed a bit too dark to attract immediate attention. Therefore, I dodged the face with a small dodging tool, for the last 4.9 s (1/3 stop) of the base time, while rapidly moving it, so not to leave any visible marks. To attract further attention to the model, a 1/3-stop edge-burn to the right and lower side was applied. All of the exposures were collected into the printing map shown in fig.6. This is done first on little pieces of scrap paper or on the back of the print. After the darkroom session, it is recorded onto a print card, which is filed with the negative for future use.
The results are shown in fig.7 and in the lead picture. With a few methodical steps a much more communicating image was achieved. The viewer’s eyes are not left to aimlessly wander, and the model is not obscurely blending into her surroundings anymore. The model is now clearly the main focus of attention, and the background has been demoted to the important, but secondary, function of supporting and emphasizing the difference between the urban decay and the young woman’s beauty.
Preparing additional test strips, to determine the best exposure deviations for dodging and burning, can be laborious, but optimized print manipulation remains pure guesswork without them.
As a very effective alternative, prepare additional full-sheet test prints with -1/3, +1/3 and +2/3-stop exposures or as required. These allow for more educated guesses and save time and paper.
Archival Print Processing
Challenging the test of time
In an exponentially changing world, one increasingly looks backwards for a sense of stability. It is comforting for photographers to know that their images will survive the ravages of time to become an important legacy for the next generation. Although the need for archival processing is often a personal ambition, rather than a necessity, the qualities required of a print depend on circumstance. For instance, prints destined for collectors of fine art require archival qualities, simply due to the extremely high, but fully justified, customer expectations in this special market.

Additionally, fine-art prints, exhibition work and portfolio images not only require archival processing, but they also demand the extra effort of careful presentation and storage. With reasonable care, the lifetime of a silver image can approach the lifetime of its paper carrier. Fiber-base (FB) prints, combined with a carefully controlled full archival process, have the best chance of permanence. This is confirmed by many true natural-age photographic images from the mid 1800s, which still show no sign of image deterioration. Although resin-coated (RC) prints also benefit from archival processing, our knowledge of their stability is based on accelerated testing rather than true natural age. This lack of historical data limits serious application to fine-art photography but should not be a concern for commercial photography.
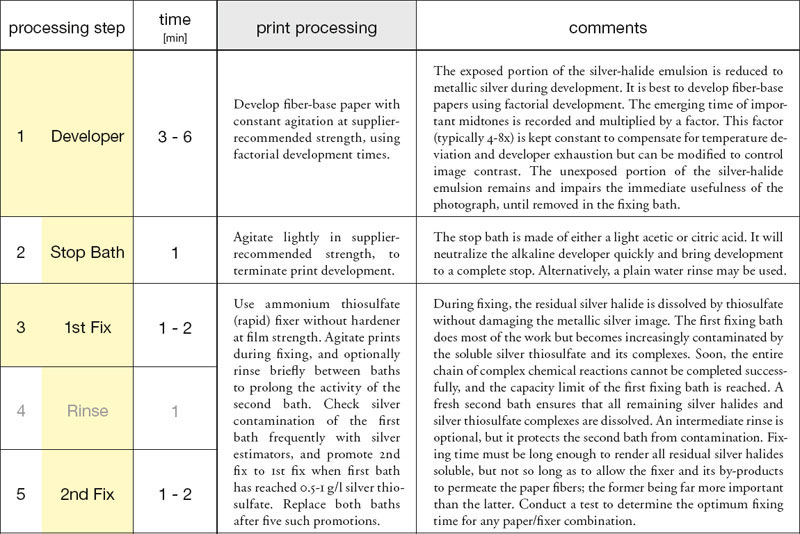
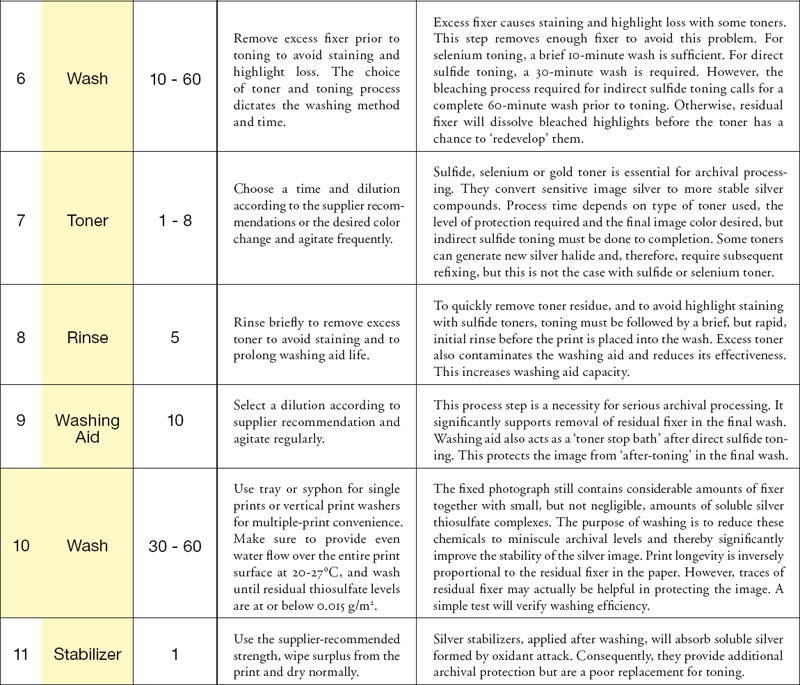
fig.1 Maximum permanence and archival qualities in FB prints are achieved with these processing recommendations. RC prints will also benefit, but reduce development to 90 s, each fix to 45 s, drop the washing aid and limit washing to 2 min before and 4 min after toning. All processing times include a 15s allowance, which is the typical time required to drip off excess chemicals.
In short, archival processing requires the developed image to be (1) well-fixed to remove all unexposed silver, (2) toned appropriately to protect the remaining image silver and (3) washed thoroughly to remove potentially harmful chemicals from the emulsion and the paper fibers. Archival storage requires the final photograph to be mounted and kept in materials that are free of acids and oxidants, meeting the requirements of ISO 18902. They must also be protected from direct sunlight, temperature and humidity extremes, as well as other potentially harmful environmental conditions and pollution.
Fixing
The light-sensitive ingredient of photographic paper is insoluble silver halide. During development, previously exposed silver halides are reduced to metallic silver in direct proportion to the print exposure, but the unexposed silver halides remain light sensitive and, therefore, impair the immediate usefulness of the photograph and its permanence. Consequently, all remaining silver halides must be made soluble and removed through fixing.
Commercial fixers are based on sodium or ammonium thiosulfate and are often called ‘hypo’, which is short for hyposulfite of soda, an early but incorrect name for sodium thiosulfate. Ammonium thiosulfate is a faster acting fixer and is, therefore, referred to as ‘rapid fixer’. Unfortunately, some practitioners have continued using the erroneous term and expanded it referring to any type of fixer as ‘hypo’ now.
Fixers can be plain (neutral), acidic or alkali. Plain fixers have a short tray life and are often discounted for that reason. Most common are acidic fixers, as they can neutralize any alkali carry-over from the developer and, in effect, arrest development. Alkali fixers are uncommon in commercial applications but find favor with specialist applications, such as maximizing the stain in pyro film development and retaining delicate highlights in lith-printing. At equivalent thiosulfate concentrations, alkali fixers work marginally quicker than their acid counterparts and are more easily removed during the final print washing.
Fixing Process
For optimum silver-halide removal and maximum fixer capacity, prints are continuously agitated in a first fixing bath for at least 2x the ‘clearing’ time (typically 1-2 minutes), followed by an optional brief rinse and a second fixing bath for the same amount of time. The ‘clearing’ time is the least amount of fixing time required to dissolve all silver halides and is determined through a separate test. The initial fixing-bath duo is used until the silver contamination of the first bath reaches the limit for archival processing, at which point the bath is exhausted and, therefore, discarded. The second bath is then promoted to take the place of the first, and fresh fixer is prepared to replace the second fixing bath. After five such changes, both baths are replaced by fresh fixer. The optional intermediate rinse reduces unnecessary carry-over of silver-laden fixer into the second fixing bath.
During the fixing process, the residual silver halides are dissolved by thiosulfate without any damage to the metallic silver forming the image. The resulting soluble silver thiosulfate and its complexes increasingly contaminate the fixing bath until it no longer dissolves all silver halides. Eventually, the solution is saturated to a point at which the capacity limit of the fixer is reached. The fresher, second bath ensures that any remaining silver halides and all insoluble silver thiosulfate complexes are rendered soluble.
Fixer Strength
Kodak recommends paper fixer strength to be about half as concentrated as film fixer. For archival processing, Ilford recommends the same ‘film-strength’ fixer concentration for film and paper. Kodak’s method exposes the paper to relatively low thiosulfate levels for a relatively long time, where Ilford’s method exposes the paper to relatively high thiosulfate levels for a relatively short time. It has been suggested that this reduces fixing times to a minimum and leaves little time for the fixer to contaminate the paper fibers. Conversely, whatever fixer does get into the fibers is highly concentrated and takes longer to wash out.
The best fixing method is clearly the one that removes all residual silver, while leaving the least possible amount of fixer residue in the paper fibers during the process. Whichever of the above methods is more advantageous depends greatly on the composition of the silver-halide emulsion and the physical properties of the fiber structure onto which it is coated. Start with the manufacturer’s recommendation, but ultimately, it is best to test your chosen materials for optimum fixing and washing times at low and high fixer concentrations.
The process instructions, shown in fig.1, assume the use of rapid fixer at film-strength (10% ammonium thiosulfate concentration). A primary concern with strong fixing solutions and long fixing times is the loss of image tones due to oxidation and solubilization of image silver. Fig.2 shows how several reflection densities are affected by film-strength fixer over time. Fixing times of 2-4 minutes do not result in any visible loss of density, but excessive fixing times will reduce image densities considerably. The density reduction is most significant in the silver-rich image shadows; however, the eye is more sensitive to the midtone and highlight density loss. Data is not available for density loss using paper-strength dilution, but it is conceivable for it to be significantly less.
Fixing Time
By the time it reaches the fixer, each 16x20-inch sheet of FB paper carries 25-35 ml of developer and stop bath. The fixing time must be long enough to overcome dilution by these now unwanted chemicals, penetrate the emulsion layer and convert all remaining silver halides. However, if the fixing time is too long, the thiosulfate and its by-products increasingly contaminate the print fibers and become significantly harder to wash out. Consequently, archival processing has an optimum fixing time.
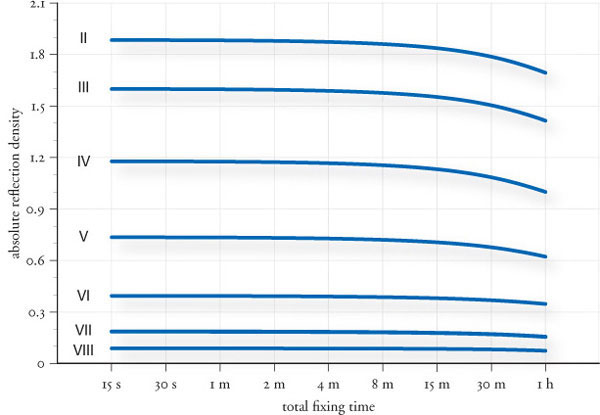
fig.2 Fixing times of 2-4 minutes do not result in any visible loss of density, but excessive fixing times will reduce image densities considerably.

fig.3a Determine the optimum fixing time with a 1x10-inch test strip, marked in 5s increments. Immerse the strip into a fresh fixing bath, starting with the 45s patch, and continue to immerse an additional patch every 5 seconds, while agitating constantly.
Testing for the Optimum Fixing Time
The recommended fixing times, shown in fig.1, have been tested and work well for current Ilford (1 min) and Kodak papers (2 min), but the optimum fixing time depends on the type of emulsion, the type of fixer and the concentration of the fixer. We suggest you use the following test to establish the optimum fixing times for each paper/fixer combination.
1. Cut a 1x10-inch test strip from the paper to be tested. Turn on the room lights, fully exposing the test strip for a minute. Avoid excessive exposure or daylight, as this will leave a permanent stain.
2. Dim the lights, and divide the test strip on the back into patches, drawing a line every inch (fig.3b). Mark the patches with fixing times from ‘45 s’ down to ‘5 s’ in 5s increments. Leave the last patch blank to use as a ‘handle’.
3. Place the whole strip into water for 3 minutes and then into a stop bath for 1 minute to simulate actual print processing conditions.
4. Immerse the strip into a fresh fixing bath, starting with the 45s patch, and continue to immerse an additional patch every 5 seconds, while agitating constantly (fig.3a).
5. Turn the lights on again, and thoroughly wash the test strip for 1 hour under running water to remove all traces of fixer, and tone in working-strength sulfide toner for 4 minutes. Then, wash again for 10 minutes and evaluate.
If the entire test strip is paper-white, all fixing times were too long. If all patches develop some density in form of a yellow or brown tone, all fixing times were too short. Adjust the fixing times if necessary and retest. A useful test strip has two or three indistinguishable paper-white patches towards the longer fixing times (fig.3b). The first of these patches indicates the minimum ‘clearing’ time. Double this time to include a safety factor, allowing for variations in agitation, fixer strength and temperature, and the result is the optimum fixing time. Be careful, however, not to use a fixing time of less than 1 minute, as it is difficult to ensure proper print agitation in less time, and patches of incomplete fixing might be the result. Use the optimum fixing time, but at least 1 minute for each bath, allowing the first bath to be used until archival exhaustion. After all, incomplete fixing is the most common cause for image deterioration.

fig.3b A useful test strip has two or three indistinguishable paper-white patches towards the longer fixing times after processing. The first of these patches indicates the ‘clearing’ time (approximately 30-35 seconds in this example). Double this time to determine the optimum fixing time.

fig.4 Incomplete fixing is detectable by sulfide toning. Process a test strip and apply a drop of working-strength sulfide toner to it for 4 minutes. The toner reacts with silver halides left behind by poor fixing and creates brown silver sulfide. Any stain in excess of a barely visible pale cream indicates incomplete fixing.
a) Working-strength sulfide toner applied to an unprocessed piece of Ilford Multigrade IV FB paper.
b-c) Fixed for 30 and 60 seconds in highly diluted (1+19) rapid fixer.
d) Fixed for 2 minutes in exhausted film-strength (1+4) rapid fixer.
e-f) Two-bath fixed for 1+1 minutes in exhausted+fresh and fresh+fresh film-strength rapid fixer.
Optimum print fixing reduces non-image silver to archival levels of less than 0.008 g/m2, but periodically, a process check is in order. As we have seen, incomplete fixing, caused by either exhausted or old fixer, insufficient fixing time or poor agitation, is detectable by sulfide toning. Apply a drop of working-strength sulfide toner to an unexposed, undeveloped, fixed, fully washed and still damp, test strip for 4 minutes (fig.4). The toner reacts with silver halides left behind by poor fixing and creates brown silver sulfide. Any stain in excess of a barely visible pale cream indicates the presence of unwanted silver and, consequently, incomplete fixing. Compare the test stain with a well-fixed material reference sample for a more objective judgment.
Fixer Capacity
The maximum capacity of the first fixing bath can be determined either by noting how many prints have been processed or, more reliably, by measuring the silver content of the fixer solution with a test solution or a silver estimator. Tetenal’s estimator (fig.5) provides small test papers, similar to pH test strips, to estimate silver thiosulfate levels from 0.5-10 g/l. A test strip is dipped briefly into the fixer solution, and its color is compared against a calibrated chart after 30 seconds. For archival processing, discard the first fixing bath as soon as the silver thiosulfate content has reached 0.5-1.0 g/l. This occurs with images of average print density after each liter of chemistry has processed about twenty 8x10-inch prints. At the same time, the silver thiosulfate content of the second fixing bath is only about 0.05 g/l. For less stringent commercial photography, many printers process up to fifty 8x10-inch prints per liter, allowing the first bath to reach 2.0 g/l silver thiosulfate and the second bath to contain up to 0.3 g/l. These levels are too high for true archival processing.
Hardener
Some fixers are available with print hardener optional or already added. Hardeners were originally added to fixers to aid in releasing the emulsion from ferrotyping drying drums. This type of drier is not popular anymore, because its cloth-backing is difficult to keep clean of chemical residue, which may contaminate the print. The hardener also protects the print emulsion from mechanical handling damage during the wet processes. Unfortunately, toning and archival washing are impaired by print hardener, leading to longer processing times. In our opinion, the disadvantages are not worth the questionable benefit, and consequently, we do not recommend the use of print hardener, unless when using a mechanized print processor whose rollers may cause scratches.

fig.5 Tetenal’s estimator provides small test papers, similar to pH test strips, to estimate silver thiosulfate levels from 0.5-10 g/l. A strip is dipped into fixer, and its color is compared against a calibrated chart.
Toning
Toning converts the image forming metallic silver to more inert silver compounds, guarding the image against premature deterioration due to environmental attack. The level of archival protection is proportional to the level of image silver conversion, and anything short of a full conversion leaves some vulnerable silver behind. ISO 18915, the test method for measuring the resistance of toned images to oxidants, recommends at least a 67% conversion. Nevertheless, toning causes an unavoidable change in image tone and density (see fig.7). In many cases, a pronounced tonal change is desired, because it appropriately supports the aesthetic effects intended. However, an obvious change in image tone and density is not always suitable or wanted. To avoid any tonal and density changes, some printers consider toning an option and rely on post-wash treatments, such as Agfa’s Sistan silver stabilizer, alone. The image silver will likely benefit from the stabilizer, but some toning is certainly better than none. An informed printer makes an educated choice, balancing the aesthetics of tonal and density changes with the benefits of image protection.

fig.6 Sulfide toners effectively convert metallic image silver to the far more stable silver sulfide. Agfa Viradon is a polysulfide toner, mainly used for direct toning. Even short direct toning provides strong image protection with minimal change in image color. Selenium toners convert metallic image silver to the more inert silver selenide and giving a range of tonal effects. Light toning in Kodak Rapid Selenium Toner mildly protects the print, starting with the shadows, without an obvious color or density change. Combination toning with selenium and sulfide is recommended to protect all print tones.
There are three commonly agreed archival toners: sulfide, selenium and gold. Platinum may also deserve to be added to this list, but its high cost is hard to justify, since it does not provide increased image protection in return. Additional toners are available, including iron (blue toner), copper (red toner) and dye toners. However, they are known to actually reduce the life expectancy of an image, compared to a standard B&W print, and consequently, these non-archival toners should only be considered for aesthetic toning purposes.
The exact mechanisms of silver image protection are not completely understood and are still controversial, but the ability of archival toners to positively influence silver image permanence is certain. Nevertheless, many toners contain or produce highly toxic chemicals and some are considered to be carcinogenic. Please follow the safety instructions included with each product.
Sulfide Toning
For aesthetic or archival reasons, sulfide toners have been in use since the early days of photography. They effectively convert metallic image silver to the far more stable silver sulfide. Sulfide toning is used either as direct one-step (brown) toning or as indirect two-step, bleach and redevelop, (sepia) toning. Even short direct sulfide toning provides strong image protection with minimal change in image color. Indirect sulfide toning, on the other hand, yields images of greater permanence, although a characteristic color change is unavoidable. Indirect toning requires print bleaching prior to the actual toning bath. The bleach leaves a faint silver bromide image, which the toner then redevelops to a distinct sepia tone. Several sulfide toners are available for the two different processes:
Indirect Sulfide Toner
1. Sodium sulfide toners, such as Kodak Sepia Toner, are indirect toners. Similar products are available from Photographers’ Formulary and Tetenal. They produce hydrogen sulfide gas (the rotten egg smell), which is a toxin at higher concentrations. It can fog photographic materials and is highly unpleasant, if used without sufficient ventilation. Nevertheless, sulfide was the toner of choice for most of the old masters. The indirect method had the added benefit of lowering the contrast and extending the contrast range. This salvaged many prints, which were not very good before toning, and 100 years ago, variable contrast papers were not available.
2. Odorless toners use an alkaline solution of thiourea (thiocarbamide) to convert the image silver to silver sulfide. They are effective indirect toners and are more darkroom-friendly than their smelly counterparts, but they are still a powerful fogging agent. Odorless toners are available from Fotospeed, Photographers’ Formulary and Tetenal. Some of these products allow the resulting image color to be adjusted through pH control.
Direct Sulfide Toner
3. Polysulfide toners, such as Kodak Brown Toner (potassium polysulfide), Agfa Viradon (sodium polysulfide) and Photographers’ Formulary Polysulfide, can be used for both, direct and indirect toning. These toners also produce toxic hydrogen sulfide gas, as well as the offensive odor that goes along with it. But when direct toning is preferred, they are highly recommended for use on their own or in combination with a selenium toner, as long as adequate ventilation is available.

fig.7 Toning protects the image against premature deterioration, but causes an unavoidable change in image tone and density. In many cases, a pronounced tonal change is desired, because it appropriately supports the aesthetic effects intended. However, an obvious change in image tone and density is not always suitable or wanted. The examples, shown here, illustrate the tonal changes in Agfa Multicontrast Premium RC paper, due to various combinations and levels of archival toning in Kodak Rapid Selenium Toner (KRST 1+19) and/or Kodak Brown Toner (KBT 1+31). An informed printer makes an educated choice, balancing the aesthetics of tonal and density changes with the benefits of image protection.
4. Hypo-alum toners are odorless direct toners. They require the addition of silver nitrate as a ‘ripener’. Consequently, they are not as convenient to prepare as other sulfide toners, and toning can take from 12 minutes in a heated bath up to 12 hours at room temperature. These ‘vintage’ toners give a reddish-brown tone with most papers and are still available from Photographers’ Formulary.
Residual silver halide, left behind by poor fixing, will cause staining with sulfide toners. Furthermore, residual thiosulfate, left behind by poor washing, can also cause staining and even highlight loss with sulfide toners. To avoid staining from residual silver halide or thiosulfate, it is, therefore, essential that FB prints are fully fixed and adequately washed in preparation for, or anticipation of, sulfide toning.
For direct sulfide toning, a preceding 30-minute wash is sufficient. This wash is also required for direct sulfide toning subsequent to selenium toning, as selenium toner contains significant amounts of thiosulfate itself. The bleaching process, required for indirect sulfide toning, calls for a complete 60-minute wash prior to bleaching. Otherwise, residual fixer will dissolve bleached highlights before the toner has a chance to ‘redevelop’ them. Likewise, a brief rinse after bleaching is highly recommended, because the interaction between bleach and toner may also cause staining. Washing minimizes the risk of unwanted chemical interactions between fixer, bleach, and toner.
Indirect toning, after bleaching, must be carried out to completion to ensure full conversion of silver halides into image forming silver. If warmer image tones are desired, it is often tempting to pull the print from the toning bath early, but it is far better to control image tones with adjustable thiourea toners, and tone to completion. Otherwise, some residual silver halide will be left behind, since the toner was not able to ‘redevelop’ the bleached image entirely. This is rare, because indirect toning is completed within a few minutes, but if residual silver halide is left behind by incomplete toning, the print will eventually show staining and degenerate, similarly to an incompletely fixed print.
Some polysulfide toners have the peculiar property of toning faster when highly diluted, and an extremely diluted toner can leave a yellow or peach colored stain in the highlights and the paper base. To remove toner residue quickly and to avoid highlight staining, direct polysulfide toning must be followed by a brief, but intense, initial rinse before the print is placed into the wash. Nonetheless, toning will continue in the wash until the toner is completely washed out. To prevent after-toning and possibly over-toning, or staining of FB prints, a 5-minute treatment in 10% sodium sulfite, prior to washing, must be used as a ‘toner stop bath’. A treatment in washing aid, before the final wash, also acts as a mild toner stop bath, because sodium sulfite is the active ingredient in washing aid. For the same reason, never treat prints in washing aid prior to sulfide toning, as it would impede the toning process.
Sulfide toner exhaustion goes along with an increasing image resistance to tonal change, even when toning times are significantly extended. At that point, sulfide toner also loses some of its unpleasant odor, develops a heavy yellow precipitate in the bottle and becomes distinctly lighter in color.
Selenium Toning
This is a popular fast acting toner, used by most of today’s masters, which converts metallic image silver to the more inert silver selenide and gives a range of tonal effects with different papers, developers, dilutions, temperatures and toning times. Selenium toner has a noticeable effect on the silver-rich areas of the print, increasing their reflection density and, consequently, gently darkening shadows and midtones. This slightly increases the paper’s maximum black (Dmax) as well as the overall print and shadow contrast. For this reason alone, some practitioners make selenium toning part of their standard routine, in an attempt to conserve some of the wet ‘sparkle’, which a wet print undoubtedly has, when coming right out of the wash, but otherwise unavoidably loses while drying. Selenium toners are available as a liquid concentrate from Kodak, Fotospeed and a few others. Due to its high toxicity, we recommend against preparing selenium toner from powders.
Depending on the paper, prolonged use of Kodak Rapid Selenium toner, diluted 1+4 or 1+9, makes a very pronounced effect on paper Dmax and image color. Alternatively, a dilution of 1+19 can be used for 1-4 minutes, at which paper Dmax is still visibly enhanced, but the image exhibits less color change. Light selenium toning mildly protects the print without an obvious color or density change. As toning continues, and starting with the shadows, the level of protection increases and the print tones become darker and warmer in color. To increase image protection, selenium toning can be followed by sulfide toning.
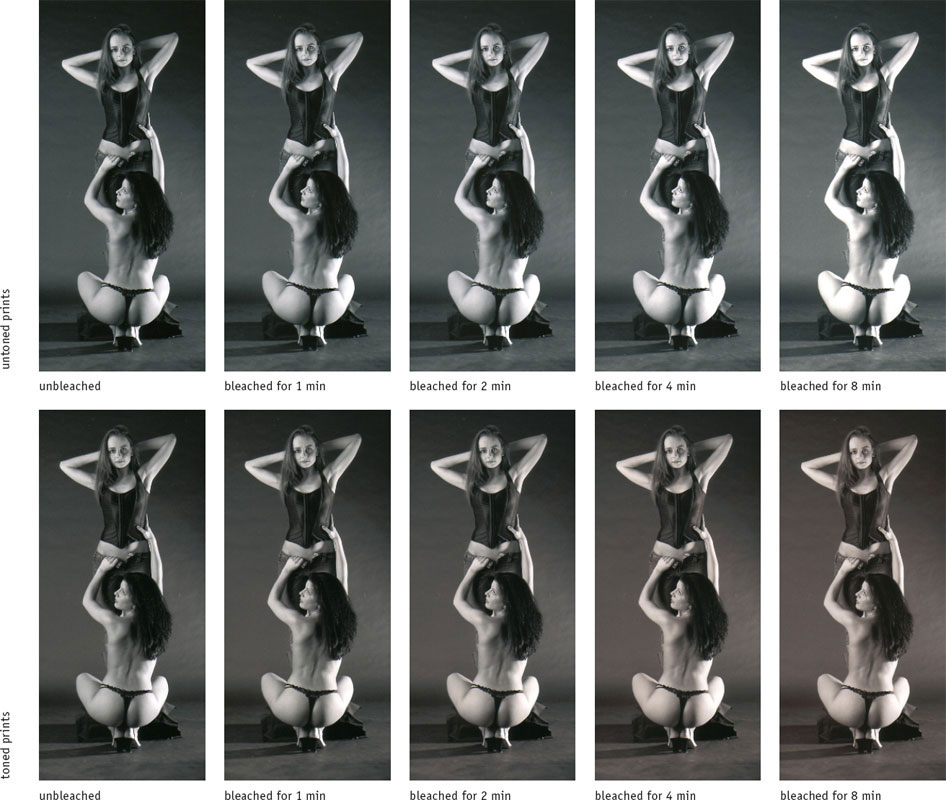
fig.8 The level of archival protection through toning is proportional to the level of image silver conversion, and anything short of a full conversion leaves some vulnerable silver behind. It is possible to test the amount of toning by bleaching out the vulnerable image silver. All images, shown here, are on Agfa Multicontrast Premium RC paper, but the bottom row was toned in Kodak Rapid Selenium Toner (1+19) for 1 minute (protecting the shadows), followed by Kodak Brown Toner (1+31) for 2 minutes (protecting the highlights). The prints were subsequently bleached in a 0.1% solution of potassium ferricyanide for 0-8 minutes and refixed. In the untoned prints, bleaching reduced shadow and highlight density for similar amounts, eventually destroying all highlight detail. In the toned prints, bleaching changed image color and reduced shadow density slightly, but the highlights withstood the bleach well. Toned prints resist bleaching better than the untoned prints.
As with sulfide toners, residual silver halide, left behind by poor fixing, will also cause staining with selenium toners, and prints must be fully fixed before toning. FB prints also benefit from a 10-minute wash, prior to toning, to prevent potential image staining and toner contamination from acid fixer carryover. Prints processed with neutral or alkali fixers do not require a rinse prior to selenium toning.
Selenium toner exhaustion is heralded by heavy gray precipitates in the bottle, the absence of the noxious ammonia smell and the lack of an image change, even when toning times are significantly prolonged.
Gold Toning
Gold toner is a slow, expensive and low capacity toner, which is easily contaminated by selenium or polysulfide toners. The resulting image is stable and, in contrast to sulfide toner, ‘cools’ the image with prolonged application towards blue-black tones. Process recommendations vary from 10 minutes upwards. Gold toning, in combination with selenium or polysulfide toning, can produce delicate blue shadows and pink or orange-red highlight tones.
Some gold toners generate silver halide and, therefore, require subsequent refixing to ensure image permanence. Nelson’s Gold Toner specifically requires such refixing. If refixing is skipped, the print will eventually show staining and degenerate, similar to an incompletely fixed print. The subtlety and limited working capacity of gold toner inhibits its exhaustion detection, and therefore, it is often reserved for prints requiring a specific image tone, rather than being used for general archival toning.
Combination Toning
Strong image protection is achieved through a combination of selenium and polysulfide toning, which converts the image silver to a blend of silver selenide and silver sulfide, protecting all print tones. Combination toning can be carried out by mixing polysulfide and selenium toner, creating a combination toner, or by simply toning sequentially in each toner.
When preparing a selenium-polysulfide toner, final image tones can be influenced by the mixing ratio. Kodak recommends a working-strength selenium-to-polysulfide ratio of 1:4 for warm image tones. Adding 1-3% balanced alkali will stabilize the solution; otherwise, consider the mixture for one-time use only. As with plain, direct polysulfide toning, prints must be fully fixed and washed for 30 minutes prior to combination toning, which is in turn followed by an intense rinse and a washing aid application, before the print is placed into the final wash.
When using selenium and polysulfide toners sequentially, final image tones depend on toning times, as well as the toner sequence. A very appealing split-tone effect can be achieved when selenium toning is applied first. The selenium toner will not only darken the denser midtones and shadows slightly, but it will also shift these image tones toward a cool blue and protect them from much further toning. This will leave the lighter image tones, for the most part, unprotected. The subsequent polysulfide toner then predominantly tones these, still unprotected, highlights and lighter midtones, shifting them toward the typical warm, brown sepia color. This, in turn, has little consequence for the already selenium-toned, darker, blue image tones. The result is an image with cool blue shadows and warm brown highlights. This split-tone effect is most visible at the highlight to shadow borders and can be controlled with different times in each toner. As a starting point, try a selenium-to-polysulfide ratio of 1:2 at 2 and 4 minutes, respectively. For this toning sequence, prints must be fully fixed and washed for 10 minutes prior to selenium toning, and they must be washed again for 30 minutes prior to polysulfide toning, which is then followed by an intense rinse and washing aid, prior to the final wash.
When the split-tone effect is undesired or does not support the aesthetic intent of the image, the toning sequence may be reversed, and polysulfide toning is done first. Fig.7 illustrates some of the appearance differences achievable with plain or combination toning. When selenium toning is done last, prints must be fully fixed and washed for 30 minutes prior to polysulfide toning, which is followed by an intense rinse, washing aid, selenium toning, wash aid again and, ultimately, the final wash.
Washing
A fixed, but unwashed, print contains a considerable amount of thiosulfate, which must be removed to not adversely affect later processing operations and to optimize the longevity of the silver image. Even if the print was already washed prior to toning, the remaining thiosulfate levels are still far too high for archival image stability, and some toners, for example selenium toner, contain thiosulfate themselves. The principal purpose of archival washing is to reduce residual thiosulfate to a concentration of 0.015 g/m2 (0.01 mg/in2) or less, including the usually small, but not negligible, amount of soluble silver thiosulfate complexes, which otherwise remain in the paper.
The process of print washing is a combination of displacement and diffusion. Just prior to the wash, a relatively large amount of excess fixer is gently clinging to the print through surface adhesion. An initial, brief but rapid, rinse in water quickly displaces this excess fixer, simply washing it off the surface. However, there is still plenty of thiosulfate left in the print, and this is a bit harder to get rid of. It has been deeply absorbed by the emulsion and saturates the print fibers. The remaining thiosulfate can only be removed by the process of diffusion (fig.9).
As long as there is a difference in thiosulfate concentration between the print and the wash water, thiosulfate will diffuse from the print into the water. This gradually reduces the thiosulfate concentration in the print and increases it in the wash water. Diffusion continues until both are of the same concentration and equilibrium is reached, at which point no further diffusion takes place. Replacing the saturated wash water entirely with fresh water repeats the process, and a new equilibrium at a lower residual thiosulfate level is obtained. However, diffusion is an exponential process that decreases geometrically with time. This means that the rate of diffusion slows down rapidly towards the equilibrium. Print washing is quicker if the wash water is not entirely replaced in certain intervals, but slowly displaced with a constant flow of fresh water across the print surfaces, keeping the concentration difference, and therefore the rate of diffusion, at a maximum during the entire wash. Other essential elements for effective washing are the use of washing aid, water replenishment and temperature.
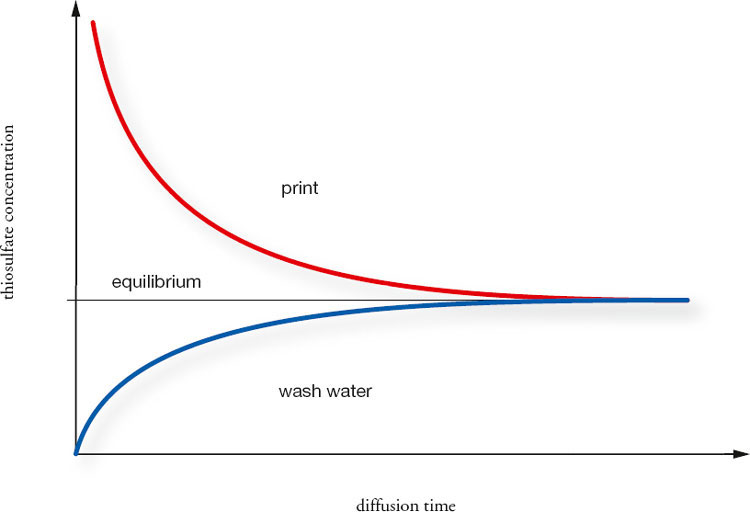
fig.9 As long as there is a difference in thiosulfate concentration between the print and the wash water, thiosulfate will diffuse from the print into the water. This gradually reduces the thiosulfate concentration in the print and increases it in the wash water. Diffusion continues until both are of the same concentration and equilibrium is reached, at which point no further diffusion takes place.
Thiosulfate diffuses from the print emulsion, during washing, with relatively little resistance. Paper fibers and the baryta layer, on the other hand, have a tendency to adsorb residual thiosulfate, which can render washing into a rather sluggish process. This is firstly a reason to keep fixing times as short as possible, and secondly, it is a reason to use washing aids. Washing aids, also known as hypo-clearing agents, are marketed by Ilford, Kodak, Tetenal and others. These products help to desorb thiosulfate and improve washing efficiency. Washing aids are not to be confused with hypo eliminators, which are no longer recommended, because ironically, small residual amounts of thiosulfate actually provide some level of image protection. In addition, hypo eliminators contain oxidizing agents that may attack the image. There is little danger of over-washing FB prints without the use of hypo eliminators. However, over-washing is a risk with some RC papers, and the use of washing aid is, therefore, discouraged for RC processing. Nevertheless, with FB prints, the use of a washing aid is highly recommended, because it conserves water, reduces the total processing time by about 50%, and it lowers residual thiosulfate levels below those of a plain wash (see fig.10). Its use increases washing efficiency in cold wash water and overcomes some of the wash retarding effects of hardener. Processing times vary by product, but all washing aids dramatically reduce the archival washing time, also limiting the potential loss of optical brighteners from the paper.
Residual Thiosulfate Limits
for Archival Processing of
Photographic Papers
(in various units)
0.015 g/m2
15.0 mg/m2
0.15 mg/dm2
0.0015 mg/cm2
1.5 µg/cm2
__________
0.01 mg/in2
10.0 µg/in2
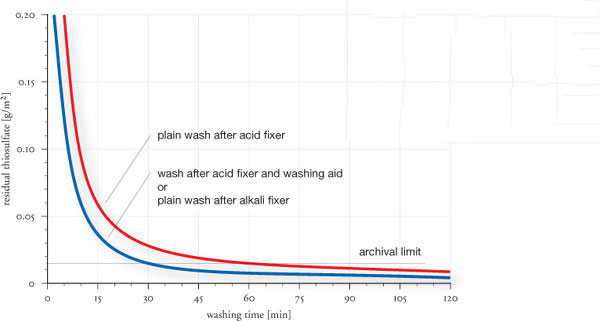
fig.10 The use of washing aid is high ly rec om mend ed when using acid fixers. It con serves wa ter, re duc es the to tal pro cess ing time by about 50% and lowers residual thio sul fate levels be low those of a plain wash.
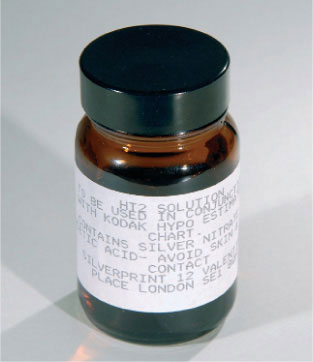
fig.11 Residual thiosulfate, left by the washing process, can be detected with Kodak’s light sensitive silver nitrate solution HT2.
Water replenishment over the entire paper surface is essential for even and thorough washing. Washing a single print in a simple tray, with just a running hose or an inexpensive Kodak Print Siphon clipped to it, is effective archival washing, as long as the print remains entirely under water, but washing several prints this way would take an unreasonably long time. When many prints require washing at the same time, it is more practical to use a multi-slot vertical print washer, such as those made by Calumet, Gravity Works, Nova, Zone VI and many others. They segregate the individual prints and wash them evenly, if the correct water flow rate is controlled effectively. However, water flow rates can be kept relatively low, since the rate of diffusion is the limiting factor of thiosulfate removal. The flow of water only needs to be sufficient to replace the entire volume of water every 5-8 minutes. Increasing water flow will not speed up print washing but may introduce unwanted turbulence patterns, which will cause uneven print washing!
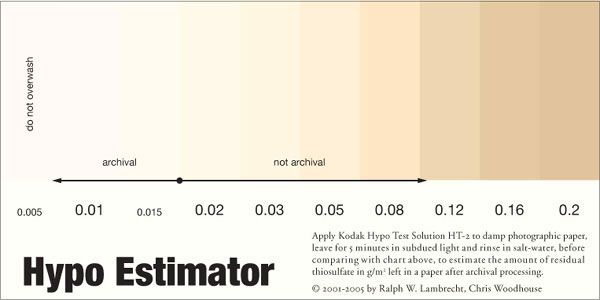
fig.12 Residual hypo can be detected with Kodak’s hypo test solution, which is applied to the print border for 5 minutes. The color stain left by the solution is an indicator of the hypo level in the paper. Compare the color stain with this chart to estimate residual thiosulfate levels.
Be aware of a few pitfalls, when using a vertical print washer. The emulsion side of the paper can stick to the smooth wall of the washing chamber, or dividers, and never get washed! Only use textured dividers in vertical print washers, and make sure that the textured side is always facing the emulsion side of the paper. Also, most print washers have dividers tall enough to be head and shoulders above the water level. When a print is submerged, some excess fixer is caught on the top edge of these dividers and is inadvertently wiped onto the clean print again when it is pulled from the wash. Hose down the top edge of the dividers after a print is inserted, to avoid its re-contamination.
Washing efficiency increases with water temperature, and a range of 20-27°C (68-80°F) is considered to be ideal. Higher washing temperatures will soften the emulsion beyond safe print handling. On the other hand, if you are unable to heat the wash water, and it falls below 20°C (68°F), the washing time should be increased, and the washing efficiency must be verified through testing. Avoid washing temperatures below 10°C (50°F). Also, research by other authors indicates that washing efficiency is increased by water hardness. Soft water may be good for household plumbing, but it is not a good medium for print washing.
Testing Washing Efficiency
Residual thiosulfate, left by the washing process, can be detected with Kodak’s HT2 (hypo test) solution (fig.11). The test solution is applied for 5 minutes to the damp print border. The color change is an indicator of the residual thiosulfate level in the paper. Compare the color stain, caused by the test solution, with fig.12 to estimate the residual thiosulfate levels and their limits to satisfy archival standards. HT2 contains light sensitive silver nitrate. Consequently, the entire test and its evaluation must be conducted under subdued tungsten light. If you need to keep your tests for later evaluation, rinse the test area in salt water to stop further darkening.
We also recommend verifying the evenness of your print washing technique with a whole test sheet. Fix and wash a blank print, noting the washing time, water temperature and flow rate. Apply the test solution to the wet sheet in five places, one in each corner and one in the center. After 5 minutes, compare the spot colors with the chart in fig.12, and compare their densities as an indicator for even washing.
The washing efficiencies in fig.10 are our own test results, based on research by Martin Reed of Silverprint and published in his article ‘Mysteries of the Vortex’ in the July/Aug and Nov/Dec 1996 edition of Photo Techniques. The test chart in fig.12 is based on a Kodak original, but the stain colors are based on our own research with currently available chemicals and papers. In these investigations, we also measured the washing performance of prints fixed in alkali and acid fixers of similar thiosulfate concentrations, with and without a consecutive treatment in washing aid. In all cases, prints fixed with alkali fixer, followed by just a plain wash, had the same washing performance as prints fixed with acid fixer and treated in washing aid.
Image Stabilization
Agfa markets a silver-image stabilizer product called ‘Sistan’ (fig.13). It contains potassium thiocyanate, which provides protection, in addition to toning, in two ways. First, it converts residual silver halides to inert silver complexes, and while remaining in the emulsion, it converts mobile silver ions, created by pollutants attacking the silver image, to stable silver thiocyanate during the print’s life. The resulting silver compounds are transparent, light insensitive and chemically resistant thus protecting the image beyond toning. Alternative products are Fuji AgGuard and Tetenal Stabinal. Their main ingredients are different from Sistan’s, to which our experience is limited.
Silver image stabilizers are applied in a brief bath after archival washing. After this treatment, the print is not to be washed again. The stabilizer solution remains in the emulsion ready to react with any oxidized silver to prevent discoloration. Silver image stabilizers are not a replacement for toning, but offer additional image protection.
Print Drying and Flattening
With the conclusion of the last wet process, the print is placed onto a clean and flat surface draining into the sink. Any excess liquid must be safely removed from both sides of the print to avoid staining. A window squeegee and an oversized piece of glass from the hardware store make perfect tools for this step. However, for safe handling, the glass must be at least 1/4 inch, or 6 mm, thick, and all sharp edges must be professionally ground to protect your hands and fingers from nasty cuts. In addition, make sure that your hands and equipment are clean at all times, and handle the print slowly and carefully. The paper and emulsion are extremely sensitive to rough handling while wet, and kinks and bends are impossible to remove.
To dry prints sensibly, place FB prints facedown, and RC prints faceup, on clean plastic-mesh screens. RC prints dry easily within 10 minutes at ambient temperatures. FB prints are dried either at ambient temperatures, within 2-4 hours (fig.14), or in heated forced-air industrial driers within 30 minutes. If space is at a premium, hang the prints on a line to dry. Use wooden clothespins to hold them in place, but remember that these will leave minor pressure marks and possible contamination on the print. Consequently, this method requires that the print be trimmed before mounting or storage. Film hangers or plastic clothespins will not contaminate the print, but depending on their design, may leave objectionable pressure marks or trap humidity.

fig.13 Agfa’s silver image stabilizer

fig.14 A dry print soaks up enough liquid to almost double its weight, while going through wet processing. Simply letting excess liquid drip off, for a few seconds, loses about half of that weight gain, and a final wipe reduces it further. The remaining damp print dries within 2-4 hours at normal ambient conditions.

fig.15 This untoned, and therefore unprotected, RC print shows significant signs of discoloration after only 17 years.
After drying, RC prints lay extremely flat, but FB prints have an unavoidable, natural curl towards the emulsion side of the paper. The amount of curl differs by paper brand, but if considered intolerable, it can be reduced with some attention to the drying technique applied. Dry prints at ambient temperatures, because curling increases with drying speed (and toned images may lose color). Place FB prints facedown to dry, as the weight of the wet print works against the curl, or hang two prints back-to-back with clothespins at all four corners, as the two curls will work against each other.
The techniques above will reduce, but not eliminate, the natural curl of FB prints. To store or mount prints, further print flattening is often required. One simple and moderately successful method is to place dry prints individually, or in a stack, under a heavy weight for a day or two. A thick piece of glass, laden with a few thick books, makes for an effective weight without contaminating the prints. Another outstanding and expeditious practice to flatten numerous dry prints is to place them sequentially into a heated dry-mount press, for a minute or two, and then, leave them to cool under a heavy sheet of glass for several minutes.
An alternative approach is to utilize gummed tape and affix the still damp print to a sheet of glass, where it is left to dry. This type of tape can be purchased wherever framing supplies are sold, as it is also used for matting prints. For this technique to work, print the image with a large white border, and wipe the print, front and back, to remove any excess liquid. Place the print faceup onto the clean sheet of glass, moisten a full-length piece of tape and secure one print border to the glass. Repeat this for the remaining print borders and leave the print to dry overnight. The next day, cut it loose and remove the taped borders by trimming the print. While drying, the shrinking paper fibers are restrained and stretched by the tape, leaving a perfectly flat print, ready for storage or presentation.
Print Deterioration
From the instant of its creation, a silver-based image faces attack from a variety of sources. Some are internal and essential to the materials photographic papers are designed and manufactured with. They come in the form of chemicals, inherent or added to the paper, the emulsion or the coating. They either are a fundamental part of the paper characteristics or meant to improve them.
Other sources of attack are of external origin. Nevertheless, some are intrinsic to the photographic process and can be minimized but not completely avoided. Most processing chemicals fall into this category. In the very beginning of a print’s life, and only for a few minutes, we need them to be present to complete their designated tasks. Beyond that point, we like to rid the print of them quickly and entirely. Fortunately, these sources of image deterioration are under our control, but no matter how attentive our work might be, unavoidable traces of them will remain in the print forever, and given the right environmental conditions, they will have an opportunity to attack the very image they helped to create.
The remaining extrinsic sources of image attack are hiding patiently in our environment, ready to start their destructive work as soon as the print is processed and dry. They can broadly be separated into reducing and oxidizing agents. Roughly until the introduction of the automobile, reducing agents were the most common sources of image deterioration. Then, oxidizing agents like aldehyde, peroxide and ozone took over. Their presence peaked in the Western World around 1990 and fortunately began to decline since.
The print in fig.15 illustrates common contemporary image deterioration. It is a photograph of Ralph’s 10-month-old daughter, Alyssa. This RC print spent 17 years framed under glass, partially covered by an oval overmat and displayed in an interior hallway, away from direct sunlight. Where protected by the mat, it is fine, but where exposed to light, image discoloration is clearly visible. This is due to oxidation of the metallic image silver, caused either by internal oxidants from poor washing or by environmental gases, as found in atmospheric oxygen, ozone, curing paint and adhesive, new carpet, fossil fuel fumes, the resins from processed particle board and unfinished wood.
Image oxidation follows a pattern. Initially, image silver is oxidized into silver ions. Then, these mobile silver ions, supported by humidity and heat, migrate through the gelatin layer and, when the concentration is high enough, accumulate at the gelatin surface. Finally, the silver ions are reduced to silver atoms, which combine to colloidal silver particles. They are brownish in color, as seen around the shoulder strap, but at the print surface and viewed at a certain angle, they are visible in the form of small shiny patches. This more advanced defect is referred to as ‘mirroring’, and it occurs exclusively in the silver-rich shadows of the print.
There is evidence that RC prints are more susceptible to image oxidation than FB prints. One possible reason is that the polyethylene layer between emulsion and paper base in RC prints keeps the mobile silver ions from dissipating into the paper base, as they can in FB prints. In RC prints, the ions are more likely to travel to the emulsion surface, since they have no other place to go. Another reason for RC image oxidation is that light absorption by the titanium dioxide pigment in the polyethylene layer can cause the formation of titanium trioxide and oxygen. This will increase the rate of silver oxidation if the prints are mounted under glass, preventing the gases from escaping. As a preventive measure, modern RC papers made by the major manufacturers contain antioxidants to reduce the chance of premature oxidation. Proper toning and image stabilization practice will help to protect against image deterioration!
Print Storage
Besides emphasizing the importance of careful processing, the print in fig.15 also illustrates the difference between light and dark storage in regard to print longevity. It takes little imagination to still make out the border of the removed oval overmat. A print stored in the dark has a much longer life expectancy than a print stored in similar temperature and humidity conditions but exposed to light. Therefore, prolonged exposure to light, and especially ultraviolet radiation, presents one of the dangers to print survival. This does not mean that all prints must be stored in the dark and should never be displayed, but it does mean that all prints destined for long-term display must be processed with the utmost care, and the print in the family album is more likely to survive the challenges of time than the one exposed to direct sunlight. However, the latter may not be true if the album is made from inferior materials or is stored in an attic or a damp basement, because other significant dangers to print longevity are the immediate presence of oxidants, non-acid-free materials and extreme levels and fluctuations of humidity and temperature.
A summary of the most important processing, handling and storage recommendations follows. Simple, reasonable care will definitely go a long way towards image stability and longevity.
Print Processing, Handling and Storage Recommendations
1. Prints should only be processed in fresh chemicals. Without exception, they must be well fixed, protectively toned, thoroughly washed and stabilized.
2. Minimize print handling, and always protect finished prints from the oils and acids found on bare hands by wearing clean cotton, nylon or latex gloves. Avoid speaking while leaning over prints.
3. Store valuable prints in light-tight, oxidant and acid-free storage containers, or mount them on acid-free rag board, protected by a metal frame and glass, if destined for frequent display.
4. The storage or display environment must be free of oxidizing compounds and chemical fumes. Before redecorating a room (fresh paint, new carpet or furniture), remove prints and store them safely elsewhere for at least 4-6 weeks, before they are brought back.
5. Store or display prints at a stable temperature at or below 20°C (68°F) and at a relative humidity between 30-50%. Do not use attics (too hot) or basements (too damp) as a depository for photographic materials. Store prints in the dark, or when on display, minimize the exposure to bright light to the actual time of exhibition, and always protect them from direct exposure to daylight.

fig.16 Four prints were produced from the same negative. They were treated differently to test for archival influence of various processing steps. They were all mounted and framed within an hour and are constantly exposed to natural light. This test is likely to last several decades.
Our print storage recommendations above are not nearly as strict as standard operation procedures for a museum, conservation center or national archive would demand. Nevertheless, they are both practical and robust enough to be seriously considered by any discerning amateur willing to protect, and occasionally exhibit, valued prints at the same time. A concerned curator is obliged to verify that all photographic enclosures meet the specifications of ANSI/PIMA IT9.2-1998 and that they have passed the Photographic Activity Test (PAT), as specified in ANSI/NAPM IT9.16-1993. Regular consumers can contact their suppliers to confirm that their products satisfy the above standards.
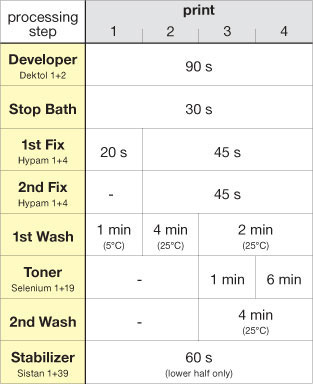
fig.17 Different processing steps provided prints ranging from poorly processed and unprotected to well processed and well protected.
Image Permanence
Archival processing is preparation for an unknown future. If it is done well, the print will most likely out-last the photographer who processed it. On the other hand, if it is done carelessly, or just plain sloppily, then the print may look fine for years, or decades, before deterioration suddenly becomes evident. There is research evidence that modern environmental conditions can shorten the life of a print, even when processed perfectly. And of course, we have no idea how the chemical cocktail of future environments will affect new and old silver-based images, making any prediction about a print’s potential life expectancy problematic, or at best, demoting them to professional guesswork. Also, the print’s long response time to processing errors or environmental attack makes reliable process and storage instructions difficult, if not impossible, and all too often highly argumentative. We can only build on the experience of previous photographic generations and combine this with reasonable disciplines, which are based on the current understanding of the underlying chemical and physical principles. That is the purpose of this chapter and the most sensible way to deal with image protection and permanence.
Nevertheless, a few simple experiments can give some insight to the severity of processing errors and to the effectiveness of recommended preventions. Fig.8 illustrated a standard bleach test to verify toning efficiency, and fig.16 shows a long-term experiment in progress, involving four identical RC prints, made from the same negative but with very different processing details after development and stop bath (fig.17).
Print 1 is the result of an attempt to create a worst-case scenario by processing the image as poorly as possible. The time in exhausted fixer was clearly too short to remove all residual silver halides, and the brief cold wash is highly unlikely to have removed enough thiosulfate to secure any reasonable image stability. We expected this print to be the first to show signs of deterioration. Print 2 represents finest commercial processing. The residual silver was properly removed with two fixing baths, and the warm wash was long enough to reduce thiosulfate levels to acceptable amounts for an RC print. However, no subsequent protective sulfide or selenium toning was performed, which leaves the image silver without any protection against environmental influences.
Print 3 has the additional benefit of a mild selenium toning and an even longer wash without over-washing. Assuming current wisdom to be correct, this print should have a life expectancy of several decades, outperforming color photographs displayed under similar conditions. Print 4 goes a step further by increasing the toning time to a point where even the highlights experience a visible color change. Esthetically, this is not everybody’s taste, but from an archival viewpoint, it promises increased print protection. One can only do better with the previously mentioned combination toning, using both sulfide and selenium to fully protect all print tones and using FB papers.
As a final processing step, the bottom half of all prints were treated in Agfa Sistan. This test is designed to eventually reveal the effectiveness of silver-image stabilizer protection for poorly and well-processed prints. Until then, we highly recommend them for RC and FB prints. The prints were mounted and matted with acid-free museum board and framed under glass within an hour from processing. The following day, they were displayed on a windowsill, facing out and south, where they have been ever since.
These prints were processed, mounted and framed in January 2001. Since then, they received a daily exposure to sunlight and seasonal temperature fluctuations. In early 2008, the highlights in the upper half of print 1 developed a hardly visible, light-brown stain. At the time of this writing, in January 2010, these highlights are clearly stained, and print 2 shows a similar deterioration but to a much lesser degree. However, in each case, there is a sharp dividing line to the lower half of the print, which was treated in Sistan and shows no sign of degradation. Print 3 and 4 look as well as they did the day these prints were made.
This test is no proof that toned prints (3 and 4) will last forever, but it does verify that a badly fixed and washed print (1) has only a short life expectancy. It also indicates that otherwise proper print processing, but without the protection of toning (2), is not enough to promise reasonable image stability. This test will be continued to evaluate the difference in image protection between light (3) and full (4) toning, and the test may also reveal how long Sistan is able to protect poorly processed RC prints.
Print deterioration is a quietly ticking time bomb. There may be no visible evidence for years, or even decades, but the unstoppable damage is slowly and secretly progressing inside the emulsion layer. As soon as the first signs of decay become perceptible, the cherished print will quickly lose its initial appeal and may only be kept as a record or for its sentimental value. Once the damage is done, it is impossible to repair it. An ounce of prevention is worth a pound of cure.
Additional Research
Obtaining assurances and reliable longevity statements from photographic manufacturing companies is difficult, although Crabtree, Eaton, Muehler and Grant Haist of Kodak, have published maximum fixer capacities for commercial and archival printing. Valuable information also comes from more recent research reported by Larry H. Feldman, Michael J. Gudzinowicz, Henry Wilhelm of the Preservation Publishing Company, James M. Reilly and Douglas W. Nishimura of the Rochester Institute of Technology (RIT) and the Image Permanence Institute (IPI) and by the ISO Working Group. Leading photographers have publicly challenged some claims for silver image stability. Nevertheless, their findings also show that silver image stability is improved with two-bath fixing, toning, thorough washing and the final application of an image stabilizer.

fig.18 After being framed behind glass for nine years, with daily exposures to sunlight and seasonal temperature fluctuations, residual chemicals, left behind by poor fixing and washing, created an unsightly yellow stain in the upper half of print 1. Proper print processing and light selenium toning protected print 3 from the same kind of print deterioration. However, print 1 shows a sharp dividing line between the upper and lower half, which was treated in Sistan and exhibits no sign of degradation.
The research on silver image stability will continue. However, past findings have often been proven wrong and improved. Unfortunately, questionable advice has often turned into persistent myth. Ironically, the most vocal companies claiming high archival print standards are those offering inkjet products. Although current inkjet prints cannot outlast an archivally processed FB print, these companies continue to claim for their products to have a lifetime similar to Leonardo da Vinci’s sketchbook. Our tests prove these claims to be unreliable, with carbon-based monochrome prints visibly fading within six months.
Claims of archival lasting prints are based on accelerated testing and not actual natural age. Accelerated testing is usually run under high humidity, high temperature and high light levels. These tests may serve as an indicator and comparator, but it would be naive to expect reliable, absolute print life predictions from their results, even though current lifetime predictions are typically based on accelerated testing and the results are prone to interpretation. This is especially true of monochrome prints made with colored inks, for the brain can detect even the most subtle change in image tone with ease.
We cannot claim that our advice or current wisdom is the final word in archival print processing. However, we are confident that processing a FB print according to our recommendations will significantly increase its chance for survival, while protecting the memories and feelings it has captured. RC prints definitely benefit from similar procedures, and modern RC papers, made by Ilford and others, rival the stability of FB papers. However, until we have the true, actual natural-age data for resin-coated papers to confirm their stability, fiber-base papers remain the best choice for fine-art photography.
Review Questions
1. Which of the following is true about f/stop timing?
a. requires a dedicated enlarger timer
b. makes better prints
c. only works in combination with print maps
d. creates test strips with even exposure increments
2. Which of the following is true about print contrast?
a. is controlled by print exposure
b. is independent of paper surface
c. is the density difference between highlights and shadows
d. should be controlled with development time
3. What are the characteristics of a properly exposed print?
a. the highlights have the correct appearance
b. all shadows show sufficient detail
c. the highlights are pure white
d. the midtones are 18% gray
4. What is dodging and burning used for?
a. to rescue a print
b. to emphasize image features and optimize print appearance
c. to change the contrast with fixed-grade papers
d. not required with perfect negatives
5. Which of the following is false?
a. fix as long as you must but as short as you can
b. incomplete fixing can be detected with sulfide toner
c. selenium and sulfide toning improve print longevity
d. the purpose of washing is to remove all residual fixer
6. Which of the following is the best practise for archival processing?
a. two-bath fixing
b. the use of hypo eliminators
c. soak prints overnight in running water
d. a water softener should be used to reduce wash times
7. Which is the most reasonable print storage recommendation?
a. store prints as cold as possible, freezing them is best
b. store prints in the dark and only present them in dim light
c. use a protective spray and seal prints in plastic envelopes
d. store at 20°C between 30-50% humidity in acid free containers
1d, 2c, 3a, 4b, 5d, 6a, 7d