
Windows 8 takes an app-first approach to managing files. If you want to view your photos, open the Photos app. To find your music, open the Music app.
This approach is very different from how you managed files in Windows 7. In Windows 7, most users ran Windows Explorer to access files of any type. For example, to view your photos in Windows 7, you use Windows Explorer to browse to the Pictures library. Then, to view a specific picture, you double-click it, and Windows opens the file in Windows Photo Viewer. The same process applies to finding your music: open the Music folder in Windows Explorer, and then double-click a song to open it in Windows Media Player.
Because in Windows 7 you use Windows Explorer to manage files of every type, it can become rather complicated. You can use Windows Explorer to add tags to your photos or associate a song with a different artist, but it isn’t necessarily the easiest or most efficient way to do it. Photos deserve their own app with a specialized user interface, and so do music, videos, and every other type of file you use.
This chapter describes the most useful concepts of file management for Windows 8.1. I’ll show you how to manage, compress, and protect your files, folders, and libraries in the File Explorer desktop app (previously known as Windows Explorer, which many users accessed by clicking Computer or Documents). I’ll also show you how to find lost files and how to free up space on a full disk. I won’t, however, show you every aspect of using File Explorer. If you were a Windows 7 user, you already know how, and if you’re new to Windows 8.1, you’ll never need to learn.
The Windows 8.1 app-first approach to file management makes sense. When you use many apps designed for Windows 8.1, you don’t even need to know which file system folders the data is stored in, and you certainly don’t need to understand how to view file metadata, group files, or change the thumbnail size. The individual apps know best how to organize files of that type, and they hide the underlying file system structure from the user.
You can still take a file-first approach in the Windows 8.1 interface: open the Search charm and search for files. For most users, searching is a quicker and more accurate way of finding files than browsing the relatively complex file system.
Of course, for those of us comfortable with the file system, File Explorer is still available on the desktop. In fact, as described in Chapter 2, the user interface has been significantly improved. To open File Explorer, simply launch the Desktop from the Start screen, and then click the pinned File Explorer window on the taskbar. (It looks like a yellow folder.)
When you use Windows 8.1 apps and everything works like it is supposed to, you really don’t need to understand how a file system works. For those of us who still use desktop apps or who want to understand the inner workings of an operating system, this section provides an overview of basic file system concepts.
Windows 8.1 uses a file system called NTFS. NTFS stands for New Technology File System, which was a completely appropriate name when the file system was originally released in 1993. NTFS is old enough to vote now, but Microsoft has regularly added new features to keep it up to date.
Note
Windows 8.1 should automatically fix most file system corruptions. For more detailed information, refer to Chapter 12.
NTFS uses a hierarchy of folders inside other folders, including C:Users<username>My Documents, which is your documents folder, and C:Windows, which (by default) stores your Windows system files. Each folder can contain files and other folders. Figure 9-1 shows a portion of the file system tree of the C drive in File Explorer.

File names can be long (up to 255 characters) and contain some special characters, such as spaces and parentheses. File names can’t contain other characters, including slashes, backslashes, and asterisks (*). You can type file names in uppercase and lowercase, such as MyFile.txt, and Windows remembers the case you used. However, file names aren’t case sensitive, so if you later attempt to open myfile.txt without using the uppercase letters, it still works.
File names almost always end with an extension that indicates the file type and which app the file should be opened with. For example, many image files have a .jpg extension (for example, MyPicture.jpg), and Windows knows to open .jpg files with the Photos app. Text files often have a .txt extension (such as MyTextFile.txt), and Windows opens .txt files in Notepad by default. Chapter 2 describes how to change which app opens a specific file type by default.
File Explorer hides file name extensions by default, but it’s very useful to see them. To show file name extensions, select the View tab in File Explorer, and then select File Name Extensions, as shown in Figure 9-2.

Besides names, files and folders have attributes. Attributes control some aspects of how Windows interacts with a file. The most commonly used attributes are:
Hidden. Prevents a file from being displayed by default. Hiding a file isn’t at all secure; you can show hidden files in File Explorer by selecting the View tab and then selecting the Hidden Items check box. I describe how to protect files later in this chapter.
Read-only. Indicates that a file shouldn’t be changed or deleted. This attribute also shouldn’t be trusted; any app or user can overwrite read-only files. Most apps provide an extra warning if a file is read-only. Some apps don’t allow you to overwrite a read-only file. You need to go to File Explorer to remove the read-only attribute.
Compressed. Compresses a file so that it consumes less disk space. When you compress a folder, you can compress all files within that folder. Accessing compressed files can be a little slower than accessing noncompressed files, but if there’s any performance impact, you probably won’t notice it. Compression is always lossless, which means that your file contents aren’t changed in any way; the original data is still stored in its entirety, it’s just stored a little more efficiently. It won’t do you any good to compress image, music, or video files, but text files and documents become much smaller when they’re compressed.
Encrypted. Encrypts a file so that only authorized users can access it, even if they bypass Windows by connecting the hard disk to another computer. Encrypting files is discussed in more detail later in this chapter.
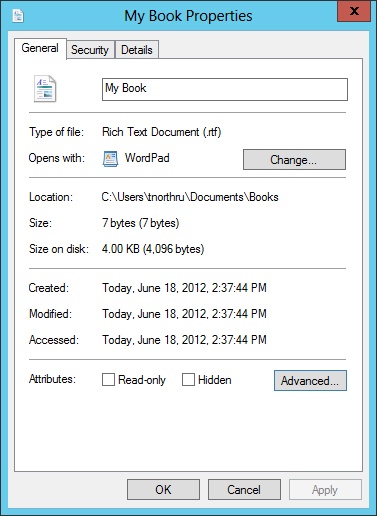
To modify a file’s attributes, right-click the file in File Explorer and then click Properties. The General tab gives you check boxes for Read-Only and Hidden, as shown in Figure 9-3. To modify the compressed or encrypted attributes, click the Advanced button.
Libraries are collections of folders that make it easy to find files in different places. You use libraries all the time, even though you might not be aware of them.
For example, Documents, Pictures, Music, and Videos are all libraries, even though they behave very similarly to folders. Each library, by default, contains two separate folders: a private and a public folder.
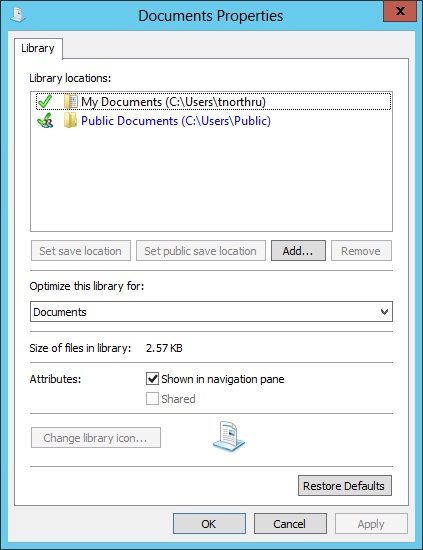
Figure 9-4 shows the properties for the Documents library (which you can view by right-clicking Documents in File Explorer and then clicking Properties). As you can see, my Documents library contains two different folders: C:Users northruDocuments (my private documents folder) and C:UsersPublicDocuments (the public documents folder that all users on my computer can access).
As you can see by the check mark in Figure 9-4, your personal Documents folder is set as the default save location. Therefore, any newer Windows apps will automatically save your documents in this folder. Different file types, such as music, pictures, and videos, will be saved in the appropriate library’s save location. You can select a different folder as your default location by selecting the folder and then clicking Set Save Location.
Here’s why libraries are useful: you can access and search multiple folders as if they were a single folder. For example, if you run out of room on your C drive, you could buy a USB drive and connect it to your computer, create a new Documents folder on it, and then add that folder to your library. If you want new files to be saved to your external drive by default, select the new folder and then click Set Save Location.
Similarly, if you decide to move all your documents to a different drive, just move your Documents folder to the new drive, add the new folder to the library (and set it as your default save location), and then remove the old folder from the library.
Inside OUT: Creating custom libraries
I don’t recommend creating custom libraries; Windows won’t know about them or use them by default. It’s better just to add folders to the existing libraries.
However, if you find a need to create a custom library, right-click Libraries in File Explorer, point to New, and then click Library. Then, right-click and select Properties to configure the library. As shown in Figure 9-5, you can add folders to the new library, specify the document type, and change the library icon.

You don’t really need to use libraries. You could simply select a different folder to save your files in. However, using libraries saves you a few clicks each time you open and save files, which can add up to thousands of clicks over time. Libraries are also backed up by default, assuming you configure backups as described in Chapter 10. Adding folders to your Pictures, Music, and Videos libraries allows the associated apps to automatically find your files, too, and the Search charm searches your libraries by default.
You can compress files and folders using attributes, but the compression isn’t very efficient. However, you can dramatically reduce the size of many types of files by zipping them. Accessing files in a zipped archive takes a bit longer, so you only want to zip folders that you don’t frequently use. Zipping doesn’t reduce the size of most pictures, videos, or music, however, because those files types are (usually) already compressed.
To zip a folder, right-click it in File Explorer, click Send To, and then click Compressed (Zipped) Folder. Windows makes a new file with a .zip extension. This file contains a compressed copy of every file that was in your folder, including all subfolders. To view the contents of the compressed file, simply open it like you do a folder.
To unzip an archive and return it to its original state, right-click it, and then click Extract All.
Zipping a folder is also a good way to send several files to someone as an email attachment. Zipping a folder creates a second copy, so if you are archiving the folder, you should delete the original folder after zipping it.
Windows 8.1 offers two ways to protect your files and folders: permissions and encryption.
Every file and folder has its own set of permissions. These permissions define which users can open, edit, and delete files. The default settings work for most users, so you might never have to see or change permissions.
However, if you’re curious, right-click a file or folder in File Explorer, click Properties, and then select the Security tab. As Figure 9-6 shows, permissions consist of a list of different users and groups and the rights they have to that file or folder. This list is known as an access control list (ACL).

Figure 9-6 shows typical permissions for a system folder: the Everyone group (which, logically, applies to everyone on the computer, including guests) can read files and run apps. The SYSTEM account and the Administrators group (both of which are also logically named) can also update files. These permissions allow a user with administrator privileges (such as the first account you created on your computer) to update system files but prevent standard users from updating files, reducing the risk of malware infecting your computer.
Figure 9-7 shows typical permissions for a user folder. A user can access his or her own files, as can the SYSTEM account and members of the Administrators group. No other users are allowed to access the files, however. Because the Everyone and Users groups are not listed, members of those groups can’t view or edit files in this folder.

If you want to share a folder or files with another user on the same computer, simply drag them to a public folder. Public folders are located within C:UsersPublic. Other users on the same computer will be able to access files in the same folder.
Inside OUT: Booting from a live CD
A live CD is a CD or flash drive containing an operating system that doesn’t need to be installed on a computer. Simply insert the CD or connect the flash drive, start your computer, and the operating system on the live CD will start, allowing you to perform basic tasks such as browsing the web, opening files, and recovering corrupted files.
You should always keep a live CD ready because they’re extremely useful for recovering a failed Windows installation and saving corrupted files. There are dozens of different live CDs available, but my favorite is Puppy Linux, available from PuppyLinux.org.
Live CDs are usually distributed as ISO files. It’s surprisingly hard just to find the ISO file to download on the Puppy Linux website, so you might have better luck searching the Internet for the phrase “Puppy Linux ISO.” After downloading the ISO file, insert a blank CD into your computer, right-click the ISO file in File Explorer on the desktop, and then click Burn Disk Image. To create a bootable USB flash drive, download the free UNetbootin tool from http://sourceforge.net/projects/unetbootin/, and use it to copy the ISO file to a flash drive.
After burning the CD, restart your computer to load the live CD. If the computer doesn’t automatically start from the CD, change the startup sequence in your computer’s BIOS settings to start from a CD first.
Once Puppy Linux loads, you can browse your files by clicking the hard disk icons in the lower-left corner, as shown in Figure 9-8. This is useful when Windows won’t start, but it also has a more nefarious purpose: bypassing permissions. The permissions discussed in this section apply only when Windows 8.1 is running. If you load a different operating system, that operating system will completely ignore those permissions.

For security that can’t be ignored, use encryption, as described in the next section.
Permissions are useful for protecting your privacy because other users who log on to your computer by using their own account won’t be able to accidentally access your files. However, you shouldn’t rely on permissions for security purposes. Permissions can be bypassed simply by starting a computer from an operating system other than Windows.
Note
Protecting your files Watch the video at http://aka.ms/WinIO/protect.
Encryption changes how Windows stores your files but not how you access them. Encryption is a process that replaces your files with seemingly random data. With the right security key, however, you can decrypt the files and access their contents.
Encryption complements permissions perfectly. Whereas permissions can be bypassed by starting your PC from a different operating system, encrypted files are completely unreadable to other operating systems.
Windows 8.1 provides file encryption using a feature called Encrypting File System (EFS). EFS encrypts each user’s files with a unique key. When you log on, all your files are automatically decrypted when you access them, so there are no additional steps for you to take. Other users can decrypt your files only if you specifically share the files with them.
To encrypt a file or folder, right-click it in File Explorer and then click Properties. On the General tab of the Properties dialog box, click the Advanced button. As shown in Figure 9-9, select Encrypt Contents To Secure Data. Click OK twice, and you’ll be given the option to encrypt subfolders and files.

The first time you encrypt something, Windows prompts you to back up your recovery key, as shown in Figure 9-10. While you will probably never need to directly access your key, backing up your key is really important, because if your key gets corrupted for some reason, you won’t be able to access your encrypted files.

Windows stores your key in a certificate, so to back up your key, Windows uses the Certificate Export Wizard. The wizard is used for other types of certificates as well, so it has many options you won’t use. Simply accept the default settings on the Export File Format page and provide a password on the Security page.
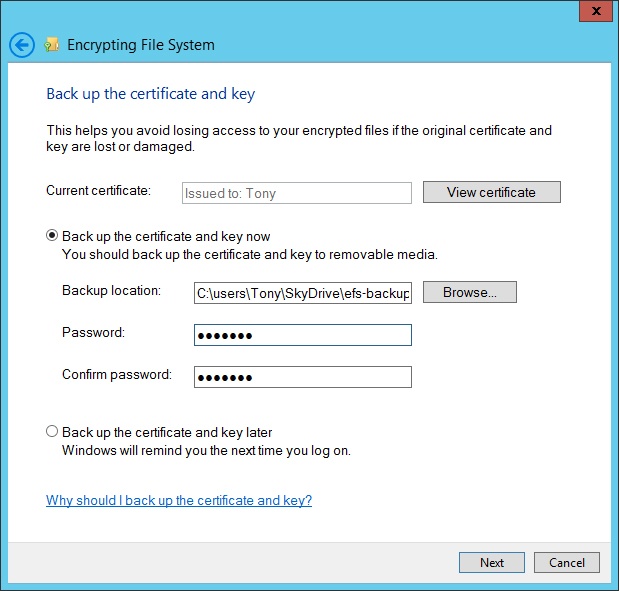
If you miss the notification to back up your key, you can back up your key at any time by using the Encrypting File System tool. Search Settings for encrypt, and then select Manage File Encryption Certificates. On the Select Or Create A File Encryption Certificate page, accept the default settings. On the Back Up The Certificate And Key Page (shown in Figure 9-11), provide a password and select a backup location. Don’t select any files on the Update Your Previously Encrypted Files page.
You should back up your encryption key somewhere other than your computer: use SkyDrive, a USB flash drive, a writable CD or DVD, or a different computer.
If you ever need to recover your EFS-protected files (for example, if you connect your drive to a different computer), follow these steps:
At the Start screen, type certmgr.msc. Select Certmgr.
Select the Personal folder.
On the Action menu, click All Tasks, and then click Import.
The Certificate Import wizard appears.
Click Next.
On the File To Import page, click Browse. In the lower-right corner, click the file types drop-down list and select Personal Information Exchange. Now, select your EFS certificate backup. Click Open, and then click Next.
On the Private Key Protection page, type the password and select the Mark This Key As Exportable check box. Do not enable strong private key protection. Click Next.
Click Finish.
Now, you should be able to open the EFS encrypted files.
The easiest way to search files is to use the Search charm. However, File Explorer offers more advanced file search capabilities.
First, open File Explorer and select a folder that you want to search. Searching automatically searches all subfolders. If you’re not sure which folder your file might be in, simply select Libraries in the left pane to search all folders where users typically store files.
With the folder selected, simply type a search term in the search box in the upper-right corner. By default, File Explorer returns results that have a matching file name, matching metadata (such as tags on picture files), or matching file contents (such as a word within a text file). Figure 9-12 shows how to search all user libraries for files matching the term Ireland.

Figure 9-12. Select Libraries and use the search box to search all your libraries for any text you specify.
Searching with File Explorer works very similarly to the Search charm. However, File Explorer uses a very different technique for finding files.
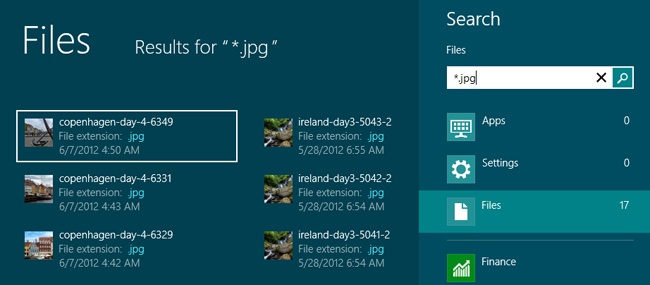
You can also use either File Explorer or the Search charm to find files by file name. If you don’t know the exact name of a file, use the asterisk (*) wildcard. An asterisk replaces any number of characters in the file name. For example, searching for Book* returns all files with a name that starts with Book, including Book1.rtf, BookingTickets.docx, and BookPages.jpg. Searching by using the term *.jpg returns all files with a .jpg extension, including File1.jpg, Picture.jpg, and MyCat.jpg, as shown in Figure 9-13. You can use multiple wildcards in a single search, so *ope*ge*.jpg would return .jpg files with Copenhagen in their name (and perhaps other files). Basically, if you know part of the file name, replace any part you don’t know with an asterisk and then search.
If you don’t know the name of a file, but you know you worked on it recently, you can use File Explorer to sort by when files were last updated (you can’t do this using the Search charm). Follow these steps:
Open the desktop, and then open File Explorer.
Select a folder to search. If you don’t know which folder the file might be in, select Computer to search everything.
In the search box (in the upper-right corner), type your search term, such as part of the file name. If you don’t know anything about the file, type an asterisk (*).
File Explorer displays every file and folder on your computer.
On the View tab, select Details. This sorts the files in a list form.
Click the Date Modified column heading to sort the files from newest to oldest. If the arrow at the top of the column points up, the list is sorted from oldest to newest. Click the column heading again so that the arrow points down.
If you think your file might be hidden (for example, if you’re attempting to find a temporary file or an automatic backup copy of a file saved by a Microsoft Office app), select the View tab and then select the Hidden Items check box.
You can use the same technique to find recently created files. Right-click any column heading in Details view and then select the Date Created column. Then, click that column to sort by it. Date Created is the time the file was first written, whereas Date Modified is the time the file was most recently updated.
By right-clicking a column and then clicking More, you can choose from a wide variety of useful details about files, including photo metadata (such as the shutter speed or aperture setting), music metadata (such as the artist and album), and Date Accessed (the last time a file was used).
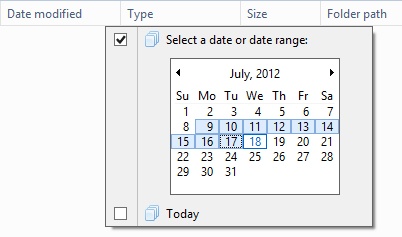
If you know when you last updated the file, you can search by Date Modified. First, open a folder or perform a search. Select the Search tab, click Date Modified, and select a date range, such as Today, Yesterday, This Week, or Last Year, as shown in Figure 9-14.

To specify a custom date range, switch to Details view and then click the drop-down list on the Date Modified or Date Created column, as shown in Figure 9-15. Drag your pointer across the dates you want to search for.
You never have enough disk space. No matter how large your hard disk, at some point you’ll fill it up.
Here are some ways to free up disk space. Before you do anything, though, make a complete backup of your computer as described in Chapter 10. That way, if you accidentally delete something important, you can restore your backup.
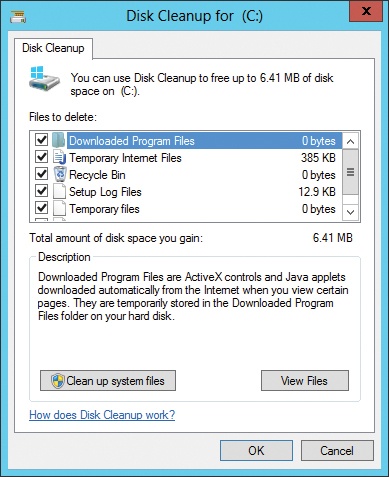
Run Disk Cleanup. Search settings for disk and choose Free Up Disk Space By Deleting Unnecessary Files. As shown in Figure 9-16, you need to select the types of files to delete (you can typically select all the check boxes) and then click OK. Click Clean Up System Files to free additional space used by Windows Defender and Windows Error Reporting.
Uninstall apps. Remove apps you no longer need. To remove Windows 8.1 apps, select them from the Start screen and then select Uninstall. To remove desktop apps, use the Search charm to search for uninstall, and then click Uninstall A Program.
Compress your drive. In File Explorer, right-click your C drive and then click Properties. Select the Compress This Drive To Save Disk Space check box. You’ll probably receive at least one error because a file is in use. Click Ignore All to continue.
Reduce your Internet Explorer cache size. Web browsers spend a great deal of time downloading the same data. For example, the first time you visit your favorite social networking site, Internet Explorer downloads a copy of the site’s logo. Although Internet Explorer could download the logo every time you visit the site, Internet Explorer keeps a copy of the logo (and most images on a webpage) cached locally. When you visit the site in the future, Internet Explorer shows you the cached version of the logo instead of downloading the logo again. All these cached files take up disk space. To reduce the disk space Internet Explorer uses (and free it up for other apps), open Internet Explorer from the desktop. Then, click the Tools button (Alt+X) and select Internet Options. On the General tab, click Settings, and then choose how much space you want to dedicate to the cache. 100 megabytes (MB) is usually plenty.
Analyze your disk space. If you have no idea why you’re out of disk space, use a disk space analyzer tool, such as the free Scanner tool shown in Figure 9-17, available at http://www.steffengerlach.de/freeware. Because Scanner is a desktop app from the Internet, Windows 8.1 will warn you about running it; click More Info and then click Run Anyway. Inner sections of the chart show folders, while outer sections show subfolders. Hover your pointer over a folder to show the name and size in the upper-left corner, click a folder to zoom in, or right-click a folder and then click Open to view the folder in File Explorer.
This is a good way to find large files that you forgot about and no longer need, but don’t delete files that you aren’t sure about.

Windows gives you complete flexibility to create any folder structure you want. If you’re a naturally organized person, this is really useful. If you’re more like me and your files are chaotic and lost, this can lead to many moments of frustration and even terror when you can’t find important files.
Here’s some advice on keeping your files organized:
Save your files. This sounds obvious, but I’ve known people who never save their files. For example, if you close Microsoft Word without saving your files, it will automatically reopen them for you. Word is storing your files in a temporary location, though, and if you ever need to find those files, it’s going to be difficult. Every time you create a new file, save it somewhere you can find it later.
Create folders for every project. For example, if you’re creating a presentation for work, create a folder called Contoso Presentation. Then, save all the files related to that presentation in that folder. Some people create different folders for each different file type, such as Word Documents, Excel Spreadsheets, and PowerPoint Presentations. It’s easy to sort files by file type, so this organization doesn’t help you at all.
Create a logical folder hierarchy. For example, if you previously created a folder called Contoso Presentation and your boss has asked you to create a contract and an invoice for Contoso, create a top-level folder named Contoso. Within the Contoso folder, create subfolders named Presentation, Contract, and Invoice. It takes a few seconds the first time, but you’ll save yourself time in the long run.
Be consistent. If you have many different projects, use the same naming strategy for all of them. For example, if you create a new folder for your taxes every year, name them Taxes 2012, Taxes 2013, and Taxes 2014. Don’t name them Taxes 2012, 2013 Taxes, and I HATE TAXES 2014. You’ll have a hard time finding them later.
Use favorites. File Explorer shows a list of favorite folders in the upper-left corner. By default, your Desktop, Downloads, and Recent Places folders are your only favorites. If you often open a folder from File Explorer, just drag it to the favorites list. Later, you can open that same folder by clicking the Favorites link.