
Chapter 14, and Chapter 16, each discussed different techniques for playing music and videos on your home TV and stereo. Those approaches, such as using an Xbox or a digital media receiver (DMR), are far less complex than connecting a Home Theater PC (HTPC). Additionally, your cable TV company will probably rent you a digital video recorder (DVR) with the most important HTPC features.
So why dedicate an entire chapter to the HTPC?
The apps. You can run dozens of different apps to play your music and videos, and they can be infinitely customized. I’m not using hyperbole; people write custom scripts to accomplish anything they want to do with their HTPC.
The codecs. DMRs can play music and videos using only a limited number of codecs. Because an HTPC is a full Windows PC, and Windows always has the latest codecs available, you’ll never find a file you can’t play back on your HTPC.
The capacity. Large-capacity hard drives are relatively inexpensive, allowing you to store thousands of songs, movies, and TV shows for just a few hundred dollars. Most DMRs are not very easy to extend.
The online connection. HTPCs can connect directly to online sources for streaming music and video, giving you entertainment options not available through your cable company.
The games. Though PC games aren’t typically designed to be played from your couch, many can be played with a wireless controller. MAME (Multiple Arcade Machine Emulator) is particularly popular, because it allows you to play retro games. To download MAME and some free games, visit http://mamedev.org/roms/.
The cost. While many people build high-end HTPCs that cost thousands of dollars, you can also create an HTPC from a very inexpensive computer—even a 10-year-old computer is capable of being a useful HTPC. So, you can create an HTPC from a computer that you would otherwise throw away, and you can probably find a capable computer on eBay for less than US$100 (just make sure it can run Windows 8.1). Computers with slower processors might struggle with some HD codecs, but I personally use an old laptop with an Intel Core2 processor at a meager 2 GHz. Compared to renting a DVR from your cable company, an HTPC can even save you money.
Still, an HTPC is not for everyone. Fortunately, you don’t have to go all out. Start by running free HTPC software on your computer and see if you like it. If you do, spend a few minutes connecting your PC to your TV so you can experience it the way it should be. Once you get a taste for the power of HTPC, you may never want to go back to a conventional DVR.
HTPC software manages your music, TV, and movies and lets you access everything from your couch with a remote control. Different apps have different features, but most HTPC software provides these basic capabilities:
Remote control. Whereas most apps are designed to be controlled by a mouse, keyboard, or touch, HTPC apps are primarily controlled using an infrared remote control, just like your TV and stereo.
10-foot user interface. Whereas tablet computers are accessed from a foot or two away, and desktop and laptops are usually within two or three feet, most people watch TV from across the room. The so-called 10-foot user interface (UI) is similar to a touch interface, with large text and icons.
Digital video recorder (DVR). Many HTPC apps can play and record live TV. This is known as time-shifting, and it requires specialized hardware known as a tuner card (discussed later in this chapter). DVR capabilities usually allow you to skip past commercials in recorded TV.
Converting recorded TV for mobile devices. HTPC software, or add-ons such as MCEBuddy (discussed later in this chapter), can convert TV into formats you can play on your smartphone or media player, allowing you to take your shows with you.
Skipping commercials. HTPC software makes it easy to skip through the commercials. Typically, you can simply fast-forward 30 seconds at a time until the commercials have passed. Some HTPC software even supports add-ons that can automatically remove commercials from recorded TV shows. This makes the shows more enjoyable and reduces their storage requirements by making the video files shorter and the file sizes smaller.
Photo slide shows. HTPC software can show off your photos on the big screen, giving a much nicer presentation than a computer monitor.
Access to online streaming services. HTPC software can allow you to connect to online streaming services such as Zune HD (previously known as Zune Internet TV, available to download from within Media Center), Hulu, Netflix, and YouTube without leaving the HTPC user interface. Basically, you can stream TV from these services by using your remote control.
Streaming to digital media receivers (DMRs). HTPC software often allows you to stream to other rooms in your house using a DMR. For example, Windows Media Center can stream content to an Xbox 360. For more information about streaming, refer to Chapter 16.
The ability to use your smartphone as a remote control. Popular HTPC software has spawned mobile apps that allow you to use your phone as a remote control or even stream music and video directly to your phone. While non-techies will still prefer a traditional remote control, smartphones allow you to view detailed information about shows, see album art, and select the next show without interrupting playback on the TV.
Some of the more popular HTPC apps include:
Media Center. Microsoft’s official HTPC software, it’s also the easiest to set up and has some of the best third-party add-ons available for it. Provides CableCARD support, allowing you to record TV shows from digital cable without using a cable box. Media Center is not as customizable as some of the other HTPC apps, however.
XBMC. Free HTPC software with some amazing capabilities. It provides a richer user interface than Media Center by displaying artwork, cast information, and reviews for TV shows and movies. Setup is more challenging than for Media Center, however.
Boxee. Based on XBMC, Boxee makes it very simple to install add-ons that give you access to many interesting Internet entertainment sources.
SageTV. Not free, but extremely customizable HTPC software for the enthusiast.
If you’re new to HTPCs, Media Center is a great place to start. If you learn to love your Media Center HTPC but wish the software was more customizable, you should explore XMBC, Boxee, and SageTV.
Windows Media Center, as shown in Figure 17-1, is Microsoft’s own HTPC software. Technically, it’s a desktop app. However, once you maximize the window, it very much feels like a native Windows 8.1 app, and works perfectly with touch.

Some editions of Windows XP, Windows Vista, and Windows 7 included Media Center. With Windows 8.1, Media Center is an add-on. If you buy a new computer, you’ll have to buy Media Center. If you upgrade from Windows 7, Media Center might be available as a free add-on by using the Add Features tool, which you can access by searching Settings for add features and then selecting Add Features To Windows 8.1.
Note
Windows Media Center overview Watch the video at http://aka.ms/WinIO/mediacenter.
When using Media Center for a dedicated HTPC, there are some settings you should change. Adjust settings by selecting Settings from Tasks, as shown in Figure 17-2.

I won’t bother describing all the settings, but there are some that you might want to adjust. First click Settings, then click through the menus as indicated to adjust the settings:
General, Startup And Window Behavior. Clear the Show Taskbar Notifications setting to prevent annoying messages from appearing while you watch videos.
General, Windows Media Center Setup, Set Up TV Signal. Use this wizard to configure Media Center with the information it needs to determine your TV schedule so that it can record TV shows for you. The section Recording TV later in this chapter describes the hardware requirements.
General, Windows Media Center Setup, Set Up Your Speakers. Use this wizard to configure and optimize the sound through your speakers. You can select from common speaker setups including two speakers, 5.1 surround speakers, and 7.1 surround speakers. The wizard lets you test your speakers to make sure they are all working correctly and to verify that you haven’t plugged any of the wires into the wrong connectors.
General, Windows Media Center Setup, Configure Your TV Or Monitor. Use this wizard to configure display settings, such as whether you have a 4:3 (standard) or 16:9 (widescreen) TV, which of your multiple displays you should use, and the type of cable you use to connect to your TV. Figure 17-3 shows the wizard selecting a flat panel TV.
General, Windows Media Center Setup, Install PlayReady. Installing the PlayReady component allows you to play some content encrypted using Digital Rights Management (DRM) and to copy content to portable devices.
General, Parental Controls. Allows you to configure the TV and movie ratings so that you can block shows that might be inappropriate for your family. The first time you open these settings, you will be prompted to configure a four-digit PIN. This PIN is required to bypass the parental controls and to change the parental control settings. Navigate to GeneralParental ControlsTV Ratings and then click Advanced to fine-tune the TV content that is allowed based on violence, dialogue, and other criteria, as shown in Figure 17-4.
General, Optimization. Select the Perform Optimization check box and choose a time when your HTPC will be turned on but you aren’t likely to be using it.
TV, Closed Captioning. Media Center records closed captioning when you record TV, and many videos and movies that you download include closed captioning information. By default, closed captioning is turned on only when you mute the sound.
Pictures. Use these settings to turn on the slide show screen saver, which starts a slide show of your favorite photos when you’re not using Media Center. Use the other settings within this section to choose exactly which pictures from your Pictures library Media Center shows as part of the default slide show. You can also specify a different folder, which is a good way to force Media Center to show specific pictures.
Music. Use these settings to choose the types of songs Media Center displays in your favorite music playlist. You can also start visualizations automatically and select which visualizations Media Center shows while music is playing.
Extenders. Choose this option to configure an Xbox 360 to work with Media Center.
Media Libraries. Choose this option to add Music, Pictures, Videos, Recorded TV, and Movies folders to your Media Center library. There’s an easier way to do this, however: follow the instructions in Chapter 9, to add the folder to the appropriate Windows 8.1 library using File Explorer. Then, Media Center will find the folder automatically, and you’ll also be able to access the folder from the Music or Video app. The one exception to this is the Recorded TV library, which does not have an equivalent in Windows 8.1. If you have multiple PCs running Media Center, share the folder from each PC that records TV, and add it to every other Media Center PC so that you can watch recorded TV from any of your PCs.


One of the great things about using an HTPC is that you can take your recorded shows with you by copying them to a mobile computer, your smartphone, or a media player. Media Center records TV in a very high-quality format that uses a great deal of disk space. Most smartphones and media players won’t be able to play the format, and if they could, the large size of the files would quickly fill up their storage.
To solve these problems, convert your recorded shows into a different video format. My favorite tool for this is MCEBuddy, available at http://mcebuddy2x.codeplex.com/. When you install MCEBuddy, it will prompt you to install other required tools.
Once installed, MCEBuddy has a straightforward user interface, which is primarily used to monitor the conversion process. Change the Priority in the lower-right corner to Low (shown in Figure 17-5) to reduce the performance impact that converting videos has on other running apps.
MCEBuddy is designed to automatically find and convert new recordings. By default, it monitors your C:UsersPublicRecorded TV folder, which is the folder Media Center uses to store new recordings, and stores converted files in your C:UsersVideos folder. You can change these settings by launching the app and clicking Settings to open the MCEBuddy Settings dialog box, as shown in Figure 17-6.


When you specify a new folder to monitor, you can specify a search pattern that will convert only files that match the pattern you specify. For example, if you don’t want to convert every TV show you record, you can specify the names of the shows you want to convert as part of the search pattern. First, examine your Recorded TV folder to see how Media Center names the shows you want to convert. Then, specify a pattern that matches those names, using an asterisk for a wildcard and separating different names with a semicolon. For example, entering *HisShow*;*HerShow* will convert all files that have either HisShow or HerShow in the file name. For more information about creating search patterns, hover your pointer over the phrase “Search pattern” in the Monitor Location dialog box.
Converting videos will consume every bit of your computer’s processor time. This has the potential to slow down other apps and might heat up your HTPC so much that the fan starts to make noise, disturbing your audio experience. Expand the Advanced Settings area at the bottom of the MCEBuddy Settings dialog box, as shown in Figure 17-7, to fine-tune the conversion schedule. For example, you could use these settings to perform all conversions when your family is asleep.

Figure 17-7. Use MCEBuddy Advanced Settings to schedule conversions for times when you are not using your HTPC.
MCEBuddy allows you to convert to several different formats. Naturally, you should choose the newest video format supported by the devices you plan to play the video on. When in doubt, choose the MP4 format, which is the default for MCEBuddy. MP4 provides great compression and quality and is supported by most video players, including iOS, Android, and Windows Phone devices.
As an added bonus, MCEBuddy can automatically remove commercials from recorded TV shows. Not only does this make the show more enjoyable to watch, but it reduces the file size, allowing you to fit more shows onto your media players.
There are several settings you’ll want to change to configure your PC as a dedicated HTPC.
First, configure your PC to log on automatically after you restart your computer. This saves you from having to type a password every time the computer restarts, which can happen when Windows automatically installs updates. This is only a good choice if you’re not at all concerned about security.
To configure your PC to log on automatically, follow these steps:
At the Start screen, type netplwiz and then press Enter.
In the User Accounts dialog box, clear the Users Must Enter A User Name And Password To Use This Computer check box, as shown in Figure 17-8.

The next time you restart your PC, Windows will automatically log on with your account.
In previous versions of Windows, Media Center provided a simple check box to configure it to start automatically when you log on. Media Center in Windows 8.1 lacks that option, but you can still configure Media Center (or other HTPC software) to start automatically when you log on. Follow these steps:
Open the desktop by clicking the Desktop app from the Start screen or by pressing Windows+D.
Open File Explorer. Type the following path in the address bar and then press Enter: %AppData%MicrosoftWindowsStart MenuProgramsStartup.
Right-click in the Startup folder, click New, and then click Shortcut.
The Create Shortcut wizard appears.
On the What Item Would You Like To Create A Shortcut For page, type %WinDir%ehomeehshell.exe, as shown in Figure 17-9. Ehshell.exe is Media Center’s executable file. If you use other HTPC software, select the app’s executable file, which is probably located under C:Program Files. Click Next.
On the What Would You Like To Name The Shortcut page, type Media Center (or the name of your HTPC software), and then click Finish.
Right-click in the Startup folder, click New, and then click Shortcut.
The Create Shortcut wizard appears.
On the What Item Would You Like To Create A Shortcut For page, type explorer.exe shell:::{3080F90D-D7AD-11D9-BD95-0000947B0257}. Running this command opens the Windows desktop, and creating a shortcut for it allows you to run the command automatically when Windows starts. If you were to automatically run Media Center or another desktop app at startup, it would start, but it would be hidden behind the Start screen. Opening the Windows desktop brings any running desktop app to the foreground. Click Next.
On the What Would You Like To Name The Shortcut page, type Show Desktop, and then click Finish.
The next time you log on, Media Center (or the HTPC software you selected) will start automatically a short time after the Start screen appears. If you also configure Windows to log you on automatically, then Media Center will appear each time your computer starts, making it always available to everyone in your family.

One last setting to verify: disable backups for your Recorded TV folder. Recorded TV takes up a great deal of drive space, and if you do lose your hard drive, it’s probably easier for you to wait for your episode to air again. For more information, refer to Chapter 10.
You can turn almost any computer into an HTPC. This section describes the benefits of different types of hardware if you plan to buy a new PC or upgrade an existing PC, and gives you information about getting the best out of the hardware you already have.
For information about selecting a tuner card to record TV, refer to section Recording TV later in this chapter.
Note
Home Theater PC hardware Watch the video at http://aka.ms/WinIO/hardware.
A computer’s case determines its form factor. Large desktop computers offer plenty of room for internal adapters and drives, but they also take up more space in your entertainment center. Small form-factor cases are the most popular for HTPCs, but if you have room in your entertainment center, a full desktop case offers lower cost, easier upgrades, and more flexibility.
My favorite way to store an HTPC is to keep it with the audio/video (A/V) equipment in a closet or the basement and just run cables through the wall to the TV and speakers. I recommend that approach if it’s an option because you can pick any size case, you won’t have to see it from your living room, and fan noise will never be an issue.
If you do plan to keep your HTPC near your TV, choose an attractive case that fits in with your A/V equipment. Several vendors sell PC cases specifically for this purpose, or you can simply look for a case with a black front.
Here’s an audiophile’s nightmare: you spend thousands on a top-of-the-line digital amplifier and connect it to an amazing subwoofer and surround-sound speakers. You position your couch for absolutely perfect acoustics. Then, you play your first movie on your HTPC, and the fan buzzes the entire time, ruining the sound for you.
PC processors, power supplies, and memory get hot when you use them. Almost all PCs are air cooled; they have a couple of fans inside them that blow whenever the thermostat inside the computer determines that it’s getting too hot. Unfortunately, those fans can be very noisy.
As I recommended in the previous section, one of the simplest solutions is to put your HTPC in a closet or another room. Then, the fan can buzz all it wants and you won’t be bothered by it. If that’s not an option, find a quiet PC. Many PCs are designed to stay as cool as possible and have particularly quiet fans, and some are so efficient they don’t need a fan at all. They’ll cost more than a more conventional PC, but the extra cost might be worth it if you get the most out of your sound system.
Other than specially designed quiet PCs, mobile computers tend to be quieter. They’re designed to minimize power usage, which in turn minimizes heat and how fast the fan needs to run.
Many entertainment centers have doors that close. That door can minimize the sound that comes from your computer. It can also trap the heat in, causing your computer to overheat and run the fan even more. The point is: consider cooling when choosing an entertainment center for your HTPC.
Here’s some great news: you don’t need an expensive video card for playing music and videos. You only need an expensive video card if you plan to play 3-D games.
You do, however, need to make sure you can easily connect your video card to your TV and stereo. Most newer TVs support High-Definition Multimedia Interface (HDMI), so choose a video card that outputs both audio and video through HDMI. Figure 17-10 shows an HDMI connector.
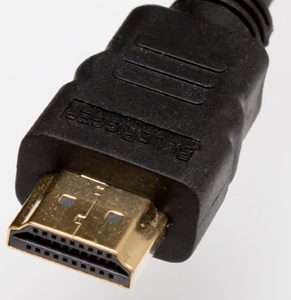
Typically, you can run an inexpensive HDMI cable from your HTPC to your stereo, and then run a second HDMI cable from your stereo to your TV. The stereo will play the audio and pass the video on to your TV. This makes for a very simple connection because you don’t need to run a second cable for audio.
If you plan to use your TV’s speakers, simply run an HDMI cable from your HTPC to your TV. Verify that your video card, your HDMI cable, and your TV all support both audio and video over HDMI. Figure 17-11 shows a video card with DVI, HDMI, and VGA outputs.

If your TV doesn’t support HDMI, check to see whether it supports VGA or DVI (Digital Visual Interface). Most new video cards support one or the other, and you can use an inexpensive adapter to convert between the formats. Figure 17-12 shows a VGA cable with an inexpensive DVI adapter connected to it.

If your TV doesn’t support HDMI, VGA, or DVI, then choose a video card that supports TV out in the format your TV requires. For example, some early HDTVs require component input, while others support composite input. Video cards are available with both types of connections. Figure 17-13 shows a video card designed for connecting to analog TVs. From left-to-right, the video card has three outputs: composite, S-Video, and VGA.

If you already have a video card you want to use and it isn’t compatible with your TV, you can purchase an adapter. For example, you can buy an adapter that connects HD video to HDMI, as shown in Figure 17-14, allowing you to connect otherwise incompatible HD systems. These adapters tend to be more expensive than basic video cards, however.

Most new mobile computers include an HDMI, mini-HDMI, or micro-HDMI port. Use an HDMI cable with the appropriate connector type to connect directly to a TV. If you are using a mobile computer and your TV requires analog composite or S-Video connectors, purchase an adapter such as the one shown in Figure 17-15, along with the appropriate cables to connect to your TV.

When I travel, I bring a PC running Windows 8.1 with Media Center installed, an HDMI cable, the adapter shown in Figure 17-15, a composite cable with audio support, and an S-Video cable (they don’t take up as much room as you might think). Depending on the type of TV the hotel room has, I connect my mobile PC with either the HDMI cable or the adapter and watch TV shows and movies using Media Center. While I could watch them on the PC’s screen, I much prefer watching them on the TV. This is particularly important when traveling to foreign countries/regions where I don’t know the local language.
Playing videos doesn’t require a particularly cutting-edge processor, but there’s no specific formula I can give you; the processing requirements vary depending on the resolution of your video and the codec being used. For example, 1080p HD video requires much more processing capacity to play smoothly than does 480p video. With that said, modern, low-end mobile processors are very capable of playing 1080p video.
As an added benefit, lower-power processors use less power and generate less heat. Not only will that help keep your electricity bill down, but it will allow the HTPC’s fan to run at lower speeds, keeping the HTPC quieter.
Encoding or transcoding video can be a different story. If you have remote DMRs connecting to your HTPC across the network and you run transcoding software (as described in Chapter 16), you should choose the fastest processor you can afford. Transcoding video in real time, especially HD video, can max out even higher-end systems.
Memory is another area where you can skimp with an HTPC. Even 1 gigabyte (GB) of RAM is sufficient for playing any video, including HD video. As with the processor, if you plan to transcode video, more memory can help. Additionally, other apps you run on your HTPC might require more memory, so refer to those apps’ recommendations.
Even the slowest modern hard drives can play back 1080p video with no problem. Therefore, choose a low-RPM, low-power hard drive for your HTPC, as shown in Figure 17-16.
If you plan to stream video across the network, you need only enough storage for Windows 8.1 and any apps that you plan to run. Even the smallest modern hard drives will be more than sufficient.
If you plan to store movies and TV shows, you might need a very large hard drive, and you might even need to combine multiple drives. Table 17-1 lists typical file sizes for different media types, though file size can vary widely depending on the video quality and the compression algorithm being used. Multiply these sizes by the number you plan to store on your HTPC simultaneously to determine your storage requirements.

Table 17-1. Approximate storage required for different file types
Approximate size | |
|---|---|
Medium-quality MP3 or WMA song | 3 megabytes (MB) |
High-quality MP3 or WMA song | 5 MB |
Lossless song | 25 MB |
480p, 30-minute TV show without commercials | 200 MB |
720p, 30-minute TV show without commercials | 750 MB |
1080p, 30-minute TV show without commercials | 2 GB |
480p, one-hour TV show without commercials | 400 MB |
720p, one-hour TV show without commercials | 1.5 GB |
1080p, one-hour TV show without commercials | 4 GB |
480p movie | 700 MB |
720p movie | 2.5 GB |
1080p movie | 8 GB |
If you need more capacity than a single drive can provide, combine your drives into a Storage Space so that you can access them as a single volume. For detailed information, refer to Chapter 12.
The type of sound card you need is determined by how you connect your HTPC to your stereo and TV:
HDMI or other digital connection (recommended). If you use HDMI for both audio and video, you don’t need a sound card at all. Your computer will simply pass the digital audio signals directly across the HDMI cable with no additional processing. Your receiver or TV will be responsible for decoding the stereo and surround-sound signals.
Analog. When you use an analog connection, your computer must perform the decoding of stereo and surround-sound signals. This isn’t an extremely processor-intensive task, and many inexpensive sound cards (including sound cards built into most motherboards) are quite capable of this task. However, the quality of analog sound can vary widely because analog sounds are subject to interference from both other components within your computer and other wiring that the cables are near outside your computer. For best results, use an external USB sound card (which eliminates interference from internal components) and use shielded cabling that only crosses other wires perpendicularly.
Digital is always superior. If you’re not sure whether your receiver or TV supports digital audio, just look at the connectors on the back of the receiver and choose a sound card with similar connectors. The most common digital connection types are HDMI, Toslink/SPDIF, and digital coaxial.
As a last resort, you can connect your amplifier or speakers to the headphone jack on your computer. While many stereos have a 3.5mm auxiliary port, many others require red and white RCA connectors. Figure 17-17 shows a specialized cable designed to connect any device with a headphone jack to a stereo that uses RCA connectors.

If you connect your computer’s headphone jack to a stereo, turn the volume on the computer all the way up, and then adjust the volume using your amplifier. Sound quality might be noticeably bad, especially when playing back quiet recordings. If you hear crackling during the louder parts of the sound track, turn the volume on the computer down until the crackling disappears.
If you plan to record all your TV and movies using a tuner card, your HTPC’s network connection isn’t terribly important. You’ll still need some network connection so that the HTPC software can download show schedules and information, but any wired or wireless connection will be sufficient.
Similarly, streaming music across the network doesn’t require much bandwidth. As long as your network connection is stable, you shouldn’t have any problem streaming music.
If you plan to stream video, however, your bandwidth becomes very important. If you plan to stream HD video, especially 1080p video, getting sufficient bandwidth could be the most challenging aspect of setting up your HTPC.
If you plan to stream standard-definition video from the Internet, just about any broadband connection should be sufficient. On your local network, make sure that you consistently maintain at least 10 Mbps available bandwidth. The latest wireless networks are capable of that; in particular, look for equipment that supports 802.11n, and try to keep your HTPC as close to your wireless access point (WAP) as possible.
If you plan to stream HD video from the Internet, make sure your LAN speeds are at least as fast as your Internet connection. For example, if you have a 20 Mbps Internet connection, configure your LAN so that it has at least 20 Mbps throughput. Remember that wireless bandwidth estimates are wild exaggerations, and even the latest 802.11n networks can reach 20 Mbps only when the wireless access point is very close to the PC.
If you plan to stream 1080p HD video across your LAN, you’re going to need as much bandwidth as possible. The precise amount of bandwidth varies depending on the compression level used in the video, but 100 Mbps throughput is a good value to strive for. Wireless networks will simply be inefficient. Instead, run wired Ethernet cables between the PC storing your videos and the HTPC or DMR playing the videos. If you can’t run wired Ethernet, use the latest powerline networking adapters rated at 200 Mbps or 500 Mbps, as shown in Figure 17-18. In my experience, the 200 Mbps and 500 Mbps adapters have similar performance, so paying more for 500 Mbps might not be worth it.

When choosing connection types and cables, choose digital over analog whenever possible. You have several choices for digital connections, and the quality will be similar regardless of which you choose. However, for simplicity, you should choose HDMI for both audio and video when your equipment supports it.
Don’t buy expensive digital cables. Digital signals don’t degrade from interference like analog signals do; digital signals either work or they don’t. Don’t trust anyone who tells you that a more expensive digital cable will improve your sound or image quality. Really, you only need to spend a few dollars on cables.
If you regularly remove and reconnect a cable, you should pay particular attention to how the connector is attached to the cable because that area tends to wear out quickly. However, if you simply plan to connect a cable once and leave it connected for years, even the most flimsy cable should work fine.
Speaker cables (the two-wire cables that connect your amplifier to your speakers) are analog. Therefore, proper shielding really can make a difference. Still, as long as you’re not running them through the wall or alongside power cables (always cross power cables perpendicularly to minimize interference), you shouldn’t notice a difference.
If you do run cables through the wall, be sure to get cables that meet your local building codes. Typically, this requires plenum cables that minimize the risk that fire will travel up a cable, thus reducing the risk that the cable will help spread a fire throughout your house.
If you want to use your computer to record TV, you’ll need a tuner card. You can use a tuner card to connect your computer to your cable or satellite TV or to record broadcast transmissions. The four ways of connecting, in rough order of preference, are:
Digital, by connecting your cable service directly to a tuner card and using a CableCARD with Media Center
Digital, by connecting your cable service to a cable box, and then connecting the cable box to a tuner card
Analog, by connecting your cable service directly to a tuner card
Analog, by connecting an antenna directly to your tuner card
The sections that follow describe these four ways in more detail. Except for the discussion of CableCARD, references to cable TV also apply to satellite TV.
The best way to record premium and encrypted digital channels is by using a CableCARD. If you had a laptop 15 years ago, you might remember Personal Computer Memory Card International Association (PCMCIA) cards, which were later known as PC cards. CableCARDs are PCMCIA cards that contain the technology to allow your computer to decrypt the digital cable signals that most consumers use a cable box to decrypt.
When you use a CableCARD, you do not have to use an infrared (IR) blaster (described later in the chapter), so you never have to worry about missed channels. Additionally, you can save some money by not having to rent a cable box from your cable provider. Modern CableCARDs allow your HTPC to record multiple channels simultaneously, so you typically need only a single CableCARD and a single connection to your HTPC.
CableCARDs came about as part of the Telecommunications Act of 1996. Among other purposes, CableCARDs free consumers from needing to use their cable company’s cable box. By connecting a CableCARD to a DVR or an HTPC, your HTPC can receive all the basic and premium digital cable channels you receive with a cable box.
Your cable company should be able to provide a CableCARD at your request. Many people complain that their cable companies make this process as difficult as possible. This makes sense because the alternative to using a CableCARD in an HTPC is to rent a costly DVR from the cable company.
You’ll also need a tuner card that supports the CableCARD standard. A single tuner card, CableCARD, and coaxial connection will allow you to record multiple channels simultaneously. At the time of this writing, some of the popular cards include:
The Ceton InfiniTV 4 card. An internal card that can record four channels. Costs about US$200.
The SiliconDust HDHR3-CC HDHomeRun PRIME. An external USB device that can record three channels. Costs about US$150.
The Hauppauge WinTV-DCR-2650. An external USB device that can record two channels. Costs about US$110.
Finally, you’ll need HTPC software that is compatible with the CableCARD standard. The cable companies define copy protection for shows recorded with a CableCARD, and software must be certified for use with the CableCARD; otherwise, it would be too easy to circumvent copy protection. Right now, only Media Center is certified for use with a CableCARD. For detailed information about CableCARD copy protection, read “Cable Provider Copy Protection, Switched Digital Video and Self-Install Status Master List” at http://www.missingremote.com/forums/cable-provider-copy-protection-switched-digital-video-and-self-install-status-master-list.
Unfortunately, pay-per-view and on-demand services are not available when using a CableCARD. Therefore, you might need a separate cable box connected directly to your TV for those services.
If your cable company won’t provide a CableCARD, you can still record TV output from a cable box. For example, the Hauppauge Colossus PCI Express Internal HD-PVR has HDMI and component video (YCrCb) HD inputs, allowing it to record 1080i video from any device that would normally connect to an HDTV. This allows you to record from almost any source. To allow your HTPC to change the channel on your cable box, you need an IR blaster, which is included with most tuner cards.
If you want to record multiple channels simultaneously, you need multiple cable boxes, each separately connected to a video recording card in your HTPC. Naturally, you’ll need to pay a rental fee to your cable company, making this a much more expensive option than using a tuner card that supports a CableCARD.
Higher-end tuner cards include a hardware encoder, whereas lower-end tuner cards require the processor in your HTPC to do the encoding. Choosing a tuner card with a hardware encoder will reduce your processor usage, but it might not be necessary if your computer has a powerful processor. If you have a low-end processor and you plan to record HDTV, choosing a tuner card with a hardware encoder can ensure trouble-free operation.
You can watch and record analog and unencrypted digital cable by connecting the coaxial cable directly to your tuner card (shown in Figure 17-19) and recording analog TV. Inexpensive TV tuners, such as those made by Hauppauge, can be used to record analog or unencrypted digital cable TV using quadrature amplitude modulation (QAM). QAM basically broadcasts over-the-air channels, including local HDTV, across cable TV unencrypted and for free.

Internal tuners tend to work better than USB tuners. However, if you are using a mobile computer, a USB tuner is your only option.
Typically, only basic cable channels are provided as analog and unencrypted digital cable. Premium channels such as HBO and Showtime are not available using this recording technique. This type of recording is the simplest because your computer can control the channel without communicating with any external device.
Some tuner cards can also receive FM radio when connected to an antenna. Most popular radio stations stream across the Internet, and that’s how I prefer to listen to them on my HTPC. However, if you listen to FM radio and your favorite station doesn’t stream, look for a card with an FM tuner.
Though most tech-savvy people seem to use cable or satellite TV, there are some distinct advantages to recording over-the-air broadcasts:
There are no monthly fees.
You can receive high-quality HDTV.
You can receive local news, which is often not available through a cable provider.
Your HTPC can act as the tuner, so you do not need a separate cable box or IR blaster (discussed later in this chapter).
Most tuner cards that record directly from a coaxial cable can also record over-the-air broadcasts. Of course, most cable channels do not broadcast over the air, but you can receive your local TV for free by connecting a TV antenna to your tuner card. A significant advantage of recording over-the-air broadcasts is that you can record digital, HDTV without using a cable box.
To record over-the-air broadcasts, you need an HDTV antenna, which typically costs between US$35 and US$80.
HTPCs can use a device, known as an IR blaster, that transmits infrared (IR) signals to control other components of your entertainment system. These devices send the same IR signals you send with a remote control.
Most commonly, IR blasters are used to change the channel on the cable box, just like you do when you watch TV. In other words, if you use a cable box and you want to watch live TV on channel 36 on your HTPC, you’ll use your HTPC’s remote control to change the channel. The HTPC will then change the channel on your cable box and begin recording and playing back the video signal.
Some people also use IR blasters and HTPC software to turn their TV and receiver on or off and to make sure they are configured for the right input.
You should stick your IR blaster directly on the IR receiver of the device to be controlled. They tend to have an adhesive surface that allows you to fasten them semi-permanently to the device. If they fail to stick properly, you might need to tape them down.
Unfortunately, IR blasters can be unreliable, and they tend to be the weak link in an HTPC setup. For example, if your computer needs to tune your cable box to channel 36, the cable box might not receive the 6 and will tune to channel 3, causing your HTPC to record the wrong channel. How reliable your signals are depends on both your IR blaster and the cable box that you’re controlling. While many people experience problems, others report never having a missed channel.
All IR signals are unreliable, but when you’re changing the channel manually, you notice when a signal isn’t received and push the button again. Your computer simply isn’t that smart. As a result, if you must use IR blasters to control your cable box, be prepared for missed recordings at times.
Most people want to be able to control their HTPC with an infrared remote control. An inexpensive USB IR receiver, as shown in Figure 17-20, provides that capability.

You’ll probably need two remote controls for your HTPC: a full-featured wireless keyboard and mouse and a more conventional remote that your family can use.
While Media Center and other HTPC software is designed to be used with a traditional remote (that is, only requiring you to type numbers and use a direction pad), a keyboard/mouse is useful for installing updates, configuring Windows, and browsing the web. You might not think that’s important, but when you have a few friends over and one of them says, “Hey! Did you see that video where the cat that looks like a dog eats bacon and then looks suspicious?” you’ll be able to quickly pull it up on the big screen so everyone can watch it comfortably, instead of having people crowd around a tiny smartphone.
Those times are frequent enough that you’ll want to manage them when you’re comfortable, not while you’re sitting cross-legged on the floor with the wired mouse and keyboard you’ve kept stored in the basement from a long-dead computer. The example shown in Figure 17-21 is an infrared keyboard with a pointing device in the upper-right corner that functions like a mouse.

Bluetooth keyboards with a built-in trackball or trackpad work well for this purpose. Bluetooth’s range of 30 feet is usually good enough, though it can be unreliable at a distance, and enclosing the HTPC in an entertainment center can substantially reduce that range.
You can download apps for your smartphone that control your HTPC across your wireless network, providing both a touchpad and a small keyboard. HippoRemote LITE for the iPhone or Valence for Android do this very well. Some remote-control apps even support Wake-on-LAN to wake your computer up across the network, which can save you the trouble of walking to your HTPC and pushing the power button.
Only use an IR keyboard or mouse if you use an IR relay system to send signals to your audio/video equipment in an enclosed room. While it’s fairly easy to point a traditional remote at your computer, you typically use a keyboard while it’s on your lap, and your attention is focused on typing rather than on keeping the keyboard pointed directly at the computer. IR keyboards tend to miss keystrokes, and using them can be a very laborious process.
For all scenarios that don’t involve an IR relay system, choose an RF (radio frequency) keyboard and mouse combination. RF devices communicate more reliably and don’t need to be pointed directly at a receiver.
Most of the time, you’ll want a remote just to turn your gear on and off and select music, TV shows, and movies. Your TV and stereo probably require IR anyway, and if you don’t want to teach everyone in your family to juggle three remotes, you’re going to want to be able to control your HTPC with a universal IR remote. You’ll still want an RF keyboard and mouse combo when you need the extra power.
Your family remote should be small and simple, because while you’re clearly good with technology (you’re reading this book, after all), you probably live with someone who simply wants to watch their show without dealing with an 80-button keyboard. The simplest way to control Media Center is to use a remote designed for Media Center, such as the remote shown in Figure 17-22.
