Storage is the most important part of your PC. Storage is all the data you hold dear—your documents, pictures, and videos, plus the drives that they’re stored on. Most PC users never need to worry about their storage because the drive their PC came with is good enough for them and they aren’t worried about data security.
For the rest of us, this chapter shows how to take advantage of Storage Spaces, allowing you to easily and cheaply expand your storage however you see fit. This chapter also discusses BitLocker, which encrypts entire drives and can help to protect you from rootkits, a type of malware that might watch your every move without being detected by tools such as Windows Defender.
When I first read about Storage Spaces, my response was “Finally!” Storage Spaces takes whatever random drives you connect to it and combines them to make useful, and optionally redundant, storage.
Here’s why that’s great:
You never have to think, “Did I save that on my C drive, my D drive, or my E drive?” All your drives can have a single drive letter.
You don’t have to reorganize your files when you add a new drive; just add the drive to the storage pool and expand the capacity.
You can buy drives with the best price per terabyte, rather than buying larger capacity drives just to simplify your file management.
You can get redundancy (allowing a drive to fail without you losing data) without spending extra on a proper RAID (redundant array of independent disks) array.
You can connect all those old drives you have lying around from outdated PCs and use their storage without needing to manage your files on many different drives.
Instead of accessing drives directly, you access Storage Space pools. Pools are a collection of one or more drives of varying sizes. As you do drives, you access pools using a drive letter such as E:.
One of the features of a pool is resiliency. Resiliency is a form of redundancy, which sounds wasteful: it stores multiple copies of your data on different drives. That does waste space, but if you ever lose a drive, redundancy will enable Storage Spaces to regenerate the data that was on your drive. With redundancy, a lost drive doesn’t mean lost data.
Storage in a pool is written to the underlying drives in blocks. By default, blocks are 4 kilobytes (KB) in size (4,096 8-bit bytes), so a 1-terabyte (TB) drive is divided into about 250 million blocks.
When you save a file to a drive without using Storage Spaces, the entire file is written to blocks on a single drive using the FAT file system or the NTFS file system format, which all modern operating systems can access. Therefore, you can take that drive and connect it to a different PC (even if it’s running an earlier version of Windows) and that PC can still read the same file.
Storage Spaces completely separates the layout of your files from the physical arrangement of drives in your PC. If you configure three drives in a single pool and then save a file to that pool, blocks from the file might be saved across different drives. They might not. It’s entirely up to Storage Spaces to decide how to store files, and you don’t have much insight into it.
Storage Spaces also uses a new format that is not supported by earlier versions of Windows. Therefore, you can’t move drives that are part of a Storage Spaces pool to a PC running an earlier version of Windows. You also can’t access data in a pool if you multiboot to an earlier version of Windows on a single PC.
You can, however, move all the drives that make up a pool to a different PC running Windows 8.1 and access that pool. Windows will detect the drives and configure the pool automatically.
Note
Using Storage Spaces Watch the video at http://aka.ms/WinIO/storage.
In practice, the architecture of Storage Spaces means a few things might have to change about how you work with files and drives:
Read performance might be improved if your PC can communicate with the separate drives faster than with a single drive. For most PCs, however, you won’t notice a substantial difference.
If you use resiliency, write performance might be decreased. Parity (one form of resiliency) requires the PC to perform some mathematical calculations and then write both your data and its parity information, which can be one-third the size of the original data. If you use mirroring (another type of resiliency), your PC has twice as much data to write for every update. In theory, your PC might be able to write to multiple drives simultaneously, but in practice, most home PCs aren’t designed for parallel input/output (I/O) to multiple drives, and drive I/O performance is bottlenecked at a much slower pace.
If you configure multiple drives in a pool, you cannot access the data on the drives individually, because each drive has only part of any given file. Therefore, if you want to move a storage pool to a different PC (which must be running Windows 8.1), you must move every drive in the pool.
If one drive fails and you have not configured redundancy, all your data is lost. Therefore, if you have a 6-TB storage pool consisting of three 2-TB drives, and one of the drives fails, you lose access to all 6 TB of data. If you had configured those three 2-TB drives as separate drive letters without using Storage Spaces, you would need to restore only the one drive instead of the data from all three.
The risk of failure increases because the failure of any one drive causes an entire nonredundant storage pool to fail. Consider two scenarios: one 3-TB drive or three 1-TB drives in a storage pool. It might be less expensive to buy three 1-TB drives and configure them in a storage pool, but the odds of any one of those three drives failing are much higher than the odds of the single 3-TB drive failing.
Drives that are added to a pool must be formatted, which erases all the data from the drive. Therefore, you cannot integrate an existing drive with data into a storage pool. Instead, you need to copy the data to your storage pool (assuming you have enough free space) and then reuse the original drive.
There’s one other factor you should consider before you trust your data to Storage Spaces: the technology hasn’t yet been proven over a long period of time. People like me, who study storage reliability, have a great respect for well-proven technologies, even if they’re not the most cutting-edge. I’m not telling you to avoid Storage Spaces, but if you use it, configure resiliency and have a reliable backup. For more information, refer to Chapter 10.
To manage Storage Spaces, search Settings for storage spaces, and then select Storage Spaces to open the Control Panel tool, as shown in Figure 12-1.
When you click the link to create a new pool, Windows prompts you to select the drives to add to the pool. As shown in Figure 12-2, Windows automatically selects all unformatted drives. Those are drives you wouldn’t be able to access anyway, and they definitely don’t have any useful data on them (at least not data created by a PC running Windows). If you select a formatted drive, all the data from that drive will be lost forever, so be sure there’s nothing you love on it.


After selecting your drives and clicking Create Pool, you’ll be prompted to configure your resiliency, as shown in Figure 12-3.

The Size (Maximum) option is set by default to the maximum available capacity for the physical drives you have allocated. You can set it to a larger value, but I have no idea why you’d want to. For example, if you connect 4 TB of physical drives, you can set a 10-TB capacity. Naturally, Windows can’t actually save 10 TB of files in that pool, but when you start to run out of physical space (for example, if you have used 3.9 TB of your physical drives), Windows will prompt you to add more physical drives to the pool.
Storage Spaces supports four levels of resiliency, each with its own advantages:
Simple (no resiliency). Storage Spaces writes one copy of your data, so if a drive fails, you lose all the data in the pool. This requires only one drive and you can access 100 percent of your physical capacity.
Two-way mirror. Storage Spaces writes two copies of your data, allowing you to lose one drive without data loss. This requires at least two drives, and you can access only 50 percent of your physical capacity.
Three-way mirror. Storage Spaces writes three copies of your data, allowing you to lose two drives simultaneously without data loss. This requires at least three drives, and you can access only 33 percent of your physical capacity.
Parity. Storage Spaces uses mathematical algorithms to protect your data more efficiently than by simply creating additional copies of it. Parity requires at least three drives. The portion of the physical capacity that you can access is related to the number of drives you add. To calculate the maximum capacity you can access, take the reciprocal of the number of physical drives, and then subtract that from one. Basically, divide one by the number of drives you have to calculate the capacity used by parity. If you have three drives, you can access up to 66 percent of your physical capacity. If you have four drives, you can access up to 75 percent of your physical capacity.
If you have one drive, you can’t use resiliency.
If you have two drives, you can choose to create a two-way mirror, which protects your data but limits your capacity to the size of the smaller drive. In other words, a two-way mirror uses at least 50 percent of your space for resiliency.
If you have three or more drives, you can choose from any of the options without any major drawbacks:
If you have frequent backups and you don’t mind the elevated risk of data loss by combining multiple drives, choose Simple.
If you don’t want to lose the data in your pool and you don’t mind if your drive is a little slow, choose Parity.
If you don’t want to lose the data in your pool, but performance is really important to you, choose Two-Way Mirror. Mirrors offer no performance penalty when reading data, and the performance penalty for writing data is typically less than other types of resiliency.
If you really, really don’t want to lose the data in your pool and you don’t mind losing two-thirds of your storage capacity, choose Three-Way Mirror.
You can’t change your resiliency choice after you click Create Storage Space. You would need to delete the Storage Space and then re-create it, which would delete all of your data. So, be really sure that you’re going to be happy with your resiliency choice over the long term.
On PCs running Windows 8.1 Pro and Windows 8.1 Enterprise, BitLocker encrypts your entire drive, helping protect your data in the event someone steals your PC and you haven’t left your PC logged on. It also prevents your PC from starting if any of the monitored system files have been tampered with. This primarily helps reduce the risk of rootkits, a clever type of malware that installs itself underneath the operating system so it cannot be easily detected.
Other editions of Windows 8.1, including Windows RT 8.1, support device encryption but do not include the BitLocker tools described in this section. Device encryption is turned on by default for new installations of Windows 8.1. If you upgraded from Windows 8, device encryption is not automatically turned on. To turn device encryption on or off, open PC Settings, PC & Devices, and then PC Info.
Not a lot has changed for consumers using BitLocker at home, but there are a few improvements:
Windows 8.1 now supports offloading drive encryption and decryption to specialized hard drives that have those features. If you happen to have one of these drives, you won’t suffer the same performance degradation after enabling BitLocker.
Windows 8.1 now supports encrypting just the part of your drive with data on it, a feature known as Used Drive Space Only encryption. This means that BitLocker doesn’t encrypt all the free space on your drive, which reduces the time the initial encryption requires. This makes first enabling BitLocker quicker (though the interruption is pretty minimal, anyway), and it’s the right choice for a brand new PC or hard drive.
BitLocker isn’t right for everyone, and it might not even be right for most people, because it has a few major drawbacks:
It slows down your drive performance. Every bit of data read from the drive must be decrypted by your CPU. Likewise, data written to the drive must be encrypted. How much you notice this performance depends on your drive and CPU speed.
You might lose your data. BitLocker is well proven at this point, but a corrupted key or damaged Trusted Platform Module (TPM) chip will result in your PC being unbootable and your data being inaccessible. To offset this risk, make frequent backups, as described in Chapter 10. You should keep your backups secure, too, because if someone steals your backup, they’d have access to all your files, anyway.
It makes data recovery much more difficult. If you ever have drive corruption issues, the odds of you recovering files from a BitLocker-encrypted drive are almost zero. After all, BitLocker is specifically designed to prevent that type of data recovery. For more information about data recovery, refer to Chapter 10.
BitLocker is right for some people, though: those who have secrets on their PC that they really want to keep secret. If you’re willing to accept a bit slower performance and give up some data recovery options to reduce the risk of someone seeing your secret files, turn on BitLocker.
Note
Using BitLocker Watch the video at http://aka.ms/WinIO/bitlocker.
You can use BitLocker to encrypt three different types of drives:
System drive. BitLocker’s primary purpose is protecting your system drive (your C drive, which has Windows installed on it). When you enable BitLocker for your system drive, the entire system drive is encrypted, including Windows files. If your PC has a TPM chip, this helps protect you from malware that modifies the system, including rootkits. You can use BitLocker on the system drive to require a PIN, password, or USB flash drive for Windows to start.
Data drive. You can also encrypt data drives with BitLocker. Protecting a data drive benefits you only if someone attempts to access the data offline by starting your PC from a different operating system or by stealing your drive and connecting it to a different PC. As an alternative, consider using Encrypting File System (EFS), as described in Chapter 9.
Removable drive. If you use BitLocker to protect a removable drive, whoever you give the drive to will be prompted for a password or a smart card when they connect the drive to a PC. This helps protect your data if someone steals your flash drive.
Of course, encrypting a drive isn’t useful if BitLocker simply decrypts the drive for everyone. When you configure BitLocker to protect your system drive, you’re given two or three of these choices:
Enter A PIN. You must enter a numeric PIN each time your PC starts. This option is available only when your PC has a TPM.
Enter A Password. You must enter a password (which can contain letters, numbers, and special characters) each time your PC starts. This option is available only when using BitLocker without a TPM.
Insert A USB Flash Drive. Connect a USB flash drive to your PC the way you would use a key to start your car. If you lose your flash drive, you won’t be able to start your PC.
Let BitLocker Automatically Unlock My Drive. BitLocker doesn’t prompt you for a PIN, a password, or a USB flash drive. Instead, it only verifies the system’s integrity and then automatically starts up. This option doesn’t offer any protection from someone who steals your entire PC, but it does protect your data in the event someone steals just the drive from inside your PC (a scenario that is more common in business environments). It also helps protect you from rootkits and other malware that might modify your system files.
If you have a TPM chip, your PC’s BIOS will prompt you to enter a PIN. Therefore, the prompt happens before any part of Windows has loaded. If you don’t have a TPM chip and you decide to use a password, the Windows boot loader starts, prompts you to select an operating system (if you have multiple operating systems installed), and then BitLocker starts and prompts you to enter your password, as shown in Figure 12-4.

When you configure BitLocker and your computer has a TPM chip, you’ll see the BitLocker wizard page for choosing how to unlock your drive, as shown in Figure 12-5.

However, if your computer does not have a TPM chip, you’ll instead see the BitLocker wizard page shown in Figure 12-6. As you can see, you have the option to enter a password instead of a PIN, and there’s no option to let BitLocker automatically unlock your drive.

You can always change the startup options after you enable BitLocker.
BitLocker is designed to be used primarily with a TPM chip. If you use it without a TPM chip, your PC won’t be able to start up automatically like a BitLocker-protected PC with a TPM chip is able to. Instead, you’ll need to authenticate yourself by typing a password or by connecting a USB key with a secret certification before Windows 8.1 starts.
If you don’t have a TPM, you also won’t be able to take advantage of the TPM’s system-integrity checks. That means that BitLocker won’t be able to protect you from rootkits. You’ll still enjoy the benefits of an encrypted drive, however.
If your PC doesn’t have a TPM chip and you want to use BitLocker, you need to change a Group Policy setting:
Run gpedit.msc.
Browse to Local Computer PolicyComputer ConfigurationAdministrative TemplatesWindows ComponentsBitLocker Drive EncryptionOperating System Drives.
Double-click Require Additional Authentication At Startup, select Enabled, and select Allow BitLocker Without A Compatible TPM (Requires A Password Or A Startup Key On A USB Flash Drive), as shown in Figure 12-7.
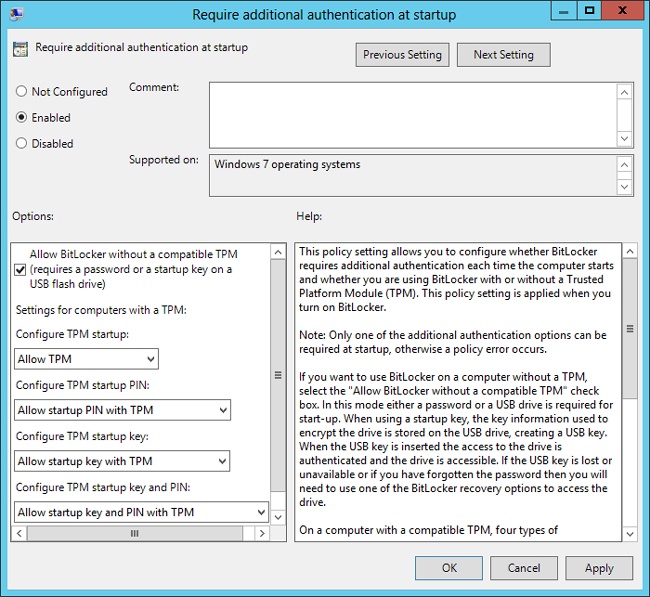
Now, you can enable BitLocker using Control Panel.
After you enable BitLocker, the Control Panel tool gives you options to suspend BitLocker or turn it off, as shown in Figure 12-8.

You’ll want to use these options in different circumstances:
Turn off. Turning off BitLocker decrypts your drive. Of course, you lose the benefits of BitLocker, but you also lose the drawbacks. You’ll be able to access data directly from other operating systems, and you won’t suffer any performance penalty for encryption and decryption. If you turn BitLocker back on, it will need to re-encrypt all of your files.
Suspend. Suspending BitLocker keeps your drive encrypted but stores the decryption key in plain text. Suspending BitLocker allows you to start Windows without a password, PIN, flash drive, or recovery key. If you’re using a TPM, Windows will start even if system files have been modified. Suspend BitLocker when you don’t need to access the files from other operating systems and you plan to reenable it in the near future.
The consequences for losing your decryption key are pretty severe: you permanently lose access to every file on your PC. You really don’t want that to happen, so BitLocker provides a recovery key.
The recovery key is a second type of key that you don’t use on a regular basis. The recovery key is never stored in the TPM, so it can never be applied automatically. Instead, you need to save it some place safe where you will be able to find it in the event you can’t start BitLocker normally.
Figure 12-9 shows the options BitLocker provides to save your recovery key. Depending on your PC’s configuration, you might also be prompted to save the recovery key to a USB flash drive.

No matter where you back up your key, keep in mind that your data is only as safe as your key backup. If you save the key to a file, save that file to a disc and lock the disc up. If you print the recovery key, lock the page you printed it on in a safe. If you save it to your Microsoft account, make sure you have a strong password that you don’t use on any other sites and that you haven’t told anyone else. For the best level of protection, save your recovery key in multiple locations.
The option to save your recovery key to your Microsoft account is new with Windows 8.1. Choose this option if you’re at all concerned that you might lose your recovery key or if you travel with a mobile PC and don’t bring your recovery key everywhere with you. It’s great for people like me who constantly misplace small things like flash drives.
If you choose to print the key or save it to a file or a USB flash drive, the file will resemble the following:
BitLocker Drive Encryption recovery key

To verify that this is the correct recovery key, compare the start of the following identifier with the identifier value displayed on your PC.

Identifier:
....4641E004-E05D-4890-8018-1D307E793C16

If the above identifier matches the one displayed by your PC, then use the following key to unlock your drive.

Recovery Key:
....243276-554829-375265-700414-356246-257708-607915-497486

If the above identifier doesn't match the one displayed by your PC, then this isn't the right key to unlock your drive.
Try another recovery key, or contact your administrator or IT Help Desk for assistance.
Notice that the file contains two separate, really long series of numbers, letters, and dashes:
Identifier. A series of 32 hexadecimal characters (which consist of the numbers 0–9 and A–E). If you need to recover BitLocker, BitLocker will display this identifier. This isn’t especially useful if you have only one PC, but if you have several PCs, this will make it much easier to find the recovery key that matches a particular PC.
Recovery Key. A series of 48 numbers, broken into eight groups of six; memorize this sequence so that you can start your PC if you ever have a problem with BitLocker. Just kidding, of course. It’s hard enough just remembering where you saved the recovery key.
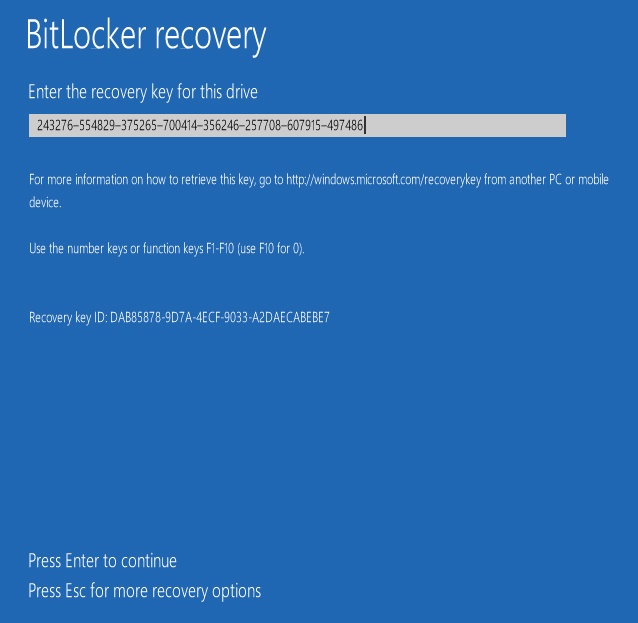
As shown in Figure 12-10, BitLocker prompts you with the recovery key ID when you attempt to recover your PC. If you type the recovery key correctly, Windows will start normally.
If you saved your recovery key to your Microsoft account, press Esc from the page shown in Figure 12-10. Windows 8.1 will prompt you to enter the recovery key again, but this time it will provide you a URL you can type into a different PC. Visit that URL (which redirects you to https://skydrive.live.com/P.mvc#!/recoverykey), log in with your Microsoft account (you might need to verify the new PC), and you’ll be able to retrieve your recovery key, as shown in Figure 12-11.

When you save the recovery key to a file, the file name includes the identifier. Don’t confuse this with the recovery key. If you lose your recovery key while your PC is still running, you can save a new copy of it by clicking Back Up Recovery Key from the BitLocker tool in Control Panel.
As you might imagine, typing a series of 48 numbers is an error-prone experience. Fortunately, BitLocker warns you if you make a mistake within each of the six-digit groups. Also, you need to use the recovery key only in the event of a BitLocker failure, which might never happen.
BitLocker’s initial encryption will fail if your drive has any errors. Therefore, your first step should be to preventatively find and fix any errors. Windows 8.1 is supposed to do this automatically, and it does a good job of it. However, in my experience, quite a few attempts at enabling BitLocker fail in a frustrating way because of drive errors, so it’s better to fix them ahead of time. For more information, read Fixing errors later in this chapter.
To enable BitLocker, search Settings for bitlocker and select BitLocker Drive Encryption. Then, click Turn On BitLocker, as shown in Figure 12-12.

Enabling BitLocker is a three-step process:
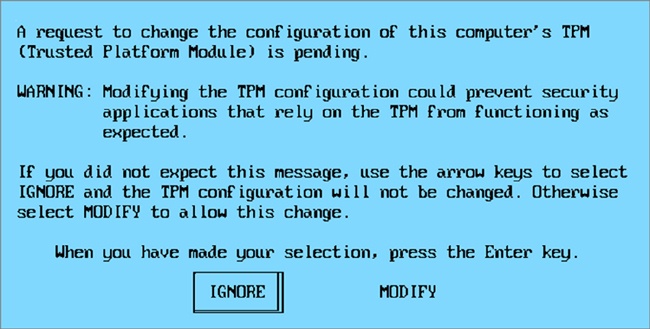
Turn on the TPM security hardware.
It’s possible that your TPM security hardware is already enabled. If not, Windows will prompt you to configure your TPM hardware and restart your PC. Depending on your PC, it’s possible that your BIOS will prompt you to allow the change, as shown in Figure 12-13. It’s also possible that you will need to enter your BIOS configuration and modify the TPM settings yourself.
Perform a system check to ensure that the PC is ready for BitLocker. This step is optional.
Encrypt the drive.
You can keep using your PC during the encryption process, and you can even restart if you need to. BitLocker will notify you when encryption is complete.
Troubleshooting: Windows says I don’t have a TPM
If you see the message in Figure 12-14, there are two possible causes: either your PC doesn’t have a TPM chip, or it has a TPM chip and it is disabled in the BIOS. Check your PC’s manual to determine how to adjust the BIOS settings, and look for an option to turn on the TPM chip. On most PCs, the TPM is disabled by default (for no reason I’ve been able to understand).

If you don’t have a TPM chip, you can still use BitLocker. Refer to the section, Using BitLocker without a TPM, earlier in this chapter.
You can also use BitLocker to encrypt removable drives. Simply connect your removable drive, right-click it in File Explorer, and then click Turn On BitLocker. BitLocker initializes the drive and then prompts you to protect it with a password, a smart card, or both (see Figure 12-15).

As with protecting fixed drives, you’ll have a recovery key that you can save to your Microsoft account, save to a file, or print. Recovery keys for removable drives aren’t usually as important, however, because the files on the drive are typically copies of files you have stored elsewhere, and a lost password won’t stop your PC from booting.
Because removable drives are slower than your system drive, encryption can take much longer. You can continue using your PC while encryption takes place, but don’t remove the drive until encryption is finished, or you might damage your files.
When you connect a BitLocker-protected drive, Windows 8.1 notifies you. Click the notification and type a password to quickly unlock the drive, or click More Options to recover it. Clicking More Options also gives you the option to automatically unlock the drive in the future, as shown in Figure 12-16.
You can use BitLocker-protected removable drives with Windows 7, too. If you want to use them on PCs running Windows XP or Windows Vista, you need to run the executable file stored on the drive to access the drive. For Windows XP and Windows Vista users, the drive is read-only, so you can copy the files to your PC and edit them there, but you can’t edit the files directly on the removable drive.

Drives aren’t perfect. They’re physical devices subject to fluctuating power, unexpected shutdowns, and (especially for mobile PCs) sudden impacts. Sometimes they get errors.
Total failures happen occasionally, and your only recourse is to recover from a backup (as described in Chapter 10). More frequently, small errors appear that might only change a byte or two on the drive. These happen so frequently that Windows 8.1 actually looks for them and attempts to fix them automatically, a process known as online self-healing. As part of that process, Windows 8.1 performs an online verification to make sure the error is the drive’s fault, and not an error occurring in some other part of the PC (such as a memory error).
Some types of drive errors must be fixed while Windows is offline. For example, if a drive error has corrupted a system file, Windows 8.1 can replace the corrupted file with a genuine version of the file—but only while Windows is offline. If Windows 8.1 automatically detects a drive error that it cannot fix while online, it will prompt you using a notification in the Action Center. You can then restart your PC to allow Windows to fix the problem, or simply wait until the next time you normally restart your PC.
To manually find and fix errors, switch to the desktop and open File Explorer. Within Computer, right-click your drive and then click Properties. On the Tools tab, click the Check button. If you’re prompted, click Scan Drive. Windows scans your drive, as shown in Figure 12-17.
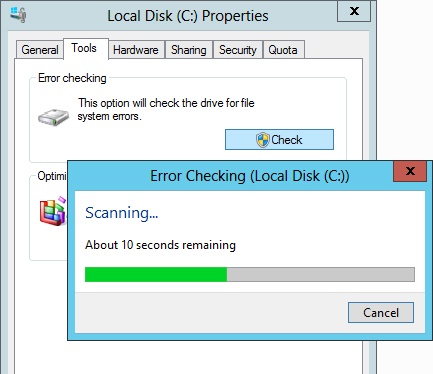
Windows 8.1 is the first version of Windows to allow you to scan for and fix some problems with your system drive while Windows is running. Previous versions of Windows required you to restart your PC to scan for errors, which often prevented you from using your PC for several minutes or even hours. Sometimes, Windows would automatically start the scan when you were restarting your PC, preventing you from using your PC without much warning (it did give you 8 seconds to abort the scan, but if you happened to be getting some coffee while the computer rebooted, your coffee break might extend into a lunch break).
Windows 8.1 will still need to fix some types of problems while offline, a process known as a spot fix. However, the scan was the time-consuming part, so if it does identify a serious problem during the online scan, it should be able to fix it during your next reboot within just a few seconds.
If you’re in the habit of manually scanning your drive for errors, or if you run ChkDsk regularly, you can stop once you upgrade to Windows 8.1. Like defragmentation (a process that was manual in earlier versions of Windows but is now automated), scanning for drive errors is best handled by Windows.
You still have the option of manually performing an offline scan, though you need to do this only when the file system is so corrupted that Windows cannot mount it. Use the WinX menu to open an administrative command prompt and then run this command (replacing C: with the drive you want to scan):
chkdsk C: /f /rInside OUT: Viewing ChkDsk output
Whereas earlier versions of Windows displayed the results from ChkDsk on the screen, Windows 8.1 shows a more attractive (if less informative) screen. To view the ChkDsk results, open the Computer Management console from the WinX menu. Browse to Event ViewerWindows LogsApplication, and then click Find on the Action menu. Search for the phrase chkdsk, and open the most recent event. Figure 12-18 shows an example of the ChkDsk output containing several errors that have been fixed.

Drives are one of the best upgrades you can make to improve the performance of an older PC (especially if you upgrade the system drive). If you happen to be running out of space, choose a fast drive to get some extra performance along with your capacity.
You can choose from two types of drives: magnetic drives and solid-state drives (SSDs). Magnetic drives have been common in PCs since the 1980s, and they’re still the best choice if you’re on a budget or you need lots of drive space.
Magnetic drive performance is typically illustrated using rotations per minute (RPMs): 5,400-RPM drives are the slowest common drives, 7,200-RPM drives are quite a bit faster, and there are also 10,000-RPM drives. Professionals might use higher-RPM drives, but they’re not common in consumer PCs. Drives with lower RPMs are slower, but they also tend to be less expensive, use less power, and last longer. For those reasons, choose low-RPM drives any time performance doesn’t matter: for example, when choosing a backup drive or a drive for a home theater PC (HTPC).
Generally, larger magnetic drives are faster than smaller drives. So, if you upgrade from a 500-MB, 7,200-RPM drive to a 3-TB, 7,200-RPM drive, you’ll probably discover that it’s much faster, even though the RPMs didn’t change. This makes sense, because a 3-TB drive accesses six times more data in every rotation than a 7,200-RPM drive.
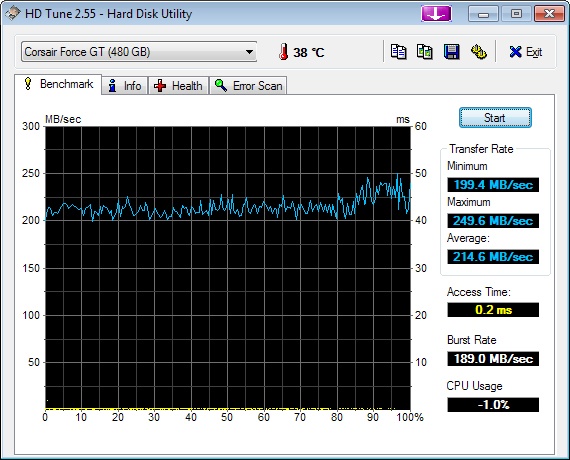
If you really care about performance or power usage (for example, if you’re using a mobile PC), SSDs are the best choice. SSDs don’t spin like a magnetic drive, so their performance isn’t measured in RPMs. Instead, you’ll see their performance measured in megabytes per second (MB/s or MBps). As of the writing of this book, typical consumer SSDs read data at 500 MB/s and write it at 250 MB/s. Don’t be confused by measurements of 6 Gb/sec or 3 Gb/sec; those are the maximum throughput of the SATA bus, and not the realistic performance of the drive.
The bus speed is important, though. If your PC only has SATA II connectors, read and write performance will be limited to about 240 MB/s, so you might not get the full performance out of an SSD unless you use SATA III. If you have a desktop PC, you might be able to add a SATA III card, but there’s still no guarantee that you’ll get the full performance from your SSD, because performance might be limited by the motherboard’s bus. If you connect an external drive using USB 2.0, you’re going to be limited to a maximum of 60 MB/s (though you’ll usually get even less).
MB/s measures the sequential read of a drive, which is how fast the drive could read a single file. There’s another important performance metric: access time (also known as seek time). Access time is the time required to start reading a new piece of data, and it’s typically measured in milliseconds (ms). Magnetic drives typically have access times of 4–8 ms, while SSDs often have access times of less than 1 ms. Naturally, faster is better.
If you want to measure the performance of your drive, use the free version of HD Tune, available at http://www.hdtune.com/. Run it on your drive before and after you upgrade so you can measure the performance difference. Figure 12-19 shows a screen shot of HD Tune running on an SSD drive that is limited by a SATA II connector.