
Ever since you were a small child, you’ve had your own unique preferences: your favorite color, your favorite food, and your favorite animal. Preferences like these don’t go away when you become an adult. In fact, they only become more complex.
You have a unique personality, with a set of preferences that you share with nobody else on the planet. Your friends, home, and music reflect those preferences, and so should your PC.
Yet the power to personalize a PC comes with a heavy cost. Simply allowing users to choose from round corners or square corners requires developers to test their app (and every update to that app) with both styles. Allowing users to choose translucent borders (such as the Aero theme in Windows 7) creates a user interface that can’t be supported on mobile devices with lower processing capabilities.
This chapter provides an overview of how you can personalize Windows 8.1 by using built-in settings or third-party tools, but it does not describe personalizing the desktop.
The Start screen is the first screen you see when you log in to Windows. It’s more than just a way to launch your apps: it’s an entire dashboard, showing live updates from your social networks, weather, news, and more. If you arrange the Start screen properly, you can have all the most important apps and updates available at a glance, without scrolling, and that can save you enormous amounts of time.
The next sections show you how to customize your Start screen and give you advice about the best ways to do it.
Note
Customizing the Start screen Watch the video at http://aka.ms/WinIO/startscreen.
By default, Windows 8.1 adds the standard apps to the left side of your Start screen and displays those same apps every time Windows starts. That left side of the Start screen is the most valuable real estate on your PC though, and it’s best filled with the tiles containing the most useful updates and the apps you launch most often.
Arranging tiles is intuitive: drag them on the Start screen. To change the size of a tile, select it by flicking or by right-clicking it, and then click Resize.
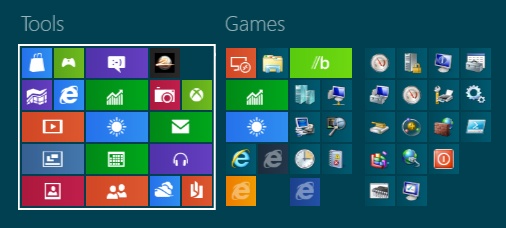
Although it might not be obvious, apps on the Start screen are divided into groups, as shown in Figure 5-1, and each group has a name. To move an app between groups, simply drag the app to the new group. To rename a group, select any app in the group by right-clicking or flicking it, and then type the new group name.
You can zoom out by pinching with your fingers or by pressing Ctrl+Minus Sign on the keyboard. With the Start screen zoomed out, you can rearrange entire groups by dragging them left or right.
I arrange the tiles so that all the apps I use regularly are at the left and appear by default on the Start screen. Apps I use less frequently are grouped logically according to the type of app.
While you don’t have as many options as you do on the desktop, you can still configure the color of the Start screen and choose from a few graphical themes. From the Start Screen, select the Settings charm, and then select Personalize. In the right pane, select the graphic you want, as shown in Figure 5-2, or select your desktop wallpaper (always the last item). Then, pick your color and the background style you want. That’s really it!

In the early versions of Windows, Microsoft expected everyone to have some basic systems administration skills, but each version has gotten progressively more automated. If everything goes as planned with Windows 8.1, most users will never need to launch an administrative tool.
That’s a step in the right direction, but power users still need every tool available to them. Especially if you’re familiar with earlier versions of Windows, you want to have the same tools at your fingertips. While the Windows 8.1 Start screen doesn’t show administrative tools by default, you can turn them on with a few clicks: from the Start screen, open the Settings charm, click Settings, click Tiles, and then click Show Administrative Tools.
Windows 8.1 displays the administrative tools only on the All Apps page (accessed by clicking the down arrow from the main Start screen), as shown in Figure 5-3. To add individual tools to your main Start screen, right-click or flick the tool and then select Pin To Start.

Most users will not need to manually shut down or restart their computer; they’ll simply close the lid or press the power button. Those who do can open the Settings charm and then click Power. For me, that’s quick enough.
If you’d rather bypass the Settings charm, you can add links to shut down or restart your computer to your Start screen by following these steps:
Open the desktop by clicking the Desktop icon from the Start screen or by pressing Windows+D.
Right-click, choose New, and then click Shortcut. In the Type The Location Of The Item box, type one of the following:
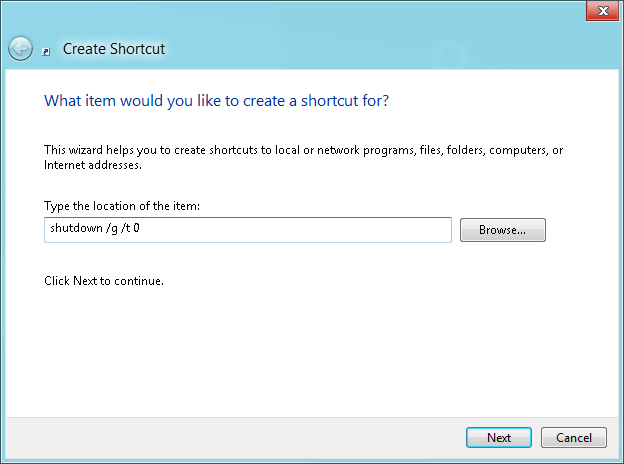
To restart Windows without restarting open applications, type shutdown /r /t 0.
To restart Windows and any open applications, type shutdown /g /t 0 (as shown in Figure 5-4).
To shut down Windows, type shutdown /s /t 0.
Click Next. On the What Would You Like To Name The Shortcut page, type a name for the shortcut, and then click Finish.
Right-click the newly created shortcut, and then click Properties.
On the Shortcut tab, click Change Icon.
In the Change Icon dialog box, select an appropriate icon, such as the power icon. Click OK twice.
Right-click the shortcut, and then click Cut.
Open File Explorer. Type the following path into the address bar, and then press Enter: %UserProfile%AppDataLocalMicrosoftWindowsApplication Shortcuts
Paste the shortcut into the folder by pressing Ctrl+V or by right-clicking and selecting Paste.
Now, open the Start screen. Your new app tile will be at the far right side. Drag it anywhere you want it.
Tiles appear on the Start screen, replacing app icons. You can click a tile to start an app, but if an app uses tiles effectively, the tile will give you the information you need to completely avoid starting the app.
Tiles can display content from the app and display updates without requiring you to open the app. Fortunately, tiles are designed to use very little battery power and bandwidth. Nonetheless, they do use some trace amount of power and bandwidth, and if you don’t use the live tile feature for an app, you might as well turn it off. I’ve turned off the live tile feature for the Mail, People, and News apps because I find the updates too distracting—they tempt me to check my email or Facebook when I’m supposed to be working.
To disable a live update for a tile, select an app on the Start screen by flicking it or right-clicking it. Swipe up from the bottom, and then click Turn Live Tile Off.
It’s entirely possible for live tile data to show something you’d rather not see on your Start screen. Realistically, it’s only a matter of time before one of your Facebook friends posts something absurd that shows up on your People tile. Fortunately, it’s easy to manually clear the live tile data. From the Start screen, select the Settings charm, click Settings, click Tiles, and then click Clear.
Windows 8.1 will clear all data from your live tiles, so you will see the default tiles. At some point, though, it will refresh the tile data, and your friend might make another appearance unless you disable live tile updates for that app.
To automatically clear live tile data when you log off from Windows 8.1 Pro or Windows 8.1 Enterprise, follow these steps:
Run gpedit.msc to open the Local Group Policy Editor. You can run an app by typing the name at the Start screen. For example, simply open the Start screen, type gpedit.msc, and then press Enter.
Select User ConfigurationAdministrative TemplatesStart Menu And Taskbar.
Double-click Clear History Of Tile Notifications On Exit. Click Enabled, and then click OK.
Restart the computer.
Apps can display notifications that appear as a message on top of other apps for 10 seconds. These messages appear any time the app has something it wants to tell you immediately. For example, an instant messaging app would show a notification each time you receive a new message, and Windows shows a notification each time you insert a memory card with pictures on it.
Unfortunately, it’s also possible for apps to show annoying notifications. For example, you probably don’t care if a role-playing game you installed six months ago is now offering 50 percent off bronze armor, or if a social networking app thinks you’ve gone too long without updating your status.
In those situations, you can turn off notifications for the offending app. Select the Settings charm, and then click Change PC Settings. In the left pane, click Search & Apps, and then click Notifications. In the right pane, turn off notifications for individual apps as shown in Figure 5-5. You can also use this page to set quiet hours during which Windows hides notifications. This is a good way to stop your PC from waking you up while you’re sleeping.

You should temporarily turn off notifications before giving a presentation or sharing your computer with a coworker (unless, of course, you want them to see the unexpected love note from your spouse/partner). To temporarily disable all notifications, select the Settings charm, and then click Notifications in the lower-left corner of the settings bar. You can then choose to hide notifications for one hour, three hours, or eight hours.
When the Notifications icon shows a clock over it, notifications are disabled. Click the icon to reenable notifications.
Note
Personalizing Windows 8.1 Watch the video at http://aka.ms/WinIO/personalize.
The lock screen is the first thing you see when you start Windows. The lock screen shows a picture along with app notifications, both of which can be customized by changing the lock screen picture or personalizing lock screen notifications.
Ideally, you should set up the lock screen to tell you that you don’t need to log in to your computer. For example, if you regularly log in just to see if you have any new email messages, you should display email notifications on the lock screen. Then, you can tell at a glance, without logging in, whether you have any new messages. I have it set up to display the details about the next appointment on my calendar and the number of new messages waiting for me.
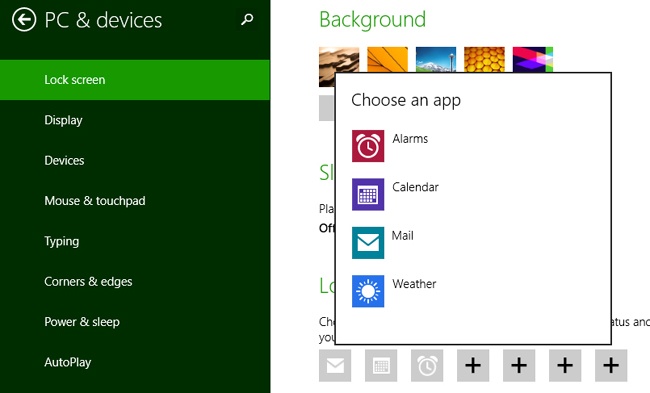
To set the lock screen picture, select the Settings charm and then click Change PC Settings. Select PC & Devices, click Lock Screen, and then click Browse to select a picture. To control which apps display notifications on the lock screen, under Lock Screen Apps, click a plus symbol to add an app, as shown in Figure 5-6. To remove a notification, click the icon and then click Don’t Show Quick Status Here.
Whereas a standard notification simply shows a number (which might indicate the number of new messages), a detailed notification shows text (which might show a preview of the most recent message). Only one app can show detailed notifications, so choose the one that will save you from having to log in to your computer most often, and be sure you’re comfortable with other people seeing those notifications, because anyone can see the lock screen without logging in.
To choose which app shows a detailed notification, click the icon below Choose An App To Display Detailed Status, and then click the app.
You can also completely disable the lock screen. Even though the lock screen is useful for giving you information without logging in and for preventing accidental input on touch-screen computers, it’s rather unnecessary on desktop computers, because you can usually get more detailed information from the live tiles on the Start screen.
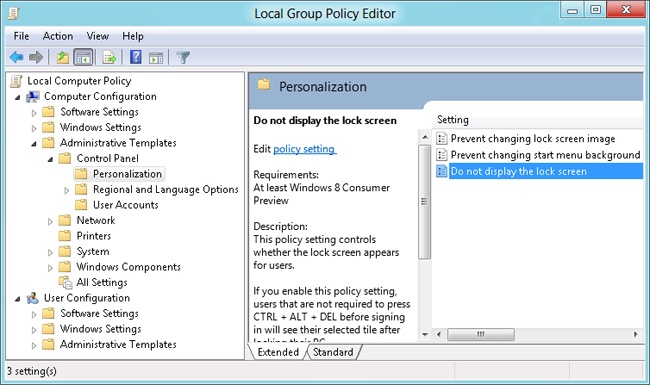
If you’d rather skip the lock screen and jump directly to the login screen, run gpedit.msc (only available on Windows 8.1 Pro and Windows 8.1 Enterprise) to open the Local Group Policy Editor. Select Computer ConfigurationAdministrative TemplatesControl PanelPersonalization, as shown in Figure 5-7. Double-click Do Not Display The Lock Screen. Select Enabled, and then click OK. The next time you restart the computer, Windows will display the login screen when it starts, bypassing the lock screen.
Over time, more applications will be designed for Windows 8.1, and users will rarely need to access the desktop. Windows 8.1 is designed with that long-term goal in mind. While Windows 8.1 is new, however, many of us will still spend a great deal of time running desktop apps created for Windows 7. If that sounds like you, you might also find it frustrating that Windows 8.1 deemphasizes the desktop. Fortunately, there are several steps you can take to make the Windows 8.1 desktop more usable while waiting for your apps to catch up with your new operating system.
If you missed it in Chapter 1, you can download and install a desktop app that provides a Start menu very similar to the one built into Windows 7. My favorites are ViStart, available at http://lee-soft.com/vistart/, and Start 8, available at http://www.stardock.com/products/start8/. Also check out Classic Shell at http://classicshell.sourceforge.net/.
You can launch any app simply by typing its name from the Start screen. However, if you’re a desktop user and you’d rather not use the Start screen to launch apps, you can create a special folder containing shortcuts to your Windows 8.1 apps. The easiest way to launch desktop apps is still by pinning the apps to the desktop taskbar.
To launch Windows 8.1 apps directly from the desktop, create a shortcut that links to the special folder location containing the apps. Follow these steps:
Open the desktop by clicking Desktop from the Start screen or by pressing Windows+D.
Right-click the desktop, select New, and then click Shortcut.
The Create Shortcut wizard appears.
On the What Item Would You Like To Create A Shortcut For page, type %windir%explorer.exe shell:::{4234d49b-0245-4df3-b780-3893943456e1}, and then click Next.
On the What Would You Like To Name The Shortcut page, type Apps, and then click Finish.
To make the folder easier to access, right-click it and then click Pin To Taskbar.
To launch an app from the desktop, open the folder you created and double-click the app. You might not be able to see the icons for Windows 8.1 apps because most of them are white, and File Explorer shows a white background by default. To see the icons, select them with your mouse or press Ctrl+A, as shown in Figure 5-8.

If you have a desktop app that doesn’t use a conventional installer (for example, an .exe file that you run directly), you can still add it to the Start screen. From the desktop, right-click the .exe file and click Pin To Start. Press the Windows key to open the Start screen; the new tile for the app will be the last item.
The Recycle Bin is always located on your desktop, and you can drag files and folders to it to delete them. To make it even easier, you can add the Recycle Bin to your taskbar, as shown in Figure 5-9.
To add the Recycle Bin to your taskbar, follow these steps:
Open the desktop by clicking the Desktop icon from the Start screen or by pressing Windows+D.
Start File Explorer by clicking it on the taskbar. On the View tab, select the Hidden Items check box. Close File Explorer.
If the taskbar is locked, unlock the taskbar by right-clicking it and then selecting Lock The Taskbar. If Lock The Taskbar does not have a check mark next to it, the taskbar is already unlocked.
Right-click the taskbar, select Toolbars, and then click New Toolbar. Select C:Users<username>AppDataRoamingMicrosoftInternet ExplorerQuick Launch.
This displays the Quick Launch toolbar on the taskbar, which provides quick access to shortcuts and folders. The Quick Launch toolbar was popular with Windows Vista and earlier versions of Windows, but Windows 7 and Windows 8.1 support pinning shortcuts to the taskbar, so the Quick Launch toolbar became redundant. However, you cannot easily pin the Recycle Bin to the taskbar, so the Quick Launch toolbar is still useful.
Grab the dotted line and drag the Quick Launch toolbar to the left, making it larger.
On the taskbar, right-click Quick Launch, highlight View, and then select Large Icons.
On the taskbar, right-click Quick Launch and clear the Show Text option.
On the taskbar, right-click Quick Launch and clear the Show Title option.
Drag the Recycle Bin from the desktop to the Quick Launch toolbar.
Once again, grab the dotted line to resize the Quick Launch toolbar. This time, drag it all the way to the right, making it as small as possible.
Right-click the taskbar, and select Lock The Taskbar.
Now, you can drag items to the Recycle Bin on your taskbar to delete them, and empty the Recycle Bin by clicking it on the taskbar.
Windows 8.1 provides an entirely new system for searching content on your computer and the Internet. Whereas Windows 7 simply searched files on your computer, Windows 8.1 allows applications to include their own search results. Windows 8.1 also stores your search results so that it can automatically suggest similar searches in the future.
To configure which applications can be searched and to clear your search history, select the Settings charm and click Change PC Settings. In the left pane, select Search & Apps, and then select Search.
Now, you can perform several different actions:
Clear your search history. Click the Clear button in the right pane.
Stop Bing from searching the web. Change the settings under Use Bing To Search Online to prevent all automatic Bing searches or to prevent them just when you’re using a metered connection (to reduce your data usage).
Stop Bing personalization. Under Your Search Experience, select Don’t Get Personalized Results From Bing. This option stops Bing from tracking your specific interests, so the results you get will be more generic.
Allow Bing to use your location. Under Your Search Experience, select Get Personalized Search Results From Bing That Use My Location. This option sends your location along with Bing queries, potentially allowing Bing to provide catered results. For example, searching for “pizza restaurant” might return local results rather than more generic results.
Filter (or stop filtering) adult content. Under SafeSearch, choose Strict, Moderate, or Off to control which types of results searches will return.
All computers, but especially mobile computers, must balance performance and power usage. Windows 8.1 default settings are effective for most users, and if you buy a new computer with Windows 8.1 installed, the computer manufacturer has probably tuned the settings specifically for your computer.
The Windows 8.1 update includes Power & Sleep options, which you can access by opening the Settings charm, selecting PC & Devices, and then selecting Power & Sleep. These options allow you to control whether Windows 8.1 automatically adjusts the screen brightness and to specify how long it waits to turn off the screen or to enter Sleep mode.
There are times when you might want to fine-tune power settings. For example, if you are on an eight-hour flight and you need your battery to last for as long as possible, you might be willing to tolerate slower performance. On the other hand, if you need to finish a report in the next 30 minutes, you want every bit of performance your computer has to offer.
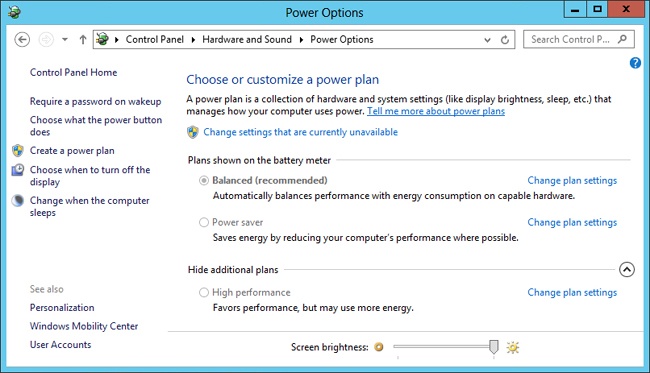
Windows 8.1 includes three power plans. Each one adjusts performance differently depending on whether the computer is plugged in or running on battery power. The three plans are:
Balanced. The default plan, which is sufficient for most users. Performance is maximized when the computer is connected to power, but the balance shifts toward efficiency when the computer is running on battery.
Power Saver. This plan reduces power usage even when the computer is plugged in. You might see less performance from your wireless network, but your batteries will last longer.
High Performance. This plan maximizes performance even when the computer is running on battery power. You won’t notice a difference when the computer is plugged in, but performance will improve when you are using batteries. Switch to this plan when you have more than enough battery power and you want your computer and wireless network to be as fast as possible.
I usually leave my computer on Balanced mode and adjust the advanced settings for my typical usage. When I need my batteries to last as long as possible (for example, on a long flight), I switch to Power Saver mode. When I have more than enough battery power, I switch to High Performance mode.
To change your power plan or adjust a power plan’s settings, search for power options and then select Power Options. Select a power plan, as shown in Figure 5-10. (If you don’t see High Performance, click Show Additional Plans.)
The first setting you might want to change is Require A Password On Wakeup. If you are not worried about other people using your computer or accessing your files, change this setting to No.
You might also need to customize power settings for specific scenarios. If you are uploading a large file, you don’t want your laptop to automatically go into Sleep mode when you close the lid. If you have a really weak Wi-Fi signal, you might want to boost the power of your wireless network radio without changing the power settings for other aspects of your computer. To customize a power plan’s settings, click Change Plan Settings, and then click Change Advanced Power Settings. Some of the more useful settings include:
Wireless Adapter Settings. Choose how much power your wireless network adapter uses. If your wireless signal is too weak when on battery power, if you know there’s a wireless network available but your computer can’t see it, or you just need as much bandwidth as possible, change it to Low Power Saving or Maximum Performance.
Processor Power Management, System Cooling Policy. The more work your PC’s processor is doing, the hotter it gets. When the processor gets hot, Windows can cool the processor in one of two ways: active cooling or passive cooling. Active cooling runs a fan, whereas passive cooling slows down the processor. By default, Windows uses active processing when the PC is plugged in and passive cooling when the PC is on battery power. If you’re like me and you find it annoying that your PC slows down when it gets busy, change the On Battery setting to Active.
Power Buttons And Lid. Choose what happens when you press the power button or close a laptop’s lid. For example, if you are transferring a file or encoding a video, you might want to close the lid on your laptop without putting the laptop into Sleep mode.
Display, Enable Adaptive Brightness. Adaptive brightness uses a light sensor on a mobile computer to adjust the screen brightness based on the amount of light in the room. The brighter the room, the brighter the screen. In dim rooms, adaptive brightness decreases the screen brightness to reduce power. Disable adaptive brightness if you prefer to manually control the brightness. To manually change the screen brightness, select the Settings charm, click the Brightness icon, and then adjust the brightness. Many computers also have dedicated hardware buttons for changing the screen brightness. Dimmer settings extend battery life.
Multimedia Settings, When Sharing Media. If you use a mobile computer to share music or videos across your network, you definitely do not want it to turn off automatically. It won’t turn off when plugged in, but, by default, it will turn off when on battery power.
Multimedia Settings, When Playing Video. If you use your computer to watch videos on battery power (for example, on an airplane), adjust this setting to balance video quality with power consumption. I would rather have my battery last through a long flight and tolerate lower video quality, so I set Multimedia Settings, When Playing Video, On Battery, to Optimize Power Savings.
Battery. Windows will warn you and then automatically hibernate your computer as your battery runs down. This works well when the battery is new, but when the battery is older, you might need more warning. If your computer warns you only seconds before the battery runs out, or it doesn’t have time to hibernate, increase the percentage for Critical Battery Level.
Using multiple monitors is a great way to improve the productivity of anyone working in a traditional computing environment with a desk, keyboard, and mouse. When you have more than one screen, you can keep more windows open simultaneously. Instead of returning to the Start screen to switch apps, you can simply move your mouse over to the other monitor.
Some apps can take advantage of multiple monitors, also. For example, Adobe Lightroom provides tools for cataloging and editing pictures. If you have more than one monitor, you can display thumbnails of all your pictures on one monitor while viewing the selected image full-screen on your second monitor, making it much faster to browse pictures.
If you use Windows 8.1 with more than one monitor, the Start screen and apps designed for Windows 8.1 will use the primary monitor, while the desktop will use all additional monitors. You can also use the primary monitor for desktop apps.
The sections that follow describe how you can customize the way Windows 8.1 uses your monitors.
Windows 8.1 will automatically configure the resolution for each monitor, and you will be able to move your mouse between monitors. However, Windows 8.1 might incorrectly guess the arrangement of your monitors. Follow these steps to correctly arrange your monitors:
Open the Settings charm, click Change PC Settings, select PC & Devices, and then select Display.
On the Customize Your Display page, click Identify to display a number on each monitor. Drag the monitors shown on the page so that they match the physical arrangement on your desk.
Select the monitor that you want to use for the Start screen and Windows 8.1 apps. If the Customize Your Display page shows Make This My Main Display, select the check box, as shown in Figure 5-11.
By default, Windows 8.1 extends your display across all desktops, which is the best way to use multiple monitors in most scenarios. If you want to show the same desktop on multiple displays (for example, if one display is a projector for a presentation), click the Multiple Displays list and then select Duplicate These Displays.
Click Apply.

Windows 7 was only capable of displaying the taskbar on your main display. Windows 8.1 makes an important improvement: it can display the taskbar on every monitor that displays the desktop. That feature is disabled by default, however. Follow these steps to enable it:
Right-click the taskbar, and then click Properties.
In the Multiple Displays group, select the Show Taskbar On All Displays check box, as shown in Figure 5-12.
Open the Show Taskbar Buttons On list, and then select Taskbar Where Windows Is Open. I find the other settings confusing.
Click OK.

You’ll definitely want to configure Windows 8.1 to use the language you’re most comfortable with. If you have people in your household who speak different languages, or are trying to learn other languages, you can add multiple languages to Windows 8.1, regardless of where you bought your computer.
To add a language, follow these steps:
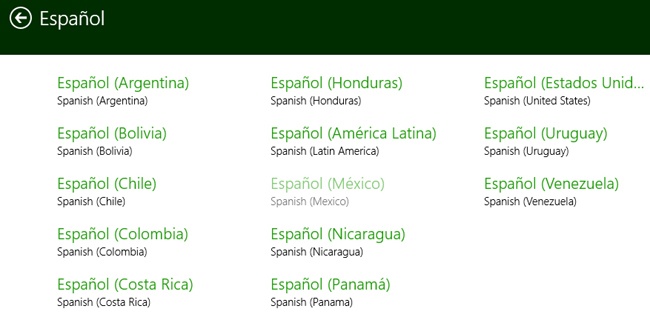
Open the Settings charm, click Change PC Settings, select Time & Language, and then select Region & Language.
Click Add A Language.
Select the language. If prompted, also select the dialect, as shown in Figure 5-13.
As shown in Figure 5-14, you can switch between installed languages at any time. Click the Settings charm, click the language in the lower-right corner, and then select the new language.

Pressing Windows+X on the keyboard or right-clicking the lower-left corner opens a list of commonly used power user tools, such as a command prompt with administrator privileges, as shown in Figure 5-15. This menu is commonly known as the WinX menu.

As you might guess, most users won’t ever stumble across the WinX menu. That’s okay, because most users won’t need these tools frequently enough to want a special menu. After all, all these tools can be started in other ways, such as by using the Start screen. However, the WinX menu can save power users a great deal of time, especially if you take a few minutes to add your own custom items to it.
The simplest way to update the WinX menu is to use the Win+X Menu Editor tool, available for download from http://winaero.com/. You can manually add your own items to the WinX menu by following these steps:
In File Explorer, type %LocalAppData%MicrosoftWindowsWinX in the address bar, and then press Enter. This opens the hidden folder.
On the Home tab, click the New Folder button. Create a folder named Group4.
Copy a shortcut from the %ProgramData%MicrosoftWindowsStart MenuPrograms folder to the %LocalAppData%MicrosoftWindowsWinXGroup4 folder.
Download the HashLink tool from http://www.withinwindows.com/2012/04/04/windows-8-secrets-the-winx-menu-and-its-hashing-algorithm/.
Extract the hashlnk.exe file and save it to your Windows folder.
Open an administrative command prompt. Switch to the %LocalAppData%MicrosoftWindowsWinXGroup4 folder.
Run the command hashlink <shortcut>.lnk.
Restart your computer. Technically, you only need to restart Explorer, but it is probably easier just to restart Windows.
Your custom shortcuts will appear at the top of the WinX menu.