
Each person in your home should have their own user account, and each time they use a PC, they should sign in to that account. Signing off or switching users takes a couple of clicks, literally: from the Start screen, click your picture and then click Sign Out or select a different account. That inconvenience is outweighed by many benefits:
Personalization. Each user account can use its own colors, Start screen arrangement, web bookmarks, and more.
Privacy. Each user’s files, apps, browsing history, and bookmarks can be kept separate.
Security. The first account you create is an administrator account and is allowed to change system settings. Administrators can also mistakenly install malware, which is easy to do. By creating new accounts for other people in your house, you can let them do almost anything they want while limiting the potential damage they might accidentally cause.
Protection. Unless you’re ready to reveal the entire Internet to your children, you probably want to restrict what they can do with a PC. By creating a separate account for your kids, you can use Family Safety to control their access without restricting your own.
Monitoring. Family Safety is also capable of monitoring PC and web activity. However, if everyone uses the same account, you can’t know for sure who did what on a PC.
This chapter discusses how to create user accounts, how to assign them different privileges, and how to configure Family Safety to allow your children to use a PC while keeping them as safe as possible.
By default, users sign on to Windows 8.1 using a Microsoft account, which is linked to Microsoft’s online services. You can also sign on using a local account, which is how users have logged on to Windows 7 and earlier versions of Windows. The sections that follow describe the advantages of each account type.
When you use a Microsoft account, you sign on with your email address and a password. Microsoft accounts authenticate with a Microsoft service across the Internet, though you don’t always need an Internet connection to sign on. As part of using a Microsoft account, Windows 8.1 backs up important settings to servers on the Internet.
Because settings are stored on the Internet, you can sign on to multiple computers with the same credentials and have your settings automatically synchronized. For example, if you rearrange your Start screen tiles and change the Start screen color on your desktop PC, the next time you sign on to your laptop, Windows 8.1 will download and apply those same settings.
Signing on with a Microsoft account also allows you to manage your account with a web browser. If you forget your password, you can reset it from any computer by visiting https://account.live.com/, as shown in Figure 18-1.

If you were to forget your password for a local account, you might never be able to sign on again, and you would permanently lose access to all of your encrypted files. This happens more often than you think; someone changes their password, forgets it the next day, and then needs to reinstall Windows before they can use their computer again. So, being able to update your account information from a browser can save you a great deal of frustration—it’s convenient, but it carries with it important security risks:
Microsoft stores your password, so you have to trust Microsoft to keep it safe. I do.
An attacker who gains access to your password can use the convenient online tools to change your password, possibly locking you out of your computer. To mitigate this, Microsoft allows you to change your password only from trusted computers. If you log in from a computer that isn’t trusted, you have to verify the computer’s trust using your email. If the password for your computer is the same as for your email, that won’t slow down the attacker.
Windows prompts you to create a Microsoft account when you first set it up. If you don’t already have a Microsoft account associated with your email address, Windows walks you through that process.
After you sign on with your account, you can create other accounts. Within PC Settings, select Users, and then select Add A User. Provide the user’s email address. If a Microsoft account is already associated with that address, setup is complete. The user will need to sign on with their existing Microsoft account password, and the computer will need to connect to the Internet the first time they sign on. If that email address doesn’t have a Microsoft account, you’ll be prompted to create a password and provide other account information, including information to allow you to reset your password, as shown in Figure 18-2, your date of birth, and your gender.
As shown in Figure 18-3, the last step of setting up a new account is to confirm whether the account is for a child. Specifying that the account is for a child turns on Family Safety, which is discussed later in this chapter.

Figure 18-2. The Add Security Info page prompts you for information to allow you to reset your password.

Under the covers, Windows 8.1 creates two accounts: a Microsoft account and a local account. When you sign on with your Microsoft account, Windows 8.1 verifies your password with your online Microsoft account if you have Internet access. If you don’t have Internet access, it verifies it against cached credentials. So, if you don’t have an Internet connection, you can sign on using the same password you used for your previous sign on.
All local authorization occurs using a behind-the-scenes local account, which you can manage using the same tools described in the following section. The local account user name is the name you typed as the user’s first name when creating the account. By default, additional Microsoft accounts are added to two local groups:
Users. A group that grants access to run and install apps from the Windows Store, but not to change important system settings. Users can install most, but not all, desktop apps.
HomeUsers. A group that grants access to your homegroup. Windows only creates this group membership if the PC has joined a homegroup.
Notice that additional Microsoft accounts are not added to the Administrators group. Only members of the Administrators group are allowed to change system settings and install desktop apps. By default, only the first account you create is a member of the Administrators group. To add an account to the Administrators group, follow the instructions in Changing group memberships later in this chapter.
Note
Creating users Watch the video at http://aka.ms/WinIO/logon.
As the name implies, local accounts are stored on your local computer. They don’t automatically synchronize like Microsoft accounts do, and you can’t reset your password from another computer. However, if none of the online features of Microsoft accounts are useful to you, you should use a local account because they’ve withstood the test of time; every earlier version of Windows used local accounts.
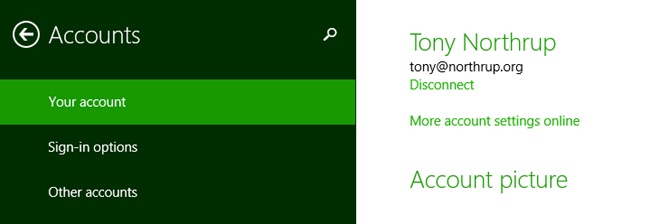
Windows prompts you to choose between a Microsoft account and a local account when you first create your password, but it’s easy to overlook. Look for the Sign In Without A Microsoft Account link. If you change your mind and want to change account types, open the Accounts page of PC Settings, select Your Account, as shown in Figure 18-4, and then click Disconnect.
Windows 8.1 gives you two additional authentication options that Windows 7 and earlier versions of Windows didn’t offer: picture passwords and PINs. Picture passwords are perfect for tablets, while PINs are useful anytime typing is difficult. Both reduce your computer’s security, but that compromise might be worth it for you.
You can create a picture password or a PIN only when you’re physically at your computer. In other words, you can’t do it across the network when using Remote Desktop.
Note
Passwords, picture passwords, and PINs Watch the video at http://aka.ms/WinIO/passwords.
Typing a password on a touch screen is a pain. As an alternative, Windows 8.1 supports using a picture password. When you enable the picture password feature, you tap, circle, and draw lines on the picture of your choosing.
To enable picture passwords, select Users in PC settings and click Create A Picture Password. Then, verify your credentials by retyping your existing password.
Select a picture to use for your picture password, and then select Open. The best pictures have multiple points of interest. A point of interest can be a person’s eyes, the peak of a mountain, or the wingtip of a bird. Any place you can remember to touch the picture is a point of interest.
After you select your picture, you can drag it to position it. The left portion of the picture is going to be hidden when you enter your picture password, just as it is in Figure 18-5. Select Use This Picture.
Now you can specify your gestures. For every single point of interest on the picture, you can make five gestures:
A tap
A small clockwise circle
A large clockwise circle
A small counterclockwise circle
A large counterclockwise circle

For every pair of points of interest on the picture, you can draw a line between them in either direction. Figure 18-6 shows three gestures:
A large counterclockwise circle drawn around the ibis’s right wingtip.
A small counterclockwise circle drawn around the ibis’s left wingtip.
A line drawn from the ibis’s eye to the tip of its bill.

The next time you log on, Windows prompts you to enter your picture password.
Windows doesn’t expect you to be precise with your touch; as long as the points you touch are relatively close to those you specified when you created your picture password, you won’t have any problem logging on. If you do have problems, click Switch To Password to type your conventional password, as shown in Figure 18-7.
Picture passwords can be quite secure, and I discuss the math behind this later in this section. Of course, because Windows always gives you the option to sign on using your password, adding a picture password reduces your security by just a tiny amount by giving an attacker another option for breaking into your computer.

Nonetheless, the convenience of tablet computers makes it worthwhile for me and many other users. To minimize the security risks of picture passwords, follow these best practices:
Use a complicated picture with many different points of interest. For example, a group picture of five people is better to use than a portrait of a single person, because there are more possible points to circle, tap, or draw a line to.
Don’t pick the obvious gestures. If you choose a picture of three people, tapping each of the three faces would be very easy to guess.
Go counterclockwise with your circles. Most people are inclined to draw clockwise circles, so a counterclockwise circle will be a bit more difficult to guess.
Go right to left with your lines. Like using counterclockwise circles, going against the natural inclination improves security.
Cover your screen. Don’t let people see you enter your picture password. Be wary of cameras that might record you logging in.
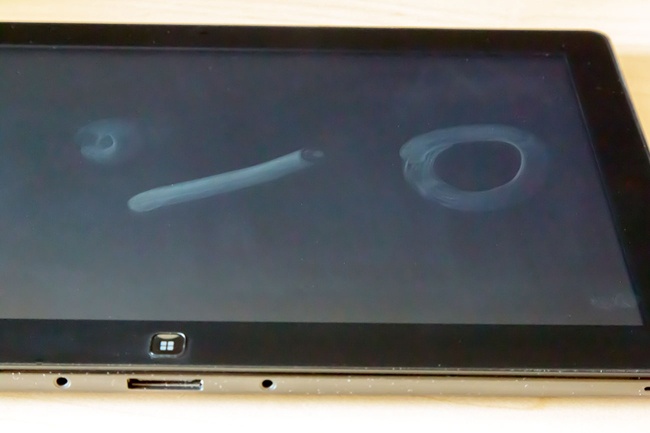
Leave your screen dirty. The worst thing you can do is to clean your touch screen and then log in, because the only smudges on the screen will be from your picture password. While those smudges wouldn’t reveal the sequence or the direction of lines and circles, they might reveal the three actions that you performed. When you do clean your screen, clean it after you log on instead of before you log on. Figure 18-8 shows my tablet computer after I cleaned the screen and then logged in with my picture password. You can clearly see the three actions, but you don’t know the sequence or the direction, so there are still 120 possible combinations. Windows stops you from guessing after five. Under these ideal circumstances, an attacker who gains physical access to my PC immediately after I clean the screen and log on still has only a 4 percent chance of guessing my picture password correctly.
Don’t use picture passwords. Really, if you’re paranoid about someone guessing your picture password and breaking into your computer, you’re better off using a complex and long conventional password. Picture passwords are a convenience, and they’re better than nothing (and also better than a PIN), but they’re simply not the most secure way to log on if you don’t want other people using your account.
Consider the simplest scenario: a picture password composed of three taps on a picture with three points of interest. If the attacker knows you use only taps and don’t tap in the same place twice, this results in six possible combinations, with the average attacker guessing it after three attempts. WIndows locks out users after five failed attempts to enter a picture pasword, so most attackers would be able to guess the password.
You can repeat yourself, however, raising the number of possible sequences to 27. The average attacker would need to guess 13 or 14 times to get it right, and by being locked out after five failed attempts, most attackers wouldn’t be able to guess this very simple picture password even when given information they wouldn’t normally have.
Consider a scenario where an attacker knows you hate drawing lines and large circles, and thus would only use taps and small circles (both clockwise and counterclockwise) on a picture with three points of interest. In that case, the number of possible combinations jumps to 729. Use only taps, small circles, and large circles, and the number of possible combinations is 3,375.
If the attacker doesn’t know anything about your picture password, but your picture only has three points of interest, the attacker would also have to guess lines drawn in different directions. Add lines in different directions between the three points of interest, and now the attacker would need to guess 9,261 combinations. Because they’re locked out after five guesses, the attacker would need an average of 926 separate sessions separated by a password sign on to guess the picture password (assuming they could precisely keep track of the different possibilities and what they previously guessed).
That’s secure enough for most home users. If you use a picture password with more points of interest, the possible combinations skyrocket. A picture with 10 points of interest has 2,744,000 possible combinations. If you don’t feel comfortable with the security of picture passwords, just keep typing a conventional password.
If you want to disable your picture password, open PC Settings, select Users, and then click Remove next to Change Picture Password.
You can sign on with a numeric personal identification number (PIN) instead of using a password. PINs aren’t terribly secure, but they’re easier to type.
Think of using a PIN as a compromise between typing an annoying password and not having any security at all. PINs are much easier to guess than a password, but if a password is annoying or difficult for you, a PIN is much better than nothing.
To enable signing on with a PIN, open PC Settings and select Users. Then select Create A PIN. Type your password to confirm your identity. As shown in Figure 18-9, you then need to type your new PIN twice and select Finish.

The next time you sign on to your computer, Windows will prompt you to enter your PIN. If you are using touch, Windows displays a numeric keypad, which is much easier to type on than a full keyboard. To sign on with a conventional password or a picture password instead, select Sign-In Options.
The math behind an attacker guessing your PIN is much easier to calculate: there are always 10,000 possible combinations (0000–9999), so the odds of guessing your PIN (assuming you don’t use your birth date or some other significant number) are 1 in 10,000. Like picture passwords, if you type the PIN incorrectly five times, Windows requires you to type your full password. So, the odds of an attacker guessing your PIN correctly in five attempts is 1 in 2,000.
If you want to disable your PIN, open PC Settings, select Users, and then click the Remove button beside Change PIN.
We rely on passwords to protect our privacy and our important data. If your passwords fall into the wrong hands, the results can be devastating:
Your identity is stolen.
Your credit card is used to buy things for other people.
Your credit is ruined.
Your private data is posted on the Internet.
Justin Bieber is added to your Likes on Facebook.
You can greatly reduce the risk of your password being compromised, and the damage that can be done with a successful compromise, by following a few basic password best practices.
Every time you create an account on a website, you trust everyone involved in that website with your password. If anyone who manages the website isn’t trustworthy, they might abuse your password. If you happen to use the same password on multiple websites, a single untrustworthy IT guy can log in as you on all of those websites. I worked in IT for many years. Most IT guys are very trustworthy, but some of them aren’t.
Besides requiring you to trust everyone who manages the website with your password, you also trust the skills of their IT staff to protect the password database from outside intruders. If a website’s password database gets hacked, that malicious person will definitely do terrible things with your identity. Websites and password databases get hacked all the time, and often the IT staff never even discovers it, so they can’t notify you of the intrusion. Sometimes the IT staff does discover it and they don’t notify anyone because they want to protect their reputation.
There are several ways attackers guess passwords:
If an attacker knows you personally or they have access to your personal information (for example, using your Facebook profile), they’ll attempt to guess your password using your favorite sports teams, your pets’ names, the names of your children, the name of your spouse/partner, different dates that are important to you, and so on.
If an attacker doesn’t have personal information about you, they’ll use a dictionary attack. A dictionary attack attempts to access your account using common passwords listed in a password dictionary. If your password is a common term or name, or a password used by other people, it’ll be in the dictionary and your account will be compromised.
Inside OUT: Storing your passwords
Now, I don’t know you personally, but I’d be willing to bet that you used the same password on two different websites. Almost everyone does. I don’t, and I have over 400 different passwords. Considering I have the long-term memory of a fruit fly, you’d be right in guessing that I store my passwords somewhere, and it’s not on sticky notes all over my desk.
I use a free tool called KeePass (Professional Edition), as shown in Figure 18-10. KeePass does a really good job of organizing your different passwords and keeping them as safe as they can be. You can synchronize KeePass databases between different computers and even your smartphone, giving you access to your passwords wherever you are.

Besides tracking your passwords, KeePass can protect your passwords with a key file, remind you to change your passwords on a regular basis, and can generate random, complex passwords, as shown in Figure 18-11.

Download the latest version of KeePass from http://keepass.info/.
The best way to keep your password from being guessed in these ways is to use a random, complex password, because that password won’t contain any personal information and it won’t appear in a password dictionary. Complex passwords mix uppercase and lowercase characters, numbers, and symbols. For example, “password” isn’t complex and would be easily guessed, while “XC3m$U}L” is complex and would be very difficult to guess.
If you use a random, complex password, attackers might be forced to use a brute force attack, which guesses every combination of letters, numbers, and symbols. There are so many possible combinations, however, that a complex password of more than six characters would probably take far too long to guess.
Complex passwords are a very good way to improve your account security. They’re also a very good way to make yourself crazy. Random passwords especially can be almost impossible to remember.
That’s one of the biggest benefits of using a Microsoft account. If you forget your password, you can use your email address to reset it. Microsoft accounts do not require you to use complex passwords (though the website will warn you that you aren’t using one when you change your password).
Inside OUT: Become a believer in complex passwords by cracking yourself
If you still have any doubt about the importance of complex passwords, download the Ophcrack live CD (the version for Windows Vista and Windows 7) and boot from it. If you can’t boot from a CD, use the Unetbootin tool (available at http://sourceforge.net/projects/unetbootin/) to create a bootable USB flash drive. In just a few minutes, the handy tool will display any passwords that aren’t complex, as shown in Figure 18-12. Only your complex passwords will remain private.

Ophcrack is a great way to make sure other people on your PC are using complex passwords.
However, you can configure Windows 8.1 to require complex passwords when you change the password for your local account or your Microsoft account using the PC Settings tool, as shown in Figure 18-13. This doesn’t stop you from changing your Microsoft account password online to something weak, but if you don’t trust yourself not to break your own rules, who can you trust?

Follow these steps to require complex passwords for Windows 8.1:
At the Start screen, type secpol.msc and press Enter.
Windows opens the Local Security Policy desktop app.
Select Security SettingsAccount PoliciesPassword Policy.
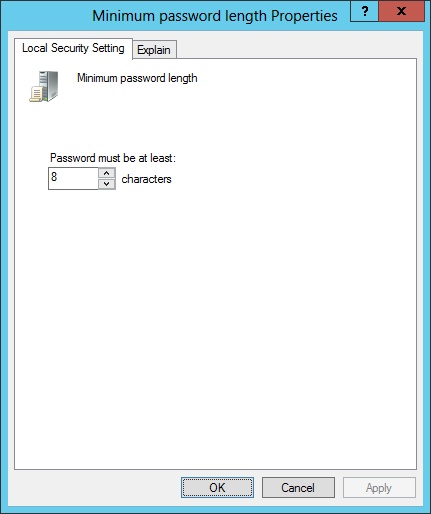
Double-click Minimum Password Length, and choose a minimum length. As shown in Figure 18-14, eight characters is typically considered very secure. Click OK.
Double-click Password Must Meet Complexity Requirements. Select Enabled, and then click OK.
Close the Local Security Policy app.
When you require complex passwords for a local account, Windows 8.1 requires that passwords:
Not contain the user’s account name or parts of the user’s full name that exceed two consecutive characters
Be at least six characters in length (though you can require more characters using the Minimum Password Length policy)
Contain characters from three of the following four categories:
English uppercase characters (A through Z)
English lowercase characters (a through z)
Base 10 digits (0 through 9)
Nonalphabetic characters (for example, !, $, #, %)
You should regularly change your password. Changing your password protects you in a number of ways:
If someone steals your old password, changing your password will prevent them from accessing your account in the future. Basically, it limits the damage a bad guy can do with your password.
If someone is attempting to crack your password by guessing it, they’ll have to start the entire process over.
It makes it virtually impossible for someone to identify your password by examining fingerprints on a touchscreen or keyboard wear.
It reduces the risk that you’ll use the same password for multiple accounts.
Changing your password regularly has a few disadvantages important enough to cause Microsoft to not require users to change them by default:
It’s quite annoying.
You’re much more likely to forget a password you recently changed.
If you’re afraid of forgetting your password, you’re much more likely to write it down somewhere.
If someone sees your password written on a note stuck to your monitor (this really does happen often), they’ll be able to log in as you, completely defeating the purpose of having a password.
If a sophisticated attacker steals your password, they might use your credentials to create their own account, negating the first benefit in the previous list.
Weighing the benefits and costs, most businesses require their employees to regularly change their passwords. As a home user, though, the choice is up to you. I don’t think most home users need to change their password on a regular basis. Instead, you should use a different password for logging on to Windows than you do for other websites, and change your password if you think someone might know it, if you break up with someone, or if someone you live with moves out.
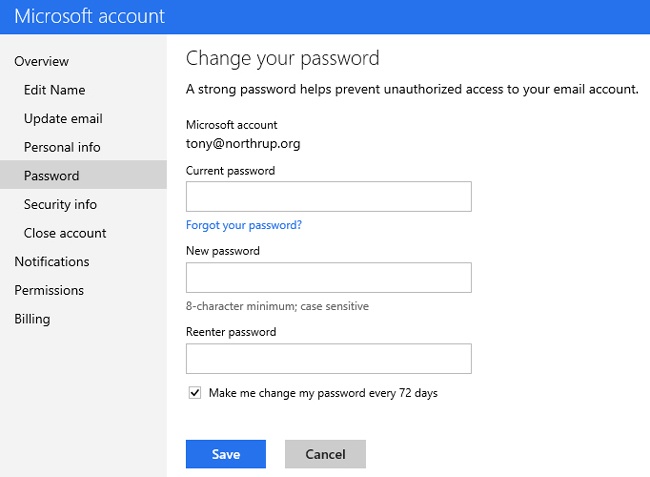
If you use a Microsoft account, edit your account information online at https://account.live.com/ and click the Change Password link. As shown in Figure 18-15, select the Make Me Change My Password Every 72 Days check box and then click Save.
If you use a local account, follow these steps to require regular password changes:
At the Start screen, type secpol.msc and press Enter.
Windows opens the Local Security Policy desktop app.
Select Security SettingsAccount PoliciesPassword Policy.
Double-click Maximum Password Age, and choose a time span after which the user will be required to change their password, as shown in Figure 18-16. Windows will notify the user several days in advance that they need to change their password. Click OK.
Double-click Enforce Password History. Set the value to 10, and then click OK. This prevents users from choosing a password that they have recently used, which is a concern because many people simply alternate between passwords when required to change their password.
Double-click Minimum Password Age, and set it to 1 day and then click OK. Working with Enforce Password History, this setting prevents the user from changing their password to something new and then immediately changing it back.
Close the Local Security Policy app.

The next time you change the password on your local account, Windows 8.1 will require it to meet the complexity requirements.
If you have a difficult time remembering long or complex passwords, there’s a new approach: passphrases. Whereas a complex password might be P@s5w0R>, a passphrase might be A little password is a dangerous thing.
The extra length of a passphrase offers several security advantages:
They’re easier to remember than a complex password.
Brute force cracking tools that guess passwords by attempting every combination will probably never guess the passphrase. These tools start with “a,” “b,” “c” and work their way to “zzzzzzzzzz,” covering every combination of letters, numbers, and characters in between. Guessing a long passphrase would be impractical.
Dictionary cracking tools guess passwords from a list of commonly used passwords. Because passphrases are not common, password dictionaries aren’t likely to have them.
Shoulder surfing (a process whereby someone learns your password by watching you type it) would be much more difficult.
They also have a couple of disadvantages:
If you’re using touch, or you’re not a good typist, typing your passphrase will be time-consuming.
Passphrases are a fairly new concept and haven’t withstood the test of time. There could be some fundamental security flaw that simply hasn’t been discovered yet.
As passphrases become more popular, attackers will add common phrases to password dictionaries, making those passphrases easy to guess. For example, “We’re not in Kansas anymore” and “Go ahead, make my day” will be as easily guessed as your dog’s name.
In summary, use a passphrase if you have a hard time remembering complex passwords. Just don’t use a common phrase, or a phrase that someone who knew you well might be able to guess. Instead, make up something ridiculous that you can remember but nobody else would ever be able to guess.
You can do basic account management using the same Users tool in PC Settings that you use to manage Microsoft accounts, including changing your password and adding new users. Perform more complex actions, such as adding users to groups or disabling an account, using the Computer Management console.
The easiest way to open the Computer Management console is to select Computer Management from the WinX menu. You can open the WinX menu by pressing Windows+X on your keyboard or by right-clicking in the lower-left corner.
With touch, the easiest way to open the Computer Management console is to enable administrative tools on the Start screen. To do that, open the Start screen and touch the Settings charm. Under Settings, touch Tiles, and then set Show Administrative Tools to Yes. The console will then appear on the right side of the Start screen.
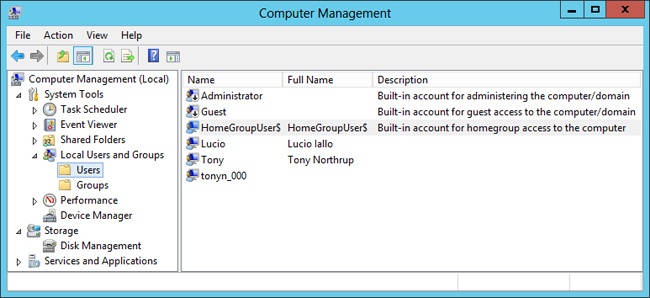
With the Computer Management console open, browse to System ToolsLocal Users And GroupsUsers, as shown in Figure 18-17. Some editions of Windows might not have the Local Users And Groups node.
The sections that follow describe common account management tasks.
If you have a friend or family member who occasionally uses your computer (say, your parents when they visit on vacation), it’s a good idea to create an account for them. This does a few things:
It lets them rearrange things on their Start screen without messing up your settings.
Assuming you don’t add them to the Administrators group, it greatly reduces the risk that they’ll install software or accidentally infect your computer with malware.
It keeps your own files and browsing history private so you don’t have to worry about them stumbling across something.
It keeps their files and browsing history private, so you aren’t scarred for life when you see what your parents are searching for.
If they already have a Microsoft account, just create an account for their email address, and their settings will be synchronized automatically. If they don’t have a Microsoft account, create a local account for them.
Creating an account is easy enough. Here’s the trick: when they leave and won’t be using your computer for a while, you should disable their account. Disabling an account keeps the settings and files on your computer but prevents the user from logging on. That reduces your security risk, especially if your dad still uses your birth date for his password.
To disable an account, double-click the user in the Computer Management console. As shown in Figure 18-18, select the Account Is Disabled check box, and then click OK.

The next time they visit, simply repeat the process to clear the Account Is Disabled check box and they will be able to log on, with all their files and settings intact.
If a person isn’t ever going to use your computer again, you can just delete their account. From the Computer Management console, right-click an account and then click Delete. If you use the Computer Management console, you will also need to use File Explorer to delete their user profile, which is located in C:Users by default.
A more user-friendly way to delete an account is to use Control Panel. To delete an account with Control Panel, search from the Start screen for remove user and then select Add, Delete, And Manage Other User Accounts. Select the account you want to delete. As shown in Figure 18-19, click Remove, and follow the prompts that appear to delete or keep their files.
If you delete a Microsoft account, the account still exists online, but that user will no longer be able to log on to your computer.

You can create security groups, such as Parents, Kids, and Guests, add users to one or more groups, and then assign different permissions to each. This isn’t usually necessary, however, even if you want to keep some files private, because encryption, sharing, and Family Safety are sufficient authorization for most home users. For more information about encryption, refer to Chapter 9.
To create a security group, open the Computer Management console and select System ToolsLocal Users And GroupsGroups. On the Action menu, select New Group. In the New Group dialog box (as shown in Figure 18-20), type the name of your group. Click the Add button to add members to the group by typing their user names. Then, click Create, and click Close.

You can also add users to existing groups. The easiest way is to select System ToolsLocal Users And GroupsUsers in the Computer Management console, double-click a user, select the Member Of tab, and then click Add (as shown in Figure 18-21). Then, type the name of the group and click OK.

Part of the beauty of PCs and the Internet is that they provide unlimited access to people and information anywhere around the world. If you’re a parent, that potential can be very scary, however. Most parents want to supervise their children, and many parents want to do their best to protect their children from unpleasant outside influences.
Family Safety, a feature of Windows 7 and Windows 8.1, can help you do that. Family Safety is capable of monitoring your child’s PC and web activity. It can also restrict what your child can do, where they can browse on the web, and how long they can do it.
You can manage Family Safety either locally (using Control Panel tools) or on the Family Safety website. The two tools provide similar capabilities. The website is handy if you need to make changes while you’re away from home. For example, you can use the Family Safety website while you’re at work to extend a child’s PC time while they do homework.
The sections that follow describe best practices for using Family Safety and show you how to configure it.
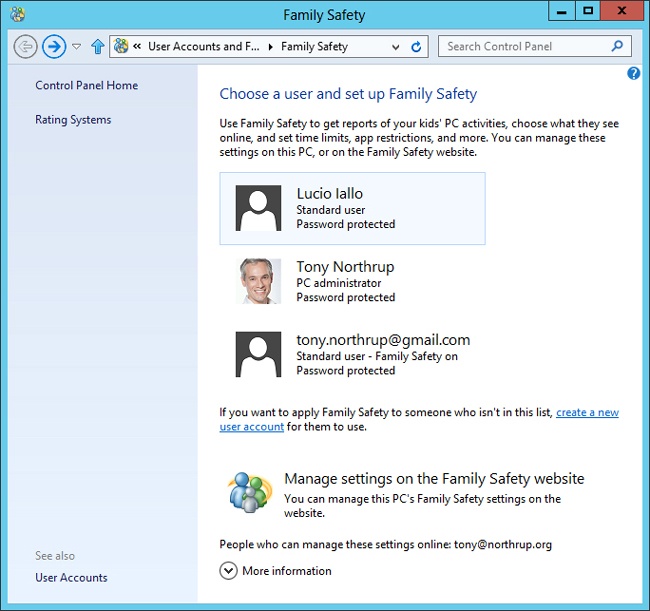
You can use Control Panel to turn on Family Safety on a user-by-user basis. From the Start screen, search for Family Safety, and then select Family Safety. Control Panel opens and lists the users on your computer, as shown in Figure 18-22.
Select the user for whom you want to turn on Family Safety, and then select On, Enforce Current Settings, as shown in Figure 18-23. Once Family Safety is enabled, you need to customize it to your particular needs.

Figure 18-23. Once you turn on Family Safety, you’ll be able to customize a large number of settings.
Note
Using Family Safety Watch the video at http://aka.ms/WinIO/familysafety.
The sections that follow discuss each of the settings in more detail.
Web filtering lets you control which websites users can visit. At a high level, there are three approaches to this:
Block all except. Also known as whitelisting, this approach allows the user to visit only the sites that you specify. This is the most secure approach, but it can be a frustrating experience for the user, because many links simply won’t work, and components of a webpage might not load correctly.
Allow all except. Also known as blacklisting, this approach allows the user to visit any website except those that you specify. This is not at all a good way to protect your children from the dangers of the Internet, because there’s no way to list every website that might be objectionable. However, it’s an excellent way to stop someone from spending their time on Facebook instead of doing their homework.
Allow based on ratings. This approach provides a compromise between the previous two approaches. You can specify the types of websites the user can visit. Internet Explorer will allow or block websites according to a rating system that you specify. This isn’t perfect, but it’s pretty good. If someone is determined, they can still find ways around the system. Likewise, there will be times when the rating system might block content that wouldn’t be objectionable.
To use any of these options, click Web Filtering in the User Settings window (shown in Figure 18-23). Then select the second option shown in Figure 18-24, which allows the user to use only the websites that you specify.

To allow a user to visit only the websites you specify, click Set Web Filtering Level, and select Allow List Only, as shown in Figure 18-25. Finally, select the Click Here To Change Allow List link, and specify the websites the user is allowed to visit.
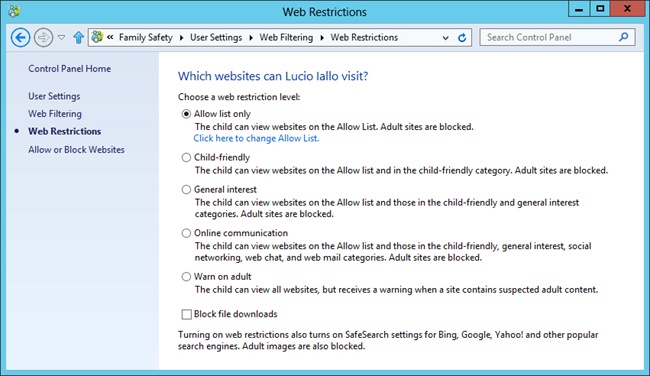
Figure 18-25. Select Allow List Only to limit a user to those websites you have reviewed and approved of.
To allow a user to visit any website except those you specify, simply click Allow Or Block Websites and add the websites you don’t want the user to visit, as shown in Figure 18-26. You can block specific websites in addition to applying other web filtering options.

Figure 18-26. If there are particular websites that you don’t want someone to visit, you can block them.
Blocking a website is far from foolproof. The user might be able to find a proxy server or gateway that will forward requests to the unauthorized website. Family Safety has thought of this, naturally, and blocks most such websites (including Anonymizer.com and translate.bing.com). However, it’s possible to find one that hasn’t been blocked.
Of course, you can’t be expected to compile a list of every good or bad website on the Internet. Most of the work of filtering websites needs to be done by Family Safety, and the simplest way to do that is to select one of the predefined web filtering levels:
Designed For Children. For little kids. This blocks just about the whole Internet, including search sites such as Bing.com and Google.com. Blocking search sites makes it more difficult for kids to find what they’re looking for, but they can still type the URLs for family-friendly sites such as Disney.com, Microsoft.com, and Northrup.org. For best results, create bookmarks for the sites your kids can use, and show them how to use those bookmarks.
General Interest. For older kids who might need to use the Internet for research, but who you don’t want on Facebook or Twitter. This allows most of the Internet, including sites such as Wikipedia.com, Bing.com, and Google.com. Search sites will have filtering active, somewhat limiting what kids can search for. Kids can still craft searches that will return very objectionable content, however.
Online Communications. This setting adds social networking sites such as Facebook and Twitter. Of course, the risks with these sites is that your kids will talk to people you wouldn’t want them to talk to.
Warn On Adult. The least restrictive setting, this blocks no part of the web. However, Family Safety warns the user if they’re visiting a site that might have adult content. The warnings work well if you rely on activity reporting to monitor your child’s web activity. After all, forcing the child to click past the warning (shown in Figure 18-27) removes any possibility that your child might have accidentally stumbled onto a site.
Block File Downloads. You can select this option in addition to selecting any of the previous options to prevent the user from downloading files. It’s generally a good idea to select this option.

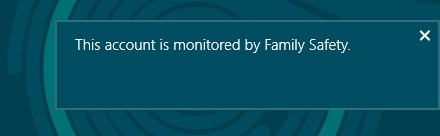
When you enable Family Safety, the user is notified when they log on, as shown in Figure 18-28. Some people prefer to secretly monitor a user’s web activity, but my personal philosophy is to always let the person know that they’re being watched. For example, I might install a camera to monitor employees at work, but I would never install a hidden camera. I believe it’s often important to monitor people, especially children, but I also believe that everyone has a right to privacy and to know when they’re being watched. People get tense if they think people might be watching them at any particular moment.
The biggest problem with filtering websites is that legitimate, safe content occasionally gets blocked. If a user attempts to visit a website that’s blocked, Windows 8.1 notifies them, and if they click the notification, they are given the opportunity to bypass the block by having a parent type their password (click My Parent Is Here), as shown in Figure 18-29.

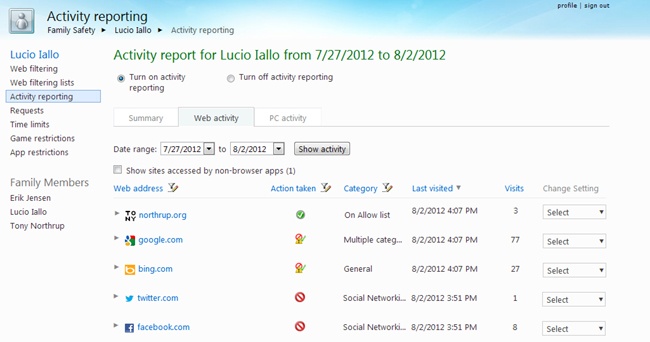
Activity reporting records every website a user visits, every Internet search, and how long they use the PC and different apps (including both Windows 8.1 apps and desktop apps). It’s a very precise way to find out what your children are doing on their computer. Figure 18-30 shows the Activity Reporting summary page, which you can view by visiting https://familysafety.microsoft.com/. Naturally, it will only have useful information if you’ve had it turned on for a user and that user has been at their PC.

The Web Activity tab (Figure 18-31) shows a list of every website the user attempted to visit, even if Family Safety blocked the website for the user. You can expand each website to view specific pages the user visited (click a link to open it in your own browser). It also shows you how many visits the user made, though it doesn’t show you how much time they spent on that website. In other words, if your child is playing a game at the same website all day, it will still show up as a single visit.
The PC Activity tab, as shown in Figure 18-32, shows how long the user was signed in, which apps they downloaded, which apps they ran, and how long they used each app.
Combined, these reports are a perfect way to make sure your child is using a computer appropriately. For example, if you tell your child not to play any games, you can check the PC Activity tab to make sure they didn’t launch any game apps, and check the Web Activity tab to make sure they didn’t play an online game. If you tell your child they can only use the computer for an hour a night, you can make sure they’re following your rule with the PC Activity tab (or allow Family Safety to forcibly limit their usage, as described in the next section). It wouldn’t hurt to give them a few minutes of leeway, because Family Safety doesn’t always detect precisely when a user steps away from the PC.

Figure 18-32. The PC Activity tab shows how long the user was signed in to their PC and which apps they ran.
If you enable Family Safety for a user before they log in for the first time, you’ll see a large number of apps downloaded from the Windows Store. You can ignore this part of the report; it’s Windows 8.1 installing the standard apps that are available for all users. It doesn’t even need to download the apps from the Windows Store, because they’re already on your local hard drive.
While you can view the Activity Report online at any time, Family Safety also sends you a weekly email for each user that contains the same information shown on each user’s summary page.
As shown in Figure 18-33, Family Safety can also limit how long a user is on a computer, making it easy to enforce rules like, “You can only use your PC for 45 minutes on weeknights.”

Figure 18-33. Use time limits to control how long your child uses a PC (but set the times carefully).
Keep in mind this is total PC usage. You can’t, for example, allow your kid to play a game for 30 minutes and do their homework for as long as they need to. If your child is using Microsoft Word to finish an important report and their time allowance expires, you’ll have to use the Get More Time button (as shown in Figure 18-34) to allow them to continue working. You can then choose exactly how much additional time they can have, in 15 minute increments.
Unfortunately, time limits aren’t very flexible. For example, you might want the weekend schedule to apply to holidays, or you might want to give your child extra time on Fridays. Time Limits can’t do that. If you don’t want to bypass the time limit for those exceptions, you could set the time limit to the most amount of time you’d ever want your child to use the PC, and then use activity reporting to monitor your child’s PC usage after the fact.

If you have more than one child, clever children might start bartering PC time. For example, if your daughter runs out of time, your son might log on with his account and allow the daughter to use his time. There’s no way around this type of trickery other than physically keeping an eye on your kids.
You can also set a curfew to make sure your child doesn’t use the PC when they’re supposed to be sleeping or doing their homework. Figure 18-35 shows a schedule that limits PC use on weeknights to a few hours in the evening, but allows more time on the weekends. If you also set time limits, the child will be limited by the most restrictive rules. In other words, if you set the curfew to stop them from using the PC at 8 P.M., but they still have 30 minutes of their time limit left, the curfew will sign them off.

App restrictions let you choose which apps users can run. This is important to configure along with web filtering, because many apps simply provide a user interface for a website. For example, if you block the Facebook.com website but allow the Facebook app, the user can still access Facebook.
You can configure app restrictions using the Family Safety Control Panel tool or by using the Family Safety website, as shown in Figure 18-36. Simply select which apps users can run.

Family Safety shows the user a notification when apps are blocked, as shown in Figure 18-37, and when the user attempts to run a blocked app. Oddly, it doesn’t remove the tiles for the apps the user can’t run, so those tiles simply tease the user on the Start screen. It would be a good idea to unpin apps that you don’t want the user to run.

Whereas app restrictions control access to individual apps, game restrictions allow you to control access based on game ratings. This way, if you install games on a shared computer, you can create rules that limit your younger children from playing games that might be too scary or violent for them without limiting which games you can play. Be sure to always sign out of Windows when you finish a session at the PC, however, because all these rules are useless if your children use your account.
As shown in Figure 18-38, Windows Store and game restrictions use the Entertainment Software Rating Board (ESRB) rating system by default. You can use the Rating Systems page in Control Panel to choose a different game rating system, but games in the Store are rated according to age and map closely to ESRB ratings, so I recommend simply using the default.

Figure 18-39 shows the Control Panel page used to select a game rating level when you use the ESRB rating system (different rating systems can have different levels). There are two very important options on the page: Allow Games With No Rating and Block Games With No Rating.
Choosing to allow unrated games means the user can run any game that hasn’t been rated, but all the games in the Windows Store are rated, so choosing this option would only block desktop apps. Blocking unrated games improves security, but it prevents the user from running any app that doesn’t have a rating and that you haven’t specifically allowed by selecting Allow Or Block Games. My recommendation is to select Block Games With No Rating and make a point of allowing every desktop game you want your child to play. It’s a nuisance, but it’s better than allowing a scary game to slip past the filter.
