
You can upgrade a PC running Windows XP, Windows Vista, or Windows 7 to Windows 8.1. That’s pretty amazing, especially considering Windows XP was released more than 11 years before Windows 8.1. Additionally, if you buy a new PC, you can easily transfer your files and settings from your old PC to your new PC.
This chapter prepares you for the upgrading process and teaches you all the tricks you need to know to make sure an upgrade goes smoothly. For information about buying Windows 8.1, refer to Chapter 3. If you’re looking for information about upgrading from the original release of Windows 8 to Windows 8.1, you really don’t need any. Simply run Windows Update and follow the prompts that appear.
To prevent yourself from losing data and to ensure that an upgrade goes smoothly, you should take care of a few things before performing your upgrade:
Back up your PC. This is really important. If you are running Windows Vista, perform a Complete PC backup. If you are running Windows 7, perform a system image backup. Windows XP didn’t include good software for backing up your entire PC, including apps and settings, so find third-party software. Be sure you have a bootable CD or flash drive that will allow you to restore your PC from the backup.
Upgrade your BIOS and other firmware. Motherboard and PC manufacturers occasionally release BIOS upgrades for PCs to update the lowest-level software that runs on the PC. Often, they release updates specifically to improve compatibility with new versions of Windows. Search for your PC model or make of motherboard to find a BIOS upgrade, and install the latest version of your PC’s BIOS.
Uninstall unwanted apps. From Control Panel, access the Add Or Remove Programs tool in Windows XP or the Uninstall Or Change A Program tool in Windows Vista and Windows 7. Remove any app that you aren’t using. This frees up disk space, improves the performance of your PC, and simplifies the upgrade.
Deactivate or deauthorize apps. Some apps, including Apple iTunes and Adobe Photoshop, can be authorized on only a limited number of PCs. Your upgraded PC might count as another PC. To avoid this, deactivate or deauthorize such apps prior to your upgrade.
Free up disk space. Windows 8.1 requires at least 16 gigabytes (GB) of free disk space, but more is better. Right-click your drive in Windows Explorer, and click Properties. On the General tab, click Disk Cleanup, and free up as much space as possible. Also delete any unwanted files.
Verify that you have enough memory (RAM). Your PC needs to have 1 GB of RAM for the 32-bit version of Windows 8.1 or 2 GB of RAM for the 64-bit version of Windows 8.1. To determine how much memory you have installed, right-click My Computer and then click Properties.
Verify that your PC supports Data Execution Prevention (DEP). Your CPU and motherboard must support DEP (a feature of newer CPUs and motherboards) and have it enabled. Check your BIOS settings and verify that DEP is enabled. If it’s not an option, you might be able to find a BIOS upgrade for your PC that adds support, but probably not.
Make sure you know your Wi-Fi password. Windows 8.1 won’t transfer your Wi-Fi password, and you don’t want to be left without Internet access after upgrading.
You can upgrade PCs running Windows XP and Windows Vista to Windows 8.1. In fact, many users report that their system actually feels quicker after installing Windows 8.1. It’ll certainly be more powerful and secure.
If you’re running Windows XP, you must have Windows XP Service Pack 3 installed. You can download Service Pack 3 by using Microsoft Update or directly from http://www.microsoft.com/en-us/download/details.aspx?id=24.
If you’re running Windows Vista and you want to keep your apps and settings, you must have Windows Vista Service Pack 1 or Service Pack 2 installed. If you already have Service Pack 1 installed, don’t bother to install Service Pack 2 before upgrading. If you have never installed a service pack, you can still perform an in-place upgrade, but you will only be able to transfer your personal files. To install Service Pack 2, visit http://windows.microsoft.com/en-us/windows/service-packs-download#sptabs=win8.
If you are running the 32-bit version of Windows XP or Windows Vista, you can only upgrade to the 32-bit version of Windows 8.1. Unless you plan to use more than about 3.5 GB of RAM, the 32-bit version of Windows 8.1 should work just fine for you. To determine whether you’re running 32-bit or 64-bit Windows XP or Windows Vista, right-click My Computer and then click Properties.
To perform the upgrade, launch Windows 8.1 Setup while your existing version of Windows is running. You can’t upgrade by booting your PC from Windows 8.1 Setup.
The upgrade process is straightforward, and I won’t walk you through every page of the wizard. I’ll cover the few tricky parts, however.
Unlike earlier versions of Windows, in Windows 8.1 you can’t easily bypass entering the product key, as shown in Figure 4-1. Windows Setup hasn’t made any changes to your PC at this point, so if you don’t have a product key, just close Setup and restart it when you have a product key. If you enter a product key that has already been used, Windows Setup will continue, but you’ll be required to purchase a new product key once Windows 8.1 is running.
Note
Upgrading to Windows 8.1 Watch the video at http://aka.ms/WinIO/upgrade.

The Choose What To Keep page presents a very important choice:
Keep Windows Settings, Personal Files, And Apps. Choose this option (available in Windows 7 and Windows Vista with Service Pack 1 or later only) to migrate everything to Windows 8.1. This is the right choice for most people.
Keep Personal Files Only. This option forgets your Windows settings (such as your desktop background) and your apps. This is the right choice if you are upgrading from Windows XP. If you’re using Windows 7, choose this option only if you haven’t customized Windows and the only app you use is a web browser.
Nothing. This performs a clean install of Windows 8.1, deleting all your files, apps, and settings. Only do this if you want to start completely clean and you have anything important backed up to an external hard drive.
If you choose Keep Personal Files Only or Nothing, Windows Setup will move the data it couldn’t migrate, including the data in your Program Files and Documents And Settings folders, into C:Windows.old, so you can access it after setup is complete. You will need to reinstall every app that you need.
If you choose to keep your apps, Setup will analyze your apps to determine if there’s anything that definitely won’t work in Windows 8.1. As shown in Figure 4-2, it prompts you to uninstall those apps to continue setup. In Figure 4-2, the compatibility report for my ultrabook shows two hardware related apps. While both those apps provide important functionality in Windows 7, Windows 8.1 has hardware support for those components built in, so I can uninstall the apps and still be able to use my trackpad and wireless.

You might have to restart your computer and then start setup again after uninstalling the apps. However, if an app’s uninstaller warns you that you need to restart your PC for the changes to take effect, you can probably ignore the warning and continue with setup.
If there are any apps you absolutely need that Windows 8.1 does not support, you have a few options:
Upgrade to Windows 8.1 and run the app with compatibility settings, as described in the section App compatibility settings in Chapter 6. This won’t work for some apps, however.
Upgrade to Windows 8.1 and run an earlier version of Windows within a virtual machine. Then, install the app in the virtual machine. This will work for many apps, but it might not work for games or apps that require a specific hardware accessory. For more information, refer to Chapter 20.
Install Windows 8.1 separately from your current Windows installation, and then dual-boot your PC. This will allow you to start either your existing Windows installation or Windows 8.1. However, Windows Setup will not automatically migrate your apps and settings. For more information, refer to Chapter 3.
Once you begin the installation, Windows will take about 20 minutes before it prompts you to personalize Windows. The process closely resembles that used to perform a clean installation of Windows 8.1, as described in Chapter 3.
All your hardware, including Bluetooth accessories, should work properly during Windows 8.1 setup. If you need to run a command to configure hardware, press Shift+F10 to open an administrative command prompt.
The Sign In To Your PC page will prompt you to enter your email address. We’re so accustomed to entering our email address in forms that it would be easy to overlook the significance of this step. If you enter your email address, your existing local account will be associated with a Microsoft account, and Windows 8.1 will use your Microsoft account for future logins and to synchronize your files. I’m a huge fan of using a Microsoft account, but if you prefer to keep your login local, choose Skip on the Sign In To Your PC page. For detailed information about account types, refer to Chapter 18.
If you buy a new PC with Windows 8.1 and you want to replace an existing PC, you can use Windows Easy Transfer to copy the files and settings from your old PC to your new Windows 8.1 PC. You’ll feel instantly at home at your new PC, though you will need to reinstall any apps.
As shown in Figure 4-3, Windows Easy Transfer provides three ways to copy your files and settings. The network option is going to be easiest for most people, and that’s the method that I’ll describe. If you have a large number of files, it might be worth your while to connect both PCs to a wired network to reduce the time the transfer takes.

If your old PC is running Windows XP, make sure you have Service Pack 3 installed. You can download the service pack by using Microsoft Update or directly from http://www.microsoft.com/en-us/download/details.aspx?id=24.
Here’s an overview of the Windows Easy Transfer process:
On your new PC running Windows 8.1, open the Start screen, type transfer, and then select Windows Easy Transfer. Follow the prompts that appear. On the Do You Need To Install Windows Easy Transfer On Your Old PC page, select I Already Installed It On My Old PC. Don’t worry if you haven’t actually done that, because you’ll install it in the next step.
On your old PC, download and install Windows Easy Transfer from http://windows.microsoft.com/en-us/windows7/products/features/windows-easy-transfer. Windows Easy Transfer hasn’t changed since Windows 7, so the Windows 7 version of Easy Transfer will work.
When you reach the Go To Your New Computer And Enter Your Windows Easy Transfer Key page (as shown in Figure 4-4) on a computer running Windows XP, make note of the key and type it into your new PC.
Windows Easy Transfer will verify compatibility. If it finds any problems, such as a missing service pack, it will warn you.
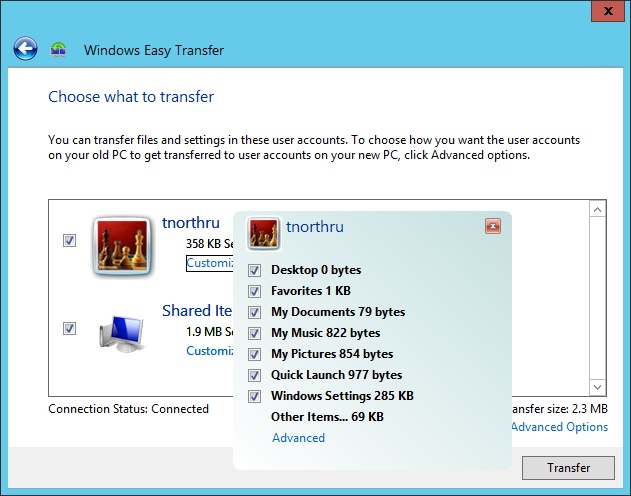
After it verifies compatibility, Windows Easy Transfer prompts you to choose what to transfer. Click the Customize link to choose exactly which files and settings should be transferred, as shown in Figure 4-5. To reduce clutter and speed the migration process, you should transfer only files and settings that you need. Click Advanced Options to configure how user accounts on your old PC are mapped to user accounts on your new PC, and how drives on your old PC are mapped to your new PC. If you have only one drive and one user on each PC, you don’t need to bother changing the defaults.
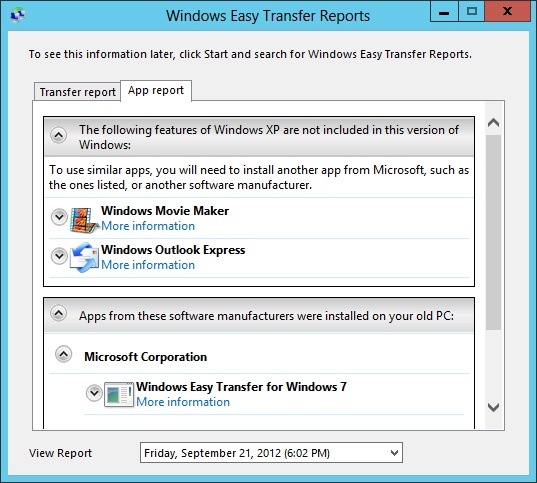
Windows Easy Transfer now copies over your files and settings. On the last page, be sure to click See A List Of Apps You Might Want To Install On Your New PC to view the App Report, as shown in Figure 4-6. Before you install the same desktop app on your Windows 8.1 PC, you should check the Windows Store to see if there’s a newer version of the same app, or an app with similar functionality, that was designed specifically for Windows 8.1.

Restart your PC, and Windows 8.1 is ready to use.
Feel free to play around as soon as you get Windows 8.1 installed. At some point, though, you should spend a few minutes configuring Windows 8.1 so you have easy access to the apps you use most often. Additionally, you should test your apps and hardware to identify any incompatibilities that weren’t found during setup and remove the massive amount of unnecessary files that setup leaves behind.
After setup is complete, you’ll see the Start screen for the first time. The left side of the Start screen has the standard apps included with every Windows 8.1 installation, as described in Chapter 2. Scroll right (or scroll down with your mouse scroll wheel) to see a selection of the apps that were migrated to Windows 8.1. Windows 8.1 doesn’t add all your apps to the Start screen; it seems to select those apps you use most often.
If any of your favorite apps are missing, right-click the Start screen or swipe up from the bottom, and then select All Apps. On the Apps screen, select each app that you want to appear on your Start screen, and then select Pin To Start. You can select apps by right-clicking them with your mouse or flicking them with your finger.
Of course, you don’t need to add every app to the Start screen. You can always access apps by typing the app name on the Start screen or by opening the App screen.
All apps migrated from your earlier version of Windows will run on the Windows 8.1 desktop, which isn’t optimized for mobile devices or touch. It’s a good idea to search for your apps in the Store to see if Windows 8.1 versions are available for download. Apps designed for Windows 8.1 will work better than desktop apps.
The Store will probably have several updates to apps that are preinstalled with Windows 8.1, so start Store and click Updates in the upper-right corner to install those updates. You should also select the Windows Update page from PC Settings to see if any updates to Windows components are available.
Now, you’re ready to customize Windows 8.1. Refer to Chapter 5, for information.
After you have Windows 8.1 up and running, you should spend a few minutes going through the tasks that are most important to you to make sure you don’t have any compatibility problems. Here’s a quick list of steps to take:
I suggest these steps not because my experience leads me to believe you’ll have problems. On the contrary, I haven’t had any compatibility problems with Windows 8.1. However, in the unlikely event you do have a compatibility problem, I don’t want you to be stranded without being able to use your PC.
Naturally, Windows 8.1 has different system files from earlier versions of Windows. Windows 8.1 doesn’t delete any of your existing system files or apps. Instead it saves them in the C:Windows.old folder, which will probably be about 16 GB if you’re upgrading from Windows 7.
Wait a week or two, and once you’re sure you don’t need any of your system files, delete that folder to free up some disk space. You can remove it by using the Disk Cleanup tool (described in Chapter 9) and choosing Clean Up System Files. Then, in the Disk Cleanup dialog box, select Previous Windows Installations, as shown in Figure 4-7. You can also select Temporary Windows Installation Files (about 5 GB) and Windows Upgrade Log files (about 170 MB).

I haven’t had any compatibility problems with Windows 8.1, but if Windows 8.1 doesn’t support an important piece of hardware or software and the vendor won’t provide you with an update, the easiest way to get back to your Windows 7 installation is to restore the system image backup I suggested you make at the beginning of the chapter. If you don’t have a recent backup, you should copy your files to an external drive and reinstall Windows 7 by deleting all existing partitions during the setup process. Then, restore your files from your external drive.
If you just don’t like the Windows 8.1 user interface, I suggest giving it a couple of weeks. You’ll probably learn to love it, as I have. If you still don’t like it, read Chapter 5 for information about customizing Windows 8.1 to be a bit more like earlier versions of Windows.