This chapter looks at the installation and configuration of the client access license (CAL) management services for both Terminal Server and MetaFrame Presentation Server. In order to run these products, a separate licensing service must be installed and configured for each product to enforce proper user access license compliance. A grace period is provided by each vendor (these durations are discussed shortly) before the corresponding licensing service must be “activated” and purchased licenses installed for client use. These grace periods exist to allow an administrator time to test out the proposed implementation and make any necessary changes without having to worry about reactivating the required licenses. Before getting into the details of the installation and configuration, I quickly summarize the licensing requirements and behavior of Terminal Services and MetaFrame.
Licensing requirements for Windows 2000 and 2003 Terminal Server are compared and summarized in the two following lists. More detailed information on Terminal Server licensing was discussed in Chapter 1, “Microsoft Windows Terminal Services.”
Whenever one or more Windows servers are configured to run as Terminal Servers (Application Server mode, in Windows 2000), a server running the Terminal Services licensing service is also required. A Windows server running Remote Desktop for Administration (Remote Administration mode, in Windows 2000) does not require a license server.
A Windows Terminal Server will function without a licensing server for a specified grace period before remote connections are denied. Even after the grace period, logons directly from the console (not using a remote console session) will be allowed. The grace period durations are as follows:
Windows 2000 Server: 90 days
Windows Server 2003: 120 days
Where the Terminal Services licensing service can actually reside will depend on what Terminal Server version is being used, as well as within what domain configuration the Terminal Server resides. Table 12.1 summarizes the host options for the licensing service.
Table 12.1. Terminal Server Licensing Service Host Options
TIP:
Adding an entry to the registry specifying the desired license server will override the normal discovery process. If a license server is listed in the registry but is unavailable, the Terminal Server will not attempt to find a license server using an alternate method. Populating the appropriate registry key is discussed a little later in this chapter.
The license server maintains license information within a Microsoft Jet database that exists locally on the license server. The license file itself is called TLSLic.edb and is located in
%SystemRoot%System32LServer
On average the storage requirements for each assigned license are less than 1KB, so an allocation of 1500 licenses would be expected to consume less than 1.5MB of total disk space.
During installation the license service can be defined as an Enterprise License Server, allowing it to automatically service client licenses to Terminal Servers residing in different domains within the same forest.
Once a license server has been discovered, the Terminal Server continues to use this same server unless it becomes unavailable. Availability of this license server is confirmed by the Terminal Server once every hour. If the license server cannot be located, the query for an alternate license server is immediately initiated.
If a license server has no permanent Terminal Server device tokens available for issuance to a requesting Terminal Server, it queries the other license servers in the domain to see if they have an available token. If a token is available on another server, the first license server requests that token from the other license server and then passes it on to the requesting Terminal Server.
Any client connecting to a Terminal Server requires a valid Terminal Server Client Access License (TSCAL), issued by the Terminal Server licensing server.
Until activated, the Terminal Services licensing server issues only temporary TSCALs, good for only 90 days to the requesting clients. If a permanent license is not issued to the client within that time frame, the temporary license expires and the client is no longer able to connect to the server. The licensing server itself is activated through a Microsoft clearinghouse; this process is explained in the “Activating a Windows 2000 Terminal Services License Server” and “Activating a Windows 2003 Terminal Services License Server” sections of this chapter.
The exact type of client license required varies based on the version of Terminal Server being implemented and is summarized in Table 12.2 and Table 12.3.
Table 12.2. Supported Windows 2000 Terminal Server Client Access Licenses
Available License Types | Notes |
|---|---|
Per Device licensing | Only one type of client licensing is supported with Windows 2000 Terminal Services; this is known as Per Device licensing. With Per Device licensing, a separate TSCAL must be purchased for each device that will be connecting to the Terminal Server with the exception of devices running Windows 2000 Professional or Windows XP Professional. Devices running one of these operating systems are issued built-in client access licenses by the licensing service. A built-in license is automatically available for use and never expires. All other devices such as Windows 98, Windows ME, Linux, and so on must acquire a permanent license that was purchased and installed on the license server. Purchased Terminal Server CALs must also be activated through the Microsoft clearinghouse. If no purchased licenses are available for these devices, the server issues a temporary license to the client that is valid for 90 days. If no purchased license is available within that time frame to replace the temporary license, the device is no longer able to connect. Client devices retain and use the same permanent client device license they were issued the first time they successfully logged on to the Terminal Server. This license is not relinquished when the user logs off. Because of this, the pool of available licenses diminishes as devices connect and licenses are allocated by the server. In order to facilitate the recovery of licenses that may have accidentally been assigned to the wrong device, an expiry date between 52 and 89 days is assigned to the license token when issued. If no validation occurs within 7 days of the expiration date, the license server automatically recovers the license and makes it available for re-use. This automated recovery feature was not present in the original Windows 2000 Server release but was added as a hotfix and eventually incorporated into Service Pack 3. As long as you are running Service Pack 3 or later for Windows 2000, this feature will automatically be included and available. |
Internet Connector License (ICL) | Windows 2000 also supports a special type of licensing called Internet Connector Licenses. These licenses are used to allow up to 200 concurrent anonymous non-employee connections to the Terminal Server. If a Terminal Server is configured to request ICLs, it will not process regular Terminal Services licenses. Any user connecting to this Terminal Server will be assigned an ICL and automatically be logged on using the special TSInternetUser account. The ICL is installed on the Windows 2000 license server, and then the Terminal Servers that will utilize this license must each be configured within the Terminal Services Configuration tool, as shown in Figure 12.1. |
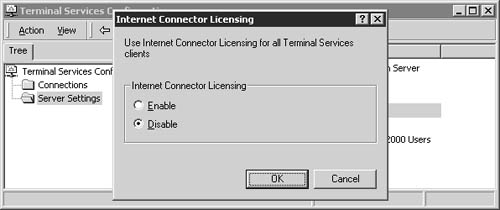
Table 12.3. Supported Windows 2003 Terminal Server Client Access Licenses
In conjunction with the release of MPS 3.0, Citrix introduced the new licensing model for MetaFrame known as MetaFrame Access Suite Licensing (MASL). Central to this is the requirement for a separate licensing server responsible for storing and issuing licenses when requested. MASL not only provides license support for MPS but also will eventually support licensing for the entire suite of Citrix products. At the time of this writing, MetaFrame Conferencing Manager 3.0 was the only other product supporting this licensing infrastructure. Following is a brief summary of the licensing requirements for the licensing server and MetaFrame client access licenses. A complete discussion on licensing requirements for MetaFrame Presentation Server is discussed in Chapter 2, “Citrix MetaFrame Presentation Server.”
When deploying one or more MetaFrame Presentation Servers, you are required to have a Citrix license server, where the MetaFrame client access licenses will be centrally stored and allocated to users connecting to an MPS 3.0 server.
The new MetaFrame Access Suite Licensing is not backwards compatible with previous versions of MetaFrame. It cannot manage licenses for earlier MetaFrame versions such as MetaFrame XP.
In order for an MPS 3.0 server to function, a license server must be present and accessible. As long as the license server is present, the following grace-period licenses are available:
Two non-administrative users: 96 hours (4 days)
Administrative user: Indefinite
The Citrix licensing service should be installed and functioning before installing MPS 3.0.
You will need to decide whether the license server will reside on a dedicated server or on a server that has also been assigned other roles (Terminal Server, file and print server, and so forth). There are two factors that directly influence the load exerted on the license server:
The number of MetaFrame servers that have been configured to point to the license server.
The number of user connections per MetaFrame server.
As each user logs on to a MetaFrame server, the server contacts the licensing server to check out or check in a client access license. Only under extremely high usage situations should you ever expect to see a significant load on the license server. Having said all that, I must add that Citrix does have some recommendations regarding whether or not to create a dedicated license server:
If you currently have or are expecting to have between 50 and 500 MetaFrame servers, you should have a dedicated license server.
If the number of servers is expected to exceed 500, it is recommended that you create multiple license servers to divide the load.
If you also currently have or will be implementing other Citrix products that utilize the new licensing server, you will need to include them in the total server count. When more than one license server exists in an environment, they do not communicate in any way and licenses on one server cannot be automatically transferred to the other server. If you must use more than one server because of multiple Citrix products, try to segregate them so that all the licenses for a product remain on the same server. For example, all MPS licenses go on one server and all Conferencing Manager licenses go on the other.
You should look into placing your license server on the same network as the majority of your MetaFrame servers. This keeps the license traffic on the local network, reducing chances of a wide area network (WAN) issue causing any problems.
If you have MetaFrame servers spread between two or more geographic locations, you may want to run a license server in each location.
Multiple license servers can also be employed when segmenting licensing into different departments for management or security reasons.
Multiple instances of the licensing server cannot be run on the same Windows server. If you require two distinct license servers, they must be located on separate machines.
Hardware selection for the license server was discussed in Chapter 6, “Terminal Server Hardware Planning.”
NOTE:
My personal preference is to combine the Windows 2003 Terminal Services licensing and MPS licensing onto the same member server in the domain (something Citrix supports), regardless of the number of MetaFrame servers that will be implemented. Unless absolutely necessary, I try to avoid adding critical services such as licensing or the data store to a MetaFrame server.
In a Windows 2000 domain I do not recommend that you run the Citrix licensing service on a Windows 2000 domain controller. I suggest trying to find another server in your environment that could host the licensing service.
The licensing server can be managed either from the command prompt or using the License Management Console (LMC). The LMC is a Web-based service that must reside on the license server and requires IIS 5.0 or later. The license server itself is not dependent on IIS. In order to view the license reporting that is available, you will need the LCM.
The licensing server currently runs only on all Windows Server versions (2000 or 2003), except for Windows Server 2003, Web Edition.
Unlike Microsoft Terminal Server licensing, which requires a unique license for each user or device that connects to the server, MetaFrame licensing is based strictly on concurrent user sessions. If for example you have 300 users who may connect to your MetaFrame server, but only 125 are ever logged on at any given time, you would be required to purchase the following licenses:
300 Terminal Server CALs
125 MetaFrame CALs
When a user logs on to a MetaFrame server, the MetaFrame server is responsible for communicating with the Citrix licensing server and requesting the appropriate license for the user. If the request is approved, the license is assigned to the active user session and the CAL is considered to be checked out. The license remains checked out and in use until the user logs off his or her session, at which point the license is returned to the license server, available for use by someone else. If a user attempts to log on and there are no client licenses available, the logon will be denied.
In order to make client access licenses available for use, the associated license code that came with your MPS product must be used to obtain a corresponding license file from Citrix’s Web site. This file is generated by Citrix based on the name of your license server and is valid only when installed on that server. Once the file has been loaded and validated by the license server, the licenses will be available for use by Citrix client sessions.
Now that we have completed a quick summary of the characteristics of the Microsoft and Citrix client access license management systems, we can move on to look at the actual installation and configuration steps for these products.
TIP:
If you are considering running the licensing service on a Terminal Server, keep in mind that although the overhead is relatively small, this service will consume additional resources that would otherwise be available to your end user. If alternate member servers are available in your workgroup or NT 4.0 domain, I recommend that you consider using them as the host for your licensing service instead of a Terminal Server.
When you are ready to implement a Windows 2000 Terminal Services licensing server, the installation steps are as follows:
Log on to the server that will host the licensing service and open Add or Remove Programs from the Control Panel.
Click the Add/Remove Windows Components button, scroll to the bottom of the list, and select Terminal Services Licensing, as shown in Figure 12.2. Click Next to continue.
If you have Terminal Services installed on the server (Application or Remote Administration mode), the Terminal Services setup dialog box will appear. Make sure the correct mode has been selected and then click Next to continue.
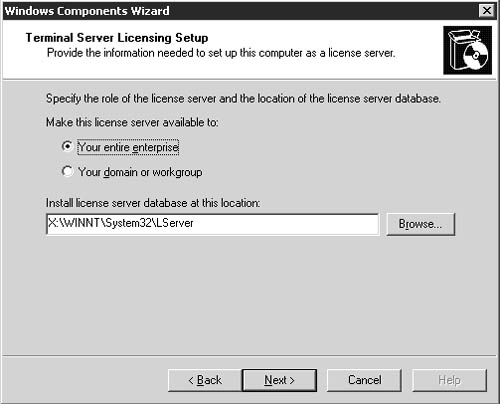
The Terminal Services Licensing Setup dialog box appears (Figure 12.3). Here you can define the scope of this license server’s role in your domain or workgroup. When you are installing the license service on a server in a workgroup or NT 4.0 domain, only the Your Domain or Workgroup option is available. When installing the licensing service on a Windows 2000 domain controller, you will also have the option of defining this licensing server as being available to “Your entire enterprise.” An enterprise license server will service TSCAL requests from all Terminal Servers on the same physical site, regardless of their domain membership. Based on your implementation plan (discussed in Chapter 8, “Server Installation and Management Planning”) you should already know what choice of license server you will deploy. Once you have selected the appropriate scope for your license server, provide the location where you would like to store the license database information. The default location is suitable for most implementations.
After you click Next, the necessary licensing service files are copied to the server and the installation completes. The licensing service becomes accessible immediately; you are not required to reboot the server.


Now that the licensing service has been installed, the next step is to activate it through the Microsoft clearinghouse. Until the licensing service has been activated it will not allocate Terminal Services licenses, and purchased CALs cannot be added to the server.
TIP:
After its installation has completed, the Terminal Services licensing service should automatically start. The most common reason for its failing to start is that you installed it onto a member server in a Windows 2000 domain instead of onto a domain controller. In this situation, an error is logged in the system event log stating, “Terminal Services Licensing can only be run on Domain Controllers.”
An undocumented feature does exist allowing you to configure this service to run on a member server even in a Windows 2000 domain. You simply update the ImagePath registry value for the TermServLicensing registry key and add the parameter -nodc. Once this has been done, the service starts properly. In order for a Terminal Server to locate this license server, the DefaultLicenseServer registry key must be populated on the Terminal Server (this will be described in the “Common Terminal Services Licensing Configuration Tasks” section of this chapter). This undocumented feature is supported by Microsoft and was originally created to assist customers who were unable to deploy the licensing service on a domain controller. I recommend against using this feature unless absolutely necessary. I have deployed Terminal Services licensing on a number of domain controllers and never had an issue with it affecting the stability or performance of that domain controller.
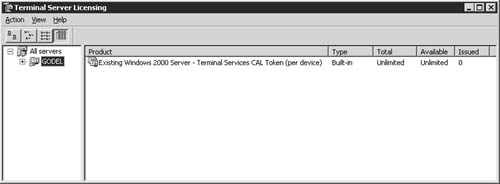
The new Terminal Services licensing service is activated using the Terminal Services Licensing application, located under Administrative Tools on the Start menu. While starting up, this tool queries for all available license servers and lists those it finds. In the right pane it displays whether the licensing service has been activated or not. Clicking on a specific server will display what licenses exist, which are available, and how many are in use.
TIP:
If a license server that you know exists does not appear in the list, you can manually add it by right-clicking All Servers, selecting Connect, and then entering the name of the license server when prompted. You need only provide the name of the server, not the UNC name with the leading double backslashes (\).
The status of each server is listed (activated or not). If you click a specific server, the right pane displays which licenses exist, which are available, and how many are in use (see Figure 12.4).
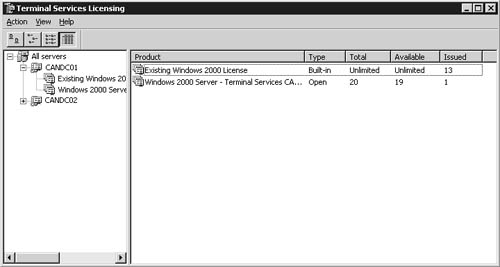
Figure 12.4. License allocation can be viewed by clicking on a server in the Terminal Services Licensing tool.
To activate a server, simply right-click the server name and select Activate Server. The Licensing Wizard launches and begins the following activation process:
After the welcome screen, you are provided with the four methods of activation listed in Table 12.3. The two recommended methods, Internet and Web activation, require the least amount of time and provide almost immediate access to the activation code.
Table 12.3. Terminal Services Licensing Activation Options for Windows 2000
Activation Method
Description
Internet
This option establishes a direct connection with the Microsoft clearinghouse.
Word Wide Web
Information is manually entered on Microsoft’s Terminal Server Licensing Web site at https://www.activate.microsoft.com, and the provided key is used to activate the server.
Fax
This option lets you generate a form that is then faxed to Microsoft for processing. If you select this option, you are presented with a list of countries from which to choose an appropriate fax number for sending the necessary information.
Telephone
Information is provided to a customer service representative who gives you the necessary activation information. A call to customer service may also be required if you need to have your client licenses re-issued due to a licensing server failure, migration to another license server, or other licensing issuance problem. This option presents the same list of countries provided with the Fax option. Select the appropriate country, and a customer service clearinghouse number will be provided. Call this number to receive your required activation code.
Selecting the Internet option and clicking Next will immediately initiate a connection with the clearinghouse. If the connection is successfully established, you will be asked to choose the appropriate licensing program under which to request the license activation (Figure 12.5).
After choosing the desired licensing program, click Next. You are then asked to provide company information such as name, contact name, phone number, and so on. Provide the required information and then click Next.
Reenter your e-mail address to verify it is correct. The activation code will be sent to this account, so be certain it has been entered properly.
Provide the remainder of the requested company information. After you click Next, the activation server is once again contacted and the request is prepared to be sent.
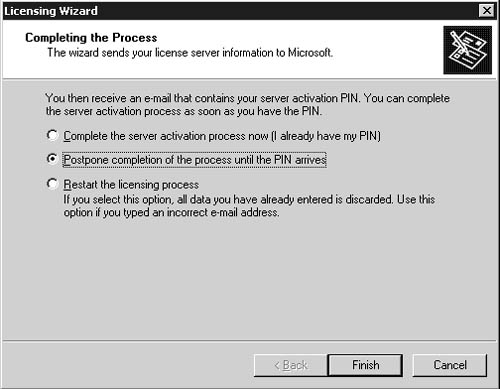
The next screen prompts you with the three options shown in Figure 12.6. Unless you wish to wait until the PIN arrives via e-mail, select the middle option: Postpone Completion of the Process Until the PIN Arrives. Clicking Close completes this process, and the status of the license service will then change from “Not activated” to “PIN needed to complete activation.”
When the e-mail arrives you will receive a PIN, which you must enter into the system to complete the activation. You once again right-click the server to activate and then select the Activate Server option. The dialog box from Figure 12.6 once again appears. This time select Complete the Server Activation Process Now (I Already Have My PIN). You will be presented with a dialog box where you paste in the PIN you received via e-mail. Clicking Next completes the activation.

After activating the Terminal Services License Server, you’re ready to install the Terminal Server client access license packs. These licenses are required for all Terminal Server clients other than those running Windows 2000 Professional or Windows XP Professional.
NOTE:
The activation PIN provided by Microsoft is generated specifically for the server from which you initiated the activation process. You cannot take this PIN and use it to activate a different license server. The PIN is specifically for the server’s product ID, which is displayed on the first screen that appears when the server activation process is initiated.
Client access licenses are installed on activated license servers by right-clicking the server name in the Terminal Services Licensing tool and selecting Install Licenses. The Licensing wizard is similar to the one used to activate the license server itself. With each client license pack comes a license and/or activation code that is sent to Microsoft; in return, you receive an activation code to be used to make the TSCALs available for distribution. The Licensing wizard requests the following information in this order when processing an Internet-based activation:
When the Licensing wizard starts, it displays the activation information for the license server including connection method, licensing program, and product ID. The activation method used to activate the server is automatically used to activate client licenses.
The next dialog box prompts you to provide the necessary client licensing information. Figure 12.7 shows an example of the information that would be requested with the Microsoft Open Licensing program. All this information should be available on the license information sheet that accompanied the purchased licenses. Enter all the information requested for your particular licensing program. If the information provided is correct, then after you click Next the information will be processed and the requested licenses will be added and activated on the Terminal Server.

With the release of Windows Server 2003, Microsoft discontinued the sale of Windows 2000–specific Terminal Services CALs. Instead, if you are required to purchase licensing for a Windows 2000 Terminal Server environment, you must purchase Windows Server 2003 Terminal Services licenses and then take advantage of the downgrade rights granted by Microsoft to apply these licenses to a Windows 2000 environment. A summary of the Windows Server 2003 downgrade rights appear on Microsoft’s Web site at http://www.microsoft.com/windowsserver2003/howtobuy/licensing/downgrade.mspx.
The process of downgrading to Windows 2000 TSCALs is not automated. You must contact the Microsoft clearinghouse and acquire a Windows 2000–equivalent license key that you can then apply to your Windows 2000 Terminal Services License Server. You cannot directly install a Windows Server 2003 TSCAL package on a Windows 2000 Terminal Services License Server.
To acquire the downgrade license, you will need to call the appropriate clearinghouse for your country and explain that you wish to downgrade the licenses from Windows 2003 Terminal Services to Windows 2000 Terminal Services. You will then receive a valid license key you can use to complete activation of the Windows 2000 TSCALs, as outlined in the previous section.
TIP:
If you will be deploying a Terminal Services License Server on a Windows 2003 server, you are not required to explicitly downgrade your existing Windows 2003 Terminal Services licenses in order to support Windows 2000 Terminal Servers. If a Windows 2000 Terminal Server requests a license from a Windows 2003 license server and there are no Windows 2000 TSCALs available, by default the license server will issue an available 2003 license in its place. This behavior can be modified by using a group policy and is discussed in the “Licensing Group Policy Objects” section of this chapter.
The steps for installing and activating a Windows Server 2003 Terminal Services licensing server are similar to those for a Windows 2000 licensing server. One of the main differences is the eligibility of a member server in a Windows 2003 domain to host the licensing service. As mentioned in Table 12.1, if a member server is configured as a domain license server, the Windows 2000/2003 Terminal Servers in the domain must have the license server listed as a preferred server. My recommendation regarding where to place the licensing service in a 2003 environment depends on whether or not you will be running MetaFrame Presentation Server:
Windows 2003 Terminal Services only—. Unless you are running in a workgroup or NT 4 domain, place the licensing service on a domain controller. The overall load introduced by a license server is relatively low, and placing it on a domain controller ensures that all your Terminal Servers can locate the license service even if you forget to hard-code the server location.
Windows 2003 Terminal Services with MetaFrame Presentation Server 3.0—. In this scenario, I prefer placing both the Microsoft and Citrix licensing servers on a dedicated or at least non-domain controller server. I do not recommend running the MPS license server on a domain controller, mainly due to the IIS requirement in order to use the management console.
NOTE:
I do not like running the licensing service on a Terminal Server, except in very small environments. As much as possible I recommend not having any data on a Terminal Server that must be backed up, even if it is only the license database.
When you are ready to set up a Windows Server 2003 Terminal Services licensing server, the installation steps are as follows:
Log on to the server that will host the licensing service and open Add or Remove Programs from the Control Panel.
Click the Add/Remove Windows Components button, scroll down to the bottom of the list, and select Terminal Services Licensing. Unless this server is also a Terminal Server, you are not required to enable the Terminal Server option when adding the licensing service.
The Terminal Services Licensing Setup dialog box appears (Figure 12.8). Here you define the scope of this license server’s role in your domain or workgroup. The option you choose will depend on the number of domains in your forest and the licensing distribution your environment is implementing. License server distribution is discussed in Chapter 8. For most environments, the Your Domain or Workgroup option is appropriate. Once you have selected the appropriate scope for your license server, provide the location where you want to store the license database information. The default location is suitable for most implementations.
After you click Next and provide the Windows Server 2003 CD-ROM if prompted, the necessary licensing service files are copied to the server, and the installation completes. The licensing service becomes available immediately; you are not required to reboot the server.
The next step is to proceed with activating the license server with Microsoft’s clearinghouse.
Once the license server is installed, you are required to activate it with Microsoft’s clearinghouse before it can provide anything other than temporary licenses. It is activated using the Terminal Services Licensing application, located under Administrative Tools on the Start menu. This tool must be run from the server on which you installed Terminal Services licensing. When loading, this tool queries for all available license servers and lists those it finds. If a server is not listed, it can be manually added by right-clicking All Servers and selecting Connect. In the dialog box, type the name of the server you wish to add.
The status of each server is listed (activated or not). If you click an existing server, the right pane displays which licenses exist, which are available, and how many are in use. Figure 12.9 shows how this would look immediately after installing Terminal Services licensing on a Windows 2003 domain controller. The only licenses available by default are the existing built-in Windows 2000 tokens, which are included to provide backwards compatibility with the Windows 2000 Terminal Services licensing.
To activate a server, simply right-click the server name and select Activate Server. The Licensing wizard will launch and begin the following activation process:
After clicking Next to move past the welcome screen, you are provided with three methods of activating, which are listed in Table 12.4.
Table 12.4. Terminal Services Licensing Activation Options for Windows Server 2003
Activation Method
Description
Automatic connection
Establishes a direct connection with the Microsoft clearinghouse.
Web browser
Information is manually entered on Microsoft’s Terminal Server Licensing Web site at https://www.activate.microsoft.com, and the provided key is then used to activate the server.
Telephone
Information is provided to a customer service representative who then gives you the necessary activation information. A call to customer service may also be required if you need to have your client licenses re-issued due to a licensing server failure, migration to another license server, or other licensing issuance problems. This option presents a list of countries. Select the appropriate country, and a customer service clearinghouse number will be provided. Call this number to receive your required activation code.
The two recommended methods, automatic connection and Web browser, require the least amount of time and provide immediate access to the activation code. For this example, we will choose automatic connection.
Select Automatic Connection and then click Next. The application will attempt to establish a connection with the clearinghouse. If this is successful, you will be asked to provide your name, company’s name, and country.
On the next dialog box you are asked to provide additional information, including your e-mail address and a mailing address. All this information is optional and can be left blank. After you click Next the application establishes a connection with the clearinghouse and automatically activates the license server. With the Automatic Connection option, there is no need to wait for an e-mail response as you would with a Windows 2000 license server.
After activating the Terminal Services License Server, you’re ready to install the Terminal Server client access license packs. On a Windows 2003 license server, you can install both Windows 2000 and Windows 2003 Terminal Server client access licenses. Depending on what version of Terminal Server a user connects to, the license server will issue the appropriate license to that user.
Client access licenses can be installed only on activated license servers. This is done by right-clicking the server name in the Terminal Services Licensing tool and selecting Install Licenses. The Client Licensing wizard is very similar to the one used to activate the license server itself. With each client license pack comes a license and/or activation code that must be provided during the activation; in return, you receive an activation code to be used to make the TSCALs available for distribution. When the Terminal Services CAL Installation wizard is launched, the first dialog box displays the license server settings, including the installation method (defaults to the one used when activating the server) and the licensing program. If any of the displayed information needs to be changed, you can cancel the license installation, right-click the server name, and then choose Properties from the pop-up menu. From here you can also modify any of the information you may have entered when activating the server.
Automatic license activation would proceed as follows:
After confirming the settings on the Welcome dialog box, click Next to begin.
You are now requested to choose the appropriate license program for your environment. You are presented with eight options:
License Pack (Retail purchase)
Open License
Select License
Enterprise Agreement
Campus Agreement
School Agreement
Services Provider License Agreement
Other agreement
When an option is selected, the description at the bottom of the dialog box updates to reflect that selection, and an example of the license code format required is also shown. Choose the option that most closely matches your current license program with Microsoft and then click Next.
You are now required to enter all the desired licenses that you wish to install on this license server, as shown in Figure 12.10.
Once you have added the desired license codes, click Next. Each valid code is sent to the clearinghouse and processed, and the corresponding license is installed on the license server. When the process is completed, a Summary dialog box appears listing all the installed licenses.

All installed licenses are now available for distribution when requested by a Terminal Server.
If you have not already done so, I suggest you configure your Terminal Servers to use the appropriate license configuration for your Terminal Server environment, either Per Device or Per User. This option is configured on the Terminal Server by running the Terminal Services Configuration utility, selecting Server Settings, and then choosing the licensing mode as shown in Figure 12.11. This option must be explicitly set on each Terminal Server. It currently cannot be set using a group policy object in an Active Directory domain.

Windows Server 2003 Active Directory introduces a number of additional group policy objects (GPO) tailored specifically for Terminal Services. Included in this set are two Computer Configuration policies specifically created to dictate the behavior of the Terminal Services licensing service. These policies can be found in the following folder within the GPO editor: Computer ConfigurationAdministrative TemplatesWindows ComponentsTerminal ServicesLicensing
The two policies are
License Server Security Group—. This policy allows you to limit what Terminal Servers and other license servers can request licenses from a 2003 Terminal Services License Server. By default, a 2003 license server will grant licenses to any requesting Terminal Server (2000 or 2003) or other license server. When this policy is applied to a 2003 license server, a local security group is created on the server called “Terminal Server Computers.” The license server will then issue licenses to only a requesting Terminal Server or license server if it is a member of the local security group. Initially when this policy is applied, the group is created without any members, so until Terminal Servers are added to this group the license server will not issue licenses to any server.
The standard practice of local group membership should be applied in this situation. Begin by creating a domain group called something like “Authorized Terminal Servers,” and into it add all the Terminal Servers and license servers in the domain that you want to be authorized to request TSCALs. Now assign this domain group to the local group on the license server. If the license service is running on a domain controller, this will be a domain local group. Once the domain group has been added to the local group, you need to manage membership in only the domain group in order to control the list of authorized servers. Figure 12.12 shows this group, which was automatically created on my domain controller when I enabled this GPO. In this example I have a Windows 2003 Terminal Services license service running on this test domain controller.
Prevent License Upgrade—. The other GPO dictates whether or not the license server will substitute an available Windows 2003 TSCAL when a Windows 2000 Terminal Server requests a Windows 2000 TSCAL but none are available for issuance on the license server. The default behavior is to allocate a Windows 2003 TSCAL if there are no Windows 2000 TSCALS available. By enabling this GPO, you prevent this substitution and instead force the Terminal Services License Server to issue a temporary license if there are no full TSCALs available.

TIP:
Use of group policies to manage a Terminal Server implementation is discussed in detail in Chapter 15, “Group Policy Configuration.”
One of the major changes in licensing between Windows 2003 and Windows 2000 is the elimination of the built-in license for the most recent version of the Windows desktop operating system, commonly referred to as “desktop equivalence.” Windows 2000 Terminal Services licensing exempts users running Windows 2000 Professional or Windows XP Professional from requiring an additional license to access a Windows 2000 Terminal Server. A license is automatically provided by the licensing service for clients running one of these operating systems. The license in this case is drawn from an infinite pool of built-in Windows 2000 licenses.
Windows 2003 Terminal Services eliminates this exemption and requires that a license be provided for all clients, regardless of the desktop operating system they are using. In order to provide some compensation to those users who may have anticipated that desktop equivalence was going to continue to be supported, Microsoft is offering a Windows Server 2003 TSCAL for each Windows XP Professional license purchased prior to April 24, 2003 (the official date of Windows Server 2003’s launch). These transitional licenses are being offered on a one-to-one basis, and if you also have Software Assurance or Upgrade Advantage coverage as of that date, that coverage will automatically carry over to this new license as well. More details on these transitional licenses as well as the form letter required to request a license can be found at http://www.microsoft.com/windowsserver2003/howtobuy/licensing/tsletter.mspx.
Now that the Terminal Services licensing server has been installed, there are some additional tasks you may wish to perform based on the needs of your implementation, either now or sometime in the future. Because many of these tasks differ only slightly between operating system versions, I’ve grouped them together in this section.
The Terminal Services license discovery process can be overridden by hard-coding the desired license server in a Terminal Server’s registry. By hard-coding the server name, you force the Terminal Server to go to only that server to request client licenses. If this target server is not available, the Terminal Server will not attempt to locate an alternate server.
A common scenario in which the license server is hard-coded is when you have Terminal Servers from different domains all located at the same site and you would like them to all share the same license server instead of creating a separate license server for each domain. By default a Terminal Server will attempt to find and use a license server in its own domain, even if that server is located across a wide area network (WAN) link. For example, a Terminal Server would choose this remote server over a local license server simply because the remote server is located in the same domain as the Terminal Server and the local license server is not.
The specific registry location where the default license server is defined differs between Windows 2000 and Windows 2003. For a Windows 2000 Terminal Server, in order to designate a specific license server to talk to, you must traverse to the following registry key on every participating Terminal Server: HKLMSYSTEMCurrentControlSetServicesTermServiceParameters. and add the value DefaultLicenseServer: REG_SZ: <Server Name>, where <Server Name> is the NetBIOS name of the server hosting the licensing service.
For a Windows 2003 Terminal Server, the parent registry key is the same: HKLMSystemCurrentControlSetServicesTermServiceParameters, but under this key you must then create another key called LicenseServers. For each license server you wish to add, create a new key (not a value) and assign it a name representing the target license server. Unlike the Windows 2000 Terminal Server, where the name must be the NetBIOS name, the 2003 Terminal Server lets the registry key have any one of the following types of names:
The NetBIOS name of the license server (HERCULES)
The fully qualified domain name of the license server (hercules.nrsc.com)
The IP address of the license server (192.168.1.1).
For this registry change to take effect, the Terminal Server must be restarted.
When a Terminal Services CAL is issued to a client, it is stored in the registry of the client device and then presented whenever requested by the Terminal Server to verify that a valid license has been assigned. As I mentioned earlier, when running either Windows 2000 with Service Pack 3 or later or Windows Server 2003, an issued client license will automatically be recovered within 52–89 days of assignment. No other automated mechanism exists for recovering a client license that may have been allocated to the wrong device.
You can remove the license that has been stored locally on the client device by deleting the registry keys under HKLMSoftwareMicrosoftMSLicensingStore.
All keys under here represent Terminal Services client access licenses (see Figure 12.13). By deleting the existing keys you will eliminate the license from the local client, but you are not modifying the allocation reference from the Terminal Services License Server.

Figure 12.13. Terminal Services client access license certificates are stored in the local registry on Win32 devices.
In order to recover licenses that may have been erroneously allocated or lost due to a license server failure, you must contact the Microsoft clearinghouse and request a replacement license key. This key is then activated on the existing or new license server to make the client access licenses available. If this key is added to an existing license server, it will simply appear as another set of CALs in the license manager. There is no special designation for replacement license keys.
No automated mechanism exists for migrating the currently allocated and available CALs from one Terminal Services licensing server to another. If you are recovering from a failure of the license server, and you have a full backup of the original license server that includes the registry and the license server files located under %SystemRoot%system32LServer, then the recovered server will maintain all information on currently issued and available Terminal Server licenses.
If you had to restore the license database onto a new Windows server, or if you wished to migrate the licenses from one Windows server to a completely different server, you would need to do the following:
Install Terminal Services licensing on the new server and activate it as described earlier. Once it is up and running, manually stop the Terminal Services licensing service.
Now replace the contents of the folder %SystemRoot%System32LServer on the new server with the information backed up from the original license server. If you are copying these files directly from one server to the other, be sure to stop the licensing service on the original server as well.
Once the files have been copied, you can restart the service on the new server. The service should start up without any errors, and you should be able to go in and view licenses through the Terminal Services Licensing tool. You will immediately notice that only assignments for the built-in Windows 2000 licenses will have actually been imported. All other license references will be lost, including any installed client access licenses.
When the licensing service on the new server was restarted, it immediately recognized that licenses were present in the database, but since they did not originally belong to this server (because of different product IDs), the installed licenses were purged from the database. These actions are logged in the system event log, including an entry that lists how many unallocated licenses were purged. Figure 12.14 shows the two event log entries generated when a foreign database is detected and when any unassigned licenses are purged.
In order to restore the missing licenses, you will need to contact the Microsoft clearinghouse and explain what was done; the Clearinghouse will issue you a new license code that can be activated on the new license server to restore the missing client access licenses.

I recommend that you stop the licensing service on the original server but do not uninstall or rebuild the server for a few days, at least until you have verified that the new licensing server is functioning properly.
There are three different tools readily available that you can use to monitor the Terminal Services client license usage. The first tool is Terminal Services Licensing, which we have used to add and activate the license server and TSCALs. This tool provides an interface where you can quickly see how many licenses have been allocated and how many remain. It also lets you view who has been assigned a license and what their expiry date is, if applicable. Figure 12.15 shows an example of this, with a Terminal Services device CAL assigned to a host named linuxhost. You can see that the expiry date for this token is Saturday, October 2, 2004, at 3:32:29 p.m. If linuxhost does not log on sometime within a week of the expiry date, the CAL will be reclaimed by the license server to be issued to someone else.

Figure 12.15. The Terminal Services Licensing tool can be used to view the current license allocations and how many CALs are still available for use.
Another tool is the Terminal Services License Reporting tool, available for both the Windows 2000 and 2003 Resource Kits. This simple command line tool will output the information from the Terminal Services license database to a text file with tab-delimited formatting. This file can then be viewed or manipulated using software such as Excel.
The tool is launched by issuing the command lsreport.exe from a command prompt. Without any parameters, the tool will query the domain controller to acquire a list of license servers and then query those servers for the license information. The output from this will be written by default into the current folder with the name lsreport.txt. Running this command with the /? parameter outputs the usage for the tool.
The final tool is also provided as part of the Windows Resource Kit. This tool, the License Server Viewer (LSView), simply queries the network at regular intervals (every five minutes, by default) looking for available Windows Terminal Server licensing servers. The utility uses the same discovery process as the Windows 2003 Terminal Server, so running this tool directly off a Terminal Server will indicate whether the license server is visible or not. Figure 12.16 shows the main display for this utility with a couple of license servers detected. LSView can be a useful tool in troubleshooting license server connectivity problems.

You are likely wondering what happens if a license server is unavailable due to some type of failure, whether it be hardware or software related. If a Terminal Server is operating past its grace period and any of the following situations are true for a user attempting to connect to a Terminal Server, and the Terminal Services licensing server is inaccessible, the user will be denied access to log on to the Terminal Server:
It is the first time the user is trying to connect, and they currently have no Terminal Server license. Because there is no license server available to issue even a temporary access license, the user’s connection is refused. If the Terminal Server was still operating in its grace period, the user’s connection would be accepted.
A user is trying to connect to the Terminal Server but their temporary or permanent TSCAL has expired. If a user’s CAL has expired, there is no license server available either to renew the existing license or attempt to allocate a permanent license from its pool. In either case the Terminal Server has no choice but to reject the connection and prevent the user from logging on.
License verification is currently enforced only with Per Device licensing. Beyond the Terminal Server being able to contact a license server after its grace period has expired, there is no actual interaction with the licensing server when dealing with Per User licensing.
TIP:
As soon as a Terminal Server is successfully able to connect to a license server, the grace period of operation without a license server is immediately terminated. If the license server goes down five minutes later, the Terminal Server will not revert back to operating with the grace-period status.
The actual task of constructing a redundant licensing server configuration is straightforward. Because licensing servers already communicate with each other in order to attempt to satisfy any permanent TSCAL requests, it is only a matter of deploying two or more license servers in your environment using the following criteria:
Configure all license servers to be Enterprise License Servers. This will allow for their discovery by any Terminal Server within the same site regardless of what domain the Terminal Server resides in.
Divide your available permanent licenses between the different license servers. For example, if you have three license servers you could activate one-third of the licenses on each server. If one server happens to have allocated its entire set of permanent licenses, it will still query other servers in an attempt to provide a requesting Terminal Server with the appropriate license.
When two or more license servers are deployed in this fashion, they will provide high-availability support for your Terminal Services implementation.
During installation of MetaFrame Presentation Server, you will be prompted to provide the server name and port number of the server running your MetaFrame Access Suite Licensing (MASL) server (Figure 12.17). As a consequence, the MASL server is typically installed and configured prior to installation of the MPS software itself.

Figure 12.17. The MetaFrame Access Suite Licensing server location is requested during the MPS installation.
Installation steps for the MASL server are as follows:
Log on to the server that will host the Access Suite Licensing and then launch the Autorun feature from the installation CD-ROM.
When the Setup window appears, select MetaFrame Access Suite Installations and then click Install MetaFrame Access Suite License Server.
Once you have moved through a couple of informational dialog boxes, you arrive at the Select Components dialog box, where all the MPS components are listed (see Figure 12.18). Ensure only the license service option has been enabled and then click Next. The Windows Installer component for the license server immediately begins.
Next the Welcome to the Citrix MetaFrame Access Suite Licensing Installation Wizard dialog box appears. Click Next to move past the screen and be presented with the MetaFrame license agreement. If you agree with the terms of the agreement, click the appropriate radio button and then click Next to proceed.
Choose the desired destination folder for the application and then click Next.
You are now presented with the Select Features installation dialog box for the licensing setup. If you do not have IIS installed on your server, the License Management Console Web Service option will not be enabled. The license server itself does not require IIS in order to install and function properly. Select the desired options to install and then click Next to continue.
You are prompted to specify a folder where the license files that are received from Citrix will be stored. In order to install licenses with MPS 3.0, you must now fulfill the license entitlement on the Citrix Web site (http://www.MyCitrix.com) and then download the generated license file for your server. This process is discussed shortly in the “Managing and Assigning Citrix Licenses” section. In most cases the default license file location is appropriate. Click Next to proceed.
If you will be installing the Web interface, the next dialog box will require you to authorize the restart of the IIS service in order to complete the installation. The installation cannot complete successfully until this service has been restarted. Make certain that a service stoppage will not affect any production users.
Once the IIS service has been restarted (if applicable), the installation completes. An installation summary is presented at the end of the setup listing all the possible components that can be installed along with the status of their installation attempt. After you click Finish, the licensing server is available for use. You can now assign licenses and provide this server’s information when required during the MetaFrame Presentation Server installation (discussed in Chapter 13, “MetaFrame Presentation Server Installation”).

TIP:
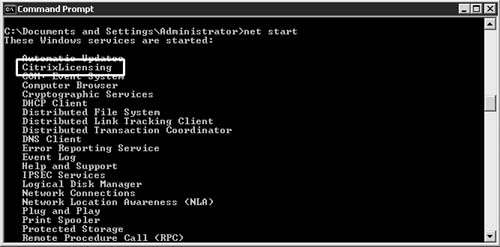
You can verify that the licensing service has been installed and started properly by viewing the status of the CitrixLicensing service through Computer Management or issuing the NET START command from a command prompt (see Figure 12.19).
If installed on your Citrix license server, all license server management can be done through the License Management Console (LMC), which is accessed by pointing a Web browser at http://<server name>/lmc/index.jsp, where <server name> is the name of the server where you installed the licensing service and management console. Alternatively, you can select the License Management Console from the Citrix folder on the Start menu of the license server. Figure 12.20 shows the main welcome screen for the License Management Console.

This menu provides four selections:
View Current Usage Data—. Displays the current license usage as reported by the LMC, including any special alerts. Information on this screen does not update automatically and must be manually refreshed.
Generate Historical Reports—. Lets you generate reports based on the license usage data logged by the license server.
Configure License Server—. Lets you manage all aspects of the licensing server, including the Citrix licenses.
User Administration—. Lets you manage the user access to your license server via the LMC.
From within any of these menus you can access any other menu simply by clicking the appropriate toolbar across the top of the screen.
The first task you will want to complete is assignment of the appropriate licenses to the license server so they are available to the MetaFrame servers in your environment. In order to install the licenses on your license server, you need to do the following:
Go to Citrix’s Web site (http://www.citrix.com) and complete the entitlement process for your specific licenses.
Acquire the associated license files that are generated as part of the entitlement process.
Install the license files onto the license server.
To acquire the license files necessary for your implementation, you must log on to your MyCitrix portal session (http://www.mycitrix.com) and process the desired license entitlement. The license file acquisition process can be completed as follows:
You can go directly to the MyCitrix site from your Web browser or from within the LMC, select the Configuration menu, and then select Download License File from Citrix Web Site. When prompted, log on to your MyCitrix session.
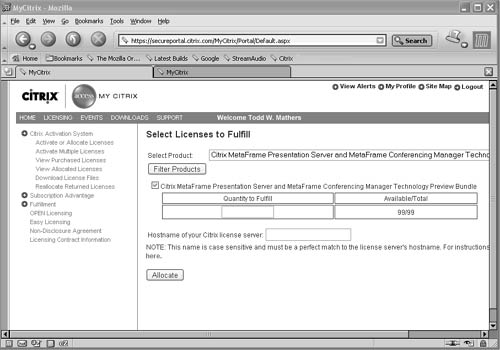
From the Licensing menu, select the Fulfillment submenu and then Fulfill Eligible Products. Select the appropriate license to fulfill and then complete the wizard. You will then receive a license code that you will use to perform the license activation and receive your license file.
Select Activate or Allocate Licenses and enter the license code you just received. You then see a Web page listing the product(s) you are eligible to fulfill (see Figure 12.21). Select the checkbox next to the product(s) that should be fulfilled and then enter the actual license quantity to fulfill. You are not required to fulfill the entire license quantity at once. You will be required to provide the host name of your Citrix license server.
When entering the host name of your Citrix license server, you will need to be certain that you match the spelling exactly. This includes any capitalized letters. You can find the host name by right-clicking My Computer and loading the system properties. On the Computer Name tab you will find the full computer name shows the proper spelling of the host name. Provide only the host name, not the fully qualified domain name.
Once you have entered the correct information, click the Allocate button. When you have reviewed the information on the confirmation page and found it to be correct, click the Confirm button to complete the fulfillment. If the fulfillment is processed correctly, you are presented with the option to download the license file, as shown in Figure 12.22. Click Download License File and save the file onto the license server, or a network-accessible folder if you are not actually performing the download from the license server.
Once you have the file, you need to make sure it is copied onto the license server. You can do this from within the LMC by selecting Copy License File to License Server from the Configuration menu. You can also do this directly from the download page of MyCitrix, as shown in Figure 12.22.
The second step on this page, Copy License File to Citrix License Server, is actually a link directly to http://www.<license server>/lmc/configuration/uploadLicenseFile.jsp. If you click this link and provide the valid credentials, you will be taken to the appropriate page within the LMC automatically.
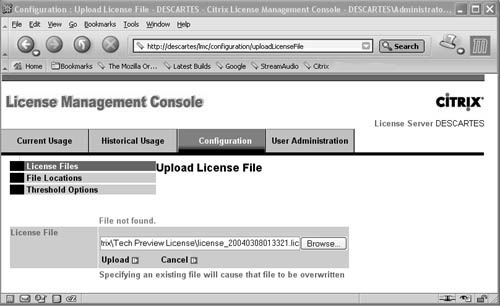
On the Upload License File page of the LMC (see Figure 12.23), browse to the location where you saved the license file and then select the Upload button. The license file is then uploaded and added to the license server. You should now be able to go to the Current Usage page of the LMC and see the licenses you just added. You may need to select the Refresh button or even close and reopen your browser for the new license information to appear properly.

TIP:
License Management Console needn’t be present in order for you to perform many of the necessary administration tasks. License files can be retrieved and loaded into the license server using either the command line tools or a Windows-based GUI for these command line tools.
First, you can still download the appropriate license file to your server through the MyCitrix portal (Steps 1 through 4 in instructions for installing licenses on your license server). Once the file has been downloaded from Citrix, copy it into the license location folder that you defined when installing the license server. The default location is
C:Program FilesCitrixLicensingMyFiles
Once the license file has been copied into this folder, you must tell the license server that a new license file is available. All the command line tools for the license server are located in the following folder, by default:
C:Program FilesCitrixLicensingLS
Open a command prompt and traverse into this folder. You can now force a reread of all license files by issuing the command
lmreread “<license folder path>”
For example, using the default license folder, the command would look as follows:
lmreread “c:program filescitrixlicensingmyfiles”
If the reread is successful, you will see a message stating this.
An alternate tool that can be used is called LMTOOLS. Launching this executable opens the GUI program that provides a front end to some of the tools. I highly recommend that you do not change any of the settings within this tool, or you may render the license server unusable. If you select the Stop/Start/Reread tab, you can then click the ReRead License File button, and it will reread the licenses in the corresponding license folder (see Figure 12.24). The current folder will be listed along the bottom of the dialog box. You can also view the current setting by clicking the Config Services tab. Among other things, it shows the current path to the license files.
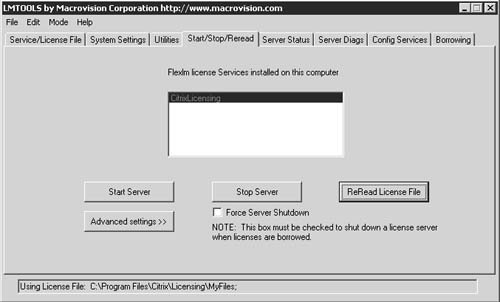
Please note that this tool is not documented in the Citrix literature and as such is not necessarily supported by Citrix. I recommend that you use the command line tool (LMREREAD) instead unless you are working in a test or development environment that will not impact production users.
License usage is tracked through the Current Usage page of the License Management Console. From here you can quickly see the following licensing information:
The product and types of licenses currently available for issuance.
The total number of licenses available for distribution.
The number of licenses currently issued, the number remaining, and the usage percentage. Details on who has been issued what license can be viewed by clicking the small red box next to the In Use count, shown in Figure 12.25.
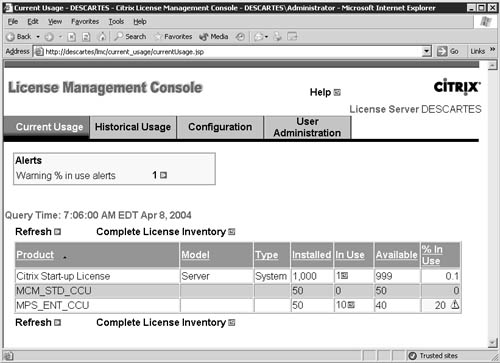
In addition to the current usage statistics, the Current Usage page issues alerts based on threshold settings under the Configuration menu. Figure 12.25 shows a “% in Use” warning that was tripped when the license usage exceeded a defined threshold. In this case, I set the threshold to issue a warning when the license usage exceeded 15 percent. As you might expect, warnings appear in yellow and critical alerts appear in red.
As I mentioned, the license alert thresholds are maintained from the Thresholds page under the Configuration menu; see Figure 12.26, which also shows the default values defined upon installation. The three categories of thresholds are
License Usage—. The warning and critical levels are assigned based on the percentage of total licenses in use.
Subscription Advantage Date—. These values represent the days remaining before Subscription Advantage must be renewed.
Expiration Date—. These values indicate the number of days prior to the expiration date of a license.

Figure 12.26. Thresholds are configured for different types of data from under the Configuration tab.
In each situation, the actual values appropriate for your implementation will depend on the length of time your organization takes to procure licenses. If the turnaround time is very short, you can raise the alert thresholds so you are not being alerted to license or date values prematurely. For example, warning levels for license usage could be raised to 80 percent for warnings and 95 percent (or higher) for critical warnings. Of course it is always better to know sooner than later that you have impending license issues, but typically when notifications appear too early, they are dismissed by the administrator and forgotten until dates expire or license usage reaches 100 percent.
TIP:
You can monitor license usage and find out information on available and in-use licenses by running the command line tool LMSTAT. After traversing into the C:Program FilesCitrixLicensingLS folder that contains the command line tools, issuing the following command returns rather detailed information about the number of server licenses and their allocation, as well as the number of user licenses installed and their current allocation.
lmstat -a -c "C:Program FilesCitrixLicesingMyFiles"
From within the LMTOOLS utility you can access this same feature from the Server Status tab. Figure 12.27 shows the results of a status enquiry immediately after installing the license server.
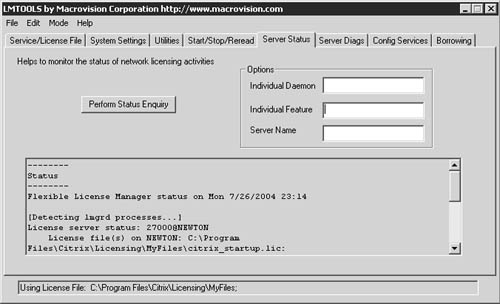
Figure 12.27. Status information for the license server can also be queried from the LMTOOLS utility.
Of course this output is not as condensed as the Web GUI, nor is there support for alert notification, but this option does allow for some general license server querying.
The Historical Usage tab lets you generate reports based on the data logged in the usage report. The usage report is generated automatically by the license server as it processes license requests. The default usage report file name and location are
C:Program FilesCitrixLicensingLS eportlog.rl
From the Historical Usage window, you need to select the Usage Logs button and add the desired logs to the list included in the historical report. After adding the desired logs and returning to the main screen, the logs should automatically appear in the usage logs list (see Figure 12.28). As long as there is at least one log available, you can select either Product Reports or Summary Reports and generate reporting information based on the available logged data. When generating a report you have the option of selecting additional criteria to fine-tune the output of the report.

By default the administrative account used to install the license server is automatically added to the list of administrators with full access to manage the configuration of the license server. Additional user accounts can be granted access to the management console by selecting the User Administration option. When this page opens, you see a list of the currently assigned users along with the privileges they have been granted. The access privileges correspond to the four menu options available:
Current Usage
Historical Usage
Configuration
User Administration
You can add a new user to the list by clicking the Add New User link. This opens a new page where you can add the desired users and define their access privileges. Existing accounts can also be modified by selecting Change Existing User Access Privileges. The list of existing users is then displayed, and you have the option to select or deselect the appropriate privilege.
Currently the Citrix license server does not support any form of real-time high availability or fail-over. The main factor impeding this is that all license files in this new licensing model are driven by the name of the license server, and you cannot have two machines operating with identical computer names on the network. There are a few options available that can be implemented to reduce the recovery time in the event of a catastrophic license server failure:
Maintain a backup copy of all license files in an alternate location that can be used to rebuild a new license server with the current license configuration—. This only needs to have the same computer name in order to use the existing license files. This name must match the original server’s name exactly.
Maintain an image of the current license server—. This option uses any one of a number of popular drive-imaging software products, such as Symantec’s Ghost, to store a complete image of the license server for quick recovery. This approach works best if you can use hardware as close as possible to the same as that of the original hardware.
Maintain a second license server with the exact same name but kept offline—. This approach, while effective, can be costly. Effectively, you are maintaining a hot spare of the license server that can quickly be brought online if the current production server fails.
Unfortunately none of these configurations is ideal, but I feel the first option is adequate in most situations. Very little is required to bring up a Windows server with a matching server name and perform the basic license server installation. Even if IIS is not available, the command line tools let you perform the necessary administration to get the new server up and running. A MetaFrame Presentation Server will function for 96 hours without active license server connectivity, which under normal circumstances should allow enough time to get even a very basic server up and running to keep the environment functioning until a permanent replacement can be put in place.
NOTE:
Many people suggest running multiple license servers with different names and dividing the licenses between these servers, much like you could load-balance the Terminal Services License Server. Unfortunately this configuration works only if you have an environment where you can divide your MetaFrame servers in such a way that they can point at different license servers and there exists no overlap of user sessions between these server groups. If you have a user who requires access to two different servers, each pointing to a different license server, that user will consume two licenses.
In this chapter, we looked in detail at installation and configuration of both the Microsoft and the Citrix license server components. Once you have these license servers up and running properly, you are ready to proceed with installation of MetaFrame Presentation Server (if applicable) and then the remainder of the Terminal Server/MetaFrame environment configuration.