Regardless of the size of your Terminal Server environment, it is imperative that you take the time to properly assess the security requirements of your infrastructure. Unlike the typical Windows server, a Terminal Server lets users interact with the server in very unpredictable ways. You must provide a security mechanism that protects the Terminal Server both internally and externally. After the user has established a connection, he or she has an interactive presence on the server with direct access to the resources shared between all users, such as disk and memory. Actions of one user can have an impact on all other users on the system unless the proper steps are taken to protect against this possibility. This requirement covers all users, including system and network administrators.
Considering the multiuser nature of a Terminal Server environment, even with little risk of a malicious threat, an accidental change performed by a single user could affect every other user on the system. For this reason, the key to developing a suitable security configuration requires the right balance between mitigating risks while still providing an environment within which the end user can perform their dictated job function. While a server can be hardened to the point where it is extremely secure, the end result might be a configuration completely unusable from an end user’s perspective. This chapter focuses on helping you decide and implement the desired level of security suitable for your Terminal Server implementation.
Most security settings discussed in this chapter are implemented using group policy objects (GPOs) in a Windows Active Directory domain. An overview of implementation and use of a GPO is provided in Chapter 15, “Group Policy Configuration.” The information covered in Chapter 15 forms the foundation on which the security changes in this chapter are discussed. If you’re unfamiliar with configuration of group policies in an active directory, I highly recommend reviewing Chapter 15 before proceeding. Figure 16.1 shows the sample organizational unit (OU) configuration I use to demonstrate the security changes discussed in this chapter. As you can see, this follows the suggestions outlined in Chapter 15, whereby an organizational unit called Member Servers exists off the domain root, and under here an OU exists for each of the subcategories of member servers. In this case, I have an OU for Terminal Servers, file servers, and print servers.

NOTE:
Entire books have been written on the subject of Active Directory configuration, and details of such a configuration are beyond the scope of this book. For the purpose of this chapter I focus on configuration of the Terminal Server organizational unit in an active directory.
While most screen shots in this chapter come from a Windows 2000 domain controller, unless otherwise noted, the exact same steps can be performed against a Windows 2003 domain controller.
In Chapter 8, “Server Installation and Management Planning,” I briefly discussed the eight areas of Terminal Server security that I recommend all administrators consider when developing a security implementation plan for their environment. Figure 16.2 shows a simple visual representation of these eight layers, which I discuss in more detail in the next few sections of this chapter.
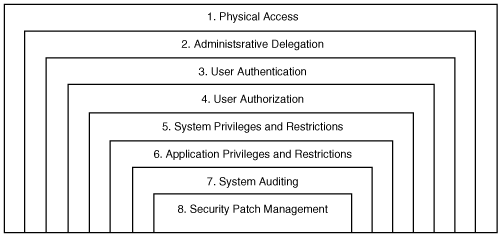
Physical access—. Physical access to your Terminal Server (and associated server hardware) should be restricted as much as possible to only the people responsible for managing the Terminal Server environment.
Administrative delegation—. Before any other security considerations can be addressed, a decision must be made as to who will have administrative authority over the Terminal Server OU and all servers that reside within this OU.
User authentication—. Almost all Terminal Server implementations have some form of user authentication to verify that a user is who they declare themselves to be. The most common form of authentication is the combination of user ID and password. In most organizations, this is also typically the weakest and most vulnerable of the security layers.
User authorization—. Unlike user authentication, which deals with verifying identity of a user, user authorization deals with regulating what users have access to log on and what server resources they can access. Just because a user is who they say they are does not necessarily mean they are authorized to access the resource they are attempting to use.
System privileges and restrictions—. Once an authorized user has logged on to the Terminal Server, their ability to interact with objects on the server is managed through user rights, security restrictions, and administrative templates. These three components work in combination to limit a user’s access to only those components of the server pertinent to their job function.
Application privileges and restrictions—. Usually access to the applications on a Terminal Server should be restricted to a subset of users based on their job function. For example, administrative applications are available only to administrators, while accounting-related applications should be accessible only to the accounting staff.
System auditing—. Once you have implemented the desired security configuration for your Terminal Servers, you need a means of monitoring effectiveness of the configuration and flagging suspicious activity when it occurs. System auditing is an important part of any secure environment but is of little use unless an effective means of monitoring the logged information is also implemented.
Security patch management—. A critical part of any secure environment is the timely deployment of all appropriate security patches. Poor patch management can be particularly damaging to a Terminal Server environment, since many of the exploits released into the wild specifically target end users and impact common applications such as Outlook or Internet Explorer. While a properly secured server normally limits the effects a user can have on stability of the server, some exploits can specifically target privilege elevation, effectively granting administrative access to the user’s session and allowing a malicious program to cause system-wide problems. In Chapter 9, “Service Pack and Hotfix Management,” I discussed security patch management in detail.
Whenever possible, one of the first steps in securing your Terminal Server environment should be to establish a secure location to store the servers and all associated hardware. The goal is to limit physical contact to only authorized Terminal Server administrators. Surprisingly, physical security is not always practiced as diligently as might be expected. Once physical security has been compromised, an otherwise secured server is at risk to a number of threats. Aside from the obvious concerns such as theft, easy-to-use tools exist that can be used to reset an administrator’s password simply by booting the server from a floppy disk or CD-ROM. Through this, code can easily be inserted onto the server allowing for further privilege elevation or data theft. Such physical attacks can completely bypass any other security and auditing measures that you may have in place. Aside from malicious threats, accidental interference is also a real concern. For example, a poorly placed server could be mistaken for a different piece of hardware and accidentally shut down.
NOTE:
I once audited an environment where they had to leave a note taped to the server reminding users not to turn the machine off. The server was stored in a stationary closet accessible by all the employees in the branch location. The note was required because certain users were frequently powering the machine off and on in order to try to fix the application problems they were experiencing instead of first contacting a support person.
Physical security should also be a consideration in large corporate data centers. Many large companies have a single data center containing all the servers (file, print, e-mail, and so on) for the organization. In these types of environments there are usually a large number of people with access to this room, all of whom are responsible for administering a subset of these servers. In this situation you should consider investing in secured server racks that can be locked to prevent administrators of another system from accidentally tampering with one of your servers.
Here are the two basic guidelines to follow when physically securing your servers:
It should be fairly obvious that granting a regular user administrative privileges to a Terminal Server will inevitably result in stability issues. It may not be quite so obvious that the exact same threat exists when legitimate administrators in your domain who are unfamiliar with managing a Terminal Server environment are also granted administrative access to your servers. In this situation, the administrator is just as likely as the regular user (if not more so) to cause server-wide problems based on a change made to the server or an application’s configuration.
Historically it has been common to have only one administrative classification in a Windows environment without any further subdivision of privileges into more granular groupings. When someone requires administrative privileges to manage resources in a domain, they are likely added to the Domain Admins group, giving them full administrative privileges that span the entire domain. The result is an environment with multiple administrators with full control over all resources in the domain, yet they may lack the experience to properly administer many of the resources they have full control over. For example, someone skilled in maintenance of Windows file servers may not be qualified to manage Active Directory, a Microsoft SQL Server, or even a Terminal Server. While many argue that it is just “easier” to manage the resources with these privileges, allowing this practice in a Terminal Server environment can introduce a significant threat to your infrastructure’s stability.
To help ensure a stable and secure Terminal Server environment, you must not give anyone administrative authority on your servers unless they are qualified to use it. The more Terminal Server administrators you have, the greater the risk of an undesirable change affecting your production environment.
When configuring administrative delegations for your Terminal Server environment, a logical starting point is creation of the four global domain security groups listed in Table 16.1. These are the same groups discussed in Chapter 8 and used when demonstrating group policy object creation in Chapter 15. I review the specific roles of the Terminal Server Operators and User Support groups in more detail in Chapter 22, “Server Operations and Support.”
Table 16.1. Terminal Server Administrative Domain Groups
Once the domain groups are created, you need to delegate administrative privileges for the Terminal Server Administrators group to the Terminal Servers OU. There are two ways you can accomplish this: Either utilize the Delegation of Control wizard, accessible by right-clicking the OU and selecting Delegate Control; or directly update the access control entries from the Security tab found under the properties for the OU, as shown in Figure 16.3. If the Security tab is not visible on the Properties page, you will need to select the Advanced Features option from the View menu.

Once the Terminal Server Administrators group has been added, I suggest disabling inheritance of permissions from the OU’s parent container. This ensures that permissions must be defined directly against the OU in order to affect delegation of authority, reducing the chances that an undesirable change performed in a parent container will negatively affect this OU’s access control list (ACL).
Inheritance is disabled by deselecting the check box labeled “Allow inheritable permissions from parent to propagate to this object.” In a Windows 2000 domain, this check box appears on the main Security tab (see Figure 16.3), while in a Windows 2003 domain, you must first click the Advanced button to bring up the dialog box containing this check box. When this option is deselected, you then must make a choice between whether you will keep a copy of inherited permissions or remove all inherited permissions and keep only permissions explicitly defined for the OU.
For this Terminal Server OU, I suggest removing all inherited permissions and keeping only those explicitly defined. In a typical Active Directory environment, your access control list would then look similar to the following:
Account Operators
Authenticated Users
Domain Admins
Print Operators
ENTERPRISE DOMAIN CONTROLLERS (Windows 2003 Active Directory only)
SYSTEM
Terminal Server Administrators
Management of this OU should be restricted further by removing the Account Operators object and the Print Operators object from the ACL, leaving Terminal Server Administrators and Domain Admins as the two groups with full authority over the organizational unit. If you have any concerns that a member of the Domain Admins group might inadvertently modify properties of the Terminal Servers OU, you should consider restricting this group’s access to the OU as well, either by completely removing the group from the ACL or by modifying the permissions to restrict activities the group can perform.
NOTE:
On more than one occasion I’ve debated the reasons for granting or revoking Domain Admins group access to manage a Terminal Server organizational unit or server. Very often it is argued that the Domain Admins group simply must retain complete control over all elements of a domain, including the Terminal Server environment.
While in theory I agree that this should be the proper configuration, the one condition I feel must be met is that membership in the Domain Admins group be tightly controlled and only those users actually requiring administrative privileges in the domain belong to this group. If this group contains users requiring administrative access to a resource in the domain but not the entire domain itself, I would consider the administrative hierarchy in the domain to be “broken” and would advise against allowing the Domain Admins group to administer the Terminal Server environment. It is simply too risky to give users not familiar with, or responsible for, the Terminal Server environment the ability to modify a Terminal Server’s configuration.
Now that administrative permissions for the Terminal Server OU have been delegated accordingly, the next step is to create and populate the necessary local groups on each of your Terminal Servers. The idea is to use the local groups on a Terminal Server to assign all the necessary server privileges and then delegate these privileges by populating these groups with the appropriate domain groups. We begin by delegating administrative authority through these local groups and return later in this chapter to assign the appropriate user privileges.
When server security is implemented in this fashion it greatly simplifies administration by introducing a layer of abstraction between the domain and the server. When you know that all security on a server relates back to the local groups, you can verify who has access to what resources simply by viewing local group membership. If domain groups or individual users were directly assigned to the access control lists (ACL) of resources on the server, you would be required to trace back permissions from these resources to the appropriate domain group to ensure that security had not been compromised (intentionally or accidentally).
Before domain groups can be assigned to the local groups on a Terminal Server, we must ensure that these local groups exist. As I discussed in Chapter 8, I typically recommend that the following two additional local groups be created on a Terminal Server to allow for more granular delegation of administrative authority on a Terminal Server:
Terminal Server Operators—. Used to assign a subset of administrative privileges to those users responsible for managing the day-to-day operations of the Terminal Server. For example, members of this group would have the ability to terminate processes or restart the Terminal Server but would not have the ability to install/remove applications or modify configuration of the server.
Terminal Server User Support—. Used to assign privileges to those users who would perform typical user support functions. Among other privileges, members of this group would have the ability to shadow other users—something a regular user can’t do.
While local groups can be added to a Terminal Server by manually creating them through the Microsoft Management Console (MMC) Computer Management snap-in, I prefer scripting their creation using the Net LocalGroup command. The script is run locally on a Terminal Server during the initial configuration phase to create the desired local groups. The following code sample demonstrates how these two groups could be created using a script:
@ECHO OFF
REM Create the desired local groups on the Terminal Server
net localgroup "Terminal Server Operators" /add
net localgroup "Terminal Server User Support" /add
Once the necessary local groups have been created, we are ready to assign the appropriate domain groups. The most common means of assigning a domain group to a local server group is directly through the MMC Computer Management snap-in, as shown in Figure 16.4. While easy enough, this method is still prone to error when the task must be duplicated across a number of Terminal Servers. Another option to consider is scripting the local group assignment, similar to what I suggested for creation of the local groups. Unfortunately this is really effective only if the local group memberships will remain static. In a production Terminal Server environment, it is likely that local group membership assignments will change over time. In a large Terminal Server environment it would not be practical to adjust and rerun a membership script on all servers. As a result, an alternative allowing more dynamic control over local group membership is necessary.

The preferred method of managing local group membership is through a group policy object (GPO) in an Active Directory domain. Through a single GPO we can define a local group membership standard that is consistent across all Terminal Servers in the domain. This method not only allows for consistent definition of the local group members but also provides dynamic control over the membership we are looking for.
To demonstrate how this is done, I use the “Terminal Server Machine Policy” created in Chapter 15. This GPO contains all the base computer configuration settings for all the Terminal Servers in the OU. There are no user configuration options defined in this GPO. The local group membership is controlled from within the Restricted Groups policy, located under Computer ConfigurationWindows SettingsSecurity Settings.
Managing the local group membership is a two-stage process. First the local groups that will be populated are added to the Restricted Groups policy, and then the desired domain members are added to each of these groups. The local groups are added to the policy by right-clicking Restricted Groups and selecting the Add Group menu option. The dialog box shown in Figure 16.5 opens, where you can enter the desired local group name.
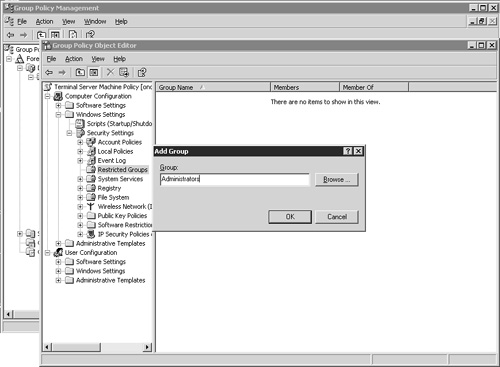
Note that there is no validation performed on any groups that you add to the Restricted Groups policy. If the group name you provide does not exist on the Terminal Server, the group name is simply ignored and is not automatically created by the GPO.
Typically I define the following local groups within the Restricted Groups policy:
Administrators—. Members of this group will have full administrative control over the Terminal Server. Because of this, access should be very tightly controlled.
Terminal Server Operators—. This group name is used to assign a subset of administrative privileges to those users responsible for managing the day-to-day operations of the Terminal Server.
Terminal Server User Support—. Those users responsible for performing typical user support functions such as shadowing or session logoffs would be members of this group.
Remote Desktop Users (Windows Server 2003 only)—. To remotely log on to a Windows 2003 Terminal Server, a user must be a member of this existing local server group.
Users—. All regular users who require access to run one or more applications on the Terminal Server are assigned to this local group.
Power Users, Guests—. These two groups are included in the Restricted Groups policy to ensure that no users are members of either of them.
Anonymous (MetaFrame servers only)—. When MetaFrame is installed on a Terminal Server, it adds support for anonymous logons through the special Anonymous group. Just as with the Power Users and Guests groups, this group is included in the Restricted Groups policy to ensure that no users belong to this group. Of course, if your MetaFrame server will allow this type of support you will need to omit this entry from the GPO.
TIP:
If you are running Active Directory Users and Computers directly off a domain controller, then browsing for the group name to add to the Restricted Groups policy will present you with only the available domain groups. To be able to browse for local groups on a Terminal Server, you need to run Active Directory Users and Computers directly from the member Terminal Server. From a domain controller, you can still type in the desired local Terminal Server group name; you’re just unable to browse for it using the GUI.
After all the local groups have been defined within the Restricted Groups policy, the next step is to assign the appropriate domain groups to these local groups. This is done by right-clicking the desired local group in the right-hand pane and selecting the Security option from the pull-down menu. The Configure Membership dialog box appears, as shown in Figure 16.6. By default this group contains no members and belongs to no other group. If these options are left as-is, then when the policy is applied to the server, all members who may have been manually added to the local group are removed. Domain groups are added by clicking the Add button on the upper half of the dialog box for the Members of This Group option. Since we’re configuring only local groups on the Terminal Server, there is no need to modify the lower portion of the dialog box, labeled This Group Is a Member Of.

Once the Add button has been clicked, an Add Members dialog box appears. This dialog box lets you type in the name of the domain group or click the Browse button to find the desired group within the domain. Multiple groups can be entered at once by separating them with a semicolon. When manually typing in the group name, be sure to precede it with the domain name and a backslash. For example, to add the domain group Terminal Server Operators of the domain called PRODUCTION, you would type the following:
PRODUCTIONTerminal Server Operators
When you have completed entering the desired domain groups for a given local group, click OK to close the Configure Membership dialog box. Each of the local groups listed in the Restricted Groups policy now appears in the Members column when the Details view is active (see Figure 16.7, which shows the defined groups in a Windows 2000 domain). When the GPO is applied to all servers in the Terminal Server OU, all the listed local groups are updated with the corresponding domain groups. As I mentioned, groups with no explicit memberships will have any existing memberships removed on the affected Terminal Servers.

Table 16.2 summarizes my suggestions for local group membership in a Terminal Server Restricted Groups policy. The domain groups listed in this table were discussed in the “Terminal Server Domain Group Creation” section, earlier in this chapter.
Table 16.2. Terminal Server Restricted Group Membership Suggestions
NOTE:
I’ve found that managing security exclusively through the local security groups on a Terminal Server is also helpful when migrating a Terminal Server from one domain to another. I was once involved in a project where a number of Terminal Servers were being tested in a test domain that was an exact duplicate of production but completely segregated from the production domain. Once the testing and validation had been completed, the Terminal Servers were removed from one domain and added to the other. Once the Terminal Servers were in the production domain, the only change required was to assign the appropriate domain groups to the local groups on the Terminal Server. All other aspects of the servers remained unchanged, helping ensure that the configuration tested matched the final production deployment as much as possible.
Almost all Terminal Server implementations require that the users perform some form of authentication in order to verify that they are who they say they are. Exceptions to this rule would include kiosk-type implementations where anonymous users access a general-purpose Terminal Server session in order to utilize a specific application. Most corporate Windows environments utilize the familiar Windows logon dialog box (see Figure 16.8) to enforce use of a user ID/password combination for user authentication. While this is the most common form of authentication, it unfortunately is also typically the weakest and most vulnerable of the security layers.

The reason for this weakness is not simply technical but also educational. In most organizations, the user community lacks understanding regarding the importance of adequate password “strength” and the potential consequences of a compromised user account. Password-cracking tools are readily available and can easily be used to discover weak passwords in an organization.
TIP:
The term strength is often used to describe the relative complexity of a password and its resistance to cracking through either manual or automated means. Some common weak passwords include the following:
A blank password or no password at all.
Some variant of the word password.
A password based on the user’s name, their spouse’s name, or some other common dictionary word such as bird, tree, snow, monkey, dog, and so on.
A password based on a user’s phone number, home address number, birthday, an so on.
Password-cracking tools attempt to exploit use of weak passwords and typically uÏtilize a combination of three cracking strategies to achieve their goal:
Dictionary attacks—. Common words found in the dictionary are used to try to quickly match user passwords.
Targeted-word attacks—. A customized dictionary of specific words is used to try to determine the user password. Custom dictionaries are usually created based on information gathered either through social engineering or other means of personal information acquisition and typically target a specific user or group of users.
Brute-force attacks—. Every possible combination of characters is used to try to discern the password. In many cases the dictionary and brute-force attacks are integrated to try to find quick hits. With sufficient time, a brute-force attack will determine any password. Of course, the complexity and length of a password determine whether such an attack can discover a password in a realistically finite amount of time.
It is not difficult to see that these strategies would easily pick off passwords such as disney, porsche, or jennifer27, all of which are passwords I’ve encountered within large production Terminal Server environments.
A number of different password-cracking tools are readily available for most operating systems. A small sample of these include
LC5—. The latest version of the famous L0phtCrack password auditing and recovery tool. Different variants of this product are available to be purchased, with the high-end product offering a number of different password-cracking techniques such as brute-force, dictionary attacks and pre-computed password tables (also known as rainbow tables). Trial versions used to be available for the product, but at the time of this writing, the latest version did not offer a trial version. The Website is http://www.atstake.com/products/lc/
Cain & Abel—. A robust and powerful password recovery tool, Cain boasts an astounding array of features, including a number of different network packet filtering options. Best (or worst) of all, this tool is completely freeware. The product can be found at http://www.oxid.it/projects.html.
Sarca Rainbow Tables—. An online Web site that allows you to paste LanManager and NT password hashes onto the site and submit them for cracking using their generated rainbow tables. The site only processes hashes once per day but can crack a large number of passwords. Limitations on the actual processing are discussed on the site. http://sarcaprj.wayreth.eu.org
Not only are such tools a threat on their own, but when used in combination can very easily crack even relatively complex passwords. Of course certain conditions must be met, namely the potential cracker must be able to access the encrypted passwords. In most cases administrative privileges are required to access this information, but certain exploits may make such information available without directly acquiring these rights. Just another reason for keeping up-to-date with the available security patches for your environment.
My reason for listing these tools here is purely to demonstrate how readily up-to-date password-cracking and acquisition tools are available. Listing them here does not imply that I endorse the use of these tools for anything other than testing the strength of the passwords in an environment. I recommend caution when looking to use any password-auditing tool, particularly in production.
Please understand the risks involved in such endeavors. Use common sense when downloading and testing any software that may be coming from a suspect source.
While it is obvious that a “strong” password will be much more difficult to crack than a “weak” one, the added complexity can be a formidable obstacle during early stages of implementation, with the primary issue being simply that it is more difficult for the end user to remember a new, stronger password. In nearly every situation where I have been party to introduction of complex password requirements, the end user community in general has commented that the new passwords are “far too confusing,” and “not necessary” for their organization or department. Without the proper education, users are unclear as to why they must use a complex password and as such become easily frustrated if the simple tasking of logging on is delayed enough to impact their ability to work. Failure to successfully introduce and enforce strong-password requirements in most cases is a result of the system administrator’s inability to adequately manage the initial flood of demands from users requesting password resets or unlocking of a locked-out account in a timely fashion.
NOTE:
Microsoft has tried to stress to administrators the idea of teaching users the concept of a “passphrase” instead of simply a password. While many users can struggle with trying to come up with and remember a seven-character password, a common phrase such as “I really love to drink coffee” can be easier to remember, easier to type, and stronger than a typical seven-character password. In an environment that is enforcing complex passwords, one way to ease password creation is to develop a passphrase that can then be used to “build” the password.
For example, a common technique I’ve used is to create a passphrase such as “Todd loves to spend money on his sports car.” I then delete all but the first letter of each word and substitute the word to with 2 and money with $. The result is the password Tl2s$ohsc, which is suitably complex and also very easy to remember. I talk more about enforcing strong passwords in the next section of this chapter.
Unfortunately, education alone rarely ensures that all users in your organization use only a strong password. Most users, given the opportunity, try to use as simple a password as possible and recycle this password (or minor variations) over and over, if periodic password changes are required. As a general rule, an administrator should never leave it solely up to the end user to ensure that a sufficiently strong password is being used.
As a complement to user education, an administrator should leverage the security features available in Windows 2000/2003 to help enforce strong user password requirements. Both Windows versions support the same six password policies shown in Figure 16.9. A subset of these policies is enabled by default in a Windows 2003 domain; unfortunately the same cannot be said for a Windows 2000 domain, where none of these policies is enabled by default.

To modify the default password requirements in a Windows domain, these settings must be defined within the Default Domain Policy group policy object (GPO), located at the root of the domain. For example, in my noisyriversoftware.com domain, this GPO is found under the Group Policy tab for the noisyriversoftware.com object. If you wish to define these password settings for local accounts on a member server or PC, a GPO containing these settings must be created and assigned to an OU that contains the computers you want to update.
WARNING:
Many organizations make the mistake of assuming that only those accounts with administrative privileges require strong passwords and that “regular” user accounts are not really as much of a concern. This is a dangerous misconception, particularly in an environment where regular patch management is not being performed. Frequently exploits are discovered that make it possible for a regular user to elevate their privileges beyond what they have been assigned and to gain full administrative control. Because of this, password security really must be enforced for all users in your environment and not only for those users with administrative privileges.
The six policies shown in Figure 16.9 provide the following functionality:
Enforce password history—. To counteract the tendency of users to reuse the same password (or small set of passwords) over and over, this policy ensures that a specific number of unique passwords are used before a user’s oldest password can be reused. By default this option is set to the maximum of 24 passwords remembered in a Windows 2003 domain.
A possible side effect of enforcing a lengthy password history is that users may start maintaining a paper record of their password to help them remember what they are currently using. The two most effective ways to counteract this are through the proper education of secure computing practices and the use of a suitably long maximum password age (described next) to allow the user time to learn the password before the system once again requires them to change it. My preference is to use the maximum value of 24 in all production Windows domains whenever possible.
Maximum password age—. The longer a user is allowed to retain the same password, the greater the chances that the account may be successfully cracked or accessed by someone who may already have the password to the account. Periodically forcing a user to change their password helps minimize these risks. A Windows 2003 domain has a maximum password age of 42 days, which most administrators find to be an optimal medium between frequent password change requirements and adequate password aging.
Similar to enforcing a large password history, requiring users to change their passwords too often will likely result in at least some of the users keeping a paper record of their current password, often in an easily accessible location (taped to the monitor, under the keyboard, and so on). I highly recommend not setting the maximum password aging to zero (0) but instead using the default of 42 days.
Minimum password age—. Complimenting the maximum password age policy is the minimum password age policy. This policy defines the minimum number of days a user must use the same password before it can be changed. The main reason for this policy is to ensure that users do not attempt to quickly change their password multiple times in order to reuse a desired password, effectively circumventing the “Enforce password history” policy.
Windows 2003 defaults to a minimum password age of one (1) day, meaning that a user can change their password only once per day. This policy does not prevent an administrator from resetting a user’s password.
Minimum password length—. An adequate password length is critical to ensuring that user passwords remain secure by minimizing the effectiveness of brute-force attacks. Each increase in the minimum password length by one character exponentially increases the number of possible password permutations. Using only the standard characters on the keyboard, users have 94 possible characters to choose from when selecting their password. These 94 characters are comprised of 52 alphabetical characters (uppercase and lowercase), 32 additional characters (#, $, *, @, etc.), and 10 numeric characters (0, 1, 2, 3, etc.). When the minimum password length is 7, the user can choose from 947 (approximately 64,000,000,000,000) possible different passwords.
Of course, as the password length increases, so does the risk that a user will be unable to remember the password they are using. Windows 2003 defaults to a minimum length of seven characters, and I recommend that passwords use at least this many characters.
Password must meet complexity requirements—. Even with all these password requirements in place, education alone will not ensure that the end user consistently selects a strong password. Without some means of ensuring that a minimum level of strength is being used, the users are likely to pick the simplest password possible that complies with the policies in place.
The “Password must meet complexity requirements” policy lets you enable your Windows environment to perform a complexity validation check whenever a user’s password is changed. Here are the complexity requirements
Password must have a minimum length of six characters.
This requirement takes priority over the “Minimum password length” policy if the minimum length has been set to less than six characters.
The password must contain characters from at least three of the following categories:
Uppercase characters “A” through “Z.”
Lowercase characters “a” through “z.”
Numeric characters 0 through 9.
Non-alphanumeric symbols such as !, @, #, %, and so on.
The password cannot contain substrings of three or greater characters in length found in the user’s full account name. When this requirement is validated, the user’s full name is broken up into substrings using commas, periods, dashes, hyphens, underscores, number signs, and spaces as string delimiters. The password is then searched for substrings matching these tokens. If any matches are found, the password is rejected. Any substrings of three or fewer characters are ignored. For example, if a user has the name Steven Li Chan, it is broken into three substrings: “Steven”, “Li”, and “Chan”. The name “Li” is dropped because it is less than three characters, while the other two tokens are used to search the password. If either “Steven” or “Chan” appears in the password, it is rejected. The searches are case insensitive, so “CHaN”, “chan”, and “ChaN” are all considered to be the same.
When a user’s password is changed and it fails validation, a message similar to the one in Figure 16.10 appears. The Windows 2000 message differs slightly, providing a more verbose description of the password requirements. Invariably, when this policy is first implemented, users have a difficult time interpreting the password requirements. I’ve found that a separate description of the password requirements (including some password examples) made available to the user, either via an e-mail message or as a physical printout, can greatly ease transition pains associated with enforcement of complex passwords.

TIP:
Password validation requirements are provided as part of the passfilt.dll system file. When a password change request is made, the Local Security Authority (LSA) module of the Windows subsystem calls the password filters provided in this DLL to validate the password requirements. While the password requirements supplied with the default passfilt.dll file cannot be modified, a custom passfilt.dll file could be created containing customized password requirements for your organization. Details of such an undertaking are beyond the scope of this book, but if you are interested, you can find more information on the Microsoft Developers Network (MSDN) Web site at http://msdn.microsoft.com/library/default.asp?url=/library/en-us/security/security/strong_password_enforcement_and_passfilt_dll.asp
Store passwords using reversible encryption—. In most situations, this policy should never be enabled because it forces Windows to store passwords in such a way that they can be decrypted. This is inherently much weaker than the standard method of one-way encryption and provides an attacker with an additional means of compromising one or more user accounts.
With proper use of these six security policies you can minimize the vulnerabilities traditionally found with ID/password user authentication.
In addition to enforcing use of strong passwords, another mechanism for increasing security of Windows user authentication is use of user account lockout policies. Essentially, these policies provide a means of temporarily disabling a user’s account if a predefined number of unsuccessful user ID/password authentication attempts are performed within a given period of time. Figure 16.11 shows the three account lockout policies found in both Windows 2000 and Windows 2003. By default none of these options are enabled in either operating system.

The three policies shown in Figure 16.11 provide the following functionality:
Account lockout duration—. This policy determines the amount of time a user’s account remains disabled until it is automatically re-enabled by the system. I typically recommend that the duration be set to zero (0) in order to minimize the number of brute-force or dictionary-based attempts that can be performed against a user account before an administrator’s intervention is required. When set to zero, an account remains locked until manually unlocked by an administrator.
The one thing to consider when setting the lockout duration to zero is that a user cannot log on until an administrator manually re-enables the account. To minimize the chances of a user legitimately locking themselves out, settings for the other two account lockout policies must be set accordingly, as discussed in the following points.
Account lockout threshold—. The lockout threshold represents the number of incorrect password attempts allowed before a user’s account is disabled. One factor influencing this value is the lockout duration you configured for your environment. If the duration is set to zero (0), the lockout threshold can typically be assigned a value of 10 to 15. In most situations a user is not likely to repeatedly try their password this many times within the account lockout reset interval (see the following point).
Reset account lockout counter after—. This setting dictates the amount of time that must pass before the lockout counter is automatically reset to zero. A value of 30 minutes is usually appropriate for most environments.
When first implementing account lockout policies in your organization, it is not unusual to see a high number of account lockouts occur, particularly when first implementing strong password requirements. It will likely take a few days before the issues balance out to an acceptable level. At this time you may need to make minor adjustments to your configuration to reach a mutually agreeable configuration for both users and administrators.
WARNING:
An unfortunate downside that exists when lockout policies have been implemented is that a malicious user could exploit this configuration to purposely lockout user accounts, effectively performing a denial of service (DOS) attack on the environment. This is one of the reasons why the administrator’s account cannot by default be locked out. While there is no sure-fire way to prevent this, limiting external access to the environment as much as possible will at least help to contain such a threat to within the confines of the internal network.
While user authentication deals with verification of a user’s identity, connection authorization deals with regulating what server resources a validated user is authorized to access. For example, you may have 500 users in your organization, all of which have access to resources in the Windows domain (printers, file servers, and so on) but only 100 of which require access to log on to and function within the Terminal Server environment. While it may appear easier from an administrative standpoint to simply allow all users access to the Terminal Server environment, this invariably results in users not supposed to be logged on to the environment in fact being logged on, either intentionally or by accident. In addition to the obvious security concerns this can raise is the issue of license and server resource consumption. If you have implemented a Terminal Server environment to support 100 concurrent users, you had better be certain that you have the mechanisms in place to ensure these resources are available for the intended users.
In the “Administrative Delegation” section earlier in this chapter, I discussed use of local security groups to delegate user permissions on a Terminal Server. We now leverage the local group configuration discussed in that section to manage the connection authorization for a Terminal Server. All properties for Terminal Server connections, including security, are managed through the Terminal Services Configuration application in the Administrative Tools folder on the Start menu. Figure 16.12 shows the Terminal Services Configuration application for a Windows 2000 Terminal Server supporting both RDP and ICA connections. The Windows 2003 Terminal Services Configuration tool has the exact same interface.

Connectivity permissions for a Terminal Server are managed through the Permissions tab, found on the Properties page for each of the listed connection types, as shown in Figure 16.13. As with other access control lists in Windows, this tab lets you specify what groups have connectivity access to the Terminal Server and what specific privileges they possess. Table 16.3 shows both the default and recommended connectivity permissions for the RDP and ICA protocols. As you can see in the table, the default connection permissions differ slightly between the Windows 2000 (RDP 5.0) and 2003 (RDP 5.2) protocols.

Table 16.3. Default and Recommended Terminal Server Connection Permissions
Default RDP Settings (Windows 2000 and 2003) | Default ICA Settings (MetaFrame XP) | ||
|---|---|---|---|
Account/Group | Access | Account/Group | Access |
Administrators (local) | Full Control | Administrators (local) | Full Control |
SYSTEM | Full Control | Everyone | Guest Access |
Users (local) (W2K only) | User Access Guest Access | Guests (local) | Guest Access |
LOCAL SERVICE (W2K3 only) | Special—Message only | SYSTEM | Full Control |
NETWORK SERVICE (W2K3 only) | Special—Message only | Users (local) | User Access Guest Access |
Remote Desktop Users (local) (W2K3 only) | User Access Guest Access | ||
Administrators (local) | Full Control | Administrators (local) | Full Control |
SYSTEM | Full Control | SYSTEM | Full Control |
Users (local) | User Access Guest Access | Remote Desktop Users (local) | User Access Guest Access |
Terminal Server Operators (local) | User Access Guest Access Special
| Terminal Server Operators (local) | User Access Guest Access Special
|
Terminal Server User Support (local) | User Access Guest Access Special | Terminal Server User Support (local) | User Access Guest Access Special
|
LOCAL SERVICE | Special—Message only | ||
NETWORK SERVICE | Special—Message only | ||
Windows Terminal Server 2003 utilizes three group/user objects not found in Windows 2000:
LOCAL SERVICE—. This is a special built-in user account that has the same privileges as a member of the local Users group. This account has very limited access to network resources, presenting only null session information with no user credentials when prompted by a remote system. This account exists to make it easier for an administrator to grant limited privileges to services that require only local access on a server. By default this account has permissions to send text messages to all RDP protocol users on a server.
NETWORK SERVICE—. This built-in account also has privileges equivalent to a member of the local Users group. Where this account differs from the LOCAL SERVICE account is in the network privileges it has been granted. When prompted by a remote system for network credentials, this account sends the computer’s account credentials.
Remote Desktop Users—. By default, a user requires membership in this local group in order to log on to a Windows 2003 Terminal Server. The appropriate connection privileges and local user rights are all preconfigured for members of this group.
The main reason for creation of this group was to improve default security of a Terminal Server by negating the assumption that all members of the local Users group should be granted access to log on to a Terminal Server session. A common security problem in the Windows 2000 Terminal Server environment occurred immediately after the server was added into a domain, because a byproduct of domain membership is that the domain Users group is automatically added to the computer’s local Users group. This resulted in granting all domain users connectivity privileges necessary to be able to log on to the Terminal Server remotely. An administrator needed to be aware of this situation and modify the connectivity permissions accordingly in order to negate this potential security issue.
When configuring the RDP connection permissions, you do not need to modify the default entries, but if you plan to utilize the local Terminal Server User Support and Server Operators groups discussed earlier in this chapter, you should configure their appropriate connectivity privileges. In Table 16.3 I configured these two groups with the same permissions, but you can make the User Support permissions more restrictive if desired.
Both these groups have been assigned the same User and Guest Access privileges assigned to normal Terminal Server users, but special privileges have been added to elevate their access for specific functions. The individual permissions are assigned by clicking the Advanced button on the Permissions tab and then highlighting and editing the desired permission entry, as shown in Figure 16.14. When the additional permissions are assigned, they grant the following privileges:
Reset (Windows 2000 only)—. This attribute grants the user the ability to reset any RDP connection to the server. A reset forces the connection to be terminated and the resources allocated to be immediately freed. Unlike the execution of the Logoff command (controlled using the Logoff privilege; see the third point in this list), this does not send the Windows logoff message to the session’s running applications, allowing them to terminate. If a user has an application open and their connection is reset, any unsaved data is likely lost.
Remote Control—. This attribute grants the user the ability to remotely control (or shadow) another user’s session. The specific remote control permissions are discussed in Chapters 19 and 20, where I discuss connection-specific settings for both the RDP and ICA clients.
Logoff—. This attribute lets a user log off another user’s session just as if that target user had themselves selected Logoff from the Start menu. All running applications receive the Windows logoff message, allowing them an opportunity to cleanly shut themselves down before the user’s session is terminated.
Disconnect—. Instead of being logged off, a user can also be disconnected. This simply terminates the presentation connection between the client and the server but leaves the running desktop session active on the Terminal Server. Any running applications continue to run and be available if the user reconnects before the session is terminated by an administrator or automatically logged off by the system. Maintaining disconnected sessions on a server for long periods of time is usually discouraged because maintaining the state information consumes additional server resources.

Figure 16.14. Permission entries for the Terminal Server User Support group on a Windows 2003 Terminal Server.
Unlike the default RDP permissions, the default ICA permissions are not as secure, providing connectivity permission entries for both the Guests and Everyone groups in addition to the local Administrators, SYSTEM, and local Users. These privileges are not secure and at the very least should be modified to remove the Guests and Everyone groups.
TIP:
If a presentation protocol (RDP or ICA) is not going to be used in your environment, then one way to further secure the environment is to disable or completely remove the unused protocol entry. Removing a presentation protocol is not a permanent thing; in fact it can be re-added at any time if the requirements ever change. Another option is to further restrict the unused protocol by limiting access to only Administrators and SYSTEM. This makes the protocol available if an administrator ever requires it, while ensuring that users cannot use it to gain unauthorized (or uncontrolled) access to the environment.
For example, a common configuration when implementing Citrix MetaFrame is to make RDP connections available but limit their access to only two to four administrative accounts. This type of access can be valuable for an administrator, particularly if there are issues connecting using the ICA protocol.
In addition to the presentation protocols, when reviewing connection security other forms of potentially available connectivity should be examined. The number of running services should be minimized to limit the number of open ports on the server. The fewer network ports that are open, the fewer points of entry that are exposed. In Chapter 11, “Terminal Services Configuration and Tuning,” I discussed stopping unnecessary services on a Terminal Server.
Once an authorized user has logged on to the Terminal Server, the security focus shifts from one of complete access prevention to one of access restriction. A user’s ability to interact with objects in the system is managed through user rights, system security restrictions, administrative templates, and file and registry restrictions. The task of configuring these settings is further complicated by the need to ensure that adequate session security exists while still providing the functionality required by the users to perform their job.
As I discussed in the “Administrative Delegation” section of this chapter, whenever possible system privileges and restrictions should be managed using local user groups as opposed to individual user accounts or domain security groups. The idea is to then assign the desired domain group or user to the corresponding local group that is appropriate for their access level. Assignment of access rights on a Terminal Server should be kept as simple as possible. When the security requirements become too complex, this increases the likelihood that some setting may be missed. In most implementations this means dividing the users into two categories when delegating access rights. Either the user is a member of the Administrators group, with full rights to the entire server, or the user is a member of the Users group, with only limited access to the server’s resources.
NOTE:
With such a simplified division of access rights (Administrators group or Users group), care must be taken when the default Users permissions are not sufficient to let a user perform a particular job function. In most circumstances this occurs when an application does not operate properly under the limited privileges granted the Users group.
A common reaction to this type of problem, particularly under pressure from the user community to come up with a quick solution, is to assign regular users full administrative access. While this certainly resolves the application issue, it is critical that this never be allowed on a production Terminal Server. Such privilege elevation immediately brings the integrity of the Terminal Server into question since any mistake by a user can render the server completely unusable.
Assignment of privileges when pertaining to application integration is discussed in the “Application Privileges and Restrictions” section of this chapter.
User rights are a special set of privileges that define which basic operating system functions a user or group of users can perform. While I recommend that you review the User Rights configuration on your server to ensure that the appropriate groups have been defined, under most circumstances you will not have to modify the default settings. Figure 16.15 shows the default User Rights Assignment policies for a Windows 2003 Terminal Server as viewed from within the Local Security Settings MMC snap-in. This utility is found under Administrative Tools on the Start menu for both Windows 2000 and 2003 and is used to view the settings currently in effect on the server.
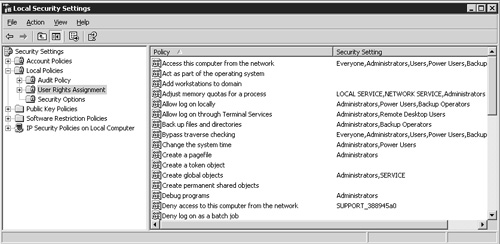
While the Local Security Settings snap-in is used to review the current settings on a Terminal Server, if you wish to make changes to the User Rights Assignment policies, I recommend that they be performed within the Terminal Server Machine Policy defined in Active Directory and not within the Local Security Settings snap-in. This ensures consistency across all Terminal Servers in your domain, since all necessary policy settings are automatically applied once the policy has been added to the Terminal Servers organizational unit. Policies defined at the domain level always take precedence over those options set locally when a conflict occurs.
When assigning user rights within a GPO, make certain that you include all the groups that require access to that user right. Rights defined within a GPO override the local settings; they do not merge with them. Also be aware that because the GPO affects all servers within the organizational unit, you need to assign permissions based on the domain groups and not the local groups of a specific server. As I discussed in Chapter 15, this is an exception to the general rule of assigning permissions based on local groups. Because GPOs are defined at the domain level, domain-level groups must be used. Figure 16.16 shows an example of User Rights Assignment policies defined within a Terminal Server Machine Policy for the Terminal Servers OU in a Windows 20003 domain.

Table 16.4 lists the user rights for both Windows 2000 and 2003 that most directly pertain to a Terminal Server. A complete explanation of each of the Windows 2000 user rights can be found in the Group Policy Reference included in the Windows 2000 Resource Kit documentation. An explanation of the Windows 2003 user rights can be found simply by right-clicking the desired user right and selecting Help.
Table 16.4. Terminal Server–related User Rights Assignment Policies for Windows 2000 and 2003
Windows Server 2003 | Windows 2000 | Explanation |
|---|---|---|
Access this computer from the network. | Access this computer from the network. | This right is not required for a user to be able to establish a Terminal Server session. This right is required only if you will be sharing folders or printers off the Terminal Server. |
The default group assignments can be limited to only Administrators if no file or print sharing is required. | ||
Deny access to this computer from the network. | Deny access to this computer from the network. | Members of this group are explicitly denied access to network resources on this server. The Deny property overrides any other permissions that might be assigned. |
Allow log on locally. | Log on locally. | This right is required for a user to be able to interactively log on to the server. On a Windows 2000 server this right is required to be able to log on to a Terminal Server session. On a Windows 2003 Terminal Server this right is required only when logging on directly from the server console. Omitting or denying this user right does not prevent a user from being able to establish a Windows 2003 Terminal Server session as long as they possess the “Allow log on through Terminal Services” privilege. |
Allow log on through Terminal Services. | Log on locally. | To establish a Terminal Server session a user must have this user right. Without it a user receives the message “The local policy of this system does not permit you to logon interactively” immediately after providing their logon credentials. |
Windows local Security Options policies allow an administrator to configure additional machine-specific security settings. As with local User Rights Assignment policies, it is recommended that changes to the local Security Options policies be performed within the Terminal Server Machine Policy and not directly on the individual Terminal Servers. Table 16.5 lists the changes I suggest making to local Security Options policies for your production Terminal Servers.
Table 16.5. Suggested Local Security Options Policies Changes for a Windows Terminal Server Environment
In Chapter 15, I discussed use of administrative templates and how they provide a centralized mechanism for applying behavioral changes and restrictions to both the target computers in the organizational unit and the users who log on to those computers. Both Windows 2000 and 2003 provide a set of standard administrative templates that include a number of security-related options. Windows Server 2003 includes new template options as well as updated naming for many of the options found in Windows 2000 Server. Because of this, I divide my policy suggestions into two separate tables. Table 16.6 lists suggested security settings for Windows 2000, while Table 16.7 lists my equivalent settings for Windows 2003. These suggestions have been subdivided based on the group policy object they should be applied in. The categories used are Terminal Server All Users Policy, Terminal Server Regular Users Policy, and Terminal Server Machine Policy. These tables list only Windows system-specific changes and no application-related settings that may pertain to a Terminal Server environment. These types of changes are discussed in the later section “Application Privileges and Restrictions.”
Table 16.6. Windows 2000 Administrative Template Security Suggestions
Table 16.7. Windows 2003 Administrative Template Security Suggestions
Administrative Templates Policy | GPO Affected | Explanation |
|---|---|---|
Windows ComponentsInternet Information Services | Terminal Server Machine Policy | |
| This policy is intended to prevent an administrator from installing IIS or any applications that require IIS. | |
Windows ComponentsTerminal Services | Terminal Server Machine Policy | |
| This policy limits a user to a single active Terminal Server session and is enabled by default on all Windows 2003 Terminal Servers. Note that it is applied on a perserver basis and does not restrict a user from having active simultaneous sessions on different Terminal Servers. | |
| This sets the maximum number of concurrent connections supported on the server. Enabling this policy in conjunction with the previous policy helps protect a Terminal Server against a crude denial-of-service attack performed by logging on to the server with the same user continuously until all server resources are exhausted. The maximum number of connections should be set to match the maximum number of users supported by your server-sizing estimate. | |
| As I discussed in Chapter 8, remote control allows an administrator (or other authorized user) to connect into a user’s session and interact with the environment. This policy lets you configure the rules for remote control on each Terminal Server. There are four choices available: | |
| ||
Windows ComponentsTerminal ServicesClient/Server data redirection | Terminal Server Machine Policy | These policies control the behavior of various data redirection options supported by Windows 2003 Terminal Services. The requirements of your implementation will dictate what redirection options will be used. It is good practice to disallow all options not required. For example, if client drive redirection is not required, the associated policy “Do not allow drive redirection” should be explicitly enabled to prevent this client drive mapping for any remote user. |
Windows ComponentsTerminal ServicesEncryption and Security | Terminal Server Machine Policy | |
| The RDP client supports entry and caching of a user’s password so it can be automatically passed to the server to log the user on. Enabling this policy causes the Terminal Server to ignore any password passed by the client and instead always prompts the user to provide their password. | |
| The minimum encryption level required by an RDP client connecting to a Windows 2003 Terminal Server is set to High by default, but you can ensure this option isn’t changed by enabling this policy and selecting High Level. | |
Windows ComponentsWindows Explorer | Terminal Server All Users | |
| This setting ensures that only those shell extensions that have been approved by an administrator or run only for a single user are allowed to load when Explorer starts. | |
Start Menu & Taskbar | Terminal Server All Users | |
| This ensures that all users have the Logoff <UserName> option on the Start menu. | |
| This option makes it more difficult for even an administrator to accidentally shut down a Terminal Server. On more than one occasion I’ve witnessed an administrator accidentally select Shutdown instead of Logoff and acknowledge the action before they even know they’ve done so. An administrator can still shut down a server by using the TSSHUTDN command from a command prompt. | |
Windows ComponentsWindows Explorer | Terminal Server Regular Users | |
| Removes the Manage item from Explorer and My Computer. If the MMC snap-in access has been prohibited (see Microsoft Management Console later in this table), this menu item has no effect on regular users, but I like to completely remove it as part of my standard configuration. | |
| This setting removes the Hardware tab from all local drives on the server, preventing users from being able to see what hardware is being used for hard drives, CD-ROM drives, and so on. | |
| When a user has a drive mapping to a DFS share, the DFS tab is available on the Properties dialog box. This option disables access to this tab, preventing users from seeing the available physical locations for the particular DFS share point. | |
Windows ComponentsMicrosoft Management Console | Terminal Server Regular Users | |
| Enabling this policy prohibits all regular users from accessing any MMC snap-in. Be aware that you may need to add specific snap-ins to the permitted list within Terminal Server User Support Policy. | |
Start Menu & Taskbar | Terminal Server Regular Users | |
| Removes the link to Windows Update from the Start menu and prevents the users from accessing the Windows Update Web site. | |
| Completely removes access to the Network Connections folder, preventing users from finding out specific details about the server’s network configuration. | |
| Eliminating this option from the Start menu prevents users from quickly launching an application by name. This policy does not prevent users from starting applications present on the Start menu or double-clicking them through Windows Explorer. The ability to launch programs or navigate folders through the Internet Explorer address bar is blocked. | |
| Windows enhances the user’s work experience by tracking user-specific information such as what applications they commonly run, the documents they open, and so on. Disabling this option turns off this tracking feature. | |
Desktop | Terminal Server Regular Users | |
| Disables access to the System Properties dialog box for the My Computer icon. This dialog box provides general access to information such as available memory, CPU type, and operating system version. | |
| If you redirected the My Documents folder for your users, you must implement this policy. Normally users have the ability to change their My Documents path, and allowing such access could result in users storing sensitive documents in a location where they may be easily accessible by others or omitted from the regular backup process. Enabling this policy does not affect use of the folder redirection policy. | |
DesktopActive Desktop | Terminal Server Regular Users | |
| In addition to providing a performance improvement, this option increases security by preventing Web-based content from being enabled directly on the user’s desktop. | |
Control Panel | Terminal Server Regular Users | |
| If users require access to one or more control panel applets, only those specific options should be made available and all other entries suppressed. Usually I provide users with access to only the Display applet so they have access to make minor changes to their visual desktop experience. The specific applet file name is DESK.CPL. | |
Control PanelAdd/Remove Programs | Terminal Server Regular Users | |
| This option completely eliminates access for all regular users to the Add/Remove Program option. | |
Control PanelDisplay | Terminal Server Regular Users | |
| Very often, users try to run custom screen savers without realizing they not only consume available system resources but also can pose a security risk. Removing access to the Screen Saver tab prevents users from easily configuring and activating screen savers. | |
Control PanelDisplayDesktop Themes | Terminal Server Regular Users | |
| Completely removes the Themes tab from the Display dialog box. | |
NetworkOffline Files | Terminal Server Regular Users | |
| Completely removes the user’s ability to modify the Offline Files menu option. Offline files in general can pose a security risk by making files available in a location that may not be secure. | |
| Turns off the ability to make files or folders available offline. | |
NetworkNetwork Connections | Terminal Server Regular Users | |
| While users typically do not have access to modify the properties for a LAN connection, by default they can still view network configuration options. Enforcing this policy prevents access to this information. | |
| Users do not require access to the statistics for a LAN connection. These statistics provide information such as link speed and connection uptime. The properties for the LAN connection are also directly accessible from here. | |
System | Terminal Server Regular Users | |
| Enabling this policy prevents users from directly launching a command prompt while still allowing scripts (logon, startup, and so on) to be processed. While the stability of this option has improved over earlier versions of Windows Terminal Services, anomalies with certain applications that rely on access to a command prompt may exist. Proper testing is very important when this policy has been enabled. | |
| When enabled, this policy prevents users from being able to run the registry tools REGEDIT and REGEDT32. Users can still update the registry by directly running valid .REG files, but interactive traversal of the registry through either tool is not permitted. | |
To effectively limit what applications a user can run on a Terminal Server, the policy “Run only allowed Windows applications” should be enabled and configured. I discuss configuration steps for this policy in the later section “Application Privileges and Restrictions.” | ||
SystemCtrl+Alt+Del Options | Terminal Server Regular Users | |
| Prevents users from viewing their running processes as well as seeing the current performance statistics for the server. |
TIP:
As I discussed in Chapter 15, customized or third-party administrative templates can be added to the active directory, allowing for the centralized management of applications or additional Windows components. Applications such as Microsoft Office support extensive configuration via administrative templates. You can also create your own custom .ADM files. General information on creation of custom administrative templates can be found in Microsoft knowledgebase article 323639.
TIP:
Windows Server 2003 administrative templates provide extensive support for many of the Terminal Services options normally configured through the Terminal Services Configuration utility. Unless otherwise stated, any Terminal Server client-related settings defined in a Windows 2003 administrative template apply to only RDP connections. Citrix ICA (MetaFrame) connections are not affected by most of these group policies.
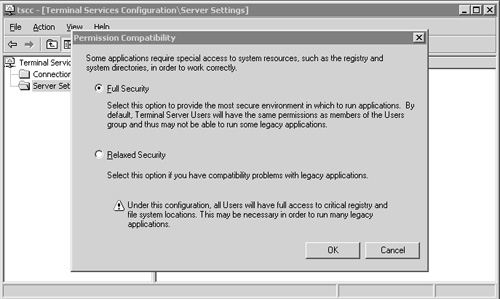
Chapter 8 discussed the file and registry security configuration on a Windows 2000/2003 Terminal Server and how they are both more secure when the Permission Compatibility option is set to Full Security on a Windows 2003 Terminal Server and set to Permissions Compatible with Windows 2000 Users on a Windows 2000 Terminal Server. Figure 16.17 shows the Permission Compatibility dialog box from within the Windows 2003 Terminal Services Configuration utility.
In Chapter 8 I talked about the following four general rules for file server security:
Divide the server’s storage into at least two logical drives. For my discussions in this chapter I assume that the server drives are X: for the system drive and Y: for the application drive.
When assigning permissions, restrict access to read-only and then grant or revoke permissions as required. When Permission Compatibility has been set to Full Security, as just discussed, the file system for the most part is already secure. There is one major change required on a Windows 2000 Terminal Server, which is discussed later in this section.
Script security changes so they’re reproducible. File permission changes can be easily scripted using the CACLS command line file security utility that is included with both Windows 2000 and 2003.
Be certain to implement all file security prior to installing any applications onto the Terminal Server. I discuss suggested default security settings for the application drive immediately after the system drive discussion. Security-related issues with application installation and execution are discussed in more detail in Chapter 21, “Application Integration.”
On a Windows 2003 Terminal Server the default file system permissions provided with the Full Security option provide a suitable security configuration for the system drive. No custom changes are necessary unless you want to be very restrictive in folders and executables accessible by your Terminal Server users. A Windows 2000 Terminal Server, even with the Permissions Compatible with Windows 2000 Users option set, requires one rather significant change to the permissions on the root of the system drive in order to properly secure the volume.
During installation of Windows 2000, the Everyone group is assigned Full Control access to the root of the system drive by default. On a Terminal Server this configuration is unacceptable because it lets a regular user add files or folders to the root of the system drive, which in turn can potentially cause stability- or security-related issues. This can be corrected by assigning the following permissions to the root of the system drive only:
Administrators (Full Control)
SYSTEM (Full Control)
Users (Read)
These permissions should not be propagated to all subfolders but instead should be applied to only the root of the drive. The following simple CACLS script demonstrates how this type of configuration can be scripted for reuse on all Windows 2000 Terminal Servers in the environment.
@ECHO OFF
ECHO Setting security permissions on system volume. Please wait...

REM ** Grant local Administrators and SYSTEM Full Control
REM ** Grant local Users READ access to the root of the system
volume.

CACLS X: /c /g Administrators:F SYSTEM:F Users:R
Configuring the initial application-volume security permissions is the same for both Windows 2000 and 2003 Terminal Server. I always set the initial application volume permissions as follows:
Administrators (Full Control)
SYSTEM (Full Control)
Users (Read)
As I mentioned, you need to treat this as the starting point when installing the applications into your Terminal Server. In some situations, you may be required to grant permissions other than Read to certain files or folders for an application to function properly. I always recommend that you start out as restrictively as possible and then loosen up only when required. Make sure that you clearly document these exceptions and place them into a script so the changes can be reapplied if necessary. The following script can be used to assign the default permissions on the application volume.
@ECHO OFF
ECHO Setting security permissions on application volume. Please
wait...

REM ** Grant local Administrators and SYSTEM Full Control
REM ** Grant local Users READ access to the entire volume.
REM ** Permissions should be adjusted on specific applications if
necessary.

CACLS Y: /T /c /g Administrators:F SYSTEM:F Users:R
ECHO y|CACLS Y:* /T /c /g Administrators:F SYSTEM:F Users:R

REM ** Application-specific changes should be appended below.
NOTE:
If you have implemented a separate pagefile drive on your server, you should assign the same default permissions to this volume as you’ve assigned your application volume, otherwise users will have unrestricted access to write data to this drive, which in turn can cause security or stability issues.
While the registry’s security requirements are similar to those of the file system, the process of assigning security in the registry can be much more difficult. The problem is that in certain situations an application can have a legitimate reason for writing to the registry. Fortunately, most applications available today are adhering to the standard of writing machine-specific information to the HKEY_LOCAL_MACHINE key (normally done during installation) while maintaining user-specific information in the user’s personal profile (HKEY_CURRENT_USER). By default, users have write access to their personal registry but not to HKEY_LOCAL_MACHINE.
If the Full Security option is not enabled, users gain additional write privileges within the registry that they normally do not have. These permissions have been granted to the special Terminal Server Users group, which is automatically assigned to Terminal Server users when legacy application support has been enabled by reducing the Terminal Server security configuration. As long as the Windows 2000 or 2003 Terminal Server is using full security, the default registry permissions do not need to be modified to support the multiuser environment.
Another part of proper registry security is restricting access to the Registry Editor tools (REGEDIT and REGEDT32). The group policy change that should be made to restrict access to these tools was discussed in the “Administrative Templates” section, earlier in this chapter. When this change is implemented, if a user attempts to launch a Windows registry tool a message similar to the one shown in Figure 16.18 appears.

Application security can be broken down into two categories. The first deals with managing user access to only those applications they are required to use, and the second deals with controlling what options and functionality within an application are available to different users. The extent to which you need to manage both categories depends on the requirements of your implementation. If you run a large number of applications on your servers, it is likely you will need to limit access to one or more of these applications (or functionality within these applications) based on security, licensing, or performance requirements.
NOTE:
Two separate Terminal Server audits I performed easily demonstrate how different organizations can view application security. In both cases, one finding was that all applications remained accessible to all users on the server.
For one administrator this came as no surprise and had been left as such simply because all Terminal Server users accessed the same group of applications, and highly sensitive data was not accessed through their Terminal Server implementation.
For the other administrator it was a completely different story. Application segregation was supposed to have been implemented prior to this team’s inheriting the Terminal Server environment, and the lack of any proper controls was a major concern because sensitive sales and customer information was easily accessible to any user interested and determined enough to search for it.
In a Terminal Server environment, application access is usually managed in one of two ways:
Restricting application access—. The most common method of access management is to assume that all Terminal Server users have access to all applications on the server, and only those applications that require limited access are restricted through special application security groups.
This implementation is commonly used simply because this is the default behavior of Windows. When an application is installed on a Windows Terminal Server, by default it is accessible to all users unless access restrictions are defined at the file system level, the application level, or both. For example, an inventory management system may be installed on a Terminal Server and all users can launch the application and reach the logon prompt, but only those users authorized to actually access the application have a valid user ID and password.
Granting application access—. The alternate application access method assumes that users have no access to any of the applications on the server unless such access has been explicitly granted. Not only is this management method the more restrictive of the two, but it also takes much more work up front to configure properly and can quickly become cumbersome, particularly when a large number of applications are involved. One benefit to being so restrictive is that users are not automatically able to run new applications introduced onto the server; this as a result helps guard against rogue applications being introduced via e-mail or download.
While the second option is certainly more appealing from a security perspective, trying to manage multiple application access lists for different groups of users can quickly become overwhelming. The best approach to restricting application access is to implement a combination of the two access methods. By combining the two, you still enjoy the additional security benefits of explicitly defining what executables a user can run while minimizing the time required to manage such an implementation.
When combining the two, the first task is to establish a list of all applications users are authorized to run. Specific items on the list are then restricted further, accessible only to the subset of users authorized to run those specific applications. For example, a typical application access list for a Terminal Server user might look like the one shown in Table 16.8. A single application access list is created, but then only users belonging to the appropriate groups can access the Inventory Management or Customer Billing programs.
Table 16.8. A Windows Terminal Server Application Access List Example
Application | Notes |
|---|---|
Microsoft Word Microsoft Excel Microsoft Outlook Custom Time-Tracking App | These applications are available to all users and not restricted based on group membership. |
Inventory Management | This application is available only to members of the APP_Inventory_Mgr group. |
Customer Billing | This application is available only to members of the APP_Cust_Billing group. |
How you approach the restriction of application access will depend on the version of Windows that you are running and how tightly you wish to enforce these restrictions. The three different methods of locking down application access that I will discuss are:
The “Run only allowed Windows Applications” group policy object. This GPO allows you to manage a list of allowed Windows applications that can be executed by users affected by the policy. Usually the policy is applied to all non-administrative users logged on to a Terminal Server. The one limitation of this policy is that it does not track applications based on their full path, only their application name. This creates the situation where a user could execute any desired application, simply by changing the application’s name to be the same as an application that is authorized to run.
The APPSEC security utility. This tool, available as part of the Windows 2000 Server Resource Kit allows you to define a list of allowed applications, much like the “Run only allowed Windows Applications” group policy. The three main differences between this utility and the GPO are:
All non-administrator users are affected by this application’s restrictions. There is no way to limit the access based on a particular security group.
Only application executables that reside on a server’s physical drive can be executed. Any attempt to launch a network-based executable will fail.
The listed applications must reside with the specific path specified for that application. Attempting to run a listed application from any other location will fail.
These differences greatly increase the effectiveness of the APPSEC utility to more tightly secure an environment when compared to the “Run only allowed Windows Applications” GPO.
Windows Server 2003 does not support the APPSEC security utility. Instead it has introduced the “Software restriction policies,” a much more robust version of the “Run only allowed Windows Applications” GPO. This GPO allows for the following:
Determine whether the default behavior of the GPO is to allow applications to execute based on the access rights of the user, or to restrict access to all executables regardless of access rights.
Applications to be allowed or restricted can be identified by a binary hash that is calculated, a certificate or a file system path or Internet security zone. These choices allowing for the clear identification of the authorized executable while still allow flexibility in how it is located and run.
Entire folders can also be managed, allowing all applications within those folders to be assigned restricted or unrestricted application execution access.
I will now take a brief look at each of these three choices.
Through use of a group policy object, Windows provides the ability to limit a user’s access to only those applications explicitly defined for that user. The specific GPO is located under
User ConfigurationAdministrative TemplatesSystem
and is called “Run only allowed Windows applications.” Typically this particular policy can be defined as part of the Terminal Server Regular Users GPO, so it is applied to all non-administrative users logged on to a Terminal Server. Figure 16.19 shows the dialog box for this policy in a Windows 2003 domain. The applications are added by clicking the Show button and entering the corresponding executable name.

For a user to be able to properly work within a Terminal Server session, you must be certain that you include all the necessary executables the user will need to run. When a user attempts to run an application not included in the list, they receive an error message similar to the one in Figure 16.20.

Contrary to what you might think, you are not required to list any of the core Windows components required for a user to be able to log on, such as winlogon.exe, wfshell.exe, or explorer.exe. This is because the application list applies only to launching programs through Windows Explorer. Applications launched directly from the system or through a command prompt are not controlled by this policy. If you restricted the user’s ability to access the command prompt, they cannot circumvent Explorer to launch applications directly. If you enable this policy but include no applications in the list, the user still can log on to the server but once logged on cannot launch any applications.
Table 16.9 shows an actual executable list taken from a Terminal Server implementation where users were restricted to running only the listed applications. Note that this list also includes a batch script. If you provide users with an application shortcut that launches a batch script that in turn launches an executable, you must include the batch script name in the authorized application list or it will fail to launch. The name of the executable itself is not required because it is launched from within the batch script.
Table 16.9. Sample Listing of Allowed Application Executable Names Taken from an Actual Terminal Server Implementation
Executable Name | Application Name | Notes |
|---|---|---|
Excel.exe | Microsoft Excel | |
Iexplore.exe | Internet Explorer | |
Notes.cmd | Custom batch script to launch Lotus Notes | This batch script performs some configuration prior to starting Lotus Notes. Note that the script name is included in the executable list but not the actual Notes executable. This is because the executable is launched from within the CMD session initiated by the batch script and is not controlled by this application access list. |
Osa.exe | Microsoft Office Startup Assistant | This is provided with Office XP and initializes a number of shared Office components for use. It is normally found in the Startup folder. |
Outlook.exe | Microsoft Outlook | |
PN.exe | Citrix Program Neighborhood | If you’re going to allow users to access published applications available on different servers through a Terminal Server session, then PN.exe must be made available. This is required only when using the ICA passthrough client. If users are launching published applications directly from their local PC desktop, this executable does not need to be included in the list. |
Powerpnt.exe | Microsoft PowerPoint | |
Winword.exe | Microsoft Word |
Once the list of all allowable applications has been defined and implemented, access to these applications can be further restricted using security groups if necessary. For example, if access to Microsoft PowerPoint was to be limited to only a few individuals, then a group could be created (for example, APP_TS_PowerPoint_Users) and used to define security on the PowerPoint executable. Any users not belonging to this group who attempted to run PowerPoint would receive an access-denied message.
TIP:
Whenever a Terminal Server implementation calls for restriction of access to one or more applications, it can be less confusing to the user if the Start menu has been organized in such a way that applications they cannot access are segregated and, ideally, not even visible. Common applications accessible by all users are usually located under the main portion of the Start menu, while restricted applications available to only a limited number of users are located in subfolders with labels such as “Customer Service Managers” and “Order Desk Sales Reps.” The permissions on these subfolders are set to grant read access to only those users authorized to run the applications they contain, so when other users click the subfolder it appears empty, as shown in Figure 16.21.

Before running the APPSEC utility you must download the appropriate installation files from the Microsoft Web site and install APPSEC on your Terminal Server. The version of APPSEC that ships with the Windows 2000 Server Resource Kit will not function properly as it is missing some necessary system files. The APPSEC.ZIP file can be downloaded from the Microsoft FTP site at: ftp://ftp.microsoft.com/reskit/win2000/
Once downloaded, extract the contents into a temporary folder and then run InstAppSec to install the tool.
The APPSEC security utility is launched by running APPSEC from a command prompt or using the Run command on the start menu. Once started, the main APPSEC application window will appear as shown in Figure 16.22. The application automatically includes a set of applications required for a user to be able to log onto the server. By default the APPSEC utility will be disabled until explicitly enabled by an administrator.
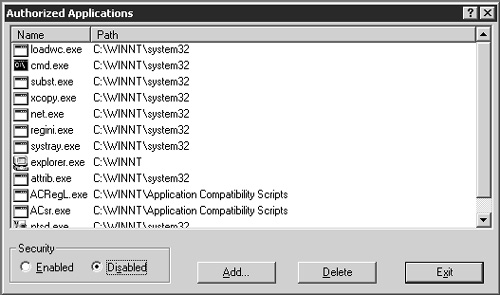
Once APPSEC has been enabled, the settings will immediately be applied to any new user session logons. Users currently logged onto the server will not pickup these changes until they have logged out and back into the server. APPSEC settings apply only to regular users and will never restrict anyone with administrative privileges. When a user attempts to run an application not in the list they will receive an error message stating that “Access to the specified device, path or file is denied.”
Adding and removing applications from the list are very straightforward and performed by selecting the desired option. When adding new applications to the list, there is an option available to “track” the results of running a particular application (Figure 16.23). Tracking allows an administrator to run an application while APPSEC monitors and adds any associated executables to the list. This helps to ensure that a particular program has all of the necessary components in order to work properly.

Figure 16.23. The APPSEC utility provides a means of tracking any associated executables for an application to ensure they are all added to the allowed application list.
While APPSEC provides a very rudimentary interface, it can be a very powerful tool for securing a Windows 2000 Terminal Server environment.
Windows Server 2003 provides the specific GPO for Software Restriction Policies, which can be found under
Windows SettingsSecurity SettingsSoftware Restriction Policies
By default this policy is not enabled and must be created by right-clicking Software Restriction Policies and selecting New Software Restriction Policies (SRP). Once selected the appropriate settings for the policy are created and available to be set as shown in Figure 16.24.

The basic layout of the Software Restriction Policies is as follows:
Only one SRP is created for each GPO. After selecting New Software Restriction Policies, that option will no longer be available unless the existing SRP is deleted.
Under the Software Restriction Policies folder, there are three attributes, which are
Enforcement—. This setting dictates the general enforcement criteria for the policy. By default, it will restrict only executables (not executable libraries such as DLLs) and will apply to all users affected by the policy, including administrators.
Designated File Types—. In addition to the standard executables files with the suffix EXE all of the file types listed here are assumed to represent executables and will be included in the software restrictions. File types can be added and removed on this screen.
Trusted Publishers—. Defines whether or not the user has any control over what publishers will be trusted when presented with certificates that verify the authenticity of an application.
The Security Levels folder has two items, Disallowed and Unrestricted. Only one of these items can be set as the default at any given time. When Disallowed is chosen, the policy enforces that no users will be able to run software, unless the software has been designed as an additional rule, which is discussed next. If the Unrestricted option is chosen, then all applications are accessible unless explicitly denied in the Additional Rules section.
The Additional Rules folder is where the majority of the items will be managed. The purpose of this folder is to store either specific entries that are unrestricted or disallowed. Entries are added here simply by right-clicking and choosing the rule to define the entry. The four choices are Certificate Rule, Hash Rule, Internet Zone Rule and Path Rule. The most common select is Path Rule, allowing an administrator to provide an explicit path to a folder, executable file, or registry location. The security level for the rule dictates if the entry is unrestricted or disallowed.
In a Terminal Server deployment, the Software Restriction Policies are usually created within the Terminal Server Regular Users policy so that the changes are picked up by the non-administrative users in the environment.
In addition to allotting the desired application access to your various user groups, quite often you will want to control what options and functionality in an application are available to different users. The exact method by which these changes are performed (if they’re even supported) will vary from application to application. Many provide their own integrated security based on a logon ID and password managed from within the program, while others such as Microsoft Office leverage functionality of group policy objects to allow customization based on group membership. When an application supports configuration changes using a GPO, the functionality is added into the active directory through what are know as administrative template files. Figure 16.25 shows the Add/Remove Templates submenu along with some of the Office XP templates already loaded into the Administrative Templates folder. Custom template files are usually stored in the WINNTINF folder and have the extension ADM. More details on general installation and use of template files are provided in Chapter 15.
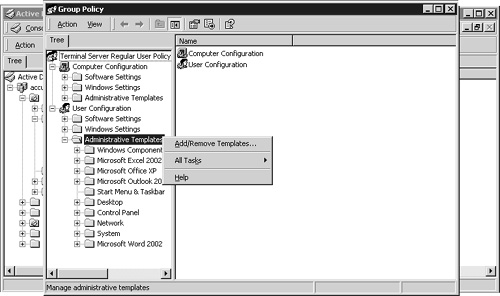
Figure 16.25. Custom and third-party administrative template files can be added to a group policy in the active directory.
As part of a complete security implementation, I recommend that whenever you have the opportunity to customize and/or lock down any of the applications you are implementing, you should do so. By pre-configuring options such as target data directories, turning off Web-based integration, or disabling automatic update features, you are simplifying the user’s environment and reducing the exposed areas where potential security issues could develop. The fewer the number of customization options available to the end user, the less likely you are to have application-related issues in the environment. In Chapter 20, I look more closely at some of the configuration options available for Microsoft Office through administrative templates.
As I mentioned in Chapter 8, a secure environment not only consists of properly configured servers but also requires effective auditing to detect anomalies in application or user behavior. Auditing alone is of little value unless you also have a means of effectively monitoring these logs and flagging suspicious activity when it occurs. Unfortunately, most organizations are quick to implement the logging portion but rarely establish any effective method of monitoring these logs. As a result, the environment typically logs huge amounts of security information that is rarely ever even examined. The log files themselves are usually so small that information is quickly overwritten, eliminating any possibility of examining the security information even if a problem is detected.
Windows provides support for auditing in a number of different areas of the system; in this section I review these areas and provide suggestions on specific event auditing that can be useful to audit. Even if you do not plan to implement any real form of auditing in your environment (although I advise against this), understanding how auditing works can be an important tool when performing application integration (see Chapter 21 for more information on this) because it can help you to determine files or directories that may require modified security permissions in order to allow an application to function properly.
If you will implement security auditing, you need to consider carefully what events you actually want to audit. Although it is easy to simply configure your environment to audit all events, the resulting logs are difficult to review and manage, defeating the purpose of auditing in the first place. Finding the proper level of auditing for your environment requires a bit of work but is an exercise I highly recommend. My simple rule is if you are not planning on proactively monitoring an event, don’t waste your time auditing it. People may disagree with this, but in most situations, by the time you discover there is a security problem, the pertinent log information very likely is gone.
Before you can begin to track audited events, you must enable auditing on the system itself. As with the other security options configured in this chapter, Terminal Server auditing should be enabled through a group policy object in the active directory. Alternatively you can configure the audit settings directly from the Local Security Settings application, but any options configured in the domain will override this. Figure 16.26 shows the Audit Policy folder containing the available policy properties, which are located in
Computer ConfigurationWindows SettingsSecurity SettingsLocal Policies
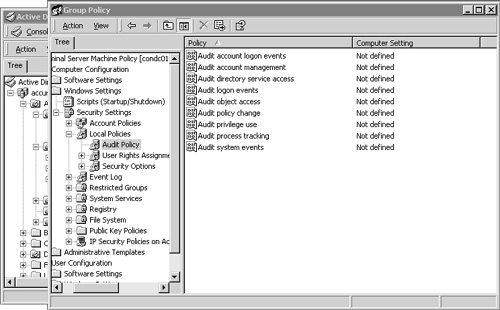
Figure 16.26. Audit policy settings for Terminal Servers should be defined in a GPO in the active directory.
The auditable events listed in the Audit Policy folder are described in the following list. Unless otherwise stated, these policies are not enabled for either Windows 2000 or Windows 2003 Terminal Server.
Audit Account Logon Events—. This audit policy should not be confused with the Audit Logon Events policy described later in this list. The purpose of this policy is to log an event whenever an account on the computer being configured is used to authenticate on this or any other computer. This option is typically enabled only on a domain controller and is not normally required on a Terminal Server. Windows Server 2003 has this option set to SUCCESS by default on all member servers.
Audit Account Management—. The result of a creation, deletion, or modification of a local user account or group is logged when this audit event is selected. I recommend tracking both success and failure.
Audit Directory Service Access—. Access to an active directory object that has its own system access control list (SACL) is audited using this policy. This audit policy is valid on only a domain controller and so does not need to be set on a Terminal Server. A group policy object is an example of an object in an active directory that has its own SACL.
Audit Logon Events—. Whenever a user attempts to log on or log off the Terminal Server, an event is written to the log. This differs from the Audit Account Logon Events policy, which generates a log entry on the server where the user account resides. The Audit Logon Events policy generates a log entry on the server where the logon was attempted. I recommend that you audit both success and failure. Successful logons let you audit the logon activities for users, and failures may indicate an attempt by someone to access a restricted resource. MetaFrame includes a command line tool called AUDITLOG, which generates output from the security event log based on the logon/logoff information in the security log. See Appendix B, “MetaFrame Presentation Server Command Reference,” for more information on this. This event is enabled and set to track SUCCESS events on Windows 2003. It is not defined for Windows 2000.
Audit Object Access—. Access to standard objects that have their own SACL defined, such as files, folders, printers, or the registry, are audited using this policy. I recommend auditing failures since this will indicate users with insufficient privileges attempting to access a resource. Mapping successes offers little value except in isolated situations, because users can successfully access a large number of objects during a single Terminal Server session.
Audit Policy Change—. This setting covers any changes made to the security policies, which are composed of the user rights policies and the audit policies on a Terminal Server. Because of the sensitive nature of this security information and the fact that it should rarely change, both success and failure should always be audited.
Audit Privilege Use—. This audits use of a user right on the Terminal Server, such as taking ownership of an object or changing the system time. Failure should be tracked for this policy.
Audit Process Tracking—. This policy tracks actions such as process (including program) starting and stopping. Indirect object access would include tracking a process or thread from an application that manipulated an object in some way. Failures should normally be audited for this policy.
Audit System Events—. When a user attempts to restart or shut down a system, this policy is triggered. Any event that affects the system security or the security log is also tracked with this event. I recommend auditing both success and failure.
Auditing introduces additional performance overhead, so unless you are willing to actively monitor your audit logs and feel their use is necessary, you can provide a performance gain by not implementing auditing. Of course, the performance gains must be worth not having the auditing information available for review if necessary. I suggested some events to audit, but the ones you implement will depend on the information you’re interested in tracking and what you feel is necessary. You should monitor your security logs carefully to see if there is extraneous information that can be eliminated.
NOTE:
If the Shutdown command has not been removed from the Start menu using a group policy, do not be too surprised if you see restart and shutdown attempt failures made on your Terminal Servers shortly after you implement the new infrastructure. If your users have had previous experience with Windows, they may be accustomed to shutting down their computers when they finish working for the day. This will be common among users who use the Alt+F4 key combination to terminate Windows. Even on a Terminal Server, using Alt+F4 presents the user with the Windows Security dialog box where he or she has the option to shut down. Although regular users will have insufficient privileges to successfully complete this operation, the shutdown or restart attempt still will be logged.
After enabling object access auditing, you can set up the desired file system auditing. If object access is not being audited (see the preceding section regarding system auditing), any file auditing you configure will simply be ignored. File auditing is enabled by following these steps:
Right-click a file object (drive, folder, or file) and select Properties.
Click the Security tab and then the Advanced button.
Here you find the Auditing tab. By clicking the Add button, you can add groups or users that will be audited based on the options you select. Figure 16.27 shows the auditing options available for both Windows 2000 and 2003, which correspond to the file system security attributes. More information on these specific attributes can be found in Appendix E, “File System and Registry Security Primer.”

Table 16.10 lists my suggested auditing settings for the system and application volumes on a Windows 2000/2003 Terminal Server. On the system volume, you may want to create separate audit settings for the profile directory (%SystemDrive%Documents and Settings”), since users will continuously be writing, editing, and deleting information from that location.
Table 16.10. Suggested Windows 2000/2003 Terminal Server System and Application Volume Auditing Settings
Volume | Permission | Audit Setting |
|---|---|---|
System/Application | Create Files/Write Data | Failure |
Create Folders/Append Data | Failure | |
Delete Subfolders and Files | Success, Failure | |
Delete | Success, Failure | |
Change Permissions | Success, Failure | |
Take Ownership | Success, Failure |
Typically, registry auditing is enabled only on the HKEY_LOCAL_MACHINE hive and all subkeys. The auditable events are set similar to those shown in Figure 16.28.

Registry auditing is enabled through the registry-editing tool (REGEDT32 on Windows 2000, REGEDIT on Windows 2003). Depending on the operating system, the Auditing dialog box is accessed as follows:
Windows 2000: Open REGEDT32, select the Permissions menu, click the Advanced button, and select the Auditing tab.
Windows 2003: Open REGEDIT, choose Permissions from the Edit menu, click the Advanced button, and select the Auditing tab.
Click the Add button to add the users or groups and then select the events to audit. You will need to select the Reset Auditing Entries check box to configure all child objects and enable propagation of inheritable audit entries.
You may receive a message indicating that all subkeys could not be updated. This is okay, as the update process will fail to update subkeys for which you don’t have access, such as the HKLMSECURITY or the HKLMSAMSAM key. Auditing on the relevant keys will be updated properly.
You shouldn’t monitor success of either the Query event or the Enumerate Subkeys event, because both generate a large number of event entries very quickly and should be enabled only when attempting to troubleshoot or resolve a specific issue.
Both versions of Windows support connection auditing, which monitors actions that one user session performs against another or performs directly on the connection configuration. Actions such as modifying connection properties or remotely controlling a user’s session can be monitored when connection auditing has been enabled. Figure 16.29 shows the Auditing dialog box for an RDP-TCP connection entry. The selected entries also represent my recommendations for the events to audit. Connection auditing simply tracks the success or failure of performing a particular connection action.

Connection auditing is enabled as follows:
Open the Terminal Services Configuration tool located under Administrative Tools on the Start menu.
Right-click desired connection protocol (RDP or ICA) and select Properties.
From the Permissions tab, click the Advanced button and then select the Auditing tab, where you are presented with the familiar Audit dialog box.
Even if an administrator has been completely diligent in all aspects of securing their Terminal Server environment, failing to employ proper security patch management can still leave them vulnerable to attacks. In fact, even a cursory configuration of traditional security measures on a Terminal Server coupled with a diligent security patch implementation strategy can leave a server much more secure than one without proper patching.
Today, administrators have little choice but to ensure that their servers remain up-to-date with the latest patches. Because of this I’ve dedicated a complete chapter to this subject. Chapter 9 provides a thorough discussion on properly managing deployment of security patches in your Terminal Server environment.