It probably comes as no surprise that the greatest challenges you’re likely to face during your Terminal Server project involve not the configuration and implementation of the servers but instead the installation, testing, and deployment of the applications you want to run on those servers. The purpose of implementing Terminal Server is to centralize the management and servicing of these applications, so it’s vitally important that they be configured to work with as little loss of functionality as possible (or no loss).
In the role of an application integrator (AI), you’re likely to face a combination of both technical and managerial challenges, such as these issues:
Release management—. One area where many AIs seem to have difficulty is in establishment and enforcement of release management procedures. One reason is simply that the PC computing environment has traditionally had poor release management control. For your Terminal Server environment to remain stable, you must adopt the release procedures common in more traditional multiuser environments, such as the mainframe and UNIX environments. As I state many times throughout this book, it’s required that you put the proper release management procedures in place, regardless of whether you’re deploying 2 or 20 applications. If there’s no control over releasing of software into the Terminal Server environment, it’s only a matter of time before a release causes your environment to fail. Please see Chapter 7, “Server and Application Software Planning,” for more information on release management.
NOTE:
Problems with implementing and enforcing release management can be very difficult in smaller implementations where two or three people are responsible for all aspects of the company’s infrastructure. End users are generally accustomed to getting what they ask for quickly, so trying to enforce a release schedule that requires end users to wait for a specific time can be difficult to justify and implement. If you find yourself in such a situation, be diligent and ensure that you implement only the software changes you are certain will work properly.
Application stability—. Although application stability is not strictly an issue for the AI (it’s more of a concern for Terminal Server operators), the AI must keep this requirement in mind when installing and configuring the application. On the desktop, an application failure affects only one person and usually results in no more than a few harsh words directed from the user to the computer. On a Terminal Server, however, an application failure could immediately affect 20, 50, 100, or more users. In this situation, the harsh words likely would be directed to the Terminal Server operators and administrators.
As an AI, you must ensure that the installed application is configured to be as stable as possible. It must also interoperate with any other programs that users may be running on Terminal Server. Of course, you have little control over an application that’s inherently buggy, but if this is the case, it’s likely that these problems existed on the desktop.
One thing you’ll quickly learn is that whenever an issue comes up with any application running in the Terminal Server environment, the problem is immediately attributed to Terminal Server and not to the application.
Multiple simultaneous users—. The most obvious challenge you’ll face is configuring applications to function properly when run simultaneously in multiuser sessions on the same computer. Although we’re slowly starting to see the development of applications designed specifically to run in a Terminal Server environment (mostly to do with requirements for Windows 2000 and 2003 application certification), many applications on the market today were not developed with that purpose in mind. I’ve found that most apps still function properly, but in some situations additional work and “fiddling” are required to overcome specific problems. Typically, if an application was designed using proper Windows development techniques, such as storing program-specific information in HKEY_LOCAL_MACHINE while maintaining user-specific information in HKEY_CURRENT_USER, it should run on Terminal Server with few problems. I’ve encountered some very recent Windows applications that for some unknown reason require that the user have at least Power User permissions in order to run the application. I can understand elevated privileges being a requirement for the software installation, but requiring these privileges for normal operation really is completely unacceptable.
A number of products available on the market support Terminal Server; Microsoft Office 2003 and WRQ Reflections, a host access application, are just two examples.
Enhanced security—. Very often the enhanced security requirements of Terminal Sever pose more of a problem to the AI than the multiuser requirements. Security issues can introduce unexpected problems, particularly when the AI has been testing with an administrative account instead of a regular user account. When you encounter a situation where the program runs for an administrator but not for a user, it’s almost always a security-related problem.
NOTE:
I can’t count the number of times I’ve reviewed a Terminal Server implementation where the administrators have said, “We originally had the system locked down, but we couldn’t get the application to run, so we gave everyone Full Control and now it works fine.” Although this certainly fixes the immediate problem of getting the programs to function properly, it is not a solution. In fact, this is likely to cause more problems down the road. Every time you give a user elevated security access to the Terminal Server, you’re introducing the potential for a problem. It is only a matter of time before the user installs or modifies something that causes an application to fail.
My goal in this chapter is to provide the information you need to become a successful application integrator in a Terminal Server environment. I discuss the application support features available in Terminal Server, the tools and techniques that will assist you, and the process I typically follow when installing an application. Although no amount of documentation can prepare you for every situation, I hope that, with the information in this chapter, you are able to resolve most application problems you encounter.
Here are the three rules I follow when performing application integration:
Have patience—. Although many applications can be installed on the first try, there are many that can’t. You might need to try a few configurations to find the one right for your environment. Don’t always settle for the first solution that comes along.
Automate as much as possible—. If you have the option of preconfiguring something or automating a process that would normally require user interaction, do so. The more the Terminal Server user must do before he or she can run an application, the more likely that the user won’t do it properly. If a user must run a setup program before he or she can use the program for the first time, put it in a batch script and ensure that it runs before the application does.
Test, test, test—. Always test the applications with a restricted user account. Testing an application with an administrative account is useful only to ensure that it runs at all. Ninety-nine percent of the users in your environment are not administrators, so don’t waste a lot of time testing with an admin account.
To ensure that the majority of applications will function properly, Terminal Server incorporates a number of application support features that you must understand in order to be an effective application integrator. Before installing any applications, you should have a clear understanding of why these features are required and how you can use them to your advantage.
Chapter 1, “Microsoft Windows Terminal Services,” talks about the management tools included with Terminal Services, including the special options available for configuring a user’s account for operation on a Terminal Server. Active Directory Users and Computers for both Windows 2000 and 2003 provides these features. Figure 21.1 shows the Terminal Services Profile tab for a user’s account properties. This is where the user’s Terminal Server home and profile folders are defined.

The home folder is of particular importance in a Terminal Services environment because it’s where the user-specific application and environment data are stored. For example, a Terminal Server uses the home folder to store a personal copy of WINI.INI and SYSTEM.INI for each user who may be running a 16-bit application, instead of using the single copy normally found in the %SYSTEMROOT% folder.
The Terminal Server home folder and profile paths are referenced only when a user is logged on to a Terminal Server. When the user is logged on to a non–Terminal Server environment (such as a Windows 2000 or Windows XP Professional desktop), this information is ignored. Figure 21.2 shows the simple process flow used by Terminal Server to determine where the user’s home folder is located.

Figure 21.2. The process flow for determining the home folder path to use in a Terminal Services session.
If a Terminal Server home folder has been defined, it’s used. If not, and a regular Windows home folder has been defined, that’s used instead. If neither has been defined, Terminal Server defaults to using the user’s local profile path:
%SystemDrive%Documents and Settings\%Username%
You can view the current location of a user’s home folder simply by opening a command prompt from within the session and running SET to view the current environment variables. The variables to look for are HOMEDRIVE, HOMEPATH, and HOMESHARE. Assuming that the share point is \FileSrvUsers, a sample output of SET would look something like this:
HOMEDRIVE=U:
HOMEPATH=
HOMESHARE=\FileSrvUsers	wmathers
Another application integration feature available with Terminal Server is having two special modes of operation: execution mode and installation mode. By default, the Terminal Server operates in execution mode for all users, including administrators. As you may have guessed, the server is put into installation mode when an application is being installed on the server.
There are two ways in which to control the mode of operation. The first is to use the CHANGE USER command from a system prompt as follows:
Change user /install—. Puts the session into install mode.
Change user /execute—. Returns the session to execute mode.
The other option is to use the Add/Remove Programs applet in Control Panel. When adding or removing a program, the server automatically performs the switch between execute and install modes.
In Windows 2003/2000 Terminal Services, the operating system itself doesn’t let you install many applications unless the server has been placed into install mode. Figure 21.3 shows the message you receive when you try to do this. This doesn’t work for all applications, but many of the most popular commercial applications are caught by this operating system feature. This feature was not available in Windows NT Server 4.0, Terminal Server Edition.
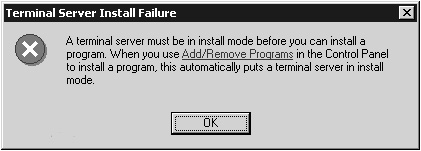
Figure 21.3. The warning message displayed on a Windows 2003 or Windows 2000 Terminal Server when you attempt to install an application while in execute mode.
When the server is placed into installation mode, it performs the following tasks during an application installation:
All registry entries created under HKEY_CURRENT_USER using the standard Windows APIs are copied into this registry key:
HKLMSoftwareMicrosoftWindows NTCurrentVersionTerminal ServerInstallSoftware
Any changes to INI files are written to the appropriate INI in the %systemroot% directory.
The times that the registry and files were last updated while in install mode are stored under this key:
HKLMSoftwareMicrosoftWindows NTCurrentVersionTerminal ServerInstallIniFile Times
NOTE:
The key point to remember is that the Terminal Server captures changes made to the registry or INI files only if they have been made using the standard Windows API functions. Registry changes made using REGEDT32 while Terminal Server is in install mode are not captured and recorded under the Terminal Server registry key.
When the Terminal Server is running in execution mode, the following may occur:
If an application attempts to read an entry from HKEY_CURRENT_USER that doesn’t exist, Terminal Server checks to see if a copy of the key exists under this registry entry:
HKLMSoftwareMicrosoftWindows NTCurrentVersionTerminal ServerInstallSoftware
If it does exist, this key and all subkeys are copied to the corresponding area location under HKEY_CURRENT_USER.
If an application tries to read from an INI file in the %SystemRoot% folder, Terminal Server transparently redirects the request to look in the user’s personal Windows directory located under his or her home drive (for example, W:Windows). If the INI file doesn’t exist in the user’s folder but does exist in %SystemRoot%, Terminal Server copies it into the user’s Windows folder.
Whenever a user logs on to the server, Terminal Server compares the last update time of the registry keys in Terminal ServerInstall and the INI files with the user’s last synchronization time. The user’s registry synch time is stored in the value LastUserIniSyncTime in this registry key:
HKCUSoftwareMicrosoftCurrentVersionTerminal Server
The synch times for the INI files are stored in the file INIFILE.UPD, located in the user’s personal Windows folder on his or her home drive.
If any entries are out of date, they’re updated for the user. By default, any out-of-date registry keys are deleted before the new registry keys are loaded into the current user’s registry. The changes in the INI files are either merged with the existing ones or completely replaced. The default is to replace them. I talk about modifying the default behavior for both registry and INI files in the section “Program Compatibility Flags.” The previous version of the INI file is renamed with the .CTX extension.
Once you understand the behavior of a Terminal Server when operating in install mode, you can exploit this behavior to help preconfigure many applications with common settings that you want to have automatically picked up by the user the first time he or she runs the application. Install mode is not simply for performing the initial installation of the application. It can be used at any time to change configuration of many 32-bit or 16-bit applications. For example, you could run a Microsoft Office application such as Word while in install mode to set any defaults you want the users to have, such as turning off animation or modifying the default folder locations. This is an effective alternative to using the Office profile (.OPS) files.
NOTE:
If you want to configure an application with a setting that you don’t want your users to be able to modify afterward, you should investigate whether the application supports use of group policy objects (GPOs) in the active directory. For example, Microsoft Office XP and Office 2003 both support custom GPO templates that can be found in their respective Office Resource Kits. Whenever GPOs are available, I suggest using a GPO to configure an application, because it then can be locked down in most cases so the user is forced to run in a particular configuration.
The one caveat worth repeating is that changes are captured while in install mode only if the application is using standard Windows API calls to perform the registry/INI file updates. If an application directly manipulates an INI file through file system read and write operations, Terminal Server is not aware that the changes have occurred and does not update the last-modified date in the registry. This prevents the changes from being incorporated into an existing INI file in the user’s home directory. Note that if the user didn’t already have the INI file, it would still be copied to his or her home directory, even if the last update time had not been updated.
Terminal Server provides the ability to modify the behavior of specific applications as well as the registry and INI file mappings that I discussed in the preceding section. This is done through use of program compatibility flags (PCFs). PCFs are a special set of registry values that tell Terminal Server what to do with a specific program, registry key, or INI file. These three registry keys are located under this key:
HKLMSoftwareMicrosoftWindows NTCurrentVersionTerminal ServerCompatibility
These are the specific keys:
Applications—. This key contains a list of subkeys corresponding to executable names, each containing specific values that dictate how the application should be handled when run. For example, the subkey EXCEL would contain options specific to EXCEL.EXE.
IniFiles—. This key contains a list of values, each corresponding to an INI file name in the %SystemRoot% folder. Each has an associated flag that determines how file replication should be handled. There are two entries by default: one for SYSTEM.INI and another for WINI.INI. The .INI extension is not included in the value name.
Registry entries—. This key contains a list of values corresponding to registry keys located under HKLMSoftware. The value of each entry determines how registry replication is handled while the Terminal Server is in execute mode. Three entries usually exist: Classes, MicrosoftWindows NT, and MicrosoftWindowsCurrentVersionExplorerShell Folders.
Depending on the key, certain compatibility flags are available to use in modifying the entries’ behavior. All PCFs are REG_DWORD hexadecimal entries. If multiple entries are set for a particular value, you need to sum the individual hex values to determine the actual hex number to enter. If you’re uncomfortable with performing hexadecimal arithmetic, use the Calculator application to perform hex calculations in scientific mode.
Table 21.1 lists the valid flags for the IniFiles and registry entries keys.
Table 21.1. INI and Registry Compatibility Flags
Flag | Valid For | Action |
|---|---|---|
0x00000004 | INI files | Flags a 16-bit Windows app. |
0x00000008 | Registry entries | Flags a 32-bit Windows app. |
0x00000040 | INI files and registry entries | Synchronizes values to system version. For INI files this means that new entries from the system version of the INI file are merged with the user’s version. Normally the user’s version is deleted and replaced with the system version. For registry entries this flag means that new keys and values from the system registry are added, but existing keys and values are not deleted. The default is to delete any keys and values out of date with the system version. |
0x00000080 | INI files only | Do not substitute user’s Windows directory for system directory. This means that the user’s personal Windows directory is not substituted, and the %SystemRoot% directory is used instead. |
0x00000100 | Registry entries only | Disable registry mapping for the given key. This automatically includes all subkeys. |
Multiple flags can be entered for a single value by summing them (in hex) to get the final flag value. The IniFiles folder on the Terminal Server contains the following two entries:
SYSTEM:REG_DWORD:0x44
WIN:REG_DWORD:0x44
As noted in Table 21.1, INI synchronization is on for the 16-bit files SYSTEM.INI and WIN.INI. Any changes made while you are in install mode are merged with any existing information in the user’s SYSTEM.INI or WIN.INI. All other INI files are replaced.
Under the Registry Keys key is the following entry:
MicrosoftWindows NT:REG_DWORD:0x108
Referring again to Table 21.1, notice that registry mapping has been disabled for the 32-bit Windows NT key.
NOTE:
Typically, you won’t need to modify any of these entries. However, if there’s a particular registry key or INI file that you don’t want users to have in their personal area (registry or Windows folder), you can exclude it from synchronization. Default Permissions on the Windows folder prevents users from modifying the system version.
For a specific application, up to four registry values can be created that control the application’s behavior while running on Terminal Server. Figure 21.4 shows the registry entries for the Microsoft Access application (MSACCESS.EXE). Notice that the .EXE extension is not included in the key name.

As the figure shows, there are four registry values for MSACCESS:
FirstCountMsgQPeeksSleepBadApp
MsgQBadAppSleepTimeInMillisec
NthCountMsgQPeeksSleepBadApp
Flags
The first three entries are used to tune an application to function optimally on Terminal Server. You shouldn’t modify or set any of these values for an application unless you’re experiencing a real performance issue. I talk more about these settings a little later in this section.
The fourth entry is the Flags value. It contains a hex value that provides Terminal Server with information about the application and indicates whether any special actions are required, such as disabling registry mapping. Table 21.2 lists the entries for the Flags value. As with the INI and registry settings, multiple values are set simply by summing the hex values to come up with the new hex value. For example, if you want to flag that the entry is for both the 16-bit and 32-bit applications, you sum 0x04 and 0x08, resulting in 0x0c in hex.
Table 21.2. Valid Flag Settings for an Application
Flag | Description |
|---|---|
0x00000001 | DOS application. |
0x00000002 | OS/2 application. |
0x00000004 | Windows 16-bit application. |
0x00000008 | Windows 32-bit application. |
0x00000010 | Substitutes the user name for the computer name. If the application requests the computer name using the GetComputerName API, Terminal Server returns the user name instead. This setting is typically used with applications that equate the NETBIOS name for the machine with an individual user. |
0x00000020 | Returns the Terminal Server build number instead of the Windows build number. For Windows 2003/2000, the build numbers are the same. On TSE4.0 the Terminal Server component has a different build number than the OS. |
0x00000040 | This indicates that INI file or registry data should be synchronized with any new data instead of the existing information being replaced by the new information. |
0x00000080 | For this application, don’t substitute the user’s personal Windows folder for the system folder. This means that the user’s personal Windows folder is not substituted, and the %SystemRoot% folder is used instead when this application makes reference to an INI file. |
0x00000100 | Disables registry mapping for this application. |
0x00000200 | Enables per-object mapping for user and system global objects associated with this application. |
0x00000400 | Returns the %SystemRoot% folder to the application instead of the user’s personal Windows directory. This overrides the server’s default behavior when running in execute mode. This applies only to the specific application. |
0x00000800 | Limits the physical memory reported to the application. This flag is typically used when an application has problems running on a system with a large amount of physical memory. When specified, the default memory reported is 32MB. You can modify this value by including the PhysicalMemoryLimit value in the program compatibility key. This value should also be of type REG_DWORD. |
0x00001000 | Logs creation of named objects by the specified application. This flag is used to assist in debugging an application not running properly on Terminal Server. Normally, when an application runs, objects are created within the user’s name space by appending the session ID to the object name. This can cause certain applications that expect to find a fixed object name to fail. Using the REGISTER command, you can tell the Windows Object Manager to not append the session ID to an object created by a specified DLL or EXE. Using this flag you can generate a list of the objects created by an application along with the associated DLL. From this, you can get a list of the DLLs that must be registered. For the logging to take place, you must create a system environment variable called CITRIX_COMPAT_LOGPATH and assign it a valid directory where the log will be created. The logfile “<app name>.log” will be created in the specified location. This flag should be set only while debugging because it will degrade the application’s performance. For more information on the REGISTER command, see Appendix A, “Terminal Services Command Reference.” |
0x20000000 | Indicates that the application should not be put to sleep when it polls the keyboard unsuccessfully. This option should normally not be set because it can cause significant performance degradation. |
Notice in Figure 21.4 that the value for the Flags entry is 0x80c. Consulting Table 21.2, this equates to the following:
For both 16-bit (0x008) and 32-bit (0x004) applications we get the following summed flag values: 0x008 + 0x004 = 0x00c
Limiting the physical memory reported has the flag value 0x800.
For both 16-bit and 32-bit applications: 0x008 + 0x004 = 0x00c.
This value limits the physical memory reported (0x800).
This is easily validated by adding the results to get 0x80c.
Now that you’re familiar with the various flags available for an application, the next thing to look at is the settings used for tuning a “badly behaved” application.
A “bad” application can exhibit unusually high or low processor utilization. If an application is run on a Terminal Server and a corresponding key does not exist for it under the CompatibilityApplications registry, it is automatically throttled by Terminal Server if it queries the message queue too often within a default time period. The result is an application that runs very slowly even though the system resource utilization (such as CPU and disk) is low. Software installation programs commonly fall into this category. A common solution is to add a registry key corresponding to the application’s executable name with values that correspond to the MSACCESS key. The descriptions for these registry values are as follows:
FirstCountMsgQPeeksSleepBadApp—. This represents the number of times the application can query the message queue before Terminal Server initially flags it as “bad.” Lowering this value causes the application to be flagged more quickly, decreasing its processor utilization.
MsgQBadAppSleepTimeInMillisec—. Once Terminal Server has decided that an application is “bad,” this is the number of milliseconds that the application must “sleep” before it can query the message queue again. Increasing this value forces the application to sleep longer.
NthCountMsgQPeeksSleepBadApp—. Once Terminal Serer has flagged an application as “bad,” this is the number of times the application can query the message queue before it is once again put to sleep. Typically, this value is less than the FirstCountMsgQPeeksSleepBadApp value.
Looking again at Figure 21.6 for the MSACCESS entry, the values for the three settings are as follows:
FirstCountMsgQPeeksSleepBadApp = 0xff (255 decimal)
MsgQBadAppSleepTimeInMillisec = 0x1 (1 decimal)
NthCountMsgQPeeksSleepBadApp = 0x5 (5 decimal)
So after 255 consecutive queries of the message queue, Access is put to sleep for one millisecond, and thereafter for every 5 queries.
NOTE:
These tuning values apply only to 16-bit or 32-bit Windows applications. If they’re set for a DOS application, they’re simply ignored. No native Windows mechanism ships with Windows 2003 or Windows 2000 to tune a DOS application. Those of you familiar with using the DOSKBD command from NT 4.0, Terminal Server Edition, will find that this tool is no longer available with Windows 2003/2000 Terminal Services.
As mentioned, you shouldn’t create or modify any of these program compatibility flags unless you have an application that’s behaving “badly.” If the application is running unusually slowly, even though the system utilization is low, then add an entry and assign values equal to those for the MSACCESS key. If an application exhibits unusually high processor utilization, I recommend performing the following steps to tune the application:
Launch PerfMon and monitor CPU utilization.
Start the offending application and record the baseline performance while running the application. Ideally, you should run it for 5 to 10 minutes or longer.
Exit the application and create the corresponding entry or entries in the registry under the Applications key. You can either type the entries or save the Setup key and then add it back in with the name of your application. The default values for Setup are as follows:
FirstCountMsgQPeeksSleepBadApp = 0xf (15 decimal)
MsgQBadAppSleepTimeInMillisec = 0x1 (1 decimal)
NthCountMsgQPeeksSleepBadApp = 0x5 (5 decimal)
Flags = 0xc (16-bit or 32-bit)
Rerun the application and compare the new PerfMon results with the baseline.
Exit the application and change the application settings to something like this:
FirstCountMsgQPeeksSleepBadApp = 0xf (15 decimal)
MsgQBadAppSleepTimeInMillisec = 0x64 (100 decimal)
NthCountMsgQPeeksSleepBadApp = 0x5 (5 decimal)
Run the application again and compare the reduction in processor utilization to the responsiveness of the application. You may want to compare this to adjustments in the FirstCount value to see if one provides a larger improvement over the other. Unfortunately, this is not an exact science, so it might take some time to develop the ideal tuning values for a particular application. You’ll likely have to settle for some excess utilization to ensure that the program is responsive enough that users will be able to use it.
Luckily, additional tuning isn’t usually required with most applications that run on Terminal Server.
The next application support feature I look at is Terminal Server’s handling of each individual user’s temporary folder location. Normally, every user who logs on to a Windows computer has a temporary directory defined with the environment variables TEMP and TMP, where temporary data can be stored that can be deleted when the user logs off.
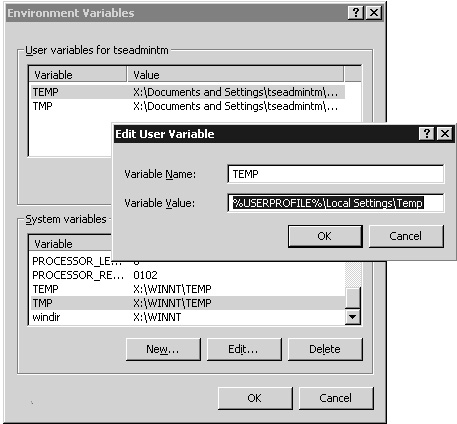
The only difference on a Terminal Server is that multiple temporary folders exist at the same time and must be managed individually. The default temporary folder location for all users is the %UserProfile%Temp folder. From Control Panel, open the system properties. Select Advanced and then click the Environment Variables button to display the TEMP and TMP values set in the user variables (see Figure 21.5).
To give multiple simultaneous users access to the temporary folder, Terminal Server provides a feature known as per-session temporary folders. Every time a user logs on, Terminal Server creates a subfolder corresponding to the user’s session number underneath the TEMP folder. The user’s TMP and TEMP variables are then updated automatically to point to this location. If you open a command prompt and type “SET”, you see the modified values for these environment variables. For example, you might see this:
TEMP=C:DOCUME~1ADMINI~1LOCALS~1Tempa5
TMP=C:DOCUME~1ADMINI~1LOCALS~1Tempa5
The subfolder “a5” corresponds to the current session number, and the short name (eight-character maximum) is used to ensure that DOS and Win16 applications can use the same environment variable. If these were my temp folders and I did a QUSER from a command prompt, I would see something like this:
USERNAME       SESSIONNAME      ID  STATE    IDLE TIME   LOGON TIME
 nsamble       ica-tcp#390      143  Active         .    8/2/2004 9:47 AM
 jhayman       ica-tcp#391      148  Active         .    8/2/2004 9:49 AM
>twmathers     ica-tcp#392      165  Active         .    8/2/2004 9:50 AM
 gott          ica-tcp#393      169  Active         4    8/2/2004 9:53 AM
 bsmith        ica-tcp#394      170  Active         .    8/2/2004 9:59 AM
The hexadecimal number a5 in base-ten notation is 165, which corresponds to my session ID, not the session name shown in the list above.
The permissions set on the folder are set to allow access only by the specified user and SYSTEM. When the user logs off, Terminal Server automatically deletes the associated temporary folder.
Whenever you reference a user’s temporary folder, be sure to use the TEMP or TMP environment variables. Never hard-code the complete path because it’s very likely that the next time the user logs on, he or she will have a different temp folder.
The temporary folder mapping feature can be disabled using the FLATTEMP command or through Terminal Services configuration. When this feature is disabled, the special subfolder is not automatically created and the contents of the user’s TEMP folder are not automatically deleted when the user logs off. I do not recommend disabling this feature.
In order to ensure a smooth upgrade path from Windows NT 4.0, Terminal Server Edition (TSE) and Windows 2000 Terminal Services to Windows Server 2003 Terminal Services, certain legacy application support features had to be retained and supported. These are root drive mapping support and application compatibility scripts, both of which were well-used in the majority of the TSE implementations, saw diminished use in Windows 2000, and now are, for the most part, relegated to backwards compatibility status in a Windows Server 2003 environment.
While neither one of these features are necessary for the majority of new Windows 2000 or 2003 implementations, if you are tasked with supporting an environment that was upgraded from TSE, or are involved in a project to migrate an existing TSE environment, then I feel that it is important to have a clear understanding of how these two support features function so that you will better understand the roles that they serve and what requirements must be considered when migrating or supporting such an infrastructure.
NOTE:
Those of you who are performing a clean Windows Server 2003 Terminal Server implementation and are not upgrading from an existing Windows NT 4.0, Terminal Server Edition or Windows 2000 Terminal Server environment should not be considering utilizing either of these legacy support features. Improved application support and Windows functionality negates the need for either feature except in the most limited of situations.
The first legacy support feature that we will look at is the Root Drive Mapping feature. If you have worked with Windows NT 4.0, Terminal Server Edition (TSE), or a Windows 2000 Terminal Services environment upgraded from NT 4.0 TSE, you likely are familiar with the Root Drive Mapping feature. If you are inheriting or planning on upgrading an existing TSE environment, you need to clearly understand this feature in order to plan your migration appropriately. This was one of the most common areas of confusion for administrators of an NT 4.0 TSE environment, and for those who need to work with it today, it seems to remain a bit of a mystery. To better understand how this feature works, it helps to understand why this functionality was created in the first place. A good place to start is with a simple example that demonstrates the underlying issue that existed in an NT 4.0 Terminal server environment.
TIP:
Root drive mapping support exists in Windows 2000 Server and Windows Server 2003 in order to provide backwards compatibility for direct upgrades from NT 4.0, Terminal Server Edition to Windows 2000/2003. The root drive mapping is not intended for use in clean Windows 2000 or 2003 Terminal Server implementation. If you are considering using this feature in your new implementation, or it has been recommended to you by someone else, then I greatly encourage you to carefully review this section before make a decision.
If we refer to the example in the previous section of running the SET command, we have the following information returned from a Windows 2003/2000 Terminal Server.
HOMEDRIVE=U:
HOMEPATH=
HOMESHARE=\FileSrvUsers	wmathers
If the same SET command was run on an NT 4.0 Terminal Server, the results would appear slightly differently:
HOMEDRIVE=U:
HOMEPATH=	wmathers
The difference is that the HOMEPATH on Windows 2003/2000 is simply the root (), while on NT 4.0 it’s the path from the share point into the specific folder ( wmathers). This is because Windows 2003/2000 support a feature commonly called map root, which lets you map a drive letter to a specific folder located below a defined share point. This feature was not supported in NT 4.0. NT 4.0 would allow you to map a drive letter only to an explicitly defined share point.
So, on Windows 2003/2000, if I went to the U: location, I would still be within my personal home folder (\FileSrvUsers wmathers), but if I went to the same location on NT 4.0, I would actually be one folder above my home folder, in the root of the share (\FileSrvUsers). Although the default file system security would prevent me from accessing any other user’s home folder, I would still be able to generate a list of all of the other users. The shortcomings of not supporting the map root feature are personified when coupled with the multiuser Terminal Server environment.
Consider the following example:
I’m installing an application on TSE 4.0. During the installation, the setup program asks me to provide a working folder where user information will be stored. What directory should I specify? Of course, I want to use the user’s home folder. But how do I tell the installation program where this is, since I need the folder to change depending on the individual user? Ideally, I’d like to provide U:\%Username%, but most applications don’t do variable expansion. Since TSE 4.0 doesn’t support the map root feature, I don’t have an easy solution to this problem.
A common application that suits this example is Microsoft Word. Word lets you define custom folder locations where certain files are stored. For example, the default location for newly created documents or the location for personal template files can be defined within the Options dialog box for Word. The ability to use a constant drive letter would greatly simplify this configuration.
Microsoft’s solution to this problem was to create a new drive mapping definition specific to Terminal Server called the root drive (this is not the same as %systemroot%), the purpose of which was to provide a means of defining a consistent drive letter that pointed directly to the user’s home folder, regardless of what the user’s home drive letter actually was and where their HOMEPATH was defined to be. Be aware that while the Terminal Server root drive is most often designated as W:, it can be assigned to any available drive letter.
TIP:
Confusion can arise when a distinction is not made between root drive and the server’s %SystemRoot%. Root drive mapping is not the same as %SystemRoot%. Root drive mapping points to the user’s home directory, while %SystemRoot% points to the main Windows operating system folder.
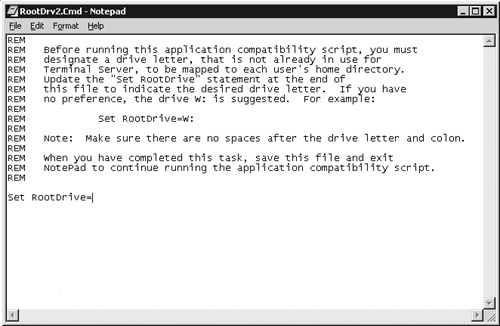
The root drive normally is not defined until the first time an application compatibility script is run(discussed in the next section). You can create the root drive immediately by running this batch script:
%SystemRoot%Application Compatibility Scriptschkroot.cmd
When the script is run, Notepad opens, as shown in Figure 21.3. The root drive letter is set simply by entering the letter and colon immediately after the equal sign (=) and then saving and exiting the batch script. For example, if you want to use W:,as the Root drive then you would enter this:
Set RootDrive=W:
Once set, whenever a user logs onto the MetaFrame server, the user’s home folder is automatically mapped to the root drive using the standard DOS command SUBST. For example, if my home directory was currently U:users wmathers, the SUBST command would be as follows:
Subst W: U:users wmathers
If the root drive letter ever needed to be changed, the only thing that had to be done was to edit this entry to contain the new drive letter to be used.
The actual drive letter substitution is done in the USRLOGON.CMD compatibility script. This script is automatically run for each user every time the user logs on to Terminal Server. It appears momentarily as a minimized DOS window before the logon completes. I discuss application compatibility scripts in the next section.
As I mentioned at the beginning of this section, the root drive feature has been maintained in both Windows 2000 Server and Windows Server 2003 in order to ensure a smooth upgrade path from Windows NT 4.0, Terminal Server Edition. The usefulness of the root drive is really quite limited, considering that both Windows 2000 Server and Windows Server 2003 support the map root functionality, which was the limitation in TSE 4.0 that the root drive was created to overcome.
To help resolve issues that applications might have when trying to run on Terminal Server, particularly an NT 4.0 Terminal Server, Microsoft developed an intricate group of batch scripts called application compatibility scripts (ACSs). These scripts are used to perform any necessary file and registry modifications in order to allow an application to function properly on Terminal Server.
NOTE:
The need to create and use application compatibility scripts has continued to diminish as the number of applications that recognize and support Terminal Services has increased. Many of the most popular products on the market today such as the Microsoft Office product suite will install and function with little or no issues.
Most often, the exceptions to this rule involve custom-developed or very specific vertical market software that changes very slowly over time and is developed for very specific industries. These types of applications may require some form of scripting to resolve the issues and so may still depend on application compatibility scripts.
Most of the files that collectively make up the ACS are located in the folder %SystemRoot%Application Compatibility Scripts. The main batch script, which is called by every user who logs on to Terminal Server (whether remotely or from the console), is located in the System32 folder and is called USRLOGON.CMD.
The ACS has three main functions:
Configure the environment—. This includes defining the root drive (as described in the previous section), as well as setting any other environment variables that may be used in the compatibility scripts. The root drive feature does not have to be enabled in order to use application compatibility scripts.
Run scripts immediately after an application has been installed—. These scripts run once in order to perform post-installation changes that must be made to an application. While all installation scripts do not require it, I recommend that you always have the server in install mode (discussed in the next section) prior to running an installation ACS. These scripts are located in the INSTALL subfolder under the ACS folder.
Run scripts during a user’s logon—. These scripts need to be run every time a user logs on in order to ensure that the necessary file and registry changes have been made to support any applications the user might run. Logon ACSs are located in the Logon subfolder, also under the ACS folder. One common use for these types of scripts is to copy a required file into a user’s personal folder if it does not already exist so that the user is able to run an application properly.
TIP:
The USRLOGON.CMD script that is invoked during every user’s logon is launched from the AppSetup value located under this registry key:
HKLMSoftwareMicrosoftWindows NTCurrentVersionWinlogon
Entries in this value are run during every user’s logon. If you want to completely disable use of application compatibility scripts, you need only remove the USRLOGON.CMD entry from this registry value.
Typically, application compatibility scripts are invoked by an administrator the first time an application is installed on the Terminal Server. Not all applications require compatibility scripts, and Microsoft provides only a limited set of scripts for those that do. In certain situations, you may need to define your own compatibility scripts; I provide an example of how this can be done in the “Application Installation Examples” section of this chapter. Before you can develop your own scripts, you need a clear understanding of how the ACS environment operates, and you must know the exact functions of the files that comprise the ACS. Table 21.3 lists and describes the main scripts that make up the ACS environment. The scripts are identical on both Windows 2003 and Windows 2000.
Table 21.3. Components of Application Compatibility Scripts
Script Name | Location Under %SystemRoot% | Description |
|---|---|---|
Usrlogon.cmd | System32 | Called during every user’s logon and by the ChkRoot script. It’s responsible for calling all the other required scripts. It also performs the SUBST command to map the root drive. |
Usrlogn1.cmd | System32 | Called by UsrLogon.cmd.Initially, this file doesn’t exist. When it does exist (either by running a compatibility script or manually created), it contains calls to only those compatibility scripts that do not require the root drive to be defined. |
Usrlogn2.cmd | System32 | Called by UsrLogon.cmd. Initially, this file doesn’t exist. When it does exist, it contains calls to any compatibility scripts that do require the root drive to be defined. |
SetPaths.cmd | Application Compatibility Scripts | Called by UsrLogon.cmd. This script de-fines a number of environment variables used during running of the ACSs, such as the common and per-user startup folder locations. |
RootDrv.cmd | Application Compatibility Scripts | Called by UsrLogon.cmd. This script simply calls RootDrv2.cmd if it exists. |
RootDrv2.cmd | Application Compatibility Scripts | Called by RootDrv.cmd. This script sets the environment variable %RootDrive% to the desired drive letter so UsrLogon.cmd can perform the proper substitution. RootDrv2.cmd is created by the ChkRoot.cmd script. |
ChkRoot.cmd | Application Compatibility Scripts | Called by the various application compatibility scripts to verify that the root drive has been set. If it hasn’t been set, this creates the RootDrv2.cmd file and prompts the user to specify the drive letter to use as the root drive. |
End.cmd | Application Compatibility Scripts | Called by UsrLogon.cmd. This script performs no function. It simply sets @ECHO OFF. |
Terminal Server also comes with a set of three “helper” executables used by the compatibility scripts to retrieve and update registry and file information. These helper application names all begin with the AC (application compatibility) prefix. The helper applications are as follows:
ACINIUPD.EXE—. This tool is used to update INI files. Its usage is as follows:
Aciniupd.exe [/e] [/k] [/u] [/v] <ini filename> <section
name> <key name> <new value>
/e tells ACINIUPD to update the value for the given section and key name. An existing value is replaced by the new value given.
/k tells the tool to update the given key name in the section with the name specified in <new value>. This replaces the key name, not the key’s value.
/u signals the tool to update the INI file in the user’s Windows directory instead of in %SystemRoot%.
/v means to run in verbose mode. The default is to run silently.
ACREGL.EXE—. This utility searches the registry for the provided key and value and outputs them to a file as a SET statement with the provided environment variable name. This is primarily used to retrieve specific information from the registry and make it available as an environment variable that can then be used by the compatibility scripts. Its usage is as follows:
Acregl.exe <output filename> <set variable name> <registry
key> <registry value> <options>
The registry key must start with either HKCU (HKEY_CURRENT_USER) or HKLM (HKEY_LOCAL_MACHINE) and must be enclosed in a string, such as “HKLMSoftwareMicrosoft”.
The <options> value can be an empty string (“”), STRIPCHARcn, or STRIPPATH. STRIPCHARcn, starting from the right side of the string, strips n instances of the character c. Anything to the right of c is dropped. STRIPPATH removes the full path from a file name, so X:WindowsSystem32UserLogon.cmd would become simply UserLogon.cmd.
ACSR.EXE—. This tool performs search-and-replace on the given input file, sending the results to the provided output file. The syntax is simple:
Acsr.exe <search string> <replace string> <input file> <output
file>
Every occurrence of <search string> is replaced with the <replace string> value and saved to the <output file> location.
NOTE:
I’ve included the information regarding these helper programs more as a guide to reviewing the existing compatibility scripts than as a primer for using them to create your own scripts.
I prefer to use a scripting language such as VBScript or JavaScript when writing custom compatibility scripts. This allows much more flexibility and control over exactly what’s happening than using these fairly limited tools.
Even with a list of all the components that make up the ACS, it’s not necessarily clear how these pieces fit together. The flowchart in Figure 21.7 summarizes how the different application compatibility scripts interact from the main script, UsrLogon.cmd.

Each release of Terminal Server has included a number of application compatibility scripts created by Microsoft to assist in the installation and operation of applications on Terminal Server. Windows 2000 Server includes 31 compatibility scripts, while Windows Server 2003 includes only 3. When Windows 2000 Server was released, compatibility scripts were created for a number of legacy applications including Office 4.3 and Netscape Navigator 3.x. These applications had never been designed with the idea of a multi-user environment such as Terminal Services in mind, so some rather intricate scripting had to be done in order to enable these applications to function. Many of the scripts found in Windows 2000 were direct ports from scripts found in Windows NT Server 4.0, Terminal Server Edition.
With the release of Windows Server 2003, all of these legacy compatibility scripts were thankfully omitted with the exception of only 3. These 3 scripts are:
eudora4.cmd—. A script to allow the Eudora 4.0 mail program to function.
msvs6.cmd—. This script allows Visual Studio 6.0 to run on a Terminal Server. It is not recommended to run any development tools on a production Terminal Server, but certain circumstances may dictate that a development environment should run on a test or development server.
outlk98.cmd—. A script to allow Outlook 98 to function on Terminal Services.
A small portion of the Outlook 98 installation script is shown below. You will notice is that this script makes use of the %rootdrive% environment variable discussed in the “Root Drive Mapping” section of this chapter. The script begins by checking to see that %rootdrive% has been defined. This is done by calling the ChkRoot.cmd script. If the script fails, this script simply exits without any warning. If the root drive has been defined, the script next verifies that Outlook 98 has been installed by searching the registry using the ACRegL utility.
@Echo Off

Rem ######################################################################
#

Rem
Rem Verify that %RootDrive% has been configured and set it for this
script.
Rem

Call "%SystemRoot%Application Compatibility ScriptsChkRoot.Cmd"
If "%_CHKROOT%" == "FAIL" Goto Done
Call "%SystemRoot%Application Compatibility ScriptsSetPaths.Cmd"
If "%_SETPATHS%" == "FAIL" Goto Done
Rem
######################################################################
#

Rem
Rem Get the installation location of Outlook 98 from the registry.
If
Rem not found, assume Outlook isn't installed and display an error
message.
Rem

..ACRegL %Temp%O98.Cmd O98INST
"HKLMSoftwareMicrosoftOffice8.0CommonInstallRoot" "OfficeBin"
"Stripchar1"
If Not ErrorLevel 1 Goto Cont0
Echo.
Echo Unable to retrieve Outlook 98 installation location from the reg-
istry.
Echo Verify that Outlook 98 has already been installed and run this
script
Echo again.
Echo.
Pause
Goto Done
.
.
.

:SkipWarning

Pause

:done
Even though this script is dependent on the existence of the root drive, if you find that you must create an application compatibility script for an application that you are deploying, you are not required to enable the root drive feature. Instead I would recommend that you simply reference the proper drive letter that you have defined as the home folder for your Terminal Server users.
There is really no practical reason why the root drive functionality needs to be used in a Windows Server 2003 (or even a Windows 2000) Terminal Server environment.
NOTE:
You may have noticed that there is an uninstall folder alongside the install and logon folders in the Application Compatibility Scripts folder. The scripts in this folder are run simply to remove the reference to the corresponding application compatibility script from either the usrlogn1.cmd or the usrlogn2.cmd script. This doesn’t actually uninstall the software from the server. You still need to use Add/Remove Programs for this to work properly.
In order to be an effective application integrator (AI) you need to have the proper tools for the job. While there is no question that a stable and reliable Terminal Server is key to a successful implementation, without the actual applications, the environment is of little use to the end user. Applications deployed on a Terminal Server must run properly, efficiently and reliably. If not, the end user will make their feelings known not only to yourself but most certainly to their superiors. The user’s satisfaction is paramount to ensuring that the project is deemed to be a success.
One way to minimize the turnaround time required to resolve application issues is to familiarize yourself with some of the common tools and techniques available. Think of your AI toolbox as a combination of software utilities and a notebook of tips and techniques that can serve as a valuable reference source when dealing with any application issues that may come your way.
The following list summarizes the software utilities and integration techniques that I will discuss in more detail in this section of the chapter.
SysInternals RegMon—. Regmon allows you to monitor activity against the registry, providing an invaluable tool in resolving security-related registry issues.
SysInternals FileMon—. The sister tool to Regmon, Filemon allows you to monitor activity against the local file system. Security-related issues with the file system are quickly resolved using this tool.
Microsoft Windows Server Resource Kit—. The appropriate server resource kit (Windows Server 2003 or Windows 2000 Server) should be a staple of any Windows administrator’s toolbox. The resource kit contains a wide assortment of tools developed by Microsoft and its partners to assist an administrator in a number of different tasks.
Microsoft Office Resource Kit—. The Office Resource Kit delivers a similar, Office-specific set of tools for deployment and administration.
Windows Scripting—. Having a basic knowledge of programming techniques and specifically, basic Windows scripting is an essential part of an application integrator’s suite of talents. The ability to quickly develop simple scripts to assist in the configuration of an application can save hours of support and manual administration time.
In the next few sections of this chapter I will look more closely at each of these areas.
If I had to choose only one utility to assist in the installation and configuration of applications on a Terminal Server, it would be an extremely difficult decision between these two excellent utilities. When it comes to troubleshooting security-related issues with applications running on a Terminal Server, no other utilities come close to SysInternal’s Regmon and Filemon. Best of all, the basic versions of both of these tools are available free from the SysInternals Website (http://wwwsysinternals.com), where besides Regmon and Filemon, a plethora of other tools exist.
No proper installation is required for either product, simply download the appropriate Zip file and extract the single executable into the desired directory. My preference is to save these files into a folder that has been added to the system path so that the files can be launched by opening a command prompt and entering the desired executable name (regmon.exe or filemon.exe). Another option is to create a shortcut on the Windows desktop that points into a folder containing all of the tools that I commonly access. Figure 21.8 shows the main window of the Regmon utility, which is very similar in appearance to the main window of the Filemon utility.
When either tool is first opened it will immediately begin to log all file or registry access and very quickly tracks thousands of log entries. Sifting through so much log data in an attempt to troubleshoot a problem is neither time-effective nor likely to be very successful. Sysinternals provides some simple configuration options to help narrow down the scope of information being tracked and displayed. These settings are managed through a combination of toolbar (or hot-key) and menu selections. The options along the toolbar are:
Save—. Saves the current log contents to a text file, which can then be viewed using an application such as Excel or loaded back into Regmon or Filemon at a later date.
Capture—. Turns logging on and off. Capture defaults to being enabled when Regmon/Filemon is first opened.
Autoscroll—. When enabled the display will automatically scroll as new log entries are added, otherwise the display will remain static on the screen.
Clear—. Clears the current log display.
Time Format—. Allows you to toggle between either standard time format (hh:mm:ss) or in seconds since logging began. When in standard time format you can enable the display of milliseconds from under the Options menu.
Filter/Highlight—. This setting dictates how the logged information is filtered. Figure 21.9 shows the Filter/Highlight configuration dialog box. You have the option of specifying the information to be included, excluded, and highlighted. Something that many people don’t know is that the filter information applies to all of the logged data, not just process information. For example you could choose to include Winword.*, which would display only information captured by Microsoft Word processes, or you could specify HKLM*, to capture only log data that accesses the HKLM (HKEY_LOCAL_MACHINE) portion of the registry. You can also choose to log only certain types of actions by selecting or deselecting the appropriate checkboxes along the bottom of the dialog box. After clicking OK, changes are immediately applied to the log information.
You can also filter on specific entries that have been captured by right-clicking on the row in the log and choosing the desired option from the pop-up context menu.
History Depth—. The default value for this option is 0 (zero), meaning that all logged information is kept. Entering a value for this setting defines an upper limit on the logged data that is retained. For example, specifying 500 will limit the log to the last 500 entries captured. In most cases I recommend keeping this value at 0 to ensure that all information is tracked. This is important when trying to troubleshoot a problem since you rarely know the bounds that dictate where in the log the information you’re looking for may be captured.
Find—. Allows you to search the log.
Regedit or Explorer Jump—. When a particular row is highlighted in the log, you can click this toolbar button to immediately open Regedit or Explorer and jump to that specific object reference. Double-clicking on a row will perform the equivalent action.

One option specific to Regmon is the Log Boot setting under the Options menu. When checked, this configure Regmon to log registry access during the system startup. This can provide valuable assistance in troubleshooting a problem during the startup of your Terminal Server.
Filemon also has some settings that are not found in Regmon. The Volume menu option in Filemon allows you to specify what drive volumes are monitored as well as alternate file sources such as mailslots and named pipes.
I will provide an example of the use of Regmon when discussing the installation of Infor Global Solutions’ Invue product in the “Application Installation Examples” section of this chapter.
Windows 2000 Server and Windows Server 2003 each have their respective set of resource kit tools available for download free from the Microsoft Website (www.microsoft.com). The resource kit tools were developed by Microsoft and their partners to assist in streamlining the support of a Windows server environment. Tools such as Lsview.exe, the Terminal Services License Server Viewer, have been designed specifically for Terminal Server environments, while other tools provide more generic functionality to an administrator.
After downloading the resource kit (or an individual tool), a very simple installation wizard will walk you through the actual installation steps. During installation, unless an alternate installation location is selected, the resource kit tools will go into the folder C:Program FilesWindows Resource KitsTools.
The installation will then automatically update the system path to include a reference to this folder, allowing you or any authorized user the ability to execute a resource kit command from a command prompt without requiring the full path to where the tools reside.
TIP:
Instead of allowing all of the resource kit tools to be accessible on a Terminal Server, you may want to consider placing only those executables that you will be implementing into an alternate folder that is referenced in the system path. This can provide a more secure environment by better controlling the tools directly accessible on your servers.
One resource kit tool that I use quite often when creating simple application-related scripts is the IfMember utility, which determines whether the current user is a member of one or more user groups. IfMember is commonly used to direct process flow in a batch script, and can be useful to an application integrator when scripting changes that must be applied to only certain users. The following code sample demonstrates how IfMember might be used to copy a folder of files into a user’s personal U: drive, but only if a user belongs to a certain application group (“APPCustService”). Multiple user groups can be listed, allowing for a single test condition to be satisfied by more than one group membership. Multiple groups are separated by a space and logically OR’d together, so one positive membership match will satisfy the ifmember test.
The use of the IfMember utility as part of an application-specific script is also discussed in the “Application Installation Examples” section of this chapter.
@echo off
ifmember "APPCustService"
if not errorlevel 1 goto quit
xcopy "S:CSConfig*" "U:CSConfig." /s /I /R /Y /Z

:quit
Microsoft also makes available the Office Resource Kit (ORK), a collection of tools designed to aid an administering and deploying Microsoft Office. In particular, there are four components of the ORK that are of particular interest to a Terminal Server application integrator:
Custom Installation Wizard—. This tool allows for the creation of a Microsoft Transform file (MST) that can be used to modify the default installation behavior of Microsoft Office. Options such as the default installation folder, the definition of default application settings or a customized default Outlook profile are just some of the settings that can be configured using this wizard. In order to create the MST file, the Custom Installation Wizard must be able to read the installation MSI file from the Microsoft Office installation media. An MST file viewer is also included in the ORK, allowing you to view the configuration of an existing MST file.
Custom Maintenance Wizard—. The custom installation wizard can only be used to modify the installation behavior of Microsoft Office. It will not modify an existing installation. In order to apply certain changes to an existing installation of Office you need to use the Custom Maintenance Wizard (CMW). The CMW creates a CMW file that is then used to apply changes to a Terminal Server. Just as with the Custom Installation Wizard, the Custom Maintenance Wizard requires the original installation media in order to generate the corresponding CMW file. A CMW file viewer is also included in the ORK.
Office Policy Template Files—. Probably the most important components of the ORK, at least from a Terminal Server application integrator’s perspective are the Office Policy Template files. These files allow the AI to define application settings within group policy objects and have them apply to all Office users, in particular, those users running Office on one or more Terminal Servers. Figure 21.10 shows a sample of the configuration options available within these template files. When the Office Policy Template files are selected for installation as part of the ORK setup, they are automatically copied into the %WinDir%INF folder.

Figure 21.10. The Office administrative template policy files allow group policy objects to be created that contain Microsoft Office settings.
If you wish to place these template files onto a domain controller I would recommend that you do not install the full ORK. Instead, select only the Office Policy Templates option during the installation. This will place the necessary files into the INF folder, where the Group Policy Management tool (or Active Directory Users and Computers) can be used to load the templates and use them in defining group policy objects. Details on the loading of template files and the creation of group policy objects were discussed in Chapter 15, “Group Policy Configuration.”
Profile Wizard and Removal Wizard—. The final two wizards included with the ORK are the Profile Wizard, a tool used primarily for capturing and migrating user settings from one computer to another, and the Removal Wizard, which is used to remove previous versions of Microsoft Office tools. The Profile Wizard is rarely used in a Terminal Server environment, but the Removal Wizard can be used if you’d like to ensure a clean removal of previous versions of Office from a Terminal Server.
I’ve always felt that one of the most useful skills that an application integrator, (or a Windows administrator in general) can have is the ability to create basic Windows command line scripts. Whether it is copying files to a user’s home folder or ensuring a required drive letter is mapped, not being able to automate these tasks with scripting can leave the administrator with few options other than manually making the necessary adjustments for each user or educating the users on how to do it themselves. While this type of solution does work, I find that it is neither very elegant, nor very time (and cost) effective to the user or the administrator.
Repetitive user intervention increases the likelihood of error and a subsequent support call. A basic understanding of scripting does not require an in depth knowledge of application development. A number of resources exist that provide excellent learning tools for those administrators that may need to brush up on their scripting. Many online resources exist including Microsoft’s own scripting site, http://www.microsoft.com/script and the excellent scripting community site, the MSN Windows-Script group (http://groups.msn.com/windowsscript). Articles and information can be found to satisfy all skill levels, including webcasts that are put on periodically that are geared specifically to novice scripters.
Many of you will find that you can quickly get up to speed simply by investing a few hours in playing around with some basic scripting in a test environment. Once you understand the basics you will be able to perform many of the tasks commonly relegated to scripts, and you’ll wonder how you ever managed to administer an environment without it.
A discussion on application integration would not be complete without some examples of how to install applications on a Terminal Server. In this section I will provide a basic walkthrough on the installation of the following products:
Microsoft Office 2003—. I demonstrate the basic steps for installing a typical Windows-compliant application followed by some common configuration changes that can be made for a Terminal Server environment.
Invue 4.0—. A legacy application used to interact with a Trend, SHIMS, or WDS-II host system. This application is used to demonstrate some of the common issues encountered when deploying a legacy application in a Terminal Server environment. Some application integration techniques discussed in this section will include using RegMon to resolve a security issue and scripting to deliver personal session files to the application users.
Custom client-server application—. The final application is a customer-developed SQL Server application. This application is used to demonstrate the steps commonly involved when deploying an in-house developed application in a Terminal Server environment. We’ll look at the application installation and the configuration of a required data source name on the server.
While I cannot hope to cover every scenario that may arise when deploying applications, these three applications do provide a broad summary of the different classification of applications that you’re likely to encounter in the role of an application integrator.
Since the release of Office 2000, Microsoft’s flagship product has natively supported running in a Terminal Services environment, although it is only since Office XP that the product has seamlessly supported installation on a Terminal Server with no special configuration required by an administrator.
NOTE:
When Microsoft Office 2000 was released, the default installation included features that were not recommended to run on a Terminal Server. Attempting to run the Setup program included on the installation CD would generate an error message saying that the product could not be installed on Terminal Server without using a special transform file. In order to perform the installation you were required to download the Office 2000 ORK and use the special TermSrv.mst transform file to complete the installation. This transform could be customized using the Office 2000 Custom Installation Wizard. Office XP and Office 2003 do not require such a transform file, although one can be used if you wish to customize the default installation of Office. Details on installing Office 2000 on a Terminal Server can be found in the Microsoft knowledgebase article 283675.
The installation of Office 2003 is very straightforward on a Terminal Server and is performed as follows:
Although not absolutely necessary, I suggest that you log onto the console (physically or using the remote console feature of the RDP client) to perform the Office 2003 installation. If you’re performing the installation across the network, make sure you have the full UNC path to the installation files. I have had issues with Microsoft Installer packages (MSI) failing when launched from a mapped network drive on a Windows 2000 Terminal Server.
Open a command prompt and place the server into installation mode (change user /install). Alternatively you can initiate the installation through Add/Remove Programs by selecting Add New Program, selecting the CD or Floppy button and then browsing to find the setup program to initiate the installation.
Once setup has begun, follow the wizard until the end, selecting only the necessary components for your environment along the way. Whenever possible, remove any options that you know will not be required in your environment. For example, if users do not require Microsoft Access or FrontPage, then there is no need to install those products on the Terminal Server.
One option that I recommend removing is access to the Office Assistant. This can be performed simply be setting the Office Assistant to Not Available. In order to see this option you will need to select “Choose advanced customization of applications” when selecting what components to install. The Office Assistant component is then found under Office Shared Features as shown in Figure 21.11.
Once the installation has completed, make sure to place the server back into execute mode using the change user /execute command. You will normally not be required to reboot the server in order to complete the installation.

Before users begin to log onto your Terminal Server and work with Office, it is a good idea to configure the desired Office administrative policies in your Active Directory, establishing the desired default configuration from the very beginning. Details on the setup and creation of group policies were discussed in Chapter 15.
TIP:
A common mistake made by many administrators is to create a group policy and proceed to define a number of different settings for the Office environment without clearly understanding what the setting is modifying or even testing to ensure the change is working as expected. The proper way to go about configuring group policy settings is to log onto the Terminal Server with a regular user account and run Office, looking for any settings that may cause issues on the Terminal Server. Modify the corresponding group policy, then log back in as the user and test to ensure the changes are applying properly. While potentially time consuming, it will ensure that you have configured the Office environment properly.
Almost at the completely opposite end of the application spectrum are legacy applications that require some post-installation “tweaking” in order to behave properly in a Terminal Server environment. A nice example of this is the Invue 4.0 Advanced Terminal Emulation software. A product circa 1999 that was created in order to provide an advanced terminal interface to SHIM, Trend and the WDS-II host systems, are all products from NxTrend Technology. While the software is certainly legacy, many customers still access systems such as Trend on IBM RS/6000 hardware, and of course still require access via software such as Invue.
When deploying legacy software on a Terminal Server there are a couple of points to keep in mind:
Make sure that security is properly locked down on the server before you install and test this, or any software. Legacy software is notorious for misbehaving in a secured environment (as we shall see), and installing and testing on an unsecured server is pointless, since the probability is very high that something will go wrong when ported to a more secure server.
Always test the application with both an administrator and a regular user account. You need to be sure to verify that a regular user, with restricted access to the registry and file system can still work as expected in the software.
Test the application with multiple concurrent users. Another common issue with legacy applications is their inability to function with multiple simultaneous users accessing them. Typically this is caused by the application attempting to maintain some form of temporary log file in a centralized location where it cannot be created and/or accessed by more than one user at a time.
NOTE:
Instead of viewing this as a detailed breakdown of how to install Invue, try to look at this as more of a generic training exercise in how to detect and resolve security and other common issues that arise from trying to deploy legacy applications on a Windows 2000 or Windows 2003 Terminal Server.
The installation steps for the Invue application, like most other Windows applications follow the standard installation wizard. After completing the installation some basic testing as an administrator indicates that everything is functioning normally, but as soon as an attempt is made to launch the application as a regular user, an error message appears stating that the application “Failed to update the system registry.” Clicking OK terminates the message and the application starts but obviously such an error is not acceptable for the end-user.
Considering that the application functioned properly as an administrator but not as a regular user immediately raises the alert that it is permission related, and considering that the message states the registry, it is apparent that the Regmon tool is required.
Ideally you will want to run Regmon on a server that has no active users so that you can easily isolate the issue with only one instance of the offending application. For this test we will assume that there is only the test user running Invue.
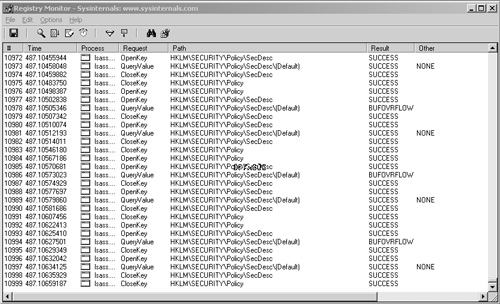
I start by launching Regmon from within an administrator’s session, immediately stop capturing data, and then configure the filter to capture data only originating from the Invue application. The executable is Invue40, so the Regmon filter would look as shown in Figure 21.12. As you can see I have entered “Invue40*”. I’ve included the wildcard so that I capture all instances of the Invue executable running on the server. Because I don’t know yet what the process ID is for the user when he or she runs the application, I can’t narrow it down any further.

Figure 21.12. Regmon filtering allows you to specify a wildcard when filtering on an executable name.
Making sure that Regmon is once again capturing, I log on as the test user account and launch Invue. Immediately Regmon begins to capture all registry traffic from the Invue program. As soon as the registry error appears in the client session I halt capturing in the Regmon tool. There is no need to keep capturing data now. We already have what we need in the log.
From the top of the Regmon log file I perform a search for the text ACCDENIED, the telltale sign that the user did not have sufficient privileges to perform an action on the registry. Immediately I find three hits pertaining to the properties for a key called Joystick. This is a common ACCDENIED entry and can be ignored. This is not the source of the problem.
The next hit is for the subkey Pixel under HKLMSoftware. This seems much more likely, since the About Window in Invue mentions Pixel Innovations. These entries are noted and I continue searching the log. The next entry is under HKCRSession.Settings. This is also likely so it too is noted.
Another match is found pertaining to a CLSID entry. Security issues are common with legacy applications attempting to access CLSID entries, so this too is noted. This turns out to be the last match, so I find that there are 3 registry keys that are likely causing the error message in the application to appear. The registry entries are:
HKLMSoftwarePixel—. Users have only read access to this key. I will begin by changing the permissions on this key using the regedit utility and assigning users the Set Value property, allowing them to update an existing registry value. Rerunning the test we still fail with the registry error, but this particular key isn’t generating an ACCDENIED anymore.
HKCRSession.Settings—. Modifying the permissions on this key removes the ACCDENIED entry, but a new one appears now for the HKCR.SES entry.
HKCR.ses—. The permissions on this key are also corrected, but the error still appears. No new ACCDENIED entries are created.
HKCRCLSID {DA0DBD41-8576-11D0-81C0-0080489EE34E}—. This CLSID entry is tied specifically to the Invue application and by default users appear to have no access to the object, and likely results in the error message appearing. I begin by granting users Read access to this object, but this of course still fails. From Regmon it appears that the application is trying to create a key. Granting users access to modify this entry immediately fixes the problem. Now when the user runs the Invue program they are no longer getting the Registry error message.
This example clearly demonstrates how involved the process of troubleshooting a permission issue can be, but also how helpful a tool such as Regmon is in tracking down and resolving these types of problems.
TIP:
Instead of granting the Users group elevated access to these registry keys, a more secured approach would be to grant access to a special group containing only those users authorized to run this application. Always try and minimize the actual number of security permission changes required in order for an application to function.
Once these registry corrections were made, the pair of test users were able to log on and use this new application. Everything appears to be going well until it is determined that the users are unable to save the changes that they have made to their terminal sessions—changes such as font and background color changes, as well as customized macros. In some environments, administrators would not want their users modifying the default configuration, but in others the administrators may be less strict. Assuming that we’re going to allow the users to save their Invue changes, we need to figure out a solution.
After some quick investigation it is determined that the default Invue configuration has all users accessing the same session file located in the folder containing the Invue executable. This introduces two problems. The first is that the file is located in a folder where users do not have write access; and second, even if they did, all users would share the same file, likely resulting some other kind of contention issue, or at the very least a situation were one user could easily overwrite changes made by another user.
A solution is devised where each user will keep their own personal copy of the default session file in their home folder. Invue is then configured to read that file using the home drive letter mapping. For example, if U: maps to each user’s personal home folder, then we could configure Invue to read from the U:InvueData folder.
The final piece to this puzzle is ensuring that each user has a copy of these default files in their personal U:InvueData folder. The easiest way to do this is using a Windows script that checks for the existence of those files, and if they don’t exist then copies them over to the user’s U: drive. If they do exist, then we do nothing so that we don’t accidentally overwrite any personal settings the user may have.
This script could be implemented as part of a logon script, but because it is required only on a Terminal Server, it actually makes more sense to configure it as an application compatibility script. The script in question looks as follows:
@ECHO OFF
REM This script configures Invue for everyone so that they can manage
their
REM own session files and save personal preferences
REM When users launch Invue they are accessing session files in their
own
REM personal home folder, in the "U:InvueData" subfolder.

REM Begin by verifying group membership
IfMember "APP_Invue"
if not errorlevel 1 goto END

REM Now see if the folder already exists on the U: drive
U:
cd
if exist "InvueData" goto END

REM Does not exist, so let's copy over the folder from the D: drive
xcopy "D:InvueData*" "U:InvueData." /s /I /R /Y /Z

:END
The actual script is copied into the %WINDIR% Application Compatibility ScriptsLogon folder, since we want this script to run for every user as they log onto the Terminal Server, but only if they belong to the group APP_Invue. You can see within this script that I have also used the IfMember script to verify group membership before attempting to copy the files.
In order for this script to run during the user’s logon, we must configure it to do so. This requires adding an entry to the Usrlogn1.cmd batch script located in the %SystemRoot%System32 folder. If the file does not exist it must be created. For a new file the contents would look as follows:
REM This batch script processes application compatibility scripts
that
REM do not require the existence of a RootDrive mapping. There should
be
REM no reason why the root drive feature should be enabled on a W2K3
Terminal Server.

REM Process the Invue application setup.
call Invue.cmd
When a user logs on, the Usrlogon.cmd file is run. This in turn launches the Usrlogn1.cmd file, which finally launches the custom Invue.cmd file, whose responsibility it is to ensure that the user’s session is prepared to run Invue.
With the implementation of this script, the installation of the Invue application is complete.
The final application that we will discuss involves the deployment of custom-developed client-server applications on Terminal Server. For the most part, the deployment of a custom application is somewhere between a typical legacy application and the most current Windows applications. Development environments such as Microsoft Visual Studio provide robust application packaging and deployment tools that allow a developer to create a self-contained set of installation files that can be used to deploy the application on Terminal Server.
While the number of issues is typically minor, there are some that I have encountered on more than one occasion. Issues such as:
Hard-coded to a specific installation folder—. Many custom applications that I have encountered have a tendency to assume that they will be installed and launched from a consistent location such as C:Program FilesApplication Name. While this assumption may be acceptable for most desktop deployments, in a Terminal Server environment, an administrator may want to force application deployments to all go to an alternate drive such as D:. If a MetaFrame Server has had its drives remapped as part of the MetaFrame installation, then there may not even be a valid C: drive to reference.
Elevated permissions requirements in the application folder—. This seems to fall into the realm of legacy issues, but for some reason many custom applications seem to expect elevated user privileges in the application folder, usually in order to access a log or configuration file of some kind that is remotely updated.
Packaged with installations of the Microsoft Data Access Component (MDAC)—. Some installation building programs may include the setup files for the latest MDAC version as part of the package. This could potentially cause an issue with existing programs on a Terminal Server that use a particular MDAC version. Before deploying a custom application make sure that either the existing MDAC is acceptable for the application, or the new MDAC version included will not affect existing programs on the Terminal Server.
Local application database use—. Applications developed around a desktop-based database system such as Access, Microsoft SQL Server 2000 Desktop Engine (MSDE) or Pervasive.SQL Workgroup can potentially cause problems for a Terminal Server deployment, depending on where the database is stored and how it is accessed. A locally running instance of a database can cause issues on Terminal Server, particularly if the same application is expected to run on multiple servers. Data on each Terminal Server will be different, and additional complexity is then introduced into the environment, because now volatile user data is being maintained on a Terminal Server.
All of these types of issues are preventable simply by properly educating the development team to the requirements of the environment that they are developing for. In my experience a brief phone call is not enough. Detailed boundaries within which the developers must comply is key to ensuring a successful application build the first time, eliminating the need for the development team to go back and correct the deficiencies.
NOTE:
One installation note worth mentioning has to do with the configuration of a data source entry for accessing a database management system such as SQL Server or Sybase. A common question that I am asked is what type of database data source name (DSN) should be created? Should it be a User DSN, a System DSN, or a File DSN? When creating a DSN for a custom application, the appropriate type in most cases is a System DSN as shown in Figure 21.13. System DSNs are globally accessible by all users on a Terminal Server.
I will wrap up this chapter by looking briefly at the steps involved in publishing an application within MetaFrame Presentation Server. Throughout this book I have discussed published applications and how they provide a simple interface not only to making applications available to the end user but also for balancing the access load across multiple servers. The ease with which applications and full desktops are published within MPS makes the task almost anticlimactic. Most people expect the task to be much more complicated than it is, and more often than not when finished, I’m met with somewhat blank stares and the question “that’s it?”
As with most management tasks in MPS, application publishing is driven from the Management Console, within the Applications folder (Figure 21.14). Any applications that have already been published will appear as icons under this folder.

Figure 21.14. Application publishing is managed under the Applications folder in the Management Console.
The creation of a new published application is very straightforward and is performed as follows:
Begin by right-clicking on the Applications folder and selecting Publish Application. The Application Publishing Wizard starts and prompts you to provide a name and description for the application. The name entered here will be displayed when the application is published, and the description will appear if the user requests to see a description of the application when using a supported client.
In this example I will publish Microsoft Excel, so I enter the name Microsoft Excel and click Next to continue.
Now you are asked to specify what you would like to publish. An application, a desktop, or content. When publishing a full desktop you would select Desktop. Content allows you to publish a link to web-based content. The application used to open the content (local or Citrix-based) depends on how the content redirection has been configured. Details on this were discussed in Chapter 2.
Selecting Application will present you with space to provide the command line and working directory of the application (Figure 21.15). If you know this path information you can type this in, or you can click the Browse button and browse for the executable on one of the MetaFrame servers in the farm or another network-based location. Network-mapped drives are not available for selection when browsing and must be provided manually. A warning message stating that the network path may not be available will appear, but you are still able to publish an application located on a network-mapped drive.
Pay particular attention to the option at the bottom of this dialog box labeled Allow this published resource to be accessed externally through MetaFrame Secure Access Manager. If you have not implemented the Secure Access Manager (SAM) then you can ignore this setting, but if you are using SAM, then be certain that you want this application to be available outside your network, otherwise deselect this option before continuing.
The next dialog box is where you define the Program Neighborhood settings. These dictate where the icon for this application is displayed from either Program Neighborhood or the Program Neighborhood Agent. Certain options are available only when using the PNAgent client, and they are labeled as such. Click Next to continue.
The application’s appearance is configured on the next screen. All of these options are ignored when an application is running in a seamless window on the user’s desktop, otherwise these settings are applied unless overridden by the client. Specifics on how these options affect the appearance of an application on the client are discussed in Chapter 20, “ICA Client Installation and Configuration.”
The Client Requirements dialog box is where you specify additional settings that are only applied when accessed by the PN or PNAgent clients. Unless necessary support for legacy audio should be disabled, encryption should be changed to 128-bit (RC5), and Start this application without waiting for printers to be created should be enabled in order to speed up the logon time and increase the perceived responsiveness for the end-user. This setting applies only to client-mapped printers.
Application Limits allows you to define restrictions on how many concurrent instances of an application may run and limit how many instances can be run by a single user. One reason to institute a maximum number of application instances that can run in a farm would be to ensure that a certain maximum license quota was being satisfied. Another reason might be to limit an ill-behaved program from consuming too many resources in a farm. Even though the option exists on this screen to adjust the CPU priority for the application, I highly recommend that this setting not be altered in any way. Setting an application to have a high priority can adversely affect other programs on the server.
The Specify Servers dialog box is where you decide what MetaFrame servers will simultaneously publish the same executable. If you are running Advanced or Enterprise Editions of MPS then you have the Load Management component, allowing you to publish the same application on multiple servers and automatically enabling load balancing.
Simply by specifying more than one server to publish an application, you are enabling load balancing for that application. Figure 21.17 shows an example of this. If both servers are moved from Available to Configured, then they will automatically begin to load balance the published application between them. If the source and working folders differ between the two servers then the Edit Configuration button can be used to ensure the proper path was used for both.
Figure 21.17. Assigning multiple servers to publish the same application implicitly enables load balancing between the selected servers.
If a load evaluator is not specifically assigned to a published application, which can only be done after the published application has been created, then the application will default to using the load available assigned to the server. Unless modified, all servers that support load balancing will have the default load evaluator, which bases server load on the number of concurrent users and the maximum load is set when there are 100 concurrent users on the server.
The next-to-last dialog box is where you specify the users who will have access to run the published application. You can specify domain or local users or groups. Users not listed here will not see the published application in PN, PNAgent, or the Web Interface. Directly trying to connect to the published application will fail when the credentials are entered and validated.
The final dialog box is where you select the client file associations that can be redirected to this published application. This setting represents client-to-server redirection, meaning that a local file that is double-clicked will initiate the launching of the associated published application on the MetaFrame server. Associations can be modified at any time through the properties for a published application.

Once the application is published it will automatically appear with the other listed applications and is now ready to be accessed by authorized users. Any of the properties configured during the published application created can be modified at any time through the properties for the published application.