In Chapter 8, “Server Installation and Management Planning,” I provided a large amount of background material around properly planning implementation and support of printing in your Terminal Server/MetaFrame environment. The goal of this chapter is to successfully implement that plan and deliver a robust and reliable printing infrastructure for your Terminal Server/MetaFrame deployment.
We begin by discussing installation and management of printer drivers, which are required on the Terminal Server regardless of the printer access method used. Next, the three general categories of printer support provided by Terminal Server and MetaFrame are reviewed, after which focus shifts for the remainder of the chapter to how these scenarios are implemented and managed within both Terminal Server and MetaFrame, based on the appropriate network configuration (see Chapter 4, “Network Planning”).
NOTE:
The printing categories and features supported by both Terminal Server and MetaFrame were discussed in Chapter 8.
One area discussed in Chapter 8 was the need to evaluate the printers required in your environment and ensure that you have the appropriate printer drivers available. Regardless of how your printers will be configured in your environment, every printer in a Windows system requires an associated printer driver.
Two types of printer drivers are supported by Windows 2000/2003: the traditional printer driver, and what is called a printer mini-driver. A mini-driver works in conjunction with the Windows Universal Printer Driver (WUPD) to perform the actual printing to the physical device. Because a printer driver must interact with the graphical device interface (GDI), it must provide a standard set of interfaces that the GDI expects to be available. A mini-driver provides what are called stubs to these interfaces but actually relies on the WUPD to deliver most of the functionality. The mini-driver provides only the information unique to a particular printer.
NOTE:
The Windows Universal Printer Driver differs from the universal printer drivers provided with MetaFrame Presentation Server. I discuss more about the MetaFrame UPDs in the “MetaFrame Printer Support” section of this chapter.
The alternative to a mini-driver is the full printer driver, which delivers all the required GDI interfaces and does not use the WUPD in any way. Full printer drivers are much more complicated to develop than mini-drivers but can also provide more robust printing features and functionality.
Typically, the mini-driver can be much more stable than a full printer driver, since most of the GDI-based interaction is through the WUPD, which has already been thoroughly tested. This is the main reason why I will recommend implementing a mini-driver whenever possible in a Terminal Server environment.
WARNING:
Deploying a printer driver on a production Terminal Server or MetaFrame server should always be taken very seriously. Ideally, the process is subjected to the same change management process as any other application or operating system update. Deploying an unstable printer driver into a production Terminal Server environment can introduce significant printing issues.
When deploying a new printer driver on a Terminal Server, always be sure to test, test, and test some more. One good test to perform is having multiple users concurrently sending jobs to the printer as opposed to one user sending multiple large jobs. Many Terminal Server printer failures occur when a printer driver is stressed under a heavy load resulting from concurrent user print requests.
The current driver associated with a printer can be determined by opening the Properties page for the printer and selecting the Advanced tab. An alternate printer can be selected from the drop-down list, as shown in Figure 17.1. All drivers currently installed on the server will be available for selection.

Before choosing a printer to install on your Terminal Server, make sure you have reviewed my list of recommendations regarding printer driver selection in Chapter 8. In this chapter I discussed the concerns about printer driver stability in a Terminal Server environment, as well as some of the reasons printer drivers fail and the impact they can have on a Terminal Server. The most severe printer driver issues can result in the system halting with a STOP error (the familiar blue screen of death). In an ideal world all printer drivers would work flawlessly, but unfortunately this is not the case and care must always be taken when deciding on the drivers to be installed on a Terminal Server. Whenever possible test the driver before deploying it into production.
Printer drivers can be added to a Terminal Server in a couple of ways. The first, which will be familiar to Windows NT 4.0 Terminal Server Edition administrators, is using the Add Printer wizard under the Printers and Faxes folder and installing a “fictitious” local printer with the desired driver. This can be done as follows:
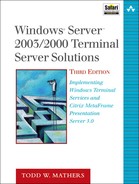
Launch the Add Printer wizard and select the Local Printer Attached to This Computer option.
Be sure to deselect Automatically Detect and Install My Plug and Play Printer, as shown in Figure 17.2. You do not want Windows to try to detect a nonexistent printer on your server.
Select the desired port.
It is best to choose a port not currently being used. I normally select LPT2.
Select the desired printer driver to install.
If the driver is not listed, you need to download and install a driver provided by the printer manufacturer. Refer to the section, “Printer Driver Stability on a Terminal Server,” in Chapter 8 for information on choosing the appropriate printer for your environment.
The default printer name is usually appropriate, but if you already have a large number of printers installed on your server, appending text such as “Delete-” to the beginning of the name will make it easy to find when it’s time to remove the queue.
Make sure you do not share the printer, and do not try to print a test page.
Unless the print queue is associated with an existing printer, the test page will, of course, fail.
Once the printer has been created, return to the Printers folder and delete this printer.
Even when deleted, the associated printer drivers remain installed and available on the server.
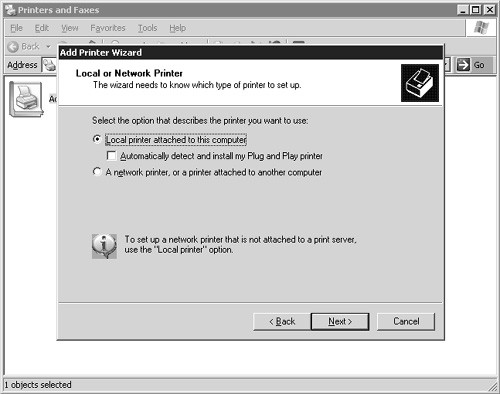
A more straightforward method of adding a printer driver to your server is through the Print Server Properties dialog box. This is found by opening the Printers and Faxes folder and selecting Server Properties from the File menu. Under the Drivers tab, you find a list of all currently installed printer drivers (see Figure 17.3). You can also fully manage your drivers from this location by adding, deleting, updating, or viewing a driver’s properties. Clicking Add launches the Add Printer Driver wizard.
The steps to install the printer driver are as follows:
After the introduction screen, the Add Printer Driver wizard immediately takes you to the printer driver selection dialog box. From here you can select an existing driver or choose a driver you downloaded separately by clicking the Have Disk button. If you have not already done so, you need to extract the necessary driver files into a temporary folder, where you can select the appropriate driver to install.
Once the driver is chosen, the next screen asks you to select the appropriate processor/operating system combination that will use this driver (Figure 17.4). Usually the default selection is appropriate.
The final screen simply asks you to confirm your selection before the driver is installed on the server. Once this step is finished, the newly installed driver appears on the driver installation list.

The steps required to install a printer driver are fairly straightforward, but if you have a large number of Terminal Servers in your environment (5, 10, or more), having to manually install the necessary drivers on each server can become tedious, time consuming, and prone to error. A more effective method of distributing the desired drivers throughout the environment would certainly be desirable. In the next section, I look at printer driver replication techniques.
Microsoft provides a downloadable tool that can be used to simplify the task of replicating printer drivers from one server to another. Originally designed as a tool for backing up the printers on a print server, the Windows Print Migrator tool works very well at replicating printers and their drivers from one server to another. The Windows Print Migrator tool can be downloaded from the Microsoft Web site by going to http://www.microsoft.com/downloads and searching on “Print Migrator.” The latest version at the time of this book’s release was 3.1, and it supports both Windows Server 2000 and Windows 2003 Server. No installation is required for this product; it is simply downloaded into a folder and executed. The main window for Print Migrator is shown in Figure 17.5, with the currently installed printer driver list expanded.

Printer driver replication is performed in a two-step process. First, the current printer drivers on the source server are backed up by selecting Backup from the Action menu, selecting the Target source backup server if necessary, and providing the file name in which to store the printer information. This data is backed up into a Microsoft cabinet (CAB) file.
Once you have the printer driver information backed up into the CAB file, the next step is to restore it onto the target destination server. Select the Restore option from the Action menu. When prompted, provide the source CAB file and the target server where the printer drivers will be replicated, as shown in Figure 17.6. Click Open to begin the restore. The results of the restore are automatically logged to the file PM.LOG, located in the folder
%SystemRoot%System32spoolpm

If errors or issues are encountered during the restore, they will be logged in this file and you will receive visual notification at the end of the restore attempt.
TIP:
If you will be implementing MetaFrame Presentation Server, you can leverage the advanced printer driver management and replication features that it provides. I look more closely at these features in the “MetaFrame Printer Support” section of this chapter.
The different types of printer support offered through Terminal Server were covered in Chapter 8. The three categories discussed were
Network printer shares
Local server printers
Local client printers
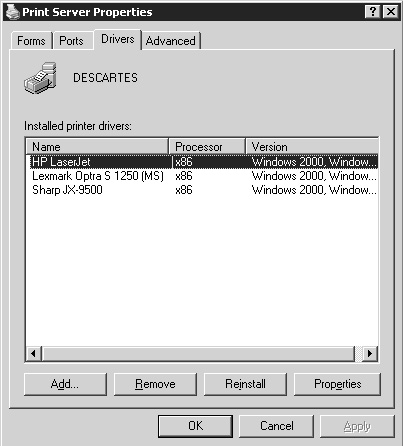
Probably the most common printer access configuration and the one most familiar to a Windows administrator is use of one or more print servers that centralize access to various printers within the organization. These printers are all made available as network printer shares on the print server. Figure 17.7 gives an example of a number of printers shared off a Windows print server and listed in the active directory.
Shared printer resources are typically accessed in one of two ways: automatically through a logon script or manually mapped by the user using the Add Printer wizard. Of the two, I prefer to implement logon scripts to automatically map the appropriate printers based on the user’s group membership. This provides a means of transparently delivering the appropriate printers without interaction from the user. If printer assignments are left up to the user, you need to be sure they understand how to locate and map the printer properly using the Add Printer wizard. Inexperienced users can easily become confused and either map to the incorrect printer or fail to map the necessary printers at all. Either way, they are almost guaranteed to end up calling for support to try to resolve the problem.
When properly configured, logon scripts can provide a reliable and effective way to manage printer mappings for your users. While a lack of programming skill will certainly limit the extent to which you can customize and modify scripts to suit your environment, the configuration steps involved are fairly straightforward, and the sample scripts I include can be customized to function in your environment with some very minor changes. A simple logon script configuration can be created in a couple of steps.
The first task is to create a simple logon script that will map printers based on a user’s group membership. The following code sample demonstrates how such a script could be created using Visual Basic Scripting (VBScript).
The logic for this script is straightforward. A global user group called PRN Accounting has been created in the active directory, and any users who should map to this printer are assigned to that group. The script looks to see if the user belongs to this group, and if so, the printer connection is established and set as the default. When a user is mapping the drive, a pop-up message briefly appears saying the drive is being mapped. This message closes either when OK is clicked or automatically after being displayed for three (3) seconds. I like to include this message not only as a visual confirmation to the user that the proper printer mapping is being initiated but also as a troubleshooting tool for an administrator if printer mapping issues arise.
Example 17.1. Windows Logon Script Sample Demonstrating How to Script Mapping of Client Printers
'**********************************************************************
**
'* ConnectPrinters.vbs
*
'*
*
'* Connects the user's printers based on their group membership.
*
'* Printers are assigned by the particular group's business function.
*
'* For example, the accountants belong to the group "PRN Accounting".
*
***********************************************************************
**
option explicit

'Define the printer groups that are being evaluated
'We use constants so that the code doesn't have to change if
'the printer name changes.
Const PRN_Accounting = "cn=PRN Accounting"

'Define the variables that will be used for mapping
dim wshNetwork, ADSysInfo, oCurrentUser
dim sPrinterPath, sPrinterDriver, sGroups
dim wshSysEnv, wshShell

'Initialize the variables and retrieve the necessary information
Set wshShell = CreateObject("WScript.Shell")

'system environment information
set wshSysEnv = wshShell.Environment("PROCESS")
Set WshNetwork = CreateObject("WScript.Network")
Set ADSysInfo = CreateObject("ADSystemInfo")

'retrieve the user's account information
Set oCurrentUser = GetObject("LDAP://" + ADSysInfo.UserName)
sGroups = LCase(Join(oCurrentUser.MemberOf))

'verify the user's domain group membership and map printers
If InStr(sGroups, LCase(PRN_Accounting)) Then
    wshShell.Popup "Mapping Accounting printer...", 3, "Mapping
Printer", 64
    wshNetwork.AddWindowsPrinterConnection "\PRNServer01Accounting"
    wshNetWork.SetDefaultPrinter "\PRNServer01Accounting"
End If
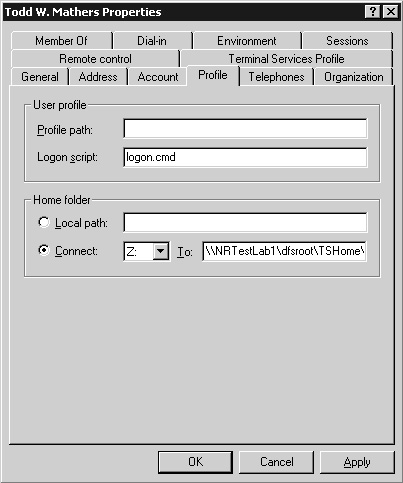
Once you have a simple script created, the next step is to define what logon script will be used and under what circumstances it will execute. Logon scripts can be initiated either through a group policy or from within the user’s domain account on the Profile tab, as show in Figure 17.8. The entry in the user’s profile is executed under all circumstances, whether the user is logging on to a desktop PC or a Terminal Server. If you wish to use the same logon script for all desktop environments, it can be defined here. If you prefer to configure logon scripts that apply only from within the Terminal Server environment, the script should be configured to start within a group policy defined for Terminal Servers only.
In this example I use a logon script defined within the group policy called All Users Policy, as defined in Chapter 15, “Group Policy Configuration.” This policy is applied to all users who log on to a Terminal Server that is a member of the Terminal Servers organizational unit. The specific policy to modify is located under
User ConfigurationWindows SettingsScripts (Logon/Logoff).
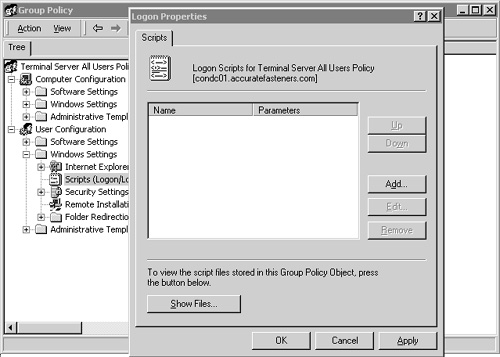
By double-clicking the Logon entry, you open a dialog box where you can list the logon scripts that will execute (see Figure 17.9). If multiple scripts are listed, they are processed in order from top to bottom. In order for Windows to process the desired logon script(s) during a user’s logon, the script must be saved into the specific Scripts folder for the policy. You can quickly access this folder by clicking the Show Files button located on the lower left-hand side of the Logon Properties dialog box shown in Figure 17.9. This opens a Windows Explorer screen pointing into the proper script folder. The logon script you created earlier can now be copied into this folder.
Once all the desired scripts have been copied into this folder, close the dialog box and then click Add from the main Logon Properties screen. The Add a Script dialog box opens, and you can then click Browse to be taken into the Scripts folder where you can select the logon scripts to add to the policy. Once added, the scripts appear in the script list, and once the Logon Properties dialog box is closed by clicking OK, the scripts are configured and ready to execute.
You can now test out the script processing by logging on to your Terminal Server using a user account configured to process the corresponding group policy. If you used the same policy configuration as the one I discussed in Chapter 15, any Terminal Server user will process this logon script. If everything is configured properly, the desired network printers should automatically be connected and ready for use.
TIP:
If you implemented the application restrictions discussed in Chapter 16, “Terminal Server Security,” you need to include the script processor WSCRIPT.EXE as a valid application to run; otherwise, the logon scripts will not be processed properly.
Besides using the traditional method of printer assignment based on membership in one or more domain user groups, one alternative is to designate printer assignments based on the client device’s name. During logon, information such as the client name can be accessed directly from the environment variables, such as CLIENTNAME variable. Listing 17.2 shows an example of the environment variables listed when running the SET command from a Windows Server 2003 command prompt.
Example 17.2. Environment Variables Provide Information That Can Be Used to Assign Printers
C:Documents and Settingsadministrator.NRTESTDOM>set
CLIENTNAME=GLENROTHES
ClusterLog=C:WINNTClustercluster.log
CommonProgramFiles=C:Program FilesCommon Files
COMPUTERNAME=OBAN
ComSpec=C:WINNTsystem32cmd.exe
HOMEDRIVE=C:
HOMEPATH=Documents and Settingsadministrator.NRTESTDOM
LOGONSERVER=\LAGAVULAN
NUMBER_OF_PROCESSORS=1
OS=Windows_NT
Path=C:WINNTsystem32;C:WINNT;C:WINNTsystem32WBEM; C:Program
FilesCitrixSystem32CitrixIMA; C:Program FilesCitrixSystem32
CitrixIMASubsystems;C:WINNTSystem32CitrixIMA;C:Program
FilesCitrixsystem32
PATHEXT=.COM;.EXE;.BAT;.CMD;.VBS;.VBE;.JS;.JSE;.WSF;.WSH
PROCESSOR_ARCHITECTURE=x86
PROCESSOR_IDENTIFIER=x86 Family 6 Model 8 Stepping 3, GenuineIntel
PROCESSOR_LEVEL=6
PROCESSOR_REVISION=0803
ProgramFiles=C:Program Files
PROMPT=$P$G
SESSIONNAME=RDP-Tcp#8
SystemDrive=C:
SystemRoot=C:WINNT
TCP_NODELAY=1
TEMP=C:DOCUME~1ADMINI~1.NRTLOCALS~1Temp3
TMP=C:DOCUME~1ADMINI~1.NRTLOCALS~1Temp3
USERDNSDOMAIN=NRTESTDOM.COM
USERDOMAIN=NRTESTDOM
USERNAME=Administrator
USERPROFILE=C:Documents and Settingsadministrator.NRTESTDOM
windir=C:WINNT
Depending on how the client machines are named, you may be able to modify your logon scripts to assign printers based on the client and its location in the organization. This approach is one way to address the problem of users who roam to different computers in the organization and wish to print to the printer local to that particular printer, not just the printer they access normally. For example, if a user normally works in the Miami office but travels to the Orlando office for the day, that user would likely prefer to print to a printer in the Orlando office instead of defaulting to their normal printer back in the Miami office.
For such a logon script configuration to work effectively, the company would have to be sure to employ a naming standard based on physical site location, as well as possibly office location, if the site was large enough. While scripts could be created for each individual computer name, being able to break things down based on some general geographic region would expand the range of the scripting and simplify the management process.
For example, you could employ a client-naming standard such as
<SITE>PC-<FLOOR><REGION><COUNT>
where SITE is the actual PC site (MIA or ORL, for example). In the example,
PC- is a constant value.
FLOOR is the building floor where the PC is located (a fixed, two-digit number such as 01).
REGION is the region on the floor where the PC is located.
COUNT is the PC count for that location.
An example client name might be ORLPC-03WEST003.
With this information, you could create a logon script that would look at the SITE, FLOOR, and REGION information and assign a default printer based on this. While certainly more complicated than simply using a domain security group, this method can provide much more flexibility in how printers are managed.
NOTE:
I once was involved in a large Citrix deployment to implement the strategy of assigning printers based on location of the client device and thereby reduce complexity of managing large numbers of domain user groups. The issue was that the client device names did not employ a naming standard based in any way on the geographical location of the device, so no algorithm could be derived from the name that would allow the associated printer to be easily deduced.
Maintaining a reference list based on the PC name and corresponding printer was simply out of the question, and the complications involved in trying to group PCs was also not a viable option. A solution had to be created that would make it easy for the user to manage the printers if necessary while remaining as simple as possible.
Instead, what I ended up doing was developing a simple custom application that provided the users with an interface that listed the available printers (based on a text file maintained by the administrators in a central location) from which the user could select the two they wished to connect to. One printer was set to be the default printer and the other to be a backup printer. This printer information was then stored in a central location and cross-referenced with the name of the client device.
After selecting and saving the choices, the application would automatically map the printers and set the default. To eliminate the requirement for the user to do this every time they wanted to map the printers, the application also generated a script that was stored in a well-known location with a name matching the client device. The next time anyone logged on from that machine, the script matching that client name was run to automatically reconnect to those printers.
This application achieved two goals. First, it allowed the default printers to be associated with the name of the client device. Second, it achieved this without having to place the full setup and support burden directly on the administrators. Because the users had access to a simple tool, they could easily adjust the printers if necessary, and when saved, the changes would automatically be associated with the client device, ensuring those changes were available the next time anyone logged on from that device.
This printer configuration technique involves setup of printers locally on the server, much like setting up a local printer on a Windows workstation. This configuration is common in smaller environments where only one or two Terminal Servers exist with limited supporting hardware (file servers, print servers, and so on) and a relatively small user community that has only light printing needs. In larger environments, the printers are usually configured on a central print server and shared out for access by Terminal Server users.
There are two types of local server printers: those directly connected to the server via a physical cable and those connected through a logical port that is redirected to a printer located on the network. Printers physically connected to a Terminal Server are rare, since most implementations have the Terminal Server located in an area not accessible by the end user. Use of a logical port is much more common, particularly when a TCP/IP port or a print manufacturer’s custom printer port is used. Figure 17.10 shows an example of the Ports tab accessible from a printer’s Properties dialog box. All ports configured on the server (whether in use or not) are listed, and from here you can redirect the current printer to any given port if desired.

Configuring a local printer is straightforward and usually done with the Add Printer wizard but can also be set up using a third-party installation program, such as a Lexmark Network Port. These custom ports are typically used in conjunction with a network-enabled printer or a dedicated print server device that connects to the network and shares any printers physically connected to it. A TCP/IP port is used to connect to a network-enabled printer that supports TCP/IP printing or to a UNIX-based printer queue that uses the LPD print daemon.
WARNING:
Some third-party custom port software, such as Lexmark Network Port, must be installed and configured from the local console; it cannot be managed through an RDP or ICA client session. Attempting to do so results in error messages such as “This operation is not supported.” Using the remote console support in Windows Server 2003 resolves this issue in most—but not all—situations.
Of course, once these ports are configured, they can be the target of print jobs for Terminal Server clients without any issues. It is only the configuration that must be managed through the local console.
To install and complete configuration of the TCP/IP port, you need to know the TCP/IP address of the printer or print server, the protocol used (RAW or LPR), and the corresponding protocol setting (port number for RAW or queue name for LPR). Of the two, LPR is much more common. When using the Add Printer wizard, the steps for configuring a local TCP/IP port are as follows:
Begin by opening the Add Printer wizard under Printers and Faxes and then click Next until prompted to select a local or network printer. Choose “Local printer attached to this computer” and then be certain to deselect the “Automatically detect and install my Plug and Play printer” option.
On the next dialog box you are asked to select the desired printer port. Click Create a New Port and select the Standard TCP/IP Port option. This launches a new wizard called Add Standard TCP/IP Printer Port, where you are prompted to provide two things (see Figure 17.11): first, either the fully qualified domain name of the device or its IP address and, second, a name for the port. This is the name that will appear when viewing all the available ports on the Ports tab of a printer’s properties. It does not have to match the name of the printer that will be assigned to the port.
Windows tries to detect the device type using SNMP (Simple Network Management Protocol). If the device cannot be detected, a dialog box appears prompting for additional information regarding the network device you are attempting to connect with.
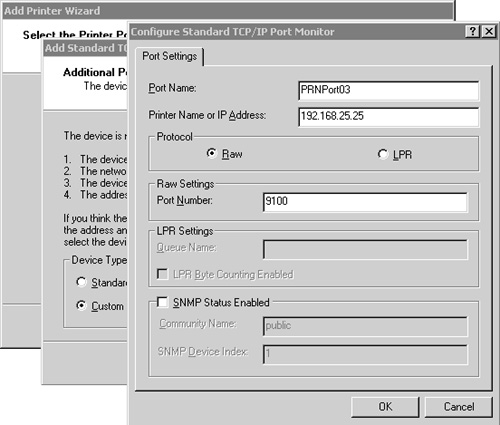
Unless the desired device exists in the drop-down list, you need to select the Custom radio button and then click the Settings button to bring up the customization screen shown in Figure 17.12. Here you can define the proper settings for connecting the port to the network device. The default protocol option of RAW with port number 9100 will likely need to be changed to the LPR protocol and the proper queue name. The LPR Byte Counter option normally should not be enabled.
Once the custom settings have been configured as desired, you are returned to the previous dialog box requesting the additional port information. After clicking Next, you reach the final port creation confirmation screen and then are returned to the standard printer installation wizard.
Upon returning to the printer installation wizard, you are asked to provide the appropriate printer driver. Printer driver requirements were discussed earlier in this chapter, in the “Printer Driver Management” section.
Next you’re asked to provide a name for the printer. Try to use a name both concise and descriptive. Ideally, it is something users can quickly recognize and determine as the right one for them.
The final two screens prompt you to configure printer sharing and attempt to print a test page. Enable printer sharing only if absolutely necessary, particularly when sharing off a Terminal Server.
When finished, print a test page to verify that the port and new printer are configured properly.

While the steps involved in setting up a local printer on the server are straightforward, take care when implementing such a configuration. Additional load is introduced because of the print server responsibilities this creates, which in turn diminishes the resources available to Terminal Server sessions. Local server printers are best suited for smaller, less loaded Terminal Servers that have the capacity to manage print server duties without noticeably degrading the user’s Terminal Server experience.
As I mentioned in Chapter 8, the introduction of client printer mapping (printer redirection) support greatly enhanced a Terminal Server’s ability to more tightly integrate with the user’s local desktop. In summary, local client printer mapping provides the following features and functionality:
Print jobs originating from within a user’s Terminal Server session can be redirected to a printer on the user’s local desktop.
When connecting to a Windows 2000 or 2003 server using the RDP 5.1 or higher client, you can connect to either physically connected local printers or local network-mapped printers. Both versions of Windows Terminal Server support this feature in conjunction with the RDP 5.1 or higher client.
Print job traffic is completely contained within the Terminal Server client’s session data, utilizing a virtual channel between the client and the server to deliver the print job. No other network connectivity needs to exist between the client and the server.
Client printers are mapped only if a suitable driver exists on the Terminal Server.
When local client printer redirection is enabled, an attempt is made by Terminal Server to redirect all client printers within the Terminal Server session. A subset of the desired printers cannot be selected, for example, only the local default printer can be selected. This type of functionality is available with MetaFrame Presentation Server.
In the remainder of this section, I describe how to properly configure your Terminal Server to support redirection of local client printers and methods of troubleshooting common printer redirection issues.
NOTE:
A lot of confusion and misinformation exist, even in some of the documentation available on the Microsoft Web site, indicating that network-mapped client printers cannot be redirected through a Windows 2000 Terminal Server but only through a Windows 2003 Terminal Server. This is simply not true.
From a server’s perspective, the logic behind redirecting a network-mapped printer is no different from the logic for a locally attached printer. It is the responsibility of the RDP client to enumerate the local print queues and pass the necessary information through to the Terminal Server. This information is then used to construct the corresponding printer queue on the server.
To integrate redirected network-mapped printer support into the RDP 5.0 protocol (used by Windows 2000), Microsoft developed the RDP 5.1 client so that it constructs the information delivered to the Windows 2000 Terminal Server in such a fashion to still conform to the older protocol’s specifications. Figure 17.13 shows an example of a redirected network printer in an RDP session on a Windows 2000 Terminal Server.

The first printer in the list is the redirected network printer. You will notice that the queue name was constructed from the original mapped printer name, with the backslashes () converted to underscores (_). The last printer in the list is a redirected local client printer. I discuss queue naming for local client printer redirection in the “Enabling Redirection of Local Client Printers” section.
For this redirection to be successful, you need to ensure that the Terminal Server is configured so it automatically attempts to map the client’s printers when he or she logs on to the server. To do this, client printer redirection must be enabled at both the RDP connection level and the individual user account level. By default both methods are enabled, but you can verify or modify this option as desired. At the RDP connection level, you can configure this setting using either the Terminal Services Configuration tool or a group policy object, which is the preferred method in large deployments because it centralizes the management process and alleviates the need to log on to each server to set these options. If you want to use the Terminal Services Configuration tool, you can do so as follows:
Open the Terminal Services Configuration application located under Administrative Tools on the Start menu and then select the Connections folder.
Double-click the RDP-Tcp connection to open the Properties dialog box and then select the Client Settings tab (Figure 17.14).
Within the Connection group box, you have two available options. You can configure the properties for the RDP-Tcp connections to use the settings from the individual user accounts or to define the settings here that will affect all users who log on to the Terminal Server, including administrators. If you enable “Use connection settings from user settings,” no other change needs to be made here. If this option is disabled, you need to explicitly enable “Connect client printers at logon” in order to get client printer mappings. If you want the local default printer to also be the default Terminal Server printer, enable “Default to main client printer.”

Details on configuration and use of group policy objects were provided in Chapter 15, so there is no need to rehash the steps here. It is sufficient to say that the GPO properties directly related to managing printer redirection can be found within the Computer Configuration section in the following folder:
Administrative TemplatesWindows ComponentsTerminal ServicesClient/Server data redirection
Any settings defined here override any set directly on the Terminal Server using the Terminal Services Configuration tool. Figure 17.15 shows these properties listed within the Group Policy Object Editor.

Client printer mappings for individual user accounts are managed as follows:
Open Active Directory Users and Computers for the domain and select the user account you want to manage.
Select the Environment tab; in the lower portion of the dialog box, you find the Client Devices group box, as shown in Figure 17.16. “Connect client printers at logon” must be enabled. If you wish to have the local default printer also set as the default printer in Terminal Server, you also need to select “Default to main client printer.”

TIP:
As I discussed in Chapter 1, “Microsoft Windows Terminal Services,” the RDP protocol can be expanded to support additional, customizable features using what are called virtual channels. Virtual channels are also used to drive RDP features such as clipboard mapping, client drive mapping, and local client printer redirection.
While it has been suggested that access to these features is dependent on whether the Virtual Channels permission for the RDP protocol is allowed or not, this information is false (see Figure 17.17). Local client printer redirection is in no way affected by the status of this connection permission. Even if Virtual Channels have been expressly denied, local client printer redirection still functions as designed.

When local client printer redirection is enabled, the Terminal Server attempts to automatically connect all the printers available on a user’s local desktop whenever they log on to the server. Whether or not a client printer is successfully redirected within an RDP session depends on whether a suitable match between the client and the server printer drivers can be determined.
During the logon, the RDP client enumerates all the client’s local printers and sends the local queue name and complete driver name to the Terminal Server. For this redirection to occur, the Terminal Server must take the client’s driver name and find a corresponding driver on the server with the exact same name. For example, if the client machine has a driver called “hp deskjet 970c series”, the server must have a driver with an identical name (same punctuation, same case, same everything) in order for the redirection to occur. If the names do not match or a driver cannot be found, an event ID 1111 (see Figure 17.18) is created in the server’s system log and the printer mapping silently fails. No error message is displayed to the user. Driver installation is discussed in the “Printer Driver Management” section, earlier in this chapter. If the corresponding driver has been installed and the mapping is still failing, it is likely because the driver names differ between the client and the server. I discuss ways to correct this problem in the next section.
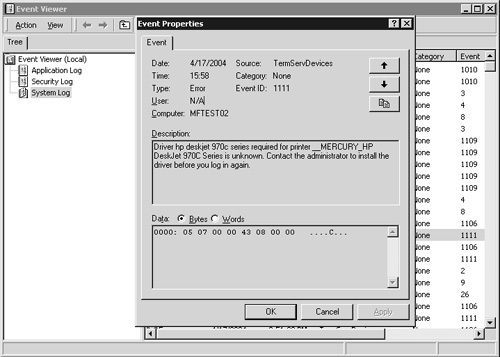
Figure 17.18. An event ID 1111 message is displayed when a client printer driver cannot be found on the Terminal Server.
NOTE:
If a local client printer is using a local printer port that is labeled something other than LPT, COM or USB, then it will not automatically be redirected to the Terminal Services session. This is a common problem for multifunction printing devices, which very often use a DOT4 port. Because of this port name, the printer is not automatically available within the Terminal Services session.
The one exception to this is when the client device is running Windows Server 2003. Details on this issue along with a resolution can be found in the Microsoft Knowledgebase article 302361.
When an event ID 1111 is generated, it is either because the driver names on the client and the server do not match or because a corresponding driver has not yet been installed on the Terminal Server. If the driver is not yet installed, it needs to be made available before you attempt the mapping. The earlier section entitled “Printer Driver Management” discusses in detail the criteria for managing printer drivers on your Terminal Server.
If a suitable server driver has been installed and the client printer mapping still fails, then the two drivers have slightly different names and a special cross-reference matching (also commonly called a mapping or substitution) file must be used to tell the Terminal Server that these two names do in fact reference the same drivers. For example, if we have a Windows XP client connecting with an updated version of the DeskJet 970c driver with the name
“hp deskjet 970c series”
and our Windows 2003 Terminal Server has the following driver installed:
“HP DeskJet 970Cse”
then when the mapping comparison is made, we see that these two drivers are certainly not identical, so the mapping is not created and an event ID 1111 is created. To remedy the problem of nonstandard driver names, Microsoft provides the ability (Windows 2003, and Windows 2000 post–Service Pack 2) to create a custom substitution file to handle these anomalies. The substitution file would then contain an entry such as
“hp deskjet 970c series” = “HP DeskJet 970Cse”
This entry tells the Terminal Server that whenever a client connects and provides the driver name “hp deskjet 970c series”, the corresponding server driver “HP DeskJet 970Cse” should be used.
To use this custom substitution file, you must first make an addition to the system registry telling the Terminal Server what file to use and where within that file to find the custom substitution information. You can do this by opening REGEDIT, traversing to the following registry key:
HKLMSYSTEMCurrentControlSetControlTerminal ServerWds dpwd
and adding the two values listed in Table 17.1 to the key.
Table 17.1. Registry Values Required to Enable an Alternate Driver Cross-Reference File
Value Name | Value Type | Description |
|---|---|---|
PrinterMappingINFName | REG_SZ | The name and full path to the file that will contain the cross-reference file. You can use whatever name you wish. A common name for this file is ntprintsubs.inf |
Example: C:WINDOWSINF tprintsubs.inf | ||
PrinterMappingINFSection | REG_SZ | The name of the section within the INF file where the cross-reference information resides. |
Example: Printers |
The substitution file would then need to be created and placed in the proper folder. For example, my sample INF file for these DeskJet drivers would look like the one shown in Listing 17.3. You can list multiple driver substitutions within this file if necessary.
Remember that for the substitution to function properly, you must have the server-side driver installed on your Terminal Server. The driver will not automatically be installed by itself.
Example 17.3. A Sample Substitution File Containing a Single Printer Driver Match
[Printers]
;
; Client Side Driver     |   Server Side Driver
;
"hp deskjet 970c series" = "HP DeskJet 970Cse"
NOTE:
Pay particular attention to the syntax of this custom file. If a mistake is made in the creation of this file, an event log entry (Event 1110) will be generated stating that the NTPRINT.INF file is corrupt. This is a misleading error, and actually pertains to a syntax error in this custom substitution file.
To assist users in making the necessary changes to a substitution file, Microsoft released a tool called the Printer Driver Redirection wizard, which is downloadable free from the Terminal Services Community Web site. The URL for this site is http://www.microsoft.com/windowsserver2003/community/centers/terminal/default.mspx
Both the Windows 2000 and 2003 communities point to the same home page. As you scroll down toward the bottom of this page, you see the link for the Printer Driver Redirection wizard. After downloading the file, simply extract it into a folder on your Terminal Server and double-click the TSPDRW.EXE executable. The redirection wizard will scan either a local or remote server for any existing event ID 1111 entries in the event log with the source “TermServDevices”. Once completed, it provides you with an option screen where you either choose an existing printer driver to use as a substitution or manually add a driver. Figure 17.19 shows this utility prompting for the choice of the installed driver to be used to substitute for the “hp deskjet 970c series” entry that was found.
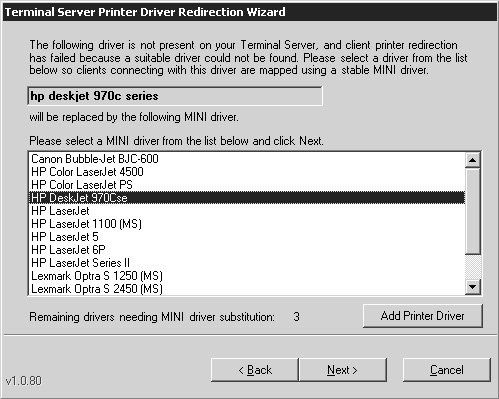
Figure 17.19. The Printer Driver Redirection wizard automates creation of the substitution file used to map printers with different printer driver names on their client and the MetaFrame server.
After choosing the appropriate file to create the substitution with, you can click Next and see the next driver found in the event log displayed. If you do not wish to create a substitution, you can select the (none) entry located at the bottom of the list.
Once the last driver is prompted, the tool displays a summary message stating what changes were made. On the very last screen you are provided with the name of the substitution file that was created or updated. The necessary registry entries to have MetaFrame read the contents of this file are also automatically set. If a reboot is required to complete the setup, you are prompted. If you say no, the updates are deferred until later.
TIP:
As I discussed in the “Printer Driver Management” section earlier in this chapter, whenever possible you should try to use matching driver versions on both the client and the server. While the substitution feature does allow some flexibility in the drivers used, certain features may not be supported if an older or nonmatching server driver is being substituted. If exact driver matches cannot be implemented, use a Windows-certified driver as close to the same make and model as possible.
The Terminal Server substitution feature pertains to only client printer redirection. Driver substitution entries are not used when printer mappings are initiated through the Add Printer wizard or a logon script.
WARNING:
When manually adding a printer using the Add Printer wizard, you may notice that under the list of local printer ports are a number of special ports with the prefix TSxxx, where xxx is a three-digit number as shown in Figure 17.20. As you might suspect, these ports are associated with redirected local ports for the listed computer name.

Although Windows will let you complete the action, it is highly recommended that you do not manually create a local printer associated with one of these printer ports. While doing so may appear to work properly, Microsoft does not support the configuration because of a couple of different issues that may arise. The first has to do with how these ports are cleared when a user logs off. Normally the Terminal Server will purge all redirected client ports when a user logs off, but because the server is not “aware” of these manually created ports, they will not be cleared and will remain on the server unless manually removed. Another side effect of this manual mapping is that print jobs that are sent to one client printer actually end up printing out on a different client printer, usually belonging to someone else.
While Terminal Server alone provides rather thorough printer support, there are some limitations that can become a factor in large-scale implementations. This is where MetaFrame Presentation Server’s advanced printer support features become a valuable addition to the implementation. In addition to supporting all the same printer options as Terminal Server alone, MPS supports the following:
Advanced printer driver management—. MetaFrame provides a centralized method of administering printer drivers on all servers in the Citrix server farm. The drivers need be installed on only one MetaFrame server, and then replication can be configured so all other servers in the farm receive these same drivers.
Advanced network printer share support—. In addition to the standard network printer support available with Terminal Server, MetaFrame expands on this functionality by providing the ability to auto-assign network printers listed in the server farm to MetaFrame users based on user account or domain group membership, providing an easier way to manage printers than through logon scripts.
Advanced local client printer support—. Much like the client printer support provided by Terminal Server, MetaFrame will also automatically redirect a client’s local printers so they are accessible from within a MetaFrame session. MetaFrame expands the support available for client-mapped printers by providing a number of customization features, including the ability to map printers using a set of universal printer drivers that can compensate for a missing or ill-behaved native driver for the printer when used on a MetaFrame server. MetaFrame also provides the ability to throttle the amount of bandwidth a client-mapped printer consumes in the ICA presentation services data stream between the server and the client.
Whether or not you’re implementing MetaFrame, you must still have a suitable printer driver available on the Terminal Server. The process of driver installation is exactly the same as described in the “Printer Driver Management” section, earlier in this chapter. What MetaFrame provides is an advanced mechanism for managing these printer drivers once they have been installed on the server. Figure 17.21 shows the Drivers tab for the Printer Management module in the MPS Management Console. The drivers shown on this tab are dependent on the server selected from the drop-down list. When (Any) is selected, as it is in this example, all the drivers installed on the servers across the farm are displayed. The drivers listed may not actually be installed on all servers; clicking an individual driver brings up, in the right-hand side of the window, a list of the servers on which the driver resides. Changes in status of a printer driver (added, removed, updated) are automatically communicated back to the data store and are visible in the Printer Management Drivers folder. Through printer driver replication, which I discuss in the next section, you can ensure that all the necessary drivers are available on all servers in the farm.
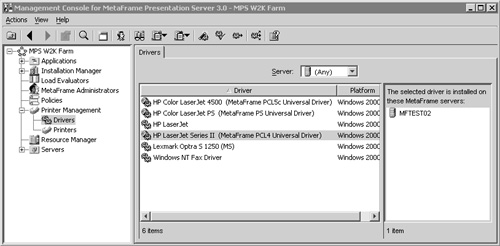
Three of the six drivers are Citrix universal printer drivers (UPDs) and allow client printers to be mapped that otherwise would fail due to driver compatibility issues. UPDs are discussed in more detail in the “Advanced Local Client Printer Support” section, later in this chapter.
Two types of printer driver replication are supported by MPS: replication between specific servers, and auto-replication of printer drivers between all servers in the farm running the same operating system platform.
Replication between specific servers running the same Windows platform is configured as follows:
From under the Printer Management module, click the Drivers object and then select the desired drivers from the right-hand pane.
Now right-click and then select Replicate Drivers. This opens the Replicate Driver dialog box, shown in Figure 17.22. From here you can choose to replicate to all servers and add to the auto-replication list, or you can choose the specific servers to replicate the driver(s) to.
Click OK to complete the replication setup and queue up the drivers for replication. As the replication completes, events are written to the target server’s system event log. Replication is performed on servers running the same platform operating system (Windows 2000 or 2003). Drivers are not replicated between different operating system versions.

Auto-replication of printer drivers to all available MetaFrame servers in the farm is configured as follows:
From under the Printer Management module, right-click the Drivers object and select the Auto-Replication option.
The Auto-Replication dialog box opens, and any drivers configured for replication are displayed. To add one or more drivers, click the Add button to open the driver selection dialog box (Figure 17.23).
Select the desired server from the drop-down list. This should be the server you arbitrarily designated as the main printer driver replication source. Do not use the default option of (Any). Once you select the specific server, the driver list changes to show only the drivers installed on that server.
Highlight the drivers you want to replicate and then click OK. The selected drivers are then added to the Auto-Replication dialog box. Once you click OK on this screen, the drivers are automatically queued for replication to all other servers running on the same platform operating system (Windows 2000 or Windows 2003). As replication completes, events are written to the target server’s system event log.

NOTE:
While printer driver replication can be a valuable administrative tool, care must be taken when replicating a large number of printer drivers across a large number of MetaFrame servers. The data store maintains information on all printer drivers when auto-replication is being used, which increases the size of the data store. During replication, the server acting as the source for driver replication may experience a high CPU load. This can negatively impact the computing experience of users who may have user sessions on this source server. A few options are available for reducing possible negative effects of driver replication:
Establish the MetaFrame server acting as the source server as a dedicated print replication server. By eliminating user logons, you can allocate resources to the replication effort without fear of impacting the production users. Establishing such a printer configuration is one example of when a MetaFrame print server may be appropriate for the environment.
Perform the replication when load on the farm is relatively light.
Use scheduled replication instead of auto-replication.
Implement the data store on a true DBMS database (SQL Server, Oracle, or DB2).
Performance of the replication itself is dictated by the size of the replication queue; this is the queue from which the printer drivers are pulled for replication. Citrix recommends that the queue itself not exceed 1,500 entries because beyond that, performance begins to degrade. At first glance this size seems more than sufficient, but considering how the queue size itself is calculated, this recommended cap could be quickly exceeded.
The queue size is easily calculated using the formula
QueueSize = (# printer drivers) × (# of servers)
So if you have 8 printers in your environment and want to replicate these to all 25 servers in your farm, the queue size will be 8 × 25, which calculates to 200. If the number of servers was much higher, say 50 servers and 20 printers, the queue length would be 1,000, which is much closer to the soft cap of 1,500.
The speed at which these entries are processed is a direct product of how busy the server is managing other tasks. Because the IMA service processes the queue entries with a low priority, if the server is busy with other things this process takes much longer. The number of servers that are the target of the driver replication also affects the replication speed. As the number of servers increases, the time it takes to replicate each driver to all servers also increases.
The QPRINTER utility can be used to help monitor and troubleshoot printer driver replication. The tool is located in the Supportdebug<OS Version> folder on the Windows MPS installation CD. The OS version is W2K3 for Windows Server 2003 and W2K for Windows 2000 Server.
Earlier in the “Managing Printer Shares Using Logon Scripts” section of this chapter I discussed use of logon scripts as a method for assigning network printers to users when logging on to a Terminal Server. MetaFrame compliments this functionality by letting you assign printers available in the server farm to any MetaFrame user based on their user ID or group membership. All available printers in the farm are listed under the Printers object in the Printer Management module of the MPS Management Console. Printers can be added to this list in one of two ways:
Printers shared directly off a MetaFrame server automatically appear in the printer list for the farm. Many people refer to these types of printers as “local printers,” since they are local to a MetaFrame server, but I’ve found that many users and administrators find this name misleading because the printer is actually local to only those users logged on to the MetaFrame server sharing the printer. I prefer to call this type of printer a “local server farm printer.”
If the printers reside on a print server not also a MetaFrame server, shared printers do not automatically appear in the farm printer list. These printers must be manually imported into the farm. This is done from within the Printer Management module, details of which are discussed in the next section.
Figure 17.24 shows a pair of printers listed in the 2K3FARM. The first printer, HPDJ970Cse, was imported from a print server that is not a MetaFrame server (or is a MetaFrame server in a different farm), while the second printer, MFLaserJet, was automatically added because it is currently being shared off the NEWTON server, which is running MetaFrame. Because the MFLaserJet printer is shared off a MetaFrame server, additional information about that printer is available within the Management Console.

Figure 17.24. How printers are added to the farm depends on whether or not they are shared off a MetaFrame server.
Regardless of how a printer is added, once it is visible within the server farm, it can be assigned to a group (or specific user) so that when a member of that group logs on to a MetaFrame server in the farm, the corresponding printers are auto-created and available for use. This provides the MetaFrame administrator with an alternative to using logon scripts for printer assignment. I describe how to configure this printer auto-creation in the next section of this chapter.
NOTE:
While sharing a printer directly off a MetaFrame server is a convenient way to make the printer available within the farm, doing so introduces additional overhead on the server that can impact any active client sessions.
One way Citrix recommends avoiding this is to dedicate a MetaFrame server solely as a print server. This configuration has the server running MetaFrame and sharing out one or more printers to the farm but not allowing any ICA or RDP user logons.
Manually importing printers from a non-MetaFrame print server is a straightforward exercise executed by right-clicking the Printer Management module in the Management Console and selecting Import Network Print Server. You are then prompted to provide the name of the print server. Do not include the double-backslash that normally would precede a Windows server name; instead, just enter the server name. You then need to provide the credentials necessary to allow the connection with the server to be established. Figure 17.25 shows an example.
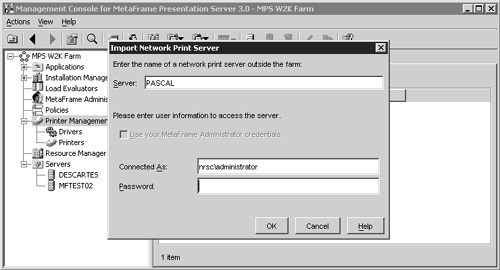
Figure 17.25. When importing printers from a print server, you must provide the server name and credentials for authentication.
Once the contents of the print server have been imported, the server appears on the Network Print Servers tab that is visible when you click the Printer Management module. The print server remains on this list indefinitely until manually discarded. If you add or remove specific printers from any of the listed print servers, you must manually update the printers in the data store by right-clicking the print server and selecting Update Network Print Server. You will need to provide valid credentials before the updated contents are read from the server. Once the printers from a print server have been imported, they appear in the Printers list alongside any printers shared off MetaFrame servers within the farm.
If at some point it is ever decided that printers from this print server are no longer required, they can all be removed simply by right-clicking on the print server and selecting Discard Network Print Server. The print server will be removed from the list and all associated printers under the Printers object will also immediately be removed.
With all the desired printers now listed in the server farm, you are ready to configure the network printer auto-creation so these network printers are automatically mapped to the appropriate users based on their user ID or group membership.
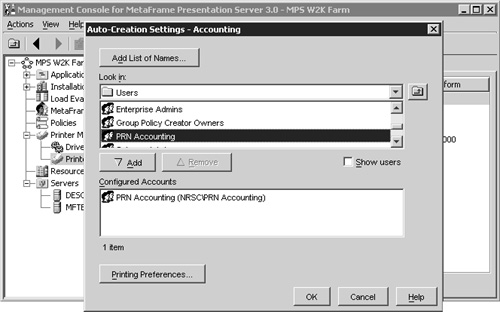
Printer auto-creation assignment is performed by right-clicking the desired printer listed in the Printers object and then selecting the Auto-Creation option. You are then presented with a dialog box where you are expected to select the desired user ID or group to be assigned to this printer when they log on to any MetaFrame server in the farm (see Figure 17.26). When a user who belongs to this group logs on to a MetaFrame server in the farm, they have their associated printers automatically mapped for them.
If you wish to assign the same groups to more than one printer, you can duplicate an existing auto-creation configuration from one printer onto another simply by right-clicking the printer you wish to replicate and selecting Copy Auto-Creation Settings. You can then select one or more printers from the list and click OK. The auto-creation settings are automatically replicated for the selected items.
One configuration option exists that dictates whether or not a user can maintain personal configuration settings from one session to the next for an auto-created network printer. By default, a user can modify the settings for an auto-created network printer and have those settings persist from session to session. The option can be found by right-clicking the Printer Management icon and selecting Properties from the Context menu. From the Properties dialog box, select the Printers settings. You see the auto-created network printers setting at the bottom of the dialog box. I describe the settings that pertain to auto-created client printers in the next section.
Now that we’ve examined the advanced features MetaFrame provides for managing network-mapped printers in your environment, we look more closely at the features MetaFrame provides to enhance support for client-printer redirection.
Some of the key requirements that Terminal Services and MetaFrame have in common with regards to redirection of local client printers are
A suitable printer driver is required to exist on the MetaFrame/Terminal Server.
Printer driver selection is determined by comparing the full printer driver name on the client with the corresponding printer driver name for the server.
Any mismatches in driver name, or no driver being found, result in the client printer mapping silently failing.
MetaFrame attempts to offset some of the time required to support printers in your environment by including advanced support and management options specifically for client printer mappings, including the following:
Complete centralized management of the drivers and printers pertaining to client printer redirection, including enabling or disabling of drive-mapping support.
Support for a universal printer driver (UPD) that can be configured to be used if a suitable native driver match cannot be found.
In this final section of the chapter, I look at the options pertaining to MetaFrame’s client printer mapping support and how they are configured. Most of the options pertaining to local client printer redirection on MetaFrame are managed from the Printer Management Properties dialog box, as shown in Figure 17.27.
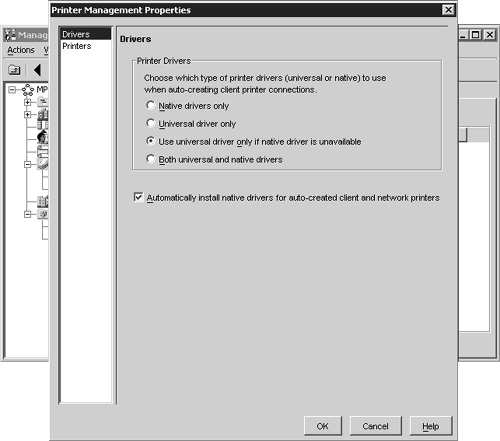
Figure 17.27. The Printer Management Properties dialog box contains most of the settings specific to client-printer mapping.
The first group of printer management options available pertains directly to the logic employed by MetaFrame when attempting to establish a printer driver match between the client and the server. There are four options available:
Native drivers only—. The available universal printer drivers (UPDs) are never used; if a driver is not found that matches the client’s driver, the mapping is never established.
Universal driver only—. Regardless of whether or not a native driver exists, a suitable UPD is used instead.
Use universal driver only if native driver is unavailable (Default option)—. The UPD for a printer is used only if the corresponding native driver cannot be found.
Both universal and native drivers—. A printer queue is created for both types of drivers. Even if a native driver exists, a universal printer driver is also created.
The default option of using the native driver and falling back on the UPD only if the native driver is not found is a suitable configuration under most circumstances, but there may be certain situations where you want to support only the native drivers. In this case, you need to modify the default printer driver action.
When the option “Automatically install native drivers for auto-created client and network printers” is enabled, the MetaFrame server automatically installs the signed drivers provided by Microsoft if they are not already available when a user attempts to establish a client-mapped or network-mapped printer. This option installs only the native drivers that ship with Windows; it cannot be used to install custom third-party drivers. Third-party drivers must still be installed manually and then replicated. Because the printer drivers being installed have been digitally signed by Microsoft, they are certified to work not only with Windows but also with Windows Terminal Services. I prefer not to enable this option, in order to maintain control over exactly what drivers are available on the MetaFrame servers.
Under certain situations you may want to control the printer drivers that are used to support client printers. You may wish to limit your MetaFrame environment to use only a specific set of printer drivers, or maybe you are having issues with only one particular printer driver and want to ensure that it is never loaded into your MetaFrame environment.
The drivers used by client printers are managed using the Printer Driver Compatibility tool, which is accessed by right-clicking on the Drivers object and selecting Compatibility from the context menu. This opens the Driver Compatibility dialog box shown in Figure 17.28.
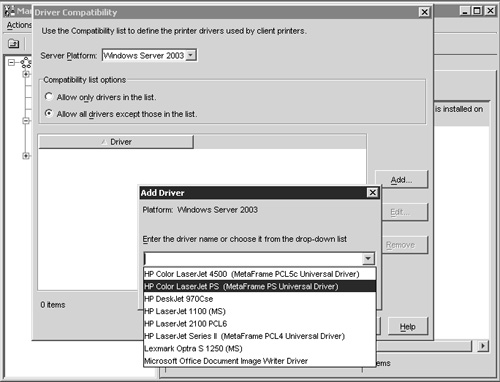
Figure 17.28. The Driver Compatibility dialog box allows you to control what printer drivers are used by client-mapped printers.
The default behavior of MetaFrame is to allow all printer drivers to be used except for any that are added on this screen. You can add the drivers to exclude simply by clicking the Add button and either typing in the driver name, which must match exactly, or selecting the driver from the listbox.
You can also configure MetaFrame so that all drivers are disallowed, except for those that are explicitly added to this list.
Many people have asked why they should even bother with managing installation and replication of printer drives now that MetaFrame supports the different universal printer drivers (UPDs). Why not use the UPD for all client-mapped printing? While certainly the UPD helps ensure that most client-based printers are accessible through a MetaFrame session, there are some limitations to this approach.
The universal drivers by nature must be based on a generic printer driver that is most likely to be compatible with most of printers available. Citrix has deployed three flavors of its UPD, one for PCL5c based on the HP Color LaserJet 4500 driver, a PCL4 driver based on the HP LaserJet Series II, and a PostScript (PS) driver based on the HP Color LaserJet PS. While these drivers meet most basic printing requirements, they may not be able to access certain special features available with a printer; for example, special paper trays, output bins, and collating or duplex options.
I prefer to try to implement the true printer driver for any work-based client printers that must be mapped and relegate the generic universal drivers to support of any other client printers that may need to be supported. Home and home-office printers will fall into this category, since many are targeted specifically for the home user, and reliable, stable server-grade printer drivers may not be readily available.
If you click the Printers selection on the left-hand side of the Printer Management Properties dialog box, the options specific to configuring auto-created client printers are displayed (Figure 17.29).
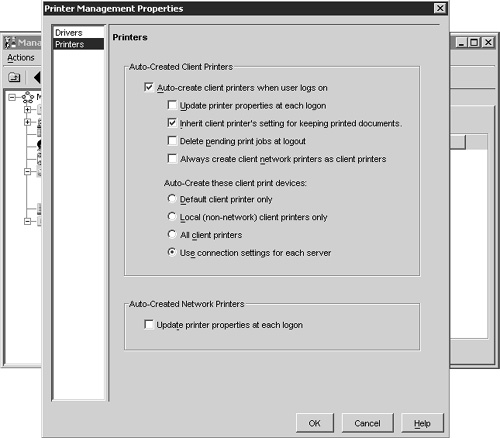
Figure 17.29. The Auto-Created Client Printer settings for the Printer Management Properties dialog box.
From this screen you can centrally manage the state of client printer redirection for the server farm. The default options are suitable under most circumstances, except that you may want to change the “Auto-create these client print devices:” setting from reading the individual connection settings on each server to following a single configuration option. The function of each property is described in Table 17.2.
Table 17.2. Auto-Created Client Printer Settings
Description | |
|---|---|
Auto-create client printers when user logs on. | Controls whether client printers are mapped globally on all servers in the farm. If it is disabled here, it will be disabled on all servers in the farm. |
Update printer properties at each logon. | Disabled by default, this option controls whether setting changes to be made on the local client’s printer are applied to the client-mapped printer on the MetaFrame server at each logon. When disabled, changes made to the properties of the client-mapped printer within the MetaFrame session are retained and can differ from the settings on the client. If you want to retain the server-side settings, do not enable this option. |
Inherit client printer’s settings for keeping printed documents. | Enabled by default, this option dictates whether the client-side setting for retaining printed documents in the print queue is applied to the server-side printer as well. A kept document is retained in the print queue and not deleted once the print has completed. This setting can consume a large amount of disk space on the boot/system drive of the server, as all job files are retained in the %SystemRoot%System32SpoolPrinters folder. |
Delete pending print jobs at logout. | Normally if there are pending print jobs and a user logs off, the print queue is retained on the server and the jobs held until the printing has completed. When this option is enabled, the pending jobs are deleted without being printed and the client printer queue is removed. |
Always create client network printers as client printers. | By default, if the client-mapped printer is a network printer and that printer is directly accessible by the MetaFrame server, the print jobs are sent directly from the MetaFrame server to the network printer, bypassing the client-side print queue. This results in faster printing of network printer–bound print jobs. This configuration results in degraded performance if the printer resides across a WAN link, in which case the full job is being sent across the WAN, consuming additional bandwidth. If this is the configuration for most of the farm users, this option should be enabled. When this option is enabled, the print job is always sent through the client device. This results in slightly slower printing but consumes less network resources because the client-server communications utilize the ICA protocol and data compression. |
Auto-create these client print devices. | You can choose one of the four listed options, which dictate for all servers in the farm what type of client-side print devices are auto-created. The available choices are
Within a farm I prefer to manage the client printer settings centrally from here instead of allowing the individual settings on each client to be utilized. This ensures a consistent configuration across all servers in the farm. |
Auto-Created Network Printers: Update printer properties at each logon. | This option pertains to any auto-created network printers, which were discussed in the “Network Printer Auto-Creation” section of this chapter. When this option is enabled, the printer settings that a user may define for an auto-created network printer are replaced every time they log back on. This option may be enabled if you want to ensure that a printer maintains a consistent configuration and do not want your users to be able to modify this configuration. |
Earlier in the chapter, in the “Driver Naming Requirements and Alternate Name Matching” section, I explained that when a client printer is being mapped in a Terminal Server session, the printer driver name on the client is compared to the driver name on the server. If they do not match exactly, the mapping is not generated. MetaFrame provides a graphical interface directly within the Management Console where any necessary substitution entries can be added without having to make registry changes or modify text files. The specific dialog box is opened by right-clicking the Drivers object and then selecting Mapping from the Context menu. The Driver Mapping dialog box opens, listing all the existing mappings that have been created. A new substitution is added by clicking the Add button. The dialog box shown in Figure 17.30 appears. In the upper portion, enter the full client driver name exactly as it appears. The spacing and capitalization must match exactly, or the substitution will not function properly. For the server driver, you can either manually type in the name or select the name of an installed printer driver from the drop-down list box.

Figure 17.30. When you enter a mapping, enter the client-side drive name exactly as it appears on the client.
Once the information has been entered, click OK to save the changes. The information then appears in the Driver Mapping dialog box (Figure 17.31). Once entered, this information is applied to all servers in the farm. In this example, when a client provides the server with the driver name “hp deskjet 970c series”, the client queue is created but the driver “HP DeskJet 970Cse” is used instead.

The final note to mention has to do with the naming convention used by MetaFrame for client-mapped printers. This was discussed in Chapter 8, but I review it quickly here. When mapped, a MetaFrame client-mapped printer has the following naming:
Client<Client name>#<Printer Name>
where “Client” is a constant used to show that the mapping is a client printer. “Client name” is the name assigned to the client device during installation of MetaFrame. And finally, the printer name corresponds to the full printer name on the client device.
For example, if I have a local printer called “HP LaserJet”, and I log on to a MetaFrame server configured to support this client mapping, I would expect to have a client printer mapping with the following name:
ClientTODDPCHP LaserJet
where “TODDPC” is my client name. Similarly, if I had a network-mapped printer on my local PC with the mapping of
\PrintServHP DeskJet 970C Series
then when I next logged on to the MetaFrame server, my client name should automatically become
ClientTODDPC\PrintServHP DeskJet 970C Series
The extra backslashes in the name are not a concern because they are ignored and have no effect on actually attempting to print to that client-mapped printer.
When clients are connecting to a MetaFrame server over a limited bandwidth connection, the amount of bandwidth consumed by client printer jobs can directly impact the user’s computing experience. To the end-user the impact manifests itself as sluggish screen updates and slow system response to keyboard and mouse input. In order to counteract this problem, Citrix provides the ability within MetaFrame to dictate the maximum bandwidth that all client print jobs on a server can utilize. This setting is accessed by clicking on the Printer Management icon in the Management Console and then selecting the Bandwidth tab as shown in Figure 17.32.

Figure 17.32. The bandwidth available for client printing can be set from within the Printer Management module.
By default all servers in the farm are automatically assigned no limit on the bandwidth that is consumed by client-mapped print jobs. A limit on bandwidth is set by right-clicking on the desired server and selecting Edit. A dialog box will then open allowing you to choose Unlimited or to set a limit by specifying a value in Kilobits per second (Kbps). This value has the following characteristics:
The setting dictates the maximum bandwidth for print jobs only for the given server. If you have 10 servers in your farm you will need to define a maximum bandwidth on all MetaFrame servers that will allow connections over the link you’re trying to manage.
The bandwidth value represents the maximum bandwidth available per ICA connection on the MetaFrame server. So if you have 20 connections and a maximum bandwidth of 5Kbps, then 100Kbps of total bandwidth would be consumed on the server.
The setting defined here is server-wide and affects all client connections. If you wish to manage client printing bandwidth for only certain users then create a MetaFrame policy specific to those users and set the client printing bandwidth within that policy. MetaFrame policies are discussed in Chapter 14, “MetaFrame Presentation Server Configuration.”
In order to determine the per-connection client printing bandwidth you need to know how much available bandwidth there is over the link and then divide that by the total number of concurrent users that are operating across that link. Using this simple formula you can establish an initial estimate that you can then adjust up or down as necessary to maximize the configuration for your environment.
PrinterBandwidth = (Total bandwidth available – Total bandwidth utilized) / Total concurrent users
The specific parameters are
Total bandwidth available—. This is the total bandwidth for the network link. For example 1.54Mb for a T1 connection.
Total bandwidth utilized—. This is the total bandwidth that is being consumed. This value can be estimated or based on data gathered using network monitoring tools. An average over a few days will give a more accurate estimate of usage over time.
Total concurrent users—. The total number of concurrent user connections across all MetaFrame servers that need to be managed.
With this information you can generate some numbers that will give a starting point. For example, say I have a T1 connection (1540 Kb), a total bandwidth utilization of 80% or around 1232Kb, and 45 concurrent users that must access that link. The formula would generate a result of around 6.8Kb per connection. This means that you would then enter the value of 7Kb for the bandwidth limit. You can enter only integer values, so I have simply rounded the number 6.8Kb up to 7Kb.
I would recommend that after entering this value you monitor the network to see if the change has reduced the network load. With this information you can increase or decrease the value as necessary to fine-tune your environment.
When in doubt about the bandwidth available, you can simply start off by setting the value to 5Kbps and then slowly adjusting the value upwards until a noticeable degradation in performance occurs. At this point you will know that you have reached that threshold and need to throttle back a little.
NOTE:
One important point to remember is that these limits on bandwidth apply only to client-mapped printers. This is because these print jobs are sent through a virtual channel in the ICA protocol, which can be directly managed by MetaFrame.
Print jobs sent to standard network-based printers are not throttled by this bandwidth setting, including client network printers that are being directly access via the network and are not being treated as client printers. This behavior is managed from within the Printer Management properties, which were discussed in the “Auto-Created Client Printer Settings” section in this chapter.