With the introduction of Active Directory in Windows 2000, Microsoft provided an advanced policies implementation known as Group Policy. Although it is conceptually similar to the policy features originally available in Windows NT, Group Policy provides a much more robust and centralized way of managing Windows policies. Without a proper understanding of Windows Active Directory and Group Policy management, a Terminal Server administrator is greatly handicapped in his or her ability to successfully implement and effectively manage the production environment. It is important to have a clear understanding of the role policies play in configuration of your Terminal Server environment.
While a profile (which I discuss in Chapter 18, “User Profile and Account Configuration”) is used to store the desktop and application settings for a user, it doesn’t provide a mechanism for controlling which features are actually available to the user. This is where policies come in. Policies are used to control the features and restrictions for one or more users. For example, a policy may be implemented that removes the Shutdown option from the Start menu and replaces it with the Log Off option for all non-administrative users. A policy may also be used to redirect a user’s My Documents folder to an alternate location on the network instead of storing it locally on the Terminal Server.
Policies are not simply about imposing restrictions but, more importantly, they provide a means to easily configure a Windows environment to function exactly as required, simplifying the user’s workspace and allowing users to more easily focus on their designated tasks. Profiles and policies work together to provide the optimum environment in which your Terminal Server users will work.
WARNING:
If you intend to implement policies, review the entire contents of this chapter before beginning your implementation. Unless implemented properly, a policy you create may affect a user’s settings not only when the user is logged on to a Terminal Server but also when he or she is logged on to any other Windows desktop or server. Certain improperly applied policies can also effectively lock an administrator out of certain areas of a system.
Before getting into the details of how to create and manage policies, there is some preparation work to be done in order to maximize the effectiveness and organization of your policy implementation.
Probably the best place to start is by summarizing the tools that can be used to manage and support the group policy objects (GPO) in the domain. A number of tools are provided by Microsoft for managing, monitoring, and troubleshooting group policies in an active directory; they are summarized here:
Group Policy Object Editor—. In Windows 2000 this tool was known simply as the Group Policy Console, and while the name has changed, the basic functionality remains. This Microsoft Management Console (MMC) snap-in is the tool commonly used to actually update the individual policies in a GPO. This tool is available on all Windows 2000 and Windows 2003 installations. It is accessed directly from a command prompt by running the command GPEDIT.MSC. When launched in this fashion, it automatically opens the Local Computer Policy for the computer upon which it is run. Both the Active Directory Users and Computers tool and the Group Policy Management Console tool launch this snap-in when an administrator edits a group policy object.
Active Directory Users and Computers—. This is the primary tool for managing all objects in an active directory (AD) and was the main tool for creation and management of GPOs in Windows 2000 Active Directory. Active Directory Users and Computers is one of the tools I use when demonstrating creation and editing of GPOs in this chapter. This tool is available for both Windows 2000 and Windows 2003 and is installed by default on a domain controller. It can be launched from a command prompt by executing DSA.MSC.
While the Group Policy Management Console tool, which I discuss in the “Creating and Managing Group Policies” section of this chapter, lets you create organizational units (OUs), you cannot use that tool to modify OU membership. Active Directory Users and Computers is still the primary tool for managing OU membership.
Group Policy Result—. This is a command line tool provided with the Windows 2000 Server Resource Kit or available for download directly from the Microsoft Web site. This tool will generate a summary of the group policies in effect for both the user who runs the tool and the computer upon which the tool is executed. Group Policy Result was created to assist in troubleshooting issues with application of group policies. While this tool will run on Windows Server 2003, its functionality has been superceded by the new Group Policy Management Console.
Group Policy Management Console—. With the release of Windows Server 2003, Microsoft made available a new unified tool for managing GPOs, the Group Policy Management Console (GPMC). The GPMC is downloadable from Microsoft (details of which I discuss in the “Installing the Group Policy Management Console” section) and can be used to manage group policies in both Windows 2000 and 2003 Active Directory domains. GPMC will run only on Windows XP Professional or Windows Server 2003; it will not run on any earlier version of Windows. If you wish to use it to manage a Windows 2000 domain, you must have a computer in the domain running XP or 2003.
Resultant Set of Policy—. Another Windows 2003 tool, Resultant Set of Policy (RSoP) provides an administrator with the ability to determine the cumulative effects of multiple GPOs on any user or computer. It also generates information on how modifications to GPOs in a domain can impact objects in the network. Much of the basic functionality found in RSoP has also been integrated into the Group Policy Management Console, and this is the access method that Microsoft recommends for administrators. The RSoP utility can be launched from directly within the GPMC tool if advanced information is desired after reviewing the basic report.
When discussing management of policies in this chapter, I demonstrate the corresponding configuration option using both the Active Directory Users and Computers tool and the Group Policy Management Console tool. Because of the robust and centralized support provided by GPMC, I recommend use of this tool whenever you’re implementing a Windows 2003 Active Directory or if you’re implementing a Windows 2000 Active Directory and have access to either a Windows XP Professional desktop or Windows Server 2003 machine.
The first task to perform when preparing to configure GPOs in your environment is to download and install Group Policy Management Console. This tool is an invaluable aid for an administrator responsible for configuring and managing group policies in an Active Directory domain. I use this tool, along with Active Directory Users and Computers (ADUC), to demonstrate how to create and manage group policies in your Terminal Server/MetaFrame implementation.
TIP:
Once you have installed GPMC on a server, group policies can no longer be managed using ADUC from that server. If the GPMC is uninstalled, GPO functionality is immediately reinstated to the ADUC tool.
The Group Policy in the Windows Server 2003 home page is an excellent resource for finding information on group policies in Windows 2003 Server, as well as accessing the link to download GPMC. The URL for that page is
From this page you will find the link “Download the Group Policy Management Console” with Service Pack 1. After clicking this hyperlink, you are taken to the main download page where you can download GPMC. Save the MSI installation file into a convenient location on your network where it will be accessible from the machines on which you will install this tool.
After logging on to the server where you will install GPMC, locate the file you downloaded and double-click it to launch the installer. The installation is straightforward. After you agree to the license agreement, the snap-in is installed and a new shortcut entitled Group Policy Management appears under Administrative Tools on the Start menu. Before you can begin to use this tool, you need to ensure that you are logged on to the host computer using a domain account.
NOTE:
When installing GPMC into an environment, I always add it to all the domain controllers. This is because most administrators establish a remote desktop session with a domain controller when they want to perform a domain configuration task such as managing group policies. Even if most administrators run this tool locally, it is a good practice to have it available on all domain controllers in case there is an issue and this is the only mechanism available for running the tool.
If you have not already done so, you should create the base Terminal Server domain security groups that I discussed in Chapter 8, “Server Installation and Management Planning.” In that chapter I discussed creation of these local security groups and the role they play in managing the file, registry, and connection security. Besides security, which I discuss further in Chapter 16, “Terminal Server Security,” domain groups also play a key role in implementation of policies, as you will soon see. Table 15.1 describes the domain security groups I use in the examples in this chapter.
Table 15.1. Terminal Server Domain Security Groups
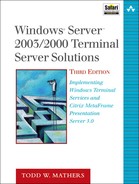
In an active directory, you’ll need an organizational unit structure to which you can apply the desired group policies. Figure 15.1 shows the OU configuration I use to demonstrate creation and use of group policies in this chapter. This configuration allows assignment of group policies specific to Terminal Servers, without affecting other Windows servers.
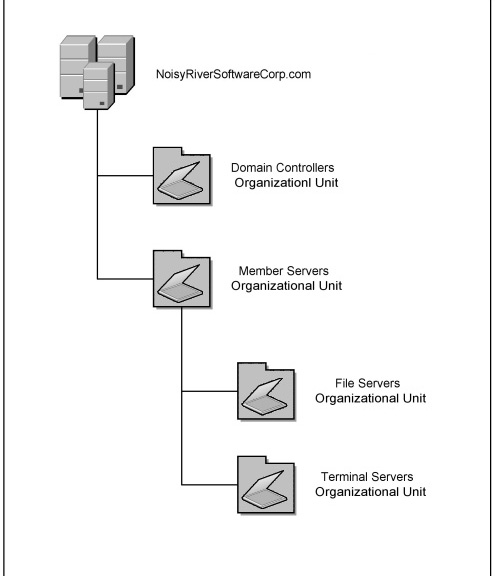
Each group policy definition created is made up of two components, computer configuration and user configuration, and can be applied to objects contained in a site, domain, or organizational unit. Figure 15.2 shows an example of the User Configuration options available within a group policy from within the Group Policy Object Editor.
Policies implemented higher in the Active Directory tree apply to all objects situated lower in the tree unless special override features have been put in place. For example, in Figure 15.3, if a policy is applied to the Member Servers OU, it affects all objects underneath it, including those within the Terminal Servers OU. On the other hand, if a policy is applied for the Terminal Servers OU, it applies only to the server objects contained within it and to no other objects within the active directory. A group policy applied to a child OU does not affect any objects “higher up” than itself (at the parent OU’s level or higher).
Figure 15.3. Policies applied to a parent OU are automatically applied to any child OU unless explicitly overridden.
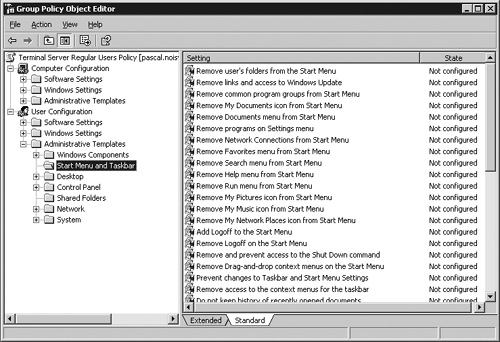
Figure 15.4 demonstrates how the same OU hierarchy configured using Active Directory Users and Computers (Figure 15.3) would appear from within Group Policy Management Console.
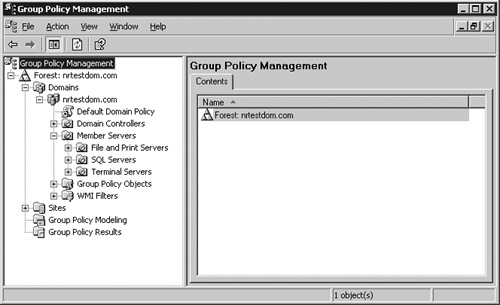
Figure 15.4. Once the OU structure is created, policies can be defined using GPMC running on Windows 2003 Server or a Windows XP Professional desktop.
All the policies I discuss in this chapter will be applied to the Terminal Servers OU and not any of the parent OUs in the tree. The main reason for this is that the policies are configured in such a way as to affect users only when they log on to a Terminal Server that is a member of this OU. When users log on to any other server, including Terminal Servers located in other OUs, these policies do not apply.
When configuring group policies for a Terminal Server environment, I suggest that you perform the following tasks in the order shown.
Begin by creating a “Terminal Server” organizational unit into which you will place all your Terminal Server computer objects. This is the container against which you will apply all the desired Terminal Server–specific policies.
Create the server-specific policies that will dictate configuration of the Terminal Server itself. Some server-specific settings include things such as clearing the pagefile during shutdown, deleting cached copies of user profiles, or setting the refresh interval for applied policies.
Next, define the default policies that will apply to all users who log on to the Terminal Server, regardless of whether they are an administrator or a regular Terminal Server user. Policies that apply to all users include ones such as removing the shutdown command from the Start menu or defining an alternate location for the My Documents folder.
Next is creation of the user-specific policies. These policies are applied to users based on their group membership. You may define different policies here for administrators, server operators, helpdesk support staff, and regular Terminal Server users. User-specific policies typically dictate what Windows features and functionality are available to the users.
Once all the desired policies have been defined, the final step is to ensure that the proper priorities have been set so these policies are applied in the desired order.
In the next few sections of this chapter I focus on looking at each of the preceding steps in more detail.
Earlier in the “Terminal Server Organizational Units” section I discussed the OU that would be used to demonstrate creation of group policies (refer to Figure 15.1). The Member Servers OU is created by opening the Active Directory Users and Computers Microsoft Management Console (MMC) snap-in. This snap-in can always be found on any Windows 2000 or 2003 domain controller under Administrative Tools on the Start menu.
TIP:
You can also load this tool onto a member server or Windows desktop by installing the AdminPak.msi file found on the Windows installation CD. This will add the Administrative Tools folder to the Start menu on the computer where it is installed. You can download the AdminPak for Windows Server 2003 from the Microsoft Web site. The Windows Server 2003 administrative tools will run only on a Windows 2003 Server or Windows XP Professional with Service Pack 1 or higher.
Once you have Active Directory Users and Computers running, you can simply right-click the domain and then select New and Organizational Unit from the Context menu. Similarly, you can create the Terminal Servers OU by right-clicking the new Member Servers OU, selecting New, and then selecting Organizational Unit.
The first policy you create will be the Terminal Server Machine Policy, which will contain only those settings that directly affect the Terminal Server and, as a result, any users who log on to that server. No user-specific policies should be defined in this group policy. While technically there is no reason for avoiding this, from an administrative standpoint, differentiating server policies from user policies helps maintain some structure to the configuration. A poorly structured group policy implementation can quickly become overwhelming for an administrator.
The base Terminal Server Machine Policy is created as follows.
In a Windows 2000 domain in which you will not be running GPMC, you can use ADUC to manage your group policies. If you’re using GPMC, skip ahead to the “Creating the Terminal Server Machine Policy Using Group Policy Management Console” section.
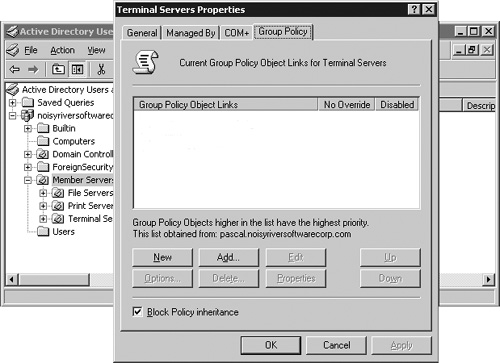
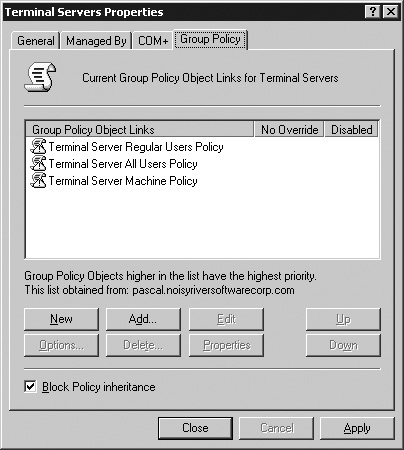
Launch the Active Directory Users and Computers MMC snap-in and drill down into the Terminal Servers OU. Right-click the OU and select Properties to open the Terminal Servers Properties dialog box.
Click the Group Policy tab (see Figure 15.5). This tab is available only if you have not installed GPMC on this computer. Here, you’ll manage the group policies for all Terminal Servers in your environment. You now have three options:
Create a new group policy object (GPO).
Add an existing GPO that may be linked to another site, domain, or OU.
Enable the Block Policy inheritance option. This will prevent policies defined in parent objects from affecting objects in this OU, unless an override option has been enabled that forces these changes to occur. I normally enable this option, as it prevents policies that may not have been configured explicitly for Terminal Server from being applied accidentally.
Click the New button to create a new policy. Its name is automatically added to the GPO link list. Right-click the object, select Rename, and then change the name to “Terminal Server Machine Policy.”
With the Terminal Server Machine Policy highlighted, click the Properties button. The general properties for this policy are set in the resulting dialog box. There are three tabs of information for a Windows 2000 Server, and four tabs of information for a Windows Server 2003 server:
The General tab provides a summary of the policy’s creation and modification history and lets you disable the Computer or User settings. Because this will be the Terminal Server Machine Policy, click the Disable User Configuration Settings option (see Figure 15.6). This helps speed up application of the policy on a server by skipping all the user settings.
The Links tab shows which other sites, domains, or OUs are using this policy. Because the policy in this example is new, only the current OU has this policy assigned.
The WMI Filter tab (Windows 2003 only) lets an administrator define a WMI filter used to control whether a GPO is applied or not. The filter contains one or more scripts that must evaluate to TRUE in order for all settings in the GPO to be applied to the target machine. The Windows Server 2003 Deployment Kit available on the Microsoft Web site provides more detailed information on use of WMI filters and how they can be applied. WMI filters can be very slow to process, and because they are processed each time a group policy is applied, this can impact the time required for a user to log on. Under most circumstances you will not need to worry about utilizing WMI filters for your Terminal Server implementation.
On the Security tab, you define who can access, manage, and apply these policies. This includes the Terminal Server computers themselves; unless they’re authorized to apply a policy, the policy won’t be applied to the server.
Figure 15.7 shows the adjusted list of user permissions I’ve set for this example. My list includes only three user permissions: Terminal Server Administrators, authorized to manage the policy; Authenticated Users, which ensures that all servers in the OU are able to apply the given policies; and the SYSTEM account. Before changing your security, make sure that you’re a member of the Terminal Server Administrators group, or you’ll end up locking yourself out of the policy as soon as you close the dialog box. Table 15.2 shows the permissions that should be assigned to each of these groups.
WARNING:
Make certain that you are a member of the Terminal Server Administrators group before you close the Security dialog box. If you are not a member of this group, you’ll immediately lock yourself out of the policy as soon as you close the window.
NOTE:
You will notice in Table 15.2 that the Terminal Servers Administrators group has not been assigned the Apply Group Policy permission. When this permission is set to Allow for a user, any user group policies that have been defined are applied to the user. The Apply Group Policy permission need only be enabled in one of the groups that a user belongs to for the policy to be applied. For the Terminal Server Machine Policy this is not a concern, since only computer configuration settings are being applied. But if this policy also included user configuration options and I wanted to ensure that a member of the Terminal Server Administrators group would not have the policy applied, I would explicitly set the Apply Group Policy privilege to Deny. This is necessary because a member of the Administrators group is also a member of the Authenticated Users group, which does have this permission set and so would have the policy applied. Remember that Deny overrides any other permission setting from a different group.
With the permissions configured, you can now set the actual policy options. After closing the Properties dialog box, you return to the Group Policy tab in the Terminal Servers Properties dialog box. Now highlight the Terminal Server Machine Policy that you just created and click the Edit button. The Group Policy Object Editor window opens.


The Group Policy Object Editor is used for both ADUC and GPMC. See the later section entitled “Configuring the Terminal Server Machine Policy Using Group Policy Object Editor” for details on configuring this policy.
If you’re using GPMC, creating the Terminal Server Machine Policy is slightly different from how it would be when using ADUC.
Begin by launching the Group Policy Management Console application from under Administrative Tools on the Start menu. Drill down into the desired domain until you locate the Terminal Servers OU you created earlier. Right-click this OU and select Create and Link a GPO Here. Immediately a dialog box opens, prompting you to provide a name for this new GPO.
Enter the name “Terminal Server Machine Policy” and click OK. The GPO is immediately created and appears in the right-hand pane, as shown in Figure 15.8. It also appears as a child object to the Terminal Servers OU in the left-hand pane.
When a new GPO is created, it is not limited to being accessible by only our Terminal Servers OU. In fact the GPO is defined globally for the entire domain but linked to only our Terminal Servers OU. The GPO is applied nowhere in the domain except against objects in the Terminal Servers OU. If you expand the Group Policy Objects folder located immediately below our Terminal Servers OU folder (you can see this in Figure 15.8), you see our newly created GPO listed.
From under the Terminal Servers OU click the newly created policy. Because you are clicking a link to the GPO and not clicking the actual GPO itself, you will likely see a dialog box appear warning you that any changes you make to this GPO will immediately apply to all other instances where it has been linked. Click OK to proceed. You immediately see the contents of the right-hand pane change to reflect the properties for this policy, as shown in Figure 15.9.
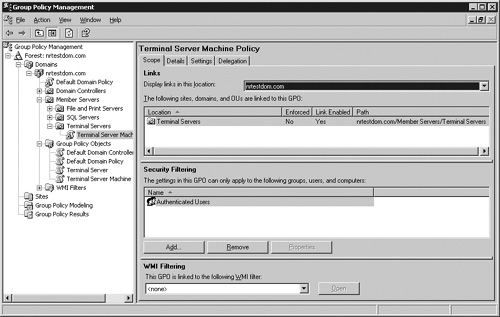
The first tab, which is labeled Scope, provides a summary of the following information:
Links—. Lists where in the domain or forest this GPO is linked. For our purposes, this GPO will likely ever link to only the Terminal Servers OU.
Security Filtering—. Lists all the objects in the domain to which this policy will be applied. For an object to have this policy apply, it must first be a member of the OU. When actually applying GPOs, Windows looks to the security filter to see if the object in the OU fits the criteria for having this policy apply. For the Terminal Server Machine Policy you can leave this filter defaulting to Authenticated Users. Computers in the domain automatically fall into the Authenticated Users category, and we’re going to have machines as members of only this OU.
Another option is to create an alternate group in the domain called Terminal Servers, for example, add all your Terminal Server computer objects to this security group, and then replace Authenticated Users in the security filter with that Terminal Servers group.
WMI Filtering—. Lists the WMI filter to which this GPO is applied. A WMI filter must already have been defined before it can be selected. A WMI filter can be used to control whether a GPO is applied or not. The filter contains one or more scripts that must evaluate to TRUE in order for all settings in the GPO to be applied to the objects listed in the security filter. The Windows Server 2003 Deployment Kit, available on the Microsoft Web site, provides more detailed information on use of WMI filters and how they can be applied. WMI filters can be very slow to process, and because they are processed each time a Group Policy is applied, this can impact the time required for a user to log on. Under most circumstances you will not need to worry about utilizing WMI filters for your Terminal Server implementation.
The second tab is labeled Details (see Figure 15.10); it provides a summary of the policy’s creation and modification history and lets you select whether to disable the Computer or User settings or enable/disable the entire policy. Because this is going to be the Terminal Server Machine Policy, click the GPO Status drop-down list box and select User Configuration Settings Disabled. This helps speed up application of the policy on a server by skipping all the user settings.

Figure 15.10. The Details tab provides a summary of the group policy and lets you disable sections of the policy that will not be applied.
The third tab is called Settings and automatically generates an HTML report that shows what settings within the policy have been defined. This is a powerful administrative tool that we review later in this chapter when I demonstrate how it appears once a number of policies have been defined.
The fourth and final tab is Delegation. This is where you will set who has access to manage this group policy. Any objects defined under Security Filtering on the Scope tab will appear here with a note appended stating that this permission is coming from a setup done on the Scope tab. Figure 15.11 shows the default delegation permissions for a GPO. You can see how the Authenticated Users entry came from the Scope tab, while the other settings are delegation entries setting who can actually manage the GPO. Depending on the requirements of the organization, you may want to restrict who can manage this GPO. Let’s assume that only Terminal Server Administrators will manage this GPO. Click the Add button and then enter the group name when prompted. You are prompted to choose the permissions to assign. Click the drop-down list box and select Edit Settings, Delete, Modify Security and then click OK. The group should be added to the list with the appropriate permissions. If you’re not going to let any other users modify this GPO, remove them from the list.

Figure 15.11. The GPMC tool does a nice job of separating delegation permissions from application permissions (security filtering), providing an intuitive interface for management.
Make certain that you belong to the Terminal Server Administrators group, or you will immediately lock yourself out of the GPO when you modify the permissions.
Now that the properties for the GPO have been set, the next task is to actually configure the appropriate policy options. Open the Group Policy Object Editor by right-clicking the Terminal Server Machine Policy folder in the left-hand pane and selecting Edit from the Context menu.
The Group Policy Object Editor is used by both ADUC and GPMC when actually editing the policy. Details on this are provided in the next section, entitled “Configuring the Terminal Server Machine Policy Using Group Policy Object Editor.”
A window similar to the one shown in Figure 15.12 appears when you begin to edit the Terminal Server Machine Policy. The first Terminal Server policy that must be created is required so any user configuration settings defined in other Terminal Server policies are applied to the users when they log on to one of the Terminal Servers located in the Terminal Servers OU. Normally when a group policy is created for an OU containing only computers (no user groups or accounts), only the computer configuration settings are applied to these machines, and any user configuration settings that are defined are simply ignored. User-related policy settings normally come from the OUs containing those user accounts and are applicable throughout the scope of Active Directory.

When implementing a Terminal Server environment, you will usually want to modify this default behavior so user configuration settings can be defined within the Terminal Servers OU that are applied to users only when logged on to a Terminal Server—not when the user logs on to a regular (non–Terminal Server) computer. To modify the default behavior, the User Group Policy Loopback Processing Mode option (simply Loopback Processing Mode, on Windows 2000) must be enabled. This policy is found under
Computer ConfigurationAdministrative TemplatesSystemGroup Policy
When you are enabling this policy you will see that there are two operating modes available to choose from, as shown in Figure 15.13. The two modes available are
Merge—. This option merges the policies defined for the Terminal Servers OU with any policies defined for the user in other OUs.
Replace—. This option replaces the policies defined for the user in other OUs with the policies defined within the Terminal Servers OU. Normally I use this option to ensure that only the appropriate policies are applied to the user while he or she is logged on to Terminal Server.

Once you have made your selection and clicked OK, the changes are immediately saved for the GPO.
After enabling the loopback mode, a couple of other options that I will typically set for the base Terminal Server Machine Policy are:
Delete Cached Copies of Roaming Profiles—. The location of this policy differs between Windows 2000 and Windows 2003. The policy location is
Windows 2003: Computer ConfigurationAdministrative TemplatesSystemUser Profiles
Windows 2000: Computer ConfigurationAdministrative TemplatesSystemLogon
Enabling this option ensures that all locally cached roaming profiles are cleared when the user logs off. This helps to conserve disk space on the Terminal Server, particularly if you have a large user base that may log on to your servers. If user profiles are very large, though, this setting increases the logon time because a new profile must be copied down to the server every time a user logs on.
Set path for TS Roaming Profiles—. In a Windows Server 2003 Active Directory domain with Windows Server 2003 Terminal Servers, this policy can be used to globally set the Terminal Server roaming profile property for all users. When set here, you are not required to populate the TS roaming profile setting within each user account. Details on user profiles will be discussed in Chapter 18, “User Profile and Account Configuration.” This policy is located in:
Computer ConfigurationAdministrative TemplatesWindows ComponentsTerminal Services
After updating the desired settings, simply close the Group Policy dialog box. The changes are automatically saved as you edit them. This group policy is now applied automatically to any computers that exist within the Terminal Servers OU the next time they reboot, or at regularly scheduled intervals. By default, this update is done every 90 minutes plus at random intervals from 0 to 30 minutes. You can modify this refresh rate for the policy by updating the Group Policy Refresh Interval for Computers option, located under
Computer ConfigurationAdministrative TemplatesSystemGroup Policy
Windows also provides a command line utility you can use to immediately refresh a policy. The utility used differs between versions of Windows being run, as shown in Table 15.3. If the update fails, an entry is added to the server’s Application event log.
Table 15.3. Group Policy Refresh Utilities by Windows Version
After creating the base machine policy, the next step is to create the default policy that will apply to all users who log on to a Terminal Server, including Administrators. The steps to configure this are almost identical to those for setting up the Terminal Server Machine Policy:
Return to the Terminal Servers OU and add a new policy called Terminal Server All Users Policy.
This policy will apply only user settings, so disable the computer configuration settings. In ADUC this is done by opening the properties for the policy and selecting the appropriate check box. In GPMC you do this by opening the Details tab for the GPO and selecting Computer Configuration Settings Disabled from the drop-down list box for GPO Status (see Figure 15.14).
The permissions for the GPO should now be set. Using ADUC, you can set the permissions as shown in Table 15.4. As mentioned, my security configuration is made up of Authenticated Users, Terminal Server Administrators, and SYSTEM. This time the Administrators are explicitly set to apply this group policy. This is because this group policy will affect all Terminal Server users.
When using GPMC, you will begin on the Scope tab with the security filter. This can remain unchanged with the default entry of Authenticated Users. This setting covers all users, Administrators or not.
The Delegation tab is where you will define who can edit this policy. I suggest that you set this up to have the same permissions as those you set for the Terminal Server Machine Policy.
After setting the appropriate permissions, open the policy for editing. Table 15.5 lists some of the common policies I implement that affect all users. All these options are set under the User ConfigurationAdministrative Templates folder. Unless stated otherwise, the individual policy names are the same for both Windows 2000 and 2003. If the names differ, the Windows 2000 name appears in parentheses. Be careful when configuring options within the Terminal Server All Users Policy. Remember that these options affect all users, including Administrators. Before enabling/disabling an option, make certain that you want this option to impact your Administrators as well.
Table 15.5. Example of Common Settings for Terminal Server All Users Policy

Most configuration and restriction changes you implement will be placed within the Terminal Server Regular User Policy. All settings configured within this policy apply to only non-administrative users on the system. The steps to creating the policy are the same as for creating the policy for all users discussed in the previous section, except when it comes to setting the appropriate permissions.
Table 15.6 summarizes the permissions that should be configured when using ADUC. Notice that in this case the Administrators group has the Deny permission explicitly set on the Apply Group Policy setting. This ensures that these policies never apply to anyone in the Terminal Server Administrators group.
Alternatively, you could replace the Authenticated Users group with the Terminal Server Users group, but I still recommend that you enable the Deny option to ensure that if an administrator accidentally belongs to that group as well as the Administrators group, they do not get the user policy restrictions applied to them.
When using the GPMC, you can choose to leave the security filter containing only the default Authenticated Users group, or you can replace this with the Terminal Server Users group. Once this has been set, you need to click over to the Delegation tab and modify the permissions for the administrative groups. Assuming that you have the Terminal Server Administrators group, you will want to ensure that a member of this group never has a regular user’s policies applied to them. You can do this by clicking the Advanced button. A dialog box opens listing all the security users and groups for the policy, as shown in Figure 15.15. Highlight the desired group, scroll down until you see the Apply Group Policy permission, and then select the Deny check box. This ensures that the members of this group will never have this GPO applied to them.
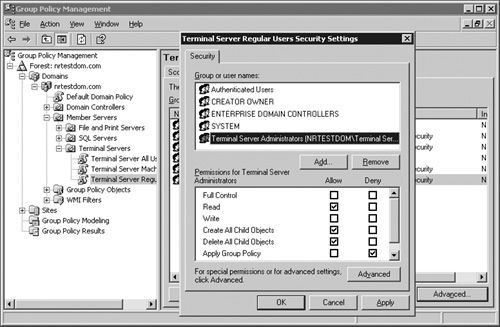
Figure 15.15. Denying the Apply Group Policy permission ensures that the policy is never applied to members of that group.
NOTE:
Depending on the complexity of your environment, you may be required to create additional Terminal Server policies to accommodate different groups of users. For example, you may need to create a set of policies for your Terminal Server support staff. You might call such a policy something like Terminal Server User Support Policy.
Table 15.7 provides an example of some of the policy options I normally enable for regular Terminal Server users. All these options are located under the User Configuration folder.
Table 15.7. Example of Common Settings for Terminal Server Regular User Policy
Location under User ConfigurationAdministrative Templates | Comments |
|---|---|
Windows SettingsFolder Redirection | An important part of configuring a user’s Terminal Server environment is the redirection of certain folders to a centralized network location—in particular, the My Documents folder, which by default is contained as part of the user’s profile. In Chapter 18, I discuss user profiles in more detail, but it’s important to note here that the My Documents folder tends to become quite large over time. When this folder is redirected to a network location, only the network path is stored in the profile, greatly reducing its size and decreasing the user’s logon and logoff times. I normally redirect the My Documents folder. To do this, right-click My Documents from under Folder Redirection and select Properties. From under the Target tab, select Basic – Redirect everyone’s folder to the same location from the drop-down list. A Windows 2000 Group Policy provides you only with a location to enter the desired target folder location. For example, if I’ve created a distributed file system (DFS) share containing each user’s home folder where My Documents will exist, then I would enter a target location as follows: \nrsc.comdfsrootTSHome\%Username% A Windows 2003 Group Policy provides an additional drop-down list box from which you can select different methods of directing the target folder location, as shown in Figure 15.16. If I wanted to use the same DFS share just mentioned, I would select Create a folder for each user under the root path and then enter the following for the root path: \nrsc.comdfsrootTSHome The default options under the Settings tab can be left as-is. If you want to redirect folders to multiple locations, you can specify where to redirect the folders based on the user’s group by choosing the Advanced setting instead of the Basic setting. Note: In some cases this particular policy can be defined as part of the Terminal Server All Users Policy, so that even administrators have their My Documents folder redirected. |
Administrative TemplatesDesktop | In conjunction with folder redirection, the option Prohibit user from changing My Documents path should be set. |
Administrative TemplatesWindows ComponentsWindows Explorer | There are two options under this location that you’ll probably want to enable for regular users. Remove the Folder Options menu item from the Tools menu prevents users from accessing the Windows Explorer properties while Remove (Hide) hardware tab removes the hardware option from the properties panel for all local devices as well as from the control panel. |
Administrative TemplatesControl Panel | One option commonly set here is Prohibit access to the Control Panel (Disable Control Panel), which prevents users from being able to load the control panel or any applet. In some situations you may want to allow users access to a subset of the control panel applets, in which case you would use the Show only specified control panel applets policy and explicitly list which applets users can access. If you’re unsure of what the file name for the applet is, you can search the Windows directory for files with the extension .CPL. Most have a descriptive name that either matches or is similar to the control panel applet name. |
Administrative TemplatesControl PanelRegional and Language Options | The one option here, labeled Restrict selection of Windows menus and dialogs language allows you to set what language the users will automatically start working with. On a Terminal Server that has multiple languages installed (the multilingual user interface version of Windows), you can use this policy to enforce different languages for different users. When multiple languages are being supported a separate policy is usually created to enforce a specific language such as German based on group membership. |
Administrative TemplatesSystem | The option Disable Registry Editing Tools is commonly set to prevent regular users from launching the registry editing tools REGEDT32 and REGEDIT. |

As mentioned, this is not a comprehensive list of what options to enable in a Terminal Server configuration but rather a suggestion as to which ones you’re likely to employ. While the number of group policy options available is extensive, it’s certainly worth the time to review and employ the ones that will help ensure that you implement a manageable and secure Terminal Server environment. In Chapter 16, I look specifically at some of the security-related group policy settings you likely will want to deploy in your environment.
NOTE:
When you configure the group policy settings, I recommend that you use caution and not implement a large number of settings simultaneously. A common mistake made by many administrators is to become slightly euphoric over the prospect of what can be restricted and proceed to implement a number of settings spread across many subfolders. The problems begin if there is an issue with one or more policies affecting a user’s ability to work properly. Tracing back to the changes made and determining where the issue is occurring can be quite time consuming. There is really no substitute for patience and adequate testing when implementing group policies.
After all the desired policies have been created, the final step is to establish an order of priority in which the policies are applied. Policy order is important because it determines what settings for a particular property are actually applied. If a policy setting has been defined in multiple GPOs, the one contained in the highest priority GPO determines how the setting is actually configured. Of course, the means by which you establish this priority differs between the ADUC and GPMC tools.
When using ADUC, the policies are applied starting at the bottom and working up to the top. Figure 15.17 demonstrates how I normally order the three GPOs that were created in this chapter. The yellow exclamation marks exist to flag that either the user configuration or computer configuration settings have been disabled.
The Terminal Server Machine Policy applies only to the servers themselves, and therefore can have the lowest priority. No other policy in the list should affect the computer settings in any way. Next comes the Terminal Server All Users Policy, which contains settings generally assigned to all users (including administrators). The third and final group is the Terminal Server Regular Users Policy, where most of the restrictions are applied. Any member of the Administrators group will not have any of these settings applied.
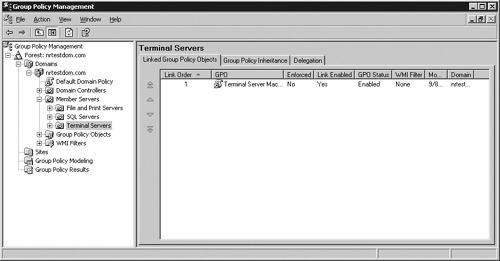
When using GPMC, the policies receive an actual number assignment that dictates the order in which they are applied. Numbers start at 1 and work their way up. The higher the number the higher the priority, so number 1 is actually the lowest. GPO priority is set in GPMC by clicking the OU and then selecting the Linked Group Policy Objects tab, as shown in Figure 15.18. This lists the policies with the exact same precedence as the ones in Figure 15.17, but of course they appear visually in reverse order.

Figure 15.18. A group policy object priority example within GPMC. The higher the link order number, the higher the precedence. Lower ordered numbers are applied before higher ordered numbers.
In Figure 15.18, the Terminal Server Machine Policy applies only to the servers themselves and therefore can have the lowest priority (number 1). No other policy in the list should affect the computer settings in any way. Next comes the Terminal Server All Users Policy (number 2), which contains settings generally assigned to all users (including administrators). The third and final group is the Terminal Server Regular Users Policy (number 3), where most of the restrictions are applied. Any member of the Administrators group will not have any of these settings applied.
The final point to mention pertains to the Group Policy Inheritance tab within GPMC. This tab lets you see what linked and inherited GPOs apply to this OU. Unless inheritance has been blocked for the OU, it will pick up any GPOs that have been defined higher up in the structure. You can enable or disable inheritance by right-clicking the OU and selecting the desired option from the Context menu. If a policy is set to Enforced, it will always override the inheritance setting and be applied to any child OU.
Whether you disable inheritance or not for Terminal Server OUs will depend on the structure of the active directory and whether a large number of policies may be applied higher up. If you’re unsure about what to choose, consider disabling inheritance until you are confident that a parent GPO won’t negatively impact your Terminal Server configuration.
You can import administrative template files into a Windows server group policy to allow for the addition of new policy options. The template files have the extension .ADM and are loaded from within the Group Policy Object Editor. You do this by right-clicking Administrative Templates and then selecting the desired template to load. The Office XP and Office 2003 Resource Kits provide .ADM files designed for use in an active directory; Figure 15.19 shows an example of the custom templates for Office XP loaded into a group policy. The .ADM files are typically located in the %SystemRoot%INF folder. I always recommend the use of templates when available to centralize the configuration of an application on one or more Terminal Servers.
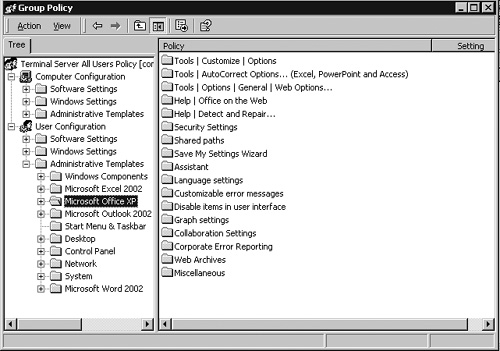
Once a template has been added then the associated policies can be configured just as any of the other policies discussed in this chapter have been configured. Be aware that many of these imported policies lack the detailed README information associated with the policies native to Windows 2000 Server and Windows Server 2003.