Chapter 2 Basic PowerShell Concepts
This chapter brings you up to speed on the technical basics of PowerShell and how to use it, with a focus on the new capabilities offered in PowerShell 2.0 CTP2. You learn how to download and install PowerShell, work with the PowerShell command-line interface (CLI), use cmdlets, access the help features of PowerShell 2.0, and write a basic script. This chapter isn’t intended to be a complete getting-started guide; instead, it covers the important concepts you need to understand for later chapters.
The best way to get started with PowerShell is to visit the Windows PowerShell home page, as shown in Figure 2.1.

The URL for the Windows PowerShell home page is http://www.microsoft.com/powershell/.
This site is a great resource for information about PowerShell, and enables you to download documentation, tools, read up on the latest product news, and obtain the latest versions of PowerShell. Your next step is downloading and installing PowerShell. Before diving into the installation process, it’s important to clarify which version of PowerShell is most appropriate for your requirements. There are currently two versions of PowerShell available for download from Microsoft: PowerShell 1.0 RTW and PowerShell 2.0 CTP2. Each of these versions is described in the following sections.
As of this writing, the current released version of PowerShell is version 1.0 RTW (Release To Web). This version of PowerShell was released to the public in November 2006. Although PowerShell 1.0 RTW does not include the new features of PowerShell 2.0 CTP2 discussed in Chapter 1, “Introduction to Shells,” it is the most current stable release of PowerShell and, as of this writing, it is the only version that can be recommended for use in a production environment. PowerShell 1.0 RTW can be downloaded for all supported platforms at the following URL: http://www.microsoft.com/windowsserver2003/
technologies/management/powershell/download.mspx.
Windows PowerShell 1.0 is included as a feature of the Windows Server 2008 operating system. However, before PowerShell can be used, it must be added using the ServerManager snap-in. To complete this task, follow these steps:
1. Log on to the desired server with Local Administrator privileges.
2. Click Start, and then click Run.
3. In the Run dialog box, type ServerManager.msc, and then click OK.
4. In the Features Summary section, click the Add Features task.
5. On the Select Feature page, select the Windows PowerShell feature, and then click Next.
6. On the Confirm Installation Selections page, review the selections made, and then click Install.
7. On the Installation Results page, review the results, and then click Close.
PowerShell 2.0 CTP2 is a Community Technology Preview version of the PowerShell language. This prerelease version of PowerShell 2.0 contains the new language features described in Chapter 1, and is most appropriate for those of us interested in experimenting with the new capabilities of PowerShell 2.0 in a lab or pre-production environment. Prior to installing PowerShell 2.0 CTP2, you need to ensure that your system meets the following minimum installation requirements:
• Supported operating systems for PowerShell 2.0 CTP2 include Windows XP with Service Pack 2, Windows Vista with Service Pack 1, Windows Server 2003 with Service Pack 1, and Windows Server 2008.
• The Microsoft .NET Framework 2.0 is required for installation of PowerShell 2.0 CTP2.
• The Microsoft .NET Framework 3.0 is required to use the new Graphical PowerShell and Out-Gridview cmdlets in PowerShell 2.0 CTP2.
• The Get-Event cmdlet works only on Windows Vista and Windows Server 2008 and requires the Microsoft .NET Framework 3.5.
• The Windows Remote Management (WinRM) CTP2 component is required to use the new remoting features in PowerShell 2.0 CTP2.
• Remoting works only on Windows Vista with Service Pack 1 (SP1) and on Windows Server 2008.
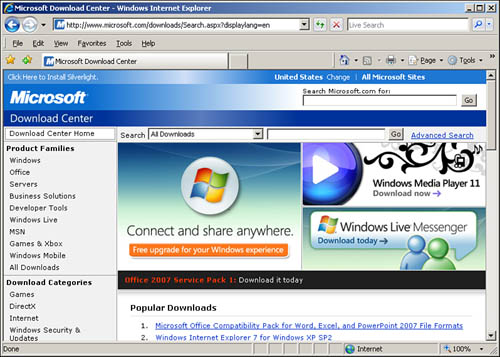
All of the additional components listed can be downloaded from the Microsoft Download Center at http://www.microsoft.com/downloads/ (see Figure 2.2).
If you currently have PowerShell 1.0 installed on your system, you need to remove it before installing PowerShell 2.0. The steps that follow describe the procedures you need to follow to uninstall PowerShell 1.0, depending on your operating system.
• Windows XP-SP2 and Windows Server 2003: Under Add/Remove Programs, select the option to show updates. Remove the PowerShell updates as applicable for your system: KB926139 (en-us), KB926140 (localized), and KB926141 (MUI pack).
• Windows Vista: Go to Control Panel> Programs and Features> Installed Updates. Uninstall the PowerShell update: KB928439.
• Windows Server 2008: In Windows Server 2008, PowerShell 1.0 comes as an optional component. If you have enabled PowerShell 1.0, you must turn the feature off before you can install PowerShell 2.0 CTP2. Launch Server Manager and choose the option to remove features. Select PowerShell from the list and disable the features.
WinRM is Microsoft’s implementation of the WS-Management Protocol, which is a Simple Object Access Protocol (SOAP)-based protocol that provides a common method for systems to access and exchange management information. By default, WinRM uses ports 80 and 443 for its transport; thus, it is compatible with most firewalls. However, WinRM also enables these default ports to be changed if necessary. While WinRM is natively supported in Windows Vista and Windows Server 2008, the WS-Management 2.0 CTP component is required to support remoting in the PowerShell 2.0 CTP2 release. The WS-Management 2.0 CTP update for can be downloaded from: https://connect.microsoft.com/site/sitehome.aspx?SiteID=200&wa=wsignin1.0
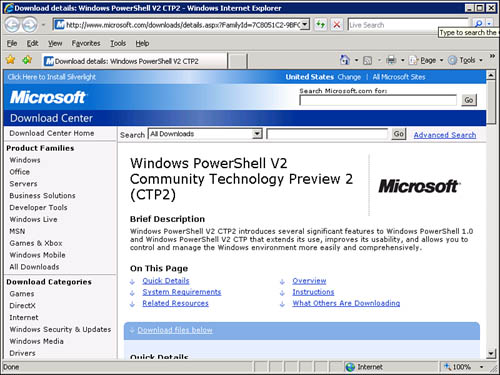
After installing .NET Framework 2.0 and .NET Framework 3.0, and after verifying that any necessary WinRM components are installed on your system, your next step is to download the PowerShell 2.0 CTP2 installation package from http://www.microsoft.com/downloads/details.aspx?FamilyId=7C8051C2-9BFC-4C81-859D-0864979FA403&displaylang=en (see Figure 2.3).
To install PowerShell, on the download page, find the correct PowerShell installation package for your x86 or x64 version of Windows. Then, download the PowerShell installation package by clicking the appropriate download link. Next, start the PowerShell installation by clicking Open in the download box or double-clicking the installation file. (The filename differs depending on the platform, Windows version, and language pack.) After the installer has started, follow the installation instructions.
Another installation method is a silent installation at the command line, using the /quiet switch with the PowerShell installation filename. This installation method can be useful if you plan to install PowerShell on many different systems and want to distribute the installation via a logon script, Systems Management Server (SMS), or another software management method. To perform a silent installation, follow these steps:
1. Click Start > Run.
2. Type cmd, and then click OK to open a cmd command prompt.
3. Type PowerShell-exe-filename /quiet (replacing the italicized text with the PowerShell installation filename) and press Enter.
After installing PowerShell, you can access it through three different methods. To use the first method of accessing it from the Start menu, follow these steps:
To use the second method, follow these steps:
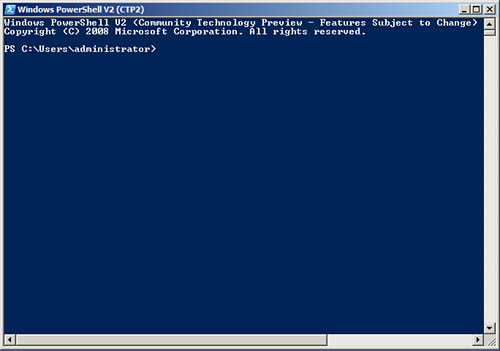
Both these methods open the PowerShell console, which is shown in Figure 2.4.
Follow these steps to use the third method from a cmd command prompt:
1. Click Start > Run.
2. Type cmd and click OK to open a cmd command prompt.
3. At the command prompt, type powershell, as shown in Figure 2.5, and press Enter.

As mentioned earlier, the PowerShell Remoting and PSJobs features rely on Windows Remote Management (WinRM) technology. For these features to work, a number of configuration changes need to be made to the PowerShell 2.0’s default WSMan settings. Fortunately, this process is made simple through a PowerShell script called Configure-Wsman.ps1 in the $pshome folder. This script configures WS-Man settings. The following command executes the Configure-WSMan.ps1 script from the $pshome location:
& $pshomeConfigure-Wsman.ps1
Please note: Due to PowerShell 2.0’s default script execution policy (initially set to Restricted), the Configure-WSman.ps1 script will initially not be allowed to run. The screen shot that follows shows the error that you receive if you attempt to run this script without modifying the default script execution policy.
![]()
![]()
To allow the Configure-WSMan.ps1 script to execute successfully, you can use the Set-ExecutionPolicy cmdlet to set the execution policy to RemoteSigned, as shown in the example that follows. After the script completes, you can optionally use the Set-ExecutionPolicy cmdlet to return PowerShell to its default script execution policy. The command sequence that follows shows three separate actions: setting the script execution policy to RemoteSigned, executing the Configure-WSMan.ps1 script, then setting the script execution policy back to Default. (We use the Set-ExecutionPolicy cmdlet again later in this chapter when writing a basic PowerShell script. Chapter 5, “Understanding PowerShell Security,” discusses PowerShell security and related best practices in more detail.) The screen shot that follows shows an abbreviated version of the verbose output generated by running the Configure-WSMan.ps1 script.
![]()
![]()
After you have completed the steps described previously, PowerShell 2.0 CTP2 is configured and ready for use.
The syntax for using PowerShell from the CLI is similar to the syntax for other CLI shells. The fundamental component of a PowerShell command is, of course, the name of the command to be executed. In addition, the command can be made more specific by using parameters and arguments for parameters. Therefore, a PowerShell command can have the following formats:
![]()
![]()
NOTE
In PowerShell, a parameter is a variable that can be accepted by a command, script, or function. An argument is a value assigned to a parameter. Although these terms are often used interchangeably, remembering these definitions is helpful when discussing their uses in PowerShell.
You can see an example of using a command, a parameter, and an argument by running the dir command with the /w parameter (which displays the output of dir in a wide format) and an argument of C: emp*.txt, as shown here:
![]()
![]()
The result of this command is a wide-format directory listing of all the .txt files in C: emp. If you use the dir command without any parameters or arguments, the outcome is entirely different. The same result happens with PowerShell. For example, here is a basic PowerShell command that gets process information about explorer.exe:
![]()
![]()
In this example, Get-Process is the command, -Name is the parameter, and explorer is the argument. The result of this command is process information about explorer.exe. If no parameters or arguments are used, the Get-Process command just lists process information about all currently running processes, not information about a specific process. To have control over what a command does or have it perform more than its default action, you need to understand the command’s syntax. To use commands effectively in the CLI, use the Get-Help command, discussed later in “Useful Cmdlets,” to get detailed information about what a command does and its use requirements.
As with all CLI-based shells, you need to understand how to navigate the PowerShell CLI to use it effectively. Table 2.1 lists the editing operations associated with various keys when using the PowerShell Console.
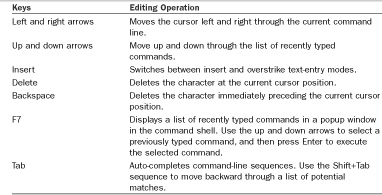
Luckily, most of the features in Table 2.1 are native to the cmd command prompt, which makes PowerShell adoption easier for administrators already familiar with the Windows command line. The only major difference is that the Tab key auto-completion is enhanced in PowerShell beyond what’s available with the cmd command prompt.
As with the cmd command prompt, PowerShell performs auto-completion for file and directory names. So, if you enter a partial file or directory name and press Tab, PowerShell returns the first matching file or directory name in the current directory. Pressing Tab again returns a second possible match and enables you to cycle through the list of results. Like the cmd command prompt, PowerShell’s Tab key auto-completion can also auto-complete with wild cards, as shown in this example:
![]()
![]()
The difference between Tab key auto-completion in cmd and PowerShell is that PowerShell can auto-complete commands. For example, you can enter a partial command name and press the Tab key, and PowerShell steps through a list of possible command matches, as shown here:
![]()
![]()
PowerShell can also auto-complete parameter names associated with a particular command. Simply enter a command and partial parameter name and press the Tab key, and PowerShell cycles through the parameters for the command you have specified. This method also works for variables associated with a command. In addition, PowerShell performs auto-completion for methods and properties of variables and objects. Take a look at an example using a variable named $Z set to the value "Variable":
![]()
![]()
After you type $Z and press the Tab key, PowerShell cycles through the possible operations that can be performed against the $Z variable. For example, if you select the $Z.Length property and press Enter, PowerShell returns the length of the string in the $Z variable, as shown here:
![]()
![]()
The auto-complete function for variables distinguishes between properties and methods. Properties are listed without an open parenthesis (as in the preceding $Z.Length example), and methods are listed with an open parenthesis, as shown in this example:
![]()
![]()
When the $Z.Contains( prompt appears, you can use this method to query whether the $Z variable contains the character V by entering the following command:
![]()
![]()
PowerShell corrects capitalization for the method or property name to match its definition. For the most part, this functionality is cosmetic because by default, PowerShell is not case sensitive.
Cmdlets are a fundamental part of PowerShell’s functionality. They are implemented as managed classes (built on the .NET Framework) that include a well-defined set of methods to process data. A cmdlet developer writes the code that runs when the cmdlet is called and compiles the code into a DLL that’s loaded into a PowerShell instance when the shell is started.
Cmdlets are always named with the format Verb-Noun where the verb specifies the action and the noun specifies the object to operate on. As you might have noticed, most PowerShell names are singular, not plural, to make PowerShell more universally usable. For example, a command might provide a value or a set of values, and there’s no way to know ahead of time whether a cmdlet name should be plural. Also, the English language is inconsistent in dealing with plurals. For example, the word fish can be singular or plural, depending on the context. If English isn’t your first language, figuring out what’s supposed to be plural or the correct plural form could be daunting.
NOTE
The default PowerShell verb is Get, which is assumed if no other verb is given. The effect of this default setting is that the process command produces the same results as Get-Process.
To determine the parameters a cmdlet supports, you can review the help information for the cmdlet by using either of the following commands:
![]()
![]()
Furthermore, you can use the Get-Command cmdlet to determine what parameters are available and how they are used. Here’s an example of the syntax:
![]()
![]()
When working with the Get-Command cmdlet, piping its output to the Format-List cmdlet produces a more concise list of the cmdlet’s use. For example, to display just the definition information for Get-Process, use the following command:
![]()
![]()
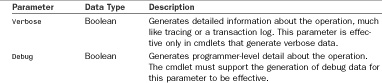
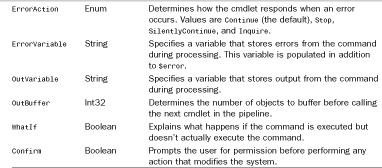
Because cmdlets derive from a base class, a number of common parameters, which are available to all cmdlets, can be used to help provide a more consistent interface for PowerShell cmdlets. These common parameters are described in Table 2.2.
NOTE
The last two parameters in Table 2.2, WhatIf and Confirm, are special in that they require a cmdlet to support the .NET method ShouldProcess, which might not be true for all cmdlets. The ShouldProcess method confirms the operation with the user, sending the name of the resource to be changed for confirmation before performing the operation.
When you’re getting started with PowerShell, the Get-Help and Get-Command cmdlets are useful. These two cmdlets, described in the following sections, help you explore what PowerShell does and help you learn more about the commands you can run.
As you might expect, you use the Get-Help cmdlet to retrieve help information about cmdlets and other topics. To display a list of all help topics, enter Get-Help * at the PowerShell command prompt, as shown in the example that follows. Please note that due to space limitations, the example shows only a subset of the available topics returned by Get-Help.
![]()
![]()
To narrow down the list of entries returned by Get-Help, you can shorten it by filtering on topic name and category. For example, to get a list of all cmdlets starting with the verb Get, try the command shown in the following example:
![]()
![]()
After you have selected a help topic, you can retrieve the help information by using the topic name as the parameter to the Get-Help cmdlet. For example, to retrieve help for the Get-Content cmdlet, enter the following command:
![]()
![]()
NOTE
PowerShell has two parameters for the get-help cmdlet: -detailed and -full. The -detailed parameter displays additional information about a cmdlet, including descriptions of parameters and examples of using the cmdlet. The -full parameter displays the entire help file for a cmdlet, including technical information about parameters.
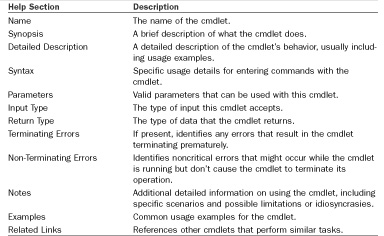
PowerShell help is divided into sections for each cmdlet. Table 2.3 describes the help details for each cmdlet.
Another helpful cmdlet is Get-Command, used to list all available cmdlets in a PowerShell session:
![]()
![]()
The Get-Command cmdlet is more powerful than Get-Help because it lists all available commands (cmdlets, scripts, aliases, functions, and native applications) in a PowerShell session, as shown in this example:
![]()
![]()
When using Get-Command with elements other than cmdlets, the information returned is different from information you see for a cmdlet. For example, with an existing application, the value of the Definition property is the path to the application. However, other information about the application is also available, as shown here:
![]()
![]()
With a function, the Definition property is the body of the function:
![]()
![]()
With an alias, the Definition property is the aliased command:
![]()
![]()
With a script file, the Definition property is the path to the script. With a non-PowerShell script (such as a .bat or .vbs file), the information returned is the same as other existing applications.
A variable is a storage place for data. In most shells, the only data that can be stored in a variable is text data. In advanced shells and programming languages, data stored in variables can be almost anything, from strings to sequences to objects. Similarly, PowerShell variables can be just about anything.
To define a PowerShell variable, you must name it with the $ prefix, which helps delineate variables from aliases, cmdlets, filenames, and other items a shell operator might want to use. A variable name is case sensitive and can contain any combination of alphanumeric characters (A–Z and 0–9) and the underscore (_) character. Although PowerShell variables have no set naming convention, using a name that reflects the type of data the variable contains is recommended, as shown in this example:
![]()
![]()
As you can see from the previous example, the information that is contained within the $MSProcesses variable is a collection of Microsoft processes that currently run on the system.
When a PowerShell session is started, a number of variables are defined automatically, as shown in this example:
![]()
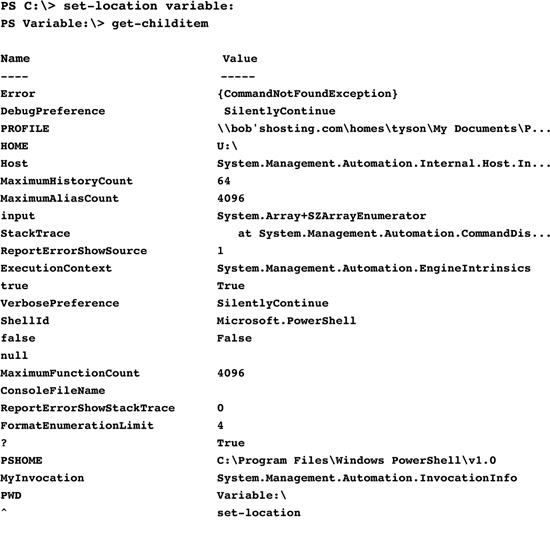
![]()
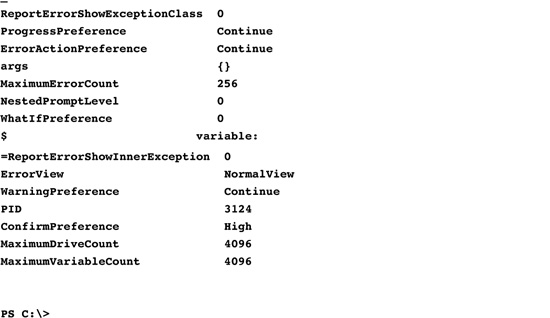
These built-in shell variables are divided into two types. The first type has a special meaning in PowerShell because it stores configuration information for the current PowerShell session. Of these special variables, the following should be considered noteworthy because they’re used often throughout this book:
• $_— Contains the current pipeline object
• $Error— Contains error objects for the current PowerShell session
![]()
![]()
![]()
![]()
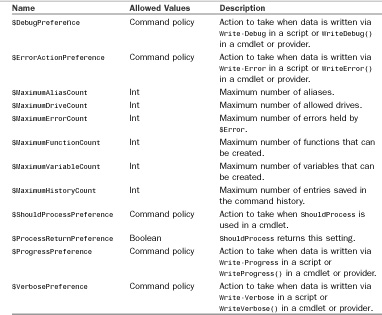
The second type of built-in variable consists of preference settings used to control the behavior of PowerShell. Table 2.4 describes these variables, based on the PowerShell User Guide.
Unfortunately, using PowerShell requires a lot of typing unless you’re running a script. For example, open a PowerShell console and try to type the following command:
![]()
![]()
That’s a long command to type. Luckily, like most shells, PowerShell supports aliases for cmdlets and executables. So, if you want to cut down on the typing in this command, you can use PowerShell’s default aliases. Using these aliases, the Get-Process example looks like this:
![]()
![]()
This example isn’t a major reduction in the amount of typing, but aliases can save you some time and prevent typos. To get a list of the current PowerShell aliases supported in your session, use the Get-Alias cmdlet as shown in the following example. Please note that due to space limitations, the example shows only a small subset of the available PowerShell aliases; the complete list is returned when you actually execute the Get-Alias cmdlet.
![]()
![]()
Several alias cmdlets enable you to define new aliases, export aliases, import aliases, and display existing aliases. By using the following command, you can get a list of all related alias cmdlets:
![]()
![]()
You’ve already seen how to use the Get-Alias cmdlet to produce a list of aliases available in the current PowerShell session. The Export-Alias and Import-Alias cmdlets are used to export and import alias lists from one PowerShell session to another. Finally, the New-Alias and Set-Alias cmdlets enable you to define new aliases for the current PowerShell session.
NOTE
The alias implementation in PowerShell is limited. As mentioned earlier, an alias works only for cmdlets or executables, not for cmdlets and executables used with a parameter. However, there are methods to work around this limitation. One method is defining the command in a variable and then calling the variable from other commands. The problem with this approach is that the variable can be called only in the current PowerShell session, unless it’s defined in the profile.ps1 file. The second (preferred) method is to place your command in a function.
The alises created when you use the New-Alias and Set-Alias cmdlets are valid only in the current PowerShell session. Exiting a PowerShell session discards any existing aliases. To have aliases persist across PowerShell sessions, you must define them in the profile.ps1 file, as shown in this example:
![]()
![]()
Although command shortening is appealing, the extensive use of aliases isn’t recommended. One reason is that aliases aren’t very portable to scripts. For example, if you use a lot of aliases in a script, you must include a Set-Aliases sequence at the start of the script to make sure those aliases are present, regardless of machine or session profile, when the script runs.
However, a bigger concern than portability is that aliases can often confuse or obscure the true meaning of commands or scripts. The aliases you define might make sense to you, but not everyone shares your logic in defining aliases. So if you want others to understand your scripts, you must be careful about using too many aliases. Instead, look into creating reusable functions.
Most of the commands covered in this chapter are interactive, meaning you enter commands at the PowerShell prompt, and output is returned. Although using PowerShell interactively is helpful for tasks that need to be done only once, it’s not an effective way to perform repetitive automation tasks. Fortunately, PowerShell has the capability to read in files containing stored commands, which enables you to compose, save, and recall a sequence of commands when needed. These sequences of stored commands are commonly referred to as scripts.
PowerShell scripts are simply text files stored with a .ps1 extension. You can use any text editor (such as Notepad) to create a text file containing commands that make up a PowerShell script. For example, open Notepad and type the following command:
![]()
![]()
Next, save this file with the name ListStoppedServices.ps1 in a directory of your choice. For this example, the C:Scripts directory is used.
Before you can run this script, you need to adjust PowerShell’s execution policy because the default setting doesn’t allow running scripts for protection against malicious scripts. To change this setting, you use the Set-ExecutionPolicy cmdlet, as shown in the following example. You can also use the Get-ExecutionPolicy cmdlet to verify the current execution policy. (Chapter 5 discusses PowerShell security and best practices in more detail.)
![]()
![]()
The RemoteSigned policy enables scripts created locally to run without being digitally signed, but still requires scripts downloaded from the Internet to be digitally signed. These settings give you the flexibility to run unsigned scripts from your local machine, yet, they provide some protection against unsigned external scripts.
After changing PowerShell’s execution policy to RemoteSigned, you can run the script in any PowerShell session by simply typing the script’s full directory path and filename. In the following example, entering the C:ScriptsListStoppedServices.ps1 command produces this output:
![]()
![]()
Although this basic one-line script is simple, it stills serves to illustrate how to write a script and use it in PowerShell. If needed, you can include more commands to have it perform the automation task. The following is an example:
![]()
![]()
The script then displays this output:
![]()
![]()
This script is a little more complex because it can filter the stopped services based on the provided string to make the output cleaner. This script isn’t a complicated piece of automation, but it does serve to illustrate just some of the power that PowerShell has. To use that power, you just need to gain a better understanding of PowerShell’s features so that you can write more complex and meaningful scripts.
This chapter served as an introduction to the use of PowerShell 2.0, including downloading and installing PowerShell 2.0 CTP2, getting familiar with and using the PowerShell CLI, and learning about PowerShell cmdlets, with a focus on the new cmdlets and features included in PowerShell 2.0. In addition, this chapter covered the use of PowerShell variables and aliases, and provided examples of how to include these techniques. Finally, this chapter walked you through creating a basic PowerShell script that lists all of the stopped services on a machine.