IN THIS CHAPTER
• Accessing the Exchange Management Shell (EMS)
• Using the Exchange Management Shell
• Scripting Scenario: GetDatabaseSizeReport.ps1
• Scripting Scenario: GetEvent1221Info.ps1
• Scripting Scenario: ProvisionExchangeUsers.ps1
• Summary
For years, Exchange administrators had two choices for performing repetitive tasks: Do them manually by using the graphical interface, or write scripts in complicated and time-consuming programming languages. Although these programming languages can be used to perform many routine tasks in an Exchange environment, they weren’t developed specifically with that purpose in mind. Hence, even the simplest task could take hundreds of lines of code.
Over time, the inability to automate tasks easily has proved to be one of the most frustrating aspects of managing an Exchange environment. Windows automation in general wasn’t sufficient because of Microsoft’s reliance on GUIs and little support for CLIs. This frustration became the motivation for the PowerShell team, led by Jeffrey Snover, to develop a CLI shell interface that enables administrators to do everything from the command line.
Around the same time PowerShell was being developed, the Exchange product team was designing the specifications for the next version of Exchange (E12, which became Exchange Server 2007). Initially, it seemed the team would develop yet another limited Microsoft Management Console (MMC) GUI as the Exchange management interface. However, the Exchange team decided to take a different course by embracing the concept of PowerShell-based management.
The result is that in Exchange Server 2007, configuration and administration are done with two new administrative tools: the Exchange Management Shell (EMS) and the Exchange Management Console (EMC). Both utilities rely on PowerShell to access and modify information and configuration settings in an Exchange Server 2007 environment.
NOTE
Exchange Server 2007 is the first Microsoft product to use PowerShell exclusively to drive its management interfaces.
The EMS is a command-line management interface for performing server administration and configuration. Because it’s built on a PowerShell platform, it can connect to the .NET runtime (also known as the Common Language Runtime, or CLR). So, tasks that previously had to be done manually in the management application can now be scripted, giving administrators more flexibility for repetitive tasks. Furthermore, administrators can manage every aspect of Exchange Server 2007, including creating and managing e-mail accounts, configuring Simple Mail Transport Protocol (SMTP) connectors and transport agents, and setting properties for database stores. Every management task in the Exchange environment can now be accomplished from the command line. In addition, the EMS can be used to check settings, create reports, provide information on the health of Exchange servers, and, best of all, automate tasks that need to be done frequently.
The EMC is an MMC 3.0 GUI utility for viewing and modifying the configuration of Exchange Server 2007 Organizations. Although similar to the Exchange System Manager (ESM) in previous Exchange versions, the EMC’s interface has been redesigned to be more organized and easier to learn. The EMC is limited in the scope of modifications administrators can make, so some configuration settings can be accessed only by using the EMS.
The EMS and EMC rely on PowerShell to accomplish management tasks. The EMC is a graphical interface that calls the EMS to perform tasks, and the EMS is a snap-in for PowerShell. Therefore, no matter which utility administrators use to create a report or modify a setting, they’re actually using PowerShell. While keeping with this concept, this chapter’s goal is to explain how the EMS and PowerShell can be used to manage an Exchange Server 2007 environment. Additionally, you review three PowerShell scripts that can be used to manage an Exchange Server 2007 environment.
The EMS is nothing more than a collection cmdlets that are compiled into a DLL, which is used as a way to extend PowerShell’s functionality. Typically, extending functionality is done to manage an application with PowerShell and can be accomplished easily by using snap-ins, much as you add snap-ins to the MMC to increase functionality. Because the EMS is just a PowerShell snap-in, accessing EMS cmdlets requires loading the EMS snap-in into your PowerShell session, as shown here:
![]()
![]()
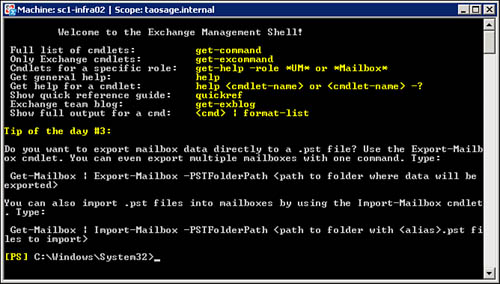
Additionally, you can also start the EMS using the Windows Start menu shortcut. However, some differences exist between just loading the EMS snap-in and starting the EMS using the Windows shortcut. If you just load the snap-in, you don’t get the customized Exchange administration console. Your PowerShell session won’t look and act like the EMS because the snap-in loads only the cmdlets for managing the Exchange environment. To make your PowerShell session resemble the EMS, you need to run the same configuration script that the Start menu shortcut runs to start the EMS. This script, Exchange.ps1, is in the default Exchange Server 2007 bin directory: C:Program FilesMicrosoftExchange ServerBin.
When this script is executed, the resulting PowerShell console session is the EMS, as shown in Figure 15.1.
The EMS consists of PowerShell’s default set of cmdlets and several additional cmdlets that can be used to complete Exchange-oriented management activities. The following can be included in these activities:
• Management of an Exchange Organization
• Reporting on an Exchange Organization
• Performing bulk management operations
This section’s goal is to gain a better understanding for some of the tasks that can be completed using the EMS. Note that the term “some” is being used. The purpose of this book is not to replay information that is readily available within help resources. Instead, the purpose is to explore PowerShell functionality and how it relates to the everyday needs of an IT professional. To accomplish this, you are shown details about some of the EMS cmdlets and how some of these cmdlets can be used to complete tasks.
To get started, you might want to become better aquatinted with the different ways you can gain access to EMS related help. For example, you can use the Exchange Server 2007 Help File, which contains all the EMS cmdlet help topics in a role-based and task-based hierarchy. Additionally, you might use Microsoft Technet, which also contains all the EMS cmdlet help topics in a role-based and task-based hierarchy. Or, you might take advantage of EMS’s slightly enhanced Get-Help cmdlet, which provides you with the ability to get help information pertaining to Exchange-related roles, components, and functionalities. For example, to get help related to the Mailbox role, you might use the following command:
![]()
![]()
Notice how the role name is enclosed using the wildcard characters (*). That is a requirement. Other resources also include the following:
• Get-ExCommand—This cmdlet behaves identically to the Get-Command cmdlet, but returns only Exchange Server 2007-related cmdlets.
• Get-PSCommand—This cmdlet behaves identically to the Get-Command cmdlet, but excludes all Exchange Server 2007-related cmdlets.
• QuickRef—This cmdlet behaves identically to the Get-Command cmdlet, but returns only Exchange Server 2007-related cmdlets.
• Get-Tip—This cmdlet generates a new Exchange Management Shell Tip of the Day.
• Get-ExBlog—This cmdlet opens Internet Explorer and navigates to the Exchange Team blog.
By using the previously listed resources, you should be able to gain insight into the different cmdlets that are available to manage an Exchange Server 2007 environment. Additionally, to further help you better understand how the EMS can be used to complete management tasks, the next few sections highlight some of the more important cmdlets, details about their usage by reviewing a number of working examples. Although not all cmdlets and usage scenarios are reviewed, the sections should provide a basis for better understanding how the EMS is used.
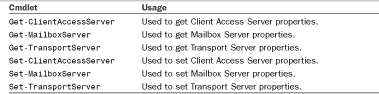
To get information about Exchange servers within an organization, use the Get-ExchangeServer cmdlet. For example, executing just the cmdlet by itself returns a list of all the Exchange servers. Primarily, you use the Get-ExchangeServer cmdlet for reporting purposes. To manage or modify the properties of an Exchange server, use the Set-ExchangeServer cmdlet. If you wanted to report on or manage an Exchange server, you might use any of the cmdlets that are directly associated with a server role, as shown in Table15.1:
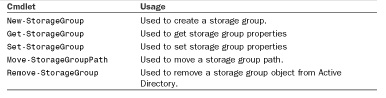
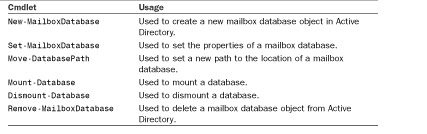
To report on or manage a storage group, you can use one of many storage group cmdlets. For example, to get information about all the storage groups in an organization, use the Get-StorageGroup cmdlet. To create a new storage group, use the New-StorageGroup cmdlet. All the storage group cmdlets and their usage information are shown in Table 15.2:
In this usage example, you use the EMS and some of the *-StorageGroup cmdlets to create and manage a storage group. To complete this example, start with the following steps:
![]()
![]()
The command that was just issued creates a new storage group in the default Storage Group path location. However, what if the indented path for the new storage group was supposed to be C:StorageGroupsSales? To correct this problem, use the Move-StorageGroupPath cmdlet, as shown in the following examples:
1. Get the properties for the storage group that was created:
![]()
![]()
2. Take note of the current values for the SystemFolderPath and LogFolderPath properties. Using EMS, create a new folder on the root of C: drive, as shown here:
![]()
![]()
3. Move the storage group to another folder path using the following command:
![]()
![]()
To report on or manage Exchange mailbox databases, use one of many database cmdlets. For example, to create a new mailbox database, use the New-MailboxDatabase cmdlet. Then, to manage that database, use the Set-MailboxDatabase cmdlet. More information about the mailbox database cmdlets and their usage is shown in Table 15.3.
In this usage example, you use the EMS and some of the *-*Database cmdlets to create and manage a database. To complete this example, use the following steps:
1. The following command creates the database:
![]()
![]()
2. Mount the database using the following command:
![]()
![]()
3. Verify the database has been created using the following command:
![]()
![]()
4. Now that the Sales database is created, the next step is to create the rest of the databases with the commands that you learned. The first step is to add all the database names into an array, as shown here:
![]()
![]()
5. Pipe the array you just created into a ForEach loop and use the New-MailboxDatabase cmdlet to create the desired databases, as shown here:
![]()
![]()
NOTE
To correctly execute the previous command example, you would first need to have created storage groups named IT, HR, and Exec.
6. Using the same type of logic, mount each of the databases, as shown here:
![]()
![]()
A recipient in Exchange Server 2007 can be a mailbox user, a mail-enabled user, a mail contact, a distribution group, a security group, a dynamic distribution group, or a mail-enabled public folder. To manage Exchange recipients, the EMS has a collection of cmdlets that are related to the following tasks:
• Managing distribution groups and dynamic distribution groups
• Managing user and resource mailboxes
• Managing contacts and mail users
• Managing public folders
• Managing the Microsoft exchange recipient
To help better understand the recipient management cmdlets, the next few sections review how to use the EMS to create mailboxes and manage those mailboxes using these cmdelts.
You can use two primary methods to create a mailbox. The first method is to mail enable an existing user using the Enable-Mailbox cmdlet. The second method is to create a new user that has a mailbox using the New-Mailbox cmdlet. In this section of the chapter, you will understand the steps involved with using both of these cmdlets.
NOTE
You can also use the New-MailUser to create a user account that has a defined email address. However, this is typically used to create user accounts with email addresses that are outside of an Exchange Organization.
Example: Enabling Existing Users When using the EMS, you can use the Enable-Mailbox cmdlet to mail enable existing users or an InetOrgPerson. The term mail enable refers to the creation of additional mailbox attributes on the Active Directory user against which you execute the cmdlet. However, a user’s mailbox object in an Exchange database is not actually created until the user actually logs in or receives an email message.
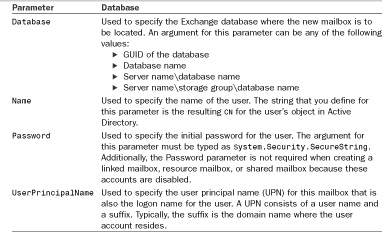
When using the Enable-Mailbox cmdlet, you must define the required parameters Identity and Database. The Identity parameter specifies the user or InetOrgPerson that you wish to mail enable. An argument for this parameter can be any of the following values:
• GUID (Globally Unique Identifier)
• Distinguished Name (DN)
• DomainAccount
• User principal name (UPN)
The Database parameter is used to specify the Exchange database where the new mailbox is to be located. An argument for this parameter can be any of the following values:
• GUID of the database
• Database name
• Server namedatabase name
• Server namestorage groupdatabase name
In addition to the two required parameters just described, several additional optional parameters can be used to define mailbox attributes, such as Alias, Share, Room, PrimarySmtpAddress, and so on. Use the Enable-Mailbox cmdlet help information for a complete list of optional parameters.
The following shows an example of the Enable-Mailbox cmdlet used to mail enable the user named Maiko:
![]()
![]()
Additionally, like all PowerShell cmdlets, you can use the Enable-Mailbox cmdlet in conjunction with other cmdlets to complete complex automation tasks. An example of this follows:
![]()
![]()
Here, the Enable-Mailbox cmdlet is used in conjunction with a Quest AD cmdlet to mail enable users who are a member of the All-IT security group.
To report on or manage Exchange mailboxes, you use one of many database cmdlets. For example, to create a new mailbox database, use the New-MailboxDatabase cmdlet. Then, to manage that database, use the Set-MailboxDatabase cmdlet. More information about the mailbox database cmdlets and their usage is shown in Table 15.5:

Example: Managing a Mailbox In this usage example, you use the EMS and some of the *-*Mailbox cmdlets to report on and manage a group of mailboxes. To complete this example, use the following steps:
1. Using the same EMS console from the previous example, use the Get-Mailbox cmdlet to get information about the mailboxes that you just created, as shown here:
[PS] C:> $Users | get-mailbox | fl name, database
2. What if these users should have been in the Sales database? Use the Move-Mailbox cmdlet to move these mailboxes into the correct database, as shown here:
[PS] C:> $Users | get-mailbox | move-mailbox -TargetDatabase "sc1-
ex01SG1IT"
3. Verify that the mailboxes have been moved by using the following command:
[PS] C:> get-mailbox | where{$_.database -eq "sc1-ex01SG1IT"}
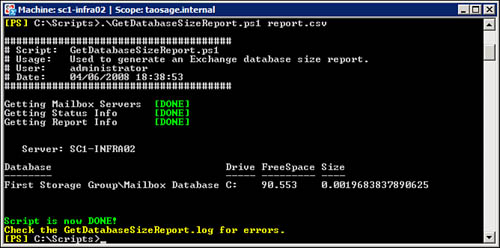
The first Exchange Server 2007 script you examine in this chapter is the GetDatabaseSizeReport.ps1 script, which produces a report on the size of a mailbox database in an Exchange organization. The report contains the following information:
• The mailbox server name
• The full database name, including the storage group name
• The drive where the database is located
• The free space on the drive in gigabytes
• The database size in gigabytes
Here’s an example of the report GetDatabaseSizeReport.ps1 produces:
![]()
![]()
Any information about your network environment is helpful. However, when you’re using Exchange, an understanding of mailbox database sizes, their growth, free space on the hosting drive, and an overall picture of how mailbox databases work in a network environment can help you prevent potential problems.
This script was developed for companyabc.com, a small manufacturing company with a network consisting of several hundred users and two Exchange servers. Because of budget constraints, the IT department is made up of only one person. The limited budget has also prevented companyabc.com from purchasing and installing monitoring and reporting software for IT systems. As a result, the IT employee has only manual methods for ensuring the systems’ operational status and often doesn’t have time to do any proactive monitoring.
As a result, the Exchange mailbox databases have grown to the point that offline maintenance can no longer be done, and database disks tend to run out of space. After several near disasters, companyabc.com’s management has asked the IT employee to find a way to improve monitoring of the Exchange databases. Needing a quick, flexible, and cost-effective solution, the IT employee turned to scripting and requested the development of the GetDatabaseSizeReport.ps1 script.
A working copy of this script can be downloaded from www.informit.com/title/9789780768687187. Running this script doesn’t require any parameters be defined. However, an optional parameter, ExportFile, should have its argument set to the name of the CSV file where you want to export report data. Here’s the command to run the GetDatabaseSizeReport.ps1 script:
![]()
![]()
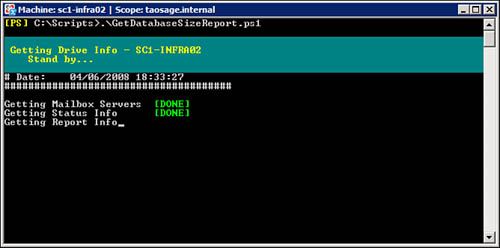
Figures 15.2 and 15.3 show the execution of the GetDatabaseSizeReport.ps1 script.
The GetDatabaseSizeReport.ps1 script performs the following sequence of actions:
1. The script creates two DataTable objects: $ServersTable, used to store status information for Exchange mailbox servers, and $ReportTable, used to store the Exchange database size report.
2. The script creates an error log named GetDatabaseSizeReport_Errors.log by using the Out-File cmdlet. This error log gives users detailed error information.
3. The script uses the Get-MailboxServer cmdlet to get a list of all Exchange mailbox servers. The list is then populated into the $MailboxServers variable.
4. The script uses the System.Net.NetworkInformation.Ping class to ping each server in the $MailboxServers object collection. If a server responds, a new row is created in $ServersTable consisting of the server’s name and its status as "Online." If a server doesn’t respond, a new row is created in $ServersTable with the server’s status set to "Offline".
5. The listing of servers and their status information is sent to the script’s error log for future reference by using the Out-File cmdlet.
6. For each server with an "Online" status in $ServersTable, the script does the following:
• The Get-MailboxDatabase cmdlet is used to get a listing of all mailbox databases on the server. Each mailbox database’s Name, StorageGroupName, and EdbFilePath are populated into the $Databases variable.
• For each mailbox database in the $Databases object collection, the script uses the Get-WmiObject cmdlet to collect information about the database size and free drive space. The script then adds a row to the $ReportTable containing the mailbox server name ($Server.Name), database name ($DBName), drive letter of the database’s location ($DBDriveName), free space ($DBDriveFreeSpace), and database size ($DBSize).
7. The script exports all data from the $ReportTable by using the Export-DataTable function.
NOTE
This script and the remaining scripts in this chapter can be run only by using a PowerShell session that has Microsoft.Exchange.Management.PowerShell.Admin snap-in loaded.
The first code snippet contains the header for the GetDatabaseSizeReport.ps1 script. This header includes information about what the script does, when it was updated, and the script’s author. Just after the header is the script’s only parameter ExportFile, shown here:
![]()
![]()
For the GetDatabaseSizeReport.ps1 script, only one function (Export-DataTable) is loaded, as shown in the next code snippet:
![]()
![]()
To perform the data export, the Export-DataTable function uses the .NET System.IO.StreamWriter class to create an object based on the .NET TextWriter class. The resulting TextWriter object ($LogFile) can be used to write an object to a string, write strings to a file, or serialize XML. In this script, $LogFile is used to dump the DataTable’s contents into the CSV export file (which is created along with $LogFile). To perform this task, the Export-DataTable function writes DataTable’s column names, separated with a comma (,) delimiter, to the CSV export file. Then, the function loops through each value in DataTable’s rows and writes these values to the CSV export file, separated with a comma (,) delimiter.
If Export-DataTable is called and a CSV export filename isn’t specified, this function makes use of a .NET System.Windows.Forms.SaveFileDialog class to construct a Save As dialog box for collecting the export file’s name and location (see Figure 15.4).
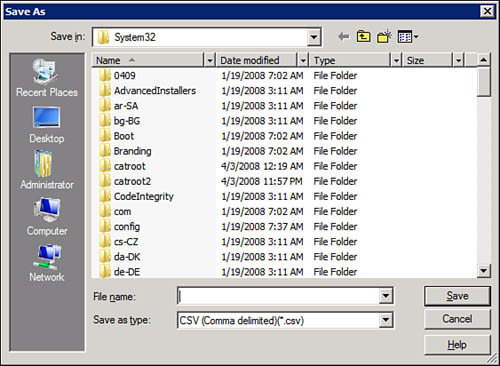
This example shows how PowerShell can use .NET-based Windows Forms to collect or display data.
In the next code snippet, variables that will be used later in the script are defined. In addition, the library file LibraryGen.ps1, which contains the script usage functions, is being dot sourced:
![]()
![]()
Next, the script checks to see if the user needed any usage help, as shown in the following code snippet:
![]()
![]()
In the next code snippet, the two DataTable objects are created. The first DataTable is the $ServersTable, which stores server information. The second DataTable is the $ReportTable, which stores the report information:
![]()
![]()
The Out-File cmdlet is used to create an error log and write header information to it. Then, the Get-ScriptHeader function is used to indicate to the script operator that the automation portion of the script has started, as shown here:
![]()
![]()
After displaying the script header to the user, the script’s next task is to get a list of mailbox servers using the Get-MailboxServer cmdlet. Then, for each server object in $MailboxServers variable, the script pings that server to determine its status. During this task, both the resulting status and the server’s name are written to a new row in the $ServersTable DataTable, as shown in the next code snippet:
![]()
![]()
The next task, as shown in the following code snippet, is to generate the final report. To do this, the script uses the Get-MailboxDatabase cmdlet to get the EdbFilePath for each Exchange server that is online. Then, for each mailbox database, the script uses WMI to collect the database size and free space for the drive on which the database is located. After collecting and formatting report information, the script then adds a new row to the $ReportTable DataTable that contains the database information, its size, and the drive free space:
![]()
![]()
Finally, the script writes the report to the PowerShell console using the Format-Table cmdlet and then exports the data to a CSV file using the Export-DataTable function, as shown here:
![]()
![]()
Administrators can use the GetEvent1221Info.ps1 script to search the Application event logs of Exchange Server 2007 mailbox servers and generate a report containing Event ID 1221 messages. Exchange administrators can use these messages to determine the amount of whitespace present in a database over a specified time span (number of days before the current day). Based on information gathered from Event ID 1221 messages, the report contains the following:
• The mailbox server name
• The date and time the event was written to the Application log
• The full database name, including the storage group name
• The amount of whitespace in megabytes
Here’s an example of the report GetEvent1221Info.ps1 produces:
![]()
![]()
This script was developed for companyabc.com, a marketing firm of 50 users who have large (4GB and up) Exchange mailboxes. It produces marketing packages consisting of digital images, which result in an average package size of more than 20MB. Because companyabc.com’s employees are scattered among many home offices and remote locations, they usually e-mail marketing packages to each other instead of posting them to a shared location.
Employees have been using their mailboxes as online file systems, so mailbox sizes have grown rapidly. Realizing that mailboxes of this size would be costly and difficult, companyabc.com’s Exchange administrator has requested that marketing content be saved locally to users’ hard drives and then deleted from their mailboxes. This practice has kept the Exchange databases from growing too quickly; however, the high deletion rate of large e-mail messages has created another problem: large areas of whitespace in Exchange databases.
The amount of whitespace is important because after an Exchange database grows, its size can’t be decreased until the administrator does an offline defragmentation. For example, a database has grown to 12GB, but users have deleted 3GB of messages. After an online defragmentation, Event ID 1221 logs report 3GB of whitespace. New messages written to the database use this whitespace, and the database doesn’t grow until that whitespace is exhausted.
The database still takes up 12GB on the hard drive, even though it contains only 9GB of data. A larger-than-necessary database can increase the time needed for backup and restore jobs. By reviewing Event ID 1221 messages, administrators can determine whether an offline defragmentation is needed to shrink the database in an effort to improve overall performance. Furthermore, with periodic review of Event ID 1221 logs, administrators can track a database’s average whitespace amount, which helps determine the growth patterns of actual data in a database. This information can be helpful in deciding when additional space needs to be allocated for a database.
With no budget available to purchase a suite of Exchange tools, companyabc.com requested the development of a script for monitoring the amount of whitespace in Exchange databases. The resulting script is GetEvent1221Info.ps1.
A working copy of this script can be downloaded from www.informit.com/title/9789780768687187. Running this script requires defining one parameter. The Days parameter should have its argument set to the time period (in number of days) for querying Event ID 1221 messages from mailbox servers. An optional parameter, ExportFile, should have its argument set to the name of the CSV file where you want to export report data. Here’s the command to run the GetEvent1221Info.ps1 script:
![]()
![]()
Figures 15.5 and 15.6 show the execution of the GetEvent1221Info.ps1 script.
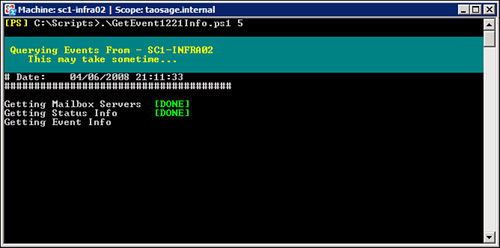
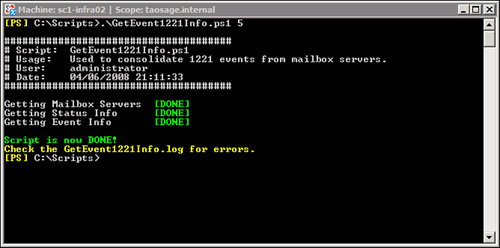
The GetEvent1221Info.ps1 script performs the following sequence of actions:
1. The script creates two DataTable objects: $ServersTable, used to store status information for Exchange mailbox servers, and $EventsTable, used to store the Event ID 1221 report.
2. The script creates an error log named GetEvent1221Info_Errors.log by using the Out-File cmdlet. This error log gives users detailed error information.
3. The script uses the Get-MailboxServer cmdlet to get a list of all Exchange mailbox servers, which is then populated to the $MailboxServers variable.
4. The script uses the System.Net.NetworkInformation.Ping class to ping each server in the $MailboxServers object collection. If a server replies, a new row is added to $ServersTable consisting of the server’s name and its "Online" status. If a server doesn’t reply, a new row is added with the server’s status set to "Offline".
5. The listing of servers and their status information is sent to the script’s error log for future reference by using the Out-File cmdlet.
6. For each server with an "Online" status in $ServersTable, the script does the following:
• The Get-RemoteEventLog function is used to create an object ($Events) bound to the server’s Application log. To create the object, the function uses the .NET System.Diagnostics.Eventlog class, which allows an application or script to interact with a machine’s event log.
• Next, the script uses the Select-Object cmdlet to select all the 1221 events from the $Events object’s Entries property that fall within the specified period ($Days). The resulting collection of events is populated to the $1221Events variable.
• For each $1221Event in the $1221Events object collection, the script then uses the get_timewritten method of $1221Events to populate the $TimeWritten variable with the time the event was written. Next, a regular expression is used to strip the database’s free space ($MB) and name ($Database) from the event message.
• A row is added to $EventsTable containing the server’s name ($Server.Name), the time the event was written ($TimeWritten), the database name ($Database), and the free space in megabytes ($MB).
7. The script exports all data from $EventsTable by using the Export-DataTable function.
The first code snippet contains the header for the GetEvent1221Info.ps1 script. This header includes information about what the script does, when it was updated, and the script’s author. Just after the header are the script’s parameters, as shown here:
![]()
![]()
Next, as shown in the following code snippet the Get-RemoteEventLog function is loaded. This function is used to collect remote EventLog information from a machine using the System.Diagnostics.Eventlog class. Then, the Export-DataTable function is loaded which was discussed in the previous section.
![]()
![]()
In the next code snippet, variables that will be used later in the script are defined. In addition, the library file LibraryGen.ps1, which contains the script usage functions, is being dot sourced:
![]()
![]()
Next, the script checks to see if the script user needed any usage help. If no help is needed, the script then checks to see if the Days parameter has been defined. If this parameter has not been defined, the script then informs the script operator that the parameter is required and shows the script usage information, as shown in the following code snippet:
![]()
![]()
Then, in the next code snippet, the two DataTable objects are created. The first DataTable is the $ServersTable, which stores server information, and the second DataTable is the $EventsTable, which stores the report information:
![]()
![]()
The Out-File cmdlet is used to create an error log and write header information to it. Then, the Get-ScriptHeader function is used to indicate to the script operator that the automation portion of the script has started, as shown in the following:
![]()
![]()
The next task is to get a list of mailbox servers using the Get-MailboxServer cmdlet. Then, for each server object in $MailboxServers variable, the script pings that server to determine its status. During this task, both the resulting status and the server’s name are written to a new row in the $ServersTable DataTable, as shown in the next code snippet:
![]()
![]()
In the next code snippet, the script generates the final report. To do this, the script uses the DataTable Select method to create a collection of online server objects ($OnlineServers). Then, for each server in $OnlineServers object collection, the script uses the Get-RemoteEventLog function to retrieve all the Application event messages from that server. For each event message retrieved with an event ID of 1221, a new row is added to the $EventsTable DataTable that contains formatted information from the event message and the server’s name:
![]()
![]()
The script exports the report information from the $EventsTable DataTable using the Export-DataTable function:
![]()
![]()
With the ProvisionExchangeUsers.ps1 script, Exchange administrators can provision mail-enabled user accounts in Exchange Server 2007 environments quickly and easily based on information in a CSV import file. This file is structured as follows:
• The user’s first name
• The user’s last name
• The user’s e-mail alias
• The fully qualified database name
Here’s an example of the import file:
![]()
![]()
With some tweaking to the code in ProvisionExchangeUsers.ps1, the format of the CSV import file and the information for provisioning mail-enabled user accounts can be tailored to fit any environment. This flexibility is important to meet changing automation needs.
This script was requested by companyabc.com, a large technology company that’s in the process of completing several mergers. The company needs to provision many new mail-enabled user accounts. Because of the number of accounts to create and the varying information for each merger’s account-provisioning process, an automated method that could be changed to meet different needs is the best solution. To meet the flexibility requirements, companyabc.com’s IT department developed the ProvisionExchangeUsers.ps1 script.
A working copy of this script can be downloaded from www.informit.com/title/9789780768687187. Running this script requires defining three parameters:
• UPNSuffix should have its argument set to the universal principal name (UPN) suffix for new mail-enabled accounts.
• OUDN should have its argument set to the distinguishedName of the OU where new mail-enabled accounts should be stored.
• ImportFile should have its argument set to the name of the CSV import file containing the list of users to create.
Here’s the command to run the ProvisionExchangeUsers.ps1 script:
![]()
![]()
Figures 15.7 and 15.8 show the execution of the ProvisionExchangeUsers.ps1 script.
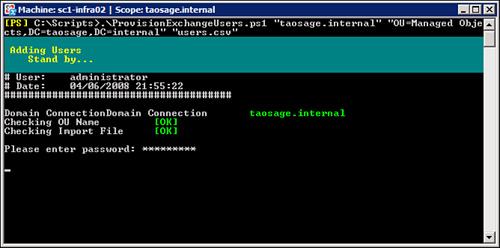
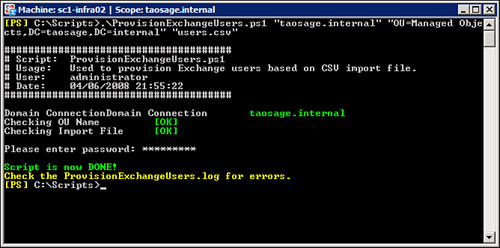
The ProvisionExchangeUsers.ps1 script performs the following sequence of actions:
1. The script creates an error log named ProvisionExchangeUsers_Errors.log by using the Out-File cmdlet. This error log gives users detailed error information.
2. The script connects to the current logon domain by using Get-CurrentDomain function. Using the object returned from this function, the script writes the domain’s name to the PowerShell console. If this connection fails, the script halts.
3. The script verifies that the specified OU exists in the current domain by using the Get-ADObject function. If the OU isn’t valid, the script halts.
4. The script uses the Test-Path cmdlet to verify that the import file is valid. If the file is invalid, the script halts.
5. The script uses the Read-Host cmdlet and its AsSecureString parameter to request the password for all new user accounts. The resulting secure string is then populated into the $Password variable.
6. The script uses the Import-Csv cmdlet to populate the $Users variable with the CSV import file’s contents.
7. For each user in the $Users object collection, the script uses the New-Mailbox cmdlet to create a mail-enabled user account based on information in the CSV file and information provided by the user. Errors generated during account creation are sent to the script’s error log by using the Out-File cmdlet.
The first code snippet contains the header for the ProvisionExchangeUsers.ps1 script. This header includes information about what the script does, when it was updated, and the script’s author. Just after the header are the script’s parameters, as shown here:
![]()
![]()
In the next code snippet, variables that will be used later in the script are defined. In addition, the library file LibraryGen.ps1, which contains the script usage functions, is being dot sourced, as shown here:
![]()
![]()
As shown in the following code snippet, the script next checks to see if the script user needed any usage help. If no help is needed, the script checks to see if the UPNSuffix, OUDN, and ImportFile parameters were defined. If these parameters are not defined, the script informs the script operator that the parameter is required and shows the script usage information:
![]()
![]()
Next, the Out-File cmdlet creates an error log and writes header information to it. The Get-ScriptHeader function is used to indicate to the script operator that the automation portion of the script has started, as shown here:
![]()
![]()
The script must verify that there is a valid domain connection. To accomplish task, the script uses the Get-CurrentDomain. If a valid domain connection doesn’t exist, the script halts and returns the script status to the operator. If a connection does exist, the script continues execution and writes the domain name to the console, as shown in the next code snippet:
![]()
![]()
In the next code snippet, the distinguished name in the $OUDN variable is verified. To perform the verification, the script uses Get-ADObject function. This function connects to Active Directory and completes a search for the OU by its distinguished name. If an object is returned from the function, the OU is valid; if no object is returned, the OU is considered invalid, and the script halts:
![]()
![]()
The script verifies that the import file is valid using the Test-Path cmdlet, as shown here:
![]()
![]()
Next, the script collects the password from the user using the Read-Host cmdlet with the AsSecureString switch, as shown in the next code snippet:
![]()
![]()
Finally, the script provisions the new user accounts using the New-Mailbox cmdlet, information from the import file, and information provided by the script user, as shown here:
![]()
![]()
In this chapter, you were introduced to how PowerShell is used to manage Exchange Server 2007 through a GUI using the EMC and the command line using the EMS. Exchange Server 2007 is the first application that uses PowerShell in this fashion. To accomplish this feat, Exchange Server 2007 makes use of PowerShell’s capability to be extended through the use of snap-ins. By using a snap-in more, cmdlets are made available to a PowerShell user, further increasing the user’s ability to manage an Exchange organization.
The scripts that were reviewed in this chapter served as a good demonstration of what can be accomplished using the Exchange Server 2007 snap-in. Thanks to these examples, you should now have an understanding about how to use PowerShell to gather Exchange database size information, calculate a database’s whitespace, and quickly provision mail enabled users. However, the limits to what can be accomplished around Exchange management don’t stop there. The limits to what can be done with PowerShell should in many respects be bounded only by your own scripting talent and imagination.