IN THIS APPENDIX
PSShell.ps1 can be used as a secure shell solution for kiosk workstations. A working copy is in the ScriptsChapter 10PSShell folder on the source CD. This script requires an understanding of Windows Shell Replacement. Make sure you read the following sections about the script components to ensure that you know how to deploy and use the script effectively. First, however, you should review why this script is needed.
Companyabc.com manufactures processors for the general public and the U.S. government. Employees working on processors intended for government use must have special security clearance, and any data related to manufacturing of these processors must be secured to prevent exposure to unauthorized entities, both inside and outside the company.
These security requirements pose a challenge for companyabc.com. Its IT department has to support business procedures for both the retail and government contract divisions. Also, companyabc.com’s CEO has issued a directive that all computer use must take place on a centralized system, which means any users at any location can access the company’s data and applications. A centralized system further complicates security measures.
The IT department’s solution to meet these requirements involves deploying Windows Terminal Service (WTS) server farms. Users working on the retail side have one set of WTS farms with a lower level of security. Users working in the government contract division have a different set of WTS farms isolated from retail users and with a high degree of security.
The IT department has decided to use thin clients for the WTS farms for quick deployment and a high degree of control over access and data security. However, although companyabc.com has the budget to build the WTS farms, funds to purchase thin clients and thin client software for all users aren’t available. Further complicating matters is a recent company-wide Windows XP desktop refresh. In addition, desktop hardware that was just purchased must be used for another few years until it can be replaced.
To stay within the budget, the IT department has searched for an inexpensive way to turn the existing Windows XP desktops into thin clients. One systems administrator read a technical article about using Windows Shell Replacement to turn a Windows XP desktop into a secure kiosk, but it involves replacing Windows Explorer with Internet Explorer to create the kiosk interface. Although this method is fine for a simple Web browsing kiosk, the IT department needs complete control over the user interface shell.
To meet this need, the IT department has decided to use PowerShell and its support of .NET Windows Forms as a way to provide a customizable shell replacement for Windows Explorer. After development and testing, the final solution to companyabc.com’s thin-client need is a hybrid of several different components. These components include Windows Shell Replacement, which uses cmd.exe as the base shell, and a PowerShell script that uses Windows Forms to present a secure, Windows Explorer–like desktop to logged on users. The following sections explain the components of PSShell.ps1 (named PSShell Kiosk) in more detail.
PSShell Kiosk’s first component is the shell replacement. Windows, by default, uses the Windows Explorer shell (explorer.exe) as an interface for interacting with the operating system. However, this shell is not required to run Windows. Sometimes users want more functionality than Windows Explorer offers, or they want to decrease functionality as a way to improve security, as is the case with companyabc.com.
Windows users and administrators can modify explorer.exe or replace it with another shell (although it might not be supported by Microsoft). This process is called Windows Shell Replacement. Shells that can be used with Windows Shell Replacement range from GUI-based shells, such as Internet Explorer (iexplore.exe), Geoshell, and LiteStep to CLI-based shells, such as cmd.exe, command.com, and even PowerShell.
You can use two methods to replace explorer.exe. One is modifying the Windows Registry and specifying your replacement shell in the Shell value found in the HKEY_LOCAL_MACHINESoftwareMicrosoftWindows NTCurrentVersionWinlogon key.
For companyabc.com, changing the Registry on every Windows XP desktop isn’t an option. Furthermore, getting rid of the shell for the entire Windows XP installation isn’t wise. Suppose IT technicians need to log on to machines to perform system maintenance. If the default shell for the entire machine has been replaced by using the Registry method, the technicians are stuck with using the limited replacement shell because the shell has been changed for all users. Although there are ways to enable user-based shell replacement in the Registry, changing the Registry isn’t a user-friendly or effective way to manage the deployment of replacement shells, as companyabc.com’s IT department has discovered.
The second method for replacing explorer.exe, which requires Active Directory, is using the Group Policy Object (GPO) setting called Custom user interface. This setting enables you to specify the shell for users when they log on to a machine. The benefits of using GPOs include centralization and ease of management. In addition, you can have different shell settings based on the user, not the machine the user is logging on to. Because companyabc.com is looking for this type of control, the IT department has chosen the GPO method to manage PSShell Kiosk. The following sections explain the steps to set up this solution.
To create the GPO for configuring the Windows Shell Replacement, follow these steps:
1. Using the Group Policy Management Console (GPMC), create a GPO called PSShell Kiosk Desktop GPO.
2. Next, disable the Computer Configuration settings.
3. Remove Authenticated Users from the security filter settings for the PSShell Kiosk Desktop GPO.
4. In the Active Directory Users and Computers console, create a Domain Local group called PSShell Kiosk Desktop GPO - Apply and add a test user account to the group.
5. Add the PSShell Kiosk Desktop GPO - Apply group to the security filter settings for the PSShell Kiosk Desktop GPO.
6. Finally, link the PSShell Kiosk Desktop GPO to the top-level organizational unit (OU) containing all your user accounts, and make sure the linking orders of any other GPOs don’t override the PSShell Kiosk Desktop GPO.
NOTE
Linking the PSShell Kiosk Desktop GPO to the top-level OU containing user accounts assumes there are no other GPOs linked to child OUs that might override this GPO. Furthermore, the GPO is applied to a group of users instead of a group of machines to prevent users with a higher security clearance from having a nonsecured desktop.
Next, you configure the Windows Shell Replacement settings by following these steps:
1. In the Group Policy Management Console (GPMC), edit the PSShell Kiosk Desktop GPO.
2. In the GPMC, click to expand User Configuration, Administrative Templates, and then click System. Then click to select the Custom user interface setting.
3. Right-click Custom user interface and click Properties.
4. In the Custom user interface Properties dialog box, click to select the Enabled option, type cmd /c “C:PSShellLaunch.bat” in the Interface file name text box, as shown in Figure A.1, and then click OK.
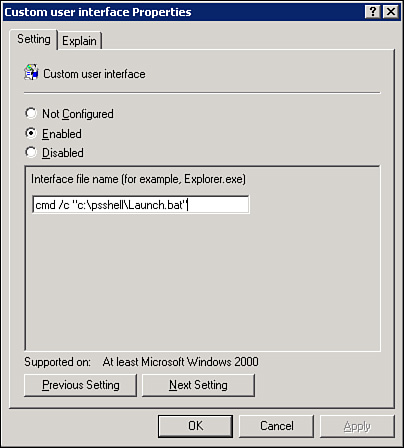
Setting the interface filename to cmd forces Windows to use cmd.exe as the replacement shell. The /c switch forces cmd to carry out the C:PSShellLaunch.bat command and then stop, which closes the cmd window after the Launch.bat file has finished running.
You might be wondering why cmd is used as the replacement shell instead of PowerShell. Unfortunately, when you’re running a PowerShell script, there’s no way to do so without displaying the PowerShell console. If explorer.exe is replaced with PowerShell, the resulting desktop contains the PowerShell console.
However, companyabc.com wants users to have a desktop similar to explorer.exe, not a desktop containing the PowerShell console. The solution involves the second component, PSShell.exe. PSShell.exe is a C# Windows application that hides the PowerShell console when PSShell.ps1 runs. The following code snippet shows the source code for this application:
![]()
![]()
To hide the PowerShell console, PSShell.exe makes use of the .NET System.Diagnostics.Process class. By using this class with the .NET ProcessWindowStyle enumeration, you can define how a process’s window should display when it starts. The style (appearance) can be Hidden, Normal, Minimized, or Maximized. For this example, you want the PowerShell window’s style to be defined as Hidden. After starting the PowerShell process by using the Start() method with the specified arguments to run PSShell.ps1, Windows doesn’t draw (display) the PowerShell console.
NOTE
Again, the C:PSShell path in the PSShell.exe source code is only a suggestion. If you change the deployment path for PSShell Kiosk, you need to update the code and build a new executable. If you’re familiar with C#, however, a better solution is modifying PSShell.exe so that it can take arguments to define the path to the PSShell.ps1 script.
To understand why cmd is used as the replacement shell, remember that PSShell.exe is not a shell, but an application written to suppress the PowerShell console when running a script. It’s also needed to start PowerShell and run PSShell.ps1 so that the PowerShell console is hidden. To start PSShell.exe, however, you need to call it from another shell, such as cmd. The interface filename you entered for the Custom user interface setting specified a batch file named Launch.bat, which is used to start PSShell.exe.
The result is that cmd is used to run Launch.bat, which then starts PSShell.exe. PSShell.exe, in turn, starts PowerShell, which finally runs the PSShell.ps1 script. This workaround is a bit convoluted but necessary to compensate for a feature PowerShell lacks. With this workaround, you can still use PowerShell to generate a secure desktop.
The last component of PSShell Kiosk is PSShell.ps1, which generates the PSShell Kiosk desktop for logged on users. This desktop is generated by a Windows Form, which is possible because of PowerShell’s capability to use .NET Windows Forms. The sole purpose of this script is to give users the illusion of seeing the default Windows desktop, when they’re actually using a custom desktop with limited functionality.
The PSShell Kiosk solution determines what users see and what programs they can run from the desktop. Companyabc.com wants high-security users to be able to perform these tasks on a secure desktop:
• Starting the Microsoft Remote Desktop (RDP) client, which is configured to connect to the secure WTS farm
• Starting a limited instance (by GPO) of Internet Explorer that navigates to companyabc.com’s Web-based e-mail site
• Logging off the PSShell Kiosk when they’re finished using it
The first code snippet contains the header for the PSShell.ps1 script. This header includes information about what the script does, when it was updated, and the script’s author:
![]()
![]()
In next code snippet, there are two long, complex statements involving the .NET System.Reflection.Assembly class:
![]()
![]()
These two statements are necessary because PowerShell loads only a few .NET assemblies into its AppDomain. For example, if you try to create a Windows Forms object with the New-Object cmdlet, you would get the following error:
![]()
![]()
To use the System.Windows.Forms.Form class, you need to load the assembly into PowerShell first by using the LoadWithPartialName() method. Assemblies must also be loaded into PowerShell for.NET-based DLLs included with Microsoft SDKs, third-party vendors, or your custom DLLs. For example, say you develop a .NET-based DLL to manage xyz application. To use that DLL in PowerShell, you use the LoadFrom() or LoadFile() methods from the System.Reflection.Assembly class, as shown in this example:
![]()
![]()
NOTE
Microsoft has made the LoadWithPartialName() method obsolete. The replacement is the Load() method, which is meant to prevent partial binds when .NET assemblies are loaded. Using the Load() method requires more work. However, if you don’t mind the implications of a partial bind (such as your script failing), you can continue using LoadWithPartialName() until it’s removed from the .NET Framework.
Now that the required assemblies for Windows Forms objects have been loaded, the next task is to finish configuring the runtime environment for the script. The first step, as shown in the following code snippet, is to define a set of launch command strings that will be used to control the applications users can launch from the PSShell Kiosk desktop. These command strings are discussed in more depth later in this section:
![]()
![]()
Then, after defining the launch command strings, the next task is to create a PowerShell Runspace, as demonstrated in the next code snippet:
![]()
![]()
This code shows a PowerShell runspace, which is represented by the PowerShell System.Management.Automation.Runspaces namespace. A runspace is an abstraction of the PowerShell runtime that enables a hosting application to run PowerShell commands to perform tasks or gather information. Although powershell.exe is a hosting application and uses its own runspace to process commands, runspaces are most beneficial when used in applications outside PowerShell.
Runspaces are needed to support PowerShell, but they were developed mainly to create an easy way for other applications to call the PowerShell runtime and have it run PowerShell commands. In a sense, the Windows Form that PSShell.ps1 creates is an application, so it makes sense for it to interact with a PowerShell runspace to perform tasks. By taking advantage of PowerShell runspaces, you then don’t have to spend time adding logic to the Windows Form to make it perform tasks for users.
Creating a runspace ($Runspace) for the Windows Form simply involves using the CreateRunspace() method from the PowerShell System.Management.Automation.Runspaces.RunspaceFactory class. Next, you create a RunspaceInvoke object that enables the Windows Form to run commands via the runspace. Last, you open the runspace by using the Open() method so that it can be used by the Windows Form.
After defining the Runspace, the next task is to construct the form itself as shown in the following code snippet. In the section that is titled “Define Images,” a series of Drawing.Image objects are created. These objects are used later in the form to represent such items are the PSShell Kiosk desktop start menu and application icons. Then in the code section, titled “Create Form,” the form object is created using a set of predefined properties used to make the form look like the default Windows desktop.
![]()
![]()
Having constructed the form, the final task before activating the form and showing it to the user is to add the menu items. This task is completed in the next code snippet.
The following code adds several MenuItems to the ToolStripMenu that acts as the Start menu for the PSShell Kiosk desktop:
![]()
![]()
Basically, the preceding code snippet shows several MenuItems being added to the ToolStripMenu, which is acting as the start menu for the PSShell Kiosk desktop. These menu items are the way users start applications or log off the PSShell Kiosk desktop. Each menu item is assigned a click event that uses the $RunspaceInvoke object and its invoke() method to run a specified PowerShell command. The following list describes the action each menu item performs:
• $MenuItem1—Uses the command specified in the $LaunchIE variable to start Internet Explorer
• $MenuItem2—Uses the command specified in the $LaunchRemoteDesktop variable to start mstsc.exe (the Microsoft RDP client)
• $MenuItem3—Uses the Get-WmiObject cmdlet to log off Windows
Finally, the script needs to activate the form and show it to the user using the ShowDialog method. This is shown in the final code snippet:
![]()
![]()
After the PSShell Kiosk Desktop GPO is configured and ready to be applied to users, the next step is to deploy the following PSShell Kiosk files to the desktops used as secure thin clients:
• Launch.bat—The batch file used to start PSShell.exe
• PSShell.exe—The C# application used to run the PSShell.ps1 script
• PSShell.ps1—The PowerShell script that creates the PSShell Kiosk
• Images folder—The folder containing images used on the PSShell Kiosk desktop
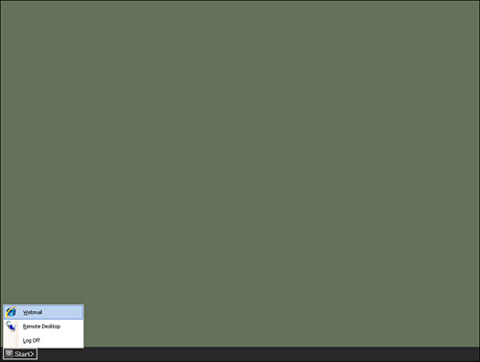
As discussed earlier, the PSShell Kiosk solution is currently configured to reside in the C:PSShell path. So, after you have deployed these files to this location on each desktop, you can place users who need a secure desktop in the PSShell Kiosk Desktop GPO - Apply group. Figure A.2 shows the PSShell Kiosk desktop with the three menu items.