IN THIS CHAPTER
This chapter explains how PowerShell can be used to manage the Windows Registry. To do this, the chapter explores in-depth examples of managing the Registry using PowerShell.
This chapter also discusses a new feature currently in the 2.0 CTP series called registry transactions and presents a series of working Registry management functions that are based on a real-world situation.
The goal is to give the reader a chance to learn how PowerShell scripting techniques can be applied to meet real-world Registry management and automation needs.
The chapter ends with an example of how to use the new built-in remoting features of the 2.0 CTP to access the registry of remote systems.
In PowerShell, you work with the Registry differently. As discussed in Chapter 4, “Other Key PowerShell Concepts,” PowerShell has a built-in Provider, Registry, for accessing and manipulating the Registry on a local machine. By default, the Registry hives available in this provider are HKEY_LOCAL_MACHINE (HKLM) and HKEY_CURRENT_USER (HKCU). These hives are represented in a PowerShell session as two additional PSDrive objects named HKLM: and HKCU:.
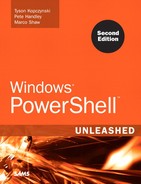
Chapter 4 also stated that accessing data through the Registry provider means PowerShell treats data in the HKLM: and HKCU: PSDrive objects like other hierarchical data stores. Therefore, accessing and manipulating data from these PSDrives requires using the PowerShell core cmdlets, as shown in this example:
![]()
![]()
By using the PowerShell core cmdlets, you can manipulate the local Registry as you see fit.
In PowerShell, you access and manipulate the Registry like you do with the file system. For example, to read a Registry value in PowerShell, use the Get-ItemProperty cmdlet, as shown in the following example:
![]()
![]()
To create or modify a Registry value in PowerShell, use the Set-ItemProperty cmdlet:
![]()
![]()
Remember that the Windows Registry has different types of Registry values. You use the Set-ItemProperty cmdlet to define the Type parameter when creating or modifying Registry values. As a best practice, you should always define Registry values when using the Set-ItemProperty cmdlet. Otherwise, the cmdlet defines the Registry value with the default type, which is String. Other possible types follow:
• ExpandString
• Binary
• DWord
• MultiString
• Qword
NOTE
Depending on the Registry value you’re creating or modifying, the data value you set the named value to needs to be in the correct format. So, if the Registry value is type REG_BINARY, you use a binary value, such as $Bin = 101, 118, 105.
To delete a Registry value in PowerShell, you use the Remove-ItemProperty cmdlet:
![]()
![]()
These examples give you an idea of how to work with the Registry. It’s simple as long as you understand how to use the core cmdlets and remember that working with the Registry is much like working with the Windows file system.
However, there’s no built-in cmdlet for accessing the Registry on a remote machine. This omission makes sense because by default, no PowerShell providers are available for accessing remote data stores. Until someone writes a provider you can use to manage the Registry remotely, you can to turn to one existing method, explained later when the LibraryRegistry.ps1 script is covered.
If you’re either using the WS-MANAGEMENT (WSMAN) add-on or the PowerShell 2.0 integration with WSMAN, doing stuff remotely becomes easier. We’re going to provide a detailed example later when 2.0 features are discussed.
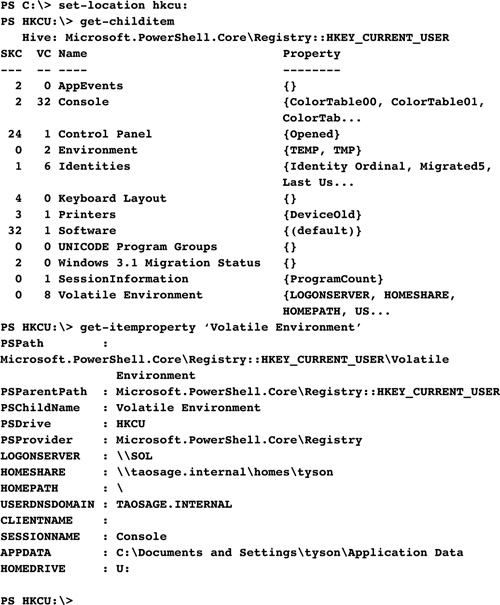
Only HKLM: and HKCU: were available by default with PowerShell. You can easily set up the other registry hives and PSDrive objects using the New-PsDrive cmdlet. Let’s show how one can create a PSDrive for the HKEY_CURRENT_CONFIG hive. We’re going to name it HKCC for short. This procedure can be used to also add the HKEY_USERS and HKEY_CLASSES_ROOT hives.
![]()
![]()
As seen in the previous example, a new registry hive has been added to the current PowerShell session.
As of the 2.0 CTP2, PowerShell now supports registry transactions. There might be support for transactions in other providers in the future, but only time will tell. This feature relies on new features provided with the base Windows operating system as of Vista and 2008 Server. Unfortunately, by the time CTP2 was released in May 2008, not all of the built-in documentation had been completed.
Transactions provide the ability to perform registry operations as a group of commands that can be similar or different. One way to think about a transaction is when considering a larger number of registry operations that are to be undertaken. Let’s say we have a dozen registry changes to make. With transaction support, we can apply or commit all the operations together or roll them all back if there is any kind of failure, for example.
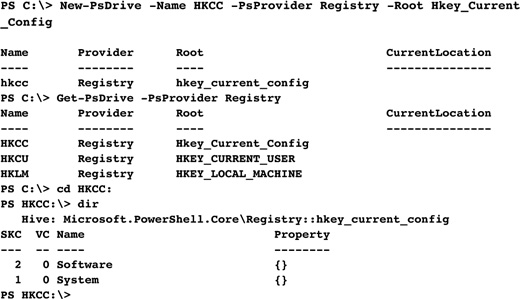
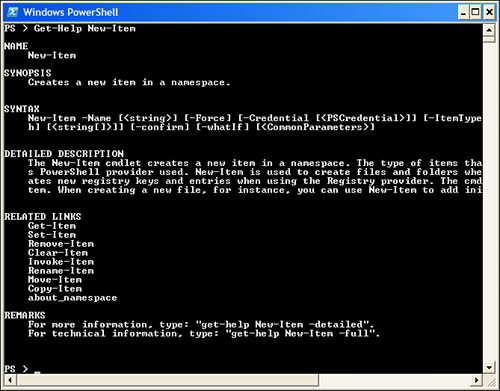
We can check what features our Registry provider supports. If you’re running the proper PowerShell version, you will see something similar to what is shown in Figure 10.1:
In Figure 10.1, we see that our provider lists transactions as a capability or supported feature.
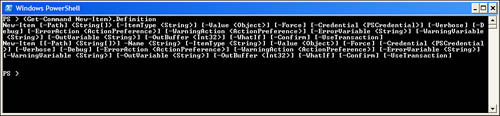
Several core cmdlets now have also been updated and provide a useTransaction parameter. Let’s focus on the New-Item cmdlet, as shown in Figure 10.2.
In Figure 10.2, you don’t notice that anything provides support for transactions. Let’s try another method to list the parameters supported by the cmdlet, as shown in Figure 10.3.
As previously mentioned, the built-in help provided with PowerShell wasn’t fully updated with the information relating to registry transactions by the time the May 2008 2.0 CTP2 was released.
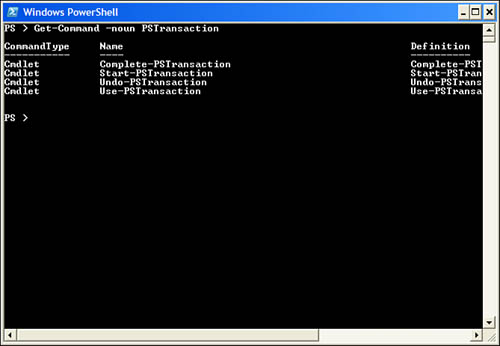
The four new cmdlets provided for registry transactions include the following, as also shown in Figure 10.4:
• Complete-PSTransaction:Used whenever someone wants to complete or end a particular transaction.
• Start-PSTransaction:Used whenever someone wants to start a transaction.
• Undo-PSTransaction:Used whenever someone wants to back out of a transaction (restoring everything to its original state before the transaction was actually started).
• Use-PSTransaction:Enables a person to use advanced features of the .NET Framework to work with transacted objects (this cmdlet is not covered in this book).
The basic procedure to using transactions is to inform PowerShell that we are starting a transaction, and then we run our commands, which potentially might be system changing. At some point, we need to determine whether our transaction is complete so that we can apply whatever changes have been done, or back out of our changes to restore the system to its initial state before we started the transaction.
One thing that must be remembered is that for any particular command to be considered part of the current transaction, the useTransaction parameter must be used, as we show in an example shortly. In other words, it is possible to start a transaction, but actually enter commands outside of the transaction that take effect immediately. Any commands run outside of the transaction cannot be rolled back as part of the current transaction. Also, after a transaction is started, some commands actually behave differently if proper consideration isn’t given to the parameters provided to commands that are run. Again, this is shown in an example shortly.
Some additional parameters available when doing transactions include rollbackSeverity and rollbackPreference. These parameters aren’t currently well documented, but provide a lot of flexibility on how transactions are rolled back when an error is encountered.
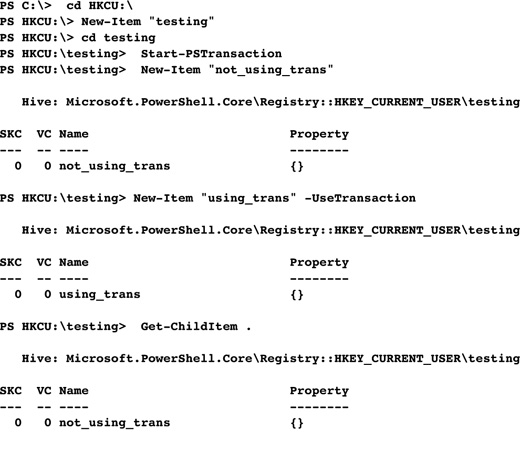
Let’s provide an example of a transaction. To keep things simple, we are going to make only one registry change here.
![]()
![]()
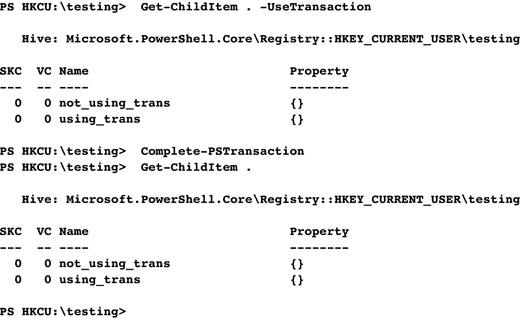
In the previous example, we used the New-Item cmdlet to create an item in the registry. There are a few things to note:
• We used the useTransaction parameter to our second call to New-Item because we had just started a transaction.
• Our first call to Get-ChildItem basically showed the current physical state of the registry because we didn’t use the useTransaction parameter.
• Our second call to Get-ChildItem listed the state of the registry with all previous transacted commands being taken into account.
We’ve just done our first transaction!
Let’s provide an example where we actually entered a few commands while in a transaction, and then decided to cancel all the changes we did and restore the system to the state it was in just before we started our transaction.
![]()
![]()
In this case, we used Undo-PsTransaction to cancel all the changes we made since we started our transaction.
We’ve shown two examples of transactions where we actually controlled what occurred. Now, let’s say we started a transaction and an error occurred. By default, PowerShell stops the current transaction and restores the system to its original state.
![]()
![]()
The previous example shows two things:
• We show that it is not just any kind of error that will stop our transaction. We must use the useTransaction parameter.
• We cause an error with the useTranscation parameter, which causes our transaction to stop and be rolled back by the system.
It is important to remember to use the useTranscation parameter when we want to take into account that we are dealing with a transaction.
This section focuses on a PowerShell script for reading and manipulating the Registry. The script is being presented as a reusable library file using reusable functions. To use such a library in PowerShell, you include or dot source the library file you want in your script or console session.
The script examples in this section contain a series of functions for reading and modifying the Registry on a local host or remote machine. To use these functions, scripters can copy them into a script or call them from a library file that has been included or dot sourced into the script.
In addition to reducing the time to create scripts, using reusable code stored in a library file makes your code more standardized and interchangeable. In fact, Jeffrey Snover, the PowerShell architect, has often recommended following this best practice for scripting.
LibraryRegistry.ps1 is a PowerShell script that we are going to look at in detail. A working copy of this script can be found at www.informit.com/title/9789780768687187. Before using this library file in a PowerShell console session, it must be dot sourced.
The dot sourcing format is a period followed by a space and then the filename, as in this example: . .myscript.ps1. To dot source LibraryRegistry.ps1 from a PowerShell console session, use the following command:
![]()
![]()
However, dot sourcing a script file every time you want to use its set of functions tends to be more work than it should be. When you dot source a script file, the contents are loaded into your current PowerShell console session’s global scope. If you close that session and open a new session, everything that was in the global scope is discarded, forcing you to dot source the script file every time you start a new session.
To avoid this problem, you can use a PowerShell profile to control the configuration of your PowerShell console. By using a PowerShell profile, such as Profile.ps1, and dot sourcing your script files in a profile file, you have everything you need already loaded in the global scope every time you start a new console session. Here’s an example of a Profile.ps1 file:
![]()
![]()
NOTE
LibraryRegistry.ps1 can also be dot sourced in a script file. Dot sourcing a .ps1 script file as such tells PowerShell to load the script into the calling script’s scope. Remember that a script’s parent scope can be a PowerShell session or another script.
After a new PowerShell session is loaded with the customized Profile.ps1, the console prompt looks like this:
![]()
![]()
By retrieving information from the Function PSDrive object, as shown in the following example, you can determine whether the Registry functions defined in LibraryRegistry.ps1 have been loaded into the current PowerShell session:
![]()
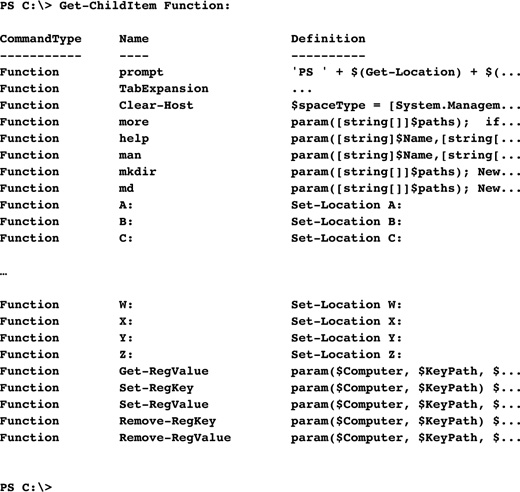
![]()
Notice in the preceding example that five different Reg functions can be used in the current PowerShell session to read and manipulate subkeys under the HKEY_LOCAL_MACHINE hive for the local host or remote machines. The remainder of this section gives you more information about these functions because we will look at each one and discuss what is being done by that particular piece of code.
The Get-RegValue function retrieves a Registry value for under the HKEY_LOCAL_MACHINE hive. This function requires defining the following parameters:
• $Computer—The name or IP address of the computer to retrieve Registry information from; “.” can be used to denote the local host.
• $KeyPath—The key path where the Registry value is located.
• $ValueName—The name of the Registry value from which you’re trying to retrieve data.
• $Type—A defined string representing the type of Registry value from which data is being retrieved, such as BIN (REG_BINARY), DWORD (REG_DWORD), EXP (REG_EXPAND_SZ), MULTI (REG_MULTI_SZ), and STR (REG_SZ).
Here is the code for the function itself:
![]()
![]()
The following example shows how to use this function:
![]()
![]()
The Set-RegKey function creates a Registry key under the HKEY_LOCAL_MACHINE hive. This function requires defining the following parameters:
• $Computer—The name or IP address of the computer to create the key on; “.” can be used to denote the local host.
• $KeyPath—The key path for the new Registry key.
Here is the code for the function itself:
![]()
![]()
Here’s an example of using this function:
![]()
![]()
The Set-RegValue function creates or changes a Registry value under the HKEY_LOCAL_MACHINE hive. This function requires defining the following parameters:
• $Computer—The name or IP address of the computer on which to create or change a Registry value; “.” can be used to denote the local host.
• $KeyPath—The key path where the Registry value is located.
• $ValueName—The name of the Registry value you’re trying to create or change.
• $Value—The data to which to set the Registry value.
• $Type—A defined string representing the type of Registry value being created or changed, such as BIN (REG_BINARY), DWORD (REG_DWORD), EXP (REG_EXPAND_SZ), MULTI (REG_MULTI_SZ), and STR (REG_SZ).
Here is the code for the function itself:
![]()
![]()
The following example shows how to use this function:
![]()
![]()
The Remove-RegKey function deletes a Registry key from the HKEY_LOCAL_MACHINE hive. This function requires defining the following parameters:
• $Computer—The name or IP address of the computer where you’re deleting the key; “.” can be used to denote the local host.
• $KeyPath—The key path for the Registry key to delete.
Here is the code for the function itself:
![]()
![]()
An example of using this function is shown here:
![]()
![]()
The Remove-RegValue function deletes a Registry value from the HKEY_LOCAL_MACHINE hive. You must define the following parameters:
• $Computer—The name or IP address of the computer where you’re creating the key; “.” can be used to denote the local host.
• $KeyPath—The key path where the Registry value resides.
• $ValueName—The name of the Registry value being deleted.
Here is the code for the function itself:
![]()
![]()
Here’s an example of using this function:
![]()
![]()
Now that you understand the Registry functions in the LibraryRegistry.ps1 script, you can practice using these functions. The first step is to create a Registry key called Turtle_Worm under the HKLMSoftware key on an Active Directory domain controller named DC1. To do this, use the following command:
![]()
![]()
The command returns a WMI object that contains no information. If any error occurred, the trap in the function writes the error information to the console, as shown in this example:
![]()
![]()
Next, you create values under the Turtle_Worm Registry key with the following set of commands:
![]()
![]()
These steps simulate creating a Registry key and its values. Next, you use the Registry library functions to determine whether a set of values exists. To do this, use the Get-RegValue function:
![]()
![]()
As you can see from the WMI objects returned, if a value exists, its information is returned as a sValue or uValue property. If the value or key doesn’t exist, the ReturnValue property is the integer 2. If the ReturnValue property is set to the integer 0, it indicates that the WMI method was completed successfully.
Now that you have verified that values under the Turtle_Worm Registry key exist on DC1, it’s time to delete the Turtle_Worm Registry key and its values. There are two methods to perform this task. First, you can delete each value by using the Remove-RegValue function, as shown in the following example:
![]()
![]()
The other method is using the Remove-RegKey function to delete the Turtle_Worm Registry key, which deletes all its subkeys and their values, as shown here:
![]()
![]()
Our previous example was basically focused on using what features PowerShell 1.0 provided us for remoting: WMI. We also wrote a bunch of functions to help us out. Let’s fast-forward now to the 2.0 CTP. 2.0 CTP provides us with built-in features for helping make things easier when dealing with remote systems.
We aren’t going to go over all of the core ideas from the previous example, but we will show a simple example using 2.0 features to show how things have improved. We also differentiate how things differ if we are dealing with a domain versus a workgroup or workgroups.
In this scenario, we work with two systems: one Windows Vista SP1 system and one Windows Server 2008 system. Let’s get right into how things can differ if we are in a domain versus a workgroup.
If we’re dealing with systems in a domain, we can create one single credential object and use it against all our systems. Even easier, if we’re actually running the script as a user with domain administrator privileges, we don’t need to worry about creating a credential object.
We are now going to look at an example where we are dealing with two different Administrator accounts. (Actually, they just have different passwords.) On Vista, we aren’t using the built-in Administrator account, but a user with Administrator privileges. On Server 2008, we are using the local Administrator account.
We are going to run our commands locally on the Vista box, so a credential object doesn’t need to be created locally, but we are going to also query the remote Server 2008 box. For that system, we need to create a credential object.
We list the version of PowerShell running on the local machine and the remote machine. We query the properties of this particular registry key: HKEY_LOCAL_MACHINESoftwareMicrosoftPowerShell1PowerShellEngineVersion.
We are going to try to use the Get-ItemProperty cmdlet to get our information. Let’s try to accomplish this with one command.
![]()
![]()
That one single command didn’t go well because our current credentials on the local machine don’t match what the remote system required. Because we can specify only one credential object on the command line as an argument to Invoke-Command, we use pre-created runspaces to run our command.
![]()
![]()
In the previous example, we created a credential object for the remote server. Then, we used that credential object to create a runspace on the remote system. Because we could use this runspace later, we pass the runspace object to a variable we could easily remember.
Our local runspace is simple to create and doesn’t actually require that we create a credential object, because our current logged on credentials are automatically used.
We then call the Invoke-Command cmdlet and pass it two runspaces that we just created. From there, the output is exactly what we wanted: a listing of the servers and the PowerShell version installed.
Underneath the covers, all the remote communications was done via WSMAN to the remote 2008 system.
Just to provide a good example of cleaning up after ourselves, we are going to remove the runspaces we just created. If we issue a Get-Runspace, we see all of the runspaces we created in our current session.
![]()
![]()
Closing these off is as easy as piping our Get-Runspace to Remove-Runspace, and all the runspaces will be gone.
This chapter focused on how to manage the Windows Registry using PowerShell.
We first looked at some of the basics of the Registry provider, and then showed how you can add additional registry hives beyond what is provided by default with PowerShell.
Next, we looked at 2.0 feature: registry transactions. We examined how transactions work and provided a few examples demonstrating the new functionality.
We looked at how PowerShell, in conjunction with WMI, can be used to remotely manage the Registry on a machine. Using both WMI and PowerShell, you should be able to accomplish any future Registry automation tasks required.
How to use reusable code and library files were also introduced in this chapter. As explained in Chapter 12, “PowerShell Scripting Best Practices,” reusing code is an important practice that can reduce the amount of time it takes to develop a script. This chapter further expanded the concept of reusable code by showing you how to implement it in the form of a library file based on a real-world example.
We finished off the chapter with a 2.0 CTP example of accessing a remote registry. With the remoting capabilities built-in 2.0, managing remote registries is much easier to accomplish.