IN THIS CHAPTER
• PowerShell Security Best Practices
• PowerShell 2.0 CTP2 and Windows Remote Management (WinRM)
• Summary
With today’s growing emphasis on security in all areas of the IT enterprise, it is becoming more critical than ever to ensure that the automation tools used to manage the enterprise can be operated in a secure manner. The Windows Scripting Host (WSH) introduced with Windows 98 provided some welcome new automation functionality for systems administrators, but at the same time, it introduced a new attack vector for virus writers. The fundamental issue with WSH is that it executes any script that is presented to it, regardless of whether the script contains a legitimate administrative command or a piece of malicious code. There is also no easy way to identify a beneficial or malicious script, or even to determine if the contents of a script have been modified. Because of these concerns, WSH quickly gained a reputation as a security vulnerability, despite its many benefits as a Windows automation tool.
One of the goals of the PowerShell team was to design an automation language that was secure by default, and also to provide the extensibility necessary to allow PowerShell to be used in an enterprise environment without compromising security. This is accomplished through a combination of several methods:
• Secure behavior by default—PowerShell implements a number of default behaviors such as requiring a full path to a script, and not automatically associating .ps1 files (the default PowerShell script extension) with PowerShell.
• Execution policies—PowerShell includes four levels of execution policy security, which provide complete control over the scripts that are run on a system with PowerShell installed. Out of the box, the Restricted execution policy is in force, which prevents any scripts from being run at all until the policy is updated to permit scripts to run.
• Code signing—PowerShell includes functionality to digitally sign scripts, which can be used in conjunction with PowerShell’s execution policies to allow only signed scripts to run.
Each of these topics is covered in detail in a subsequent section. In addition, this chapter also covers best practices for PowerShell security and specific examples on securely integrating PowerShell into your environment.
One of the key security issues with the Windows Scripting Host’s handling of scripts is that a user can simply use Windows Explorer to navigate to a folder, double-click on a script, and potentially wreak havoc on the system. This is because by default, certain file extensions such as .vbs or .js are associated with the Windows Scripting Host. When a file with one of these extensions is double-clicked in Explorer, WSH runs the script. To ensure that PowerShell scripts cannot be automatically invoked by clicking on the script, PowerShell’s .ps1 script files are associated by default with the Notepad application. In other words, you can’t just double-click a .ps1 file to run it. Instead, PowerShell scripts must run from a PowerShell session by using the relative or absolute path or through the cmd command prompt by using the PowerShell executable.
Another default PowerShell security measure is that to run or open a file in the current directory from the PowerShell console, you must prefix the command with . or ./. This feature prevents PowerShell users from accidentally running a command or PowerShell script without explicitly specifying the script to be executed.
An execution policy defines restrictions on how PowerShell allows scripts to run or what configuration files can be loaded. PowerShell has four execution policies, discussed in more detail in the following sections: Restricted, AllSigned, RemoteSigned, and Unrestricted.
By default, PowerShell is configured to run under the Restricted execution policy. This execution policy is the most secure because it allows PowerShell to operate only in an interactive mode. This means no scripts can be run, and only configuration files digitally signed by a trusted publisher are allowed to run or load.
The AllSigned execution policy is a notch under Restricted. When this policy is enabled, only scripts or configuration files that are digitally signed by a publisher you trust can be run or loaded. Here’s an example of what you might see if the AllSigned policy has been enabled:
![]()
![]()
Signing a script or configuration file requires a code-signing certificate. This certificate can come from a trusted certificate authority (CA), or you can generate one with the Certificate Creation Tool (Makecert.exe). Usually, however, you want a valid code-signing certificate from a well-known trusted CA, such as Verisign, Thawte, or your corporation’s internal public key infrastructure (PKI). Otherwise, sharing your scripts or configuration files with others might be difficult because your computer isn’t a trusted CA by default.
NOTE
The “Code Signing” section of this chapter explains how to obtain a valid trusted code-signing certificate. Reading this section is strongly recommended because of the importance of digitally signing scripts and configuration files.
The RemoteSigned execution policy is designed to prevent remote PowerShell scripts and configuration files that aren’t digitally signed by a trusted publisher from running or loading automatically. Scripts and configuration files that are locally created can be loaded and run without being digitally signed, however.
A remote script or configuration file can be obtained from a communication application, such as Microsoft Outlook, Internet Explorer, Outlook Express, or Windows Messenger. Running or loading a file downloaded from any of these applications results in the following error message:
![]()
![]()
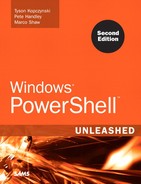
To run or load an unsigned remote script or configuration file, you must specify whether to trust the file. To do this, right-click the file in Windows Explorer and click Properties. In the General tab, click the Unblock button (see Figure 5.1).
After you trust the file, the script or configuration file can be run or loaded. If it’s digitally signed, but the publisher isn’t trusted, however, PowerShell displays the following prompt:
![]()
![]()
In this case, you must choose whether to trust the file content.
NOTE
Please see the section “Code Signing” section for more details on the options presented at this prompt.
As the name suggests, the Unrestricted execution policy removes almost all restrictions for running scripts or loading configuration files. All local or signed trusted files can run or load, but for remote files, PowerShell prompts you to choose an option for running or loading that file, as shown here:
![]()
![]()
To change the execution policy, you use the Set-ExecutionPolicy cmdlet, shown here:
![]()
![]()
If you want to know the current execution policy, use the Get-ExecutionPolicy cmdlet:
![]()
![]()
By default, when PowerShell is first installed, the execution policy is set to Restricted. As you know, default settings never stay default for long. In addition, if PowerShell is installed on many machines, the likelihood of its execution policy being set to Unrestricted increases. Fortunately, Microsoft has provided a Group Policy Administrative Template called PowerShellExecutionPolicy.adm to enable Active Directory administrators to centrally control the PowerShell execution policy at a domain level. This is accomplished by creating a Group Policy Object (GPO) to define the desired execution policy setting, which is then applied by all machines in the domain where PowerShell is installed. To create a new GPO to centrally administer the PowerShell execution policy for workstations in your domain, follow these steps:
1. Log on to a GPO management machine as the GPO administrator.
2. Download and install the Administrative Templates for Windows PowerShell. Visit www.microsoft.com and search for “Administrative Templates for Windows PowerShell,” and then download the file from the link provided.
3. Using the Group Policy MMC, create a GPO named PowerShell Script Execution Policy.
4. In the console tree, click to expand Computer Configuration and then Administrative Templates.
5. Right-click Administrative Templates and click Add/Remove Templates in the shortcut menu.
6. Navigate to the folder with the PowerShellExecutionPolicy.adm file. By default, this file is located in C:Program FilesMicrosoft Group Policy. Select the file, click Open, and then click Close. The PowerShell node is then displayed under the Administrative Templates node.
7. Click the Administrative Templates node, and then click View, Filtering from the Group Policy MMC menu. Click to clear the Only show policy settings that can be fully managed checkbox. Clearing this option enables you to manage preference settings.
8. Next, click the PowerShell node under Administrative Templates.
9. In the details pane, right-click Security Settings and click Properties in the shortcut menu.
10. Click Enabled.
11. Set the Execution Policy to one of these values: Restricted, AllSigned, RemoteSigned, or Unrestricted.
12. Close the PowerShell Script Execution Policy GPO.
13. Link the PowerShell Script Execution Policy GPO at the domain level, and then close the Group Policy MMC.
Controlling the execution policy through a GPO preference setting might seem like a less than perfect solution. After all, a preference setting doesn’t offer the same level of security as an execution policy setting, so users with the necessary rights can modify it easily. This lack of security is probably why Microsoft removed the original ADM file from PowerShell. A future release of PowerShell might allow controlling the execution policy with a valid GPO policy setting.
In an effort to learn how to sign PowerShell scripts and configuration files, you have searched the Internet, read several blogs about code signing, reviewed the PowerShell documentation, and even browsed through some PowerShell books. Yet the more you read about code signing, the more confused you are. Finally, in frustration, you open your PowerShell console and enter the following command:
![]()
![]()
Before you enter this command, remember what you learned about execution policies earlier in this chapter. Using the Unrestricted setting negates an important security layer that was designed to prevent malicious code from running on your system. Code signing is another essential component of PowerShell security, but many people believe it’s too complicated to learn and set their execution policies to Unrestricted to avoid having to use it. In response to an entry on script signing at Scott Hanselman’s blog (www.hanselman.com/blog), one person commented that “Handling code signing certificates is way over the head of most users, including average developers and admins.” This statement indicates a real need that should be addressed, hence this section devoted to code signing. Code signing seems complicated on the surface, but with some clear instructions, the process is easy to understand. Scripters, developers, and administrators should be familiar with it as an important part of their overall security efforts.
In short, code signing is the process of digitally signing scripts, executables, dynamic link libraries (DLLs), and so forth to establish a level of trust for the code. The trust granted to digitally signed code is based on two assumptions. One, a signed piece of code ensures that the code hasn’t been altered or corrupted since being signed. Two, the digital signature serves to prove the identity of the code’s author, which helps you determine whether the code is safe for execution.
These two assumptions are a way to ensure the integrity and authenticity of code. However, these assumptions alone are no guarantee that signed code is safe to run. For these two assumptions to be considered valid, you need the digital signature and the infrastructure that establishes a mechanism for identifying the digital signature’s originator.
A digital signature is based on public key cryptography, which has algorithms used for encryption and decryption. These algorithms generate a key pair consisting of a private key and a public key. The private key is kept secret so that only the owner has access to it, but the public key can be distributed to other entities. Some form of secure interaction is then required between other entities and the key pair owner. Depending on the type of interaction, one key is used to lock (encrypt) the communication, and the other key is used to unlock (decrypt) the communication. In digital signatures, the private key is used to generate a signature, and the public key is used to validate the generated signature. The process is as follows:
1. A one-way hash of the content (documents, code, and so forth) being signed is generated by using a cryptographic digest.
2. The hash is then encrypted with the private key, resulting in the digital signature.
3. Next, the content is transmitted to the recipient.
4. The recipient then creates another one-way hash of the content and decrypts the hash by using the sender’s public key.
5. Finally, the recipient compares the two hashes. If both hashes are the same, the digital signature is valid and the content hasn’t been modified.
NOTE
A one-way hash (also known as a message digest, fingerprint, or compression function) is a cryptographic algorithm that turns data into a fixed-length binary sequence. The term one-way comes from the fact that it is difficult to derive the original data from the resulting sequence.
To associate an entity, such as an organization, a person, or a computer, with a digital signature, a digital certificate is used. A digital certificate consists of the public key and identifying information about the key pair owner. To ensure a digital certificate’s integrity, it’s also digitally signed. A digital certificate can be signed by its owner or a trustworthy third party called a certificate authority (CA).
The act of associating code with the entity that created and published it removes the anonymity of running code. Furthermore, associating a digital signature with a code-signing certificate is much like using a brand name to establish trust and reliability. Armed with this information, users of PowerShell scripts and configuration files can make informed decisions about running a script or loading a configuration file. This, in a nutshell, is why code signing is an important aspect of the PowerShell security framework.
There are two methods for obtaining a code-signing certificate: generating self-signed certificates and using a CA from a valid public key infrastructure (PKI).
Generating a self-signed certificate for signing your PowerShell scripts and configuration files is simpler and quicker and has the advantage of not costing anything. However, no independent third party verifies the certificate’s authenticity, so it doesn’t have the same level of trust that’s expected from code signing. As a result, no other entity would trust your certificate by default. To distribute your PowerShell script or configuration file to other machines, your certificate would have to be added as a trusted root CA and a trusted publisher.
Although changing what an entity trusts is possible, there are two problems. One, entities outside your sphere of control might not choose to trust your certificate because there’s no independent method for verifying who you are. Two, if the private key associated with your self-signed certificate becomes compromised or invalid, there’s no way to manage your certificate’s validity on other entities. Given these problems, limiting the use of self-signed certificates to a local machine or for testing purposes is recommended.
If you plan to digitally sign your scripts and configuration files so that they can be used in an enterprise or even the public realm, you should consider the second method of obtaining a code-signing certificate: a CA from a valid PKI. A valid PKI can mean a well-known and trusted commercial organization, such as www.globalsign.net, www.thawte.com, www.verisign.com, or an internal PKI owned and operated by your organization. Obtaining a code-signing certificate from an external PKI can be quick and easy, as long as you keep a few caveats in mind.
First, a certificate must be purchased from the owner of the external PKI. Second, because you’re purchasing the certificate from an outside entity, you’re placing a lot of trust in the organization’s integrity. For these reasons, code-signing certificates from commercial PKIs should be limited to certificates used to sign scripts and configuration files for public distribution.
Therefore, an internal PKI should be used for scripts and configuration files not meant for public consumption. Keep in mind that deploying and managing an internal PKI takes planning, effort, and money (Hardware Security Modules [HSM], security consultants, and so forth can be expensive). Most organizations tend to shy away from the effort required to set up a PKI. Instead, they bring up CAs ad hoc, purchase certificates from commercial PKIs, or ignore PKI requirements. A commercial PKI might not provide the level of trust your organization needs, and the ad-hoc approach isn’t recommended because it reduces trust of certificates generated by rogue CAs which are CAs that have a low level of assurance around their integrity. Having no valid PKI infrastructure can make internal distribution of digitally signed files difficult. Finally, organizations that ignore PKI requirements illustrate another drawback of using an internal PKI: time.
If there’s no PKI in your organization, obtaining a code-signing certificate might take an extended period of time. PKIs do not materialize overnight. If you have identified a PKI requirement for your scripts, there are probably additional PKI requirements in your organization. These requirements need to be identified and considered before a PKI is deployed. Trying to drive a PKI deployment around your needs alone isn’t the best approach for an infrastructure service that needs to meet the needs of an entire organization. After you have presented the PKI requirement to your organization, you might have to wait for the services to be provided. However, after the PKI is in place, you can obtain code-signing certificates knowing that the infrastructure fully supports the distribution of your signed PowerShell scripts and configuration files.
This method of creating a self-signed certificate is based on using the makecert utility, which is part of the .NET Framework Software Development Kit (SDK). Follow these steps:
1. Download the latest Microsoft .NET Framework SDK by visiting www.microsoft.com and searching for “Microsoft .NET Framework SDK.” At the time of this writing, the current .NET Framework SDK version is 2.0.
2. Install the SDK on the machine where you want to generate the self-signed certificate.
3. Locate the makecert utility on your system. The default location is C:Program FilesMicrosoft.NETSDKv2.0Bin.
4. Open a cmd command prompt and change the working directory to the location of the makecert utility using the cd command.
5. Create a self-signed certificate by using the following command:
![]()
![]()
You should see output similar to the following:
![]()
![]()
6. Finally, use the following PowerShell command to verify that the certificate was installed:
![]()
![]()
This method is based on obtaining a code-signing certificate from a Microsoft Windows CA. These steps assume a PKI has been deployed at your organization. If not, installing Windows Certificate Services to meet your immediate need isn’t recommended. Follow these steps to set up a code-signing certificate:
1. Request that your PKI administrator create and enable a code-signing certificate template for your PowerShell scripts and configuration files.
2. Use Internet Explorer to access the Certificate Services Web Enrollment site at https://CAServerName/certsrv (replacing CAServerName with the name of your server).
3. Click the Request a Certificate link.
4. On the Request a Certificate page, click the Advanced certificate request link.
5. On the Advanced Certificate Request page, click the Create and submit a request to this CA link.
6. In the Certificate Template section, click to select the code-signing certificate your PKI administrator created.
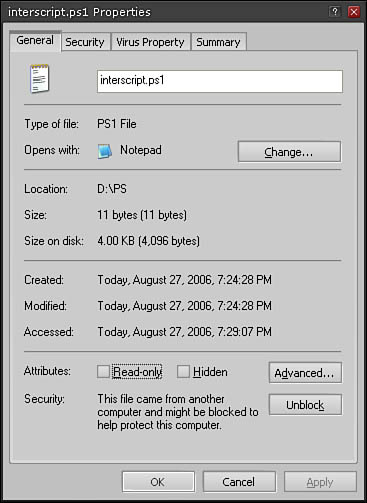
7. Enter the rest of the identifying information and certificate request options according to your organization’s certificate policy. You can use Figure 5.2 as a guideline.
8. Click the Submit button.
9. In the Potential Scripting Violation dialog box that opens (see Figure 5.3), click Yes to continue.

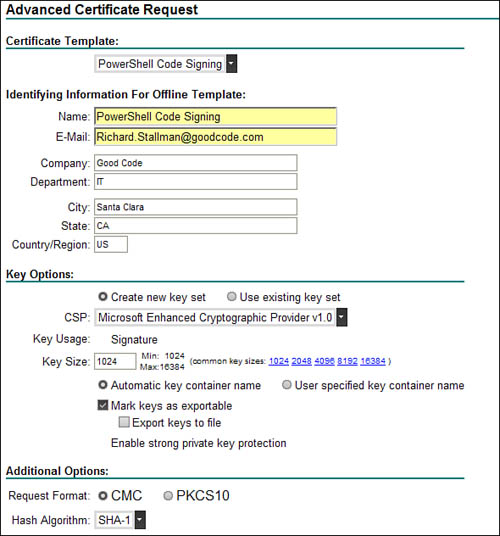
10. Next, if applicable, set the private key security level based on your organization’s certificate policy (see Figure 5.4), and then click OK.
11. If your organization’s certificate policy requires approval from a certificate manager, then ask your certificate manager to approve the certificate request you just submitted. If approval isn’t required, go to step 16.
12. After the certificate request has been approved, use Internet Explorer to access the Certificate Services Web Enrollment site at https://CAServerName/certsrv (replacing CAServerName with the name of your server).
13. Click the View the status of a pending certificate request link.
14. On the next page, click the appropriate certificate request link.
15. On the Certificate Issued page, click the Install this certificate link.
16. In the Potential Scripting Violation dialog box that opens (see Figure 5.5), click Yes to continue.

17. Finally, the Certificate Services Web Enrollment site states that the certificate was installed successfully. Use the following PowerShell command to verify the certificate installation status:
![]()
![]()
When a digital certificate is generated, sometimes the private key is stored in a PVK (private key) file, and the corresponding digital certificate is stored in a Software Publishing Certificate (SPC) file. When a code-signing certificate has been obtained from Verisign or Thawte, for example, the digital certificate is issued to you as a SPC and PVK file combination. If you want to use the code-signing certificate to digitally sign PowerShell scripts or configuration files, you must import the SPC and PVK file combination into your personal certificate store.
NOTE
A certificate store is a location that resides on a computer or device that is used to store certificate information. In Windows, you can use the Certificates MMC snapin to display the certificate store for a user, a computer, or a service. Your personal certificate store is referring to your own “user” certificate store.
To import the SPC+PVK, you use the Microsoft utility called PVK Digital Certificate Files Importer. To download it, visit www.microsoft.com and search for “PVK Digital Certificate Files Importer.”
Next, enter the following command to import the SPC+PVK, substituting your own filenames:
![]()
![]()
When signing a PowerShell script, you use the Set-AuthenticodeSignature cmdlet, which takes two required parameters. The first parameter, filePath, is the path and filename for the script or file to be digitally signed. The second parameter, certificate, is the X.509 certificate used to sign the script or file. To obtain the X.509 certificate in a format the Set-AuthenticodeSignature cmdlet understands, you retrieve the certificate as an object with the Get-ChildItem cmdlet, as shown in this example:
![]()
![]()
To retrieve the certificate you want from the user’s certificate store, you use the Get-ChildItem cmdlet with the codeSigningCert SwitchParameter. This SwitchParameter can be used only with the PowerShell Certificate provider and acts as a filter to force the Get-ChildItem cmdlet to retrieve only code-signing certificates. Last, to ensure that the entire certificate chain is included in the digital signature, the includeChain parameter is used.
After the Set-AuthenticodeSignature cmdlet has been executed successfully, the signed file has a valid digital signature block containing the digital signature. A signature block in a PowerShell script or configuration file is always the last item in the file and can be found easily because it’s enclosed between SIG # Begin signature block and SIG # End signature block, as shown here:
![]()
![]()
To verify the digital signature of PowerShell scripts and configuration files, you use the Get-AuthentiCodeSignature cmdlet. It returns a valid status or an invalid status, such as HashMismatch, indicating a problem with the file.
![]()
![]()
Invalid status:
![]()
![]()
Based on the error in the preceding example, the script has been modified or tampered with or is corrupt. If the script has been modified by its owner, it must be signed again before it can be used. If the script has been tampered with or is corrupt, it should be discarded because its validity and authenticity can no longer be trusted.
Distributing signed PowerShell scripts and configuration files requires the user to determine whether to trust code from a particular publisher. The first step is to validate the publisher’s identity based on a chain of trust. To establish a chain of trust, the user uses the publisher’s code-signing certificate associated with the digital signature to verify that the certificate owner is indeed the publisher. For example, Figure 5.6 shows an unbroken path (or chain) of valid certificates from the publisher’s certificate to a trusted root certificate (or trust anchor).

When a well-known trusted public root CA or internally trusted root CA is the trust anchor for the publisher’s certificate, the user explicitly trusts that the publisher’s identity claims are true.
For Windows users, if a root CA is considered trusted, that CA’s certificate resides in the Trusted Root Certification Authorities certificate store (see Figure 5.7).

When a root CA is not a valid trust anchor or the certificate is self-signed, the user needs to decide whether to trust a publisher’s identity claim. If the user determines the identity claim to be valid, the root CA’s certificate or the self-signed certificate should be added to the Trusted Root Certification Authorities certificate store to establish a valid chain of trust.
After the publisher’s identity has been verified or trusted, the next step is deciding whether the signed code is safe for execution. If a user has previously decided that code from a publisher is safe for execution, the code (PowerShell script or configuration file) runs without further user action.
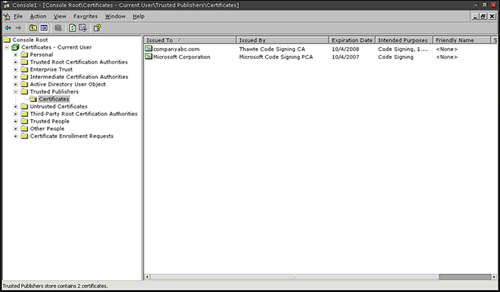
For Windows users, if a publisher is considered trusted, its code-signing certificate resides in the Trusted Publishers certificate store (see Figure 5.8).
If a publisher is not trusted, PowerShell prompts the user to decide whether to run signed code from that publisher, as shown in this example:
![]()
![]()
The following list explains the available options:
• [V] Never run—This option places the publisher’s certificate in the user’s Untrusted Certificates certificate store. After a publisher’s certificate has been determined to be untrusted, PowerShell never allows code from that publisher to run unless the certificate is removed from the Untrusted Certificates certificate store or the execution policy is set to Unrestricted or RemoteSigned.
• [D] Do not run—This option, which is the default, halts execution of the untrusted code.
• [R] Run once—This option allows one-time execution of the untrusted code.
• [A] Always run—This option places the publisher’s certificate in the user’s Trusted Publishers certificate store. Also, the root CA’s certificate is placed in the Trusted Root Certification Authorities certificate store, if it isn’t already there.
You might be wondering how to control what code is considered trusted in your organization. Obviously, having users or machines decide what to trust defeats the purpose of distributing signed code in a managed environment. If your environment is managed, your PKI deployment should have methods for controlling what’s trusted in an organization. If your organization is a Windows environment, the most common method is through GPO. For example, you can define trusted publishers by using a Certificate Trust List (CTL) or manage them through the Internet Explorer Maintenance extension.
Determining trust in the public realm is entirely different. When establishing trust between two private entities, they are able to define what is and isn’t trusted. When dealing with public entities, you don’t have this level of control. It is up to those public entities to determine what they do or do not trust.
Security has often been an area that was not considered during the development of software. Unfortunately, this has frequently been true for scripting as well. This type of approach is no longer feasible in today’s security-focused business environments. A failure of technology security in a business today can have a lasting impact on the financial health of a business, damage its reputation in the business community, and even expose the customers of the business to such threats as identity theft. For these reasons, the next three sections may be the most important sections in this chapter because they deal with PowerShell script security best practices.
As emphasized earlier in this chapter, you should always digitally sign your PowerShell scripts and configuration files so that users and machines that run your scripts can trust that the code is actually from you and hasn’t been tampered with or corrupted. Adhering to this practice also means you can keep the PowerShell execution policy on your machine and others in your organization set to AllSigned.
NOTE
Code signing doesn’t apply just to PowerShell scripts and configuration files. You can apply the principles of code signing to other items, such as executables, macros, DLLs, other scripts, device drivers, firmware images, and so forth. Other code can benefit from the security of digital signatures, and you can further limit the possibility of untrusted code running in your environment.
Setting your execution policy to Unrestricted is like leaving an open door for malicious code to run on your systems. Because of this risk, you should set your execution policy to RemoteSigned at a minimum. This setting still allows you to run scripts and load configuration files created locally on your machine, but it prevents remote code that hasn’t been signed and trusted from running. However, the RemoteSigned setting isn’t foolproof and could allow some remote code to run through PowerShell.
Following these guidelines and becoming proficient in code signing are crucial to guaranteeing that your PowerShell environment doesn’t become a target for malicious code. Setting your execution policy to AllSigned increases security even more because it requires that all scripts and configuration files be signed by a trusted source before running or loading them.
IT security practices include following the principle of least privileges, which ensures that entities such as users, processes, and software are granted only the minimum rights needed to perform a legitimate action. For example, if a user doesn’t need administrative rights to run a word-processing program, there’s no reason to grant that user the administrative level of privileges.
The principle of least privileges also applies to scripting. When you’re developing a script, make an effort to code in a manner that requires the minimum rights to run the script. In addition, document the required rights to run your script in case they aren’t apparent to users. If users don’t know the required rights to run a script, they might try running it with administrative rights, which increases the possibility of causing unwanted and possibly damaging changes to your environment.
With the introduction of PowerShell 2.0 CTP2, the PowerShell team has introduced the concept of remoting, which allows PowerShell commands to be executed against remote machines by leveraging the capabilities of a protocol called WinRM. As described in Chapter 2, “Basic PowerShell Concepts,” WinRM is Microsoft’s implementation of the WS-Management Protocol, which is a Simple Object Access Protocol (SOAP)-based protocol that provides a common method for systems to access and exchange management information. Although the addition of remoting is a major step forward in the capabilities of PowerShell, it also introduces a whole new range of potential security concerns. Fortunately, it is possible to centrally manage and configure WinRM to ensure that these powerful new remoting capabilities can be implemented securely in an enterprise. This section provides an overview of the tools and techniques needed to accomplish this.
The primary utility used to manage WinRM settings is called winrm.cmd. After you have installed WinRM using the procedures described in Chapter 2, you can enter the command winrm from a PowerShell prompt to get an overview of the syntax and available commands as shown in the following:
![]()
![]()
After WinRM is first installed, remote functionality is disabled by default. To perform an initial default setup of WinRM, enter the command winrm quickconfig at the PowerShell command prompt. This command performs several tasks:
• Sets the WinRM service to automatically start.
• Starts the WinRM service.
• Creates a WinRM listener to accept WS-Man requests.
• Enables the WinRM firewall exception.
Following is an example of the output of the winrm quickconfig command:
![]()
![]()
After the initial configuration of WinRM has been performed, additional customization of the WinRM service on the machine can be performed using the winrm command-line utility, such as changing the listener ports from the default of 80 and 443.
WinRM also includes a component known as Windows Remote Shell (WinRS). WinRS is a tool that can be used to remotely execute programs and scripts on a remote machine. WinRS is also used extensively by PowerShell 2.0 CTP2’s remoting functions. Here’s an example of running a WinRS command on a Windows XP computer named XP1 to obtain the IP configuration information from a remote computer named XP2:
![]()
![]()
Although this command looks straightforward, there are a number of things going on in the background that may not be immediately apparent. Notice that the command winrs -r:XP2.companyabc.com ipconfig /all does not specify credentials to be used to connect to the XP2 computer, yet the command succeeds in returning the IP configuration information from XP2. This command works because both XP1 and XP2 are members of the companyabc.com Active Directory domain, and WinRS automatically attempts to authenticate to a remote machine using Kerberos authentication if no credentials are specified in the winrs command. In this case, the account that was used to run the command on XP1 was a member of the Domain Admins group in the companyabc.com domain, so WinRS was able to authenticate to the companyabc.com domain via Kerberos and access the XP2 machine using the logged-in credentials of the current user account on XP1. For situations where a remote machine may not support pass-through authentication via Kerberos, as shown in the example (such as workgroup machines or machines belonging to an untrusted Active Directory domain), WinRS also supports Basic authentication, Digest authentication, and Negotiate authentication. If none of these authentication methods are available, WinRS also provides support for maintaining a static list of trusted hosts. Finally, by default, all communication between the WinRS client and the WinRM service are encrypted.
NOTE
Although it is possible to use WinRS to run commands against a target machine that does not belong to the same Active Directory domain as the source machine, doing so lowers the effective security of WinRM on both machines, and should be done only in a lab environment to ensure that the machines are not compromised. Here is an example of how to do this using the WinRM command to allow a domain workstation to run remote commands against a workgroup server:
On the workstation, enter the following commands:
WinRM set winrm/config/service/auth @{Basic="true"}
WinRM set winrm/config/client @{TrustedHosts="<local>"}
WinRM set winrm/config/client @{TrustedHosts="ServerName"}
On the server, enter the following commands:
WinRM set winrm/config/service/auth @{Basic="true"}
WinRM set winrm/config/client @{TrustedHosts="<local>"}
WinRM set winrm/config/client @{TrustedHosts="WorkstationName"}
These commands enable the use of Basic authentication between the workstation and the server, allow the use of a local TrustedHosts file, and specify that the workstation explicitly trust the server and the server explicitly trust the workstation for WinRM traffic. You can now enter the following command on the workstation, specifying the appropriate credentials for the server, and run a remote ipconfig /all command against the server:
Winrs –r:ServerName –u:ServerUserName –p:ServerUserPassword ipconfig /all
As you can see from the WinRS example, WinRM and WinRS support many different authentication options, which if improperly configured can reduce the effective security of your environment and leave machines vulnerable to attack. Although WinRM and WinRS are generally secure when the installation defaults are left in place, it is easy for a locally privileged user to change these settings. To ensure that WinRM and WinRS configuration settings are consistently applied to machines that belong to an Active Directory domain, WinRM and WinRS configuration can be performed through Active Directory Group Policy.
When WinRM is installed on a machine, two new administrative template files are copied to C:WINDOWSsystem32GroupPolicyAdm. These files are named windowsremotemanagement.adm and windowsremoteshell.adm, and are used to manage Group Policy settings for the WinRS client and WinRM service.
To create a new GPO to centrally administer the WinRM configuration settings for machines in your domain, follow the steps:
1. Install WinRM on a GPO management machine, as described in Chapter 2.
2. Log on to a GPO management machine as the GPO administrator.
3. Using the Group Policy MMC, create a GPO named WinRM Configuration Policy.
4. Right-click the WinRM Configuration Policy and choose Edit.
5. In the console tree, click to expand Computer Configuration > Administrative Templates > Windows Components.
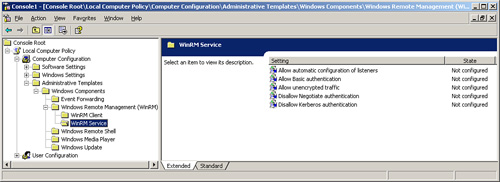
6. You will see two nodes named Windows Remote Management (WinRM) and Windows Remote Shell, as shown in Figure 5.9.

7. The Windows Remote Management (WinRM) node contains configuration settings for the WinRM Client and the WinRM Service. The Windows Remote Shell node contains settings that apply to the WinRS Client.
8. Review the available configuration settings under WinRM Client and WinRM Service, as shown in Figures 5.10 through 5.12.


9. Depending on the security requirements of your environment, you may want to disable certain functionality globally. For example, both the WinRM Client and WinRM Service support the option to disallow Basic authentication as well as disallow unencrypted traffic. The WinRM Client also supports disallowing trusted hosts.
After you have configured the settings that you want, close the WinRM Configuration Policy GPO.
Link the WinRM Configuration Policy GPO at the domain level, and then close the Group Policy MMC.
This chapter provided an in-depth exploration into PowerShell security. Although this chapter covered a wide range of security topics and technical concepts, the key thing to remember is that PowerShell 2.0 CTP2 was designed to be secure by default, and it provides a number of powerful mechanisms to ensure that it can be integrated into any Windows environment while adhering to security best practices. However, as you begin to work with PowerShell and create your own scripts, it is crucial to have a clear understanding of code signing and to always sign any scripts that are used in a production environment. Although code signing is a new concept for many scripters, and the concepts involved may seem arcane at first, code signing is a key defense against malicious or even just erroneous code that can easily damage your environment.
Just as Active Directory Group Policy can be used to establish a baseline of settings for PowerShell and WinRM in your environment, PKI also allows you to develop a framework of trust that allows your signed scripts to be distributed throughout your enterprise and used with a high degree of confidence. Although this chapter discusses PKI primarily in the context of signing code, PKI is an extremely powerful and capable set of tools that provides the technical means to accurately establish a trust level in almost any set of circumstances. Although PKI is a complex topic, there can be tremendous benefits for your organization if your interests lead you to extend the lessons learned in this chapter to your enterprise at large.