
Choosing the Right Text Editor for You
In Part III of this book, you dig in to WordPress themes, work with CSS and HTML, and type template tags and a bit of PHP. This chapter arms you with the tools you need to gather to prepare for a smooth and efficient experience.
Next to reliable ol’ pen and paper, nothing beats a good, solid text editor. I admit, I’m a little old school, so for things like grocery lists and jotting down ideas, I stick with a pad of paper and a pen. Unfortunately, writing code is difficult with a pen and paper, and it doesn’t translate very well when I need to publish it to the Internet. That’s when a basic text-editor program comes in very handy. I always have one open on my computer (usually several instances of my favored text editor, actually) and use it every day for writing Cascading Style Sheets (CSS) and HTML as well as coding WordPress templates and themes.
![]() Make sure that you use a text editor and not a word processor, such as Microsoft Word, to write any code because a word processing program automatically inserts formatting, characters, and hidden spaces. When you’re writing code, the last thing you want is anything but your own code inserted into the document — so stick with a basic text editor.
Make sure that you use a text editor and not a word processor, such as Microsoft Word, to write any code because a word processing program automatically inserts formatting, characters, and hidden spaces. When you’re writing code, the last thing you want is anything but your own code inserted into the document — so stick with a basic text editor.
The text editors I describe in this section are programs that you install on your computer. Some of them are available only for Windows, and some only for Macs — I specify as such in their descriptions.
Notepad (Windows)
Notepad is a basic, plain text editor that you can use to write code without the fuss and worry of text formatting. Notepad doesn’t support any special document formatting or characters, which makes it great for writing code and Web documents.
Notepad is the go-to text editor for most Windows users because it’s a Microsoft product that’s packaged in every Windows operating system. Often, people use Notepad to view and edit text files with the .txt extension, but many people, including myself, use it to create basic CSS and HTML files, as well.
Notepad, by default, saves files with a .txt extension. With WordPress templates and theme files, you typically save files with a .php or .css extension, so make sure you save them correctly. To save a file with a .php or .css extension with Notepad, follow these quick steps:
1. Choose Start⇒Programs⇒Accessories⇒Notepad.
Notepad opens, and you can start typing your code.
2. Create your CSS or PHP document.
Check out Chapter 14 for details on how to create CSS.
3. Choose File⇒Save As, and then from the Save In drop-down list, choose the location on your computer where you want to save the file.
4. Type the filename, including the extension, in the File Name field.
In Figure 5-1, the name of my PHP file is header.php. However, if you’re saving a CSS document, the extension is .css, such as style.css.

Figure 5-1: Saving a PHP document in Notepad.
5. Choose All Files in the Save as Type drop-down list (see Figure 5-1).
By default, Notepad wants to save the file as Text Documents (*.txt).
6. Leave ANSI chosen in the Encoding field.
This is default character encoding and is okay to leave as is.
7. Click Save.
Notepad++ (Windows)
Notepad++ is a text editor for Windows and is often referred to as “Notepad on steroids” because the interface looks a lot like regular Notepad — but that is where the similarities end. Notepad++ has advanced features such as color-coded syntax (see the nearby sidebar “Code syntax highlighting”), code indentation, and line numbering, which make it an extremely useful and helpful application for writing and editing code. Figure 5-2 demonstrates the code syntax formatting of this editor.

Figure 5-2: Notepad++ with color-coded syntax.
Notepad++ supports many programming languages, including the main ones you use for this book: CSS, HTML, and PHP. Notepad++ is free open-source software (see Chapter 1)! You can download it to your computer from http://notepad-plus-plus.org/download.
TextMate (Mac)
TextMate is an Apple product and, as such, can be used only on a Mac. TextMate is the most popular text editor for Mac and is referred to as “the missing editor.” Like Notepad++, TextMate is a syntax editor — it color-codes the markup and code that you write and has several features expected of most syntax editors, including
![]() Easily searching and replacing
Easily searching and replacing
![]() Auto-indenting and color-coding markup and code
Auto-indenting and color-coding markup and code
![]() Opening several documents, each in their own tab, when applicable
Opening several documents, each in their own tab, when applicable
![]() Working as an external editor for FTP programs
Working as an external editor for FTP programs
TextMate isn’t free, however. You can download a free 30-day trial from http://macromates.com. After the free trial ends, you can buy a single-user license for $56.
Understanding and Choosing a Web Browser
Knowing which Web browser to use as your primary browser can be confusing because so many are available. Everyone has their favorite browser, and if you don’t already, one will emerge as your favorite for one reason or another. Each browser system has a different look and feel as well as different features and tools that make one your preferred browser that you use for your personal browsing experience.
One thing you need to keep in mind, however, is that you must have access to all major browsers so that you can test and view your Web designs in different browsers to make sure they render and look the same.
![]() If you can, download and install all the browsers I discuss in this section to your computer so you have them at your fingertips to test your designs across the systems. Some browsers are system-specific (either only for Windows or only for Macs), so use the ones that are for your system.
If you can, download and install all the browsers I discuss in this section to your computer so you have them at your fingertips to test your designs across the systems. Some browsers are system-specific (either only for Windows or only for Macs), so use the ones that are for your system.
Discovering browsers and tools
A multitude of different browser systems are available on the Web. This section takes you through five major browsers that are the most popular among Internet users. Additionally, you find some helpful tools, add-ons, and extensions that assist you with your Web design efforts in the different browser systems. These include some of my favorite and must-have tools I use on a regular basis.
As far as the design and development communities are concerned, the choice over which Web browser to use typically falls on how compliant the browser is with open Web standards developed by the World Wide Web Consortium (W3C), an international community that develops Web standards to ensure long-term Web growth (www.w3.org). As a designer, you should at least have a working knowledge of what the W3C is and the standards it supports and promotes. You can read about the W3C vision and mission statement at www.w3.org/consortium/mission.html.
Internet Explorer
Internet Explorer (IE) is by far one of the most popular browsers because it’s part and parcel of all Microsoft Windows operating systems. Over the years, IE has struggled with its reputation of not keeping up, and being compliant, with Web standards and CSS rendering that the development and design communities have come to love and expect from other browser systems. This is largely because of the layout engine in use at the foundation of IE. (For more on layout engines, see “Understanding cross-browser compatibility,” later in this chapter.)
One of the challenges that designers come across is the different versions of Internet Explorer that are widely used across the Web. With each new version, Microsoft’s flagship browser comes closer and closer to compliance with open Web standards, however. But because IE is the browser present with millions of operating systems across the world, not every individual user or company is quick to adopt the new versions as they are released. This results in several versions of IE in use across the world, and designers generally make an effort to make sure their designs render correctly on, at least, the last two to three recent versions of IE.
![]() Currently, the versions of Internet Explorer that are supported by the majority of designers are versions 7 and 8, with most designers gradually dropping support for version 6 (commonly referred to as IE6). At the time of this writing, Microsoft has released version 9 beta, with the final version of IE9 expected to drop in late 2011 or early 2012.
Currently, the versions of Internet Explorer that are supported by the majority of designers are versions 7 and 8, with most designers gradually dropping support for version 6 (commonly referred to as IE6). At the time of this writing, Microsoft has released version 9 beta, with the final version of IE9 expected to drop in late 2011 or early 2012.
Trying to test designs on different versions of Internet Explorer is difficult because attempting to install different versions on your computer can cause some big headaches and problems, if you don’t know exactly what you’re doing. I use a few tools for overall browser testing (see the later section “Understanding cross-browser compatibility” in this chapter), but a tool called IETester comes in handy for specifically testing different IE versions. You can download IETester from www.my-debugbar.com/wiki/IETester. In Figure 5-3, buttons across the top are labeled for specific IE versions: IE5.5, IE6, IE7, and IE8. The figure displays the WordPress Web site in IE7.

Figure 5-3: Test different IE versions with IETester.
Mozilla Firefox
Firefox, shown in Figure 5-4, is the second most popular Web browser and has emerged over the years as a solid IE competitor. Designers and developers tend to prefer Firefox over IE because Mozilla (the makers of Firefox) use a solid layout engine that adheres closely to open Web standards and supports and renders CSS better.
Firefox is available for download and use on Windows, Mac, and Linux operating systems, in 76 languages. You can download it from the Mozilla Web site at http://mozilla.com (see Figure 5-4).
One of the main reasons why Firefox is my personal browser of choice goes beyond the fact that it adheres to open Web standards and renders CSS as it was meant to be rendered. Firefox is also an open-source software project with a vibrant development community that releases very helpful add-ons and tools, which extend its capabilities beyond just a Web browser, turning it into a Web development tool, in many cases.

Figure 5-4: The Mozilla Firefox Web browser.
You can find Firefox add-ons at https://addons.mozilla.org/firefox for just about everything from the appearance of your Firefox browser to browser-based games. At the time of this writing, Mozilla reports that 2,139,478,273 add-ons have been downloaded from its Web site.
Obviously, I can’t cover all the add-ons available for Firefox in this chapter because this is a book, not an encyclopedia. However, here are three Firefox add-ons that I use on a daily basis that make my days as a full-time Web designer and developer easier, more efficient, and just plain fun:
![]() Firebug: Firebug integrates into the Firefox browser and provides you with a host of tools for Web development, including the ability to edit, debug, and monitor the behaviors of CSS, HTML, and JavaScript live for any Web page you view. I can’t live without this tool, mainly because of the CSS editing capabilities. I can open a Web page in Firefox, and then activate the CSS editing tool in Firebug and perform live CSS editing — which makes my Web site development go tons faster. (https://addons.mozilla.org/firefox/addon/1843)
Firebug: Firebug integrates into the Firefox browser and provides you with a host of tools for Web development, including the ability to edit, debug, and monitor the behaviors of CSS, HTML, and JavaScript live for any Web page you view. I can’t live without this tool, mainly because of the CSS editing capabilities. I can open a Web page in Firefox, and then activate the CSS editing tool in Firebug and perform live CSS editing — which makes my Web site development go tons faster. (https://addons.mozilla.org/firefox/addon/1843)
![]() FireShot: FireShot gives you the tools to take quality screen shots of any Web site you view in Firefox. Not only does FireShot allow you to capture any Web page you’re viewing, but it also has an extensive editor so you can open the screen capture and edit it by adding text, graphics, annotations, and more. This is a very helpful tool for a designer because you can use it to take screen shots of your work to develop a portfolio/gallery to display on your Web site; and you can also take screen shots of client projects and add annotations to share with your client, as needed. Also, if you happen to be an author of a book (say, WordPress Web Design For Dummies, for example), you can take screen shots of the figures to include in your chapters. (https://addons.mozilla.org/firefox/addon/5648)
FireShot: FireShot gives you the tools to take quality screen shots of any Web site you view in Firefox. Not only does FireShot allow you to capture any Web page you’re viewing, but it also has an extensive editor so you can open the screen capture and edit it by adding text, graphics, annotations, and more. This is a very helpful tool for a designer because you can use it to take screen shots of your work to develop a portfolio/gallery to display on your Web site; and you can also take screen shots of client projects and add annotations to share with your client, as needed. Also, if you happen to be an author of a book (say, WordPress Web Design For Dummies, for example), you can take screen shots of the figures to include in your chapters. (https://addons.mozilla.org/firefox/addon/5648)
![]() Web Developer: This add-on adds a very helpful toolbar in your Firefox browser, giving you access to several types of Web development tools, such as CSS/HTML viewing and editing, image information, browser resizing, CSS/HTML validation tools, and more. I use the Web Developer toolbar constantly to help me develop, test, and debug Web sites that I create. (https://addons.mozilla.org/firefox/addon/60)
Web Developer: This add-on adds a very helpful toolbar in your Firefox browser, giving you access to several types of Web development tools, such as CSS/HTML viewing and editing, image information, browser resizing, CSS/HTML validation tools, and more. I use the Web Developer toolbar constantly to help me develop, test, and debug Web sites that I create. (https://addons.mozilla.org/firefox/addon/60)
![]() As much as I really like, and prefer, the Firefox browser, it has been reported by many users that it’s somewhat of a resource/memory hog on your computer. I’ve experienced this as well, but it’s not enough to make me stop using it. I can say that I have to shut down and restart my browser at least two times during a normal work day to prevent it from crashing my system with its resource usage.
As much as I really like, and prefer, the Firefox browser, it has been reported by many users that it’s somewhat of a resource/memory hog on your computer. I’ve experienced this as well, but it’s not enough to make me stop using it. I can say that I have to shut down and restart my browser at least two times during a normal work day to prevent it from crashing my system with its resource usage.
And the rest
Three other Web browsers are used regularly but aren’t quite as popular as IE or Firefox. However, they’re worth checking out:
![]() Google Chrome: Google Chrome (www.google.com/chrome) was developed and released by Internet search giant, Google; it’s available for download only for Windows. Chrome has a smaller development community and has add-ons, or extensions, that you can download and install, just like Firefox but not as many, yet. You can find Web development related extensions for Google Chrome at https://chrome.google.com/extensions/featured/Web_dev.
Google Chrome: Google Chrome (www.google.com/chrome) was developed and released by Internet search giant, Google; it’s available for download only for Windows. Chrome has a smaller development community and has add-ons, or extensions, that you can download and install, just like Firefox but not as many, yet. You can find Web development related extensions for Google Chrome at https://chrome.google.com/extensions/featured/Web_dev.
![]() Opera: Opera (www.opera.com) is available for Windows, Mac, and Linux and markets itself as fast, secure, and completely in line with open Web standards, including cutting-edge development languages like HTML5 and CSS3. Opera has add-ons available, as well, which you can find at www.opera.com/addons.
Opera: Opera (www.opera.com) is available for Windows, Mac, and Linux and markets itself as fast, secure, and completely in line with open Web standards, including cutting-edge development languages like HTML5 and CSS3. Opera has add-ons available, as well, which you can find at www.opera.com/addons.
![]() Safari: Safari (www.apple.com/safari) is installed on every Mac from large iMacs, to MacBook laptops, to iPads and iPhones. In short, Safari is an Apple product; however, it can also be installed on Windows. Instead of a bunch of add-ons that you can download and install for Web development, Safari has built-in Web developer tools, such as
Safari: Safari (www.apple.com/safari) is installed on every Mac from large iMacs, to MacBook laptops, to iPads and iPhones. In short, Safari is an Apple product; however, it can also be installed on Windows. Instead of a bunch of add-ons that you can download and install for Web development, Safari has built-in Web developer tools, such as
• A developer toolbar with tools for Web site manipulation, testing, and debugging
• A Web Inspector with a wealth of Web development tools, including an Element pane where you can inspect CSS markup
• A Resources pane that displays a Web site’s resources by date, size, and speed
• A JavaScript Debugger that displays any problems your site is experiencing due to JavaScript that is in use
• A Timeline pane that analyzes a Web site’s behavior over time
• A JavaScript Profiler that lists the performance characteristics of scripts that run on a Web site
• A Console pane for debugging
• A Snippet Editor to test HTML markup
Understanding cross-browser compatibility
Cross-browser compatibility is the practice of testing designs across all major browser systems and is important in Web design because you don’t just design Web sites for yourself, but for an entire audience on the Web. Because you have no idea what browser your audience uses, you must test your designs in all the systems to ensure that all the visitors to your Web site have the same experience.
The problem that Web designers run into with Web browsers is that each browser system uses a different layout engine (the underlying code of the browser that powers way the browser interprets design language such as CSS and HTML) that renders CSS differently. The difference in CSS rendering can sometimes make it a real challenge to adjust your CSS styling so that it takes into account the different layout engines available. Additionally, not every layout engine supports all CSS versions. Table 5-1 illustrates the different layout engines, browsers, and CSS versions the layout engine supports to give you an idea of what you’re dealing with in different browser systems. You can find more information on CSS versions, support, and validation in Chapter 14.
Table 5-1 Layout Engines, Browser Types, and CSS Version Support
|
Layout Engine |
Browser System |
Supports CSS Version |
|
Gecko |
Mozilla Firefox |
CSS v1, v2, v3 (partially) |
|
Presto |
Opera |
CSS v1, v2, v3 (partially) |
|
Trident |
Internet Explorer |
CSS v1, v2, v3 (slightly) |
|
WebKit |
Google Chrome, Safari |
CSS v1, v2, v3 (partially) |
In Table 5-1, partially means that the browser system supports most of the features of the CSS version, where slightly means that the browser system supports very few features.
The absolute best way to test your Web site across the major browser systems is to download the browsers to your computer and then load your Web site in each browser, checking for correct rendering as you go. However, if you have only a Windows computer, you can’t really test your Web site on a Mac, and vice versa. Don’t fret, though, because here are two alternatives that I use when I need to test my sites on a browser I don’t have access to:
![]() Browsershots: This is an online, browser-based tool. Visit the Browsershots Web site, enter your desired Web address in the Enter URL Here field at the top of the site, and then choose your desired browsers and operating systems. Browsershots takes a screen shot of your Web site in each of the browsers that you indicated so you can see what your Web site looks like. From there, you can fix any problems and retest again, if needed. (http://browsershots.org)
Browsershots: This is an online, browser-based tool. Visit the Browsershots Web site, enter your desired Web address in the Enter URL Here field at the top of the site, and then choose your desired browsers and operating systems. Browsershots takes a screen shot of your Web site in each of the browsers that you indicated so you can see what your Web site looks like. From there, you can fix any problems and retest again, if needed. (http://browsershots.org)
![]() BrowserCam: BrowserCam is another online cross-browser compatibility testing tool that captures your Web site and takes a picture of it in different browsers. BrowserCam even has a tool that allows you to remotely access its computers so you can see your Web site in a live browser environment, instead of just getting a screen shot of your Web site. This service isn’t free, however; there is a nominal cost associated with BrowserCam. (www.browsercam.com)
BrowserCam: BrowserCam is another online cross-browser compatibility testing tool that captures your Web site and takes a picture of it in different browsers. BrowserCam even has a tool that allows you to remotely access its computers so you can see your Web site in a live browser environment, instead of just getting a screen shot of your Web site. This service isn’t free, however; there is a nominal cost associated with BrowserCam. (www.browsercam.com)
Introducing File Transfer Protocol (FTP)
Throughout this book, again and again you run into the term File Transfer Protocol (FTP). You use FTP to perform various tasks, such as uploading and downloading WordPress files, editing files, and changing file permissions.
This section introduces you to the basic FTP elements. The ability to use FTP with your hosting account is a given for almost every Web host on the market. FTP is a way of moving files from one place to another, such as
![]() Uploading: Transferring files from your local computer to your Web server
Uploading: Transferring files from your local computer to your Web server
![]() Downloading: Transferring files from your Web server to your local computer
Downloading: Transferring files from your Web server to your local computer
Here are several other things you can do with FTP:
![]() View files: After you log in via FTP, you can see all the files that are located on your Web server.
View files: After you log in via FTP, you can see all the files that are located on your Web server.
![]() See dates when files were modified: You can see the date the file(s) was last modified, which can sometimes be helpful when troubleshooting problems.
See dates when files were modified: You can see the date the file(s) was last modified, which can sometimes be helpful when troubleshooting problems.
![]() See file sizes: You can see the size of each file on your Web server, which is helpful especially if you need to manage the disk space on your account.
See file sizes: You can see the size of each file on your Web server, which is helpful especially if you need to manage the disk space on your account.
![]() Edit files: Almost all FTP clients allow you to open and edit files through the client interface, which is a convenient way to get the job done.
Edit files: Almost all FTP clients allow you to open and edit files through the client interface, which is a convenient way to get the job done.
![]() Change permissions: Commonly referred to as CHMOD (change mode), it controls what type of read/write/execute permissions the files on your Web server have.
Change permissions: Commonly referred to as CHMOD (change mode), it controls what type of read/write/execute permissions the files on your Web server have.
Using FTP to transfer files requires an FTP client, or program. Many FTP clients are available for download. Following are some good (and free) ones:
![]() WS_FTP (PC): www.ipswitch.com/_download/wsftphome.asp
WS_FTP (PC): www.ipswitch.com/_download/wsftphome.asp
![]() SmartFTP (PC): www.smartftp.com/download
SmartFTP (PC): www.smartftp.com/download
![]() FileZilla (PC or Mac): http://sourceforge.net/projects/filezilla
FileZilla (PC or Mac): http://sourceforge.net/projects/filezilla
![]() Cyberduck (Mac): http://cyberduck.ch
Cyberduck (Mac): http://cyberduck.ch
![]() FTP Explorer (PC): www.ftpx.com
FTP Explorer (PC): www.ftpx.com
Your Web host gives you a username and password for your account, including an FTP IP address. (Usually, the FTP address is the same as your domain name, but check with your Web host, because addresses may vary.) It is this information — the username, password, and FTP IP address — that you insert into the FTP program to connect it to your hosting account. (See the next section for details on connecting to your Web hosting account via FTP.)
Figure 5-5 shows my FTP client connected to my hosting account. The directory on the left is the listing of files on my computer; the directory on the right shows the listing of files on my hosting account.
FTP clients make it easy to transfer files from your computer to your hosting account by using a drag-and-drop method. You simply click the file on your computer that you want to transfer, drag it over to the side that lists the directory on your hosting account, and drop it. Depending on the FTP client you’ve chosen to work with, you can refer to its user manuals or support documentation for detailed information on how to use the program.
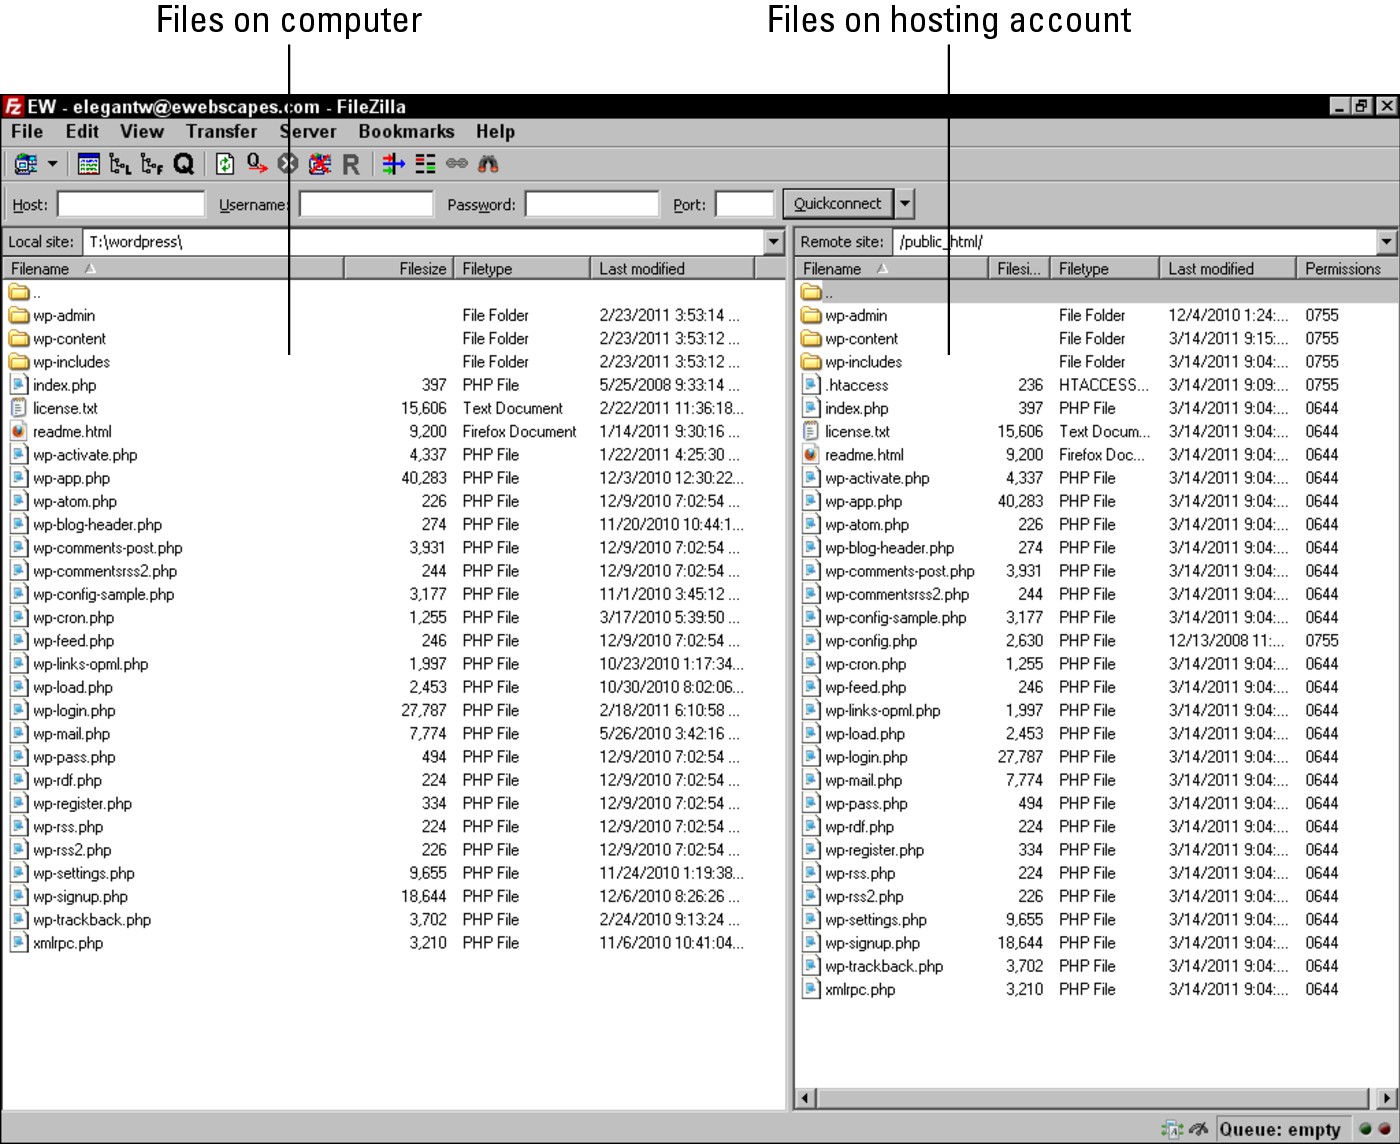
Figure 5-5: Using an FTP client makes file transfers easy.
Setting Up FTP on Your Hosting Account
Many Web hosts offer FTP as part of their hosting packages, so just confirm that your hosting provider makes FTP available to you for your account. In Chapter 2, I discuss, in detail, the specifics of a Web hosting environment, including cPanel — the hosting account management interface. cPanel is, by far, the most popular hosting account management software used by many hosts on the Web. Others, such as Plesk and Netadmin, are widely used as well but aren’t as popular.
![]() In this chapter, I use cPanel, so if your hosting provider gives you a different interface to work with, the concepts are the same, but you need to refer to your hosting provider for the specifics to adapt my directions here to your specific environment.
In this chapter, I use cPanel, so if your hosting provider gives you a different interface to work with, the concepts are the same, but you need to refer to your hosting provider for the specifics to adapt my directions here to your specific environment.
By and large, the FTP for your hosting account is set up automatically. Follow these few steps to get to the FTP Accounts page, shown in Figure 5-6, to view and set up your FTP account:
1. Log in to the cPanel for your hosting account:
a. Browse to http://yourdomain.com/cpanel to bring up the login screen for your CPanel (where yourdomain is your actual domain name).
b. Enter your specific hosting account username and password in the login fields and then click OK.
2. Click the FTP Accounts link and/or icon in your cPanel to open the FTP Accounts page, shown in Figure 5-6.

Figure 5-6: The FTP Accounts page within cPanel.
3. Check to see if you have an existing FTP Account.
If you already have an existing FTP Account, you can skip the rest of the steps in this section.
If your hosting provider automatically sets you up with an FTP account, you see it in the Account Management section. Ninety-nine percent of the time, the default FTP account uses the same username and password combination as your hosting account, or the login information you used to log in to your cPanel in Step 1.
4. (Optional) Create a new FTP Account.
If the FTP Accounts page doesn’t show a default FTP user in the Account Management section, create one in the Add FTP Account section with these steps:
a. Type your desired username in the Login text field.
This creates the username of username@yourdomain.com (in which username is the desired username you typed and yourdomain.com is your, specific, domain name).
b. Type your desired password in the Password text field and then retype it in the Password (Again) text box to validate it.
You can either type your own chosen password or click the Password Generator button to have the server generate a secure password for you.
c. Check the Strength indicator.
The server tells you whether your password is Very Weak, Weak, Good, Strong, or Very Strong (see Figure 5-6). You want a Very Strong password for your FTP account so it’s very hard for hackers and malicious Internet users to guess and crack.
d. Leave the Directory text box blank.
Leaving this field blank gives you access to the root level of your hosting account, which as the site owner, you want. Therefore, leave this field blank. (In the future, if you set up FTP accounts for other users, you can lock their access to your hosting directory by indicating which directory the FTP user has access to.)
e. Leave the default Unlimited radio button selected to indicate the space limitations in the Quota text field.
In the future, if you add a new FTP user, you can limit the amount of space, in megabytes (MB), by selecting the other radio button and typing the numerical amount, such as 50MB, in the text box.
f. Click the Create FTP Account button.
A new screen loads with a message that the account was created successfully; it also displays the settings for this new FTP account.
g. Copy and paste these settings into a text editor, such as Notepad or TextMate.
These settings contain the connection details you need to connect via FTP and looks like this (the FTP username, password, and server are specific to your domain and the information you entered in the preceding steps):
FTP Username: [email protected]
Password: {W?$s((7Tqi
FTP Server: ftp.yourdomain.com
FTP Server Port: 21 (your Web server will automatically assign the FTP Port)
Quota: Unlimited MB
![]() At any time, you can revisit the FTP Accounts page to delete the FTP accounts you’ve created, change the quota, change the password, or find the connection details specific to that account.
At any time, you can revisit the FTP Accounts page to delete the FTP accounts you’ve created, change the quota, change the password, or find the connection details specific to that account.
Transferring Files with an FTP Client
After you create an FTP account on your Web server, as described in the preceding section, you’re ready to connect your FTP client to your Web server so you can begin transferring files.
Connecting to the Web server via FTP
For the purposes of this chapter, I use the Mozilla FileZilla FTP client (http://sourceforge.net/projects/filezilla). FileZilla is my favorite FTP client software because it’s easy to use and the cost is free ninety-nine (that’s open-source geek speak for free!).
My FileZilla client is shown in Figure 5-7; it’s not yet connected to any server. On the left of the window is a directory listing of files and folders on my local computer. The right side of the window doesn’t display anything . . . yet; it will, however, when I connect to my Web server.
![]() If you use different FTP client software than FileZilla, the steps and look of the software differ from what I share with you in this chapter. You need to adapt your steps and practice for the specific FTP client software you use.
If you use different FTP client software than FileZilla, the steps and look of the software differ from what I share with you in this chapter. You need to adapt your steps and practice for the specific FTP client software you use.
Connecting to a Web server is a pretty easy process. Before you begin, however, you need the FTP settings you saved from Step 4 in the preceding section. Then to connect to your Web server via the FileZilla FTP client, follow these few steps:

Figure 5-7: FileZilla FTP client software.
1. Launch the FTP client software on your local computer.
2. Choose File⇒Site Manager to open the Site Manager, as shown in Figure 5-8.

Figure 5-8: The Site Manager in FileZilla.
3. Click the New Site button and name your site.
You can give the new site a name to help you identify it. This site name can be anything you want it to be because it’s not part of the connection data that you add in the next steps. (In Figure 5-8, I named mine My Site — pretty original, I know.)
4. Enter the FTP server in the Host text field.
The host name is the same as the FTP server information provided to you when you set up the FTP account on your Web server. My FTP server is ftp.yourdomain.com (where yourdomain is your actual domain name), so I typed that in the Host text field, as shown in Figure 5-9.
5. Enter the FTP port in the Port text field.
My port is 21. Typically, in most hosting environments, FTP uses port 21, and this never changes — just be sure to double-check your port number and enter it in the Port text field, as shown in Figure 5-9.
6. Choose FTP – File Transfer Protocol from the Server Type drop-down list and then choose Normal in the Logon Type drop-down list (see Figure 5-9).
7. Type your username in the User text field and then type your password in the Password text field.
This is the username and password given to you in the FTP settings. For example, my username is [email protected], and my password is {W?$s((7Tqi.

Figure 5-9: The FileZilla Site Manager with FTP account information.
8. Click the Connect button.
Your computer connects to your Web server. The directory of folders and files from your local computer displays on the left of the FileZilla FTP client window, and the directory of folders and files on your Web server is displayed on the right, as shown in Figure 5-10.
Now you can take advantage of all the tools and features FTP offers.

Figure 5-10: FileZilla displays local files on the left and server files on the right.
Transferring files from point A to point B
After your local computer is connected to your Web server, transferring files between the two couldn’t be easier. Within the FTP client software, you can browse the directories and folders on your local computer on the left and browse the directories and folders on your Web server on the right.
FTP clients make it easy to transfer files from your computer to your hosting account by using a drag-and-drop method. There are two ways of transferring files. Here’s what they are and how you use them:
![]() Upload: This generally means that you transfer files from your local computer to your Web server, or upload files. Click the file you want to transfer from your local computer, and drag and drop it over to the right side (the Web server side) to upload a file from your computer to your Web server.
Upload: This generally means that you transfer files from your local computer to your Web server, or upload files. Click the file you want to transfer from your local computer, and drag and drop it over to the right side (the Web server side) to upload a file from your computer to your Web server.
![]() Download: This means that you transfer files from you Web server to your local computer, or download files. Click the file you want to transfer from your Web server, and drag and drop it over to the left side (the local computer side) to download a file from your Web server to your local computer.
Download: This means that you transfer files from you Web server to your local computer, or download files. Click the file you want to transfer from your Web server, and drag and drop it over to the left side (the local computer side) to download a file from your Web server to your local computer.
![]() Downloading files from your Web server is an efficient, easy, and smart way of backing up files to your local computer. Keeping your files, especially theme files and plugins, safe is always a good idea.
Downloading files from your Web server is an efficient, easy, and smart way of backing up files to your local computer. Keeping your files, especially theme files and plugins, safe is always a good idea.
Editing files by using FTP
You will run into situations where you need to edit certain files that live on your Web server. You can use the methods I describe earlier: Download a file from your Web server, open it, edit it, save it, and then upload it back to your Web server. Or, you can use the built-in edit feature that exists in most FTP client software by following these steps:
1. Connect your FTP client to your Web server and then locate the file you want to edit.
2. In the internal FTP editor, right-click the file and choose View/Edit.
Remember, for the example, I’m using FileZilla — your FTP client may name this command something like Open or Edit. Usually, the FTP client uses a program that already exists on your computer, such as Notepad (Windows) or TextMate (Mac), to edit the files. Occasionally, depending on the FTP client software, it may have its own internal text editor. FileZilla uses a text-editing program that’s already on your computer.
3. Edit the file to your liking, click the Save icon or choose File⇒Save to save the changes you made to the file, and re-upload the file to your Web server.
After you save the file, a window opens in FileZilla that alerts you that the file’s been changed and asks whether you wish to upload the file back to the server.
4. Click the Yes button.
The newly edited file replaces the old one.
That is really all there is to it. Use the FTP edit feature to edit, save, and re-upload files as you need to.
![]() When you edit files using the FTP edit feature, you edit files in a live environment, meaning that when you save the changes and re-upload the file, the changes take effect immediately and affect your live Web site. For this reason, I always strongly recommend downloading a copy of the original file to your local computer before making changes. That way if you happen to make a typo on the saved file and your Web site goes haywire, you have a copy of the original to re-upload quickly to restore it to its original state.
When you edit files using the FTP edit feature, you edit files in a live environment, meaning that when you save the changes and re-upload the file, the changes take effect immediately and affect your live Web site. For this reason, I always strongly recommend downloading a copy of the original file to your local computer before making changes. That way if you happen to make a typo on the saved file and your Web site goes haywire, you have a copy of the original to re-upload quickly to restore it to its original state.
Changing file permissions
Every file and folder that exists on your Web server has a set of attributions, or permissions, assigned that tells the Web server three things about the folder or file. On a very simplistic level, these permissions include
![]() Read: Determines whether the file/folder is readable by the Web server
Read: Determines whether the file/folder is readable by the Web server
![]() Write: Determines whether the file/folder is writeable by the Web server
Write: Determines whether the file/folder is writeable by the Web server
![]() Execute: Determines whether the file/folder is executable by the Web server
Execute: Determines whether the file/folder is executable by the Web server
Each set of permissions has a numerical code assigned it, identifying what type of permissions are assigned to that file or folder. There are a lot of them, so here are the most common ones that you run into and deal with when running a WordPress Web site:
![]() 644: Files with permissions set to 644 are readable by everyone and writeable only by the file/folder owner.
644: Files with permissions set to 644 are readable by everyone and writeable only by the file/folder owner.
![]() 755: Files with permissions set to 755 are readable and executable by everyone, but only writeable by the file/folder owner.
755: Files with permissions set to 755 are readable and executable by everyone, but only writeable by the file/folder owner.
![]() 777: Files with permissions set to 777 are readable, writeable, and executable by everyone. Don’t use this set of permissions, for security reasons, on your Web server unless absolutely necessary.
777: Files with permissions set to 777 are readable, writeable, and executable by everyone. Don’t use this set of permissions, for security reasons, on your Web server unless absolutely necessary.
Typically, folders and files within your Web server have already been assigned permissions of either 644 or 755. You usually see PHP files with permissions set to 644 if the Web server is configured to use PHP Safe Mode.
![]() I’m giving you a very basic look at file permissions here because you usually don’t need to mess with file permissions on your Web server. In case you need to dig further into this topic, here’s a great reference on file permissions from Elated: www.elated.com/articles/understanding-permissions.
I’m giving you a very basic look at file permissions here because you usually don’t need to mess with file permissions on your Web server. In case you need to dig further into this topic, here’s a great reference on file permissions from Elated: www.elated.com/articles/understanding-permissions.
You may run across a situation where you’re asked to edit and change the file permissions on a particular file on your Web server. With WordPress sites, this usually happens when dealing with plugins or theme files. This practice is also referred to as CHMOD, or Change Mode. When someone says, “You need to CHMOD that file to 755,” you’ll know what she’s talking about.
Here are some quick and easy steps for using your FTP program to CHMOD a file, or edit its permissions on your Web server:
1. Connect your FTP client to your Web server and then locate the file you want to CHMOD.
2. In FileZilla, right-click the file on your Web server and choose File Permissions to open the file attributes for the file.
Your FTP client may use different terminology.
The Change File Attributes dialog box open, as shown in Figure 5-11.
3. Type the correct number in the Numeric Value text field.
This is the number assigned to the permissions you want to give the file. Most often, you’re given directions by the plugin or theme developer on which permissions number to assign to the file or folder, and typically, it’s either 644 or 755. In Figure 5-11, you see the permissions are assigned with 755.
4. Click OK.
The file saves with the new permissions assigned.

Figure 5-11: The Change File Attributes dialog box in FileZilla.