Chapter 6
Choosing Graphics and Software Resources
In This Chapter
![]() Understanding image types and formats
Understanding image types and formats
![]() Exploring graphic design software
Exploring graphic design software
![]() Optimizing images for use on Web sites
Optimizing images for use on Web sites
![]() Browsing image and photo libraries
Browsing image and photo libraries
These days, the term designer encompasses many things relating to the world of Web design. A graphic designer has the ability and creativity to create graphics from scratch, or to modify existing photos or graphics to suit a particular need using image-editing software. Other Web designers don’t necessarily create any graphic designs, but they master the art of manipulating images and photos to display on a Web site for a nice visual presentation.
This chapter takes a look at some of the popular graphic-editing software available (such as Adobe Photoshop and Illustrator and Corel PaintShop Photo Pro), as well as some great and inexpensive image and graphic resources to add to your toolbox. You also find out the differences between various image formats and how to optimize images for use on a Web site so pages load faster while the images look sharp and clean.
Exploring Image Types and Formats
Graphics software packages don’t come cheap, so before you make a decision on which one to use, you need to determine what type of graphic work you’ll do for your Web design projects. Web designers fall into three standard categories, and your design style may fall into one, two, or all three:
![]() Graphic designer: You may consider yourself an illustrator because you create all the graphics that you use from scratch. You start with a blank slate, and through different tools and techniques used in your favorite image-editing software, you create your own unique graphics.
Graphic designer: You may consider yourself an illustrator because you create all the graphics that you use from scratch. You start with a blank slate, and through different tools and techniques used in your favorite image-editing software, you create your own unique graphics.
![]() Graphic manipulator: You’re a master at taking graphics, or photos, that someone else created and manipulating them for use in your Web design projects. Through the use of different tools and techniques, you can do things like adjust colors and sizes, and even change the shapes and positions of the different elements of a graphic (particularly if you’re working with vector graphics, covered in the next section).
Graphic manipulator: You’re a master at taking graphics, or photos, that someone else created and manipulating them for use in your Web design projects. Through the use of different tools and techniques, you can do things like adjust colors and sizes, and even change the shapes and positions of the different elements of a graphic (particularly if you’re working with vector graphics, covered in the next section).
![]() Graphic consumer: You download images from resources on the Web (check out my list of resources later in this chapter), and you use those images to add color and visual design elements to your Web site projects.
Graphic consumer: You download images from resources on the Web (check out my list of resources later in this chapter), and you use those images to add color and visual design elements to your Web site projects.
As I state earlier, you may fit one, two, or all three of these categories, and that’s perfectly acceptable when designing themes for Web sites as long as you abide by copyright and licensing restrictions on graphics you use (if you’re a graphics manipulator and/or consumer). Additionally, it is important to understand the types of graphics that you can use to accomplish your goals for your Web design projects. The following sections cover different types of graphics and file formats to help you understand which types of graphics you need to use for different purposes.
Comparing raster and vector images
As a graphic designer, you’ll most likely work with two types of graphics — raster and vector. As a Web designer, you’ll definitely work with raster images, and you may work with vector images. The software program that you use to edit and create graphics depends on the type of image file you’re working with. Here is a brief rundown of the differences between the raster and vector images:
![]() Raster: Images made up of hundreds of little dots, or pixels. Each pixel can be a different color, allowing for rich, full-color images and photographs. Creating and editing a raster image calls for a raster-based editing program, such as Corel’s PaintShop Photo Pro.
Raster: Images made up of hundreds of little dots, or pixels. Each pixel can be a different color, allowing for rich, full-color images and photographs. Creating and editing a raster image calls for a raster-based editing program, such as Corel’s PaintShop Photo Pro.
![]() Vector: Images made up of curves, rather than pixels. Vector images have four vector points, one in each corner of the image, and you connect the dots with curves. Then, the curves can be filled with colors and effects.
Vector: Images made up of curves, rather than pixels. Vector images have four vector points, one in each corner of the image, and you connect the dots with curves. Then, the curves can be filled with colors and effects.
The following sections go into more detail about raster and vector images and how you may use them in your Web designs.
Raster images
Raster images, such as photographs and graphics used in the Web site theme design, are most often used for Web design and display on Web sites. Raster images don’t scale well; if you try to resize the image larger or smaller, you see a noticeable loss in the image quality because the pixels get resized and the image becomes grainy. Raster images are flat — there’s only one layer to the image elements — making it difficult (and sometimes impossible) to edit some of the different image elements within the graphic file. For use on the Web, however, raster images load quickly because they usually have a small file size and don’t require a lot of bandwidth to transfer.
Figure 6-1 shows a raster image file open in Photoshop. On the right side, on the Layers tab is only one layer — Background — to this raster image. Common file formats for raster images include JPG, GIF, and PNG. (I discuss file formats for images in the section “Looking at image file formats,” later in this chapter.)

Figure 6-1: A raster image in Photoshop.
Vector images
Vector images are used for print design, such as business cards, brochures, magazine ads, and billboards. Because vector images are made up of curves rather than static pixels, vector images can be resized without any quality loss. Therefore, you can reduce a vector image to the size of a postage stamp or increase its size to fit the side of a large truck, and the image quality remains the same. That’s why vector images are ideal for logos and print work. Typically, vector images are layered — each element of the image has its own layer — allowing you to use your favorite vector image editor, such as Illustrator, to manipulate and change the different elements within the vector image file.
The file sizes of vector images can get quite large, so they’re not ideal for displaying on a Web site; you’ll want to use raster images instead. However, you can start out working with a vector file for your Web design work and then save the final file in a raster format that’s optimized for the Web.
Figure 6-2 displays a vector image file open in Illustrator. On the bottom right, on the Layers tab, you see several layers available for editing on this particular image. Common file formats for vector images include AI, EPS, and DCR. (I discuss these file formats in the next section, “Looking at image file formats.”)

Figure 6-2: Vector image file with layers open in Illustrator.
Looking at image file formats
Before I discuss recommended graphic-editing software, you need to understand the types of image file formats you will work with for designing on the Web. As I mention earlier, the images, whether photos or logos, you save and use on your Web site are raster file types because of the smaller file size and rich color display. In the following sections, you find out how compression affects the size of raster images and discover what types of file formats you may use in your own projects.
Understanding compression
When you use raster images in your Web design, they need to have a certain amount of compression, or a decrease in the overall size of the file. Image compression occurs when you save a raster image file as a JPG, GIF, or PNG for use in your Web site design project. Compressing a file decreases the size of the image file so that the image loads quicker on a Web page.
![]() The larger the image file size, the longer it takes for that image to load on your Web page.
The larger the image file size, the longer it takes for that image to load on your Web page.
Compressing image files can use two different algorithms, depending on the file format you’ve chosen for your image file, and for digital image files, compression happens in one of two ways:
![]() Lossless compression: All data from the image file is retained during and after compression, usually resulting in zero loss of quality from the original image file.
Lossless compression: All data from the image file is retained during and after compression, usually resulting in zero loss of quality from the original image file.
![]() Lossy compression: Reduces the size of an image file by removing certain bits of data from the original file or combining parts of the image that are similar to one another. This usually results in image quality loss from the original file.
Lossy compression: Reduces the size of an image file by removing certain bits of data from the original file or combining parts of the image that are similar to one another. This usually results in image quality loss from the original file.
Determining which file types to use for your projects
Table 6-1 lists six common file formats you’ll work with for Web design and the type of file and compression. Although the final image files that you save and use in your Web design work are raster, you may begin with vector images to edit and manipulate graphics to suit the needs of your Web design projects.
Table 6-1 Image File Format, Compression, and Type
|
Image File Format |
Image File Type |
Compression Type |
|
JPG |
Raster |
Lossy |
|
GIF |
Raster |
Lossless |
|
PNG |
Raster |
Lossless |
|
AI |
Vector |
N/A* |
|
EPS |
Vector |
N/A* |
|
CDR |
Vector |
N/A* |
|
*Vector images do not experience compression. |
||
Here are the three main vector image formats that you’ll probably come across in your work with graphic design:
![]() AI: Adobe Illustrator, a proprietary file developed by Adobe for representing vector images
AI: Adobe Illustrator, a proprietary file developed by Adobe for representing vector images
![]() EPS: Encapsulated PostScript vector image format
EPS: Encapsulated PostScript vector image format
![]() CDR: Corel Draw proprietary graphic file developed by Corel for representing vector images
CDR: Corel Draw proprietary graphic file developed by Corel for representing vector images
When deciding what raster image file format to use in your project, you need to take into account the characteristics of each format. In addition to different types of compression, the file formats also contain varying amounts of color. The characteristics of the three most common raster image file formats include
![]() JPG: Suited for use with photographs and smaller images used in your Web design projects. Although the JPG format compresses with lossy compression, you can adjust the amount of compression that occurs when you save the file. You can choose a compression level from 1 to 100, and you usually don’t see a great deal of image quality loss with compression levels 1–20.
JPG: Suited for use with photographs and smaller images used in your Web design projects. Although the JPG format compresses with lossy compression, you can adjust the amount of compression that occurs when you save the file. You can choose a compression level from 1 to 100, and you usually don’t see a great deal of image quality loss with compression levels 1–20.
![]() PNG: Suited for larger graphics used in Web design, such as the logo or main header graphic that identifies the brand and the overall, visual look of the Web site. PNG uses lossless image compression and, therefore, suffers no data loss during compression, creating a cleaner, sharper image. PNG files can also be created and saved on a transparent canvas, whereas JPG files can’t (they must have at least a white canvas [or background], or some other color that you’ve designated).
PNG: Suited for larger graphics used in Web design, such as the logo or main header graphic that identifies the brand and the overall, visual look of the Web site. PNG uses lossless image compression and, therefore, suffers no data loss during compression, creating a cleaner, sharper image. PNG files can also be created and saved on a transparent canvas, whereas JPG files can’t (they must have at least a white canvas [or background], or some other color that you’ve designated).
![]() GIF: Compression of a GIF file is lossless, rendering the image exactly as you designed it without quality loss. However, GIF files compress with lossless quality and are limited to 256 colors. For higher color images with more quality, GIF isn’t the greatest format to use; use the PNG format instead.
GIF: Compression of a GIF file is lossless, rendering the image exactly as you designed it without quality loss. However, GIF files compress with lossless quality and are limited to 256 colors. For higher color images with more quality, GIF isn’t the greatest format to use; use the PNG format instead.
Exploring Graphic Design Software
In the following sections, I introduce you to four software programs that designers use to create graphics and edit images, as well as provide you with some valuable resources that you can use to figure out the intricacies of the software programs presented here.
![]() Graphic design software can get expensive; however, each of the software packages that I mention in this section offers trial versions that allow you to test drive the software before you fork out the cash — I recommend the practice of try-before-you-buy to make sure the software fits your needs.
Graphic design software can get expensive; however, each of the software packages that I mention in this section offers trial versions that allow you to test drive the software before you fork out the cash — I recommend the practice of try-before-you-buy to make sure the software fits your needs.
![]() The type of image file or format you’re working with determines which type of software you use for that particular image. Raster images require a raster-based program, and likewise, vector images require a vector-based program. (See the earlier section “Comparing raster and vector images.”)
The type of image file or format you’re working with determines which type of software you use for that particular image. Raster images require a raster-based program, and likewise, vector images require a vector-based program. (See the earlier section “Comparing raster and vector images.”)
Using raster-based software
The two most common raster-based graphic software programs used by designers are Photoshop and PaintShop Photo Pro. Although these programs have vector capabilities as well, they aren’t known as vector-editing programs, and their vector abilities are somewhat limited. When you work with raster images, you need at least one of these two programs in your arsenal to create your designs.
Adobe Photoshop
Available from Adobe Systems, which has several graphics programs and design software suites, Photoshop is the most popular piece of software for raster images, and it’s available for Windows and Mac. You can purchase Photoshop at http://adobe.com either as a standalone product ($699) or as part of the Adobe CS5 software suite ($1,899). You can find out more about the different packages that are available at www.adobe.com/products.
With graphic and Web design using Photoshop, the most popular format is a PSD file. A PSD file is a single image file with multiple layers that contain complex image effects and text layers that comprise a full image. PSD files are often used and developed to create full Web site designs. You can lay out an entire design look for a Web page in one file, and then using different layers and elements, you can create one, flat raster image for use in the overall design.
Figure 6-3 displays a PSD file in Photoshop. On the bottom-right side on the Layers tab are several layers that comprise the file. The PSD file shown in Figure 6-3 is one I recently developed for a Web site project for one of my clients. I can open a PSD file any time to change or edit any of the graphics, and then save the graphic as a single file, in JPG, PNG, or GIF formats to use on the Web.
There are several tools, like brushes, patterns, and plugins, that can be added onto the Photoshop software, developed by either Adobe, or third-party developers, to help you create effects and elements for your graphic design, including
![]() Plugins: Small add-on programs created by Adobe, or third-party developers, to add new features and effects to Photoshop, such as the array of Photoshop plugins available from Alien Skin (www.alienskin.com).
Plugins: Small add-on programs created by Adobe, or third-party developers, to add new features and effects to Photoshop, such as the array of Photoshop plugins available from Alien Skin (www.alienskin.com).
![]() Brushes: Small graphics created by Adobe, or third-party designers, to give you some great effects to use with the Paintbrush tool in Photoshop.
Brushes: Small graphics created by Adobe, or third-party designers, to give you some great effects to use with the Paintbrush tool in Photoshop.
![]() Patterns and textures: Small graphic files created by Adobe, or third-party designers, to give you interesting textures and pattern effects to use in your graphic design.
Patterns and textures: Small graphic files created by Adobe, or third-party designers, to give you interesting textures and pattern effects to use in your graphic design.

Figure 6-3: A PSD file in Photoshop.
Photoshop is also well-known for its built-in tools for editing and enhancing photographs. Many photographers use Photoshop for this purpose, and as a Web designer, you can also take advantage of the photo-editing tools in Photoshop to enhance and optimize photographs for your Web site designs.
If you’re interested in finding out more about how to use Photoshop, check out Photoshop CS5 All-in-One For Dummies by Barbara Obermeier or any of the online resources listed in Table 6-2.
Table 6-2 Online Photoshop Resources
|
Resource Name |
Description |
|
Photoshop.com |
The official Photoshop marketplace where you can find and download Photoshop tools like brushes and textures, as well as find tips and tutorials: http://photoshop.com |
|
Psdtuts+ |
A popular blog that covers Photoshop tutorials from beginner to advanced levels of experience and knowledge: http://psd.tutsplus.com |
|
Planet Photoshop |
A Web site where you find several Photoshop tutorials, resources and reviews: http://planetphotoshop.com |
Corel PaintShop Photo Pro
Available from Corel, well-known for its suite of graphic-editing and photo manipulation software, is the PaintShop Photo Pro image and photo-editing software available for purchase and download at http://corel.com. PaintShop Photo Pro is available for download as a single product ($49.99), or as part of the larger Corel Digital Studio software suite that bundles several digital image, photo-editing, and design products ($59.99). Currently, Corel products are available only for Windows.
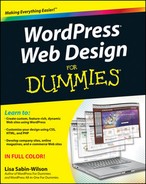
Figure 6-4 shows how you can control the amount of compression that’s applied to JPG files when saving them in PaintShop Photo Pro. (See the earlier section “Understanding compression.”) In the figure, I am applying a compression level of 10 to the photo that I’m saving. This amount of compression is a good tradeoff between reducing the file size and retaining much of the original image quality. PaintShop Photo Pro allows you to preview the compressed image first before you save it, so you can decide whether or not you like how much compression you’ve added, and can adjust if needed.
PaintShop Photo Pro makes several add-on tools and utilities available to extend the capabilities of the program, enabling you to increase its feature set for methods and techniques you can use to create and edit images, including
![]() Plugins: Add-on programs developed by Corel or third-party developers to extend the features of the program. Photoshop has plugins as well, and you can use those plugins with PaintShop Photo Pro because they’re compatible.
Plugins: Add-on programs developed by Corel or third-party developers to extend the features of the program. Photoshop has plugins as well, and you can use those plugins with PaintShop Photo Pro because they’re compatible.
![]() Masks and tubes: Small image files created by Corel or third-party designers, giving you some different image effects and graphics you can use in your designs.
Masks and tubes: Small image files created by Corel or third-party designers, giving you some different image effects and graphics you can use in your designs.
![]() Brushes and textures: Small image files created by Corel or third-party designers, which allow you to add different effects and elements to your design work.
Brushes and textures: Small image files created by Corel or third-party designers, which allow you to add different effects and elements to your design work.
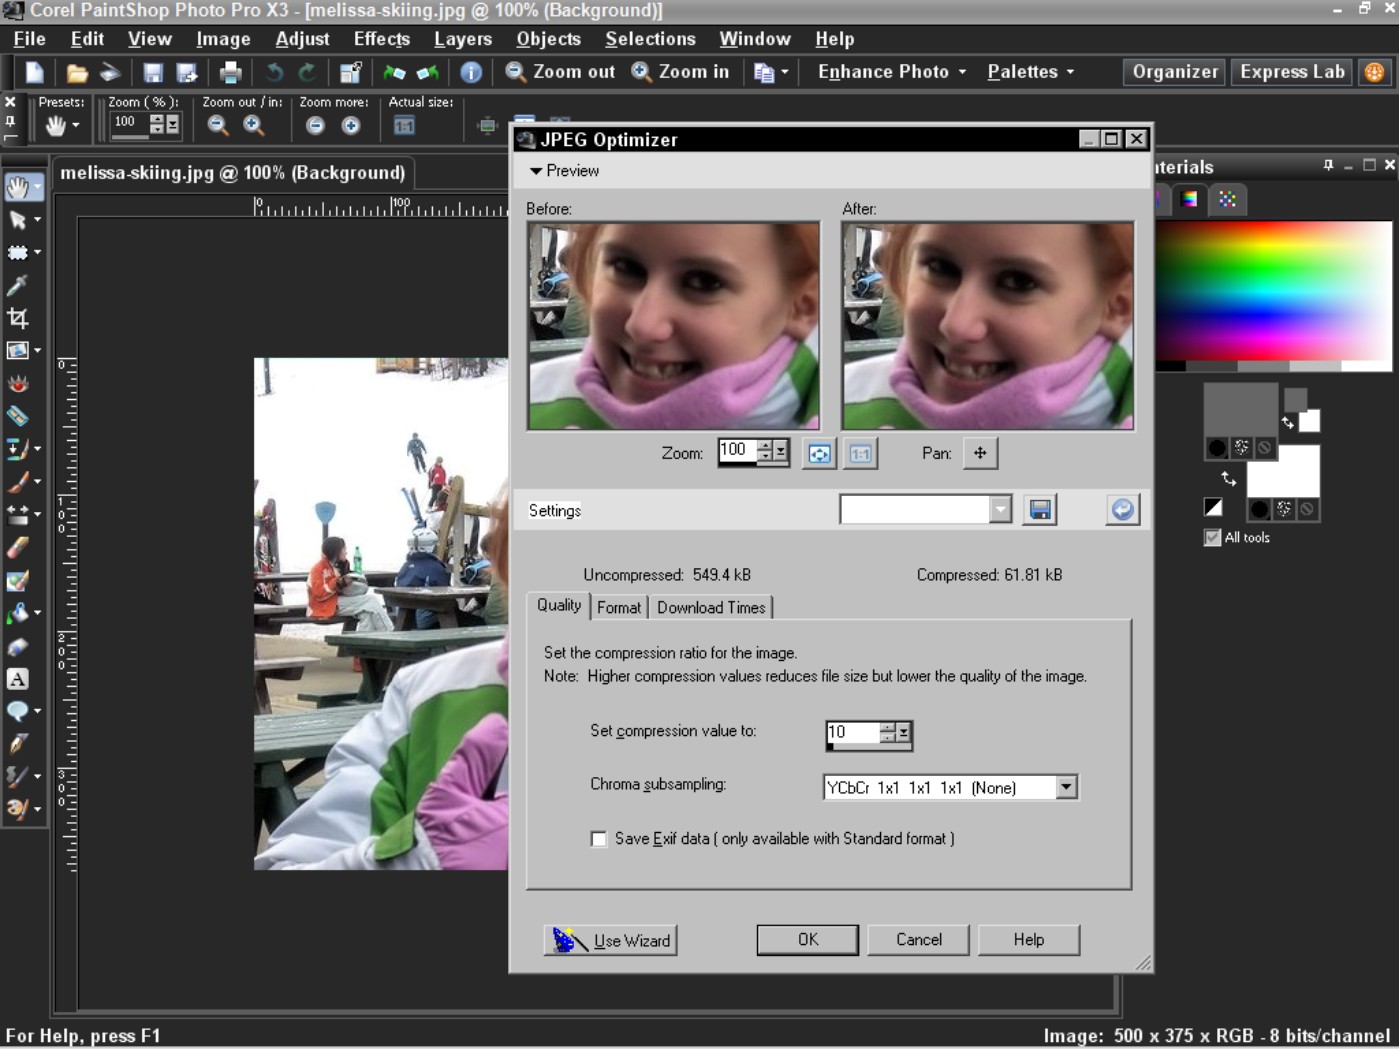
Figure 6-4: Compressing and saving a JPG file in PaintShop Photo Pro.
Table 6-3 gives you a few PaintShop Photo Pro resources, including downloadable add-ons, tutorials, and discussion forms to extend your knowledge base and improve your techniques.
Table 6-3 PaintShop Photo Pro Online Resources
|
Resource Name |
Description |
|
Corel Resources page |
Contains tutorials, tips, and tricks: www.corel.com/servlet/Satellite/us/en/Content/1152796555465 |
|
Jasc PaintShop Pro Tutorials |
PaintShop Pro tutorials and discussion form: www.tutorialized.com/tutorials/Paint-Shop-Pro |
![]() I get asked a lot whether Photoshop or PaintShop Photo Pro is the best for raster-based image files. I use both for different cases; however, I can say that Photoshop is the most popular mainly because it’s available for Windows and Mac, whereas PaintShop Photo Pro is available only for Windows. Also, with Photoshop, you can create layered PSD files for full Web site designs, whereas with PaintShop Photo Pro, you can’t (but you can edit them, with some limitations). Of course, Photoshop is much more expensive, so if price is a big consideration for you, you may want to opt for the more affordable PaintShop Photo Pro.
I get asked a lot whether Photoshop or PaintShop Photo Pro is the best for raster-based image files. I use both for different cases; however, I can say that Photoshop is the most popular mainly because it’s available for Windows and Mac, whereas PaintShop Photo Pro is available only for Windows. Also, with Photoshop, you can create layered PSD files for full Web site designs, whereas with PaintShop Photo Pro, you can’t (but you can edit them, with some limitations). Of course, Photoshop is much more expensive, so if price is a big consideration for you, you may want to opt for the more affordable PaintShop Photo Pro.
Using vector-based software
Vector-based editing software lets you create quality vector graphics and illustrations that can then be saved in raster format for Web use. Many illustrators, cartoonists, and logo designers start with vector editing programs to create vector images. (See the earlier section “Understanding the differences between raster and vector images.”)
Two of the most popular vector-based editing programs are Illustrator and CorelDRAW. Whether you create vector files from scratch or edit/manipulate existing vector files, you need to have a vector-based editing program to take full advantage of all the editing tools and features.
![]() Vector image files often have several layers that contain complex and extensive design elements that add to the overall image. Programs like Photoshop or PaintShop Photo Pro (which I describe in the preceding section) don’t allow you to expand the layers available in a vector image.
Vector image files often have several layers that contain complex and extensive design elements that add to the overall image. Programs like Photoshop or PaintShop Photo Pro (which I describe in the preceding section) don’t allow you to expand the layers available in a vector image.
Adobe Illustrator
Illustrator is a vector-image creation and editing program available as a standalone product ($599), or as part of Adobe’s Creative Suite 5 package ($1,899) at http://adobe.com/products.
With Illustrator, you can open an existing vector file and manipulate it easily by discovering the layers embedded in it. Figure 6-5 shows a simple illustration of a suitcase with multiple layers available for editing in Illustrator’s Layers tab, as shown in the bottom-right. Figure 6-6 shows the same file opened in Photoshop; with the Layers tab, the different layers aren’t available because Photoshop flattens the image. Illustrator leaves the different layers intact for editing and manipulation.
The file types that you most commonly work with and come across for Illustrator are AI and EPS. These are vector image files that you can easily open and edit in Illustrator.
If you’re interested in finding out more about how to use Illustrator for your design needs, check out Adobe Creative Suite 5 Design Premium All-in-One For Dummies by Jennifer Smith, Christopher Smith, and Fred Gerantabee, or any of the handy online resources in Table 6-4.

Figure 6-5: Simple illustration in Illustrator with multiple layers available for editing.
Table 6-4 Illustrator Online Resources
|
Resource Name |
Description |
|
n.design Studio |
Illustrator tutorials from the talented designers at n.design Studio: www.ndesign-studio.com/tutorials |
|
Vectortuts+ |
A site filled with tutorials, tips, and tricks: http://vector.tutsplus.com |
CorelDRAW
CorelDRAW is a vector-based editing software program available as part of the CorelDRAW Graphics Suite X5 ($469; http://corel.com). CorelDRAW is currently available only for Windows.
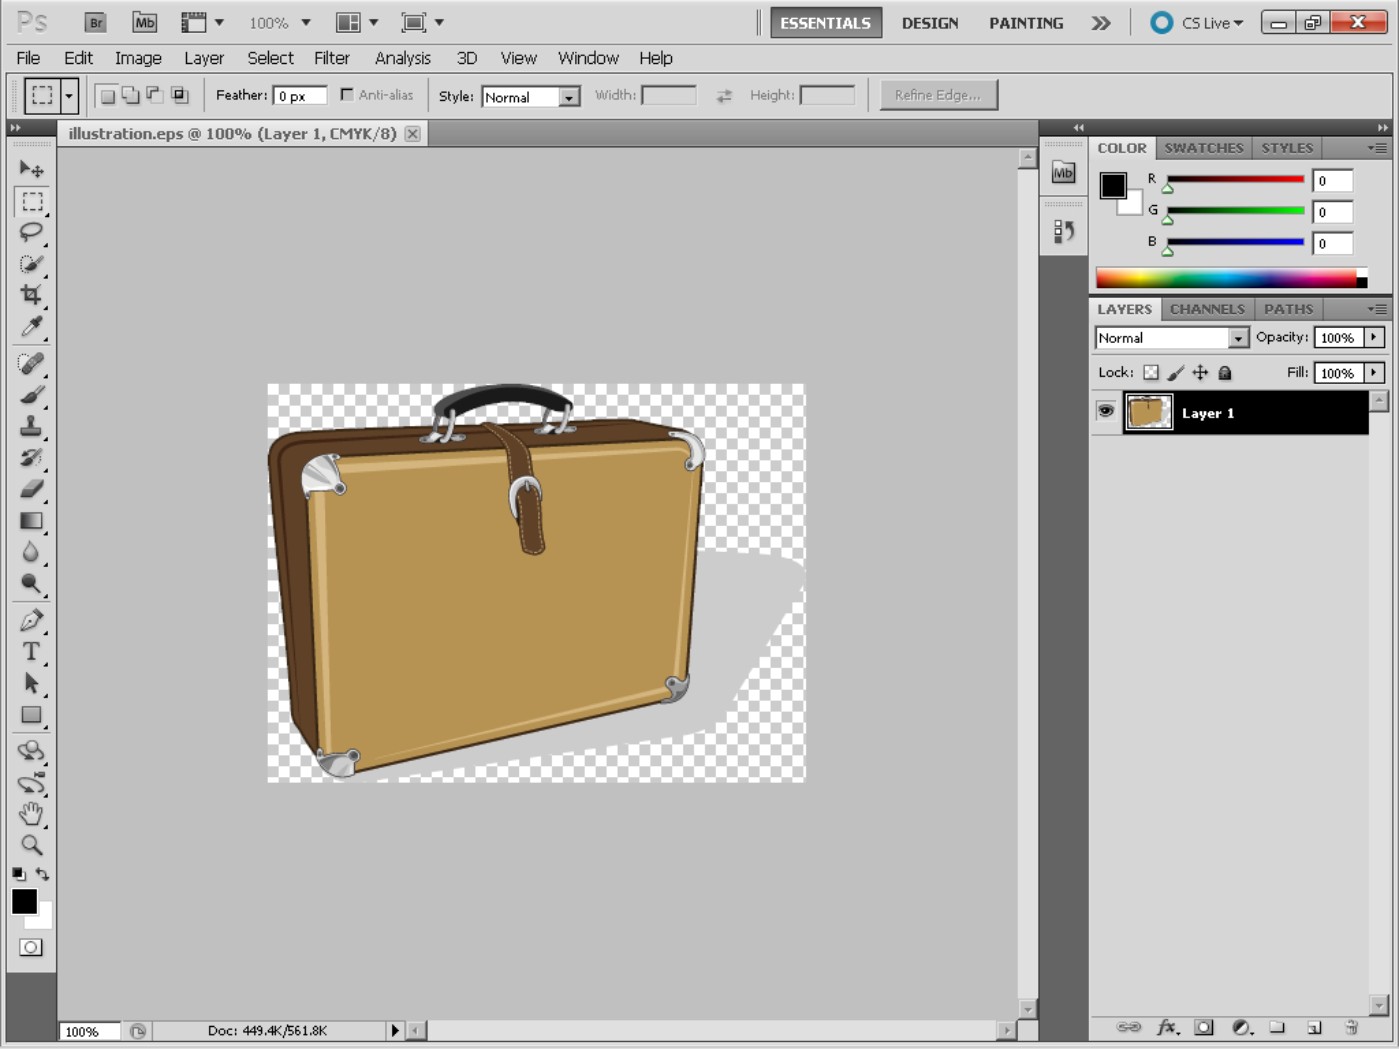
Figure 6-6: Simple illustration in Photoshop, which shows only one layer.
Like Illustrator, CorelDRAW lets you create and edit vector-based images by manipulating the available layers embedded within the vector image file. Figure 6-7 displays the same illustration I used in Figures 6-5 and 6-6, but on the right side of the image, you can see that CorelDRAW makes the different layers available for manipulating and editing to suit your design needs. Within the program, click the layer or curve, as shown in Figure 6-7, to select what you need to edit and make it active on your editing screen, allowing you to apply different effects and edit it to your liking.
You can easily open regular vector image file formats, such as AI and EPS, as well as the Corel-specific vector format, CDR. Table 6-5 gives you a few helpful online resources for you to use to find out more about using CorelDRAW for creating and editing vector images.
Table 6-5 CorelDRAW Online Resources
|
Resource Name |
Description |
|
Association of CorelDRAW Professionals |
Includes newsletters, an online magazine, tutorials, tips, and advice from other users: www.coreldrawpro.com |
|
Graphics Unleashed |
CorelDRAW books and online training classes: www.unleash.com |

Figure 6-7: Simple illustration in CorelDRAW with editable layers available.
Using Online Image Optimization Tools
Earlier in this chapter, I recommend four image-editing software programs that you, the designer, can use to edit and manipulate images for use in your Web designs. You can use these image programs to compress your image files as much as possible without losing image quality. However, what do you do when clients ask how they can compress their images, but don’t have access to the same type of software as you? Your clients will use their WordPress Web site to upload photographs and images within their blog posts and pages, and you can advise them on a few easy online tools to help them compress the images to keep their Web site load time down as much as possible.
Here are a few nifty, free, online, image optimization tools that you, and your clients, can use:
![]() Dynamic Drive: This tool lets you input the Web address of the image you want to compress or upload an image from your computer. The image optimizer lets you choose what type of image you want to output — PNG, GIF, or JPG — or you can choose all three. After this tool gives you the optimized, compressed images, you can save them to your local computer (usually by right-clicking the images and choosing Save Image As) to use on your Web site later. (http://tools.dynamicdrive.com/imageoptimizer)
Dynamic Drive: This tool lets you input the Web address of the image you want to compress or upload an image from your computer. The image optimizer lets you choose what type of image you want to output — PNG, GIF, or JPG — or you can choose all three. After this tool gives you the optimized, compressed images, you can save them to your local computer (usually by right-clicking the images and choosing Save Image As) to use on your Web site later. (http://tools.dynamicdrive.com/imageoptimizer)
![]() Yahoo! Smush.it: This tool lets you upload an image from your computer or enter the URL of the image, and it optimizes and compresses the image to make it available for you to download. Smush.it also reports on the results of the image compression by telling you, in percentages, how much it was able to smush, or compress, your image. (http://smushit.com)
Yahoo! Smush.it: This tool lets you upload an image from your computer or enter the URL of the image, and it optimizes and compresses the image to make it available for you to download. Smush.it also reports on the results of the image compression by telling you, in percentages, how much it was able to smush, or compress, your image. (http://smushit.com)
![]() Image Optimizer: Image Optimizer is another free online service that compresses and resizes your images, and then provides them in a downloadable format for you to use on your Web site pages. It’s also available as an application that you can download to your computer so you can use it locally, rather than using the Image Optimizer Web site to compress your images. (www.imageoptimizer.net)
Image Optimizer: Image Optimizer is another free online service that compresses and resizes your images, and then provides them in a downloadable format for you to use on your Web site pages. It’s also available as an application that you can download to your computer so you can use it locally, rather than using the Image Optimizer Web site to compress your images. (www.imageoptimizer.net)
![]() Web Resizer: The Web Resizer tool does the same as the previous tools, allowing you to upload an image that it compresses and then makes available for download to your computer. This tool also provides other image-editing tools like resizing, cropping, adding borders, and changing the tint and contrast of the image. (http://webresizer.com/resizer)
Web Resizer: The Web Resizer tool does the same as the previous tools, allowing you to upload an image that it compresses and then makes available for download to your computer. This tool also provides other image-editing tools like resizing, cropping, adding borders, and changing the tint and contrast of the image. (http://webresizer.com/resizer)
Finding Online Image Libraries
After you assemble your graphic- and image-editing software tools and understand the types of image files you’re working with, locate some great image and photo libraries to add to your Web design toolbox.
Frequently, when prospective clients approach you to design their Web sites, they provide some basic requirements, or specifications, they hope you can provide for their Web site designs. These requirements include things like color schemes, layout and format, content and features, and images for logos, header files, and design elements. If you’re lucky, your clients come to you with their image files in hand, ready for you to use. If not, they look to you to either create those images or find suitable images from stock photo or stock illustration Web sites. Lucky for you, many are out there — and here are the top three that I look to in these situations:
![]() iStockphoto: An extensive library of stock photography, vector illustrations, video and audio clips, and Flash media. You can sign up for an account and search through its libraries of image files to find the one that suits you, or your client, best. The files that you use from iStockphoto aren’t free — and be absolutely sure that you read the license for each image you use. iStockphoto has several licenses, and the cheapest one is its Standard license, which has some limitations. For example, you can use an illustration from iStockphoto in one Web site design, but you can’t use that same illustration in a theme design that you intend to sell multiple times over (for example, in a premium theme marketplace). Be sure to read the fine print! (http://istockphoto.com)
iStockphoto: An extensive library of stock photography, vector illustrations, video and audio clips, and Flash media. You can sign up for an account and search through its libraries of image files to find the one that suits you, or your client, best. The files that you use from iStockphoto aren’t free — and be absolutely sure that you read the license for each image you use. iStockphoto has several licenses, and the cheapest one is its Standard license, which has some limitations. For example, you can use an illustration from iStockphoto in one Web site design, but you can’t use that same illustration in a theme design that you intend to sell multiple times over (for example, in a premium theme marketplace). Be sure to read the fine print! (http://istockphoto.com)
![]() Dreamstime: Dreamstime is a major supplier of stock photography and digital images. Sign up for an account and search through its huge library of digital image offerings. Dreamstime offers free images, at times — so keep your eyes out for those. Also, Dreamstime has different licenses for its image files that you need to pay close attention to. One really nice feature is its Royalty Free licensing option, which allows you to pay only once for the image, and then use it as many times as you want; however, you can’t redistribute the image in the same Web site theme over and over again, such as in one template, sold to the public multiple times. (http://dreamstime.com)
Dreamstime: Dreamstime is a major supplier of stock photography and digital images. Sign up for an account and search through its huge library of digital image offerings. Dreamstime offers free images, at times — so keep your eyes out for those. Also, Dreamstime has different licenses for its image files that you need to pay close attention to. One really nice feature is its Royalty Free licensing option, which allows you to pay only once for the image, and then use it as many times as you want; however, you can’t redistribute the image in the same Web site theme over and over again, such as in one template, sold to the public multiple times. (http://dreamstime.com)
![]() VectorStock: VectorStock offers royalty-free vector-only illustrations and graphics for sale. You won’t find stock photography here because VectorStock is limited only to vector illustrations. (You need a vector-based editing program like Illustrator or CorelDRAW to open and use these images.) As with other digital image resources and libraries, licenses apply to the images that you purchase and use — be sure to read about the license of the image you purchase before using it in your Web design projects. (www.vectorstock.com)
VectorStock: VectorStock offers royalty-free vector-only illustrations and graphics for sale. You won’t find stock photography here because VectorStock is limited only to vector illustrations. (You need a vector-based editing program like Illustrator or CorelDRAW to open and use these images.) As with other digital image resources and libraries, licenses apply to the images that you purchase and use — be sure to read about the license of the image you purchase before using it in your Web design projects. (www.vectorstock.com)