Exploring the Layout and Structure
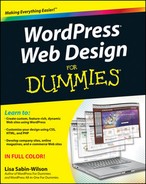
The Twenty Ten theme, shown in Figure 10-1, offers a clean design style that’s highly customizable for the millions of WordPress users who want a simple look that focuses on the content for their sites. As such, the font is sharp and easy to read. Many of the new built-in theme features allow you to make simple, yet elegant, tweaks to the theme, including uploading new feature images and adjusting the background colors.

Figure 10-1: The Twenty Ten theme.
In Chapter 8, you find out how to plan a Web design project that includes choosing how many columns you want to use for your design layout. The default Twenty Ten theme gives you two layout choices by using page templates that come with it:
![]() Two-column default layout: The two-column layout — one of the most common layouts for blogs and used more and more on general Web sites — is the default, and it includes a content area on the left, a widget-ready sidebar on the right, and a footer area with four widget-ready spaces (refer to Figure 10-1).
Two-column default layout: The two-column layout — one of the most common layouts for blogs and used more and more on general Web sites — is the default, and it includes a content area on the left, a widget-ready sidebar on the right, and a footer area with four widget-ready spaces (refer to Figure 10-1).
![]() One-column page layout: The one-column layout, shown in Figure 10-2, comes in very handy for product sales pages, e-mail subscription form pages, photography or portfolio pages, and other content that you don’t want bothered by distractions of content within the sidebar. (See Chapter 16 for the lowdown on using plugins to add e-commerce solutions, forms, and so on to your pages.)
One-column page layout: The one-column layout, shown in Figure 10-2, comes in very handy for product sales pages, e-mail subscription form pages, photography or portfolio pages, and other content that you don’t want bothered by distractions of content within the sidebar. (See Chapter 16 for the lowdown on using plugins to add e-commerce solutions, forms, and so on to your pages.)
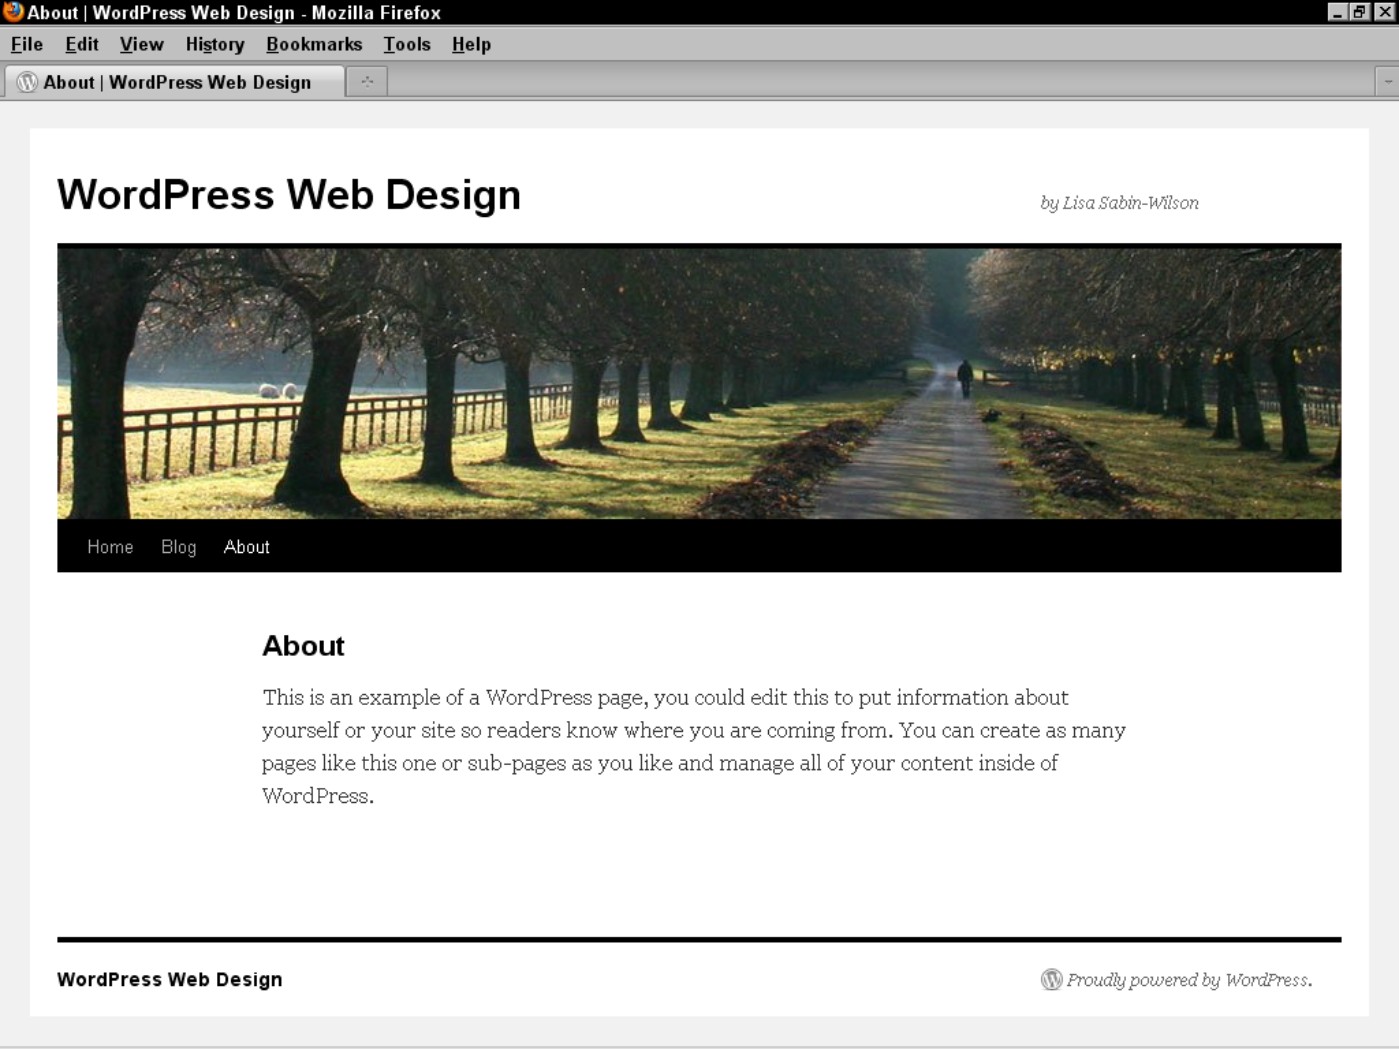
Figure 10-2: A one-column layout.
To apply Twenty Ten’s one-column page layout to a new WordPress page, follow these steps:
1. In the WordPress Dashboard, choose Pages⇒Add New.
The Add New Page page opens so that you can create a new page on your WordPress Web site.
2. Add your page title and content into the corresponding areas.
3. Choose One Column, No Sidebar from the Template drop-down list.
The drop-down list is located under the Page Attributes heading on the right, as shown in Figure 10-3.
The one-column page template is applied to the page you’re creating.
4. Click the Publish button.
Your new page saves and publishes to your site with the one-column layout assigned to it.

Figure 10-3: Choose the One Column, No Sidebar option.
Customizing the Header Image
Most themes have a header image that displays at the top of the Web site (refer to Figure 10-1). This image is generated by a graphic defined in the Cascading Style Sheet (CSS) value for the property that represents the header area or through the use of a custom header feature in WordPress. In the Twenty Ten theme, all the hard work’s done for you, so including a custom header image on a site that uses that theme is pretty easy.
With the custom header feature that the Twenty Ten theme supports, you can choose one of nine header images to display on your Web site, or you have the option to upload one of your own images. (For details on defining a background image for the header image using CSS, see Chapter 14.)
![]() An interesting story behind each of the nine header images is that Matt Mullenweg, the founder of the WordPress platform, created each image available in the Twenty Ten theme by taking photographs of different places he’s visited around the globe.
An interesting story behind each of the nine header images is that Matt Mullenweg, the founder of the WordPress platform, created each image available in the Twenty Ten theme by taking photographs of different places he’s visited around the globe.
Selecting one of the available header images
To use one of the available header images on your site, follow these steps:
1. In the WordPress Dashboard, choose Appearance⇒Header.
The Custom Header page appears in your browser window. Notice in the Preview Header section, one of the header images is selected by default and is already displayed on your Web site, as shown in Figure 10-1.
2. Scroll to the Default Images section, which shows the available header images, and select the header image you like.
Figure 10-4 shows the eight available header images (the ninth one is already selected by default).

Figure 10-4: The Twenty Ten theme’s default header images.
3. Click the Save Changes button at the bottom of the page.
The Custom Header page refreshes and displays your chosen header image in the Preview section.
![]() You can easily switch between the different header images by revisiting the Custom Header page and applying one of the other header images on your site by following the preceding steps.
You can easily switch between the different header images by revisiting the Custom Header page and applying one of the other header images on your site by following the preceding steps.
Uploading your own header image
Although the default header images are acceptable, you may want something unique for your site. You can choose a custom header image, such as a photograph you’ve taken or an image you’ve designed. (See Chapter 6 for the lowdown on different image types and formats.)
Follow these few steps to upload your own header image to display on your Web site:
1. In the WordPress Dashboard, choose Appearance⇒Header.
The Custom Header page loads in your browser window.
2. Scroll to the Upload Image section, as shown in Figure 10-5, and click the Browse button.

Figure 10-5: The Twenty Ten Upload Image section.
A dialog box pops up asking you to select an image from your computer’s hard drive.
3. Select the image you want to use from your local computer, click the Open button, and then click the Upload button.
Your chosen image uploads to your Web server, and the Crop Header Image page loads in your browser.
4. (Optional) Use the image crop tool on the Crop Header Image page to resize your header image.
![]() The Twenty Ten theme’s default header size is 940 x 198 pixels. Generally, uploading a new header image already cropped in an image-editing program to that exact size is best. However, if your image is larger, you can use the built-in image crop tool to fit the image in the default space after you upload the header, as shown in Figure 10-6.
The Twenty Ten theme’s default header size is 940 x 198 pixels. Generally, uploading a new header image already cropped in an image-editing program to that exact size is best. However, if your image is larger, you can use the built-in image crop tool to fit the image in the default space after you upload the header, as shown in Figure 10-6.
To resize and crop your larger image, simply drag one of the eight small handles located at the corners and in the middle of each side of the image, as shown in Figure 10-6. You can also click within the image and move the entire image up or down to get the optimal placement and cropping effect you want.

Figure 10-6: Cropping the header image in the Twenty Ten theme.
5. Click the Crop and Publish button.
The Custom Header page loads in the Dashboard and displays your new header image.
6. Click the Save Changes button.
The changes you’ve made are saved to the header image, and it publishes to your site.
Customizing the Background
The Twenty Ten theme has a built-in custom background feature that allows you to change the background to a different color or use an image for it. To change the background for your Web site, follow these steps:
1. Choose Appearance⇒Background.
The Custom Background page loads in the Dashboard. By default, the background color is set to white.
2a. To change the background color, type the hexadecimal color code in the Color text box and then skip to Step 4.
If you don’t know what hex code you want to use, click the Select a Color link and then click a color within the provided color wheel (see Figure 10-7).

Figure 10-7: The color wheel on the Custom Background page.
![]() A hexadecimal (or hex) code represents a certain color. Hex codes always start with a hash symbol (
A hexadecimal (or hex) code represents a certain color. Hex codes always start with a hash symbol (#) and have six letters and/or numbers to represent a particular color, such as #d5d6d7 (light gray). I talk more about hexadecimal values in Chapter 14 where I discuss basic CSS techniques.
2b. To use an image file for the background, upload an image from your computer:
a. Click the Browse button in the Upload Image section and then select a file from your computer.
b. Click the Upload button.
The Custom Background page refreshes and gives you several display options.
3. Change the display options for your new background image:
• Position: Select Left, Center, or Right to set the screen position of the background image on your Web site.
• Repeat: Choose No Repeat, Tile, Tile Horizontally, or Tile Vertically in this drop-down list to set the image on your Web site.
• Attachment: Select Scroll to set the background image to scroll down the page, or select Fixed to set the background image in a static position so that it doesn’t scroll down the page.
4. Click the Save Changes button.
Be sure to click the Save Changes button before navigating away from the Custom Background page; otherwise, your new settings aren’t saved.
![]() Because all themes are not created equal, themes that don’t have the custom header and background features enabled make it a little more challenging to change these elements. Without these features, tweaks must be made via the theme style sheet (
Because all themes are not created equal, themes that don’t have the custom header and background features enabled make it a little more challenging to change these elements. Without these features, tweaks must be made via the theme style sheet (style.css), which I discuss in detail in Chapter 14.
Including Custom Navigation Menus
A navigation menu lists the links displayed on your site. These links can link to pages, posts, or categories within your site, or they can link to other sites. No matter what they link to, you can define navigation menus on your site through the built-in menus feature in WordPress.
I suggest you provide at least one navigation menu on your site so that readers can see everything your site has to offer. Providing visitors with a link — or several — to click is in keeping with the point-and-click spirit of the Web.
Much like the drag-and-drop widgets feature (which I cover later in this chapter) that enables you to tweak areas of your site without knowing hardly any code, the menus feature offers an easy way to add and reorder a variety of navigational links to your site as well as create secondary menu bars (if your theme offers multiple menu areas).
![]() The menus feature is already built in to the default Twenty Ten WordPress theme, so you don’t have to worry about preparing your theme for it. Not all themes have this feature available though because you have to add support for it in the theme functions file. I discuss how to enable this feature by using a functions file in Chapter 12.
The menus feature is already built in to the default Twenty Ten WordPress theme, so you don’t have to worry about preparing your theme for it. Not all themes have this feature available though because you have to add support for it in the theme functions file. I discuss how to enable this feature by using a functions file in Chapter 12.
To create a new navigation menu in Twenty Ten, follow these steps:
1. Choose Appearance⇒Menus on your Dashboard.
The Menus page opens on your WordPress Dashboard.
2. Type a name in the Menu Name box and click the Create Menu button.
The Menus page reloads with a message that tells you your new menu has been created (I named my menu Main, as shown in Figure 10-8).

Figure 10-8: The Menus page on the Dashboard.
3. Add new links to your newly created menu. WordPress allows you to add new links to the menu in three ways (see Figure 10-8):
• Custom Links: In the URL field, type the URL of the Web site that you want to add (for example, type http://www.google.com). Then type the name of the link that you want to display in your menu in the Text field (in this case, type Google). Then click the Add to Menu button.
• Pages: Click the View All link to display a list of all the page(s) you have currently published on your site. Select the check box next to the page names you want to add to your menu and then click the Add to Menu button.
• Categories: Click the View All link to display a list of all the categories you’ve created on your site. Select the check box next to the category names you want to add to the menu and then click the Add to Menu button.
4. Review your menu choices on the right side of the page.
When you add new menu items, the column on the right side of the Menus page populates with your menu choices. In Figure 10-8, I populated my menu with one custom link, one page link, and one category link (Home, About, and Books, respectively).
5. (Optional) Edit your menu choices by clicking the down arrow to the right of the menu item name.
6. When you’re satisfied with your menu choices, click the Save Menu button on the right side, at the top of the Menus page.
A message confirming that the new menu has been saved appears.
![]() You can create as many menus as you need for your Web site. Although the main navigation menu (which is determined in Appearance⇒Menus⇒Theme Locations⇒Primary Navigation) displays below the header image on the Twenty Ten theme (refer to Figure 10-1), menu widgets are available that allow you to display other menus you’ve created in different areas of your Web site, such as the sidebar or footer. (I cover widgets in the next section.)
You can create as many menus as you need for your Web site. Although the main navigation menu (which is determined in Appearance⇒Menus⇒Theme Locations⇒Primary Navigation) displays below the header image on the Twenty Ten theme (refer to Figure 10-1), menu widgets are available that allow you to display other menus you’ve created in different areas of your Web site, such as the sidebar or footer. (I cover widgets in the next section.)
After you save your navigation menu, you can use the drag-and-drop interface on the Menus page to rearrange your menu items by clicking a menu item with your mouse, dragging it to the desired location, and then releasing your mouse to finalize its position. Additionally, you can create subpages under top-level menu items by moving menu items slightly to the right and below them. Subpages can be especially handy for sites with lots of page content because they enable you to avoid cluttering the navigation bar and to organize content logically. Be sure to click the Save Menu button to ensure that any changes you’ve made to the menu are saved and applied to your Web site.
Enhancing Your Web Site with Widgets
WordPress widgets are very helpful tools built in to WordPress. They allow you to easily arrange how your content — such as your blogroll, recent posts, and monthly and category archive lists — appears in your Web site sidebar. With widgets, you can arrange and display the content in the sidebar without knowing PHP or HTML.
In the following sections, I introduce you to widgets, explain how to add one to your site, and describe in detail two popular widgets — the Text widget and the RSS widget.
Understanding how widgets work
Widget areas are the editable regions defined in your theme that allow you to insert or arrange content, such as a list of your recent blog posts, links to your favorite sites, or new custom menus, by simply dragging and dropping (and editing) available widgets on the Dashboard’s Widgets page into those corresponding areas.
Many of the available widgets offered by WordPress (and those added sometimes by WordPress themes and plugins) provide drag-and-drop ease of installation of more advanced functions that would normally be available only if you wrote code directly into your theme files.
To view the widgets available for use on your Web site, choose Appearance⇒Widgets from the Dashboard. The Widgets page appears, displaying the available widgets on the left side of the page, as shown in Figure 10-9. This page enables you to control what features you use and where you place them — all without knowing a lick of code.

Figure 10-9: The Widgets page.
By default, the footer and sidebar in the Twenty Ten theme are widgetized, meaning the footer and sidebar areas will expand to show any content you add to any of the six widget-ready areas. Figure 10-9 shows the widget areas displayed on the Widgets page on your Dashboard.
When you activate the Twenty Ten theme, the Widgets page in your Dashboard shows six widget areas:
![]() Primary Widget Area
Primary Widget Area
![]() Secondary Widget Area
Secondary Widget Area
![]() First Footer Widget Area
First Footer Widget Area
![]() Second Footer Widget Area
Second Footer Widget Area
![]() Third Footer Widget Area
Third Footer Widget Area
![]() Fourth Footer Widget Area
Fourth Footer Widget Area
The first two widget areas, Primary and Secondary, display widgets on your Web site in the sidebar (in order of appearance: Primary first, Secondary second). The First, Second, Third, and Fourth Footer Widget Areas display on your Web site in the footer (or the bottom) of your Web site, as shown in Figure 10-10. They also display in a row across the bottom; the widgets added to the First Footer Widget Area display first, then the widgets in the Second Footer Widget Area display, followed by the third and fourth.
![]() The number and appearance of widgets will vary depending on the theme you are currently using on your Web site. The Twenty Ten theme has six widget areas, but another theme may only have one or two.
The number and appearance of widgets will vary depending on the theme you are currently using on your Web site. The Twenty Ten theme has six widget areas, but another theme may only have one or two.

Figure 10-10: The Twenty Ten theme’s footer widget area.
Adding widgets to your sidebar or footer
The left side of the Widgets page lists all the available widgets for your WordPress site. The right side of the page lists the sidebar and footer areas designated in your theme. You drag your selected widget from the left side of the page into your chosen widget area on the right. For example, to add a search box to the right sidebar of the default layout, drag the Search widget from the Available Widgets section to the Primary Widget Area.
To add a new widget to your sidebar or footer, follow these steps:
1. Choose Appearance⇒Widgets from the Dashboard.
The Widgets page appears (refer to Figure 10-9).
2. Decide which widget you want to use from the Available Widgets section.
For the purpose of these steps, I chose the Recent Posts widget.
3. Click the widget title and then drag and drop the widget into the Primary Widget Area on the right side of the page.
4. Configure options for the widget as desired and then click Save.
Each widget has different options that you can configure. Some widgets have a number of editable options; others simply let you write a title for the widget area. As shown in Figure 10-11, the Recent Posts widget has two options: one for editing the title of the widget and one to determine how many recent posts to display. Be sure to open the widget title’s drop-down list to explore the options available.
I discuss the options for the Text widget and RSS widget in more detail in the next two sections.
5. (Optional) Repeats Steps 1–4 to add more widgets to your layout.

Figure 10-11: Editing the Recent Post widget options.
6. Arrange your widgets in the order in which you want them to appear on your site by clicking a widget and dragging it above or below another widget. Repeat this step until your widgets are arranged the way you want them.
After you select and configure all your widgets, visit your Web site in your Web browser, and you can see that your site’s sidebar matches the content (in the proper order) you’ve arranged in the Primary Widget Area on the Widgets page in your Dashboard. How cool is that? You can go back to the Widgets page and rearrange, add, or remove items to your heart’s content.
![]() To remove a widget from your sidebar or footer, open the widget title’s drop-down list and then click the Delete link. WordPress removes the widget from the Widget area on the right side of this page and places it back in the Available Widgets section. If you want to remove a widget but want WordPress to remember the settings that you configured for it, instead of clicking the Delete link, simply drag the widget into the Inactive Widget section on the right side, near the bottom of the page. This stores the widget, with all its settings, for future use.
To remove a widget from your sidebar or footer, open the widget title’s drop-down list and then click the Delete link. WordPress removes the widget from the Widget area on the right side of this page and places it back in the Available Widgets section. If you want to remove a widget but want WordPress to remember the settings that you configured for it, instead of clicking the Delete link, simply drag the widget into the Inactive Widget section on the right side, near the bottom of the page. This stores the widget, with all its settings, for future use.
Using the Text widget
The Text widget is one of the most useful WordPress widgets because it allows you to add text and HTML code into widget areas without editing the theme’s template files. For that reason, the Text widget is the jack-of-all-trades widget; it allows you to include several types of information on your site by including your own text within it.
To illustrate this, here are some diverse examples for how I’ve used the Text widget and why it’s such a popular feature:
![]() Add an e-mail newsletter subscription form: You can add a form that allows your site visitors to sign up to your e-mail newsletter. Because this often involves HTML, the Text widget is especially helpful in this instance, because the Text Widget allows you to include basic HTML markup within it.
Add an e-mail newsletter subscription form: You can add a form that allows your site visitors to sign up to your e-mail newsletter. Because this often involves HTML, the Text widget is especially helpful in this instance, because the Text Widget allows you to include basic HTML markup within it.
![]() Display business hours of operation: You can display the days and hours of your business operation where everyone can easily see them.
Display business hours of operation: You can display the days and hours of your business operation where everyone can easily see them.
![]() Post your updates from social networks: Many social networking sites like Twitter and Facebook offer embed codes to display your updates on those sites directly on your Web site. They often include JavaScript, HTML, and CSS, and with the Text widget, you can easily embed the code provided.
Post your updates from social networks: Many social networking sites like Twitter and Facebook offer embed codes to display your updates on those sites directly on your Web site. They often include JavaScript, HTML, and CSS, and with the Text widget, you can easily embed the code provided.
![]() Announce special events and notices: If your organization has a special sale, an announcement about a new staff member, or an important notice about inclement weather closings, you can use the Text widget to quickly post these types of things in just a few seconds to your site.
Announce special events and notices: If your organization has a special sale, an announcement about a new staff member, or an important notice about inclement weather closings, you can use the Text widget to quickly post these types of things in just a few seconds to your site.
![]() The WordPress Text widget does not allow you to include PHP code of any kind, such as special WordPress template tags or functions like the ones you find in Chapter 12. However, a great plugin — the Advanced Text Widget — allows you to insert PHP code within it. If you need this feature, you can download the Advanced Text Widget from the WordPress Plugin Directory page at http://wordpress.org/extend/plugins/advanced-text-widget. (I discuss how to install plugins in Chapter 16.)
The WordPress Text widget does not allow you to include PHP code of any kind, such as special WordPress template tags or functions like the ones you find in Chapter 12. However, a great plugin — the Advanced Text Widget — allows you to insert PHP code within it. If you need this feature, you can download the Advanced Text Widget from the WordPress Plugin Directory page at http://wordpress.org/extend/plugins/advanced-text-widget. (I discuss how to install plugins in Chapter 16.)
To add the Text widget to a sidebar or footer on your site, follow these steps:
1. From the WordPress Dashboard, choose Appearance⇒Widgets.
2. Drag and drop the Text widget from the Available Widgets section to the desired widget area on the right (see the preceding section for instructions on how to do this).
The Text widget opens automatically.
3. Add a widget title in the Title field and any desired text in the text area, as shown in Figure 10-12.
4. Click the Save button and then click the Close link.
The text widget closes, and you can view the content of the widget on your Web site.
Figure 10-12: The Text widget.
Adding the RSS widget
The RSS widget allows you to pull headlines from almost any Really Simple Syndication (RSS) feed, including recent headlines from your other WordPress blogs or sites, and headlines from news sites or other sources that offer RSS feeds. This is commonly referred to as aggregation, gathering information from a syndicated RSS feed source to display on your site.
Follow these steps to add the RSS widget to your site:
1. From the WordPress Dashboard, choose Appearance⇒Widgets.
2. Drag and drop the RSS widget from the Available Widgets section to the desired widget area on the right.
See the section “Adding widgets to your sidebar or footer,” earlier in this chapter, for instructions on how to do this.
3. Open the RSS widget’s drop-down list to display the options you can configure for the RSS widget, as shown in Figure 10-13.

Figure 10-13: The RSS widget.
4. In the Enter the RSS Feed URL Here text box, type the RSS URL of the blog (or site) you want to add.
You can usually find the RSS feed URL of a blog (or a site) listed in its sidebar.
5. (Optional) Type the title of the RSS widget.
This title is what appears in your site above the links from the site. If I wanted to add the RSS feed from my personal site, for example, I’d type Lisa’s Site.
6. Select the number of items (from 1 to 20) from the RSS feed to display on your site.
7. (Optional) Select the following options as desired:
• Display Item Content: Select this check box if you want WordPress to also display the content of the feed (usually, the content of the post from the feed URL). If you want to display only the title, leave this check box deselected.
• Display Item Author If Available: Select this option if you want to display the author’s name along with the item’s title.
• Display Item Date: Select this option if you want to display the date the item was published, along with the item title.
8. Click the Save button.
WordPress saves all the options you’ve just set and reloads the Widgets page with your RSS widget intact.