
- In the Tile Engine project, rename the
Class1.csfile that was generated by the Game Library project template toTileMap.cs. Visual Studio will ask you if you wish to rename all references to the class as well. Go ahead and click on Yes. We have not referenced our new class anywhere, so no other code is actually updated. - Double-click on the new
TileMap.csfile to open it in the Visual Studio editor. - Add the following
usingdirectives to the top of the class file:using Microsoft.Xna.Framework.Storage; using System.IO; using System.Xml.Serialization; using System.Runtime.Serialization.Formatters.Binary;
- Modify the declaration of the TileMap class to make the class public and static:
public static class TileMap
- Add declarations to the TileMap class:
#region Declarations
public const int TileWidth = 48;
public const int TileHeight = 48;
public const int MapWidth = 160;
public const int MapHeight = 12;
public const int MapLayers = 3;
private const int skyTile = 2;
static private MapSquare[,] mapCells =
new MapSquare[MapWidth, MapHeight];
public static bool EditorMode = false;
public static SpriteFont spriteFont;
static private Texture2D tileSheet;
#endregion
- Add the
Initialize()method to the TileMap class:#region Initialization static public void Initialize(Texture2D tileTexture) { tileSheet = tileTexture; for (int x = 0; x < MapWidth; x++) { for (int y = 0; y < MapHeight; y++) { for (int z=0; z < MapLayers; z++) { mapCells[x,y] = new MapSquare(skyTile, 0, 0, "", true); } } } } #endregion - Add the Tile and Tile Sheet Handling region to the TileMap class:
#region Tile and Tile Sheet Handling
public static int TilesPerRow
{
get { return tileSheet.Width / TileWidth; }
}
public static Rectangle TileSourceRectangle(int tileIndex)
{
return new Rectangle(
(tileIndex % TilesPerRow) * TileWidth,
(tileIndex / TilesPerRow) * TileHeight,
TileWidth,
TileHeight);
}
#endregion
Before we continue with the implementation of the TileMap class, let's look at the difference we can see so far from the same class in Robot Rampage.
We have not used the System.Runtime.Serialization.Formatters.Binary assembly before, but in order to write our level files out to disk (and read them back in again) we need a way to convert the array of MapSquare objects in memory into a format that can be written to a file. This assembly provides a formatter object that can perform this translation.
You may notice that both the declaration and initialization regions are quite a bit shorter than they were in Robot Rampage. In Gemstone Hunter, we will define a tile sheet image that contains the tiles we will use in the game. Unlike our previous games, we will not simply store all of our game's graphics on the same sprite sheet, but break it up into multiple sheets:
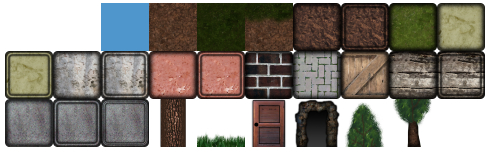
By defining a single sprite sheet to hold only tiles for the tile map, we can treat the sheet in a special manner, and decide that the sheet will be evenly divided into as many tiles as will fit on the image. Our tile sheet image is 480 by 480 pixels, and with a 48 by 48 tile size, we have 10 rows of 10 tiles, for 100 total tiles available to our game. We could always increase the size of the image to add more tiles, though we would want to keep it to increments of 48 pixels in each direction to make the math easier.
We will number the tiles starting with zero in the upper left corner of the tile sheet, and progressing across a row. When we reach the end of the row, we return to the left side of the image and start a new row. The two methods in the Tile and Tile Sheet Handling region (step seven) replace the array of pre-defined tiles by providing a way to locate the source rectangle for any tile we wish to draw on the tile sheet image.
Our map is still represented by an array, but this time around it is a two-dimensional array of MapSquare objects instead of simple integers. We have also rearranged our terminology to reflect the more complex nature of our tile map. What we referred to as squares in Robot Rampage, we now call cells. Any of our code that dealt with getting or setting information about map tiles in Robot Rampage will need to be updated to handle the entire MapSquare object in each cell instead of a simple integer value.
The TileMap itself will include support for being used in editing mode, which can be toggled by setting the EditorMode member variable. While in editor mode, we will draw the contents of the CodeValue member of the MapSquare class on top of each square, so the TileMap class needs a SpriteFont for use with SpriteBatch.DrawString().
Our Initialize() method is greatly simplified by the removal of the tiles array, allowing us to establish all of the MapCells as MapSquares with empty tiles on each layer. Our tile sheet contains a fully transparent tile in the upper left corner (tile zero) and a blue sky tile in the third position (tile two), so by filling the map with squares containing tile two on the background layer, and tile zero on the other two layers, we end up with an empty map with a blue sky background. This will simply save us time when creating a new map with the map editor by letting us skip drawing the sky on each map.