 Time for action - creating the menu bar
by Kurt Jaegers
XNA 4.0 Game Development by Example Beginner's Guide
Time for action - creating the menu bar
by Kurt Jaegers
XNA 4.0 Game Development by Example Beginner's Guide
- XNA 4.0 Game Development by Example
- XNA 4.0 Game Development by Example
- Credits
- About the Author
- About the Reviewers
- Preface
- 1. Introducing XNA Game Studio
- Overview of the games
- System requirements
- Installing XNA Game Studio
- Time for action - installing XNA Game Studio
- Building your first game
- Time for action - creating a new Windows game project
- Time for action - adding variables to the class declaration area
- Time for action - customizing the Initialize() method
- Time for action - creating the squareTexture
- Time for action - coding Update() for SquareChase
- Time for action - draw SquareChase!
- Time for action - play SquareChase!
- Summary
- 2. Flood Control Underwater Puzzling
- Designing a puzzle game
- Time for action - set up the Flood Control project
- Introducing the Content Pipeline
- Time for action - reading textures into memory
- Sprites and sprite sheets
- Classes used in Flood Control
- The GamePiece class
- Time for action - build a GamePiece class declarations
- Time for action - building a GamePiece class: constructors
- Time for action - GamePiece class methods part 1 updating
- Time for action - GamePiece class methods part 2 rotation
- Time for action - GamePiece class methods part 3 connection methods
- Time for action - GamePiece class methods part 4 GetSourceRect
- The GameBoard class
- Time for action - create the GameBoard.cs class
- Time for action - initialize the game board
- Time for action - manipulating the game board
- Time for action - filling in the gaps
- Time for action - generating new pieces
- Time for action - water in the pipes
- Time for action - making the connection
- Building the game
- Time for action - Game1 declarations
- Time for action - updating the Initialize() method
- Time for action - drawing the screen the title screen
- Time for action - drawing the screen - the play screen
- Time for action - scores and scoring chains
- Time for action - handling mouse input
- Time for action - letting the player play
- Play the game
- Summary
- 3. Flood Control Smoothing Out the Rough Edges
- Animated pieces
- Time for action - rotating pieces
- Time for action - falling pieces
- Time for action - fading pieces
- Time for action - updating GameBoard to support animated pieces
- Time for action - generating fading pieces
- Time for action - generating falling pieces
- Time for action - modify Game1 to generate rotating pieces
- Time for action - updating Game1 to update animated pieces
- Time for action - update Game1 to draw animated pieces
- SpriteFonts
- Time for action - add SpriteFonts to Game1
- Time for action - drawing the score
- Time for action - creating the ScoreZoom class
- Time for action - updating and displaying ScoreZooms
- Time for action - game over
- The flood
- Time for action - tracking the flood
- Time for action - displaying the flood
- Time for action - adding difficulty levels
- Summary
- 4. Asteroid Belt Assault Lost in Space
- Creating the project
- Time for action - creating the Asteroid Belt Assault project
- Another definition for "sprite"
- Time for action - declarations for the Sprite class
- Time for action - Sprite constructor
- Time for action - basic Sprite properties
- Time for action - animation and drawing properties
- Time for action - supporting collision detection
- Time for action - adding animation frames
- Time for action - updating the Sprite
- Time for action - drawing the Sprite
- A sprite-based star field
- Time for action - creating the StarField class
- Time for action - updating and drawing the StarField
- Time for action - viewing the StarField in action
- Animated sprites asteroids
- Time for action - building the AsteroidManager class
- Time for action - positioning the asteroids
- Time for action - checking the asteroid's position
- Time for action - updating and drawing asteroids
- Time for action - bouncing asteroids part 1
- Time for action - bouncing asteroids part 2
- Player and enemy shots
- Time for action - adding the ShotManager class
- Time for action - firing shots
- Time for action - updating and drawing shots
- Adding the player
- Time for action - creating the PlayerManager class
- Time for action - handling user input
- Time for action - updating and drawing the player's ship
- Enemy ships
- Time for action - creating the Enemy class
- Time for action - waypoint management
- Time for action - enemy update and draw
- Time for action - creating the EnemyManager class
- Time for action - setting up the EnemyManager class
- Time for action - spawning enemies
- Time for action - updating and drawing the EnemyManager
- Summary
- 5. Asteroid Belt Assault Special Effects
- Explosion effects
- Time for action - constructing the Particle class
- Time for action - updating and drawing particles
- Time for action - the ExplosionManager class
- Time for action - creating explosions
- Time for action - updating and drawing explosions
- The collision manager
- Time for action - creating the CollisionManager class
- Time for action - player shot collisions
- Time for action - player collisions
- Time for action - using the CollisionManager class
- Sound effects
- Time for action - building a sound effects manager
- Time for action - using the SoundManager class
- The game structure
- Time for action - structuring the game
- Time for action - drawing the game structure
- Summary
- 6. Robot Rampage Multi-Axis Mayhem
- Statics, statics, everywhere
- Time for action - creating the Robot Rampage project
- A world larger than the screen
- Time for action - creating the Camera class
- Time for action - building a new Sprite class
- Time for action - viewing the Sprite and Camera classes in action
- The game world tile-based maps
- Time for action - creating the TileMap class
- Time for action - dealing with map squares
- Time for action - handling tiles
- Time for action - drawing the tile map
- Time for action - random wall placement
- Adding the player
- Time for action - building the Player class
- Time for action - handling input
- Time for action - staying in bounds
- Time for action - accounting for walls
- Summary
- 7. Robot Rampage Lots and Lots of Bullets
- Visual effects
- Time for action - the Particle class
- Time for action - the EffectsManager class
- Time for action - building explosions
- Time for action - spark effects
- Adding weaponry
- Time for action - beginning the WeaponManager class
- Time for action - new weapons
- Time for action - shots colliding with tiles
- Time for action - power-ups
- Path finding
- Time for action - the PathNode class
- Time for action - beginning the implementation of A*
- Time for action - finding the path
- Time for action - adjacent squares
- Time for action - updating the WeaponManager class
- Player goals
- Time for action - building a computer terminal
- Time for action - the GoalManager class
- Enemy robots
- Time for action - building the Enemy class
- Time for action - enemy AI methods
- Time for action - the enemy manager
- Time for action - destroying enemies
- Game structure
- Time for action - the GameManager class
- Time for action - awarding points
- Time for action - updating the Game1 class
- Summary
- 8. Gemstone Hunter Put on Your Platform Shoes
- Borrowing graphics
- Time for action - creating projects
- A more advanced tile engine
- Time for action - the MapSquare class
- Time for action - the Camera class
- Time for action - the TileMap class - part 1
- Time for action - the TileMap class - part 2
- Time for action - the TileMap class - part 3
- Time for action - adding the tile map to the game project
- The map editor project
- Time for action - creating the level editor project
- Time for action - adding a form
- Time for action - adding event handlers
- Time for action - creating the menu bar
- Time for action - tile selection controls
- Time for action - scroll bars
- Time for action - final controls
- Time for action - updating Game1
- Time for action - the Game1 Update method
- Time for action - completing the editor - part 1
- Time for action - fixing the scrolling delay
- Time for action - implementing loading and saving
- One last issue
- Time for action - handling the FormClosed event
- Summary
- 9. Gemstone Hunter Standing on Your Own Two Pixels
- Animation strips
- Time for action - building the Animation class
- Animated game objects
- Time for action - building the GameObject class Part 1
- Time for action - building the GameObject class part 2
- Time for action - building the GameObject class part 3
- The Player
- Time for action - creating the Player class
- Time for action - overriding the Update() method part 1
- Time for action - overriding the Update() method part 2
- Time for action - repositioning the camera
- Loading levels
- Time for action - building the LevelManager class
- Gemstones
- Time for action - building the Gemstone class
- Time for action - implementing score tracking
- Enemies
- Time for action - summoning up the zombies
- Time for action - interacting with zombies
- Level transitions
- Time for action - supporting map transitions
- Processing other codes
- Time for action - handling codes
- Game structure
- Time for action - implementing game states
- Summary
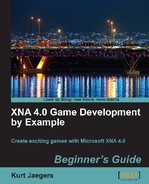
- Double-click on the
MapEditor.csfile in Solution Explorer to open the MapEditor form in the design window. - Click on the empty MenuStrip you previously added to the form, and add menu entries for the following items:
- &File
- &Load Map
- &Save Map
- (A single dash, creating a separator line)
- E&xit
- &Tools
- &Clear Map
- &Layer
- &Background
- &Interactive
- &Foreground
- &File
- Double-click on the Exit item under the File menu to have C# automatically generate an event handler for the Exit menu item.
- Enter the following code into the
exitToolStripMenuItem_Click()event handler:game.Exit(); Application.Exit();
We now have a standard Windows menu attached to our form with a few entries for our level editor. In order to add code to menu items other than the Exit command, we need to make modifications to our Game1 class, so we will come back to them after we have laid out all of the items on our display.
Tip
What are all those ampersands?
In step two above, each of the menu item entries contains an ampersand (&) character, usually as the first character in the entry. When the MenuStrip control sees these characters, instead of displaying them in the menu, it causes the next character in the name to be underlined and treated as a shortcut key. By labelling the File menu as&File, the item will be displayed as File, and pressing Alt + F will open the File menu. Items within the File menu can then be accessed by pressing their own shortcut keys (L for Load, S for Save, and so on).
-
No Comment