
There are three types of tests that you can run in Xcode:
Before we discuss each of these types of tests in detail, we need to check out how Xcode integrates with testing.
Open the test navigator by pressing Cmd + 5 on the keyboard or selecting its icon at the top of the navigator sidebar. Here, you will see a list of all the test classes and methods that have been written for your application. If you have no tests, this navigator will be empty.
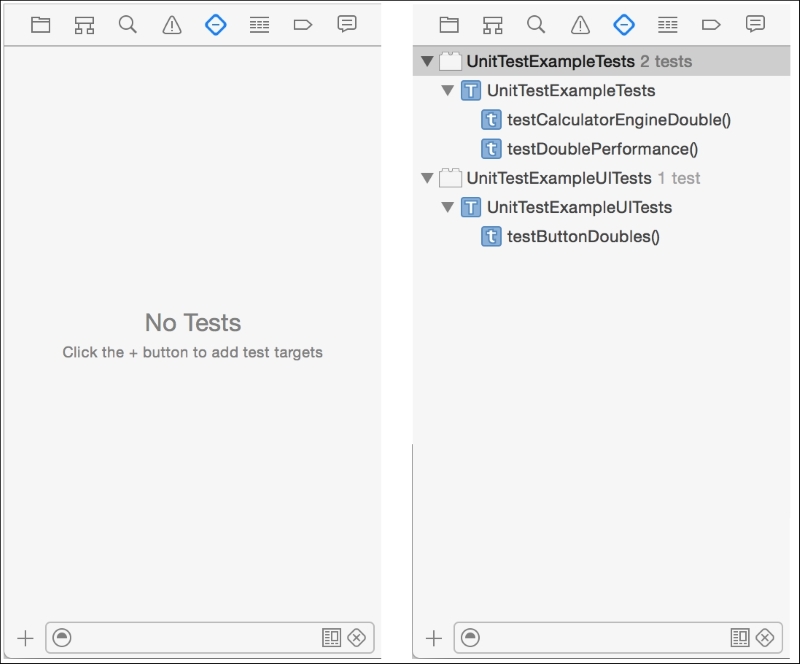
The test navigator sidebar showing no tests on the left and a list of tests on the right
Let's create a new Xcode project to start writing tests for. Select the Single View Application template and name the project UnitTestExample. Make sure you select the checkboxes next to include unit tests and include UI tests.
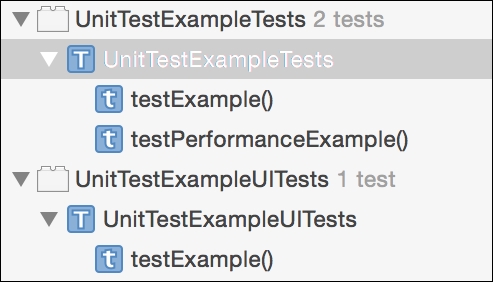
Upon opening the Test Navigator, you'll see that two test targets have been added (UnitTestExampleTests and UnitTestExampleUITests). Each target has a test class (UnitTestExampleTests and UnitTestExampleUITests), and each one has at least one example test method included (testExample and testPerformanceExample), as shown in the following screenshot. These are simply starting points for you to work from.
Select the UnitTestExampleTests class from the test navigator sidebar. You'll see that the template code is nearly identical to any other Swift class.
The first two lines are required to make this class testable. The first imports XCTest, and the second imports our app's main swift class but flags it as testable.
The two special methods at the top of this test class are setUp() and tearDown(). Both methods are called just before and after each test so that you can set up and dispose of any instances, variables, or constants needed to properly test your code. This may include initializing other objects to interact with or setting up the data models that you might need.
The remaining two methods, testExample and testPerformanceExample, are simply example starting points for your own methods and can be deleted.
A test class can have any number of test methods. The only rule is that a test must start with the string test. Any new tests that you add into the code will immediately show up in the sidebar.
With our unit test example project, we need some code to actually test. Let's build a very simple calculator application that takes an arbitrary number and simply doubles it at the click of a button.
To start, open up the Main.storyboard file and drag a Text Field and a Button onto the canvas area of the default View Controller. Place the Text Field near the top of the view and the button directly underneath. Double-click on the button to change the text from Button to X2. Then, change the placeholder text of Text Field by selecting the field, opening the Attributes Inspector in the Utility area, and entering Enter Number in the placeholder field.
Our last step is to connect these UI elements to the View Controller class by opening up the Assistant Inspector to the ViewController class, clicking and dragging from the elements to the code, and creating an outlet from Text Field called numberDisplay and a touch-up inside action called multiplyByTwo() from the button.
Tip
For more details about connecting views and controllers, refer to Chapter 4, Interface Builder.
To handle the positioning of these two elements using Auto Layout, we need to add a few constraints. Open the document outline sidebar and attach the Text Field's Vertical Spacing to Top Layout Guide. Once done, attach the vertical spacing of the X2 button to Text Field. To satisfy our layout, we need to add an X position, so let's pin both Text Field and Button to the left and right-hand sides of the screen using the Pin popup. Update the frames to fix any layout issues and place the elements in their final, calculated position.
Tip
For more details about Auto Layout, refer to Chapter 4, Interface Builder.

The final layout
Now that our view has been created and its UI elements have been connected to our controller, we need to create the calculator model; it will handle the actual functionality of our app.
Following the steps of TDD, we first need to create a test that fails so that we can then write our feature. Because this is a brand new project without any tests or code, we do need to set up a few things.
First, create a new empty Swift file by going to File | New | File and naming the new file CalculatorEngine.
Before we move on to writing tests against actual code, let's talk about assertions in Xcode. Open the UnitTestExampleTests class and create a new test method called testVariousAssertions():
class UnitTestExampleTests: XCTestCase {
    func testVariousAssertions(){

    }
}
Assertions are simply a way of declaring that a test has passed or failed.
The most fundamental test is XCTAssert(expression, message). You include one or more assertions inside of a test method. If the expressions in all of them return true, then the test will pass. If any of them returns false, then the test will fail and the message will be printed on the debugger.
While you can use XCTAssert everywhere for any test, Xcode offers many more specific assertions in order to test specific outcomes:
XCTAssertTrue(expression, message): This passes if the expression istrueXCTAssertFalse(expression, message): This passes if the expression isfalseXCTAssertEqual(expression1, expression2, message): This passes if both expressions are equalXCTAssertNotEqual(expression1, expression2, message): This passes if the expressions are differentXCTAssertNil(Any?, message): This passes if the object isnilXCTAssertNotNil(Any?, message g): This assertion passes if the object is notnil
In each case, if the test fails, the message will be printed on screen and the debugger. It's best to use specific test assertions wherever you can. This helps in maintainability and helps your code in being very explicit as to what each assertion is testing.
Note
There are more assertions than just the ones listed; these were just the most common. Visit Apple's developer site at https://developer.apple.com for a complete list.
We can write our first passing test by adding this code to our testVariousAssertions test method:
func testVariousAssertions(){
    XCTAssertEqual(1, 1, "Numbers aren't the same")
}
You can run just this one test by clicking the diamond shaped icon in the gutter next to the method declaration. The app will compile and Xcode will run the test. If it passes, the diamond icon will show a green check mark. If it fails, the icon will show a red X diamond.

The three states of the test status indicator from left to right: not run, passed, and failed
To make a failing test, simply change the test code to this:
func testVariousAssertions(){
    XCTAssertEqual(1, 2, "Numbers aren't the same")
}
Run the test again and see how Xcode shows a failing test by placing a red X diamond icon next to the test method.
Go ahead and try to create a passing test and a failing test for each of the assertions as a way to get a feel for what testing can accomplish.
While we have a UI for our app, we have no functionality. To build our first feature, we need to follow the first step in TDD: writing a failing test. In order to do this, we first need to create the class that we will be testing.
Inside of the CalculatorEngine.swift file, enter the following code:
import Foundation

class CalculatorEngine {

}
We now have our calculator engine class, so let's open our UIExampleTests class and add a new test method:
func testCalculatorEngineDouble(){

}
First, we need to ask ourselves what the goal of this feature will be. In this case, we want to simply double any number passed to the method.
Let's roughly add the method signature that we need to write our test before we write any further code:
class CalculatorEngine {
    func doubleNumber(number: Int) -> Int {
        return 0
    }
}
Since this is a function that returns a value, we need to return something for our code to compile. This is why we're returning 0.
Before any further code is written inside of our calculator engine, let's follow the TDD guidelines and write a test that fails. Edit the testCalculatorEngineDouble() test method to include the following code:
func testCalculatorEngineDouble(){
    let engine = CalculatorEngine()
    let number = 5
    let expectedResult = 10
    let result = engine.doubleNumber(number)
    XCTAssertEqual(result, expectedResult, "Number was not doubled correctly")
}
Our first step in writing a test is to set up our expectations. We initialize a new instance of our CalculatorEngine() class. We set up a starting number of 5 and an expected result of 10. We then use the XCTAssertEqual assertion to compare our expected result with the actual result that is returned from our doubleNumber() method on the engine.
When this test runs, it fails. This is because our doubleNumber() method is simply returning 0 instead of doing any actual calculations. TDD step 1 is complete.
TDD step 2 is to write the code that will cause this test to pass. Add the following highlighted code to the doubleNumber() test method and rerun the test:
class CalculatorEngine {
func doubleNumber(number: Int) -> Int {
        let doubledNumber = number * 2
        return doubledNumber
    }
}
Our first test now passes and we've completed step 2.
TDD step 3 is to refactor our code.
Looking at the current implementation of doubleNumber(), the doubledNumber constant that we've created isn't really needed. We can refactor this method to be in one line:
class CalculatorEngine {
func doubleNumber(number: Int) -> Int {
        return number * 2
    }
}
We've now refactored our code and completed step 3. Since step 4 is to repeat, we're done because we aren't implementing any further functionality.
Xcode not only gives you the ability to test your code for accuracy, but also gives you a chance to test your code for performance. You have the ability to contain code inside of a measurement closure that will be run 10 times, and then report back some statistics about its performance. But since just measuring code performance will always pass a test, you can optionally give your block a baseline performance value, and if your code is ever below it or varies widely from it, you can fail the test.
Let's write our first performance test by expanding our tests from our unit test example. Open up your UnitTestsExampleTests class and add the following lines of code after your testCalculatorEngineDouble() test method:
func testDoublePerformance(){
    let engine = CalculatorEngine()
    measureBlock { () -> Void in
        var num = 9
        for index in 1...2000 {
            num += engine.doubleNumber(index)
        }
    }
}
When you run this test, Xcode will tell you the average time that the code ran as well as the standard deviation of each run. This information will be displayed inline in the standard editor.
To the left of the code in the standard editor gutter, you'll notice a second diamond icon. Clicking on this icon will show a performance report on the code. It shows how each run compares with others. From here, you can click on the Set Baseline button to set the baseline value to test against. Once you have set the baseline, you will be shown how much faster or slower the current test is against the baseline:

With our functional unit tests, we were able to test both the accuracy and the performance of our calculator engine. But what about our views? At the moment, our view controller isn't interacting with the engine at all. Let's write a UI test that will verify that our button is functioning correctly.
Our first step is to write a failing test by opening our UnitTestExampleUITests class.
The code that you need to write to simulate a user is completely different from writing code to test functionality. While you can write this code manually, a helpful feature of Xcode is that it can record your actions and translate them into code.
To start, let's write the function declaration for our first test. Delete the testExample() method and replace it with the testButtonDoubles() test method:
func testButtonDoubles()
{
    // Leave the text insertion caret inside this method.
}
You'll notice that there's a red record button at the top of the debug area, as shown in the following screenshot. Press it.
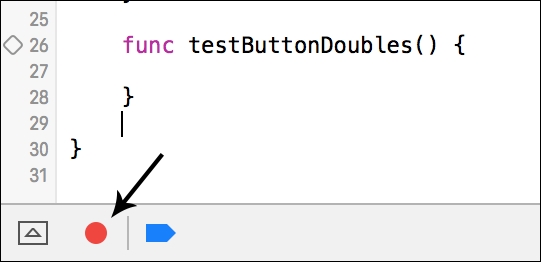
The record UI test button
Your app will now launch and any actions that you do, such as clicking on buttons or entering values, will be translated by the system into code. Select Test Field at the top, enter a value of 2, and then press the X2 button. In the testButtonDoubles() method, you should see the following code:
func testButtonDoubles() {
let app = XCUIApplication()
    let enterNumberTextField = app.textFields["Enter Number"]
    enterNumberTextField.tap()
    enterNumberTextField.typeText("2")
    app.buttons["X2"].tap()
}Press the record button again to stop recording, and stop the app from running using the Stop button in the top toolbar.
After reading the generated code, you can understand just how each action was translated into code. We have the actions, but we don't actually have a test yet. Modify the rest of the test to include the following lines:
func testButtonDoubles() {

    let app = XCUIApplication()
    let enterNumberTextField = app.textFields["Enter Number"]
    enterNumberTextField.tap()
    enterNumberTextField.typeText("2")
    app.buttons["X2"].tap()
    guard let text:String = enterNumberTextField.value as? String else {
        XCTFail()
        return
    }
    guard let numberFromField = Int(text) else {
        XCTFail()
        return
    }
XCTAssertEqual(numberFromField, 4)
}
The code takes any value entered in the text field, converts it to an integer, and then tests it against our expected value of 4. Running this test will cause it to fail. This is because our button isn't connected to any of our code. Step 1 of TDD is complete.
For step 2, we need to connect our view controller to our calculator engine. Open ViewController.swift.
Earlier, we added an IBOutlet to our UITextField as well as an IBAction to our UIButton. Let's strip down our view controller:
import UIKit

class ViewController: UIViewController {
    @IBOutlet var numberDisplay: UITextField!
    let engine = CalculatorEngine(
    @IBAction func multiplyByTwoPressed(sender: AnyObject) {
        guard let text = numberDisplay.text else { return }
        guard let number = Int(text) else { return }
        numberDisplay.text = String(engine.doubleNumber(number))
    }
}
Our IBAction now checks for a numeric value in our UITextField and then doubles it using the calculator engine. The new value is displayed in the text view.
Going back to your UnitTestExampleUITests class, make sure that the app is no longer running and then run your testButtonDoubles() test method. The test will now pass.
There isn't a lot of code that needs to be refactored and no more pieces of functionality need to be added, so we'll call steps 3 and 4 complete as well.