
In this chapter, we will learn how to handle the SPI and i2c buses of the Raspberry Pi through the Yocto Project. We'll see how to write our own recipe for custom applications.
The Serial Peripheral Interface (SPI) protocol implements a synchronous serial link between a master and a slave. When a single slave is used, only three signals (and ground) are needed.
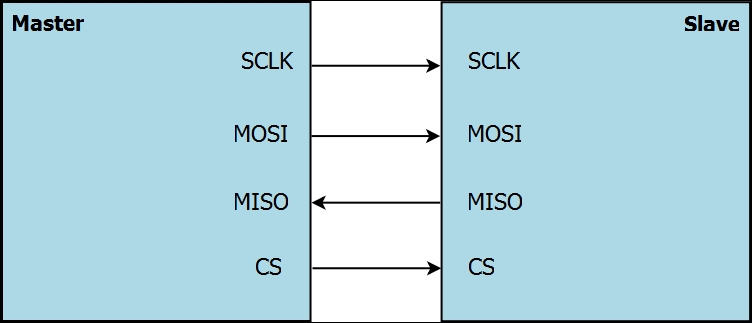
The master generates an SCLK (serial clock) clock signal, which is sent to the slave. On some transitions of this clock, the slave will read data using the appointed signal, MOSI (short for master out, slave in), or write it using the signal named MISO (master in, slave out). There are several names, depending on hardware manufacturers, used to describe these signals. It is recommended to use the MISO/MOSI notation (the most common one), because it removes any ambiguity: the MOSI pin of a master must always be connected to the MOSI pin of a slave, and the same is true for the MISO pin.
If several slaves are to be connected to the same host, they may be connected in parallel (all MISO pins connected together as well as all MOSI pins), but an additional signal (CS, or Chip Select) is required for each of them, to choose which pin communication is established with at a given time. An example is presented in the following figure:
Have fun with the SPI protocol on your Raspberry Pi; we will explore it further through a utility developed for our platform.
Note
For further information about the SPI protocol, you can visit the following website: https://en.wikipedia.org/wiki/Serial_Peripheral_Interface_Bus
To quickly establish a connection with an SPI device from a shell script, for example, we suggest you use a small package that a French engineer (Christophe Blaess) has recently developed, which simplifies configuration and bidirectional communication. It is a free project called spi-tools.
This project is divided into two tools:
- spi-config: This allows you to view or edit the communications settings on a an SPI port. Here is the command:
$ spi-config
- spi-pipe: This allows full-duplex talk with a device by redirecting standard input and standard output to the specified SPI port. The command is as follows:
$ spi-pipe
Note
If you want more information, consult the readme file in the GitHub repository: https://github.com/cpb-/spi-tools
The advantage of spi-tools is that it has been completely integrated into the Yocto/OE environment since April 2015. Indeed, it is part of the meta-oe layer.
Note
You can look at the initial commit here: https://github.com/openembedded/meta-oe/commit/90b13eded76f7f7fa1a6715e67c32504e7788e96
It is easy to introduce this layer to our environment in order to use these utilities. Here we see another advantage of the Yocto Project: flexibility.
If you want to visit the metadata index of this recipe, you can visit http://layers.openembedded.org/layerindex/recipe/33576/ .
As you may have guessed, the first step in integrating the spi-tools recipe is modifying our conf/bblayers.conf file in order to add the path of the layer:
# changes incompatibly
LCONF_VERSION = "6"
BBPATH = "${TOPDIR}"
BBFILES ?= ""
BBLAYERS ?= "
  /home/packt/RASPBERRYPI/poky/meta
  /home/packt/RASPBERRYPI/poky/meta-yocto
  /home/packt/RASPBERRYPI/poky/meta-yocto-bsp
  /home/packt/RASPBERRYPI/poky/meta-raspberrypi
  /home/packt/RASPBERRYPI/poky/meta-packt_rpi
  /home/packt/RASPBERRYPI/poky/meta-openembedded/meta-oe  "
BBLAYERS_NON_REMOVABLE ?= "
  /home/packt/RASPBERRYPI/poky/meta
  /home/packt/RASPBERRYPI/poky/meta-yocto
$ git clone https://github.com/openembedded/meta- openembedded.git
Now that the path of our layer has been set, it is visible to BitBake and spi-tools can be integrated with our root filesystem. To do this, we need to run the command to create the binaries.
In order to generate the package (ipk, rpm, or dpkg), we can run the following command:
$ bitbake spitools
Loading cache: 100%
|########################################################################################################################################################################| ETA:  00:00:00
Loaded 2006 entries from dependency cache.
NOTE: Resolving any missing task queue dependencies
Build Configuration:
BB_VERSION        = "1.27.1"
BUILD_SYS         = "x86_64-linux"
NATIVELSBSTRING   = "Ubuntu-14.04"
TARGET_SYS        = "arm-poky-linux-gnueabi"
MACHINE           = "raspberrypi"
DISTRO            = "poky"
DISTRO_VERSION    = "1.8+snapshot-20150729"
TUNE_FEATURES     = "arm armv6 vfp arm1176jzfs callconvention-hard"
TARGET_FPU        = "vfp"
meta
meta-yocto
meta-yocto-bsp    = "master:19f77cf586fbee9e67d3698263402b717303c5ec"
meta-raspberrypi  = "master:7457bf182c8fd550ec877ecd786a3edd16e65495"
meta-packt_rpi    = "master:19f77cf586fbee9e67d3698263402b717303c5ec"
meta-oe           = "master:f637fadb106a09a6f3dfba4181d06dc9b5e82ff5"
NOTE: Executing SetScene Tasks
NOTE: Executing RunQueue Tasks
Currently 1 running tasks (373 of 381):
0: spitools-git-r0 do_configure (pid 3535)
Alternatively, if we want to integrate spi-tools into our image, we just have to add the following line to our image and run BitBake raspberry-pack-image:
# Base this image on core-image-minimal
include recipes-core/images/core-image-minimal.bb
DESCRIPTION = "Image for raspberry-pi"
IMAGE_FEATURES += "ssh-server-dropbear splash"
# Include modules in rootfs
IMAGE_INSTALL += "
    kernel-modules
    gpio-packt
    spitools
    "
With our image in hand, we can now run the utilities offered by spi-tools.
To access SPI interfaces from user space, the kernel provides us entry points as special files in /dev. This requires the loading of the following module:
$ modprobe spidev
After integrating this module, we can try to launch the spi-config utility:
$ spi-config
spi-config: no device specified (use option -h for help)
$ spi-config -h
usage: ./spi-config options...
  options:
    -d --device=  use the given spi-dev character device.
    -q --query         print the current configuration.
    -m --mode=[0-3]    use the selected spi mode.
             0: low iddle level, sample on leading edge
             1: low iddle level, sample on trailing edge
             2: high iddle level, sample on leading edge
             3: high iddle level, sample on trailing edge
    -l --lsb={0,1}     LSB first (1) or MSB first (0)
    -b --bits=[7...]   bits per word
    -s --speed=   set the speed in Hz
    -h --help          this screen
    -v --version       display the version number
For example, if we wanted to query the /dev/spidev0.0 interface, we would run this:
$ spi-config -d /dev/spidev0.0 -q
/dev/spidev0.0: mode=0, lsb=0, bits=8, speed=500000
Note
If you want more details about spi-config, you can visit
https://github.com/cpb-/spi-tools/blob/master/src/spi-config.c.
The spi-pipe program can send the data it receives from its standard input to the SPI MOSI line, while simultaneously displaying data received from the MISO SPI line on its standard output.
The general principle of operation is as follows:
$ <command-1> | spi-pipe [options] | <command-2>
For example, if we want to send some data to another SPI peripheral, we can use the following command:
$ printf "HELLO from R-pi" | spi-pipe -d /dev/spidev0.0 | hexdump -C