
Many open source projects, including the Yocto Project, use mailing lists. These lists are mainly used for discussions about the project and public review of patches sent up by the people contributing to the project.
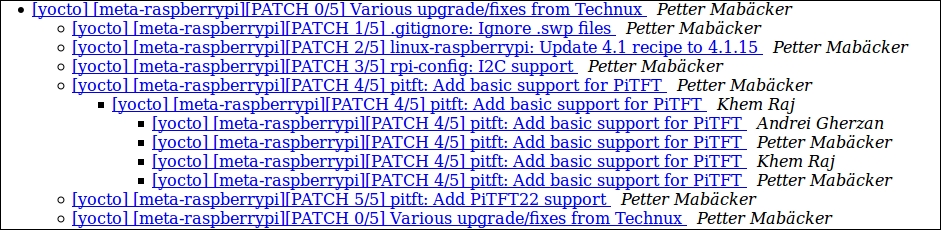
Since the Yocto Project is an umbrella project for a large set of projects, one mailing list isn't enough. For example, there are separate lists for BitBake, OpenEmbedded-Core, and Yocto, where the Yocto includes different external layers, such as meta-raspberrypi and meta-qt5. When sending e-mail to a list used by more then one project, a prefix is required if the mail is intended for a specific subproject (the syntax for the prefix is [layername] subject). The following screenshot illustrates an example of sending a series of patches to meta-raspberrypi:
The mailing lists can be easily tracked by subscribing to a specific mailing list or by reading the archives.
Note
All Yocto Project mailing lists can be found at https://www.yoctoproject.org/tools-resources/community/mailing-lists
If you have prepared a fix or feature for meta-raspberrypithat you want to share with the community, there are a number of things you need to be aware of.
The current maintainer of meta-raspberrypi is Andrei Gherzan. He has the final word about a patch and will integrate the patch into the meta-raspberrypi main layer. Since the maintainers are quite busy, it's important that you test your patch carefully before sending it upstream. The most important thing for a contributor, regardless of the project, is to build up its reputation by sending well-tested patches that follow the requested guidelines. This will significantly increase the chances of getting your patch integrated into the project.
Some overall "rules" exist for contributing to meta-raspberrypi:
- Patches related to meta-raspberrypi should always be sent to [email protected].
- Prefix your emails with "[meta-raspberrypi]"
- Follow the OpenEmbedded patch guidelines
- Follow the meta-raspberrypi readme instructions
An extended explanation of this set of rules, together with examples, will be described later in this chapter.
Before you can send anything upstream, you need set up some basic things. First, you should set up your name and e-mail for your meta-raspberrypi Git repository, as described in earlier parts of this chapter:
$ cd meta-raspberrypi
$ git config user.email "your_email@
packtpub
.com"
$ git config user.name "Forename Surname"
Next, you should set up git send-email in order to use Git to send your patches through your SMTP server. This is often required by the maintainers in order to ensure that the format of the patch is correct and it can be easily integrated. You need to manually configure the server parameters-refer to your e-mail provider's documentation or contact support in order to find the right parameters.
In addition to Git, you also need to install send-email, which is the software Git uses under the hood for git send-email. The send-email package is available on most distributions, but the name might differ. Here is how to set it up on Ubuntu and Fedora:
- Ubuntu:
$ sudo apt-get install sendemail - Fedora:
$ sudo yum install sendmail
Here is an example of how to configure sendemail:
$ cd meta-raspberrypi
$ git config sendemail.smtpencryption tls
$ git config sendemail.smtpserver smtp.packtpub.com
$ git config sendemail.smtpuser [email protected]
$ git config sendemail.smtpserverport 587
Now, you are ready to make your modifications. In this subsection,we will go through each step from implementing your changes to creating a commit that follows the patch guidelines for meta-raspberrypi.
It is common sense to create your changes in a working branch (not the master branch). In our example, we will set up a branch that tracks the master branch:
$ cd meta-raspberrypi
$ git checkout -b my_work_branch -t origin/master
Now, using your favorite editor, edit the files you want to change. When you are done with your modifications, you need to add the changed files to the Git index; otherwise, Git will not add your changes to the upcoming commit:
$ git add <files changed>
Now it's time to create a commit message by following the guidelines in the meta-raspberrypi' readme and the openembedded guidelines. Here are the most important parts of the guidelines:
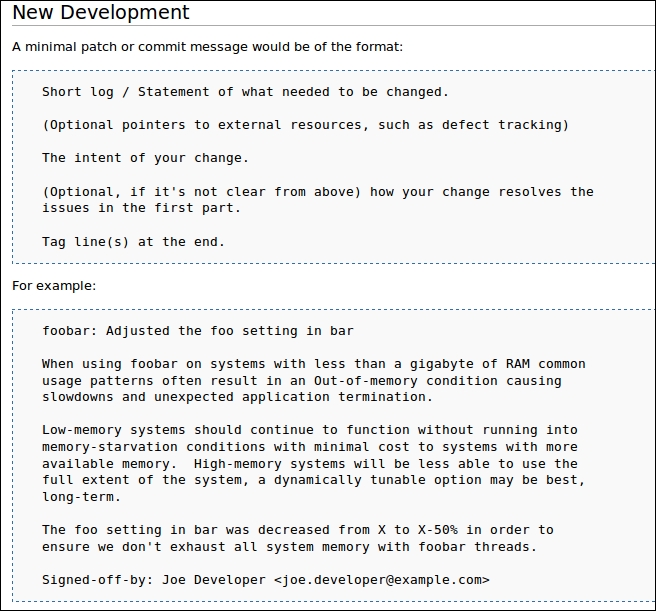
Note
The complete OpenEmbedded guidelines can be found at http://www.openembedded.org/wiki/Commit_Patch_Message_Guidelines .
When creating the commit, remember to sign off on it (using -s). The signoff is a one-liner that is added by default to the end of the commit message. The original purpose of the signoff is as follows, according to the Linux kernel documentation:
"To improve tracking of who did what, especially with patches that can percolate to their final resting place in the kernel through several layers of maintainers, we've introduced a "sign-off" procedure on patches that are being emailed around. The sign-off is a simple line at the end of the explanation for the patch, which certifies that you wrote it or otherwise have the right to pass it on as an open-source patch."
Here is how you use it:
$ git commit -s
Write your commit message
The maintainers of a project want to focus on the design of your patches and often assume that patches sent to the list are functional. Therefore, it's important to ensure that you have verified that the patch has been built and tested for relevant images supported by meta-raspberrypi.
When your patch meets your expectations and has passed all tests, it's time to send it to the community. First, we need to generate the patch. When generating a patch, we should follow the recommendations from the readme in meta-raspberrypi. If you have more than one commit, one patch for each commit will be generated. A cover letter will also be generated, and it will always be named 0000-cover-letter.patch. The cover letter is optional but strongly recommended when creating more then one patch in the same series.
$ git format-patch --cover-letter --subject-prefix='meta-raspberrypi][PATCH' origin
If you decide to generate a cover letter, you can open it with your preferred editor. Search for the lines *** SUBJECT HERE *** and *** BLURB HERE *** and replace them with appropriate information about your patches.
Time for the final step: sending the patches up to the mailing list!
$ git send-email --to [email protected] <generated patches>
By now, your patches should have reached the mailing list, and you can sit back for a while and wait for feedback. If you receive feedback from the mailing list, you are expected to reply with an answer saying that you will perform the requested changes or, if you disagree, reply with an 'appropriate reason for why you don't.
Don't be scared if you receive feedback; this is normal. In fact, many of the changes sent to the mailing list will need updates before they are ready to be integrated into the main layer.
When sending an update of your patch to the mailing list, it's important that you specify the version number of your patch series. This can easily be done by slightly modifying the line used when you generated the patch in the first place (pay attention to the new subject prefix):
$ git format-patch --cover-letter --subject-prefix='meta-raspberrypi][PATCH v2' origin
If your patch needs yet another update, just increment the version number and try again. When your patch has reached the meta-raspberrypi layer, you are done and can continue working with some other feature that interests you.
In this section, we will go through a practical example of integrating a custom tool into meta-raspberrypi. The tool we have chosen is con2fbmap, a command-line tool for setting and showing mappings between framebuffer TFT devices (such as PiTFT displays) and consoles.
First of all, we need to identify where in the layer structure we should place our new recipe. In some situations, we can guess the location by reading the name of the package. One example of this is the omxplayer recipe. It's quite easy to figure out that it should be placed among the multimedia recipes (recipes-multimedia). If we cannot use the package name to find a location, we can check whether a similar tool exists. For our example, meta-oe (the openembedded base layer) contains a somewhat similar tool called fbset. It's a tool for modifying framebuffer devices. If we locate the fbset recipe, we can see that it's placed within recipes-support, and we should probably place our package in that directory as well.
You can find the fbset tool at https://github.com/openembedded/meta-openembedded/tree/master/meta-oe/recipes-support/fbset, as shown here:

When creating a new recipe, you can either use the tools described in Chapter 7, Deploying a Custom Layer on the Raspberry Pi or create it from scratch. In this example, we will create it from scratch. The first thing we need to know is which kind of source (such as .tar.gz or Git) the tool has. In this case, the original source is Git, and we can create a basic recipe for con2fbmap, as follows:
$ cd meta-raspberrypi
$ mkdir -p recipes-support/con2fbmap
$ cd recipes-support/con2fbmap
$ touch con2fbmap_git.bb
Use your favorite editor and create the content for the BitBake file (.bb). In this book, we have chosen to use a "known state" and set SRCREV to f57bf6d28910ba665efab8a65085ba6d4c6162a5. Other information in the BitBake file, such as LIC_FILES_CHKSUM, will be based upon this particular SRCREV value. The complete con2fbmap_git.bb file looks like this:
SUMMARY = "Utility for swapping an fbtft-based device"
DESCRIPTION = "Simple utility for swapping an fbtft-based device as
the console"
LICENSE = "GPLv3"
LIC_FILES_CHKSUM = "file://COPYING;md5=d32239bcb673463ab874e80d47fae504"
SECTION = "console/utils"
Inherit autotools
SRC_URI = "git://gitlab.com/pibox/con2fbmap.git;branch=master;protocol=https"
SRCREV = "f57bf6d28910ba665efab8a65085ba6d4c6162a5"
S = "${WORKDIR}/git"
Remember to build and verify the new recipe. When you are satisfied with your changes, you can go ahead and create your new Git commit. Make sure that you follow the guidelines when writing your commit message.
$ git add con2fbmap_git.bb
$ git commit -s
con2fbmap: Add new recipe
Currently there is no easy way to manually switch between
framebuffer devices and console during run-time.
This tool can be used when the system is up and running, to
set and show mapping between framebuffer tft devices
(such as pitft displays) and the consoles.
Signed-off-by: Petter Mabäcker <[email protected]>
# Please enter the commit message for your changes. Lines starting
# with '#' will be ignored, and an empty message aborts the commit.
Once you are satisfied with your commit message, it's time to generate the patches. Since all changes in this example will fit into one Git commit, we can skip the --cover-letter flag.
$ git format-patch --subject-prefix='meta-raspberrypi][PATCH' origin
0001-con2fbmap-Add-new-recipe.patch
When the tool has been built and carefully tested on the target, we can send it to the mailing list:
git send-email --to [email protected] 0001-con2fbmap-Add-new-recipe.patch
You have now learned how to contribute to the main layer. A good piece of advice is to be patient when working with an open source community. Depending on which state the project is in, maintainers and other people responsible for integrating changes might be busy, and sometimes, it takes time until they respond to your patch. If you haven't heard anything in a while, don't be afraid to send a friendly reminder to people on the list to look at your patch.