
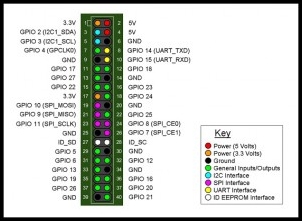
For the connection with our Raspberry Pi, we just have to connect it to the main connectors, I2C1_SDA and I2C1_SCL, as shown in this pin diagram:
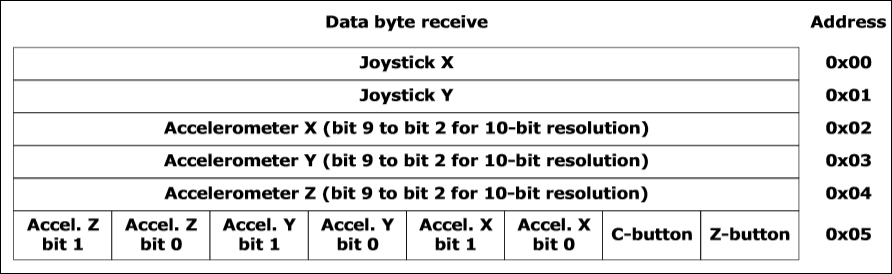
The Wii Nunchuck contains a controller that communicates through the i2c bus. In order to know where to store bytes written to it, the first byte must be an 8-bit register address. In other words, each write() operation to the Nunchuck requires one register address byte, followed by data bytes.
For a write operation, the first byte sent to the Nunchuck tells it where to start (the START condition).
The Nunchuck is designed to provide a specific encrypted link. However, this can be disabled through the following process:
- Write 0x55 to the Nunchuck's 0xF0 register
- Pause
- Write 0x00 to the Nunchuck's 0xFB register
|
Write |
Pause |
Write | ||
|
0xF0 |
0x55 |
- |
0xFB |
0x00 |
Note that if you own a white Nunchuck, the process will be different:
- Write 0x00 to the Nunchuck's 0x40 register
|
Write | |
|
0x40 |
0x00 |
You can start automatically detecting connected devices with i2cdetect. i2cdetect is not installed on the Raspberry Pi; the easiest method of using it is to install the i2c-tools package through our raspberry-packt-image Yocto image by adding i2c-tools, as follows:
# Base this image on core-image-minimal
include recipes-core/images/core-image-minimal.bb
DESCRIPTION = "Image for raspberry-pi"
IMAGE_FEATURES += "ssh-server-dropbear splash"
# Include modules in rootfs
IMAGE_INSTALL += "
    kernel-modules
    gpio-packt
    spitools
    i2c-tools
    "
After that, we can launch the BitBake raspberry-pack-image command to test it on the Raspberry Pi.
In order to detect the i2c device, we just have to launch the following commands on the Raspberry Pi:
$ modprobe i2c-dev
$ i2cdetect 0
WARNING! This program can confuse your I2C bus, cause data loss and worse!
I will probe file /dev/i2c-0.
I will probe address range 0x03-0x77.
Continue? [Y/n] Y
0 1 2 3 4 5 6 7 8 9 a b c d e f
00:          03 04 05 06 07 -- -- -- -- -- -- -- --
10: -- -- -- -- -- -- -- -- -- -- -- -- -- -- -- --
20: -- -- -- -- -- -- -- -- -- -- -- -- -- -- -- --
30: -- -- -- -- -- -- -- -- -- -- -- -- -- -- -- --
40: -- -- -- -- -- -- -- -- -- -- -- -- -- -- -- --
50: -- -- 52 -- -- -- -- -- -- -- -- -- -- -- -- --
60: -- -- -- -- -- -- -- -- -- -- -- -- -- -- -- --
70: -- -- -- -- -- -- -- --
If the Nunchuck is working, it will show up in the display at address 0x52.
Note
The Nunchuck uses the i2c address 0x52. If you want more information about the i2c interface on the Raspberry Pi, you can visit https://learn.adafruit.com/adafruits-raspberry-pi-lesson-4-gpio-setup/configuring-i2c.
We can now test our Nunchuck application (developed in the C language). You will find it in the code bundle that came with this book.
We can test compiling our application with our SDK with the following command and send it to the Raspberry Pi:
$ source /opt/poky/1.7.1/environment-setup-armv6-vfp poky-linux- gnueabi
$ ${CC} nunchuck.c -o nunchuck_packt
Now, we will prepare our environment so that all of our development is Yocto compliant.
Here is our custom integration layer for the Nunchuck recipe:
$ tree meta-packt_rpi/
meta-packt_rpi/
├── conf
│   └── layer.conf
├── COPYING.MIT
├── README
├── recipes-core
│   └── images
│       └── raspberry-packt-image.bb

├── recipes-custom
│   ├── gpio-packt
│   │   ├── gpio-packt
│   │   │   ├── fix.patch
│   │   │   └── gpio_example.c
│   │   └── gpio-packt_0.1.bb

│   └── nunchuck
│       ├── nunchuck
│       │   └── nunchuck.c
│       └── nunchuck_0.1.bb

├── recipes-example
│   └── example
│       ├── example-packt-0.1
│       │   ├── example.patch
│       │   └── helloworld.c
│       └── example-packt_0.1.bb

└── recipes-example-bbappend
└── example-bbappend
    ├── example-packt-0.1
    │   └── example.patch
    └── example-packt_0.1.bbappend
The nunchuck_0.1.bb file will contain the recipe for implementing the Nunchuck binary in our rootfs.
Now that our application is functional, we can create our recipe so that BitBake can find it.
Here is the recipe that enables us to integrate the Nunchuck application into the Raspberry Pi:
DESCRIPTION = "nunchuck i2c example"
LICENSE="GPLv2"
LIC_FILES_CHKSUM = "file://${COMMON_LICENSE_DIR}/GPL
2.0;md5=801f80980d171dd6425610833a22dbe6"
PR = "r0"
SRC_URI = "file://nunchuck.c"
S = "${WORKDIR}"
do_compile() {
        ${CC} ${CFLAGS} ${LDFLAGS} ${WORKDIR}/nunchuck.c -o       nunchuck_packt
}
do_install() {
        install -m 0755 -d ${D}${bindir}
        install -m 0755 ${S}/nunchuck_packt ${D}${bindir}
}
To integrate the package into the Raspberry Pi environment, we have to add the following line to raspberry-pack-image:
# Base this image on core-image-minimal
include recipes-core/images/core-image-minimal.bb
DESCRIPTION = "Image for raspberry-pi"
IMAGE_FEATURES += "ssh-server-dropbear splash"
# Include modules in rootfs
IMAGE_INSTALL += "
    kernel-modules
    gpio-packt
    i2c-tools
    spitools
    nunchuck
    "
Now, we can launch BitBake and test our program on the Raspberry Pi. Use this command:
$ bitbake raspberry-packt-image
On the Raspberry Pi, launch the following command:
$ nunchuck
You can now have fun with Nunchuck and Video4Linux (V4L).
Next, will see how to integrate video support to our environment.
V4L is a video API for Linux. It is integrated into the Linux kernel. It is an abstract layer between video software and video devices. It allows the capture of video streams and pictures from digital camcorders, video capture cards, TV and radio tuners, webcams, and so on.
For example, it is possible to work with OpenCV (to retrieve the video stream through /dev/video) and Qt to display content (using a framebuffer or X11).
In order to add video support, we need only look at the readme file of our BSP layer (meta-raspberry-pi). It will be evident that we can easily add video support:
2.F. Optional - Video camera support with V4L2 drivers
======================================================
Set this variable to enable support for the video camera (Linux 3.12.4+ required)
VIDEO_CAMERA = "1"
The VIDEO_CAMERA variable must be set in conf/local.conf.
In order to control the device connected to /dev/videoX, there is a set of utilities called v4l-utils. The integration of these tools is easy, as usual, through our build system (Yocto/OpenEmbedded).
To integrate the v4l-utils package to the Raspberry Pi environment, we have to add the following line to raspberry-pack-image:
# Base this image on core-image-minimal
include recipes-core/images/core-image-minimal.bb
DESCRIPTION = "Image for raspberry-pi"
IMAGE_FEATURES += "ssh-server-dropbear splash"
# Include modules in rootfs
IMAGE_INSTALL += "
    kernel-modules
    gpio-packt
    i2c-tools
    spitools
    nunchuck
    v4l-utils
    "
After that, we just have to launch the following command:
$ bitbake rapberryrapberry-packt-image
Loading cache: 100% |########################################################################################################################################################################| ETA:  00:00:00
Loaded 2057 entries from dependency cache.
NOTE: Resolving any missing task queue dependencies
Build Configuration:
BB_VERSION        = "1.27.1"
BUILD_SYS         = "x86_64-linux"
NATIVELSBSTRING   = "Ubuntu-14.04"
TARGET_SYS        = "arm-poky-linux-gnueabi"
MACHINE           = "raspberrypi"
DISTRO            = "poky"
DISTRO_VERSION    = "1.8+snapshot-20150804"
TUNE_FEATURES     = "arm armv6 vfp arm1176jzfs callconvention-hard"
TARGET_FPU        = "vfp"
meta
meta-yocto
meta-yocto-bsp    = "master:19f77cf586fbee9e67d3698263402b717303c5ec"
meta-raspberrypi  = "master:7457bf182c8fd550ec877ecd786a3edd16e65495"
meta-packt_rpi    = "master:19f77cf586fbee9e67d3698263402b717303c5ec"
meta-oe
meta-multimedia   = "master:f637fadb106a09a6f3dfba4181d06dc9b5e82ff5"
NOTE: Preparing RunQueue
NOTE: Executing SetScene Tasks
NOTE: Executing RunQueue Tasks
Currently 1 running tasks (558 of 566):
0: v4l-utils-1.6.2-r0 do_configure (pid 20717)
Once the process is complete, it will be possible to use v4l-utils.
Note
If you want more information about v4l-utils, you can visit
http://www.linux-projects.org/modules/sections/index.php?op=viewarticle&artid=16
.