
Chapter 4. Function Junction, Part Deux: Metering, auto exposure lock, focus, and drive

This dreamy-looking sunset image, shot through a rain-streaked window, was achieved by controlling the focus point, making it possible to focus on the rain itself—rather than the beach in the distance.
Just when you thought we were running out of bells and whistles to talk about, I’m here to say, “But wait—there’s more!” And it’s true. Your camera is home to several additional functions that are pretty darn slick.
If your mind is still numb from the long list of goodness in the previous chapter, and even if you’re thinking, “Advanced features? I’ll never use those!”—don’t abandon ship!
You may not change your metering mode or focus drive the way you change your socks, but if you run into a jam (or your three-year-old gets ahold of your camera and manages to change all the settings), it’s infinitely helpful to, at least, know what you’re dealing with, let alone how to fix it. So hang in there; you’re making progress!
Metering modes
As you learned in Chapter 2, “Shooting Mode Bonanza: Getting Bossy, and Learning to Like It,” metering is what your camera does to determine proper exposure. It’s the process of measuring the light in a given scene and calculating an exposure based on those measurements, and—as luck would have it—there are several different ways to do it.
You may be wondering, “Why would anyone want or need more than one way to meter the light in a scene?” What a great question! To understand the answer, it helps to understand how the meter works.
Your camera’s built-in light meter works by measuring the light reflecting back from whatever is in front of your lens. In any given scene, you may have some objects that reflect a lot of light and others that reflect substantially less. This presents a challenge when it comes to metering, because it’s entirely possible to have areas of extreme brightness next to areas of considerable darkness, which will need to be reconciled in one form or another.
It’s also not uncommon to find yourself in a situation where a large light source is actually behind your subject rather than in front of it, as when you are photographing people standing in front of a bright window.
This can make it tricky to get the exposure right, resulting in photos you may not be so fond of. Therefore, it’s helpful to have a way to tell your camera which part of the scene you care about the most (which part you want to be sure is properly exposed). When combined with “auto exposure lock” (explained later in this chapter) you will be a force to be reckoned with!
As always, there’s a chance your specific camera manufacturer may refer to these modes by different names or with slightly different icons, but the way they operate is pretty standardized. If you come across anything confusing, check your user guide for answers.
Before we get into how each mode works, grab your camera and take a moment to figure out how to access the metering modes of your particular model. The options available will vary from model to model, and finding them may be a bit trickier than finding your flash or white balance options from Chapter 3, “Function Junction: Flash, White Balance, and Exposure Compensation.”
Tip
If you think the icons for evaluative and center-weighted metering modes should be flip-flopped, I wholeheartedly agree with you. Pretty counterintuitive, isn’t it? Maybe we can all get together and lobby the manufacturers, but until then, this is the way it is, folks. We’ll just have to roll with it.
A few camera models have a dedicated button for metering modes, but on most others, you’ll find them tucked into a menu option somewhere. You’ll know you’ve found them when you either bump into a menu item conveniently called “metering modes,” or you come across an icon that looks something like ![]() . When in doubt, look it up!
. When in doubt, look it up!
In the following sections, we will take a look at these modes:
• Evaluative or matrix metering
• Center weighted
• Partial
• Spot
Evaluative (AKA Matrix)

Evaluative (matrix) metering mode is the PB&J of metering—and who doesn’t like PB&J? The go-to metering mode for most situations, it works by metering the light across the entire scene, then averaging the whole thing together to create an exposure (Figure 4.1).
Figure 4.1. The shaded area represents the way evaluative (matrix) metering mode calculates exposure by averaging together light in the entire scene.
Because evaluative (matrix) mode is often considered to be general purpose, your camera is probably set here by default, which isn’t necessarily a bad thing. It’s a fine place to be—until you have problems, at which point you’ll be glad there are other options.
Center Weighted

Although center-weighted metering mode still collects and averages exposure data from across the entire scene, the information gathered from the center area is given special consideration when it’s figured into the final exposure calculation. In other words, the camera measures light across the whole scene, but it plays favorites with information gathered from the center, as depicted in Figure 4.2.
Figure 4.2. Even though center-weighted metering mode still calculates exposure by averaging the entire scene, it gives special consideration to the area in the center of the scene, as indicated by the overall shading with the darker shading in the center.

Partial

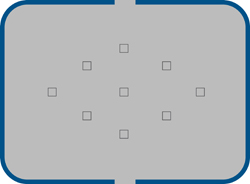
Unlike evaluative (matrix) and center-weighted modes, partial metering mode does not consider the entire scene when calculating exposure. Instead, it bases the exposure calculation on the area in the center of the viewable scene, as represented in Figure 4.3.
Figure 4.3. Unlike some of the other modes, partial metering mode does not consider the scene as a whole when determining exposure. Instead, it bases the entire calculation on a small area around the center of the frame, represented here with the shaded circle.

Because the meter is taking a targeted reading of a very specific part of the scene (rather than averaging the whole frame), you’re able to tell the camera which part of the scene you want to base the exposure on by positioning it in the center of the frame, locking the exposure (with auto exposure lock, explained later in this chapter), then recomposing the scene as desired.
This is helpful in backlit situations where there is a lot of light coming from behind the subject (like when they’re in front of a window or are being photographed outdoors on a ski slope where the surrounding snow could otherwise throw the exposure meter off balance). If you were to use a different mode, like evaluative, in such a situation, the camera would average the difference between the bright snow and the dark subject, resulting in an exposure that’s not a good match for either.
Spot

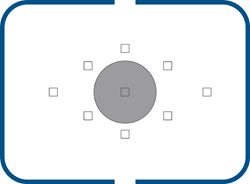
Similar to partial metering, spot metering mode calculates exposure based only on a very specific point within the frame, rather than the scene as a whole. Compared to partial metering, spot metering targets an even smaller area within the center of the total frame, as shown in Figure 4.4.
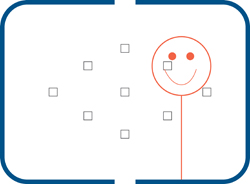
Figure 4.4. The small shaded circle in the center of the frame represents the small and targeted area that area spot metering mode uses to calculate exposure. Similar to partial mode, spot metering mode does not consider the scene as a whole—only the very limited area in the center of the frame.
As with partial metering mode, this is useful if you’re photographing a scene with backlighting or one where your subject occupies a small portion of the frame and the exposure varies dramatically from the rest of the scene, such as a person lit by a spotlight on an otherwise dark stage. When you use it with auto exposure lock (explained below), you can achieve especially pleasing results.
Auto exposure lock (AEL)
Once you decide on a metering mode, you can use auto exposure lock (AEL) to tell the camera which part of the scene you want to base the exposure on. The settings will then be locked, so nothing changes while you recompose (move your subject somewhere besides the center of the frame) and take the picture. (See Chapter 10, “Zero to Hero: Better Photos Are Yours for the Taking,” for details on photographic composition.)
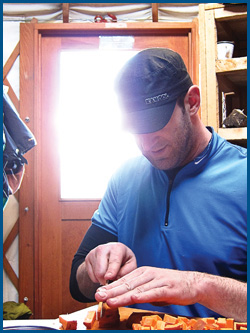
To give you an idea of how powerful AEL can be, take a look at Figure 4.5 and Figure 4.6. Believe it or not, they were captured in the same scene, with the same lighting conditions, just moments apart. The only difference is that Figure 4.5 was captured with the exposure locked on the bright sunny scene outside the window, and the exposure in Figure 4.6 was locked on my friend Paul (inside).
Figure 4.5. Exposure is locked on the bright, sunny scene outside the window.
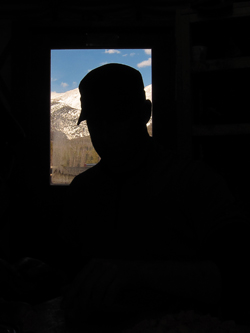
Figure 4.6. Exposure is locked on my friend Paul (inside).
Auto Exposure Lock
On most cameras, auto exposure lock is already programmed into the shutter button. (Check your user guide to know for sure; some cameras have a dedicated AEL button.)
Using auto exposure lock is simple. Just follow these steps:
- Position your subject in the center of your frame (Figure 4.7).
Figure 4.7. Positioning your subject in the center of the frame is the first step when using auto exposure lock.

- Press the shutter button halfway down to lock in the exposure.
- Continue to hold the button halfway down while you reposition the subject where you want it to be within the frame (Figure 4.8). You’ll notice that as you move the camera around, pointing it at different objects, the exposure is locked and does not change.
Figure 4.8. After locking the exposure, recompose the scene to position the subject where you want it before taking the picture.
- Press the shutter button the rest of the way when you’re ready to take the picture.
That’s it. Simple, right?
Remember, just because you have to put your subject in the center of the frame to help the meter get the exposure right, doesn’t mean you have to leave it there while you take the picture! See Chapter 10 for more about composition.
How Would You Use this in Real Life?
Take a look at Figure 4.9, captured without AEL, using evaluative (matrix) metering mode. Because this mode averages exposure data from across the whole scene, it got tripped up by the brighter background outside the window (behind the subject) and overcompensated with an exposure that’s too dark.
Figure 4.9. Using the default setting of evaluative metering mode, the camera averaged the whole scene together. Because the large, bright background was factored into the equation, the resulting image was underexposed.
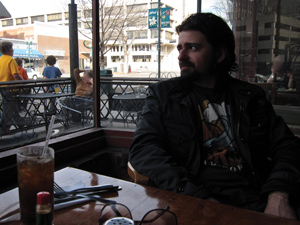
With quite a bit of difference in brightness levels between where we sat (inside) and the outdoor patio behind Emir (outside), I switched the camera to spot metering mode to avoid averaging the two areas together. Then, I used AEL to let the camera know I wanted the exposure based on Emir’s face. The result can be seen in Figure 4.10.
Figure 4.10. After switching to spot metering mode, I positioned Emir’s face in the center of the frame to get the proper exposure, then used AEL to prevent the settings from changing while I repositioned him slightly off center and took the picture.

Why Not Just Use Fill-Flash?
Whenever you’re faced with extreme exposure differences within the same scene, you have choices about how you handle it. In the previous example, I chose to avoid flash for three reasons:
- I prefer the look of natural light to that of direct flash.
- Because Emir is sitting in front of a window, the flash would have created a glare behind him, which I definitely wanted to avoid.
- If I had used fill-flash, I wouldn’t have this great example of AEL and spot metering mode to share with you!
Of course, there are advantages and disadvantages to either choice you make. In this case, I was able to avoid glare on the window behind Emir, but at a cost. In order to expose him correctly (without flash), the brighter area behind him ended up overexposed.
Photography is all about making choices. The trick is to know what your options are—and then choose accordingly. C’est la vie.
Focus
How many times have you felt like you would’ve had the perfect photo—if only it had actually been in focus? If you’re like most people, you’ve probably experienced this more times than you care to remember, right?
While there isn’t a way to guarantee that every photo you ever take will be in perfect focus, there are things you can do to increase your chances of getting sharper images.
Exploring your camera’s auto focus modes and various focus point options can have a profound impact on your ability to successfully capture the photo you’re looking for. While these settings may not be as glamorous or immediately gratifying as some of the other settings we’ve covered thus far, don’t let that stop you. Roll up your sleeves, grab your user guide, and read on!
Auto Focus Modes
Can you believe your camera has more than one way to approach something as seemingly simple as focusing? The options may actually surprise you!
Some of these settings change automatically when you select certain shooting modes or scenes (see Chapter 2). But in the event that they don’t—or you prefer to take charge and change them for yourself—it’s advantageous to know what your choices are.
If your camera is one that gives you access to these settings, it will either have a dedicated button for this purpose, or you’ll find it listed within your menu settings. If you don’t already know where your auto focus modes are, take a moment to refer to your user guide and find them before reading on.
One shot or single
If you’ve never changed your settings from factory default (or have never taken advantage of the sports shooting mode we discussed in Chapter 2), then your shooting experience thus far has likely been confined to what’s typically referred to as one shot (or single) auto focus mode.
In this mode, when you press the shutter button, the camera pulls focus once, then holds tight until the image capture is complete.
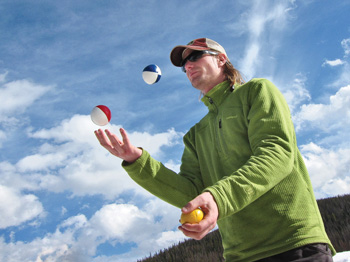
This is great for most shooting circumstances where your subject isn’t moving around much (Figure 4.11), but it can be a challenge when you’re trying to shoot a moving target whose focal distance is continually changing (for example, moving toward or away from the camera).
Figure 4.11. One shot (single) auto focus mode is the default for everyday shooting and is capable of great results, even in scenes like this. Although the subject is moving, the distance between him and the camera is steady, as he’s not moving toward or away from the lens.
Continuous or servo
As the name suggests, continuous auto focus mode enables your camera to track a moving object. Yep. You read that right. It can actually track your subject as it moves within the frame! Isn’t that amazing?
It works by continually focusing (rather than pulling focus just once) for as long as you’re pressing the shutter button halfway.
That’s the catch. You’re required to hold the button down halfway, allow the camera to focus, then keep holding the button down, following your subject with the camera and keeping them in the frame. The camera will continually focus, so when you finally take the photo, all will be well. You can see the results of continuous auto focus mode in Figure 4.12.
Figure 4.12. Continuous (or servo) auto focus made it possible for me to maintain focus on Rachel and Jeff as they raced past the camera.

Tip
Shooting in servo focus mode may—depending on your camera model—override your option to use auto exposure lock (or may lock exposure while tracking focus at the same time). When in doubt, check your user guide.
Additional focus options
Some camera models have an additional focus mode that automatically switches between one shot (single) and servo (continuous) modes as needed. If your subject starts out in one spot, then suddenly takes off on a dead sprint toward your lens, this mode will keep up! Check your user guide for details.
Focus Points
Have you ever wondered how your camera knows what part of the scene to focus on? How does it know whether you want little Bobby—or the puppy running around in the yard behind him—to be in focus?
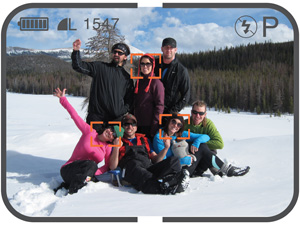
Most cameras leave the factory with a default setting where the camera basically guesses. You may have witnessed this if you’ve ever been shooting, and various boxes or squares appeared on different parts of your screen in response to whatever is in front of your lens, similar to what you see in Figure 4.13.
Figure 4.13. By default, most cameras automatically select focusing points for you, shown here as orange boxes.
Some cameras take this a step further with what is called “face detection” (which might hijack your white balance and exposure settings—check your user guide for the specifics).
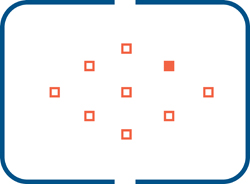
As an alternative, some cameras will let you select one of several specific focus points (Figure 4.14). This makes it easy to choose a point of focus, compose the shot, and capture the image. (Though it takes practice to get used to regularly changing your focus points, it can be done!)
Figure 4.14. Some camera models will let you select one of several focus points with the ability to change them from shot to shot to suit your subject and composition. (The pattern and availability of the points on your camera may vary.)
Even if your camera doesn’t give you the option to choose from several focus points, chances are it will, at least, let you set a single focus point at the center of the frame, as seen in Figure 4.15. Rather than having the focus point jump around while the camera plays guessing games, you can breathe easy and count on the focus area to stay put in the center of the frame.
Figure 4.15. Almost all cameras will let you cancel the default auto point selection feature and opt for a fixed center focus point instead.

Because most cameras combine auto focus lock with auto exposure lock, you should be able to use the same technique you just learned of positioning your subject in the center of your frame, then pressing and holding the shutter halfway down while you recompose before taking the photo.
If you’ve ever felt as if the auto focus point selection option was a toss-up, making it tricky to predict what the camera will decide to focus on, you may become a big fan of fixed center point focus. It leaves one less variable to guess at or leave to chance.
Drive modes
Somewhat similar to the way cars are capable of operating in different gears, you have a couple of different options for drive modes when it comes to your camera, and as you’re about to see, they’re pretty self-explanatory.
Single (One) Shot

In single shooting drive mode, the camera takes one photo each time you press the shutter button. Plain and simple. This is where the camera is set to default and where it will likely spend most of its time.
Continuous Shooting

If you’re shooting a wildly moving subject or trying to catch a specific moment in action—the very moment your kid scores the winning soccer goal, for example—you can up your chances of success by using continuous shooting mode to essentially turn your camera into a rapid-fire machine gun. As long as you continue to hold the shutter button down, your camera will happily fire away.
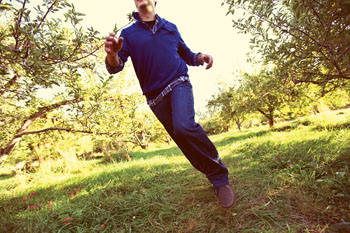
The number of frames per second that your camera is capable of capturing will vary from model to model, but either way, it’s pretty impressive. With the camera’s drive mode set to continuous (and the focus mode also set to continuous, thereby tracking moving subjects), I was able to capture a series of frames as my subjects blew past my lens, seen in Figures 4.16 - 4.18.
Figure 4.16. The first of three images in a series, captured using continuous drive mode.

Figure 4.17. The second of three images in a series, captured using continuous drive mode. Of all three frames, this one is my favorite. If I had shot in single shot drive mode, I would’ve had to rely on perfect timing to score this. Continuous drive mode is much, much easier!
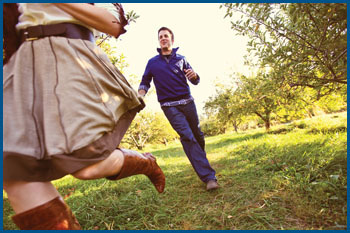
Figure 4.18. The third of three images in a series, captured using continuous drive mode.
You may be wondering why you wouldn’t just leave your camera set to continuous mode all the time. While you could, you’d quickly find yourself firing off five or more frames when you mean to shoot only one, rapidly piling up on your memory card and wasting space on your hard drive later.
So, while continuous shooting is great for catching key moments in sports or other action shots, having your camera operate like a machine gun is overkill for most situations and tends to get old quickly. And—even if you wanted to—continuous drive mode doesn’t mean you can hold the button down for hours on end and take 10 bazillion shots in a row without interruption.
Your camera can only fire off a certain number of photos in a single round (called a “burst”) without having to pause to catch its breath as each photo must be stored in active memory until it can be written to the memory card. The memory buffer is only so big and can only handle so many photos at a time—regardless of the camera’s frame-per-second rate. If you attempt to hold the shutter button down for extended periods of time, the camera will eventually be forced to suspend shooting to clear the buffer memory before it can continue.
The bottom line? Stick to single shot drive mode for most things, and make use of continuous when you really need it.
That’s not all, folks!
This is all just the beginning! There’s an endless list of other functions and features your camera may offer. Things like smile recognition, panorama assisting, and color effects like sepia or black and white are just a few. These features tend to vary so dramatically from camera to camera that it doesn’t make sense to try and include them here.
Experience has taught me that if you’ve made it this far into the book and have taken the time not only to locate everything we’ve talked about on your camera but also to really play with and get a feel for how things work, you’ll have no problem discovering and making use of these other features. Have a little faith in yourself, and don’t be afraid to explore!
Chapter snapshot
![]()
This concludes our camera function tour, and I’m glad to see you’ve hung on for the ride! Your camera thanks you and looks forward to stretching its legs next time you take it out for a spin.
Here are some things to remember:
• Metering modes give you options for the way your camera’s light meter calculates exposure. When combined with auto exposure lock, the results can be incredible!
• Auto exposure lock allows you to meter for one part of the scene, then freeze the exposure settings while you recompose the shot however you like.
• Auto focus modes allow you to either focus once for each shot or continuously while tracking a moving subject.
• Focus points tell the camera what part of the scene to focus on and are either selected automatically by the camera or chosen by you.
• Drive modes give you the ability to either capture a single image at a time or shoot continuously while holding the shutter down.
• Practice so you’re confident and comfortable, and the next time you have a great idea for a photo you’d like to take, you’ll be empowered to make it happen!