
Chapter 3. Function Junction: Flash, white balance, and exposure compensation

An understanding of basic camera functions made it possible to cancel the flash and capture this silhouette portrait with my trusty, old point-and-shoot camera.
Now that you’ve got a grip on the basics of photography and are familiar with the various shooting modes, learning to fine tune your images is going to be a breeze!
Before we get started, it’s important to remember that on most cameras, the functions available to you will vary dramatically depending on what shooting mode you’re in.
A lot of cameras won’t let you play with the functions we’re about to talk about if you’re shooting in auto mode. So as you make your way through this chapter, if you’re having a hard time finding or gaining access to a particular function, try switching from auto (A) to a less-restrictive shooting mode, such as program (or any of the priority/manual modes). It’s not that your camera is lacking, it’s just that handcuffs and limitations are the bargain price for shooting in auto (A) mode. (Kinda makes you think twice, doesn’t it?)
To make matters even more interesting, different manufacturers depict these functions in slightly different ways, often choosing to put them in different places from one camera to the next, but generally, they’re pretty easy to find. The more you get comfortable looking around, the easier it gets. And of course, you know your user guide is always there for you if you need it.
Flash
Even if you’ve never played with any of the other functions or modes on your camera, chances are you’ve at least bumped into your flash settings once or twice. So, as far as familiarity goes, it makes a great place to begin our functions tour.
Your garden-variety, on-camera flash comes in several flavors, including (but not limited to) auto flash, canceled flash, fill-flash (I like to think of it as forced flash), red-eye reduction flash, and slow-sync (aka night portrait) flash.
Accessing these different flash modes is usually as simple as pressing a button. Depending on your camera, you may have to scroll a dial or turn a knob. It’s usually an easy feature to get to, so if you’ve never bothered to find your flash options before, dig out your user guide and hop to it already!
Auto Flash

Auto flash means that the camera is in control and decides whether or not flash is needed in any given situation. Though the auto setting may be fine in some circumstances, to really take control of your photographs, you’ll need to learn how to control the flash.
Auto flash mode isn’t always everything it’s cracked up to be. Sometimes it tells the camera to fire the flash when it’s not really necessary, and other times, it forgoes flash in a situation where you might really need it. Just as you have alternatives to auto shooting mode—thankfully—you also have alternatives to auto flash mode.
Canceled Flash

You may find that flash isn’t as necessary as you think. In fact, you might discover that your photos can occasionally be greatly improved simply by turning the flash off. Doing so will force the camera to compensate for the reduced light in other ways (slower shutter speed, wider aperture, and/or a more sensitive ISO) and can result in much more natural-looking images.
Figure 3.1 was made with the camera set to auto flash while Figure 3.2 was captured on a camera that doesn’t even have a flash. Amazing, isn’t it? Even the baby is happier about the photo without the flash!
Figure 3.1. Believe it or not, this image was captured in a well-lit room with a generously sized window behind the camera. But the camera’s auto flash dramatically changed the look by brightly illuminating the subject and rendering the background a dark hole by comparison.

Figure 3.2. Captured only moments later, this image was recorded using only existing light with a camera that has no built-in flash.

Though there may not always be enough ambient (naturally existing) light to cancel the flash in every situation, you’d be surprised how often it works, and there are a few things you can do to help.
Shooting from a different direction that has more light, asking your subjects to turn around and face another way, or moving to a brighter part of the scene are all things you can do to take control of your situation and get better photos. See Chapter 10, “Zero to Hero: Better Photos Are Yours for the Taking,” for more about learning to see light and choosing your actions accordingly.
With a little bit of awareness and effort, you may be surprised how often you can get away without having to resort to flash. If you look around, there are all kinds of ways to get some great shots without flash, even at night! In our next example, Emir and I found ourselves in downtown Chicago with time to kill before catching a show. The daylight was gone, and much of the only illumination around us was coming from one of the plaza fountains. I decided it might be fun to shoot a silhouette portrait (where the light source is behind the subject). Armed with my older-model point-and-shoot camera, I asked Emir to stand in front of the fountain so I could position the camera on a nearby ledge (no tripod) and get a test shot.
Figure 3.3 is what we would’ve walked away with if I had been content to leave the flash set to auto mode. Because Emir was surrounded by so much dark background, the camera felt compelled to fire the flash, even though I didn’t need (or want) it for the shot I had in mind.
Figure 3.3. With the flash set to auto, the camera attempted to compensate for the dark surroundings by firing the flash, thereby ruining any hopes for a silhouette portrait.

The difference between the disappointing image in Figure 3.3 and the shot we had in mind (Figure 3.4) was as simple as canceling the flash.
Figure 3.4. By canceling the flash (and using the camera’s built-in self-timer), I was able to get the silhouette portrait I originally had in mind.

After framing the shot the way I wanted (read about “composition” in Chapter 10), I canceled the flash, turned on the self-timer (more on this in Chapter 4, “Function Junction, Part Deux: Metering, Focus, and Drive”), and ran to get into the shot next to Emir before the shutter clicked. Violà!
Canceled flash is also great in those situations where the use of flash is not allowed (museums, tour buses, etc.). In short, turning off your flash is worth exploring and getting very comfortable with. In fact, it may even become your preferred modus operandi! I generally operate with my flash set to the canceled mode unless I have a compelling reason to turn it back on.
Fill-Flash (AKA Forced Flash)

This option is the perfect solution for times when the camera doesn’t think flash is necessary, but you disagree. You can override the camera by choosing the fill-flash setting, thus forcing the flash to fire—whether the camera thinks it should or not.
Fill flash is especially useful when the background behind your subject is brighter than the subject is. Depending on your metering mode (read about this in Chapter 4), a background that’s brighter than your subject can sometimes trick your camera, resulting in a great photo of the background—and a subject that’s too dark, as in Figure 3.5.
Figure 3.5. The brightly lit background factors too heavily into the camera’s exposure calculation, causing the camera to forego the flash, resulting in a properly exposed mountain scene while poor Emir is left in the dark.

By simply enabling fill-flash, I was able to get the image I wanted in Figure 3.6.
Figure 3.6. Fill-flash saves the day by bringing up the exposure on Emir to match the brightness of the surrounding mountains.

Bottom line? Anytime you need to be sure the camera’s flash will fire (regardless of whether the camera thinks it should), this is the option to reach for.
Red-Eye Reduction Flash

The scary-looking red eyes occasionally seen in flash photos (Figure 3.7) are caused by the flash reflecting off the blood supply in the back of your subject’s eyes. The red-eye reduction flash option attempts to make everyone look less frightening by emitting a series of flash bursts before taking the actual photo. The first few bursts constrict the pupils, so by the time the real flash fires, there is less opportunity for the light to be reflected back from behind the retinas (Figure 3.8). Pretty sweet, huh?
Figure 3.7. My nephew Cole demonstrates what can happen without red-eye reduction flash.

Figure 3.8. Red-eye reduction flash to the rescue!

Tip
The “shine-eye” effect often seen in pets is caused by light reflecting off a mirror-like layer in their eyes. Unfortunately, the red-eye flash reduction function doesn’t have the same effect on pets as it does on people.
The only bummer about red-eye reduction flash mode is that because the camera fires a series of flash bursts (instead of a single burst), subjects (especially young children) often assume the photo is finished after the initial burst and tend to take off too soon.
Thus, it can be helpful to let your subjects know to expect a series of flashes so they don’t split after the first one!
Slow-Sync (AKA Nighttime) Flash

This is that wild card again! If this function is hiding from your flash functions, chances are you’ll find it within your camera’s shooting modes or as part of your scene collection, where it might also be known as “night portrait” mode. As usual, check your user guide to be sure.
If you’ve ever tried taking a portrait at night (or someplace dark, like at a wedding reception), you may have noticed that while your subject is plenty bright, the background tends to turn into a big dark hole as seen in Figure 3.9. Not good!
Figure 3.9. With the flash (and the camera) set to auto, Emir is brightly illuminated, but the dark background surrounding him is out of the flash’s effective range and doesn’t stand a chance. 1/60, f/4, 640

The slow-sync flash setting attempts to reconcile the difference between your flash-lit subject and the dark background extending beyond the reach of the flash by using a slower shutter speed, as in Figure 3.10.
Figure 3.10. The slow-sync flash setting tells the camera to slow down the shutter and give the background (not lit by the flash) the opportunity to be seen. 1/6, f/4, 640

If you remember back to Chapter 1, “Three’s Company: Understanding Shutter Speed, Aperture, and ISO,” you know the shutter speed controls time. By slowing down the shutter speed, the camera gives the background some additional time to “burn in” and leave an impression on the camera sensor.
Pretty slick, eh? The flash is there to light your subject, and the slower shutter speed gives the surrounding background a fighting chance. Don’t you feel fancy now? Give your camera some props; it’s loaded with all kinds of goodness like this, but it only works if you put it to use.
White balance
Did you know that different light sources emit light of different colors? It’s true! For example, you’ve probably noticed that candlelight produces an orange-ish glow that is quite different from the color of light coming from the fluorescent bulbs usually found above a corporate cubicle. You’ve also spent a lifetime witnessing the changing color of sunlight as the day progresses from morning to night, becoming a warmer shade of yellow shortly before the sun sets (often referred to as the golden hour).
Tip
The difference in color from various light sources is referred to as “color temperature.” Though measured in degrees similar to the way we measure physical temperature, color temperature is not calculated as part of the Fahrenheit or Celsius scales, but rather a scale all its own called “Kelvin.”
White balance has to do with the way your camera deals with all the different colors of light, continually attempting to correct or balance the color to produce an accurate image.
Color balance problems are responsible for all kinds of photographic disharmony and are especially common in places like high school gymnasiums, your office, and even under the shade of your favorite tree. These problems arise when the camera misinterprets the color temperature of the scene. While our brain can adjust for these discrepancies, the camera needs a little help and relies on the built-in white balance settings to help it neutralize the color.
You may not have realized it before, but your camera lovingly serves up a variety of white balance presets that may include Auto ![]() , Sunny
, Sunny ![]() , Cloudy
, Cloudy ![]() , Shade
, Shade ![]() , Tungsten
, Tungsten ![]() , Fluorescent
, Fluorescent ![]() (your camera may even offer several varieties of fluorescent), and Flash
(your camera may even offer several varieties of fluorescent), and Flash ![]() .
.
Some camera models might have additional presets such as Kelvin K, which allows you to dial in a specific color temperature from the Kelvin scale, and Custom ![]() , where you can create your own preset based on your current shooting environment. Consult your user guide for specifics.
, where you can create your own preset based on your current shooting environment. Consult your user guide for specifics.
Tip
Tungsten bulbs are also referred to as “incandescent” and are the type of bulb we depict floating above someone’s head when they’ve had a brilliant idea. They’re also the same ones you’d likely find in your own home (unless you’ve switched to compact fluorescent).
When you take a photo, the camera analyzes the image data and compensates for color temperature using whichever white balance you’ve selected. There’s no shame in defaulting to auto white balance for most situations; just be ready and willing to change it when the color starts to look wacky.
On most cameras, white balance settings are found within the menu system, but some models have a button dedicated specifically to white balance settings. Dig around and check your user guide to make sure you know how to access and adjust yours. In Figures 3.11–3.16, the same scene was photographed using a variety of white balance settings. Notice how the colors vary. In some cases (not necessarily in this example), the differences can be quite dramatic.


Changing your camera’s white balance settings only changes how future photos will look—it doesn’t affect photos you’ve already taken. Knowing this helps you be more proactive in your shooting. When moving from one shooting environment to another, check your camera settings and fire off a few test shots before getting serious. Then, adjust your white balance as necessary, and you’ll be ready to go without missing any of the action! Like so many other things, there is no right answer when it comes to white balance. (Don’t you love that?) Keep in mind that while it often works well to choose the white balance setting that most closely matches your shooting environment, you certainly don’t have to. Intentionally mismatching your white balance can be a fun creative tool, so don’t be afraid to experiment!
Exposure compensation

Have you ever shot a photo that was almost perfect except that it was a bit too dark (underexposed) or a bit too bright (overexposed)? What did you do?
Tip
If your previous answer to dealing with exposure problems was to fix it later in Adobe® Photoshop,® consider this your intervention! While Photoshop is an amazing tool, it is not a crutch. Your goal should be to get it right in the camera, not to fix it later in Photoshop.
As amazing as your camera is, it’s still at the mercy of its light meter and sometimes needs a little help to get the exposure you want. That’s where exposure compensation comes in. You’ve likely had the power of exposure compensation all along and just never knew it! Instead of having to accept photos that aren’t quite what you hoped for, you can force the camera to try again with different exposure settings to either darken or brighten the image.
To get started, check your camera for a symbol that looks like ![]() . If you can’t find it, cozy up with your user guide—it’s in there somewhere! Some camera models display exposure compensation as a linear graph similar to Figure 3.17. It may look quite a bit like the light meter we talked about in Chapter 2, “Shooting Mode Bonanza: Getting Bossy, and Learning to Like It.”.
. If you can’t find it, cozy up with your user guide—it’s in there somewhere! Some camera models display exposure compensation as a linear graph similar to Figure 3.17. It may look quite a bit like the light meter we talked about in Chapter 2, “Shooting Mode Bonanza: Getting Bossy, and Learning to Like It.”.
Figure 3.17. Some cameras display exposure compensation in a way that’s very similar to the light meter itself.

The zero in the middle represents what the camera believes to be the correct exposure. You can push the exposure to better suit your fancy anywhere from a maximum of two stops darker (−2) to two stops brighter (+2), typically in 1/3-stop increments.
To change your camera’s exposure settings, just move the indicator in either direction, depending on whether your goal is to darken (−) or brighten (+) the image. The further you move the indicator away from the center, the more significant exposure difference you will make. (Consult your user guide if you’re not sure how to adjust the exposure compensation settings on your particular camera.)
Depending on your camera, exposure compensation might be depicted numerically as in Figure 3.18 instead. A display of ± 0 means exposure compensation is set to zero (neutral) and the camera will expose as it sees fit. If you want to push the exposure darker or brighter, you simply adjust the numbers accordingly. Negative numbers (−2, −1) will make exposure darker, and positive numbers (+1, +2) will make the exposure brighter.
Figure 3.18. Some cameras represent exposure compensation numerically.
![]()
Once you’ve adjusted the exposure compensation, you’ll need to take another photo for the new settings to be used. Just like white balance, changes you make do not affect images you’ve already taken—only new ones you’re about to take. Figures 3.19–3.23 show the Brooklyn Bridge shot with varying exposure compensation settings ranging from −2 to +2. Which one do you like best?
Figure 3.19. Exposure compensation set to −2.

Figure 3.20. Exposure compensation set to −1.
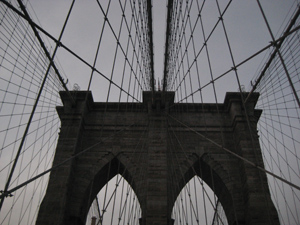
Figure 3.21. Exposure compensation set to 0.
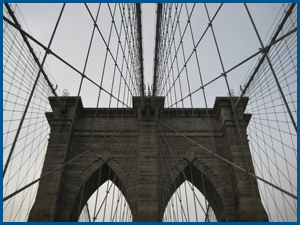
Figure 3.22. Exposure compensation set to +1. Out of this whole series, I like this frame the best. Remember there’s no right or wrong—it really comes down to personal preference.

Figure 3.23. Exposure compensation set to +2.

Tip
Exposure compensation is irrelevant if you’re shooting in manual mode. Because you have full control in this mode, you’re free to shoot with whatever exposure you want. So if you need to push the exposure one way or another, just change the settings accordingly. In this sense, you are your own form of exposure compensation.
To shoot your own series of images like Figures 3.19–3.23, follow these steps:
- Find a scene you like.
- Set your exposure compensation to −2, and take a photo.
- Adjust the compensation to −1 and take another photo.
- Take a third photo with the exposure compensation set to 0, another one set to +1, and a final image set to +2. (If you want to be very detailed, you could take a photo in 1/3-stop increments instead of full-stop increments, so after −2, your next photo would be set to −1-2/3, and so on.)
The more you play with the power of exposure compensation, the more intuitive the process will become. Before you know it, you’ll be able to actually guess the settings that will best suit your tastes.
Can you believe you’ve had this power all along and just never knew it?
Tip
Just like white balance, changing your exposure compensation doesn’t change the photos you’ve already taken; it just prepares the camera to take a better photo next time. So it’s best to take some test shots before any important moments to make sure you’re set up to capture the good stuff the way you were hoping to.
Flash compensation

In addition to being able to nudge the overall brightness or darkness of your image with exposure compensation, some cameras also give you the ability to nudge your flash power with something called “flash compensation.”
If your camera supports this feature, you’ll likely find it represented with this icon ![]()
![]() . Check your user guide for its specific whereabouts on your particular camera.
. Check your user guide for its specific whereabouts on your particular camera.
It works just like exposure compensation, except the only thing being adjusted is the flash output. While adjusting it won’t necessarily give you the power to light up the whole room, it can definitely have an impact on the brightness level of the subjects directly in front of you.
Need a more powerful flash? Crank it up toward +2 or so; then, take another shot. If your flash is blasting everyone overboard, dial it down toward −2, try again, and see what you think.
Self-timer

You probably already know that your camera has a built-in self-timer that allows you to press the shutter button, and after a set amount of time, the camera takes the picture. The settings are typically preset for varying durations, usually including 10 or 2 seconds. You might also have a custom feature where you can set the timer for different lengths of time better suited to your purpose.
The 10-second setting is great when you want to put the camera down and join the rest of the group by actually being in the photo for once! With a tripod, a countertop, or anything to steady the camera, you can make sure you don’t miss out on all the fun (Figure 3.24)!
Figure 3.24. I set my camera on a nearby tabletop and used the self-timer feature to join Emir for this portrait.

Tip
Some cameras make it possible to use the timer to capture not only a single photo, but a few in a row, saving you from having to run back and forth for retakes when you’ve joined the other subjects in front of your own lens. Cool!
What about the 2-second setting? You’d have to be pretty fast to press the shutter button on the camera and find your place on the other side of the lens before the shutter fires in only two short seconds!
Instead, this shorter timer setting is great for low-light situations or any other time you might be using a slower shutter speed when—even with a tripod—the very act of pressing the shutter button could be enough to cause the camera to shake and blur your image.
The 2-second setting gives the camera enough time to stop wiggling between when you press the button and when the shutter finally clicks. Surprisingly simple, right?
Chapter snapshot
![]()
Can you believe your camera is capable of all this cool stuff? Here are some things to remember:
• Access to these different functions varies depending on what shooting mode or scene your camera is set to.
• Auto mode may only let you access a few (if any) of these functions, and something such as program mode or one of the priority modes will usually give you more access.
• Because these functions are so handy—as long as you’re shooting in something other than auto mode—you should be able to make adjustments on the fly and get more pleasing results with less time and effort.
• The more you practice and play around with these settings, the faster and more efficient you’ll become at employing them.