Chapter 10. From Zero to Hero: Better photos are yours for the taking!

Wandering down the streets of Marrakech, Morocco, I happened upon this scene and was drawn to the lines, patterns, and colors it offered. Just as I began to compose an image, the bicyclist appeared and I was able to capture the scene with him in it—making this one of my favorite images from the trip.
Great photos don’t just happen. They’re born when someone (like you!) steps up and makes them happen. While you may get lucky with a great shot every now and then, the only way to consistently get great photos is to play an active role in making them what you want them to be.
(You’ve made it this far—there’s no sense in turning back now!)
Beyond choosing camera settings (shooting modes, white balance, and so on), you’re ready to take your images a step further. By becoming aware of your surroundings, learning to see light and background, and making active choices about composition, your photos will improve by leaps and bounds!
Snapshots vs. photographs
Have you ever thought about the difference between a snapshot and a photograph? How would you explain it? When you boil it down, the only real difference is presence of mind.
The term “snapshot” generally refers to an image that was captured on a whim without a great deal of thought, attention to detail, or regard for composition—something along the lines of “Ready, aim, fire!” For a lot of people, it’s the only way they’ve ever approached photography (after all, the term “point and shoot” didn’t come out of nowhere).
“Photographs,” on the other hand, are made with more thought and consideration. Whether captured on a compact point-and-shoot or a fancy schmancy dSLR—a photograph is a carefully made choice, captured with intention and executed with astute awareness. As the expression goes, “Snapshots are taken, photographs are made.”
Making the leap from shooting snapshots to capturing photographs isn’t rocket science, but it will require active participation and a new thinking pattern.
Ready, set, stop!
If you’ve been a snapshot shooter all your life, learning to stop and evaluate the scene before you shoot will take some getting used to. While your old thinking pattern may have been along the lines of see scene, reach for camera, take picture—your new thinking pattern is all about awareness, requiring that you learn to see (and evaluate) what you’re looking at in a whole new way.
The first step is an easy one. Just—stop. Step back and pause for a moment (or however long it takes) to make yourself aware of two very important aspects of the scene in front of you: the light and the background.
It’s funny to think that most of us spend a lifetime looking at—but never really learning to see—light and the way it shapes the world around us. It can vary drastically from one environment to the next and is capable of changing dramatically from hour to hour, or even minute to minute as clouds move across the sky.
You can practice looking at and learning to see light by exploring some of its basic attributes: quality, color, and direction.
Snapshots are not to be confused with candids. A “candid” photo is one where the subject is not posed or, in some cases, entirely unaware of the camera’s presence.
The person taking the picture, however, is very much aware of what they’re doing, making calculated decisions and shooting with intent and forethought, rather than simply “pointing and shooting” at subjects who may or may not know they’re being photographed.
For example, I captured these candid images of my friend Robin and her daughter Kylee enjoying a day at the beach. Instead of trying to pose them (easier said than done with little ones!), I positioned myself in a favorable spot and captured the moments as they naturally unfolded while paying close attention to light, background, and composition.


Quality of Light
Not all light is created equal! Light can be soft or it can be hard. How can you tell the difference?
Examine the shadows. Captured on a bright sunny day, the hard light in Figure 10.1 produces shadows that are equally hard and well defined.
Figure 10.1. Clear, sunny days produce hard light with equally hard shadows.

Soft light—found either in the open shade, or almost anywhere on a cloudy/overcast day—produces less dramatic and softer shadows, as seen in Figure 10.2.
Figure 10.2. Captured in the open shade of a sunny day, the soft light in this scene produces soft shadows.

Color of Light (Source)
Being aware of the source of light in a scene helps you better recognize and anticipate its color temperature (see Chapter 3, “Function Junction: Flash, White Balance, and Exposure Compensation,” for a refresher on white balance and color temperature) and the overall mood it contributes to the scene.
If you’re outdoors during the day, your main light source is the sun. If you’re inside, it’s likely lit from flourescent bulbs, tungsten lamps, or possibly a mix that might also include daylight pouring in from a large window.
Look around and ask yourself if the surrounding light has a cooler color like in the morning just before the sun peeks above the horizon—or a warmer glow, like the last hour before sunset, as seen in Figure 10.3.
Figure 10.3. As the sun was setting off the Oregon coast, the golden color added a warmth to the image that would be noticably missing if the scene was photographed at noon.

How might the color of the light in your scene affect the image you’re about to make? How would the color of the light change if you captured the photo at a different time of day?
Direction of Light
Light can come from anywhere, illuminating your subjects from above, from the side, behind, or even from below (see Figure 10.4 for examples).
Figure 10.4. Clockwise from top left: Lit with sun from above; lit from a window on the left side of the camera; lit with early evening sun from the left, accentuating the size and shape of the sand dune with dramatic shadows on the right; lit from below using only the light from the campfire; backlit with the sun behind the subjects, resulting in a silhouette portrait.

Before you pick up your camera to shoot, look at the scene in front of you and ask yourself which direction the light is coming from. How does it relate to the direction your subjects are facing? Is the light hitting your subjects in a way that makes them squint? Is it casting funny shadows on their face, as in Figure 10.5?
Figure 10.5. Emir frowns at me for letting the sun cut across his face, leaving part in shadow, part in highlight.

While you can’t move the sun, you can change its position relative to yours. In Figure 10.6, I simply moved about three steps in a clockwise direction and asked Emir to turn my direction, thereby eliminating the shadow that previously cut across his face.
Figure 10.6. To solve the lighting issue on his face, I simply moved three steps clockwise (away from the sun), and as Emir turned to face my new location, his face became more evenly lit. Piece o’ cake!

A Check on the Background
Once you learn to see light, the next step is to turn your attention to the background to see what’s behind your subjects.
Are things such as telephone poles, the neighbor’s car, or other people in the way? What about beams and other objects that may appear as though they’re coming out of your subject’s head? What can you do about it? Could some items be moved? Is it possible to reposition your subject (or yourself) so the eyesores are no longer visible?
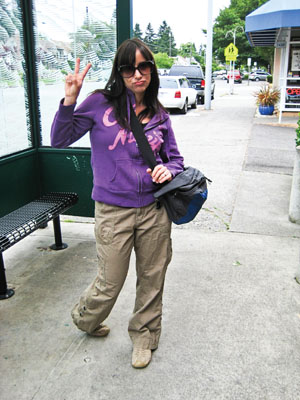
For example, if the snapshot in Figure 10.7 had been captured from a slightly different angle, the cars and street signage might have been blocked from view. How could you have positioned yourself (or the subject) to achieve a less cluttered background?
Figure 10.7. How might you compose this scene differently for an uncluttered background?
While you’re looking out for the background, be sure to also keep an eye on how the foreground interacts with your subject. In Figure 10.8, it looks like the green leafy top of the strawberry could double as a silly little moustache!
Figure 10.8. “I’ll have a strawberry daiquiri with a side of green moustache, please!” Unfortunate positioning of the strawberry, relative to my face, makes the leafy green top look like a silly moustache.

Get off the bench!
Learning to see light and become aware of the background is a huge step—but it’s useless if you don’t follow it up with action! This is your ticket to get off the bench and become an active participant in getting great photos.
After surveying the scene and weighing your options, you may discover that the light is better somewhere else, or that shooting 3 more feet to the left will enable you to keep the dumpster from showing up in the background. If that’s the case, don’t just stand there—do something about it!
Strategically choosing a location, asking your subjects to turn and face a different direction, or moving yourself across the room to capture the scene from another perspective comes with the territory of being a photographer (rather than a snapshot shooter).
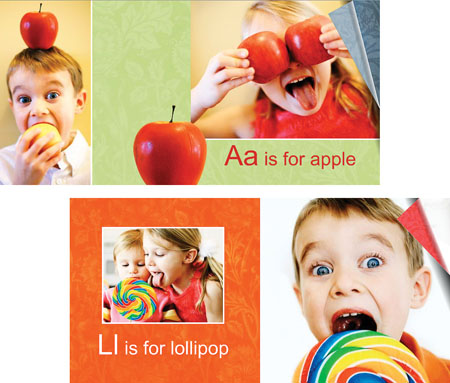
For example, the images in Figures 10.9 and 10.10 were captured as part of a series for a children’s alphabet book I created. Shot exclusively on location in the subjects’ own home (making use of whatever toys, props, and backgrounds were available), I asked the kids to stand in front of a plain, well-lit, and brightly colored wall instead of shooting in the middle of the kitchen where we found the apples. The bright yellow looked great next to the apples and added to the overall appeal of not only these images, but of the book as a whole.
Figure 10.9. Shot entirely on location at the subject’s home, I made use of whatever toys, props, and backgrounds were available—in this case, positioning the subject in front of a plain, well-lit, brightly colored wall that looked great with the apples she was holding.

Figure 10.10. If you look carefully and think outside the box, you will likely discover some fantastic backdrops right in your own home. Walls, doors, curtains, or even furniture can make great backgrounds. You never know until you try!

Keep in mind that exerting some influence over the scene doesn’t mean that you can’t shoot the candid images you might be looking for, but it does mean you’ll have a much better chance of getting what you want—and who doesn’t like that?
For example, if you’re photographing the kids running through sprinklers in the front yard, but you can’t bear the sight of your unfinished porch or goofy looking mailbox in every image—why not just move the sprinkler (and the kids) to the backyard?
If you want to capture your children at play in the living room, but the light (or severe lack of it) is bumming you out, a simple “Hey kids! Can you show me how you play with the toys over here by the window?” will usually suffice.
While there are certainly situations in which it’s not practical (or even possible) to move your subject, being able to see the light, be aware of the background, and adjust accordingly empowers you with the ability to make the most of any scene.
Putting together a collection of images for something like an alphabet book is a great way to practice your developing photo skills. And when you’re done, you’ll have a timeless treasure for your family!
If you are hungry for a little inspiration or just want to take a closer look at the book I made, visit kabloomstudios.com/blog/alphabet-book.
Composition-it’s not just for musicians and English majors
Once you’ve found the light and background that suit your fancy, how exactly will you put it all together? Where will you position yourself? How close will you get? What will you focus on or draw attention to?
The way you choose to frame an image is called “composition.” And while snapshot shooters aim and fire, photographers compose. It has a lovely ring to it, doesn’t it?
Every time you raise the camera up to capture an image, you are making a choice. And in addition to choosing all the things we talked about in Chapters 1 through 5—such as exposure settings, white balance, and focal length—with every click of the shutter, you are also choosing the angle you shoot from, the part of the scene you want to draw attention to, the exact moment you want to capture, and, ultimately, the story your image tells.
The expression “A picture is worth a thousand words” comes from the idea that images tell stories, usually much better than we do. So be sure to craft your pictures carefully. Changing any of the variables will change the image and, thus, the story it tells. That’s the power of composition.
There are lots of ways to strengthen the stories your images tell. The more you practice, the better your images—and their stories—will become.
Be Exclusive
The story you choose to tell with your photos can vary dramatically depending on what you choose to include in the image and—perhaps even more important—what you choose to exclude.
For example, what do you see when you look at Figure 10.11? A young boy, seeking thrill and adventure? Perhaps. But what you don’t see is the parking lot in the background (filled with fire trucks and crawling with people—apparently some sort of fair was taking place). Though it may look like Ryan is risking his life leaping between two seemingly tall cliffs, in reality he’s about 3 feet off the ground in a grassy city park.
Figure 10.11. Shot with a wide lens (28mm) from a low angle (purposefully excluding the background), it appears as though Ryan is risking life and limb on a daring leap of faith—when in actuality, he’s 3 feet off the ground in a city park.
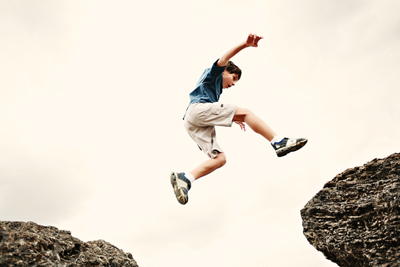
Was this an accident? Not a chance.
If I had shot without pausing to think first, I might have taken the image while standing. And if I didn’t feel like moving, I’d probably have shot it from a pretty far distance—revealing the crowded parking lot in the background and the grassy turf only 3 feet below. But because I paused before firing, I had time to make some choices.
I chose to lay on my back at the bottom of the rocks and shoot at an upward angle, creating the illusion that Ryan was a cliff-jumping daredevil by excluding the parking lot and ground (only 3 feet below) from view.
I chose to shoot wide enough to show both the left and the right rocks, but not too wide that you can see the far edge of either rock, revealing their true size (which was actually quite small in comparison to how they look in the photo).
Suddenly, because of these choices, the image takes on a new meaning. Instead of just another snapshot at the park, this image tells a story about Ryan and his youthful, adventurous spirit.
Explore a New Perspective
Just as many people have a tendency to take photos from much too far away, most also have a tendency to shoot everything from eye level while in a standing position. The next time you find yourself with a camera in your hands, take a moment to explore some alternatives.
Shooting down from above can sometimes reveal interesting patterns and shapes that may otherwise be missed. Whether you climb a ladder or ledge, or just stand on your tiptoes, shooting from above can transform almost any scene (Figure 10.12 and Figure 10.13).
Figure 10.12. Shooting down from the second-story balcony of a restaurant reveals shapes and patterns not visible from the ground level.

Figure 10.13. If you think that photographing kids at the park is a passive endeavor, think again! The more you’re willing to get involved and play along, the more interesting your photos will become. This image was captured from on top of the playground equipment, shooting down through the climbing rings.

On the other hand, getting down low (possibly even beneath your subjects) and shooting upward, as in Figure 10.14, is a great way to not only find an interesting view, but also to hide any unwanted background!
Figure 10.14. This photo of Lily and her dad Brian has an extra touch of fun and whimsy thanks to the unique angle it was captured from.

Many photos can be greatly improved by simply shooting from the subject’s eye level. Figure 10.15 was captured in the tragically common default shooting position of standing while aiming the camera in whichever direction the subject happens to be. Figure 10.16, on the other hand, was captured while lying on the floor at the subject’s eye level. Which image do you find more compelling?
Figure 10.15. Captured from a typical standing position while shooting downwards, this image lacks any real connection to the subject.

Figure 10.16. Getting down on the subject’s level makes this a far more compelling composition.

Exploring new perspectives usually involves more than standing in one spot and simply leaning in either direction (lame!). Don’t be afraid to really roll up your sleeves and dig in, even if it means looking ridiculous temporarily. Great images last forever; the embarrassment you endure while contorting yourself into whatever it takes to get the shot you want is only temporary. (Unless someone snaps an unflattering photo of you and it ends up getting published in a book like this one. Sweet. See how much I care for you? I’m including this image here just to make a point!)

Get Close and be Detailed
As you read in Chapter 9, “Death by Cropping: Don’t Shoot the Messenger!” (you did read Chapter 9, didn’t you?), one of the best ways you can improve your photos is to simply get closer.
Whether you’re shooting a portrait of a loved one, photographing the trip of a lifetime, or capturing a lazy afternoon with the kids, your images can be dramatically improved by reducing the distance between you and your subjects.
Once you get comfortable at shorter distances, scour the scene for details that can make great images and help tell your story. If you’re looking to make some special portraits of grandma, include a close-up of her hands and the character they reveal.
When you travel, make it a point to capture the textures and colors that surround you (Figure 10.17). Simple architectural details, close-ups of street signs, trinkets from the local market, or maps of your whereabouts will tell the story of your trip in a new way (while simultaneously building a frame-worthy collection of great images for your wall when you get back!).
Figure 10.17. Capturing images of colors, shapes, and textures while traveling makes for great souvenirs.

When photographing your kids, don’t leave out the details of messy faces, skinned knees, muddy feet (Figure 10.18), and missing baby teeth. Those are real memories, and they usually have great stories to go with them.
Figure 10.18. The messy details of life can make for some of the best images—don’t overlook them!

Set the Scene
In addition to some great close-ups, don’t overlook the potential to be found in wider shots such as Figure 10.19. Powerful in their own way, wide shots set the scene by helping viewers fully appreciate where the story is taking place.
Want to take your storytelling skills to the next level? Combine wide, scene-setting images with a collection of details and close-ups and the story you tell will have much more depth.
Figure 10.19. A story about skiing the backcountry in Colorado wouldn’t be the same without a view of the aspen trees.

Hold the Cheese, Please!
It’s common to ask your subjects to “Say cheese!” when trying to photograph them. Unfortunately, it’s often counterproductive, boring and generally—pretty cheesy. Learning to hold back can be a tough habit to break, but with practice, you can train yourself to banish the “cheese” from your photos for good.
Instead of asking your subjects to look at the camera with phony grins, engage them. Distract them with jokes, keep them focused on a task or activity, or redirect their attention to something else. Or, if you’re photographing children, ask them to arm wrestle, tickle each other, or whisper something silly to the person next to them—anything you can think of to elicit a genuine expression.
Even if that genuine expression isn’t the huge grin you may be hoping for, don’t panic. Ask yourself if you’d really rather end up with a picture of a forced, phony smile instead of something genuine that accurately depicts your subject and how he or she feels in that given moment?
In Figure 10.20, Evan wasn’t interested in his mother’s plea for cooperation with the camera. Although the expression on his face is far from anything resembling the smile she would’ve liked, his look says infinitely more about the dynamic person he is and the breadth of emotion he’s capable of than a cheesy smile ever could!
Figure 10.20. Genuine emotion trumps a coerced expression any day, even if it’s not the smile you were hoping for.

Make Eye Contact Optional
Once you learn to take a pass on the cheese, you can take your photos to a whole new level by acknowledging that there’s no law—anywhere—that requires your subjects to always be looking at the camera. In fact, you may discover you really love the images captured when your subject forgot you were even there!
When subjects aren’t forced to acknowledge the camera, they’re free to continue living in the moment—and you’re free to document it, capturing a more accurate glimpse of the real story. It might be the temper tantrum your two-year-old throws in protest of bath time, the “new haircut” you catch big sister giving to little sister, or the way the kids always seem to end up wearing their lunch.
Figure 10.21 is one of my all-time favorites images—and not a single kid is looking at the camera. Big sister Ellie leads by example while Evan wrestles with some runaway spaghetti sauce and Eva holds her own as the youngest, trying to get a bite before the plate is cleared.
Figure 10.21. Over time, you may discover that some of your favorite images come from moments when you let the scene unfold naturally, as if you weren’t even there—instead of asking your subjects to stop what they’re doing and look at the camera.

It’s a great example of what’s possible when you leave your subjects alone and just let them be. Instead of drawing attention to yourself and demanding that everyone stop what they’re doing and look at the camera, try letting the scene unfold, as if you weren’t even there.
Tune Up Your Timing
Similar to the way your favorite actor’s sense of timing can propel him or her toward a legendary comedy career, developing a good sense of photographic timing can take your images to new heights.
More than just the successful synchronization of your shutter with the basketball player in midair, or the soccer ball as it reaches the peak of its arc on its way to the goal, photographic timing is about learning to recognize (and grab) a key moment when you see it.
One of the best ways to sharpen your sense of timing is to work on your patience while learning to anticipate. Rather than rushing to catch up all the time, get ahead of great photo moments by guessing when and where they might present themselves so you can be ready when the time is right. Over time, you’ll get better and better at spotting potentially great photo moments before they happen and capturing them when they do.
A single moment has the ability to communicate a sense of connection and playfulness (Figure 10.22) or convey the sheer power of emotion (Figure 10.23). As the moments stream past you, which ones will you reach out and grab?
Figure 10.22. The expression on Susan’s face makes this photo moment one of my favorites. Being able to recognize and respond to whichever moments speak to you, will take your images to a higher level.

Figure 10.23. Weddings are filled with countless photo worthy moments. If you’re prepared and keep a watchful eye, you’ll have a better chance of catching them. In this image, Rosemarie is about to help her youngest daughter into her wedding dress when she’s overcome with emotion.

Don’t Default to Center
As you become mindful of what you’re shooting and how you’re shooting it, you may discover a stubborn tendency to put your subjects in the center of the frame all the time. While there’s nothing intrinsically wrong with centering your subject in the middle of the frame, make sure you’re choosing to do it with purpose and intent—and not by default.
Centering your subject in the frame can often leave you with compositions that feel trapped, lifeless, or worse—just plain boring. (Gasp!) Who wants that?
Instead, a well-known principle called the “rule of thirds” can help breathe new life into your photos. The principle calls for dividing your frame into thirds both horizontally and vertically (as seen in Figure 10.24), and positioning your subject at one of the points where the lines intersect rather than in the center. Doing so makes for more interesting, purposeful, and dynamic compositions.
Figure 10.24. The rule of thirds calls for dividing the frame horizontally and vertically, and positioning subjects near one of four “points of interest” where the lines intersect.

Tip
Some cameras have a “rule of thirds” grid built into the viewfinder or display options on the LCD screen. If you don’t see it on your screen by default, there’s usually a button or menu option you can access to turn this feature on. Check your camera guide for details.
The image in Figure 10.25 was composed with the rule of thirds in mind. Because the gentlemen’s gaze leads viewer’s eyes to the left, the men are positioned along the right third of the frame, giving viewers’ eyes room to follow their gaze without falling out of the frame.
Figure 10.25. Using the rule of thirds as a guide, the subjects were positioned along the right third of the frame, giving the viewer room to follow the men’s gaze to the left.

The rule of thirds can be applied to both horizontal and vertical shots—as in Figure 10.26.
Figure 10.26. The convergence of the walls with the road was positioned in the bottom right third of the frame to lead the viewer’s eyes into the image. The woman in the scene provides scale and reference.

Figures 10.27 through Figure 10.29 show how the rule of thirds was employed in a variety of images. Once you’re aware of the way you’re choosing to build your compositions, using the rule of thirds becomes second nature. Of course, rules are made to be broken—but they’re usually broken best after you fully understand them.
Figure 10.27. The rule of thirds can be helpful when positioning the horizon in a landscape image.

Figure 10.28. In this cityscape scene, the horizon is a natural fit along the bottom third of the frame.
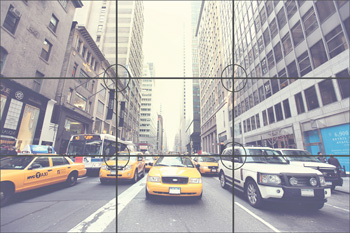
Figure 10.29. Of course, you can also apply the same principle to vertical compositions.

Chapter snapshot
![]()
Taking your photos from zero to hero isn’t rocket science—all it takes is simple awareness and presence of mind.
• Start building your awareness by pausing to thinking about what you’re shooting and how best to do it. Train yourself to see the quality, color, and direction of light and how it relates to your subject.
• Make yourself aware of the background, then position yourself (or your subjects) accordingly by getting off the bench, speaking up, and taking action to shape the scene however it works best.
• Strengthen your images by learning to be exclusive, find new perspectives, and shoot a combination of close-ups as well as scene-setting shots.
• Take your photos to a whole new level by forcing yourself to “hold the cheese,” not demanding eye contact in every shot, and working on your timing.
• Explore the rule of thirds and the ways you can use it to make your compositions more interesting and dynamic.