
Sooner or later, you probably want to add extra users to Zabbix. You probably don't want them to have access to all servers and you probably don't want them to have all rights either. So it is now time to show you how to create new users in Zabbix.
Just as with groups, we need a working Zabbix installation and a user with super admin permissions, A normal admin account will not do this time. The standard admin account automatically created when installing Zabbix is a super admin account. It can also be handy if you have some hosts already added to you setup.
- To create a new user we go to the menu Administration | Users where we will get an overview of all existing user groups already available on the system.
- Next we choose Users from the dropdown menu on the top right corner of the screen and click the Create user button.
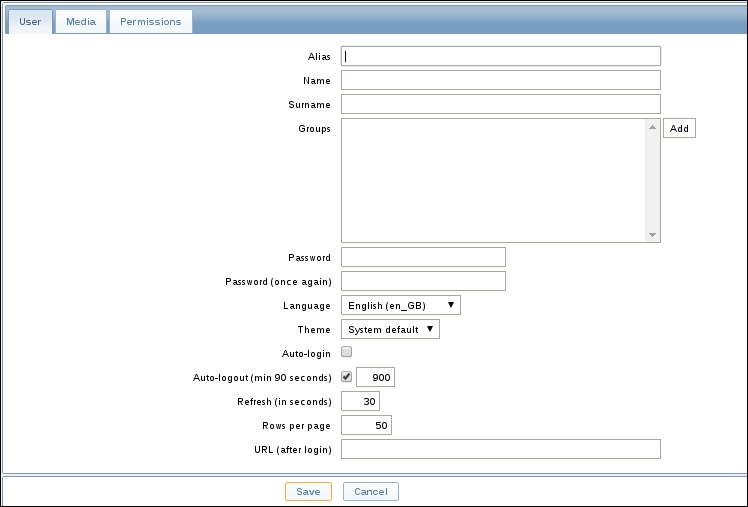
- In the Alias field, you will put the name that you want to use later when logging into Zabbix.
- In the fields Name, Surname and Password, you obviously fill in the requested information.
- In the Groups box, you add the groups where you want the user to belong to. Groups in Zabbix play an important role in the way that permissions will be placed on groups and not on users. So it's the rights on the group that will decide if the user will have access to certain servers or server groups or not.
- The Language and Theme box speak for themselves and should not need more explanation.
- The Auto-login box can be marked if you would like to log in automatically the next time you go to the Zabbix front page. Zabbix will make use of cookies and log you in automatically for the next 30 days.
- Auto-logout is the opposite of auto-login, it will log you out of Zabbix automatically after x number of seconds of inactivity. The minimum is 90 seconds.
- The Refresh (in seconds) option can be adjusted to your needs and will auto-refresh the data for graphs, screens, data, and so on. The refresh can be disabled by 0.
- The Rows per page option can be altered to the number of rows that will be displayed in Zabbix in lists.
- URL (after login) explains itself too. After logging in you will be transferred to the specified URL.
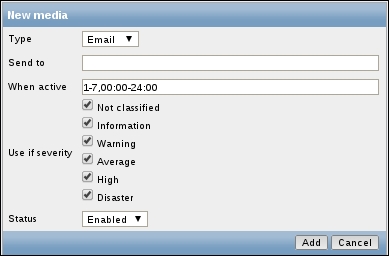
- The Media tab next to the User tab on top is where the user defines all the media that can be used for sending notifications. It is needed that the user or admin defines this or else the user will not be able to receive any messages.
- When we click on Add, a popup window will appear where we can choose the Type of media we want to use and configure. This can be Email, Jabber, or SMS.
- Next we select where we want our message to be sent to in the Send to box. Depending on the media type this will be an e-mail address, jabber account, or telephone number.
- In the box When active we will feed in the time and the days of the week that this type of media will be active. This can be only during certain hours or certain days in the week.
- Use if severity can be used to only get notifications from problems with a certain severity level. For example, we may choose that we only should get warnings from triggers with severity level Disaster by selecting only Disaster.
- The Status box speaks for itself. This is just to disable or enable our chosen media.
- This brings us to the last and probably the most important tab, Permissions. Zabbix will allow users access to certain parts of the menu based on the User type. Users will only be allowed to access certain servers depending on the rights their user group has on the host(s) or the host group that contains the host(s).
- From the User type dropdown box, we can select three options. Depending on the user type we select, our user will have more or less access to the menus in Zabbix:
- Zabbix User: This user only has permissions to the Monitoring menu. The user has no access to any host groups by default. Permission to any host group must be explicitly assigned.
- Zabbix Admin: This user will have access to the Monitoring and Configuration menus. The user has no access to any host groups by default. Permissions to any host group must be explicitly assigned.
- Zabbix Super Admin: This user has the right to access everything in the Configuration, Monitoring and Administration menus. The user also has read/write access to all the hosts and host groups. Permissions cannot be revoked by denying access to host groups.
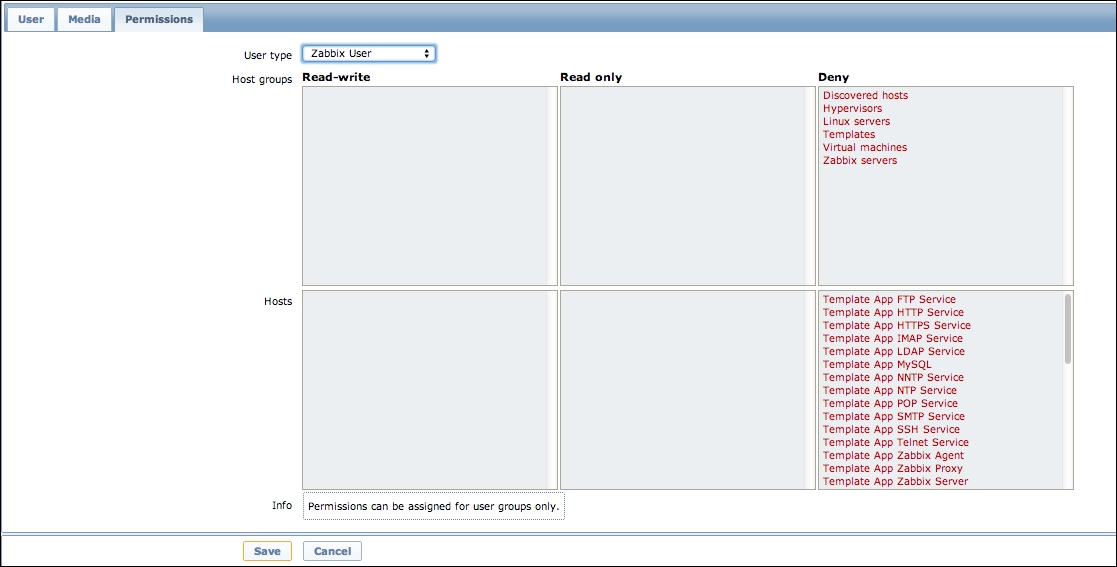
Since Zabbix 2.2, write permissions will override read-only permissions. Before 2.2 this was not the case; so if you migrate from a previous version to 2.2 or higher, be careful to check the rights!
As we have seen, depending on what kind of user we create, we will have more or less permissions to configure or administer Zabbix. Normal users and admins will start without any access permissions. Only the super admin user will start with all rights on all host groups and they can't be revoked. This means that permissions in Zabbix are set at the group-level and not at the user-level. However, alarms can only be set at the user-level.
- Have a look at the section in Chapter 1, Frontend installation and configuration where we have showed you how to configure alarms.