
Zabbix supports many ways to monitor our devices but sometimes we just want that little extra that is not possible out of the box with all the tools provided such as agents, IPMI, SNMP, and so on. But even when it seems impossible to monitor, Zabbix has a solution ready. Zabbix provides zabbix_sender, a tool to send data that we have gathered by, for example, our own scripts. This data will then be sent to the Zabbix server. The data sent to the server will be gathered by the Zabbix trapper.
To be able to finish this task successfully, we need a Zabbix server and a host with the zabbix_sender tool installed on our host.
- Make sure you have the zabbix_sender tool installed on a host in your network. This can be done from the Zabbix repositories by running the following command:
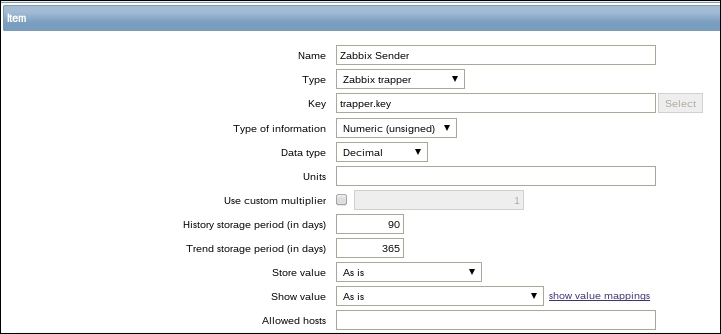
yum install zabbix-sender -y - Next step is to create an item on our host. Configuration | Hosts | Items | Create item.
- Fill in the Name of your item.
- Select
Zabbix trapperas Type. - Insert some unique Key that you want to use (example:
trapper.key). - Select the correct Type of information and Data type of the value that you will return to the Zabbix server (in our case that is a numeric decimal).
- Now run
zabbix_sender -z <ip-zabbixserver> -s <hostname agent> -k <item_key> -o <value>. - In our case, this will look like: the
zabbix_sender -z 192.168.10.102 -s "some host" -k trapper.key -o 20command. - Now when you go to Monitoring | Latest data, you will see the value you have sent to the Zabbix server. In our case 20.
On the server side, we create a trapper item. A trapper item works as an active item the data has to be send to the server. For this we make use of the zabbix_sender tool.
To be able to get information from this zabbix_sender tool, we need to send with the -z option the IP of the Zabbix server together with hostname as registered in the Zabbix frontend (-s). We also need to tell our server what key we want to update (-k) and the value that we will give to this key (-o). There are plenty more options that we can specify like the port or a configuration file. Have a look at the zabbix_sender with the option -h or the Zabbix documentation for more information about them.
If you have looked carefully, then you would have noticed that in our item there is an option Allowed hosts. As the trapper just accepts data from anywhere, it can be abused by someone if they know what key to use. This is not so hard to find out as the Zabbix protocol is not encrypted. So in production, it's probably a good idea to fill in this field with the IP from the hosts that is allowed to send information.
Another possibility is to send a text file to the Zabbix server with a list of hosts and the items with the values. If we create a file like this, then we have to put the name of the host first followed by the item key and the value, all separated by a space.
Ex: datafile.txt
server1 value1.key 10
server1 value2.key 20
server2 value2.key 10
server2 value2.key 20
We would then send this data with the zabbix_sender to our server. The command for this would look like this:
zabbix_sender -z <ip zabbix server> -i datafile.txt
More options can be found by running the zabbix_sender -h command.
- More information about the trapper item can be found here in the Zabbix documentation
https://www.zabbix.com/documentation/2.4/manual/config/items/itemtypes/trapper?s[]=trapper
- Also have a look at the documentation of the
zabbix_sender:https://www.zabbix.com/documentation/2.4/manpages/zabbix_sender