
Chapter 2. Hello Zend Framework!
| This chapter covers |
Before we can investigate in detail all the components of Zend Framework, we must get our bearings, and this is best done by building a simple website that uses the MVC) components. For a standard PHP application, the code to display the text “Hello World” constitutes just one line in one file:
<?php echo 'Hello World';
In this chapter, we will build a Hello World application using Zend Framework. We will also consider how to organize the website’s files on disk to make sure we can find what we are looking for, and we will look at Zend Framework files required to create an application that uses the MVC design pattern.
Note
Zend Framework requires many files to create the foundation from which a full website can be created. This means the code for our Hello World application may appear unnecessarily verbose as we set the stage for the full-blown website that will follow in later chapters.
This chapter will walk through all the files required to build Hello World. We will also discuss Zend Framework’s MVC design and the core components it provides for building the controller, view, and model in our application. Let’s dive right in and look at what the Model-View-Controller design pattern is all about.
2.1. The Model-View-Controller Design Pattern
In order to enable you to make sense of a Zend Framework application, we need to cover a little bit of theory. Zend Framework provides an implementation of the Model-View-Controller software design pattern coupled to another design pattern known as Front Controller. A software design pattern is a standard general solution to a common problem. This means that while implementations will vary, the concepts used to solve problems using a given pattern will be the same.
The Front Controller pattern is a mechanism that centralizes the entrance point to your application. The front controller handler (usually index.php) accepts all server requests and runs the correct action function within the action command. This process is known as routing and dispatching. Zend Framework implements the front controller pattern over a number of subcomponents. The important ones are the router and the dispatcher. The router determines which action needs to be run, then the dispatcher runs the requested action and any other action that may be required.
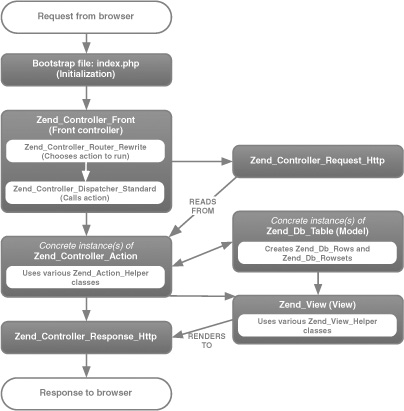
The MVC pattern describes a way to separate out the key parts of an application into three main sections: the model, view, and controller. These are the sections that you write in order to create an application. Figure 2.1 shows how the Front Controller’s router and dispatcher are attached to the model, controller, and view to produce a response to a web browser’s request.
Figure 2.1. Zend Framework’s Front Controller and MVC components work together to serve a web page. The router and dispatcher find the correct controller, which builds the page in conjunction with the model and view.

Within the Zend Framework MVC implementation, we have five main areas of concern. The router and dispatcher work together to determine which controller is to be run based on the contents of the URL. The controller works with the model and the view to create the final web page, which is sent back to the browser. Let’s look at the model, view, and controller in more detail.
2.1.1. The Model
The model part of the MVC pattern is all the business-logic code that works behind the scenes in the application. This is the code that decides how to apply the shipping costs to an e-commerce order, or knows that a user has a first name and a surname. Retrieving data from and storing it in a database falls within the model layer.
In terms of the code, Zend Framework provides the Zend_Db_Table and Zend_Service components. Zend_Db_Table provides table-level access to databases and allows for easily manipulating the data used by the application. Zend_Service provides a suite of components for easily accessing both public and private web services and integrating them into your application.
2.1.2. The View
The view is the display logic of the application. For a web application, this is usually the HTML code that makes up the web pages, but it can include, say, XML that is used for an RSS feed. Also, if the website allows for exporting in CSV (comma-separated values) format, the generation of the CSV data would be part of the view.
The view files are known as templates or scripts, because they usually have some code that allows for the display of data created by the model. It is also usual to move the more complex template-related code into functions known as view helpers, which improve the reusability of the view code. By default, Zend Framework’s view class (Zend_View) uses PHP within the script files, but another template engine, such as Smarty or PHPTAL, may be substituted.
2.1.3. The Controller
The controller is the rest of the code that makes up the application. For web applications, the controller code determines what should be done in response to a web request.
As we have discussed, Zend Framework’s controller system is based on the Front Controller design pattern. which uses a handler (Zend_Controller_Front) to dispatch action commands (Zend_Controller_Action) that work in tandem. The dispatcher component allows for multiple action commands to be processed within a single request, which provides for flexible application architectures. The action class is responsible for a group of related action functions, which perform the real work required by the request. Within Zend Framework’s front controller, it is possible to have a single request result in the dispatch of multiple actions.
Now that we understand a little about Zend Framework’s MVC implementation, we can start looking at the nitty gritty of how the files fit together. As we mentioned earlier, there are a lot of files in a Zend Framework application, so we need to organize them into directories.
2.2. The Anatomy of a Zend Framework Application
A typical Zend Framework application has many directories. This helps to ensure that the different parts of the application are separated. The top-level directory structure is shown in figure 2.2.
Figure 2.2. A typical Zend Framework application’s directory layout groups the files by their role in the application, so it is easy to find the file you are looking for.
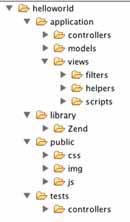
There are four top-level directories within an application’s folder:
- application
- library
- public
- tests
The application, library, and public directories are used when processing a request from the user. The tests directory is used to store unit test files that enable you to ensure that your code operates correctly.
2.2.1. The Application Directory
The application directory contains all the code required to run the application, and it is not directly accessed by the web server. In order to emphasize the separation between business, display, and control logic, there are three separate directories within the application directory to contain the model, view, and controller files. Other directories may be created as required, such as for configuration files.
2.2.2. The Library Directory
All applications use library code because everyone reuses previously written code! In a Zend Framework application, the framework itself is obviously stored in the library directory. However, other libraries, such as a custom superset of the framework, a database ORM library such as Propel, or a template engine such as Smarty, may also be used.
Libraries can be stored anywhere that the application can find them—either in a global directory or a local one. A global include directory is one that is accessible to all PHP applications on the server, such as /usr/php_include (or c:codephp_include for Windows) and is set using the include_path setting within the php.ini configuration file. Alternatively, each application can store its libraries locally within the application’s directory. In a Zend Framework application, we use a directory called library, though it is common to see this directory called lib, include, or inc.
2.2.3. The Tests Directory
The tests directory is used to store all unit tests. Unit tests are used to help ensure that the code continues to work as it grows and changes throughout the lifetime of the application. As the application is developed, existing code often needs to be changed (known as refactoring) to allow for the addition of new functionality or as a result of other code being added to the application. While test code is rarely considered important within the PHP world, you will thank yourself over and over again if you have unit tests for your code.
2.2.4. The Public Directory
To improve the security of a web application, the web server should only have direct access to the files that it needs to serve. As Zend Framework uses the Front Controller pattern, all web requests are channeled though a single file, usually called index.php. This file is the only PHP file that needs to be accessible by the web server, so it is stored in the public directory. Other common files that are accessed directly are image, Cascading Style Sheets (CSS), and JavaScript files, so each has its own subdirectory within the public directory.
Now that we looked at the directory system used by a Zend Framework web application, we can proceed to add the files required to create a very simple application that displays some text on the page.
2.3. Hello World: File by File
To create a simple Hello World application, we need to create four files within our directory structure: a bootstrap file, an Apache control file (.htaccess), a controller file, and a view template. A copy of Zend Framework, itself, also needs to be added to the library directory. The final program will display the page shown in figure 2.3.
Figure 2.3. The Hello World application produces the words “Hello World!” in our browser. A minimal Zend Framework application requires .htaccess, bootstrap, controller, and view files working together to produce this.

The result is a web page with very little text, and the code required to do this seemingly simple task appears to be long and daunting. As an application’s complexity grows, the additional code required to provide the new functionality is relatively small, showing benefits of the MVC system that are not apparent in a small example like this.
Let’s start with the bootstrap file, which is used to start the application.
2.3.1. Bootstrapping
Bootstrapping is the term used to describe the code that initializes the application and configures it. With the Front Controller pattern, the bootstrap file is the only file needed in the public directory, and so is usually called index.php. Because this file is used for all page requests, it is also used for setting up the application’s environment, setting up Zend Framework’s controller system, then running the application itself, as shown in listing 2.1.
Listing 2.1. The bootstrap file, index.php, initializes and runs the application

Let’s look at this file in more detail. Most of the work done in the bootstrap file is initialization of one form or another.
Initially, the environment is set up correctly ![]() to ensure that all errors or notices are displayed. (Don’t do this on your production server!) PHP 5.1 introduced new time
and date functionality that needs to know where in the world we are. There are several ways to set this, but the easiest method
is to call date_default_timezone_set().
to ensure that all errors or notices are displayed. (Don’t do this on your production server!) PHP 5.1 introduced new time
and date functionality that needs to know where in the world we are. There are several ways to set this, but the easiest method
is to call date_default_timezone_set().
Zend Framework assumes that the library directory is available on the php_include path. The fastest way of setting this for a global library is to alter the include_path setting directly in php.ini. A more portable method, especially if you use multiple versions of the framework on one server,
is to set the include path within the bootstrap file as we do here ![]() .
.
Zend Framework applications do not depend on any particular file, but it is useful to have a couple of helper classes loaded early. Zend_Loader::loadClass() is used to “include” the correct file for the supplied class name. The function converts the underscores in the class’s name to directory separators and then, after error checking, includes the file. As a result the code lines
Zend_Loader::loadClass('Zend_Controller_Front'),
and
include_once 'Zend/Controller/Front.php';
have the same end result. Zend_Debug::dump() is used to output debugging information about a variable by providing a formatted var_dump() output.
The final section of the bootstrap file sets up the front controller and runs it. The front controller class, Zend_Controller_Front, implements the Singleton design pattern, so we use the getInstance() static function to retrieve it ![]() . A Singleton design is appropriate for a front controller, as it ensures that there can only be one instance of the object
processing the request.
. A Singleton design is appropriate for a front controller, as it ensures that there can only be one instance of the object
processing the request.
The front controller, by default, captures all exceptions thrown and stores them in the response object that it creates. This response object holds all information about the response to the requested URL, and for HTML applications this includes the HTTP headers, the page content, and any exceptions that were thrown. The front controller automatically sends the headers and displays the page content when it finishes processing the request. In the case of exceptions, Zend Framework’s ErrorHandler plug-in will redirect the request to an action method called error in a controller called ErrorController. This ensures that we can control the error displayed to the user and possibly even offer additional help. We will implement this feature later.
To run the application, we call the front controller’s dispatch() method. This function will automatically create a request and response object to encapsulate the input and output of the application. It will then create a router to work out which controller and action the user has asked for. A dispatcher object is then created to load the correct controller class and call the action member function that does the “real” work.
Finally, as we noted earlier, the front controller outputs the data within the response object and a web page is displayed to the user.
2.3.2. Apache .htaccess
To ensure that all web requests that are not for images, scripts, or stylesheets are directed to the bootstrap file, Apache’s mod_rewrite module is used. This can be configured directly in Apache’s httpd.conf file or in a local Apache configuration file named .htaccess that is placed in the public directory. Listing 2.2 shows the .htaccess file required for Zend Framework.
Listing 2.2. The bootstrap file: public/.htaccess

Fortunately, this is not the most complicated set of Apache mod_rewrite rules, so they can be easily explained. The RewriteCond statement and the RewriteRule command between them instruct Apache to route all requests to index.php unless the request maps exactly to a file that exists within the public directory tree. This will allow us to serve any static resources placed in the public directory, such as JavaScript, CSS, and image files, while directing any other requests to our bootstrap file, where the front controller can work out what to display to the user.
2.3.3. Index Controller
The Front Controller pattern maps the URL requested by the user to a particular member function (the action) within a specific controller class. This process is known as routing and dispatching.
The controller classes have a strict naming convention requirement in order for the dispatcher to find the correct function. The router expects to call a function named {actionName}Action() within the {ControllerName}Controller class. This class must be within a file called {ControllerName}Controller.php. If either the controller or the action name is not provided as part of the request, then the default, “index” is used. A call to http://zfia.example.com/ will result in the “index” action of the index controller running. Similarly, a call to http://zfia.example.com/ test will result in the index action of the test controller running. As you will see later, this mapping is very flexible, but the default covers most scenarios.
Within Zend Framework’s front controller implementation, the dispatcher expects to find a file called IndexController.php within the application/controllers directory. This file must contain a class called IndexController and, as a minimum, this class must contain a function called indexAction(). Listing 2.3 shows the IndexController.php required for our Hello World application.
Listing 2.3. The index controller: application/controllers/IndexController.php
<?php
class IndexController extends Zend_Controller_Action
{
 public function indexAction()
 {
   $ this->view->assign('title', 'Hello World!'),
 }
}
As you can see, IndexController is a child class of Zend_Controller_Action, which contains the request and response objects for access to the date received by the application and to set the data that will be sent back to the user, along with a few useful helper functions to control the program flow. For Hello World, our indexAction() function needs to assign a variable to the view property, which is provided for us by an action helper called Zend_Controller_Action_ViewRenderer (known as ViewRenderer).
Note
An action helper is a class that plugs into the controller to provide services specific to actions. They expand a controller’s functionality without using inheritance and so can be reused across multiple controllers and projects.
The ViewRenderer action helper performs two useful functions for us. First, before our action is called, it creates a Zend_View object and sets it to the action’s $view property, allowing us to assign data to the view within the action. Second, after our action finishes, it automatically renders the correct view template into the response object after the controller action has completed. This ensures that our controller’s action functions can concentrate on the real work and not on the framework’s plumbing.
What is the “correct view template” though? The ViewRenderer looks in the view/scripts directory for a template file named after the action, with a .phtml extension, within a folder named after the controller. This means that for the index action within the index controller, it will look for the view template file view/scripts/index/index.phtml.
As we noted previously, the response’s body is automatically printed by the front controller, so anything we assign to the body will be displayed in the browser. We do not need to echo ourselves.
Zend_View is the view component of the MVC troika and is a fairly simple PHP-based template system. As we have seen, the assign() function is used to pass variables from the main code body to the template, which can then be used within the view template file.
2.3.4. View Template
The view script for our application, index.phtml, is stored within the views/scripts/index subdirectory. A useful convention that ViewRenderer follows is to name all view files with an extension of .phtml as a visual indication that they are for display only. Of course, this is easily changed by setting the $_viewSuffix property of ViewRenderer.
Even though this is a simple application, we have a separate directory for each controller’s view templates, because this will make it much easier to manage as the application grows. Listing 2.4 shows the view template.
Listing 2.4. The view template: views/scripts/index/index.phtml

As Zend_View is a PHP-based template engine, we use PHP within the file to display data from the model and controller. The template file, index.phtml in this case, is executed within a member function of Zend_View, so $this is available within the template file, and it is the gateway to Zend_View’s functionality. All variables assigned to the view from within the controller are available directly as properties of $this, as can be seen by the use of $this->title within index.phtml. Also, a number of helper functions are provided via templates, which makes them easier to write.
The most commonly used helper function is escape(). This function ensures that the output is HTML-safe and helps to secure your site from cross-site scripting (XSS) attacks. All variables that are not expected to contain displayable HTML should be displayed via the escape() function. Zend_View is designed to encourage the creation of new helper functions. For maximum flexibility, the convention is that view helper functions return their data, and then the template file echoes it to the browser.
With these four files in place, we have created a minimal Zend Framework application with all the pieces in place for a full-scale website. You should now have a fundamental understanding of how the pieces fit together. Next, we will look at what is happening within Zend Framework’s code, which provides the MVC foundation our code is built upon.
2.4. How MVC Applies to Zend Framework
While there appear to be many different ways of routing web requests to code within web applications, they can all be grouped into two camps: page controllers and front controllers.
A page controller uses separate files for every page (or group of pages) that make up the website, and this is traditionally how most PHP websites have been built. This means that the control of the application is decentralized across lots of different files, which can result in repeated code, or, worse, repeated and slightly altered code leading to issues such as lost sessions when one of the files doesn’t do a session_start().
A front controller, on the other hand, centralizes all web requests into a single file, typically called index.php, which lives in the root directory of the website. There are numerous advantages to this system; the most obvious are that there is less duplicated code and it is easier to separate the URLs that a website has from the actual code that is used to generate the pages. Usually, the pages are displayed using two additional GET parameters passed to the index.php file to create URLs such as this to display a list page:
index.php?controller=news&action=list
As we explained in Chapter 1, Zend Framework uses a Front Controller pattern coupled to the Model-View-Controller pattern to respond to a request from the browser. Each pattern is made up of multiple classes, as shown in figure 2.4.
Figure 2.4. The interaction of the various Zend Framework classes in an MVC application
One important goal of most modern web applications is that the URLs should look “good,” so that they are more memorable for users and it is easier for search engines like Yahoo! or Google to index the pages of the website. An example of a friendly URL would be http://www.example.com/news/list, because this URL does not include any ? or & characters, and the user can infer what will be displayed (a list of news items). Zend Framework’s front controller uses a subcomponent known as a router that supports friendly URLs by default.
2.4.1. Zend Framework’s Controller
Zend Framework’s front controller code is spread over a number of classes that work together to provide a very flexible solution to the problem of routing a web request to the correct place. Zend_Controller_Front is the foundation, and it processes all requests received by the application and delegates that actual work to action controllers.
The Request
The request is encapsulated within an instance of Zend_Controller_Request_Http, which provides access to the entire HTTP request environment. What is a request environment? It is all the variables received by the application, along with relevant controller parameters, such as the controller and action router variables.
The HTTP request environment contains all the superglobals ($_GET, $_POST, $_COOKIE, $_SERVER, and $_ENV) along with the base path to the application. The router also places the module, controller, and action names into the request object once it has worked them out. Zend_Controller_Request_Http provides the getParam() function to allow the application to collect the request variables, and so the rest of the application is protected from a change in environment. For example, a command-line request environment wouldn’t contain the HTTP-specific items, but would include the command-line arguments passed to the script. Thus, this code will work unchanged when run as a web request or as a command-line script:
$items = $request->getParam('items'),
In general, the request object should be treated as read-only to the application, because the values set by the user shouldn’t be changed. Having said that, Zend_Controller_Request_Http also contains parameters that can be set in the startup phase of the application and then retrieved by the action functions as required. This can be used to pass additional information from the front controller to the action methods, if required.
After the front controller has set up the request object from the superglobals, it then starts the router.
Routing
The router determines which code to run, based on the parameters within the request. This is done by a class that implements Zend_Controller_Router_-Interface. The framework also supplies Zend_Controller_Router_Rewrite, which handles most routing requirements.
Routing works by taking the part of the URI after the base URL (known as the URI endpoint) and decomposing it into separate parameters. For a standard URL, such as http://example.com/index.php?controller=news&action=list the decomposition is done by simply reading the $_GET array and looking for the controller and action elements. It is expected that most applications built using Zend Framework (like other modern applications) will use pretty URLs of the form http://example.com/news/list. In this case, the router will use the relevant variables in the $_SERVER super-global array to determine which controller and action have been requested.
After the controller and action have been determined, the correct controller action method is run, along with any other controller action methods that may be specified by the application. This is known as dispatching and is performed by the front controller after the router has completed.
Dispatching
Dispatching is the process of calling the correct method in the correct class. Like all components in Zend Framework, the standard dispatcher provides enough functionality for nearly every situation, but if you need something special, it is easy to write your own dispatcher and fit it into the front controller. The key things that the dispatcher controls are formatting the controller class name, formatting the action method name, and calling the action method itself.
Zend_Controller_Dispatcher_Standard is where the rules concerning case are enforced, such that the name format of the controller is always TitleCase and only contains alphanumeric characters (and the underscore character). The dispatcher’s dispatch() method is responsible for loading the controller class file, instantiating the class and then calling the action method within that class. If you decided that you wanted to reorganize the structure so that each action lived in its own class within a directory named after the controller, you would need to supply your own dispatcher.
At this point, the dispatcher passes control to the controller class’s action function. Action controllers are separate classes that are stored within the controllers subdirectory of the application directory.
The Action
Zend_Controller_Action is an abstract class that all action controllers are derived from. The dispatcher enforces that your action controllers derive from this class to ensure that it can expect certain methods to be available. The action contains an instance of the request, for reading parameters from, and an instance of the response, for writing to. The rest of the class concentrates on ensuring that writing actions and managing changes from one action to another are easy to do. There are accessor functions to get and set parameters, and redirection functions to redirect to another action or another URL entirely.
Assuming that the standard dispatcher is used, the action functions are all named after the action’s name with the word “Action” appended. You can therefore expect a controller action class to contain functions such as indexAction(), viewAction(), editAction(), deleteAction(), and so on. Each of these is a discrete method run in response to a specific URL.
There are also a number of tasks that you will want to do regardless of which action is run. Zend_Controller_Action provides two levels of functionality to accommodate this requirement: init() and the preDispatch() and postDispatch() pair.
The init() method is called whenever the controller class is constructed. This makes it very similar to the standard constructor, except that it does not take any parameters and does not require the parent method to be called.
preDispatch() and postDispatch() are a complementary pair of methods that are run before and after each action method is called. For an application where only one action is run in response to a request, there is no difference between init() and preDispatch(), as each is only called once. If the first action method uses the _forward() function to pass control to another action method, preDispatch() will be run again, but init() will not be. To illustrate this point, we could use init() to ensure that only administrators are allowed access to any action method in the controller, and we could use preDispatch() to set the correct view script file that would be used by the action.
After the action method has finished, control is returned to the dispatcher, which will then run other actions as required. When all actions are complete, the created output is returned to the user via the response object.
The Response
The final link in the front controller chain is the response. For a web application, Zend_Controller_Response_Http is provided, but if you are writing a command-line application, Zend_Controller_Response_Cli would be more appropriate. The response object is very simple and is essentially a bucket to hold all the output until the controller processing is finished. This can be very useful when using front controller plug-ins, as they could alter the output of the action before it is sent back to the client.
Zend_Controller_Response_Http contains three types of information: header, body, and exception. In the context of the response, the headers are HTTP headers, not HTML headers. Each header is an array containing a name, along with its value, and it is possible to have two headers with the same name but different values within the response’s container. The response also holds the HTTP response code (as defined in RFC 2616), which is sent to the client at the end of processing. By default, this is set to 200, which means OK. Other common response codes are 404 (Not Found) and 302 (Found), which is used when redirecting to a new URL. As we will see later, the use of status code 304 (Not Modified) can be very useful when responding to requests for RSS feeds, as it can save considerable bandwidth.
The body container within the response is used to contain everything else that needs to be sent back to the client. For a web application, this means everything you see when you view the source on a web page. If you are sending a file to a client, the body would contain the contents of the file. For example, to send a PDF file to the client, the following code would be used:
$filename = 'example.pdf';
$response = new Zend_Controller_Response_Http();

// set the HTTP headers
$response->setHeader('Content-Type', 'application/pdf'),
$response->setHeader('Content-Disposition',
   'attachment; filename="'.$filename.'"'),
$response->setHeader('Accept-Ranges', 'bytes'),
$response->setHeader('Content-Length', filesize($filename));

// load the file to send into the body
$response->setBody(file_get_contents($filename));

echo $response;
The final container within the response object houses the exceptions. This is an array that can be added to by calling $response->setException(), and it is used by Zend_Controller_Front to ensure that errors within the code are not sent to the client, possibly exposing private information that could be used to compromise your application. Of course, during development you will want to see the errors, so the response has a setting, renderExceptions, that you can set to true so that the exception text is displayed.
In order to extend the front controller, a plug-in system has been developed.
Front Controller Plug-ins
The front controller’s architecture contains a plug-in system to allow user code to be executed automatically at certain points in the routing and dispatching process. Plug-ins allow you to change the functionality of the front controller’s routing and dispatching system in a modular fashion, and they are designed to be easily transferred from one project to another.
All plug-ins are derived from Zend_Controller_Plug-in_Abstract, and there are six event methods that can be overridden:
- routeStartup() is called just before the router is executed.
- routeShutdown() is called after the router has finished.
- dispatchLoopStartup() is called just before the dispatcher starts executing.
- preDispatch() is called before each action is executed.
- postDispatch() is called after each action is executed.
- dispatchLoopShutdown() is called after all actions have been dispatched.
As you can see, there are three pairs of hooks into the process at three different points, which allow for increasingly finer control of the process.
One problem with the current router is that if you specify a controller that does not exist, an exception is thrown. A front controller plug-in is a good way to inject a solution into the routing process and redirect the application to a more useful page. Zend Framework supplies the ErrorHandler plug-in for this purpose, and its use is very well explained in the manual.
Now that we have looked in detail at the controller part of MVC, it’s time to look at the view part, as provided for by the Zend_View component.
2.4.2. Understanding Zend_View
The Zend_View class keeps the view portion of an MVC application separate from the rest of the application. It is a PHP template library, which means that the code in the view scripts is in PHP rather than another pseudo-language, like Smarty for instance. However, it is easy to extend Zend_View to support any other template system.
Let’s start our exploration of Zend_View by looking at how to assign data to the view. Zend_View’s assign() method is used to display data from the model. Simple variables can be assigned to a view variable like this:
$view->assign('title', 'Hello World!'),
This assigns the string “Hello World!” to the title variable. Alternatively, you can assign multiple variables simultaneously using an associative array:
$music = array('title'=>'Abbey Road', 'artist'=>'The Beatles'),
$music = array('title'=>'The Wall', 'artist'=>'Pink Floyd'),
$view->assign($music);
As we are using PHP5, we can also take advantage of the __set() magic method to write
$view->title = 'Hello World!';
which will also assign the string to the title variable. Whichever of the preceding two methods you use for assigning data, the data from the model or controller is now available for use in the view script, which is the file that contains output HTML and code.
The View Script
A view script is just like any other regular PHP file, except that its scope is contained within an instance of a Zend_View object. This means that it has access to all the methods and data of Zend_View as if it were a function within the class. The data assigned to the view is public property of the view class and so is directly accessible. In addition, the view provides helper functions to make writing view scripts easier.
A typical view script might look like this:
<h1>Glossary</h1>
<?php if($this->glossary) :?>
<dl>
<?php foreach ($this->glossary as $item) : ?>
<dt><?php echo $this->escape($item['term']);?></dt>
<dd><?php echo $this->escape($item['description']);?></dd>
<?php endforeach; ?>
</dl>
<?php endif; ?>
As you can see, this is a PHP script with an HTML bias, as the PHP commands are always contained within their own <?php and ?> tags. Also, we have used the alternative convention for control loops so that we don’t have braces within separate PHP tags—matching braces can be quite tricky when using lots of separate PHP tags.
Note that we do not trust the glossary data that has been assigned to the script. It could have come from anywhere! In the code accompanying this book, the data is created using an array, but it could equally have come from the users of a website. To avoid any XSS vulnerabilities in our website, we use the escape() helper function to ensure the term and description do not have any embedded HTML.
To avoid repeating lots of similar PHP code in multiple view scripts, view helper functions are used to provide common functionality.
View Helper Functions
Zend_View contains a number of helpful methods to make writing your view scripts easier. These methods are known as view helpers and exist in their own classes within the application/views/helpers subdirectory. As we have already seen, the most common view helper is the escape() method, which is built into the Zend_View class itself. Every other helper exists in its own class and is automatically loaded by Zend_View.
Let’s create a simple formatting helper for displaying a cash amount. Consider that we need to display a monetary value that may be negative. In the UK, for a value of 10, the display would be £10.00, and for a value of –10, the display would be –£10.00.
We would use the helper in our view scripts like this:
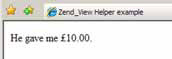
<p>He gave me <?php echo $this->formatCurrency(10);?>.</p>
Which outputs the correctly formatted amount as shown in figure 2.5.
Figure 2.5. The FormatCurrency view helper is used to display the correct currency symbol in the correct place.
All default view helpers use the class prefix Zend_View_Helper and are stored in the applications/views/helpers subdirectory. You can store view helpers elsewhere, in which case you would use your own class prefix. Our formatting helper class is called Zend_View_Helper_FormatCurrency and is stored in the file application/views/helpers/Format-Currency.php, as shown in listing 2.5. In a break from the usual convention within the framework, this is one of the few cases where the class name is not the same as the file path.
Listing 2.5. The FormatCurrency view helper
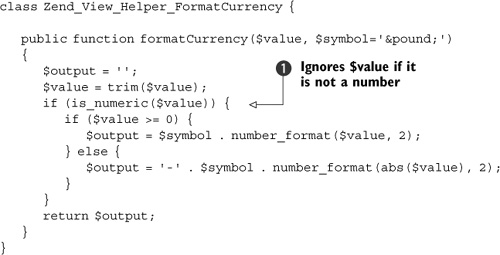
As you can see, if we don’t know that $value is a number, we do not return it as part of the output ![]() . This helps to ensure that we do not inadvertently introduce an XSS vulnerability.
. This helps to ensure that we do not inadvertently introduce an XSS vulnerability.
The name of the method within the helper class is the same as the method that is called within the view script: formatCurrency() in our case. Internally, Zend_View has an implementation of the __call() magic function to find our helper class and execute the formatCurrency() method.
Tip
When you create your view helpers, the names are case-sensitive. The class name is in CamelCase with underscores, but the method name is in camelCase. The class name must start with an uppercase letter, and the method name starts with a lowercase one.
View helpers are the key to extracting common code from your view scripts and ensuring that they are easy to maintain, so view helpers should be used whenever possible to simplify the view script files. As view script files contain the output of the application, it is important to always keep security issues in mind when sending data to the web browser.
Security Considerations
When writing view code, the most important security issue you need to be aware of is XSS. Its vulnerabilities occur when unexpected HTML, CSS, or JavaScript is displayed by your website. Generally, this happens when a website displays data created by a user without checking that it is safe for display. This could happen when the text from a comment form contains HTML and is displayed on a guestbook page “as is.”
One of the more famous XSS exploits is the Samy MySpace worm. This exploit used specially crafted JavaScript in the profile that was displayed on a page which lists all the user’s friends. The JavaScript would run automatically whenever anyone else viewed the victim’s friends page, and if that user was logged into MySpace, it made Samy their “friend” too. Thus, whenever anyone looked at your page, they were also made “friends” of Samy’s. This resulted in an exponential increase in friends for Samy—over one million MySpace profiles were infected within 20 hours. Fortunately, the code wasn’t too malicious and didn’t steal each user’s password along the way.
The easiest way to prevent XSS vulnerabilities is to encode the characters that have special meaning in HTML. That is, you should change all instances of < to <, & to & and > to > so that the browser treats them as literals rather than HTML. Within Zend Framework, you can use the escape() helper function to do this. Every time that you display a PHP variable within a template file, you should use escape() unless you need it to contain HTML. If it does need to contain HTML, you should write a sanitizing function to allow only HTML code that you trust.
We have completed our look at the view, so now let’s look at the model. This is where the guts of the application are, including interaction with databases and files.
2.4.3. The Model in MVC
We have spent a lot of time in this chapter looking at the controller and the view, as these are the minimum required for a Hello World application. In a real application, though, the model element of the MVC pattern takes on more importance as this is where the business logic of the application resides. In most cases, the model is linked in some way to a database that holds data to be manipulated and displayed by the application.
Database Abstraction with Zend_DB
Zend_Db is Zend Framework’s database abstraction library, which provides a suite of functions that insulate your code from the underlying database engine. This is most useful when you need to switch your application from using something like SQLite to MySQL or Oracle.
Zend_Db uses the Factory design pattern to provide the correct database-specific class, based on the parameters passed into the factory() static method. For example, to create a Zend_Db object for MySQL, you would use code like this:
$params = array ('host' => '127.0.0.1',
            'username' => 'rob',
            'password' => '******',
            'dbname' => 'zfia'),
$db = Zend_Db::factory('PDO_MYSQL', $params);
The Zend_Db abstraction is mostly built upon PHP’s PDO extension, which supports a wide range of databases. There is also support for DB2 and Oracle outside of PDO; they all extend from Zend_Db_Adapter_Abstract, so the interface is essentially the same, regardless of the underlying database.
What you do get in Zend_Db that you don’t get in PDO itself? Well, you get lots of helper functions to manipulate the database, and also a profiler to work out why your code is so slow. There are all the standard functions for inserting, updating, and deleting rows, along with fetching rows. The manual is particularly good at describing all these functions, so let’s move on and consider database security.
Security Issues with Databases
The most common database security problems are known as SQL injection security breaches. These occur when your user is able to trick your code into running a database query that you didn’t intend to allow. Consider this code:
$result = $db->query("SELECT * FROM users
WHERE name='" . $_POST['name'] . "'");
This typical code might be used to authorize a user after they have submitted a login form. The coder has ensured that the correct superglobal, $_POST, is used, but hasn’t checked what it contains. Suppose that $_POST['name'] contains this string:
' OR 1 OR name = '
This would result in the following perfectly legal SQL statement:
SELECT * from users where name='' OR 1 OR name= ''
As you can see, the OR 1 in the SQL statement will result in all the users being returned from the database table. With SQL injection vulnerabilities like this, it is possible for an attacker to retrieve username and password information or to maliciously delete database rows causing your application to stop working.
As should be obvious, the way to avoid SQL injection attacks is to ensure that the data you are putting into the SQL statement has been escaped using the correct functionality for your database. For MySQL, you would use the mysql_real_escape_string() function, and for PostgreSQL, you would use pg_escape_string(). As we are using Zend_Db, we can use the quote() member function to take care of this issue. The quote() method will call the correct underlying database-specific function, and if there isn’t one, it will escape the string using the correct rules for the database involved. Using it is very easy:
$value = $db->quote("It's a kind of magic");
An alternative solution is to use parameterized queries, where variables are denoted by placeholders and the values are substituted by the database engine. Zend_Db provides the quoteInto() function for this:
$sql = $db->quoteInto('SELECT * FROM table WHERE id = ?', 1);
$result = $db->query($sql);
Parameterized queries are generally considered best practice, as they result in faster database accesses, especially if you use prepared statements.
Within the Zend_Db component, Zend Framework provides a higher-level access to the database using the Zend_Db_Table component, which provides an object-oriented interface to a database table and its associated rows, thereby avoiding the necessity of writing common SQL statements in every model.
Higher-level Interaction with Zend_DB_Table
When coding the model of an MVC application, we don’t tend to want to work at the level of database queries if we can help it because we are thinking about the business logic of the application, rather than the nitty gritty of how to interact with a database. The framework provides Zend_Db_Table, an implementation of the Table Data Gateway pattern that provides a higher-level abstraction for thinking about data from the database. Zend_Db_Table uses Zend_Db behind the scenes and provides a static class function, setDefaultAdapter(), for setting the database adapter to be used for all instances of Zend_Db_Table. This is usually set up in the bootstrap file like this:
$db = Zend_Db::factory('PDO_MYSQL', $params);
Zend_Db_Table::setDefaultAdapter($db);
We don’t use Zend_Db_Table directly. Instead, we create a child class that represents the database table we wish to work with. For the purposes of this discussion, we will assume that we have a database table called news with the columns id, date_created, created_by, title, and body to work with. We now create a class called News:
Class News extends Zend_Db_Table
{
   protected $_name = 'news';
}
The $_name property is used to specify the name of the table. If it is not provided, Zend_Db_Table will use the name of the class, and it is case sensitive. Zend_Db_Table also expects a primary key called id (which is preferably automatically incremented on an insert). Both these default expectations can be changed by initializing the protected member variables $_name and $_primary respectively. Here’s an example:
class LatestNews extends Zend_Db_Table
{
   protected $_name = 'news';
   protected $_primary = 'article_id';
}
The LatestNews class uses a database table called news that has a primary key called article_id. As Zend_Db_Table implements the Table Data Gateway design pattern, it provides a number of functions for collecting data, including find(), fetchRow(), and fetchAll(). The find() function finds rows by primary key, and the fetch methods find rows using other criteria. The only difference between fetchRow() and fetchAll() is that fetchRow() returns a single row object, whereas fetchAll() returns an object, known as a rowset, that contains a set of rows. Zend_Db_Table also has helper functions for inserting, updating, and deleting rows with the functions insert(), update(), and delete().
While Zend_Db_Table is interesting in its own right, its usefulness becomes apparent when we add business logic to it. This is the point when we enter the realm of the model within MVC. There are lots of things you can do, and we’ll start with overriding insert() and update() for our News model.
First of all, let’s assume that our news database table has the following definition (in MySQL):
CREATE TABLE `news` (
`id` INT NOT NULL AUTO_INCREMENT PRIMARY KEY ,
`date_created` DATETIME NOT NULL ,
`date_updated` DATETIME NULL ,
`title` VARCHAR(100) NULL ,
`body` MEDIUMTEXT NOT NULL
)
The first business logic that we will implement in our News class, which is our model, will automatically manage the date_created and date_updated fields when inserting and updating records, as shown in listing 2.6. These are “behind the scenes” details that the rest of the system doesn’t need to worry about, so they are ideal for placing in the model.
Listing 2.6. Automatically maintaining date fields in a model

This code is self-explanatory. When inserting, if date_created hasn’t been supplied by the caller, we fill in today’s date and call Zend_Db_Table’s insert() function ![]() . For updating, the story is similar, except we change the date_updated field instead.
. For updating, the story is similar, except we change the date_updated field instead.
We can also write our own functions for retrieving data according to the business logic required by the application. Let’s assume that for our website, we want to display the five most recently created news items (within the last three months) displayed on the home page. This could be done using $news->fetchAll() in the home page controller, but it is better to move the logic down into the News model to maintain the correct layering of the application, so that it can be reused by other controllers if required:
public function fetchLatest($count = 5)
{
   $cutOff = date('Y-m-', strtotime('-3 months'))
   $where = array('date_created > ?' => $cutOff);
   $order = "date_created DESC";
  return $this->fetchAll($where, $order, $count);
}
Again, this is very simple functionality that becomes much more powerful when placed in the right layer of the MVC triumvirate. Note that we use a parameterized array for the $where variable, which ensures that Zend_Db will protect us against SQL injection attacks.
2.5. Summary
We have now written a simple Hello World application using Zend Framework, and we have explored the way the Model-View-Controller design pattern is applied to our applications. You should now have a good idea of how Zend Framework can make our applications maintainable and easy to write.
One ideal that the framework developers try to adhere to is known as the 80/20 rule. Each component is intended to solve 80 percent of the problem space it addresses, and provides flex points to enable developers who need to work with the other 20 percent. For example, the front controller system provides a router that covers nearly all requirements. Ifyou need a more specialized router, it is very easy to insert your own into the rest of the front controller setup. Similarly, Zend_View_Abstract allows for adding other template engines, such as Smarty or PHPTAL, if the supplied Zend_View is not suitable for your application.
We will now move on to build a fully functioning community website that will utilize most of the components supplied with the framework.