
Chapter 7. User authentication and access control
| This chapter covers |
|
Most websites restrict different areas to different people. For example, most e-commerce sites require that you’re logged in before you can check out your order. Other sites have members-only pages that can only be accessed after logging in. In our Places application, only registered users can write or rate a review. This functionality is known as authentication and access control, and in this chapter we’ll look at the support Zend Framework provides in the shape of the Zend_Auth and Zend_Acl components. We’ll start by looking at the basics of authentication and access control, and we’ll go on to integrating Zend_Auth and Zend_Acl into our Places application.
7.1. Introducing Authentication and Access Control
There are two different processes involved when it comes to allowing a user access to specific pages on a website. Authentication is the process of identifying an individual based on her credentials (usually username and password), and access control is the process of deciding whether the user is allowed to do something. Zend Framework’s Zend_Auth and Zend_Acl components provide comprehensive support for all aspects of authentication and access control for websites.
Because you must know who the user is before you decide if he or she can do something, it follows that the authentication process must occur before access control, so we’ll look at authentication and Zend_Auth first, before looking at Zend_Acl.
7.1.1. What is Authentication?
The goal of the authentication is deciding if someone is who they say they are. There are three ways to recognize a user, which are known as factors:
- Something they know, such as a password or PIN
- Something they have, such as a driver’s license or credit card
- Something they are, such as fingerprints or typing patterns
When you buy something from a UK shop using a credit card, you authenticate the transaction with two of these factors: have (the credit card in your pocket) and know (the PIN). Elsewhere in the world, you may need to know the signature. For pretty much every website out there (including online banks) the know factor is the only mechanism used to identify a user. Generally this means a username and password, although banks tend to ask for multiple pieces of information, such as a memorable date or place, in addition to a password.
We will follow the standard web use of a username and password combination for authentication, but the choice of where to store the information still has to be made. For standalone websites, it’s common to use a database table to hold the list of user-names and passwords, but there are other options. For sites that are part of a group, such as Yahoo!, a separate system to handle the authentication is necessary. One common system is LDAP, the Lightweight Directory Access Protocol, which stores information about users in a separate service, which can then be queried by other applications as required. OpenID and Six Apart’s TypeKey are other systems that allow for authentication to be performed by another service. For Places, we will use a database table to hold the login details of our users.
7.1.2. What is Access Control?
Access control is the process of deciding whether or not to allow a user to access a resource or action. In web terms, this usually means we’re deciding whether someone is allowed to view a certain page or perform an action, such as add a comment. One standard mechanism for doing this is to use an access control list (ACL), which is a list of permissions that are attached to a resource. The list specifies who is allowed access to the resource and what can be done with it. This means that the list will tell the system if a given user is allowed only to view a database record or to execute a controller action.
Whenever a user wishes to do something, the application checks the list to see if he’s allowed to perform that action with that data item. For example, a user may be allowed to view a news article, but be denied permission to edit it.
Now that we have defined our terms, we can look at how to implement these features using Zend Framework components. First, we’ll look at authentication with Zend_Auth.
7.2. Implementing Authentication
Let’s look at how to implement authentication with Zend_Auth using HTTP authentication, and then we’ll look at how authentication is implemented within a real-world application using a database to hold the user information and sessions to store the information across multiple page views.
7.2.1. Introducing Zend_Auth
The Zend_Auth component is the part of the framework that deals with authentication. It’s separated into the core component and a set of authentication adapters. The adapters contain the actual mechanisms for authorizing users, such as using HTTP with a file, or authorizing against a database table.
The authentication results are known as the identity, and the fields stored in the identity depend upon the adapter. For example, HTTP authentication will place only the username into the identity, but database authentication might also include the full name and email address. As it’s common to display the name of the logged-in user, this feature is very useful.
To get at the identity information, Zend Auth uses the Singleton design pattern, so that the identity results can be retrieved wherever they’re required.
These are some of the authentication adapters that are provided out of the box for Zend_Auth:
- Zend_Auth_Adapter_Http
- Zend_Auth_Adapter_Digest
- Zend_Auth_Adapter_DbTable
- Zend_Auth_Adapter_InfoCard
- Zend_Auth_Adapter_Ldap
- Zend_Auth_Adapter_OpenId
The Http and Digest adapters authorize against a file on disk using the standard HTTP login mechanism built into all browsers. The DbTable adapter is used for authorizing against a list of users stored in a database table. The InfoCard, Ldap, and OpenId adapters authenticate against remote services and are not covered in this chapter. But due to the nature of Zend_Auth’s adapter system, changing from one authentication adapter to another is relatively easy. The system is flexible and designed so that you can also create your own adapters and integrate them into Zend_Auth. This makes it easy to integrate legacy systems or to authenticate against new systems for which an official Zend Framework adapter hasn’t yet been written.
Let’s start by looking at HTTP authentication.
7.2.2. Logging in Using HTTP Authentication
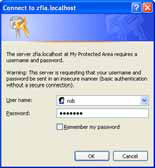
There must be very few people who have not seen the standard HTTP login box provided by web browsers, shown in figure 7.1. Using this login system within your web application has the benefit of being familiar to the user, at the expense of there being no easy way to log out. Also, you can’t customize the look and feel of the login box.
Figure 7.1. The standard HTTP login box provided by a web browser
To authenticate someone using Zend_Auth, you create an instance of an auth adapter and authenticate using Zend_Auth’s authenticate() function:
$authAdapter = new Zend_Auth_Adapter_Http();
// set up $authAdapter so that it knows what to do
$auth =  Zend_Auth::getInstance();
$result = $auth->authenticate($authAdapter);
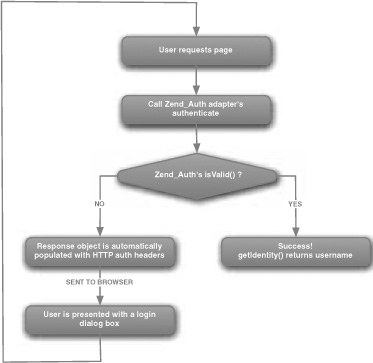
The HTTP authentication protocol assumes that the pages that you want to protect are grouped into a realm, which is displayed to the user. For example, in figure 7.1, the realm is “My Protected Area”. The name of the realm must be provided to the Zend_Auth_Adapter_Http adapter, and you must also create a resolver class to provide the password for a given username. The resolver class decouples the mechanism for authentication from the mechanics of retrieving the username and password from the user, and it generally reads the password from a database or file. Figure 7.2 shows a flowchart that describes the process.
Figure 7.2. HTTP Authentication showing Zend_Auth methods
To implement this, we first need to configure Zend_Auth_Adapter_Http, as shown in listing 7.1.
Listing 7.1. Configuration of Zend_Auth_Adapter_Http
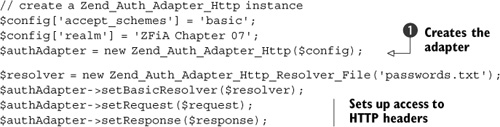
As you can see, configuring a Zend_Auth_Adapter_Http object is a two-stage process, as some settings are configured within the $config array that is used on construction of the object ![]() , and the setting of the resolver, request, and response objects is done after creation. The request object is used to retrieve
the username and password, and the response object is used to set the correct HTTP headers to indicate whether or not authentication
was successful.
, and the setting of the resolver, request, and response objects is done after creation. The request object is used to retrieve
the username and password, and the response object is used to set the correct HTTP headers to indicate whether or not authentication
was successful.
The authenticate() function performs the actual authentication, as shown in listing 7.2.
Listing 7.2. Authentication with Zend_Auth_Adapter_Http
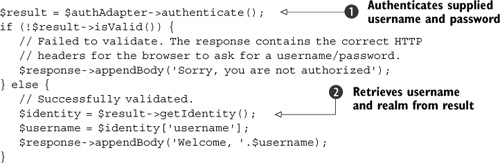
When authenticate() is called, it looks for the username and password HTTP headers ![]() . If they’re not there, the validation has failed, and it’ll set the WWW-Authenticate header in the response object. This
will cause the browser to display a dialog box requesting a username and password. Upon successful validation, the username
of the person who has just logged in can be retrieved using the getIdentity() function, which returns the identity
. If they’re not there, the validation has failed, and it’ll set the WWW-Authenticate header in the response object. This
will cause the browser to display a dialog box requesting a username and password. Upon successful validation, the username
of the person who has just logged in can be retrieved using the getIdentity() function, which returns the identity ![]() . The full source code to this mini-example is contained within one file and is provided in the accompanying source code zip
file.
. The full source code to this mini-example is contained within one file and is provided in the accompanying source code zip
file.
As you can see, HTTP authentication is easy with Zend_Auth_Adapter_Http. But most websites don’t use it. Every public-facing, commercial website provides its own login form to identify the user, usually asking for a username and password. There are a number of reasons for this:
- There’s no way to log out other than exiting the browser completely.
- It’s not optional, so you can’t display the page with different content for logged in users.
- You can’t change the look and feel of the login dialog box or provide additional information in it. For example, you may want to use an email address rather than a username.
- It’s not clear what users should do if they have forgotten their password or don’t have an account.
Some of these problems can be worked around using cookies and JavaScript, but the user experience is still not good enough, which is why most sites use forms and sessions (or cookies).
We’ll now integrate authentication using a login form and Zend_Auth into the Places application.
7.3. Using Zend_Auth in a Real Application
As Places is a community website, it is crucial to be able to identify members, and we have a users table ready to use. In order to implement authentication, we need a controller action to handle the display and processing of a form to allow the user to enter his username and password. We also need to ensure that we know the identity of the current user throughout the application, so we’ll take advantage of Zend Framework’s front controller plug-in system.
7.3.1. Logging in
To log in and out of our application, a separate controller, called AuthController is required. We use an action to display the form (auth/login) and a separate action (auth/identify) to perform the actual identification. The class skeleton, stored in controllers/AuthController.php, looks like this:
class AuthController extends Zend_Controller_Action
{
  public function indexAction()
  {
     $this->_forward('login'),
  }

  public function loginAction()
  {
  }

  public function identifyAction()
  {
  }

}
Note that we set up indexAction to forward to the loginAction so that the /auth URL will work as expected. That is, we simply redirect to auth/login if someone goes to auth/ or auth/index.
The HTML for a login form is very simple, and it goes in the view script for the login action (scripts/auth/login.phtml), as shown in listing 7.3.
Listing 7.3. The login form: auth/login.phtml
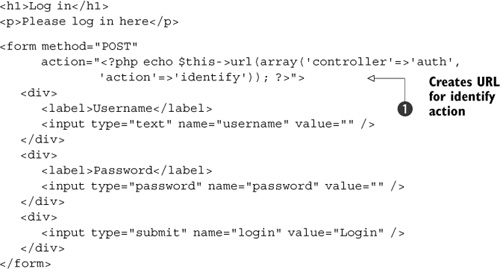
The HTML in listing 7.3 is very simple because we need the user to supply information in only two fields: username and password. As you can see,
we use the built-in url() view helper ![]() , to create the correct URL to the auth/identify controller action. The view script, itself, isn’t interested in such details,
which is why a view helper is the ideal solution. In Chapter 8, after Zend_Form has been introduced, we will refactor this form to use the Zend_Form component instead of hand-coding it.
, to create the correct URL to the auth/identify controller action. The view script, itself, isn’t interested in such details,
which is why a view helper is the ideal solution. In Chapter 8, after Zend_Form has been introduced, we will refactor this form to use the Zend_Form component instead of hand-coding it.
The identify action, shown in listing 7.4, handles the process of logging in. It uses Zend_Auth to check that the supplied username and password are valid.
Listing 7.4. The identify action validates the username and password
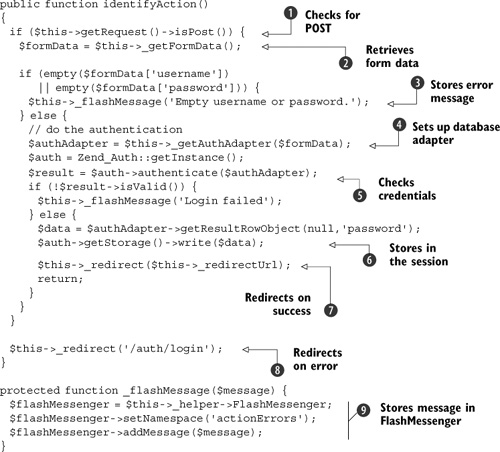
We’re only interested in this page request if it’s a POST ![]() . This is a minor security improvement to the code because it prevents the user from using a GET request. If a GET request is used, the username and password would be displayed on the address bar and could be bookmarked, which is obviously
not good security.
. This is a minor security improvement to the code because it prevents the user from using a GET request. If a GET request is used, the username and password would be displayed on the address bar and could be bookmarked, which is obviously
not good security.
We use a helper method, _getFormData(), to collect the data from the request and put it into an array ![]() . The helper method filters the data to ensure that it’s okay for use. In Chapter 8, we’ll refactor this form to use Zend_Form, which will handle filtering and validation for us.
. The helper method filters the data to ensure that it’s okay for use. In Chapter 8, we’ll refactor this form to use Zend_Form, which will handle filtering and validation for us.
When an error occurs, we use the FlashMessenger action helper to pass the message back to the auth/login action ![]() . As we need to do this twice, a separate helper method, _flashMessage() is used.
. As we need to do this twice, a separate helper method, _flashMessage() is used.
Setting up the Zend_Auth_Adapter_DbTable instance is complicated enough that we factor it out to its own method called _getAuthAdapter() ![]() . The authenticate() message does the authentication and returns a result object
. The authenticate() message does the authentication and returns a result object ![]() . The result’s isValid() method is used to test for successful log in. If we have successfully authenticated, we store the user’s database record
(except the password field) to the session
. The result’s isValid() method is used to test for successful log in. If we have successfully authenticated, we store the user’s database record
(except the password field) to the session ![]() . After successful authentication, we redirect to where the user wants to go
. After successful authentication, we redirect to where the user wants to go ![]() . If authentication has failed, we redirect back to the login form
. If authentication has failed, we redirect back to the login form ![]() .
.
The _flashMessage() method passes the supplied message to the next request, which is the login form ![]() . The FlashMessenger action helper stores a one-time message that automatically deletes itself when it’s read. This makes
it ideal for sending validation messages from one screen to the next. In our case, it’s read by the loginAction() controller action, and the message is assigned to the view using this code:
. The FlashMessenger action helper stores a one-time message that automatically deletes itself when it’s read. This makes
it ideal for sending validation messages from one screen to the next. In our case, it’s read by the loginAction() controller action, and the message is assigned to the view using this code:
$flashMessenger = $this->_helper->FlashMessenger;
$flashMessenger->setNamespace('actionErrors'),
$this->view->actionErrors = $flashMessenger->getMessages();
Listing 7.5 shows the _getAuthAdapter() method, which is the last part of the authentication puzzle. It creates an instance of Zend_Auth_Adapter_DbTable and assigns the supplied username and password to it, ready for authentication by Zend_Auth.
Listing 7.5. _getAuthAdapter() sets up the authentication adapter

For a short method, quite a lot happens! The Zend_Auth_Adapter_DbTable object requires a connection to the database; fortunately, we stored one in the registry during the bootstrap start-up phase,
ready for this sort of situation ![]() . After creation, we need to tell the adapter the name of the database table to use, and which fields within that table contain
the identity and credentials
. After creation, we need to tell the adapter the name of the database table to use, and which fields within that table contain
the identity and credentials ![]() . In our case, we need the username and password fields from the users table.
. In our case, we need the username and password fields from the users table.
While you can store the password in the database in plain text, it’s more secure to store a hash of the password. A hash can
be thought of as a one-way encryption in that it’s unique for a given source string, but if you know the hash, you still can’t
determine the original string. This is a common method of storing password data, so websites have sprung up containing thousands
of hashes for the two common hash algorithms (MD5 and SHA1). To help prevent reverse engineering, should our data fall into
the wrong hands, we further protect our users’ passwords with a salt![]() . The salt is a private string, known only to the application, that we prepend to the user’s password to create a word that
won’t be in an online dictionary. This makes the hash very difficult, if not impossible, to reverse engineer.
. The salt is a private string, known only to the application, that we prepend to the user’s password to create a word that
won’t be in an online dictionary. This makes the hash very difficult, if not impossible, to reverse engineer.
We use the database to perform the actual hashing of the salted password by called the auth adapter’s setCredentialTreatment() function when setting up the database details for $authAdapter. ![]() Because we are using MySQL, we have specified that the SHA1() function is used, like this:
Because we are using MySQL, we have specified that the SHA1() function is used, like this:
setCredentialTreatment('SHA1(?)'),
The ? is a placeholder for the password string that is set using setCredential(). For other database servers, the appropriate function should be used.
We have now completed the logging-in section of our application, but it would be helpful if we provided links to help the user log in and out. A view helper is one way to do this, and it encapsulates the logic away from the view templates themselves.
7.3.2. A View Helper Welcome Message
To provide a welcome message within a view helper, we can take advantage of the fact that Zend_Auth implements the Singleton pattern, so we don’t need to pass an instance of Zend_Auth from the controller to the view. Listing 7.6 shows the Logged-InUser view helper.
Listing 7.6. The LoggedInUser view helper
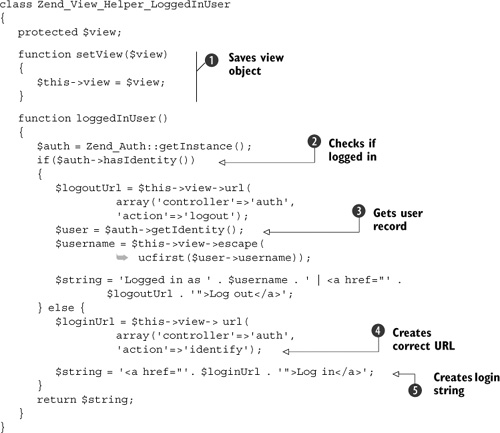
The setView() method is automatically called by the view before calling the main helper function ![]() . We use it to store a local reference to the view object so that we can reference other view helpers, such as url()
. We use it to store a local reference to the view object so that we can reference other view helpers, such as url() ![]() and escape().
and escape().
The actual work is done within the loggedInUser() method. The Zend_Auth has-Identity() method is used to check if there is a logged-in user ![]() . If there is, the user’s record is retrieved using the getIdentity() method
. If there is, the user’s record is retrieved using the getIdentity() method ![]() . Because the user can select her own username, we use the escape() method to ensure that we don’t accidentally introduce an XSS vulnerability, then we create the string to be displayed. If
the current visitor isn’t logged in, a string is created with a link to allow the user to log in
. Because the user can select her own username, we use the escape() method to ensure that we don’t accidentally introduce an XSS vulnerability, then we create the string to be displayed. If
the current visitor isn’t logged in, a string is created with a link to allow the user to log in ![]() .
.
We call the view helper in our main layout script to display the link in the main menu bar using this code:
<p><?php echo $this->loggedInUser(); ?></p>
The final result looks like figure 7.3 and provides an easily discoverable logout link.
Figure 7.3. The logged-in welcome message on the website provides feedback to the user when he’s logged in.

Now we can implement the ability to log out.
7.3.3. Logging out
In comparison to logging in, logging out is very simple. All we need to do is call Zend_Auth's clearIdentity() function. Listing 7.7 shows the logout action in the AuthController class.
Listing 7.7. The auth/logout controller action

As you can see, logging out is very simple.
It’s now time to move on and look at access control and giving logged-in users more rights than visitors. This is handled by Zend_Auth’s sibling, Zend_Acl.
7.4. Implementing Access Control
As we discussed in section 7.1, access control is the process of allowing a logged-in user access to a specific resource. There are many ways of doing this, but a flexible and standard method is to employ role-based access control lists. Zend Framework provides Zend_Acl to take care of this for us.
There is a lot of jargon when talking about access control. These are the key terms:
- role: a grouping of users
- resource: something to be protected, such as a controller action or a data record
- privilege: the type of access required, such as read or edit
ACLs are a very flexible solution to access control. All you need to do is identify which items in your application relate to the role, resource, and privilege. Figure 7.4 shows how the three main pieces of the puzzle are related.
Figure 7.4. The relationship between the pieces of the ACL puzzle

This is just one way that ACL can be used to provide access to a resource, to controller actions in this case.
We’ll start by looking at Zend_Acl and then move on to applying ACL to control access to different controller actions. Finally, we’ll look at access control at the database level.
7.4.1. Introducing Zend_Acl
Using Zend_Acl is reasonably simple because the API is clear. You create some roles and resources, set up the required permissions, and call the isAllowed() function. Sounds easy enough! Let’s look at that in a bit more detail, starting with Zend_Acl_Role.
Zend_Acl_Role
A role is a responsibility that a user has within the system. A typical role would be “news editor” or “member.” This is encapsulated with Zend_Acl_Role, which is a very simple class that just holds the name of the role. This is the code to create a role:
$roleMember = new Zend_Acl_Role('member'),
Once a role is created, its name can’t be changed. Note also that within the context of the ACL, each role name must be unique.
We can assign a role to the Zend_Acl instance using this code:
$acl = new Zend_Acl();
$acl->addRole($roleMember);
A given role may have a parent, which means that the new role can do everything the parent role can do.
A typical situation may be a forum moderator role, which would be coded like this:
$acl = new Zend_Acl();
$acl->addRole(new Zend_Acl_Role('member'));
$acl->addRole(new Zend_Acl_Role('moderator'), 'member);
In this situation, the moderator role has a parent of member, and so a moderator can do everything that a member can do, in addition to any other permissions that have been set for moderator. For a role to be useful, though, we need to have a resource to protect. This is the responsibility of Zend_Acl_Resource.
Zend_Acl_Resource
A resource is something you want to protect. A typical resource in a Zend Framework application may be a controller or action. You may want to protect access to the forums controller so that only those users belonging to the member role have access to the actions within it. Zend_Acl_Resource is as simple as Zend_Acl_Role and just holds the name of the resource, so you create one like this:
$forumResource = new Zend_Acl_Resource('comments'),
A resource is attached to Zend_Acl like a role, using the add() method. Again, parents are supported:
$acl = new Zend_Acl();
$acl->addRole(new Zend_Acl_Role('member'));
$acl->addRole(new Zend_Acl_Role('moderator'), 'member'),
$acl->add(new Zend_Acl_Resource('forum'));
$acl->add(new Zend_Acl_Resource('posts'), 'forum'),
$acl->add(new Zend_Acl_Resource('threads'), 'forum'),
Note that the method to add a resource is add(), and rather than a string, we pass in an instance of Zend_Acl_Resource. In this example, we have created resources called posts and threads that are children of the forum resource. If we’re mapping resources to modules and controllers, the posts and threads resources represent controllers within the forum module.
To link resources and roles, we need to set up permissions. This is done directly within the Zend_Acl object.
Setting Up Zend_Acl’s Permissions
The final part of setting up a Zend_Acl object is telling the object which permissions a given role has for accessing a given resource. To do this, we need to look at the concept of privileges. A privilege is the type of access required. Typically, privileges are based on the operations that will be performed, so they have names like “view,” “create,” “update,” and so on.
Zend_Acl has two methods for setting permissions: allow() and deny(). We start off with all roles being denied access to all resources. The allow() method then provides access to a resource for a role, and deny() removes a subset of the allowed access for a particular situation. Inheritance also comes into play here, as permissions set for a parent role will cascade to child roles.
Let’s look at an example:
$acl->allow('member', 'forum', 'view'),
$acl->allow('moderator', 'forum', array('moderate', 'blacklist'),
In this example, we have given view privileges to the member role for the forum resource and the additional privileges of moderate and blacklist to the moderator role, which also has view privileges because moderator is a child of member.
We have now looked at the building blocks of Zend_Acl and the key components of its API. Next, we will look at how to integrate it into a real Zend Framework application such as Places. The first approach we’ll take is to protect specific controllers and actions for specific roles.
7.4.2. Configuring a Zend_Acl Object
As we have discovered, a Zend_Acl object needs a fair amount of configuration before we can use it. This means we want to make the setting up as easy as possible, which we can do by storing the roles in our config.ini file.
For each role, we need to store its name and parent in the INI file. We can enter them into the INI file as shown in listing 7.8.
Listing 7.8. INI file entries to configure Zend_Acl roles

To read the configuration file, we extend Zend_Acl to read the roles from a Zend_Config object and into itself. The code for this is in a class called Places_Acl that is stored in library/Places/Acl.php and it’s shown in listing 7.9.
Listing 7.9. The extended Zend_Acl object
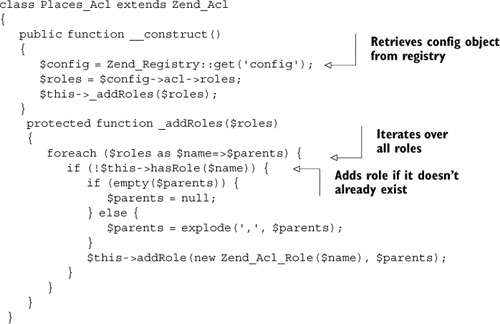
We have already explored Zend_Config, so it should come as no surprise how easy it is to retrieve the data from the config object using a foreach() loop. For each role, we check that it hasn’t already been added, then we create a new Zend_Acl_Role and add it to this object. The Acl object will be used to check permissions for every action, so we can create it in the bootstrap.
7.4.3. Checking the Zend_Acl Object
We must ensure that we don’t load the Acl object with information about every controller and action. The main issues are maintenance and performance. Maintaining a list of controllers independently of the actual controller class files will result in inaccuracies. We also don’t want to spend time and memory loading the ACL with rules that will never be required, because this is a needless performance hit.
With these requirements in mind, a good way to implement ACL checking is as an action helper. An action helper ties into the MVC dispatch system at the controller level and allows us to check the Acl rules before the controller’s preDispatch() method is called. This happens before the action is executed and so is an ideal place for the check.
We need to populate the Acl object with the rules to be checked at preDispatch(). Because this needs to be done earlier in the process, the init() function is the place. In this case, the rules are controller-specific and so are written within each controller as required.
Figure 7.5 shows the complete flow from requesting access to a controller’s action to gaining access.
Figure 7.5. Zend_Auth and Zend_Acl work together to provide access to a controller action.
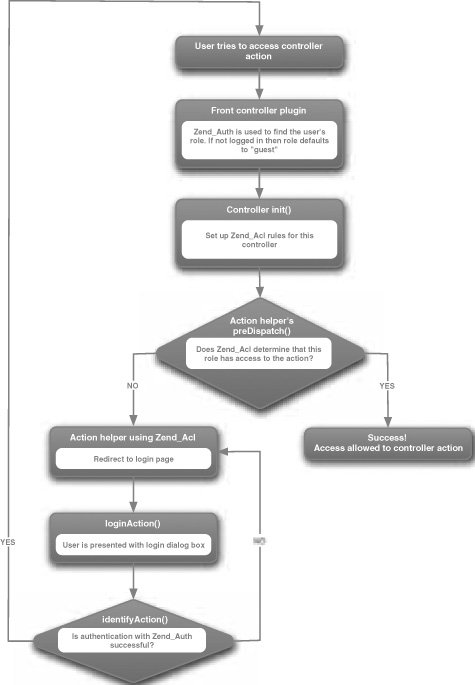
The action controller is called Places_Controller_Action_Helper_Acl, and it handles two important functions: providing a controller-centric interface to the underlying Acl object and performing the authentication. The controller is too long to show completely here, so we’ll look at the bits that do the real work (the full class is provided in the accompanying source code).
Listing 7.10 shows the class skeleton and the initial set up.
Listing 7.10. Setting up the ACL action helper
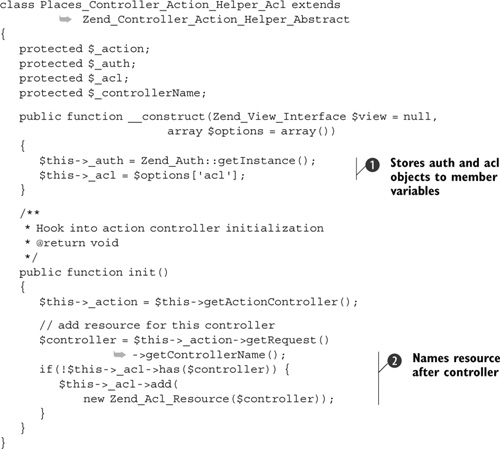
The constructor is used to pass in, via the options array, an instance of the Acl object that we’ll use ![]() . We have to use the options array because the constructor signature is already set in the parent Zend_Controller_Action_Helper_Abstract class. As the Zend_Auth class is a singleton, we can use its getInstance() function to collect a reference to it.
. We have to use the options array because the constructor signature is already set in the parent Zend_Controller_Action_Helper_Abstract class. As the Zend_Auth class is a singleton, we can use its getInstance() function to collect a reference to it.
The init() method of an action helper is called before the call to the controller’s init() method. This makes it an ideal place to set up the required resource for the controller ![]() . We use the controller’s name for the resource, because this will be unique within the Places application. We don’t need any more resources than that. We’ll use Zend_Acl’s privileges as the actions so we don’t have the performance hit of working out the names of the action methods dynamically
here in order to add them as resources.
. We use the controller’s name for the resource, because this will be unique within the Places application. We don’t need any more resources than that. We’ll use Zend_Acl’s privileges as the actions so we don’t have the performance hit of working out the names of the action methods dynamically
here in order to add them as resources.
Listing 7.11 shows the controller-centric rule methods, allow() and deny(), which proxy through to the underlying Acl object.
Listing 7.11. The ACL action helper’s rule methods
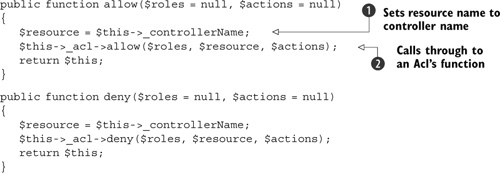
The functions allow() and deny() are used to set up the authentication rules for the controller. Typically this is done in the controller’s init() method. The view helper’s versions of allow() and deny() simply fill in the resource parameter for us ![]() and change the terminology from privileges to actions. They then call the appropriate Zend_Acl method
and change the terminology from privileges to actions. They then call the appropriate Zend_Acl method ![]() . Although that doesn’t seem like a lot, it makes much more sense when creating the rules in the controller, so maintenance
is easier too.
. Although that doesn’t seem like a lot, it makes much more sense when creating the rules in the controller, so maintenance
is easier too.
The last part of the action helper is the preDispatch() hook method. This is called automatically by the front controller and is where we check that the use has sufficient rights to continue. This method is shown in listing 7.12.
Listing 7.12. The ACL action helper’s preDispatch() method
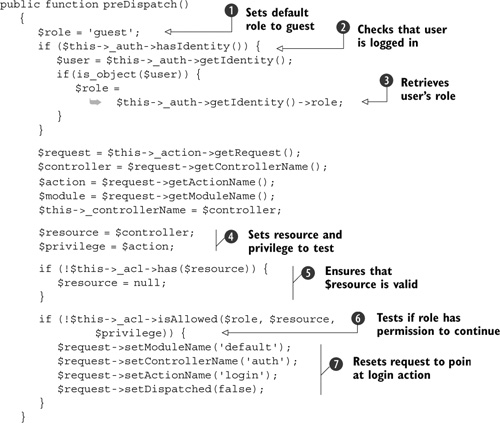
First, we set the role to guest ![]() , then check that the user is logged in
, then check that the user is logged in ![]() . If the user is logged in, we retrieve the role that has been assigned
. If the user is logged in, we retrieve the role that has been assigned ![]() . Note that this means that we need to update our users table so that it contains a string column called role that contains a value from the list of available roles set up in the config.ini file in listing 7.8. Having determined the correct role to test, we look up the resource and privilege from the request
. Note that this means that we need to update our users table so that it contains a string column called role that contains a value from the list of available roles set up in the config.ini file in listing 7.8. Having determined the correct role to test, we look up the resource and privilege from the request ![]() . The resource is the controller name, and the privilege is the action name.
. The resource is the controller name, and the privilege is the action name.
We then check to see if the resource has some ACL rules attached, and if not, set it to null ![]() in order to ensure that the isAllowed() check does not throw an exception. Finally we call isAllowed() to find out if this role is allowed access to this controller action
in order to ensure that the isAllowed() check does not throw an exception. Finally we call isAllowed() to find out if this role is allowed access to this controller action ![]() . If not, we change the request’s settings so that the front controller will dispatch to the auth controller’s login action
. If not, we change the request’s settings so that the front controller will dispatch to the auth controller’s login action
![]() and so display the login form.
and so display the login form.
In order to test the resource, it must be set up before preDispatch() is called. We set up the resources and privileges required in the controller’s init() method because this happens before preDispatch(). As you would expect, we have different rules depending on the controller in Places. For the index controller, we want to give everyone access, so the init() method is simply as follows:
class IndexController extends Zend_Controller_Action
{
  public function init()
  {
     $this->_helper->acl->allow(null);
  }

   //... class continues...
For other controllers, the rules will be more complex. For example, listing 7.13 shows what’s needed to ensure that members can only view and not manage records within the PlaceController.
Listing 7.13. More complex ACL rules so only admins can manage place records
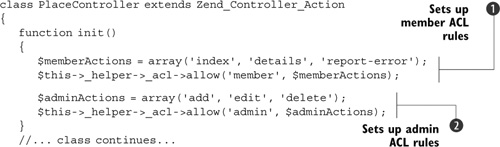
As you can see, we allow the member role access to one set of actions ![]() and administrators access to another set
and administrators access to another set ![]() . We don’t need to explicitly tell the system to allow administrators access to the member actions because the admin role is a child of the member role and so inherits those permissions automatically.
. We don’t need to explicitly tell the system to allow administrators access to the member actions because the admin role is a child of the member role and so inherits those permissions automatically.
This concludes our look at integrating Zend_Auth and Zend_Acl into the Places application. We used Zend_Auth to allow users to log into the website and Zend_Acl enables us to control exactly which controllers and actions a given user can access. This is achieved by setting each controller as an Acl resource, with the action as a privilege.
7.5. Summary
In this chapter, we have looked at the two related concepts of authentication and access control. Authentication ensures that we know the identity of the current user, and Zend_Auth is an intuitive and comprehensive component that allows for checking against different data sources. By leveraging Zend_Session, Zend_Auth provides a one-stop-shop solution and enables us to identify the currently logged on user very easily.
Choosing an authentication strategy to ensure that only users with the correct privileges are allowed access to certain parts of the application is an art in itself. Zend Framework provides Zend_Acl to manage this. We have explored a solution that uses an action helper to easily limit access to controller actions without having to do lots of setup independent of the controller being protected. One key benefit of the flexibility of Zend Framework is there is no need to force a particular application’s requirements into one methodology; the framework can be molded to solve the problem in hand.
Forms are one of those aspects of building a website that developers either love or loathe due to the complexities of validation and ensuring that the user is informed about issues in the form in a friendly manner. In the next chapter, we’ll look at how Zend Framework can help make building and validating online forms easier with Zend_Form.