
Chapter 16. Creating PDFs
| This chapter covers |
Surprising as it may seem to those of us who spend an unhealthy amount of time in the digital world, there are still people who use and need documents in paper format. Having said that, although clever use of HTML and CSS can produce well-formatted web pages, there are still limits to how pixel-perfect web pages can be, especially when it comes to printing them.
Adobe Systems created the PDF (Portable Document Format) to bridge the gap between printed and digital documents, and it has since become the standard for web-based printable documents, as well as an integral part of a modern graphics workflow. The precision of the PDF format is particularly important for documents such as specifically formatted copies of web page content, emailed invoices, site statistics, and other reports.
In this chapter, we’ll be using Zend Framework’s Zend_Pdf component to generate an example report, and we’ll work through some of its features. But before doing so, we should properly introduce the component, starting with the basics.
16.1. Zend_Pdf Basics
Using only PHP, Zend_Pdf allows you to create, load, and save PDF v1.4 documents and provides commands for drawing shapes, text, and images.
The number of classes that make up this component suggests that creating it involved a large amount of work, but you may still find it currently lacking some functionality you might expect. For example, you’ll be forced to do some things, like text wrapping and pagination, manually or with workarounds. Also, documentation is still a little sparse. On the positive side, there are already motions to add such requested features, so some effort at this stage won’t be wasted in the future.
On that note, let’s look at how to create or load PDF documents.
16.1.1. Creating or Loading Documents
Zend_Pdf has various ways of creating and loading PDF documents. The basic way to create a PDF document is to instantiate a new Zend_Pdf object, like so:
$pdf = new Zend_Pdf();
There are two ways to load an existing PDF document, both of which use a static method. The first loads from a file:
  $file = '/path/to/example.pdf';
  $pdf = Zend_Pdf::load($file);
The second loads from a string containing the contents of a PDF document:
$pdf = Zend_Pdf::parse($pdfString);
Whether you have created or loaded a PDF document, you work with it in the same way. Each document is made up of pages on which you draw your text, image, or shape elements.
16.1.2. Creating Pages in Your PDF Document
Once you have created your Zend_Pdf object, you can work with the pages of your document as if you were working with a regular PHP array. The pages array is $pdf->pages, and all of the normal PHP array functions will work.
To create a new page, you can create a Zend_Pdf_Page object and set its page size as follows:
$page = new Zend_Pdf_Page(Zend_Pdf_Page::SIZE_A4);
The Zend_Pdf_Page::SIZE_A4 argument used here uses a constant to define what size and orientation we want the page to be. Table 16.1 shows the available predefined constants, together with their measurements.
Table 16.1. Predefined Zend_Pdf_Page page-size constants with width and height measurements
|
Size in inches |
Size in millimeters |
Size in points (1/72 of an inch) |
|
|---|---|---|---|
| SIZE_A4 | 8.27 × 11.69 | 210 × 297 | 595 × 842 |
| SIZE_A4_LANDSCAPE | 11.69 × 8.27 | 297 × 210 | 842 × 595 |
| SIZE_LETTER | 8.5 × 11 | 215.9 × 279.4 | 612 × 792 |
| SIZE_LETTER_LANDSCAPE | 11 × 8.5 | 279.4 × 215.9 | 792 × 621 |
You are not limited to the predefined sizes. Each page can have its own size and orientation, so you can use any value for width and height, ordering your arguments like so:
$page = new Zend_Pdf_Page($width, $height);
You may prefer to work in inches or millimeters, but the values entered here will be treated as points, so you’ll need to convert them.
Note
All measurements in Zend_Pdf are in points. If you prefer to use inches or millimeters, you should convert them to points using $inches * 72 or $millimeters / 25.4 * 72.
If we had chosen to use the Zend_Pdf::newPage() static method to create our page, that page would be already attached to the document. In contrast, Zend_Pdf_Page objects instantiated directly are independent and need to be added to the document like this:
$pdf->pages[] = $page;
While we’re now able to set up our document and add pages to it, those pages will be blank. Before we get into filling them with content, we should add some information about the document itself in the document’s meta-information.
16.1.3. Adding Document Meta-Information
One of the advantages that digital documents have over paper is the ease with which they can be managed based on file content and document information. This document meta-information can be added to your document by setting values in the properties array of the Zend_Pdf object. The title of the document, for example, is set like so:
$pdf->properties['Title'] = 'Zend_Pdf makes great PDFs';
Of course, there are more properties than just the title property. Table 16.2 shows the keys available in PDF v1.4 that Zend_Pdf can use.
Table 16.2. The PDF v1.4 document meta-information keys available for use by Zend_Pdf
|
Type |
Description |
|
|---|---|---|
| Title | String | The document title. |
| Author | String | The name of the person who created the document. |
| Subject | String | The document subject. |
| Keywords | String | Keywords associated with the document. |
| Creator | String | The application that created the original document prior to conversion, if the document was converted from another format to PDF. |
| Producer | String | The application that performed the conversion, if the document was converted from another format to PDF. |
| CreationDate | String | The date and time the document was created; populated using Zend_Pdf::pdfDate() to correctly format the date. |
| ModDate | String | The date and time the document was last modified; populated using Zend_Pdf::pdfDate() to correctly format the date. |
| Trapped | Boolean | Indicates whether trapping has been done (true) or still needs to be done (false); trapping masks printing-registration problems by making overlaps between neighboring colors, but it is only relevant for certain printing processes. |
Opening the generated document in a PDF reader and looking at the document properties is a quick way to check that the meta-information has been set correctly.
Note
Because Zend_Pdf can read PDF document meta-information via the properties array, it could itself be used in a data management situation where, for example, cataloguing of PDF documents was required.
We now know how to create a document of blank pages containing meta-information. While this may not seem very useful, it’s enough to save or output.
16.1.4. Saving the PDF Document
Once you have finished working with your PDF document, you can use the Zend_Pdf::save() method to save it to a file, like so:
  $file = '/path/to/shiny/new/example.pdf';
  $pdf->save($file);
Or, you can have the Zend_Pdf::render() method return the PDF document as a string, like this:
$pdfString = $pdf->render();
The resulting string could then, for example, be saved to a file or database, added to a zip archive, attached to an email, or output to the browser with the correct MIME header.
We’ve now covered enough to make the first component of this chapter’s example report, so let’s start actually building it.
16.2. Building a PDF Report Generator
We’re going to imagine that Places to take the kids! has launched and been running for a long enough time for us to have gathered some statistics about its use. After numerous meetings in which we based the progress and future direction of the site on various rough pieces of information, we’ve decided that Zend_Pdf could help us produce something a bit more organized.
What we want is a single page with an introduction and a simple annual graph of the performance of any piece of functionality on the site. We’ll use this during meetings to guide decision-making, so we’ll also want some space for meeting notes on each page.
16.2.1. Our Report Document Model
Our report-generating code, shown in listing 16.1, is going to start with a model class for the document itself. We’ll call the class Report_Document and store it in the application/models/Report/Document.php file, following the Zend Framework naming convention mapping the class name to the directory structure. Creating this class allows us to set up some default features, such as the document meta-information, and it presents a clean interface we can use to build our reports later.
Listing 16.1. The report document model class forms the basis for our report generator

We could have extended Zend_Pdf to build this class, but, partly for the sake of providing a clearer example, we’ve favored composition over inheritance and made $_pdf (an instance of Zend_Pdf) a property. The basic function of Report_Document is to set up a PDF document with some meta-information, then only allow pages to be instances of the Report_Page class, which we’ll start on next.
16.2.2. Our Report Page Model
Over the course of the rest of this chapter, we’re going to build up our report page by adding content while also covering the different ways that content can be added using Zend_Pdf.
Before we do that, we’ll use the initial setup of our Report_Page class, shown in listing 16.2, to cover a few pointers about working with Zend_Pdf. Again, due to the underscore in the class name, this class lives in the application/models/Report directory.
Listing 16.2. The initial setup code for our Report_Page model class
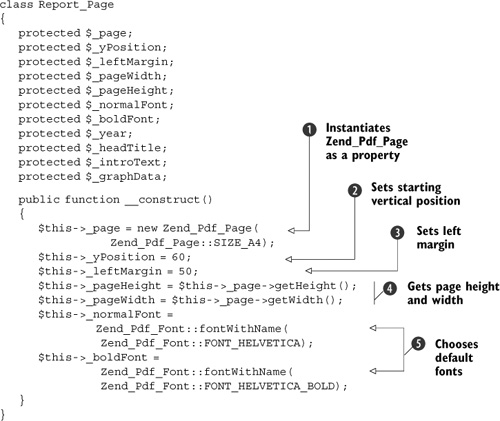
For much the same reasons as for our report document model, we’ve decided not to extend Zend_Pdf_Page for this class, and to instead use it as a property ![]() .
.
One of the first things that we need to come to grips with is that, like the PDF standard, all drawing in Zend_Pdf works from the bottom left of the page. This takes a little readjustment for those of us used to desktop applications that
work from the top left down. To get around that, we’ve decided to work with what can be pictured as a sliding y-axis marker that is initially set at 60 points up from the page bottom ![]() . Similarly, we’ve set a left margin at the x-axis position 50 points in from the left side
. Similarly, we’ve set a left margin at the x-axis position 50 points in from the left side ![]() . The use of these two settings will become clearer when we start drawing items on the page.
. The use of these two settings will become clearer when we start drawing items on the page.
Having set some points of reference with the y position marker and left-margin setting, we need to know how big the page is, which we’ve determined using the Zend_Pdf_Page::getHeight() and Zend_Pdf_Page::getWidth() methods ![]() . Because we’re working with an A4 page, these will return the point values 595 and 842 respectively. If we chose to change
our page size to something like Size_Letter, these settings would allow our layout to adapt as needed.
. Because we’re working with an A4 page, these will return the point values 595 and 842 respectively. If we chose to change
our page size to something like Size_Letter, these settings would allow our layout to adapt as needed.
The final settings in our constructor are some default font choices ![]() , which brings us to the first Zend_Pdf drawing features we’ll be covering: adding text.
, which brings us to the first Zend_Pdf drawing features we’ll be covering: adding text.
16.3. Drawing Text on the Page
Text is drawn as a single nonwrapping line along a baseline that starts from an x and y position on the page. Before adding text, it’s a requirement that a font has been set, which can be one of the 14 standard PDF fonts or a custom one.
16.3.1. Choosing Fonts
In our Report_Page class in listing 16.2, we specified using the Helvetica and Helvetica bold fonts by name by using Zend_Pdf_Font::fontWithName() and the relevant Zend_Pdf_Font constant. If we wanted to stick with the standard fonts, we could have chosen any of the following options:
- Zend_Pdf_Font::FONT_COURIER
- Zend_Pdf_Font::FONT_COURIER_BOLD
- Zend_Pdf_Font::FONT_COURIER_OBLIQUE
- Zend_Pdf_Font::FONT_COURIER_BOLD_OBLIQUE
- Zend_Pdf_Font::FONT_HELVETICA
- Zend_Pdf_Font::FONT_HELVETICA_BOLD
- Zend_Pdf_Font::FONT_HELVETICA_OBLIQUE
- Zend_Pdf_Font::FONT_HELVETICA_BOLD_OBLIQUE
- Zend_Pdf_Font::FONT_SYMBOL
- Zend_Pdf_Font::FONT_TIMES_ROMAN
- Zend_Pdf_Font::FONT_TIMES_BOLD
- Zend_Pdf_Font::FONT_TIMES_ITALIC
- Zend_Pdf_Font::FONT_TIMES_BOLD_ITALIC
- Zend_Pdf_Font::FONT_ZAPFDINGBATS
Alternatively, we could load and use a TrueType or OpenType font from a file with a statement like the following:
$font = Zend_Pdf_Font::fontWithPath('arial.ttf'),
Note that custom fonts are embedded in the PDF document by default. If you really need to keep file sizes down and are sure that your end user has the fonts on his system, you could use the Zend_Pdf_Font::EMBED_DONT_EMBED constant as the optional second argument to fontWithPath().
Once you have your font object ready, you’re ready to apply it to the page.
16.3.2. Setting the Font and Adding Text
The first thing our report page is going to need is a header, and in listing 16.3 we’ve created a setHeader() method that will produce a simple title with a horizontal line underneath it.
Listing 16.3. The setHeader() method of our Report_Page class

After setting the font for our title (bold font at 20 point size) using Zend_Pdf_Page::setFont() ![]() , we can draw it on the page. The first argument to Zend_Pdf_Page::drawText() is the text you want to place on the page, followed by the x and y locations, for which we’ve used the left margin and a position 50 points below the full page height
, we can draw it on the page. The first argument to Zend_Pdf_Page::drawText() is the text you want to place on the page, followed by the x and y locations, for which we’ve used the left margin and a position 50 points below the full page height ![]() . A further 10 points below that title text we then add a horizontal line from left margin to right margin
. A further 10 points below that title text we then add a horizontal line from left margin to right margin ![]() .
.
You’ll notice that before we worked on the text, we made a call to Zend_Pdf_Page::saveGS() ![]() , and we finished up with a call to Zend_Pdf_Page::restoreGS()
, and we finished up with a call to Zend_Pdf_Page::restoreGS() ![]() . The reason for doing this was to keep any changes to the document settings we made earlier isolated to this method, so we
could revert back to those document settings once finished.
. The reason for doing this was to keep any changes to the document settings we made earlier isolated to this method, so we
could revert back to those document settings once finished.
Note
Working in a way that reminds us of PHP’s output buffering, Zend_Pdf_Page can make isolated changes to styles by first saving the current graphics state using saveGS() and then using restoreGS() to return to it after any isolated changes have been made.
While we’re talking about adding text, you may remember that one of the requirements for our example report was to have introductory text about the information on each page. Since it’s most likely that this introduction will be more than a single line, we’re going to have to implement a bit of a workaround to wrap the text.
16.3.3. Adding Wrapped Text
Text is drawn as a single nonwrapping line, which means that if we try to add a large amount of text, it will run off the side of the page. To get around this, we’ll create a wrapText() method, as shown in listing 16.4.
Listing 16.4. Our wrapText() method, which will allow us to draw wrapped text
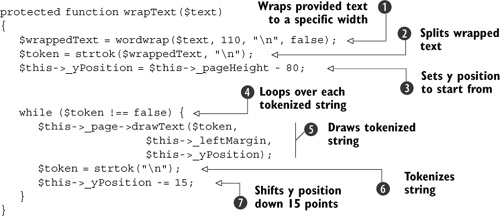
Our wrapText() method first uses PHP’s wordwrap function to set the supplied text to a width that will fit in our report page, and wraps it using the linefeed delimiter
![]() . That delimiter is then used to split the text into smaller strings
. That delimiter is then used to split the text into smaller strings ![]() , which are then looped over
, which are then looped over ![]() . Each string segment is then drawn onto the page at the left margin point, and the current y position
. Each string segment is then drawn onto the page at the left margin point, and the current y position ![]() , which we initially set as 80 points down from the top of the page
, which we initially set as 80 points down from the top of the page ![]() . The remaining string is split again (remembering that when using strtok() only the first call needs a string argument)
. The remaining string is split again (remembering that when using strtok() only the first call needs a string argument) ![]() , and the y position is moved down 15 points, ready for the next line of text to be drawn
, and the y position is moved down 15 points, ready for the next line of text to be drawn ![]() .
.
Drawing our introductory text is now as simple as passing it to the wrapText() method from within our Report_Page class, like so:
$this->wrapText($this->_introText);
Of course, this method isn’t the only way of wrapping the text, but it works for the needs of our Report_Page class, and we expect that Zend_Pdf will gain its own solution in future enhancements. In figure 16.1, you can see the results of our labors to date.
Figure 16.1. The generated header and introductory text for our PDF report

Underneath our title, we drew a horizontal line ![]() , which we’ll cover a bit later in this chapter. But before we do so, there are a few more things to set, starting with colors.
, which we’ll cover a bit later in this chapter. But before we do so, there are a few more things to set, starting with colors.
16.4. Working with Color
Together with the grayscale, RGB, and CMYK color spaces, Zend_Pdf also supports the use of HTML colors, which is a convenient addition for web developers. We can use colors in our PDF document by creating a Zend_Pdf_Color object chosen from any of these four color spaces.
16.4.1. Choosing Colors
Since the color setting methods in Zend_Pdf_Page all expect a Zend_Pdf_Color object as their argument, the first thing we need to do is choose and create one.
A grayscale object is created with the single argument being a value between 0 (black) and 1 (white):
  $grayLevel = 0.5;
  $color = new Zend_Pdf_Color_GrayScale ($grayLevel);
An RGB object accepts three arguments—red, green, and blue—based on an intensity scale from 0 (minimum) to 1 (maximum):
  $red = 0;
  $green = 0.5;
  $blue = 1;
  $color = new Zend_Pdf_Color_Rgb ($red, $green, $blue);
A CMYK object accepts four arguments—cyan, magenta, yellow, and black—also based on an intensity scale from 0 (minimum) to 1 (maximum):
  $cyan = 0;
  $magenta = 0.5;
  $yellow = 1;
  $black = 0;
  $color = new Zend_Pdf_Color_Cmyk ($cyan, $magenta, $yellow, $black);
An HTML color object accepts the usual hex values or HTML color names:
  $color = new Zend_Pdf_Color_Html ('#333333'),
  $color = new Zend_Pdf_Color_Html('silver'),
Having created a Zend_Pdf_Color object, we can move on to setting objects to use them.
16.4.2. Setting Colors
As you might expect, there are the usual two ways to set colors for drawn objects: by fill and by line or stroke.
The fill color is set by passing a color object as an argument:
$page->setFillColor($color);
The line color is set the same way:
$page->setLineColor($color);
Line settings apply not only to drawn lines but also to the strokes (outlines) of shapes. Fill colors apply to text as well as to shapes.
So far, we’ve covered setting fonts and colors, and in the next section on styles, we’ll look at ways of organizing those settings.
16.5. Using Styles
By using Zend_Pdf_Style, settings such as fill color, line color, line width, and font preferences are combined into style sets that can be applied to the page as a group. This saves us lines of code and makes it easier to make widespread style changes.
In listing 16.5, you can see that we’ve created a setStyle() method in our Report_Page class that builds a style object for our report pages. If our report generator were to get more complicated, this method could easily be refactored into its own class if needed.
Listing 16.5. Creating a style set for our Report_Page class
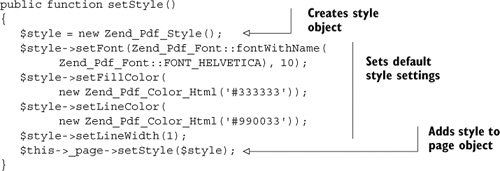
Aside from the line-width setting, the style settings should now be quite familiar, except that they have been applied to the style object, which is then passed as an argument to Zend_Pdf_Page::setStyle(). Once set, these style settings will become the defaults for our document, unless overridden. Styles only apply to elements drawn after you set the style; they won’t apply to elements that have already been drawn.
Our report page now has lots of settings and only a minimal amount of content, so it’s about time we added some. This will include using shapes to draw those graphs we needed.
16.6. Drawing Shapes
Using Zend_Pdf, we’re able to draw lines, rectangles, polygons, circles, and ellipses. Before doing so, though, we may want to define settings such as color (discussed in section 16.4), or the line width, which we set in listing 16.5:
$style->setLineWidth(1);
The line width, here, is specified in points, like all measurements in Zend_Pdf.
While we’re discussing line widths we should also explain how to draw that horizontal line underneath our page title. Let’s look at that now.
16.6.1. Drawing Lines
In the setHeader() method in listing 16.3, we drew a line under our page title using the following command:
  $this->_page->drawLine($this->_leftMargin,
                  $this->_pageHeight - 60,
                  $this->_pageWidth - $this->_leftMargin,
                  $this->_pageHeight - 60);
In this function, we specify two points with their x and y positions, and a line is drawn between them. We have therefore used the fixed and relative values in our report class to set the first point at 50,782 and the second at 545,782, so it’s a simple horizontal line.
We didn’t specify otherwise, so it is a solid line, but it could be made into a dashed line.
16.6.2. Setting up Dashed Lines
Another requirement of our report page was to have a section for meeting notes. Putting aside any personal preferences for lined or blank notepaper, we’re going to add a series of faint dashed lines to our notes section.
In listing 16.6, you can see how that setting features in our getNotesSection() method and also how we use the graphics state to make temporary changes to lines.
Listing 16.6. Drawing dashed lines in a notes section

The first argument to Zend_Pdf_Page::setLineDashingPattern() is an array of lengths of dashes and spaces in sequence, with the first number being a dash and the second a space. This dash-space sequence can be repeated as many times as needed. The setting we used in listing 16.6 is a simple 2-point dash followed by a 2-point space, which can be seen in figure 16.2.
Figure 16.2. The meeting notes section, showing the use of lines and dashed lines

Having used dashed lines to draw our meeting notes section, we’ve actually jumped too far ahead and need to go back and draw our graph. For that, we’re going to need to look at drawing rectangular shapes.
16.6.3. Drawing Rectangles and Polygons
Rectangular shapes are drawn with many of the same arguments as drawing lines. The first two arguments refer to the x and y positions of the bottom-left corner of the rectangle, and the next two arguments specify the x and y positions of the top-right corner:
$page->drawRectangle($x1, $y1, $x2, $y2, $fillType);
To draw a polygon, you can use the following command:
  $page->drawPolygon(
    array($x1, $x2 ..., $xn),
    array($y1, $y2 ..., $yn),
    $fillType, $fillMethod
  );
The first argument is an array of all the x values in order, while the second is an array of the corresponding y values.
The third argument defines the type of fill and stroke to be used, which can be one of three options:
- Zend_Pdf_Page::SHAPE_DRAW_FILL_AND_STROKE—This will draw both the fill color and the stroke according to the page’s current settings.
- Zend_Pdf_Page::SHAPE_DRAW_FILL—This will draw only the fill, leaving out the stroke.
- Zend_Pdf_Page::SHAPE_DRAW_STROKE—This will draw just the stroke, resulting in an outline of the shape.
The fourth argument is complex enough that describing what it does could take up a page in itself. It is also one you’re unlikely to need unless, for example, you want one shape to knock out another below it, in which case we’ll point you to the PDF specification at http://www.adobe.com/devnet/pdf/pdf_reference.html where you can research the following two options:
- Zend_Pdf_Page::FILL_METHOD_EVEN_ODD
- Zend_Pdf_Page::FILL_METHOD_NON_ZERO_WINDING
For our reports, we’re going to use the drawRectangle() method to draw a bar graph, where each rectangle represents a month of data. Listing 16.7 shows the getGraph-Section() method that will produce the graph.
Listing 16.7. The getGraphSection() method of our Report_Page class
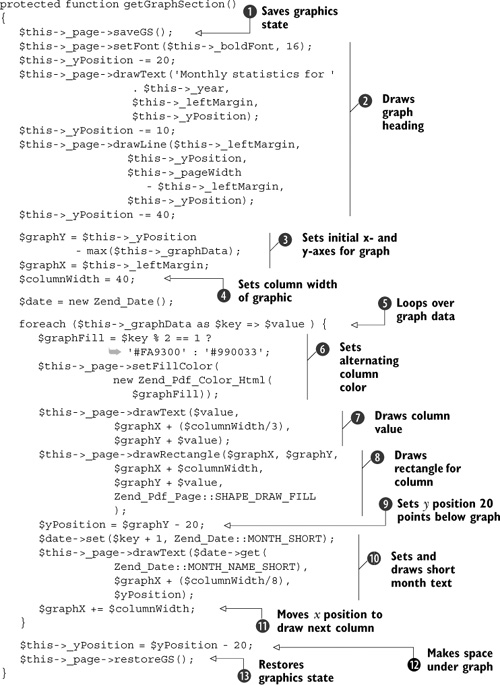
Our getGraphSection() method starts by saving the current graphics state ![]() , and adds a header for the graph
, and adds a header for the graph ![]() . The initial x and y positions are then set, the y position based on the current y position marker and the maximum value of our graph data
. The initial x and y positions are then set, the y position based on the current y position marker and the maximum value of our graph data ![]() , followed by the column width
, followed by the column width ![]() .
.
Looping over our data ![]() , we use the $key value to alternate the color setting for the columns
, we use the $key value to alternate the color setting for the columns ![]() . Each column’s value is drawn at its top
. Each column’s value is drawn at its top ![]() , and then a rectangle is drawn for the column itself, which we’ve set to not have a stroke
, and then a rectangle is drawn for the column itself, which we’ve set to not have a stroke ![]() . After setting the y position marker to 20 points below the column
. After setting the y position marker to 20 points below the column ![]() , we use Zend_Date to get and draw the shortened text for the month
, we use Zend_Date to get and draw the shortened text for the month ![]() .
.
With one column complete, we shuffle the x position along by the column width, ready for the next column to be drawn ![]() !. Once all months have been drawn, we add some space below the graph section by setting the y position marker 20 points down
!. Once all months have been drawn, we add some space below the graph section by setting the y position marker 20 points down ![]() , and we restore the graphics state
, and we restore the graphics state ![]() . When called, this method produces the final output shown in figure 16.3.
. When called, this method produces the final output shown in figure 16.3.
Figure 16.3. Demonstrating drawing rectangles with our report graph

Astute readers will notice the shortcomings in the preceding method, one being that its height is based on the largest data value, which means large values will generate an overly tall graph. We’ve done that to keep this example simple, but for actual use we’d obviously want to add calculations to keep that height proportional to the page height.
Because we’re plotting the month-by-month performance of our site, a bar graph is a suitable choice. Had we been dealing with the kind of data that would suit a pie chart better, we’d have had to draw circles or ellipses.
16.6.4. Drawing Circles and Ellipses
Before you get too excited, we’re not actually going to draw a pie chart in this section, but we’ll give you a start on drawing circles and ellipses so that you’re at least part way there.
The commands for drawing circles and ellipses are fairly similar, with the variation being due to the difference in the way they’re drawn. A circle is drawn out the length of the radius from a center marked with the x and y values, as in the following command:
$page->drawCircle($x, $y, $radius, $startAngle, $endAngle, $fillType);
An ellipse is drawn within a rectangular bounding box specified with two sets of x and y coordinates like drawRectangle():
$page->drawEllipse($x1, $y1, $x2, $y2, $startAngle, $endAngle, $fillType);
Had we been drawing pie charts, the $startAngle and $endAngle arguments would have been useful for drawing slices of a circle, as shown in figure 16.4.
Figure 16.4. Slices of a circle are drawn in a counter-clockwise direction

Circles are drawn in a counter-clockwise direction, so the example on the left of figure 16.4 starts at 90 degrees and moves around to 0 or 360 degrees and could be drawn with the following code:
$this->_page->drawCircle(300, 300, 50, deg2rad(90), deg2rad(360));
The example on the right of figure 16.4 has a start angle of 0 degrees and an end angle of 90 degrees, which could be done like so:
$this->_page->drawCircle(300, 300, 50, 0, deg2rad(90));
The final argument for both methods is used to define the fill type in the same way we did when drawing rectangles.
You’ll probably have noticed that we used the PHP function deg2rad() when specifying the angles in the preceding code. This is because angles are specified in radians rather than degrees. Whether or not you see this as intuitive, at least it’s consistent because it’s also the value used when rotating objects.
16.7. Rotating Objects
You rotate an object by rotating the page, drawing the element, then rotating the page back to its original position (or to the next angle required). This may initially seem an odd way to do it, but a quick look at the command to do so makes the logic clearer:
$page->rotate($x, $y, $angle);
By rotating the page on an angle (in radians) around an x and y position, we can rotate any object, be it text, rectangle, circle, or any other item, without the need for each item to have its own methods of rotation.
In figure 16.5, we demonstrate how page rotation works by first rotating the page 10 degrees from its normal position, then drawing text at the top of the page. More objects could be drawn at this point, and they would also adopt the rotation settings. The page is then rotated back to its original position, with the text remaining at the angle of 10 degrees to the page.
Figure 16.5. Demonstrating how rotation works by setting some text at a 10 degree angle

To make it easier to return the page to the original angle, you can save the graphics state, perform the rotation or rotations, draw the element, and then restore the graphics state:
  $page->saveGS();
  $page->rotate($x, $y, $angle);
  // Draw your element here
  $page->restoreGS();
The rotation will only apply to the elements you draw after rotating. Everything drawn before rotation will remain as is.
So far we’ve covered adding various types of objects to the page, but we’ve left out one fairly major one: images.
16.8. Adding Images to the Page
Adding images to your PDF document starts by loading your image file, which must be in TIFF, PNG, or JPEG format, passing its full path to the Zend_Pdf_Image::image-WithPath() method, then adding it to the page like so:
  $file = '/path/to/image.jpg';
  $image = Zend_Pdf_Image::imageWithPath($file);

  $page->drawImage($image, $x1, $y1, $x2, $y2);
The x and y values here are the same as you’d use for drawing a rectangle. Your image will be stretched to fit the specified size if it isn’t the same as, or proportional to, the original image size.
If you need to load alternative image formats, or you want better image resizing, you might consider using the GD library to save a modified version of the image file to be loaded into your PDF.
In cases where we want to show only a part of an image or object in our document, we can use clipping masks.
16.9. Drawing Objects within Clipping Masks
Any of the drawn shapes described in this chapter can be used as clipping masks to exclude parts of an image, such as an unwanted background, in a picture.
The methods for creating the clipping masks are almost identical to the methods for drawing the shapes, except that there are no fill types:
  $page->clipCircle(...);
  $page->clipEllipse(...);
  $page->clipPolygon(...);
  $page->clipRectangle(...);
All elements drawn after a clipping mask has been defined will be affected by the mask. If you want to continue to draw elements that aren’t affected by the clipping mask, you can do so by saving the graphics state, defining a clipping mask, drawing your elements, and restoring the graphics state.
We’ve now covered the main functions of Zend_Pdf, which means we just need to use our report generator models.
16.10. Generating PDF Reports
Throughout this chapter, we’ve been going through the various parts of our report document and page model, but we haven’t yet demonstrated how to use it. The actual Report_Page class is quite a bit bigger than we’ve been able to show in this chapter, but we’ve covered the key methods. You can view the full class in the source code accompanying this book.
One final method that we do need to cover before moving on to the controller is the Report_Page::render() method that is shown in listing 16.8.
Listing 16.8. The render() method of our Report_Page class
public function render()
{
   $this->setStyle();
   $this->setHeader();
   $this->wrapText($this->_introText);
   $this->getGraphSection();
   $this->getNotesSection();

   $this->setFooter();
   return $this->_page;
}
This method simply calls together the various pieces of our report page, and it is grouped this way so that, at a later date, we could move it to an interface or an abstract class as our reporting needs grow. You should recognize all the methods called within it, except for the setFooter() method, which, as you can probably guess, produces a page footer.
Having shown that last method, we can turn to listing 16.9, which shows how our models are used to construct the PDF document within the indexAction() method of our ReportController controller class.
Listing 16.9. Using the report models in our ReportController controller action

After creating a document object ![]() and a page object
and a page object ![]() , we add some text content to that page object
, we add some text content to that page object ![]() . Following that, we add graph data
. Following that, we add graph data ![]() which in actual use would be real data gathered from another source, such as a database; but for this example is just some
fictitious data. With that page object now complete, we can add it to the document
which in actual use would be real data gathered from another source, such as a database; but for this example is just some
fictitious data. With that page object now complete, we can add it to the document ![]() .
.
At this stage, we could repeat the process of adding as many pages to our document as needed. We’ll skip doing so and generate
the document, starting by setting the correct HTTP headers to be sent to the browser,![]() then outputting the document, rendered by the render() method from listing 16.9
then outputting the document, rendered by the render() method from listing 16.9 ![]() . Finally, since we’re outputting a PDF document, we disable view and layout rendering for the action
. Finally, since we’re outputting a PDF document, we disable view and layout rendering for the action ![]() . The final rendered document can be seen in figure 16.6.
. The final rendered document can be seen in figure 16.6.
Figure 16.6. The final PDF report page generated by our PDF report generator

With our PDF report generator built, we can now look forward to many an exciting progress meeting, armed with accurate and up-to-date information about our website!
16.11. Summary
In this chapter, we covered how to use Zend_Pdf to load or create a PDF document, add meta-information, add pages, and then save it. You learned how to set page styles, such as colors and fonts, which apply as the default to any drawn objects. You also learned how to draw shapes and text, style and rotate them, add images, and apply clipping masks to them.
Along the way, you’ll have noticed some of the quirks we alluded to at the start of the chapter regarding working with the current version of Zend_PDF. Hopefully, you can see that they aren’t too difficult to work around, and they should be ironed out as the component is developed further.
On the subject of ongoing work, ever since we began writing this book, Zend Framework development has been moving along at a pace that was sometimes hard to keep up with. Our parting recommendation, now that we’ve come to the end of our coverage of Zend Framework, is to go to the community section of the Zend Framework website (http://framework.zend.com/community/overview) and join the mailing lists, subscribe to the development newsfeeds, get on the #zftalk IRC channel, and anything else that helps you keep in touch with those developments.
Thanks for reading, and remember that if you find us at any of those Zend Framework hangouts, feel free to say hello and tell us what you thought of this book, whether good or bad.