
Chapter 3. Building a website with Zend Framework
| This chapter covers |
|
To show off the features of the framework in this chapter, we are going to build a community website where parents can find out about pro-child tourist attractions. We will call it Places to take the kids!.
Building such a community website requires a lot of time and effort, and it will be tempting to take the easy road toward intermingled PHP and HTML. We expect our website to be a key resource for many years, and following good software engineering principles now will pay off many times over the lifetime of the project. Zend Framework’s MVC system will help us to do things the right way. There is even a side benefit of being quicker, as we can take advantage of the simplicity and convention-over-configuration principles to ensure that our code is easy to write and refactor.
Before we build the basic website, we will focus on what we intend to build and the features it will need. We will then be able to set up an initial database and code the first pages.
3.1. Initial Planning of a Website
We can’t build a website without some sort of specification, but a whole specification would take too long. Instead, we will describe our site’s goals with a simple story. After looking at what the site will achieve, we will then look at any issues within the UI of the website that will lead us into the code.
3.1.1. The Site’s Goals
For any website, there is only one question that needs to be answered from the user’s point of view: What does this site do for me? If we can identify who will give positive answers to this question, then we have a potential audience. There are secondary questions to ask too, including how to fund the site, but these are relatively minor compared to ensuring that the site can get visitors.
One way to describe features of a website is to use paragraphs that explain how a certain feature works from a very high-level perspective. The main benefit these “stories” have over a proper specification is that they are written in easy-to-understand language. Without jargon. We can use the same mechanism to describe the entire website too:
Places to take the kids! is a website that enables parents to fully enjoy a day out, confident that the places they visit will be suitable for their children. The site will welcome a community of users who can review and recommend places to visit. The site provides simple mechanisms for finding places to visit by browsing through categories or by searching. The user will be able to save different places as part of a planned trip, and then can print out the details of their trip later.
Our site story conveys all we need to know to create a good website, and we are now able to start planning. Clearly, we could write even more about what the site could do, but that can be left for future phases of development. We will start looking at the main functionality of the website and at how we will use testing to improve our code.
Main Functionality
Let’s brainstorm a list of the things that the website will need using a mind map. Our initial thoughts are shown in figure 3.1.
Figure 3.1. Mind maps are a good way to brainstorm features for a new website. For this site, we have found that seven main areas of the website will be required to meet our main goals. The Locations section has been fleshed out the most.

Another nice thing about mind maps is that they can be easily added to. In this case, the Locations (or places) section is key to the site and so has had the most thought put into it. We will not worry too much about competitions, because they are a “nice to have” feature rather than a core requirement to meet the site’s goals.
We have now developed our initial plans for the website, so we will turn our thoughts to the build process. We intend to build our website by implementing one feature at time. As the site grows, the initial code will be changed to accommodate new features, and we will need to ensure that we do not break any existing functionality. Unit testing can help ensure that.
The Unit Testing Process
We will write tests for anything we are unsure about as we go along. This will give us confidence in our code and allow us to refactor it as we improve the design. Improving the design shouldn’t be hard, as we have barely done any! Even if we did lots of up-front design, it is certain that what we learn while building will be of immeasurable value; we want to incorporate what we learn as we go along. While we won’t be discussing each of the tests within these pages, the accompanying source code contains all the tests required for us to have confidence in the code.
Testing provides confidence that our code will continue work as we add new features. The testing for Places will be done mainly using unit tests, which can be automated, because testing that requires someone to follow a written procedure would not be done often enough to catch errors that result from code changes. Zend Framework’s MVC system provides a response object, so we can use unit testing to check that the HTML output has the correct data in it and test elements of the page rendering too.
3.1.2. Designing the User Interface
We need to consider how our new website is going to work in terms of the user interface (UI). I’m a software engineer, not a creative designer, so it’s probably best if I don’t provide many thoughts on design! A good user interface is much more than appearance; you also have to consider how it operates for the user. We need to ensure that our users can navigate easily to the information they are looking for.
The key UI features we will be considering on our Places website are navigation via a menu and a search system. The navigation will use a drill-down approach, with the main menu always being visible and the current level menu also being shown. This allows for a lot of flexibility while not creating a cluttered menu. We could also display a breadcrumb trail so that the user understands where they are in the site and which route they took from the home page to get to the page they are currently viewing.
When designing a UI for the site, we need to think about the features of the site, such as:
- menus and navigation
- page layout
- accessibility
- images
We will now look at the key issues to consider for these elements which form part of the design brief for creation of the actual look and feel of the website.
Menus and Navigation
The key feature we will be considering on our Places website is navigation, both via a menu and a search system.
The navigation will use a drill-down approach with the main menu across the top of the site always being visible, and the current level vertical submenu also being shown. This allows for a lot of flexibility while not creating a cluttered menu. We could also display a breadcrumb trail so that the user has an appreciation of where they are in the site and which route they took from the home page to get to the page they are currently viewing.
This will give us a site that is easy to navigate and that also has plenty of expansion room for building new features.
Page Layout
As this is a community site, we want to make sure that there is plenty of room for content and also room for discretely placed advertisements that will help pay the bandwidth bills. The site’s basic look and feel will be long-lived, because we want to build a brand and because communities don’t tend to like change. This means we will need a design that can grow as we improve the site with new features.
Accessibility
A modern site needs to be accessible to all. This means that our site needs to be standards-compliant so that it works in all modern browsers and also that we must consider users with less than perfect eyesight and mouse coordination. We need to keep the Web Accessibility Initiative (WAI) standard in mind at all times when building the front end of the website.
Images
They say that an image is worth a thousand words, but it costs a lot of time and bandwidth compared to those words! We will use images to improve how the site looks and to add value for our users. Obviously, we will provide images of the locations for each review. Images also work well for feature lists and to mark different sections of the pages.
Putting all this together into a design, we have a site that looks like figure 3.2.
Figure 3.2. PLACES TO TAKE THE KIDS! home page maximizes the amount of space for content while ensuring ease of use.
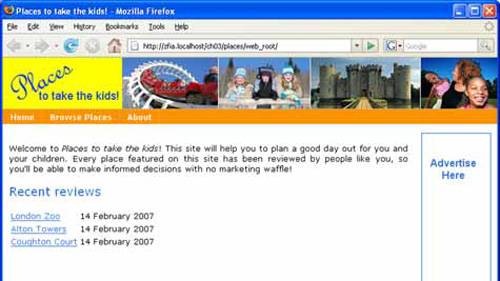
There are four sections to this design: the header (including menu) across the top, the main content on the left, a banner ad on the right, and a footer. We are now ready to look at the code required to build the site, starting with the initial setup of the directory structure, bootstrap, and loading of configuration information. We will also look at how we build the view scripts to ensure that we do not repeat the header and footer code within every action view script.
3.1.3. Planning the Code
We have looked at the goals of the site and at how the user interface will work, so we can now look at how we will organize the PHP code. As with the UI, we need to ensure that our code will not be “hemmed in” when the site’s functionality and feature lists grow. We also want the system to do as much of the plumbing automatically for us, so, for instance, we don’t have to worry about finding the correct class in the file structure, choosing the name of a view script, or struggling to relate to database tables. We will also be using Ajax and so will need to change the output format of the view from HTML at times.
Zend Framework is a good choice to meet these requirements. As we discussed in Chapter 1, Zend Framework is a flexible, robust, and supported platform that will be around for as long as our site is.
Zend Framework’s MVC system ensures that we will organize our site into separate controllers, each with a set of view scripts. We will also access our database tables via models that will allow us to write code in the language of the problem rather than in the language of the database. Another feature of the MVC system is modules that allow us to group a set of related controllers, views, and models together. We will use this functionality to separate out different logical concerns of the Places website.
With this initial planning in place, we can now start creating code and tests, just as soon as we know where to put it!
3.2. Initial Coding
We can kick off the initial coding by creating a skeleton structure onto which we can build the features that are required. This means that we will set up the directories we will need, write the bootstrap file, consider configuration issues, and create the database.
3.2.1. The Directory Structure
In Chapter 2, we looked at the core directories we need for a Zend Framework application, so we’ll start from there. Our Places website is a bit bigger than Hello World, so we will need additional directories to keep the files manageable, as shown in figure 3.3.
Figure 3.3. Directory structure of the Places website, showing key files for the home page

As with Hello World, we organize our directory structure with the goal of ensuring we can find the files again. This means that we separate out all the functionality both logically, using modules, and by concern, into separate models, views, and controllers directories. For security, the public directory is the only directory that the web server can directly serve files from, so it only contains one file: the index.php file that will load the Bootstrap class, which is the next thing we will look at.
3.2.2. The Bootstrap Class
The Hello World application’s bootstrap file was very simplistic, so it was stored in index.php. As an application grows, more flexibility is required. We will therefore create a Bootstrap class in application/bootstrap.php, which is then referenced from public/index.php. We will start with the bootstrap code from Hello World and augment it to load configuration data, initialize the database, and automatically load classes as we use them. Our initial Bootstrap class is shown in listing 3.1—we will discuss the details in the following sections.
Listing 3.1. The initial Bootstrap class: application/bootstrap.php
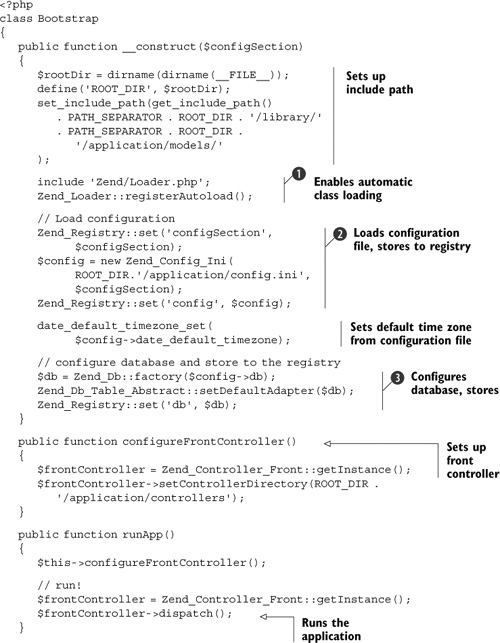
The Bootstrap class has three methods: the constructor, which initializes the environment; configureFrontController(), which sets up the front controller; and runApp(), which runs the MVC application itself. This allows us to reuse this code when testing our application.
The constructor prepares the environment for our application, so let’s look in detail at the functionality in the constructor.
Automatically Loading Classes
One less than ideal aspect of the bootstrap file in the original Hello World is that there are a lot of Zend_Loader::loadClass() calls to load up the classes we need before we use them. In larger applications, there are even more classes in use, resulting in clutter throughout the application just to ensure that the right classes are included at the right time.
For our Places website, we use PHP’s __autoload() functionality so that PHP will automatically load our classes for us. PHP5 introduced the __autoload() magic function that is called whenever you try to instantiate a class that hasn’t yet been defined. The Zend_Loader class has a special registerAutoload() method specifically for use with __autoload(), as shown in listing 3.1 ![]() . This method will automatically use PHP5’s Standard PHP Library (SPL) spl_autoload_register() function so that multiple autoloaders can be used. After Zend_Loader::registerAutoload() has been called, whenever a class is instantiated that has not yet been defined, the file containing the class is included.
This solves the problem of Zend_Loader::loadClass() clutter and ensures that only the needed files are loaded for any given request.
. This method will automatically use PHP5’s Standard PHP Library (SPL) spl_autoload_register() function so that multiple autoloaders can be used. After Zend_Loader::registerAutoload() has been called, whenever a class is instantiated that has not yet been defined, the file containing the class is included.
This solves the problem of Zend_Loader::loadClass() clutter and ensures that only the needed files are loaded for any given request.
Configuration with Zend_Config
There is an implicit requirement that our Places website will store its data to a database, such as MySQL. We need to store the database connection settings, and we’ll use Zend_Config for this purpose.
Zend_Config provides for three configuration file formats: XML, INI, and PHP arrays. We will use the INI format because it is easy to maintain. Zend_Config provides an object-oriented interface to the configuration data regardless of which file format has been loaded. Consider an INI file called config.ini containing the following information:
[db]
adapter = PDO_MYSQL
database.host = localhost
database.username = user1234
database.password = 1234
database.name = db_one
When this file is loaded, the data can be accessed like this:
$config = new Zend_Config_Ini('config.ini', 'db'),
$adapter = $config->adapter;
$databaseHost = $config->database->host;
Note how the period (.) within the key name of a setting is automatically turned into a hierarchical separator by Zend_Config. This allows us to group our configuration data easily within the confines of the INI file format.
Another extension to the INI format that Zend_Config supports is section inheritance, using the coloncharacter(:) as a separator within the section name. This allows us to define a base set of configuration settings and then provide specific changes for different parent sections, as shown in listing 3.2.
Listing 3.2. An example Zend_Config INI file
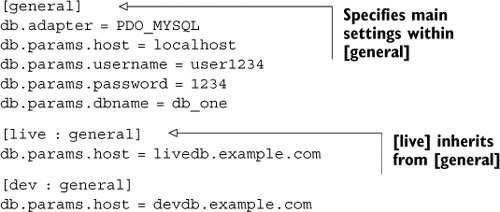
We can now load this INI file in two ways. On the live site, the INI file is loaded with this command, which loads the live configuration:
$config = new Zend_Config_Ini('config.ini', 'live'),
To load the dev configuration for use on a developer’s local workstation, this load statement would be used:
$config = new Zend_Config_Ini('config.ini', 'dev'),
In both cases, Zend_Config will load the general section first, then apply the settings in the live or dev section. This will have the effect of selecting a different database depending on whether the application is running on the live or development server.
The Places Configuration File
Because we will have only one configuration file for our Places website, we will call it config.ini, as shown in listing 3.3. and place it in the application directory.
Listing 3.3. The initial config.ini file for Places: application/config.ini
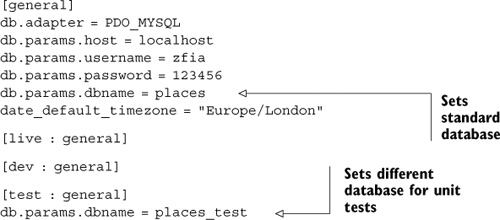
The only thing we need to set up at this point is the connection to the database. The test section is for automatic testing
of our application. While we are testing, we don’t want to touch our main database, so we will use a separate database that
we can overwrite at will while testing different scenarios. The configuration section from the config.ini file is loaded in the Bootstrap class (listing 3.1 ![]() ), and then the resulting Zend_Config object is stored in the Zend_Registry class so that the configuration data can be retrieved wherever we need it.
), and then the resulting Zend_Config object is stored in the Zend_Registry class so that the configuration data can be retrieved wherever we need it.
Zend_Registry
Using global variables is generally considered unwise for large applications, as it introduces coupling between modules and it is very difficult to track down where and when a given global variable is modified during the processing of a script. The solution is to pass variables as parameters through functions to where the data is required. This causes a problem in that you can end up with lots of pass-through parameters that clutter function signatures for functions that do not use the data, except to pass it on to the next function.
One solution is to consolidate the storage of such data into a single object that is easy to find; this is known as the registry. As its name implies, Zend_Registry implements the Registry design pattern and so is a handy place to store objects that are required in different parts of the application.
Zend_Registry::set() is used to store objects in the registry. Internally, the registry is implemented as an associative array, so when you register an object with it, you have to supply the key name that you want to identify it with. To retrieve the object at a different place in the code, Zend_Registry::get() is used—you supply the key name, and a reference to the object is returned. There is also a helper method, Zend_Registry::isRegistered(), which enables you to check whether or not a given object key is registered.
A bit of warning is in order: using the registry is very similar to using a global variable, and unwanted coupling between the registered objects and the rest of the code can occur if you are not careful. Zend_Registry should be used with caution. We will use it with confidence for two objects: $config and $db. These two objects are ideal for storing to a registry because they are generally only read from and not written to; we can be confident that they are unlikely to change during the course of a request. Even though the data is in the registry, we will still pass the relevant configuration data around our application if it minimizes coupling or makes a given section easier to test.
Now that the configuration file is loaded, we can look at the final section of the Bootstrap constructor in listing 3.1. The initialization of the database will ensure that we can access the database from any of our models throughout the rest of the application.
Database Initialization
As we discussed in Chapter 2, we can use the Zend_Db factory class to create a Zend_Db_Adapter specific to our database. In this case, we’ll receive an object of type Zend_Db_Adapter_Pdo_Mysql.
To create the object, we need to pass the adapter name and an array of configuration parameters or a Zend_Config object that has been set up correctly. Zend_Config’s nested parameter system is used to provide the expected data for the Zend_Db::factory() method. We use a top-level key of db in listing 3.3. and the subkeys are adapter, to tell the factory which instance of Zend_Db_Adapter to load, and params, which is passed to the adapter to connect to the database. The keys required within params are specific to the adapter that is loaded, with host, dbname, username, and password being common requirements for all databases.
The database initialization in Bootstrap passes the configuration object $config>db to Zend_Db::factory(), and the returned adapter is set as the default adapter for the Zend_Db_Table objects that we will use (listing 3.1 ![]() ). It also registers the adapter with the Zend_Registry so that we can retrieve it for ad hoc SQL queries.
). It also registers the adapter with the Zend_Registry so that we can retrieve it for ad hoc SQL queries.
3.2.3. Running the Application
We have now created a Bootstrap object that initializes the environment and can run our application. The code that uses this object is in public/index.php and is shown in listing 3.4.
Listing 3.4. public/index.php is used to run the application

To ensure that we load the correct section, we use the PLACES_CONFIG environment variable. This is set on a per server basis using the Apache configuration command SetEnv PLACE_CONFIG {section_name}. For a development server, we configure the Apache configuration with SetEnv PLACE_CONFIG dev and on the live site, we use SetEnv PLACE_CONFIG live. If the environment variable does not exist, we fall back to the general section ![]() . Running the application is as simple as instantiating Bootstrap and calling runApp()
. Running the application is as simple as instantiating Bootstrap and calling runApp() ![]() .
.
The configureFrontController() method (listing 3.1 ![]() ) sets up the front controller in the same manner as in the bootstrap file for Hello World (listing 2.1 in Chapter 2). Again, we use the applications/controllers directory to store the controller files, and finally, the runApp() method calls the front controller’s dispatch() method to run the application.
) sets up the front controller in the same manner as in the bootstrap file for Hello World (listing 2.1 in Chapter 2). Again, we use the applications/controllers directory to store the controller files, and finally, the runApp() method calls the front controller’s dispatch() method to run the application.
We have now set up the code necessary to run the website. We can concentrate on the controllers next.
3.3. The Home Page
The home page is the shop front to our application, so we want to ensure that we provide an attractive page with easy-to-use navigation. There are four main sections to the page: At the top, there is a header with logo and main navigation menu. The main content area is in the middle, and a column on the right side provides space for advertising. There is also a footer, which is not shown in figure 3.2, to provide contact and copyright information on all pages.
To build the home page, we will first create the initial models and the unit tests required to validate them. We will write unit tests as we go along, so that we can be confident that as we refactor to add new functionality, we do not break what we know to be working.
The centerpiece of the Places website is reviews of places to take children, so we will start there.
3.3.1. The Initial Models
We need a list of reviews on the home page, so let’s start with a database table called Reviews, with each row representing a review of a place. Each place will have more than one review, so we will need a list of locations in a table called Places. The initial database schema is shown in figure 3.4.
Figure 3.4. In order to build the initial pages, the database consists of two tables with a foreign key from Reviews to Places.
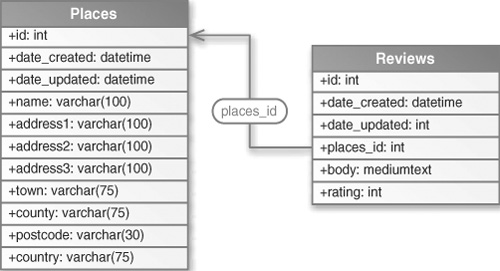
We can now go ahead and create our initial model classes, Reviews and Places. To keep things organized and easy to find, the Reviews model is stored in application/ models/Reviews.php and the Places model is stored in application/models/ Places.php. The classes are initially very simple:
class Reviews extends Zend_Db_Table
{
   protected $_name = 'reviews';
}
class Places extends Zend_Db_Table
{
   protected $_name = 'places';
}
As we explained in Chapter 2, Zend_Db_Table gives us all the functionality of a Table Data Gateway pattern without our having to write any code. This allows us to read, write, and delete from the database table by calling methods in the parent class. We have no intention of writing code that isn’t going to be used, so we will not expand our model classes until we need to. For now, we’ll populate the database directly with a few rows so we have something to display on the home page, as shown in listing 3.5.
Listing 3.5. MySQL statements to create and populate the tables with initial data
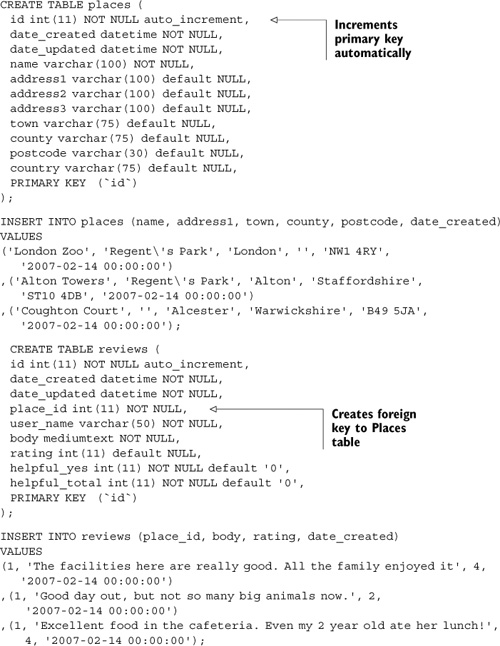
The SQL in listing 3.5 needs to be seeded into the database using a MySQL client, such as the command-line mysql application or another one like phpMyAdmin. Obviously, if you are using another database server, the SQL will have to be tweaked appropriately.
Now that we have data in the database, we can write tests using the PHPUnit framework, which will enable us to ensure that the models work as intended.
3.3.2. Testing Our Models
In section 3.1, we looked at the importance of testing our code. We use unit tests to ensure that the code works the way we intend it to. Unit testing is the process of testing individual functionality separately from the rest of the code.
The tests have to run quickly, as we want to run them whenever we make changes to the code to make sure the code functions correctly. This gives us a safety net when making changes to improve our program. If the tests still work, the changes were good. If the tests no longer work, the changes can be backed out.
The process of changing already-working code to make it better and easier to understand is known as refactoring. This is an important skill, and it’s required for maintaining an application over a long period of time. Refactoring without tests to check that the changes haven’t broken anything can be an extremely risky business, and because of this, refactoring sometimes doesn’t get done and the application’s source becomes harder to understand. With tests, refactoring is easy and possibly even fun; everything changes because of your confidence in the code.
Because we are going to write tests for the majority of our code, we need a system to run the tests. PHPUnit (http://www.phpunit.de) is a testing framework for PHP that runs each test in isolation and provides functionality to allow us to organize the test code.
Note
In order to run the unit tests, you need to install PHPUnit. The instructions can be found on the PHPUnit website (http://www.phpunit.de).
Listing 3.6 shows the initial testing of our models, although at this stage we do not have much to test!
Listing 3.6. A Places model unit test: tests/Models/PlacesTest.php
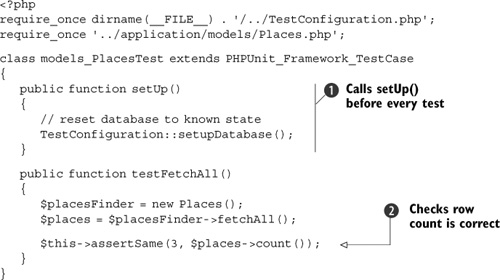
A PHPUnit test case consists of a number of separate methods that contain each test. These methods all start with the word
test, so that PHPUnit can identify them. The setUp() method ![]() is run before each test and so can be used to initialize the system for the test. This helps to ensure that tests are not
dependant upon other tests and also that one text does not cause problems for subsequent tests. The tearDown() method is run after each test and so can perform any cleanup required.
is run before each test and so can be used to initialize the system for the test. This helps to ensure that tests are not
dependant upon other tests and also that one text does not cause problems for subsequent tests. The tearDown() method is run after each test and so can perform any cleanup required.
We name the test class using the same convention as for Zend Framework classes, and we include the subdirectory name separated using underscores. In this case, the test is called models_PlacesTest because it is stored in the models/PlacesTest.php file within the tests directory. We run the test using the command-line phpunit script from the tests directory:
phpunit models_PlacesTest
For testing our models, we want to ensure that the database is in a known state for every test. We have written a separate class, TestConfiguration, which contains the setupDatabase() method to do this. It is not part of this class because it will be used for testing other models too.
Our initial test, testFetchAll(), does a simple sanity check to ensure that everything is working ![]() . It collects all the places in our test database and counts them. In this case, we are expecting three places, and that’s
what we get, as shown in figure 3.5. Of course, Zend Framework’s own unit tests ensure that the fetchAll() method works, so in your own applications, you would only test functionality that you create.
. It collects all the places in our test database and counts them. In this case, we are expecting three places, and that’s
what we get, as shown in figure 3.5. Of course, Zend Framework’s own unit tests ensure that the fetchAll() method works, so in your own applications, you would only test functionality that you create.
Figure 3.5. The unit tests are run from the command line using the phpunit script, which displays the number of tests and details of any failures.

PHPUnit maps the name of the test to the correct file, runs it, and tells us about any errors. This means that we can run any test class in isolation. In general, we will run all the tests as often as we can to ensure we do not create regressions in the application. To do this, we need to organize our tests into a hierarchy of test suites.
Test Organization
For our test case to work and to support multiple test-case classes, we will organize our tests into two suites: one for models and one for controllers. We will group these suites into an encompassing suite, so that we can run all the tests with the simple command phpunit AllTests.php. A certain amount of initialization is required, so we will put this into a separate file called TestConfiguration.php, as shown in figure 3.6.
Figure 3.6. The unit tests are divided into controllers and models. The controllers/AllTests.php and models/AllTests.php scripts allow each group of tests to be run independently if required.

The TestConfiguration.php file contains the TestConfiguration class, which contains two methods, setup() and setupDatabase(), as shown in listing 3.7.
Listing 3.7. The TestConfiguration class

The setUp() method is run when the TestConfiguration.php file is included ![]() . It sets up the include path
. It sets up the include path ![]() so that Zend Framework is on the path. Then it reuses the Bootstrap class from listing 3.1 to set up the application using the loads in the config.ini file’s test section
so that Zend Framework is on the path. Then it reuses the Bootstrap class from listing 3.1 to set up the application using the loads in the config.ini file’s test section ![]() . The test section is used so that we can specify a different database (places_test), to ensure that we don’t accidentally affect our main database.
. The test section is used so that we can specify a different database (places_test), to ensure that we don’t accidentally affect our main database.
We use the TestConfiguration::setupDatabase() method ![]() to ensure that we start each test from a clean database. This function is simply a set of SQL queries that drops the table,
creates it again, and populates it with the same data. This means that for any given test, you can be sure that the database
is in the correct state. The source code supplied with the book contains the test suite files and the full SQL code that resets
the database.
to ensure that we start each test from a clean database. This function is simply a set of SQL queries that drops the table,
creates it again, and populates it with the same data. This means that for any given test, you can be sure that the database
is in the correct state. The source code supplied with the book contains the test suite files and the full SQL code that resets
the database.
With the models defined and tested, we’ll now turn our attention to the controller part of the MVC system and create our home-page controller and update the Places model to provide the required data.
3.3.3. The Home-Page Controller
The home-page controller’s action is the default action of the default controller, so the /index/index URL will also display the home page in addition to just /. Either URL maps to the indexAction() method within the IndexController class. In this method, we need to collect a list of the most recently updated places from the Places model and assign it to the view. The view will then take care of displaying the content to the user.
Updating the Places Model
Zend_Db_Table provides the fetchAll() function to retrieve multiple rows from the database, so we could directly call it from the controller. However, we’re going to encapsulate the requirements for the home page’s list within the Places class. This is so we keep the database code where it belongs: in the model. It also provides us with a class where we can add further functionality that is specific to the concept of places.
We’ll add a new function, fetchLatest(), to the Places class, which will automatically order the results by reverse date of update, as shown in listing 3.8.
Listing 3.8. fetchLatest() ensures the business logic is kept in the model layer
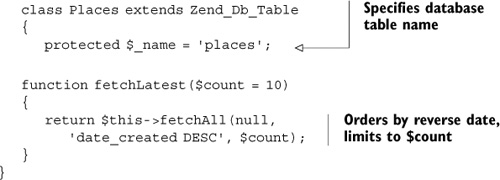
This simple function ensures that the data is ordered correctly and allows the caller to specify how many records they want to retrieve.
It is a good rule of thumb to write at least one test for every piece of functionality that you add to the model. This means that you write tests for each discrete behavior of the model class. A behavior may be implemented using multiple methods, or simply describe one use of a single method that takes multiple arguments. In this case, we add one test for fetchLatest() to the tests/models/PlacesTest.php file, as shown in listing 3.9.
Listing 3.9. The test case for the fetchLatest() method

This test method exercises the two features of the fetchLatest() method. First, we check that the number of records returned is correct ![]() , then we check the ordering by ensuring that the correct record is returned
, then we check the ordering by ensuring that the correct record is returned ![]() . The second test shows why we need to control our dataset and ensure that tests do not interact with each other. I have set
up the test data so that the second database row, with an ID of 2, has the most recent date_created. If this changed, the test would fail.
. The second test shows why we need to control our dataset and ensure that tests do not interact with each other. I have set
up the test data so that the second database row, with an ID of 2, has the most recent date_created. If this changed, the test would fail.
We have created our model for the data that will be displayed on the home page, so we’ll now move on to the controller function itself.
The Controller Action
The controller’s indexAction() method needs to ensure that the view contains everything it will display to the user. Note that this is the data specific to the main content on this page, and does not include the data that is created elsewhere, such as the ads to be displayed or any of the header or footer data.
Test names should describe the behavior tested. As you can see, we have named our test testFetchLatestShouldFetchLatestEntriesInReverseOrder(). While really long and somewhat hard to read, PHPUnit contains a feature called testdox that will translate the camelCasedWords to separate words. This gives you a really nice specification to read in the end. A well-named test method also makes it clear what specific behavior is tested in the method, which makes refactoring and bug fixing easier later.
PHPUnit also supports the use of DocBlock annotations. One useful annotation is @group, which can be used to group sets of related tests. It is often used for meta-data, such as recording bug numbers to allow the name of the test to describe the behavior under test.
The fetchLatest() function returns a Zend_Db_Table_Rowset, which can be iterated over using the foreach() construct in our view script. In listing 3.10. we assign it to the view within indexAction().
Listing 3.10. indexAction() displays a list of recently added places

The IndexController’s indexAction method is quite simple. All it does is assign a couple of member variables to the view. The model has encapsulated all the details of dealing with the database, leaving the controller to work at the business-logic level. This is MVC separation at work, and the controller only needs to worry about linking the model data to the view and letting the view render itself.
As with the model, we now need to write unit tests for the controller so that we can ensure that it continues to work as the site grows.
Testing the Controller
To round off our initial work on the home-page controller, we’ll write a test to ensure that it works. We do this in the tests/controllers/IndexControllerTest.php file. The controller’s subdirectory of the tests directory allows us to separate our tests in much the same manner as we separate our application code.
We’ll create a new test case class called controllers_IndexControllerTest, as shown in listing 3.11.
Listing 3.11. Testing the index controller
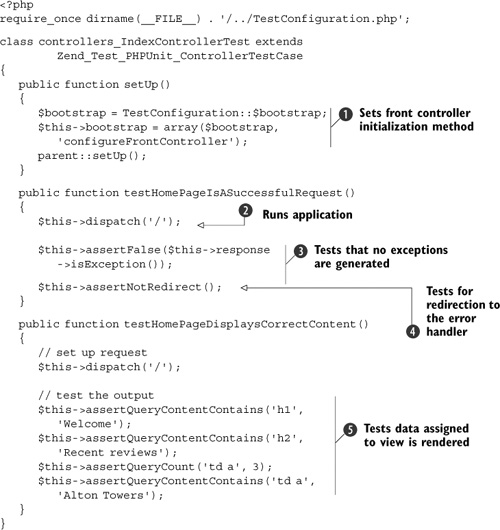
Fortunately, testing controllers is made simple by Zend Framework’s Zend_Test_PHPUnit_ControllerTestCase class. This class does the heavy lifting of setting up the front controller to enable testing of specific controller functionality. In our case, we want to test that the home page doesn’t cause an error, by using testHomePageIsASuccessfulRequest(), and that it displays the expected content, by using testHomePageDisplaysCorrectContent().
We need to ensure that the front controller is set up the same way for every test in the test case. This is done by the parent’s
setUp() method, but before we call it, we need to provide a method for configuring the front controller after it has been set up.
Our Bootstrap class in listing 3.1 has a function called setupFrontController(), which is exactly what we need here. We use it by setting the local member variable bootstrap to an array containing the
instance of the Bootstrap class that we created in TestConfiguration’s setup() method and the name of the Bootstrap’s method that we want to be called ![]() .
.
The first test, testHomePageIsASuccessfulRequest(), ensures that the request was successful. First, we use the dispatch() method to run the application against the / URL ![]() . This method mimics the user navigating to the home page. We then test that no exceptions occurred by asserting that the
response object does not have any exceptions stored
. This method mimics the user navigating to the home page. We then test that no exceptions occurred by asserting that the
response object does not have any exceptions stored ![]() . We also check that the error handler plug-in hasn’t redirected the page to an error action by using the built-in assertNotRedirect() test
. We also check that the error handler plug-in hasn’t redirected the page to an error action by using the built-in assertNotRedirect() test ![]() .
.
The second test for the home page, testHomePageDisplaysCorrectContent(), ensures that the page displays the expected data. We take advantage of the assertQuery family of methods that are built
into Zend_Test_PHPUnit_Controller-TestCase. These methods allow us to specify where to find some given text using CSS-like specifications ![]() . In the first assertion, we check that the h1 tag contains the word “Welcome”. The other assertions ensure that the other parts of the view script rendered as expected.
. In the first assertion, we check that the h1 tag contains the word “Welcome”. The other assertions ensure that the other parts of the view script rendered as expected.
This completes the testing of the home-page controller. With that test in place, we are able to confidently move forward.
3.4. Summary
This chapter has introduced a real application, Places to take the kids!, which will be expanded upon throughout the rest of the book as we discuss all the components of Zend Framework. In keeping with some modern design practices, we haven’t tried to design Places up front; instead we have a story that describes what the site is about, and from that we have an initial list of functional ideas. We then concentrated on the model and controller for the home page and have put unit tests in place. Testing is vitally important—we need the freedom to be able to change our code to suit each new piece of added functionality and to be sure that existing code still works!
We have set up the directory structure for Places and have also created the first model required. For simplicity, our model directly extends Zend_Db_Table to provide database access and it is where we have implemented the business logic required to retrieve a list of the most recently updated locations.
We are now ready to look in detail at the view components of Zend Framework, which will introduce the Composite View design pattern to allow us to create and maintain a common look and feel across the website.