
Chapter 11. Deployment
| This chapter covers |
PHP and Zend Framework allow you to develop web applications rapidly, but they also present the temptation to cut corners while developing. Many readers will have experienced that sudden cold sweat after having accidentally deleted an important piece of code and frantically tried to fix a live site before anyone noticed! In this chapter, we’ll run through development and deployment methods that can be used to ensure quality work without curbing enthusiasm. By providing a kind of safety net, the practices we’ll discuss allow more freedom and confidence in the way you approach your work.
11.1. Setting up the Server
We’ll kick off this chapter by looking at the environment under which development will progress to final deployment. Just as the rehearsal stages of any theatrical performance are intended to prevent problems occurring in the live production, careful preparation through the proper setup of our server environment can avoid problems in our live implementations.
The typical development, staging, and production environments are set up as follows, whether on the same physical machine or spread across several:
- Development— This is the rehearsal stage, in which the application is developed, changes are made and tested, and the final production is shaped. Depending on the preferences of the individual developers, this may include one or several machines. Different configurations of development machines may also have the advantage of showing up bugs that might otherwise have been missed.
- Staging— Like a dress rehearsal, this stage should mimic the final production environment as closely as possible. No development takes place on this server, so any changes still need to be made on the development server and moved across to staging. This version is accessible only by the development team and anyone else concerned with moderating the release of the application.
- Production— This is the live public performance, accessible via the internet. No development takes place on this server, because it would not only potentially break a live site but also the chain of quality control.
For single developers and very small teams, using a development server to make local changes before committing to a production server would be a minimal requirement. Changes made and tested on the development server are only uploaded to the production server when all tests have been passed. Larger teams needing to coordinate local changes made by several developers before moving to a live production server would likely require a staging server.
It’s worth stressing that what is “best practice” depends on the requirements of the team and the project. Each stage in the process adds administration requirements and costs that could stretch the resources of small teams and add to the complexity of low-budget projects. An ideal development environment is of little use if it introduces administrative delays that result in projects being late. We’ll work through an example based on how we worked with some of the code for this book, and we urge you to take from it what’s relevant to your particular needs.
11.1.1. Designing for Different Environments
One of the development goals for any kind of application is to be able to be deployed in different environments and work with minimal reconfiguration. Other than requiring PHP 5.1.4 or greater, Zend Framework itself has few specific requirements, so application portability is largely a matter of careful design.
Most of the differences between one implementation of an application and another occur during initialization where the configuration settings are read in. In a Zend Framework application, this differentiation most commonly occurs in the bootstrap file. In our Places application, we’ve separated the bootstrapping into its own class, to which we can pass the deployment environment as a parameter from the index.php file in the web root, as shown in listing 11.1.
Listing 11.1. The contents of our index.php file
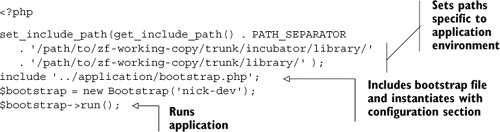
You’ll notice that an additional benefit of this approach is that it allows us to set any environment-specific paths—in this case, to a local working copy of the latest Zend Framework core components as well as the “incubator” components.
In listing 11.1, we specified using the nick-dev configuration section by passing it as a parameter to the Bootstrap constructor before the call to run. Listing 11.2 shows a stripped-down version of bootstrap.php that highlights how the deployment environment is set and used when calling the configuration settings.
Listing 11.2. A stripped-down version of the Bootstrap class in bootstrap.php
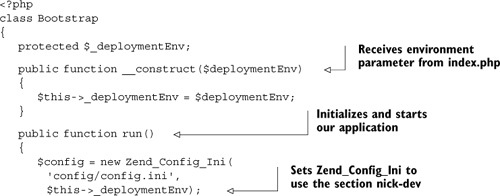
The second parameter passed to Zend_Config_Ini in listing 11.2 specifies that the section to be read from our config.ini file, which is the one passed from index.php (nick-dev). Zend_Config_Ini not only supports INI sections but also implements inheritance from one section to another. An inheriting section can also override values inherited from its parents.
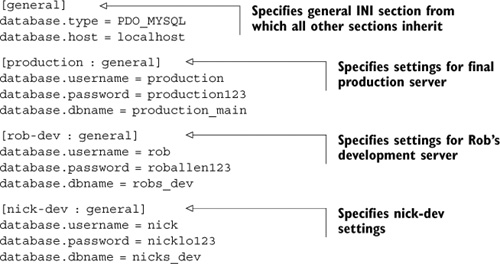
In listing 11.3, we can see that the nick-dev section in our config file inherits from the general settings, as indicated by the [child : parent] syntax of the INI file. Therefore, the database settings are being reset to those of a local development database.
Listing 11.3. The contents of our config.ini file
What we’ve managed to do so far is to contain the implementation changes within the index.php file and the configuration file. Even better, we’ve managed to do it in a way that allows us to move those files around without having to change the files themselves. To demonstrate this a little further, let’s take a look at Rob’s index.php file, which never needs to move from his local machine:
    $bootstrap = new Bootstrap('rob-dev'),
    $bootstrap->run();
Finally, on the production server is the untouched index.php file with its own setting:
    $bootstrap = new Bootstrap('production'),
    $bootstrap->run();
Having set all that up, the only file that needs to move between environments is config.ini, which, because it contains the varying sections, can be the same file in use by all stages. Containing our application in this way simplifies the moving of files between hosts, whether you’re synchronizing using your favorite FTP client or through a scripted deployment.
While we’re on the subject of hosts, let’s look at ways of setting up hosts for our development machines.
11.1.2. Using Virtual Hosts for Development
Having outlined the use of separated hosting environments for the different stages of development, it’s worth going through an example of how the hosting itself can be set up to accommodate this. In this section, we’ll look at a brief example that uses the Apache web server on a Unix-based machine on a small local network.
Virtual hosting is a method of serving multiple websites from a single machine. The use of a single machine reduces not only the cost of hardware but also the time required to support and maintain that machine. The two main variations of virtual hosts are name-based virtual hosts that share the same IP address, and IP-based virtual hosts, in which each virtual host has its own IP address. For the sake of simplicity, we’re using name-based hosting. Once it’s set up, we should be able to access our separate development stages with URLs like http://places-dev/ and http://places-stage/.
Tip
Zend Framework uses mod_rewrite to direct all requests via the front controller file. Combine that with its routing functionality, and you increase the possibilities of errors resulting from path issues. Setting up virtual hosts is one way to reduce the time wasted on path problems, because http://127.0.0.1/~places-dev can become http://places-dev/.
Setting up the Hosts File
The hosts file stores the information that maps the hostname to an IP address. Name-based hosting uses a single address for multiple names, so if we look at the hosts file in /etc/hosts we’ll see the following entry:
    127.0.0.1 places-dev
    127.0.0.1 places-stage
The names places-dev and places-stage are both being mapped to the localhost IP address 127.0.0.1, meaning that any requests this machine gets for those names will be directed to its own web server. Rather than attempt to configure a full DNS, we’re also going to configure the hosts file of one of the networked machines to point the same names to the IP address of the host machine:
    192.168.1.110 places-dev
    192.168.1.110 places-stage
Those settings in each network machine will ensure that requests to places-dev and places-stage will be directed to the IP of the machine acting as our web server. Remember that the IP address of the machine you’re working with may not be the same as this example. That also applies to many of the settings in this chapter, including those in the following Apache configuration settings.
Configuring Apache
Having set up the hosts file, we now need to configure the virtual hosts in Apache’s httpd.conf configuration file, as shown in listing 11.4.
Listing 11.4. Our virtual host settings in Apache’s httpd.conf file

In listing 11.4, we can see that the NameVirtualHost directive specifies that anything coming in on port 80 will receive requests for the name-based virtual hosts.
The directory section defines a few general settings for all virtual host directories. One to note in particular is the AllowOverride setting, which allows directories to override certain server settings using .htaccess files. This is a requirement for Zend Framework-based sites because mod_rewrite is used to direct all incoming requests through the index.php file.
Each VirtualHost section defines the full path to the web root and the name of the server.
Having specified the DocumentRoot in httpd.conf, we need to create those directories:
    $ cd Sites/
    $ mkdir -p places-dev/web-root
    $ mkdir -p places-stage/web-root
Now, when we restart Apache, it will pick up the new settings:
$ sudo apachectl graceful
If all went well, pointing our web browser at http://places-dev from either of the two machines whose host files we edited should take us to whatever files are located in / path/to/Sites/places-dev/web_root on the hosting machine. Of course, at this point there are no files in the hosting space. To get those files, we’ll need to check them out of the version control repository.
11.2. Version Control with Subversion
With Rob being in the United Kingdom and Nick and Steven being in Australia, working collaboratively on the code for this book wasn’t as simple as shouting across a desk. In order to keep up with our changes, we needed to have some kind of version control system. There are many different version control systems with varying functionality, and the one we’ll use for Places is the same one used in the development of Zend Framework: Subversion.
Subversion is an open source system that can sort, store, and record changes to your files and directories over time, whilst also managing the collaborative use of that data over a network. Getting acquainted with the process of version control, and with Subversion in particular, will allow you to work more closely with the framework’s repository and also introduce you to a workflow that will further improve your deployment practices.
We’re going to run through some of the day-to-day uses of version control using Subversion. Our intention is to give you an overview of the process and leave you with the confidence to investigate further.
To try some of the examples out for yourself you’ll need to have access to a Subversion host. This is admittedly a bit of a chicken and egg situation; setting up a Subversion server is beyond the scope of this chapter. We’ll therefore presume you have access, and we’ll focus on setting up and working with a project in Subversion. (You can find information on Subversion online, or in books such as the Subversion in Action ebook by Jeffrey Machols (www.manning.com/machols).
11.2.1. Creating the Subversion Repository
To store projects in Subversion, we first need to create a repository. Because creating a repository on a network drive isn’t supported, this must be done locally using a drive on the same machine. To create the repository for Places, we need to enter the following command:
svnadmin create /path/to/repository/places/
The Subversion project officially recommends setting up three directories, trunk/, tags/, and branches/, under any number of project roots. The trunk is fairly obviously the main directory where the bulk of the action takes place. The tags directory holds meaningfully tagged copies; for example, we might decide to mark a stage in the development of Places in the context of writing this book:
    $ svn copy http://svn.example.com/svn/places/trunk
    http://svn.example.com/svn/places/tags/chapter-04
    -m "Tagging places as snapshot of development at chapter 4."
The branches/ directory holds branched copies of the filesystem, such as those we’d create if we needed to experiment with a significant change to the architecture of Places. We’ll cover branching in a little more detail further on in this chapter.
Since we’re setting up these directories locally and we want them to be under version control, we’ll do so using the svn mkdir command:
    $ cd /path/to/svn/places/
    $ svn mkdir trunk
    $ svn mkdir tags
    $ svn mkdir branches
Having created the relevant directories, we can import the partial project we have started:
    $ svn import /path/to/places file:////path/to/svn/places/trunk/
    -m "Initial import"
    Adding places/web_root/index.php
    Adding places/web_root/.htaccess
    Adding places/application

    Committed revision 1
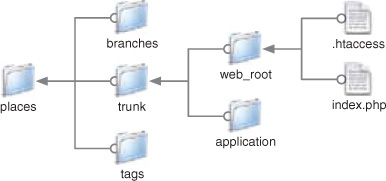
Having created those directories and imported the start of our project into the Subversion repository, we’re ready to start using it for development. Figure 11.1 shows the Subversion directory structure after the first commit.
Figure 11.1. The Places Subversion repository after the first commit
With the basic structure in place, we now need to create a working copy on our local machines, which means checking it out from the repository.
11.2.2. Checking out Code from the Repository
Having set up the project repository to this stage, those of us on one side of the world can finish up for the day and leave the others, whose day has just begun, to add their work. By the time our morning comes, the repository is bursting at the seams with new files, which we check out as a working copy into our local development machine, as shown in condensed form in listing 11.5.
Listing 11.5. Checking out the latest work from the repository
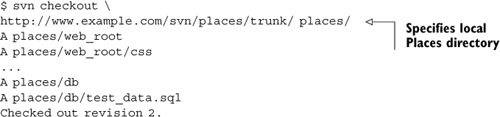
Once we’ve checked out a working copy of the files and made some changes, the next step is committing those changes back to the repository.
11.2.3. Committing Changes to the Repository
A commit sends changes from your working copy to the Subversion repository, usually accompanied by a short, descriptive message. At this point, it’s worth developing some good commit habits, the main one being to keep the purpose of your changes as focused as possible. Just think of the other members of your team having to check out one big set of changes that could be scattered across multiple files and you’ll realize how much additional work you have just given them, especially if your changes clash with any of theirs. You’ll also notice any lack of focus when your commit messages start becoming unclear and difficult to write. Most teams will have at least a few basic commit guidelines, such as including issue-tracker reference numbers in the commit message.
Going through our new working copy of Places, the first thing we notice is that the database settings in the config.ini file are different from those needed for our local database server, so we will need to change them. For now, we can make a copy, which we’ll call config.ini.default, and use the original to get the local application working. Ultimately, we’ll set the config file up more consistently, but for now let’s commit config.ini.default, as shown in listing 11.6, so that any further commits won’t write over our individual config files.
Listing 11.6. Committing our changes to the repository

In listing 11.6, you may have noticed the repeated status checks. To be sure that your working copy is as you expect, it’s good to get into the habit of checking its status before performing any further action.
Since each user of our repository will also be committing changes, we’re going to need to keep up to date with those changes by using the svn update command.
11.2.4. Updating a Local Working Copy
At each stage of development, we need to check on the status of our working copy and make sure it’s up to date with the repository. Not surprisingly, the svn update command takes care of updating a local working copy with the latest changes, and those changes are indicated by the output of the command. In listing 11.7 we perform an update of our working copy.
Listing 11.7. Updating our working copy from the repository
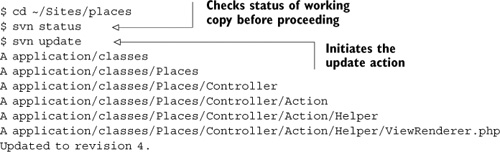
As indicated by the letter A preceding each output line in listing 11.7, the ViewRenderer.php file has been added, together with its parent directories. This has been a simple update, and no changes conflict with our working copy. Sometimes, though, conflicts do occur, and we need to be able to deal with them.
11.2.5. Dealing with Conflicts
Subversion is able to manage changes even when two people have edited the same file at the same time by simply combining changes as needed. Conflicts may arise, though, if changes have been made to the same lines of a file. For example, this is what you’d see when a later update results in a conflict with the file bootstrap.php, indicated by the letter C preceding the following file information:
    $ svn update
    C application/bootstrap.php
    Updated to revision 5.
In figure 11.2, we can see that the update produced four variations of the conflicting file:
Figure 11.2. The four conflicting variations of the bootstrap.php file after svn update
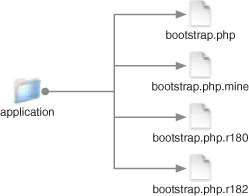
- bootstrap.php.r1110 is the original before our local modification. The “r1110” is the revision number of the file at the previous update
- bootstrap.php.r1112 is the most recent revision that someone else committed to the repository
- bootstrap.php.mine is our modified local working copy
- bootstrap.php contains the difference between the files, otherwise known as the diff, of both versions
Taking a look inside bootstrap.php, we can see the following conflicting lines:
<<<<<<< .mine
Zend_Controller_Action_HelperBroker::addPrefix(
   'Places_Controller_Action_Helper'
);
=======
Zend_Controller_Action_HelperBroker::addPrefix(
   'Zend_Controller_Action_Helper_'
);
>>>>>>> .r1112
This is roughly equivalent to the output generated if we were to run this command:
diff bootstrap.php.mine bootstrap.php.r1112
From this, we can see that our edit, .mine, removed the underscore from the end of the parameter string Places_Controller_Action_Helper, while the other edit changed the start of the parameter name to Zend_ instead of Places_. After a quick discussion, we decide that neither of our changes is needed and we should revert to the version before either of our changes. This is a simple fix—we could either edit bootstrap.php or copy bootstrap.php.r1110 over bootstrap.php. For the sake of the example, let’s edit bootstrap.php to contain only this line:
Zend_Controller_Action_HelperBroker::addPrefix(
   'Places_Controller_Action_Helper_'
);
Having done that, a quick status check indicates that while we’ve corrected the file, the Subversion conflict still exists:
    $ svn status
    C application/bootstrap.php
Since we’ve decided that, out of the four variations, bootstrap.php is now the file we want to use, we need to tell Subversion that the issue has been resolved and which file to go with:
    $ svn resolved application/bootstrap.php
    Resolved conflicted state of 'application/bootstrap.php'
Having done that, another svn status check indicates that the file is now marked as modified:
    $ svn status
    M application/bootstrap.php
The other three files have also been removed as part of the resolution process, leaving only the bootstrap.php file:
    $ ls
    bootstrap.php config.ini controllers views
    classes configuration models
The final step is to commit the changes back to the repository and to add a message noting the resolution:
    $ svn commit -m "Resolved change conflict with bootstrap.php"
    Sending application/bootstrap.php
    Transmitting file data .
    Committed revision 6.
We’ve now taken a quick look at some of the common day-to-day tasks involved in using Subversion. There remain just a few topics that are worthy of mention, starting with getting a clean copy of our code from the repository.
11.2.6. Getting a Clean Copy from the Repository
Subversion stores its information in its own .svn directories inside each directory in the repository. Those .svn directories are necessary while the content is under version control, but you may not want them in the final release, such as when you’re going to FTP the contents to a server. Listing 11.8 shows how you can use the export command to get a copy from the repository, without all those hidden directories. (The output has been abbreviated.)
Listing 11.8. Using the export command to get a clean working copy

Note that having performed the export in listing 11.8, we’re left with the same files we would have had if we had done a checkout, but since they don’t contain the .svn directories, they’re not under version control.
One reason to export a clean copy of our code is so we can work it into another project or take it in a different direction. There is another way to take our code in a different direction though, by using separate branches.
11.2.7. Using Branches
We gave an example of how tagging could be used to mark specific points in the progress of this book, but what about a bigger occasion, such as when we actually finish it? That would be an occasion to use the branching capabilities of Subversion:
    $ svn copy http://www.example.com/svn/places/trunk/
    http://svn.example.com/places/branches/its-finished
    -m "Woohoo, we've finished the book!"

    Committed revision 200.
As the name suggests and figure 11.3 illustrates, branching creates a line of history independent of the main trunk. There are numerous reasons why we might decide to branch our code. Zend Framework branches on each official minor and major release, but we could equally decide to branch for a custom version of the main code or for an experimental version.
Figure 11.3. Branches in a Subversion repository

The subject of branching could fill a whole chapter, so this brief mention is really just to indicate its use, so you can look into it further on your own; again, the Subversion in Action ebook by Jeffrey Machols (www.manning.com/machols) has information on this topic.
The last topic to mention is how to include external code that your own code relies on.
11.2.8. Externals
While we’re moving files between working copies and the repository, there is one element that has not been accounted for—our Places application is reliant on the Zend Framework code, which is external to our Places code. How do we make sure that the revisions in our code are matched with any external code dependencies? We can avoid having to deal with that by mapping one of our local directories to the external URL of Zend Framework’s repository:
    svn propedit svn:externals .
    application/library/Zend
    http://framework.zend.com/svn/framework/standard/branches/
         release-1.5/library/Zend/
Now any checkout of the repository that includes that local directory will also check out the Zend Framework code. Notice that in order to avoid issues with mismatched code versions, we pointed to a stable release branch rather than a branch that changed too frequently, such as trunk.
One of the adages of version control is never to commit broken code, and one way we can assure that this doesn’t happen is to thoroughly test our code before committing. In the next section, we’ll look at one of the ways to test the systems we’re developing.
11.3. Functional Testing
Throughout this book, we’ve made a point of unit testing the code we’ve been working on. The combination of the thorough code coverage of Zend Framework’s unit tests with application-specific unit tests should, from the programmer’s perspective, provide ongoing feedback that the code is performing as expected. But even a system that successfully passes all unit tests may fall short in other areas, such as how the system functions in actual use. To test this, we need to move on to what can be somewhat broadly referred to as functional testing.
While the functionality of the system can be narrowed into more specific testing areas, such as its usability, security, and performance, we’re going to outline more general methods of testing the system from the perspective of the end user. We’ll attempt to test what the user can do with the system. For example, in security testing we could test whether a user that isn’t logged in can access a restricted area.
Because we’re most often developing web applications with Zend Framework, testing from the perspective of the end user is most closely mimicked via a web browser. The Selenium IDE testing tool does exactly this.
11.3.1. Functional Testing with Selenium IDE
Selenium IDE is a tool for testing web applications the same way you use them: with a web browser. The Selenium IDE is a tool for recording, editing, and playing back actions. Once actions are recorded, you can run, walk, or step through them with or without start points and breakpoints.
What makes Selenium IDE particularly useful is that the PHPUnit unit-testing tool used by Zend Framework has a Selenium RC extension, which means we can integrate the Selenium IDE tests into our overall testing procedure. Hopefully you already have PHPUnit installed, so let’s look at the installation of Selenium IDE.
Note
The installation of PHPUnit was discussed in Chapter 3.
Installing Selenium IDE
Since Selenium IDE is an add-on for the Firefox web browser, you need to have Fire-fox installed (available at http://www.mozilla.com/firefox/) before you can install the extension.
Selenium IDE can be downloaded from the Firefox add-ons page (https://addons.mozilla.org/firefox) or from the project’s own download page (http://www.openqa.org/selenium-ide/download.action). The easiest method of installing the extension is to click the link to the .xpi file from within Firefox, and allow Firefox to handle the download and install.
Recording a Selenium IDE Test
To record a test, select Selenium IDE from the Firefox tools menu, which automatically sets it in recording mode. Next, simply interact with the web pages as usual.
Let’s record a very simple test that queries Google for “zend framework”, then follows the links to Zend Framework’s manual page. Follow these steps:
1. Navigate to google.com.au.
2. Enter “zend framework” in the search field, and click the “Google Search” button.
3. After the list of results appears, click the link to http://framework.zend.com.
4. On Zend Framework’s home page, click the Documentation link and choose Reference Guide from the drop-down list to get to the manual.
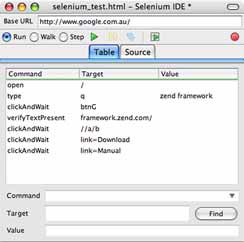
Once you’ve finished performing those steps, you can stop recording by clicking the red button at the top right of the window. If all went well, Selenium IDE will have the recorded actions visible in its Table tab, shown in figure 11.4.
Figure 11.4. Selenium IDE in Table tab with the results of the recording
If all did not go well, you can either repeat the process, altering the steps as needed, or you can edit the steps you have already recorded.
Editing the Test
If you’re following along, you’ll probably notice in figure 11.4 that we accidentally clicked the Downloads link on Zend Framework’s home page. Since this was not the aim of our test, we want to edit out that step. We can do so by switching to the Source tab of the Selenium IDE window, which will display the HTML shown in figure 11.5.
Figure 11.5. Selenium IDE in Source view with the results of our recording
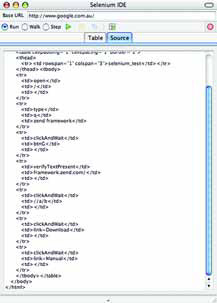
The lines that we need to remove from the source in figure 11.5 are these:
<tr>
   <td>clickAndWait</td>
   <td>link=Download</td>
   <td></td>
</tr>
They can be edited directly in the Source tab.
Having removed those lines, we can give it a quick run through by clicking the Play button.
Saving the Test
If the test performs as expected, we can save it for future use. With Selenium IDE active, choosing File from the menu bar presents several options for saving tests. In this instance, we’ll choose Save Test As, which will save the test in the default HTML format we saw in figure 11.5. It can be opened later and the test repeated as needed, ideally in an automated way.
11.3.2. Automating Selenium IDE Tests
In the previous example, we recorded a single test and ran it completely inside the browser under what’s called Selenium IDE’s test runner mode. This is fine for single tests, but to make ourselves truly productive, we need to use Selenium RC, which allows us to run multiple Selenium IDE tests written in a programming language.
One of the supported languages is, of course, PHP, which is available as “PHP—Selenium RC” when saving the test via Export Test As. Unfortunately, at the time of writing, the resulting exported file contains code that is not only wordy but does not make use of the newer PHPUnit_Extensions_SeleniumTestCase PHPUnit extension. Listing 11.9 shows the exported Selenium IDE test as a PHPUnit test case, which we chose to rewrite to be more efficient. Whether you will need to rewrite your own tests will depend on updates to the Selenium IDE and personal preference.
Listing 11.9. Our Selenium IDE test as a PHPUnit test case

Notice that our test case is actually missing the part of the test we made with Selenium IDE that operates within the zend.com domain. Because Selenium RC runs partly outside the browser, we ran into issues with the same-origin policy, which prevents a document or script “loaded from one origin from getting or setting properties of a document from a different origin.” The original test we recorded with Selenium IDE worked because it was running completely inside the browser as an extension. Selenium RC runs pages through a proxy, which partly circumvents the same-origin issue, but support for switching domains is currently experimental.
Having written our test, we’re almost ready to run it, but because it relies on the Selenium RC Server, we need to downloaded that from http://www.openqa.org/selenium-rc/download.action and start it with this command:
java -jar /path/to/server/selenium-server.jar
Once the server is running, we’re ready to run our test, as shown in figure 11.6.
Figure 11.6. Running our Selenium IDE example unit test using PHPUnit through the Selenium RC Server

Great! It passed. Now that our Selenium IDE test is written as a PHPUnit unit test, we can continue adding tests and incorporating them as part of an overall test suite that can be run from a single command.
11.3.3. Functional Testing with Zend_Http_Client
As the manual states, “Zend_Http_Client provides an easy interface for performing Hyper-Text Transfer Protocol (HTTP) requests.” At its most basic level, that is what a web browser like Firefox is. With that in mind, let’s look at listing 11.10, which shows an example of the tests we ran with Selenium IDE rewritten to use Zend_Http_Client.
Listing 11.10. Our Selenium IDE test rewritten to use Zend_Http_Client
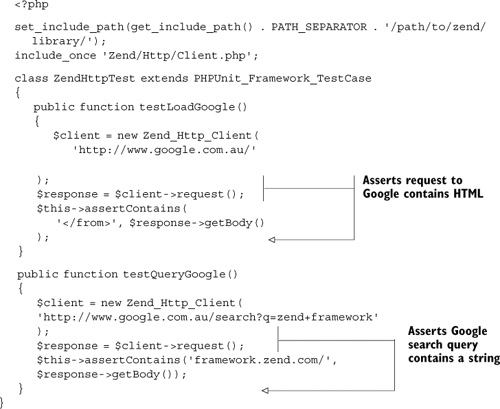
The similarities between the code for this and the previous Selenium IDE test are pretty evident, so there isn’t any need to do much more than run the test. The results are shown in figure 11.7.
Figure 11.7. One failure, due to a typo, on the first run of our unit test
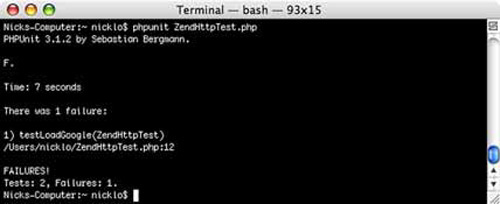
We had one failure due to the typo </from> instead of </form>. After correcting that, let’s check the results of running the test again in figure 11.8.
Figure 11.8. The final unit test is successful
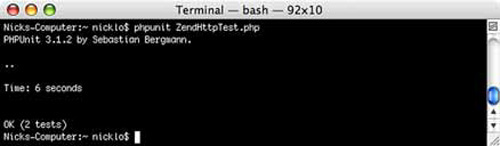
Great! That passed, and just like the Selenium IDE-based tests, it can be easily incorporated into a test suite. Zend_Http_Client does not currently have all the capabilities that Selenium IDE has, such as the ability to test JavaScript, but it is a relatively simple way to make functional tests.
We’re almost at the end of this chapter, but we’ll briefly cover an aspect of deployment that will appeal to the inner laziness of all developers: scripting the deployment process.
11.4. Scripting the deployment
We briefly mentioned using the svn export command to get a clean version of a Subversion repository, which we could transfer via FTP to a production server. That solution would be useful if, for example, we’re working with a client’s production server over which we have no control. If we did have control over the server, there’s no reason why the production server could not also be under version control and be updated with the svn update command. Since we’ve already spent a lot of time discussing methods of automating tests, the natural extension would be to automate the testing and deployment of our code between the different environments.
Unfortunately, scripting deployments is too deep a topic for a few paragraphs in this chapter, and it’s also quite specific to each team’s work requirements. We can, however, point you to Zend Framework’s build-tools directory for inspiration. This is available at http://framework.zend.com/svn/framework/build-tools/ and contains a series of shell scripts that export from the repository, generate the documentation, and generate the zip and tarball archives that can be downloaded from Zend Framework’s download page.
Another option would be to run all automated tests and only continue with the deployment if all tests pass. The running of these deployment scripts can also be automated, perhaps on a scheduled basis, resulting in a form of “continuous integration.”
11.5. Summary
This chapter’s tour of deployment practices is admittedly more a taste than a full meal, but hopefully it has whetted your appetite for more information. Our reason for including a chapter on the topic of deployment was to illustrate that producing a quality product does not stop with just writing quality code and to give you a grounding in some of the approaches and practices.
We also wanted to demonstrate how some of the current Zend Framework components, like Zend_Http and Zend_Config, can be involved in the process. You can be sure that there will be an increase in the number of components specifically targeted at the deployment aspect of development.
Which of these practices you decide to implement will depend not only on your working environment but also on the needs of the projects you’re working on. Ultimately, if this chapter has given you a clearer overview of the process and has inspired you to investigate any part of the topic further, it will have done its job.