
Chapter 10. Email
| This chapter covers |
PHP has a reasonably diverse range of functions for dealing with mail, from its mail() function, which most PHP programmers of any level will be familiar with, to its IMAP, POP3, and NNTP functions. Unfortunately, the latter need to be specifically compiled into the PHP installation, which means they may not be available for some users. In contrast, Zend_Mail is a fairly complete mail implementation that does not require any specific PHP configuration aside from the general requirements of Zend Framework itself.
We’ll start this chapter with general information about how email works, then we’ll go into more detail about the construction of an email message with Zend_Mail. From there, we’ll expand on your practical knowledge by building a simple support tracker that we’ll use while developing our Places application.
10.1. The Basics of Email
Whenever we need to describe technology to clients, we start by looking for comparable real-world examples, particularly appropriate when explaining email, because it’s actually modeled on physical mail. Let’s look at how email works and see what part Zend_Mail plays in the process.
10.1.1. Email Simplified
Just as the complex routing process of physical mail can be reduced to simply dropping a letter in the mailbox and waiting for it to arrive in the addressee’s letterbox, so it is with email, albeit many times faster. In the following example, illustrated in figure 10.1, we’ll look at a fairly typical use of email in a web application, where our user, Bert, sends a message inviting his friend, Ernie, to sign up on this fantastic new website he has just found.
Figure 10.1. A simplified illustration of the processes involved in sending an email from an HTML form to its recipient’s email client

Bert starts by writing his message in the website’s form and, once satisfied, clicks Submit, which sends the contents to the server in a POST, or occasionally a GET, HTTP request method. Zend_Mail then composes this information into email format and forwards it to the mail transfer agent (MTA). Since Zend_Mail defaults to using Zend_Mail_Transport_Sendmail, which is a wrapper for PHP’s own mail() function, the expected mail transfer agent is sendmail.
Having accepted the email, the MTA routes any local mail to local mailboxes (that is, mail for domains with a DNS entry on the same machine) or, in the case of this email for Ernie, places it in the queue to be forwarded on. Once it clears the queue and is sent, the email will be bounced from server to server before finally landing in the receiving mail server where it awaits collection. From there, all that is needed is for Ernie to click Get New Mail, and his mail client (mail user agent, or MUA) will collect the mail using a protocol like the Post Office Protocol (POP3).
10.1.2. Dissecting an Email Address
To go into a bit more detail about the routing of email messages, we need to look at the key component, the email address. The simplest way is to compare it to a physical address. Table 10.1 shows how the two compare. While Bert’s physical location is indicated by an increasingly widening, or narrowing, depending on how you read it, geographic description, his email address similarly uses a series of suffixes to identify his network location.
Table 10.1. Comparing a physical address with an email address
|
Physical Address |
Email Address |
||
|---|---|---|---|
| Addressee name: | Bert | Account name: | bert@ |
| Street address | 10 Some Street, Sydney, NSW 2000 | Account domain: | bertsblog |
| Generic top-level domain | .com | ||
| Country code top-level domain (additional and optional) | .au | ||
| Country | Australia | ||
Just as the responsibility for relaying physical mail lies with the sending parts of the various postal mechanisms and postal workers, so to do the sending MTAs handle the transfer of email. By constant referrals to the Domain Name System (DNS), the mail transfer agents work backward through the email address until the message arrives at the local domain. At each stage, the path taken is determined by the availability of servers, successfully passing firewalls, spam, and virus filters.
There’s much more to the workings of email, but this is a good time to start looking at the main reason we’re here: Zend_Mail. As well as going into some of its features, we’ll focus on some of the details of email that Zend_Mail can take care of.
10.2. Introducing Zend_Mail
While the previous discussion portrayed Zend_Mail as having a fairly minor role in the overall process, it’s nonetheless a pivotal one. Not only can Zend_Mail be used to send mail via sendmail or SMTP, it can also enable you to compose messages, add attachments, send HTML-formatted email, and even read mail messages.
10.2.1. Creating Emails with Zend_Mail
An email needs at least three things before Zend_Mail can send it:
- a sender
- a recipient
- a message body
In listing 10.1, we can see how that bare minimum, plus a subject header, is perfectly adequate for Bert to send his invite to Ernie. All those familiar with PHP’s own mail() function will immediately appreciate the way Zend_Mail encapsulates the mail composition in a much more pleasing interface.
Listing 10.1. A simple Zend_Mail example
<?php
require_once 'Zend/Mail.php';
$mail = new Zend_Mail();
$mail->setFrom('[email protected]', 'Support'),
$mail->addTo('[email protected]', 'Bert'),
$mail->setSubject('An Invite to a great new site!'),
$mail->setBodyText(
   'Hi Bert, Here is an invitation to a great new web site.'
);
$mail->send();
Now that we’re looking at the composition of our email, the first thing worth mentioning is that the email produced by listing 10.1 is simple enough that it sits comfortably within the specification for email, otherwise known as RFC 2822. The specifications for email are handled by the official internet body, the Internet Engineering Task Force (IETF), and it’s worth being familiar with some of this information because you’ll see references to it elsewhere. For example, the Zend Framework manual states that one of the validation classes, Zend_Validate_EmailAddress, “will match any valid email address according to RFC 2822.”
Unfortunately RFC 2822 is a fairly limited specification, and had Bert wanted to send an invite to his friends in non-English-speaking countries, he would have had problems without the Multipurpose Internet Mail Extensions (MIME). MIME is a collective name for a series of RFC documents that add additional functionality to the basic email specification, such as character encoding, attachments, and more. Zend_Mime provides the MIME functionality in Zend_Mail; it can also be used as a component on its own.
All that the code in listing 10.1 really does is define a few headers followed by the body, then it sends the email. Table 10.2 compares the role of that email content to the parts of a physical letter.
Table 10.2. Comparing a physical letter with an email
|
Physical mail |
|
||
|---|---|---|---|
| Envelope | Recipient and address | Headers | Sender name, recipient name, and more |
| Letter | The written contents | Body | The text of the message being sent |
Just as you may want to send a picture of your kids in a physical letter, you can add images as attachments with Zend_Mail by using a line like this:
$mail->createAttachment($pictureOfKids);
Having dropped that important picture into your physical envelope, you could then write a warning on the envelope: “Photographs—Do NOT Bend.” With Zend_Mail, we could theoretically do the same thing by adding additional headers:
$mail->addHeader('PhotoWarningNote', 'Photographs - Do NOT Bend'),
Of course, just as the note on the envelope will likely be ignored, so too will that header, because PhotoWarningNote isn’t a header recognized by any mail user agents.
Adding headers with PHP’s mail() function is something a developer needs to take care with, because it’s possible for a malicious user to add headers, such as further recipient addresses. This is known as email header injection, and you’ll be relieved to know that Zend_Mail does filter all headers to prevent such an attack.
Now that we know how to create our email, it’s time to look at the options available when sending it.
10.2.2. Sending Emails with Zend_Mail
In Zend_Mail there are two ways to send mail: using sendmail or SMTP. Let’s look at why you would choose one over another and what options are available with each.
Sending Via Sendmail
It was mentioned earlier in this chapter that Zend_Mail defaults to using Zend_Mail_Transport_Sendmail, which itself uses PHP’s mail() function. What that means is that, unless you decide otherwise, your emails are simply being composed and passed on to PHP’s mail() function, and from there to the local sendmail (or equivalent) mail server, which handles the actual transfer of the email.
To illustrate more clearly how this works, we’ll make use of PHP mail()’s option of passing additional parameters in the command sent to the mail server. In this case, we’ll use it to set a header in the constructor of Zend_Mail_Transport_Sendmail, like so:
$transportWithHeader = new Zend_Mail_Transport_Sendmail(
                            '[email protected]'
);
Zend_Mail::setDefaultTransport($transportWithHeader);
What that does is pass on [email protected] as the fourth parameter in the mail() function. mail() then sends that parameter in the following sendmail command, which sets the sender address of the email:
sendmail -f [email protected]
Since all we’re doing is sending a command, this method should be fast and incur little latency, but that is dependant on the setup of the machines it’s being called and run from.
Note
Because sendmail is a *nix command, it isn’t even an option on Windows-based servers, which will default to using SMTP anyway.
Sending Via SMTP
There are occasions when you don’t want to burden the local mail server with sending your mail. A good example would be when sending large volumes of mail in an environment where there may be restrictions on the amount of mail your local mail server can send. Another example would be ensuring mail sent from a web cluster has the same originating server, helping prevent your email being categorized as spam when it hits recipients’ inboxes. In this case, it’s possible to pass on the mail via SMTP (Simple Mail Transfer Protocol) to another service provider.
Because SMTP is the standard by which all mail is sent across the internet, our email is ultimately sent using SMTP even if we use sendmail. In this case, when we say “send via SMTP,” we mean setting up Zend_Mail to send email through a specified outgoing SMTP server in much the same way that we set up our email clients to send our mail. In listing 10.2 we’re setting up Zend_Mail to send via SMTP using the authentication required by the service provider and through a secure connection.
Listing 10.2. Setting up Zend_Mail to use an SMTP connection

Having set up Zend_Mail to use the SMTP connection, we’re ready to use it, and since we mentioned sending large volumes of email, we’ll start with sending multiple emails.
Sending Multiple Emails Via SMTP
There are occasions when you may need to send several emails out in one go, such as when sending a newsletter to multiple users. However, in the PHP manual, the mail() function has the following note:
It is worth noting that the mail() function is not suitable for larger volumes of email in a loop. This function opens and closes an SMTP socket for each email, which is not very efficient.
In contrast, when using Zend_Mail_Transport_Smtp, the SMTP connection is maintained by default until the object stops being used. Therefore, it’s more suitable than mail() for sending larger volumes of email. Here’s an example:
foreach ($users as $user) {
   $mail->addTo($user->email, $user->full_name);
   $mail->setBodyText('Hi ' . $user->first_name . ',
         Welcome to our first newsletter.'),
   $mail->send();
}
If you’re wondering why anyone would want to send such an uninteresting newsletter, you’re ready for the next section, where we’ll begin to use Zend_Mail in an actual application and make better use of the email body.
10.3. Building a Support Tracker for Places
The more you work on a project, the more you build up lists of bugs, issues, and feature ideas. These lists tend to end up all over the place—spread across emails, jotted down after phone conversations, scribbled illegibly in meetings. There are existing options for maintaining such lists, like bug trackers and project management applications, but they’re often overkill for clients to use and, besides, that would be too easy! Instead we’re going to build a solution, and since the key to good support is communication, our support tracker will do a lot of mailing. Our support tracker will also demonstrate Zend_Mail’s options for reading mail.
10.3.1. Designing the Application
Our support tracker must:
- Be simple enough that we’ll want to use it rather than a regular email client.
- Allow updates to bug statuses.
- Integrate with current user data and not require new usernames and passwords.
- Allow notification by email to all concerned.
- Have the ability to add attachments, such as screenshots, and send them with notification emails.
- Permit optional formatted emails for quick scanning.
The second requirement makes it clear that we’re going to need to store this data, and figure 10.2 shows the initial table structure of our application. Since we could have many support issues for a single user, this is reflected in the one-to-many relationship of the schema.
Figure 10.2. The initial database structure of our support tracker, requiring the addition of a single Support table alongside our existing Users table

If you’ve read Chapter 5, you should be familiar with the use of Zend_Db_Table relationships and recognize the model in listing 10.3. By specifying the $_dependent-Tables and $_referenceMap, we’re defining the relationship between the existing Users class from our Places application and our new Support_Table class.
Listing 10.3. One-to-many relationship using Zend_Db_Table
class Users extends Zend_Db_Table_Abstract
{
   protected $_name = 'users';
   protected $_dependentTables = array('Support_Table'),
}

class Support_Table extends Zend_Db_Table_Abstract
{
   protected $_name = 'support';
   protected $_rowClass = 'Support_Row';
   protected $_referenceMap = array(
      'Support' => array(
         'columns' => array('user_id'),
         'refTableClass' => 'Users',
         'refColumns' => array('id')
      )
   );
}
Linking these two classes fulfills the third requirement of integrating the current Places user data with the support tracker. Users will be able to submit support tickets without having to log in to a separate system.
In order to add support tickets, the least we’re going to need is a submission form and the functionality to create an entry in the database. We’ll start by creating a Support model class, as shown in listing 10.4, which will be responsible for the data handling.
Listing 10.4. Our Support model class
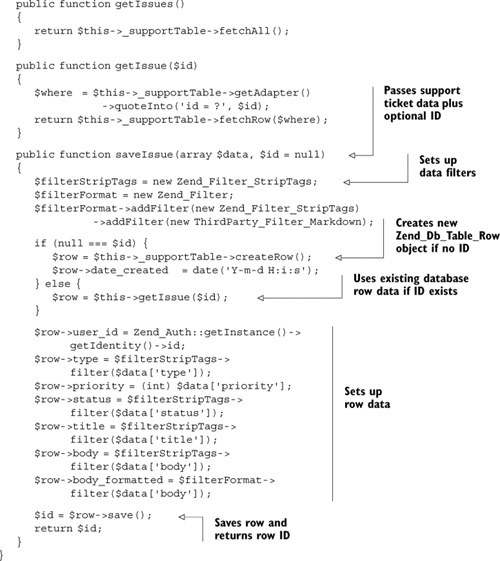
To provide some context, listing 10.5 includes other methods that are contained in our Support class. Since we’re focusing on email in this chapter, the key method in our Support class is saveIssue(), because it’s that action that will trigger the notification emails.
Until we add mail code, saveIssue() takes the support ticket data, decides whether this is a new ticket or an update to an existing one, filters the data, and saves it to the database. Listing 10.5 shows how saveIssue() will be called after a valid support-ticket form is submitted in our SupportController controller action class.
Listing 10.5. The addAction() method in our SupportController action class

If you read Chapter 8, you’ll recognize that we’re making use of Zend_Form to generate our support-ticket submission form in listing 10.5. There would be little value in going through that code here, but for the sake of completeness and for a visual reference, figure 10.3 shows the final rendered form.
Figure 10.3. The support-tracker submission form used to send bug or feature requests to the development team

We can now move on to the fourth requirement, which is to notify support team members when support tickets are added and updated. This also brings us back on to the topic of this chapter: email.
10.3.2. Integrating Zend_Mail into the Application
You’ll have noticed that there is no mail functionality in any of our code so far, and all saveIssue() currently does is filter the input and create the database row. The first question that arises is where to add the mailing code.
We know that the Support::saveIssue() method uses Zend_Db_Table_Abstract, which ultimately uses the Zend_Db_Table_Row::save() method for updating existing rows as well as creating new ones. This is a possible place to trigger the mail to the support team members.
In listing 10.6, you can see the contents of an example Zend_Db_Table_Row sub-class, and how our save() method could override the parent class’s save() method and add the notification email to the support team.
Listing 10.6. Overriding save() in our Support_Row subclass to trigger an email

In listing 10.6, whenever a call is made to the save() method, an email is sent to the support team with the support ticket information in the body of the email.
It isn’t hard to see that this code is far from optimal. For example, when we later want to send a copy to the submitter, add an attachment, or perhaps format the body text, our save() method would have bloated beyond its purpose. With that in mind, let’s refactor out the mailing code from the save() method and create a Support_Mailer class, shown in listing 10.7, which can focus on that task.
Listing 10.7. Our Support_Mailer class, which will send out notification mail

The Support_Row::save() method in listing 10.6 could now call our new mailing class and pass its id as a parameter, like so:
$id = parent::save();
$mailer = new Support_Mailer ($id);
$mailer->sendMail();
There is something dissatisfying about that, because we now have mail code embedded in a fairly low-level data-handling object. Ideally, we’d want to decouple the mailing function entirely from the data objects, and a good way to do this would be to use the Observer pattern that we discussed in Chapter 9. Trying to do that in this chapter would distract from the main subject, email, so we’re going to go part way by moving the Support_Mailer::sendMail() call to the last lines of the saveIssue() method in our more general Support class in listing 10.4:
$id = $row->save();
$mailer = new Support_Mailer ($id);
$mailer->sendMail();
return $id;
That puts it in an easier place to refactor out at a later date, and it allows us to move on to looking at the functionality of the mail class itself.
10.3.3. Adding Headers to the Support Email
The fourth requirement in our application specification was that notification emails be sent to “all concerned.” It turns out that this does not mean just to the support team at [email protected]. In fact, all admin users of the system are to be emailed, and the submitter is to be sent a copy as well. We also need to add a priority indication that email clients like Microsoft’s Outlook and Apple’s Mail can recognize. Luckily, both of these are relatively easy to do and simply require working with email headers.
Adding Recipients
For the sake of simplicity, our application stores the roles of users as a single field in the Users table, so to retrieve all admin users we need to use the following query:
$users = new Users;
$where = array(
      'role = ?' => 'admin',
      'user_id <> ?' => Zend_Auth::getInstance()->getIdentity()->id
);
$rows = $users->fetchAll($where);
You’ll notice the additional term in the argument to fetchAll(), which filters out cases where the submitter is also an admin user. This prevents them from receiving an additional unnecessary admin email on top of the CC version they’ll receive as a submitter. In some cases, you may actually prefer to send a different version to the submitter from the one sent to the support team, so this is largely an implementation preference.
Having retrieved all admin users, we can now loop over them and add them to the mail with a To header:
foreach ($rows as $adminUser) {
   $mail->addTo($adminUser->email, $adminUser->name);
}
Next, we’ll retrieve the email details for the submitter by using her ID from Zend_Auth, and we’ll add them to the mail with a CC header:
$users->find(Zend_Auth::getInstance()->getIdentity()->id);
$submitter = $users->current();
$mail->addCC($submitter->email, $submitter->name);
We also have the option of adding users with a BCC header by using Zend_Mail::addBcc(), but we don’t need it in this case.
Adding Headers
The addHeader() method can be used to set additional headers, with its first two arguments being the name and value pair of the header. A third Boolean argument indicates whether there will be multiple values for the header. The requested priority indication is an additional header that appears in the email as a name:value pair:
X-Priority: 2
We were clever enough to have preempted this requirement and designed our database field to contain an integer that corresponds to the value of the priority. Adding this value as a header is now simple enough, and you may have noticed the following line in our Support_Mailer code in listing 10.7:
$mail->addHeader('X-Priority', $supportIssue->current()->priority, false);
The arguments now specify that we’re adding a header with the name X-Priority, that it’s the priority value chosen for the current support ticket, and that it’s a single value. The received email should have an at-a-glance indication of its priority if the recipient’s email client recognizes the priority header.
We mentioned before that one reason to create our Support_Mailer class was to allow for expansion. One such example is the need to add attachments to the email, which we’ll cover next.
10.3.4. Adding Attachments to the Support Email
It would be a safe bet to say that there won’t be a single developer reading this book who hasn’t had bug reports with descriptions as vague as “it’s broken” or “it’s not working.” Narrowing down the actual problem can occasionally be more frustrating than fixing it. In such cases, a screenshot of the offending page can be a great help, and that’s why adding attachments to the support email is the fifth requirement of our application.
Once we add a file input field to the support-ticket submission form, the user will be able to browse for her screenshot file and have it upload when she submits the form. The process of dealing with the uploaded file isn’t something we can do justice to in this chapter, but let’s imagine it works something like this:
move_uploaded_file(
   $_FILES['attachment']['tmp_name'],
   realpath(getcwd()) . '/support/' . $id . '/'
);
This moves the uploaded file, which we’ll call error-screenshot.jpg, to a subdirectory of /support/, using the support-ticket ID as its directory name.
Now that we have the file in place, we can attach it to the email with the code shown in listing 10.8.
Listing 10.8. Attaching the screenshot file to the support email

The optional settings in listing 10.8 are only needed if your attachment deviates from the default, which is a binary object transferred with Base64 encoding and handled as an attachment. In our case, we’ve specified that the attachment be displayed inline in the email just so we don’t have to open the file separately to view it. As mentioned early in the chapter, settings like this are handled by Zend_Mime, so you’ll need to look at its section of the Zend Framework manual for more information.
With the fifth requirement taken care of, that leaves the sixth and final one, which is to format the emails so they can be quickly and easily read by the busy admin team.
10.3.5. Formatting the email
The choice of whether to send text or HTML email is a contentious issue that is debated at almost every opportunity. Whatever your personal preference, as a developer you still need to know how to send either one, though, ironically, Zend_Mail makes the process easier than the choice.
Sending HTML Formatted Mail
As part of the input filtering in the saveIssue() method of our Support class, the body text is formatted as HTML using the PHP Markdown conversion tool written by Michel Fortin and based on John Gruber’s original code. The formatted body is then saved in a separate field alongside the original, giving us two versions of the body to use in our email. You may have noticed in our Support_Mailer class in listing 10.7 that we allowed for this in the following code:
if ($html) {
   $mail->setBodyHtml($supportIssue->current()->body_formatted);
}
$mail->setBodyText($supportIssue->current()->body)
When we first introduced this code in listing 10.7, we made no mention of where it would be set. Since it is a personal preference, we could recover it from the current authorized user’s information like so:
$mailer->sendMail(
   Zend_Auth::getInstance()->getIdentity()->mail_format
);
Even if your user has opted to receive an HTML version of your email, you also send a plain text version for those who find they can’t or don’t want to view the HTML version, as shown here.
Formatting with Zend_View
We now know how to send preformatted mail in plain text or HTML versions, but what if we want to do some formatting to the email body before it’s sent? Earlier, while adding recipients, we mentioned that you may prefer to send a different email to the support-ticket submitter than you sent to the support team. This submitter email is the example we’ll use to demonstrate how Zend_View can be used to render an email from the same kind of view script as used in our HTML pages.
What we have decided to do is send an email to the submitter that notifies them of the support ticket number, includes the body of the submission, gives a brief description of what will happen next, and thanks them. listing 10.9 shows the plain text version.
Listing 10.9. Plain text version of support-ticket submitter email in text-email.phtml
Hello <?php echo $this->user->name; ?>,

Your support ticket number is <?php echo $this->supportTicket->id; ?>
Your message was:

<?php echo $this->supportTicket->body; ?>

We will attend to this issue as soon as possible and if we have any further
   questions will contact you. You will be sent a notification email when this
   issue is updated.

Thanks for helping us improve Places,

The Places Support team.
Unless you’ve jumped straight into this chapter, that should look very familiar, because it’s much the same as the view scripts you saw in previous chapters. The HTML version in listing 10.10 is probably even more familiar.
Listing 10.10. HTML version of support-ticket submitter email in html-email.phtml
<p>Hello <?php echo $this->user->name; ?>,</p>

<p>Your support ticket number is <b><?php echo $this->supportTicket->id; ?></
  b></p>

<p>Your message was:</p>

<?php echo $this->supportTicket->body_formatted; ?>

<p>We will attend to this issue as soon as possible and if we have any further
   questions will contact you. You will be sent a notification email when this
   issue is updated.</p>

<p>Thanks for helping us improve Places,</p>
<p><b>The Places Support team.</b></p>
All that is needed to turn those view scripts into something we can use in our email is to have Zend_View render them, like so:
$mail->setBodyText($this->view->render('support/text-email.phtml'));
$mail->setBodyHtml($this->view->render('support/html-email.phtml'));
Figure 10.4 shows the resulting emails.
Figure 10.4. Side-by-side comparison of the output of our plain text (left) and HTML (right) support-ticket notification emails
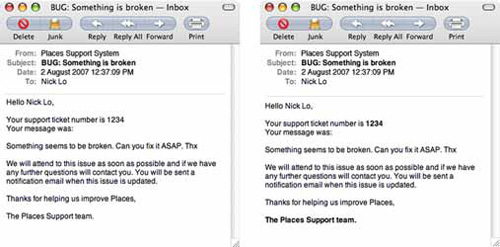
Clearly this is incredibly useful and simple, largely because it’s the same process used for any view script, which makes it flexible enough to be used for anything from a lost password email to a more involved HTML newsletter.
Having completed the final requirement of our support tracker, we have now also covered the composition and sending features of Zend_Mail. This leaves us with the final link in the email chain: reading mail. Zend_Mail has thoughtfully provided functionality to do that.
10.4. Reading Email
Our support tracker now has a web form that allows issues to be recorded and the support team to be notified, but it’s very likely that issues will be coming from other sources, such as being sent or forwarded in an email. In order to deal with this, we’re going to take advantage of Zend_Mail’s ability to read mail messages. We’re going to monitor a support email account and add issues from those messages to the support tracker.
Before we look at the requirements for this new feature in our application, let’s look at some of the components for collecting and storing email.
10.4.1. Collecting and Storing Email
Earlier in the chapter, we noted that Ernie collected his invite from Bert using POP3, but he could have just as likely used the other main email collection protocol, IMAP. Since Zend_Mail can work with both, we’ll take a look at the differences between the two.
POP3 and IMAP
Our two characters, Bert and Ernie, make use of these two protocols to access their mail, and figure 10.5 shows the basic difference between Bert’s use of IMAP and Ernie’s use of POP3. As Ernie works out of a home office and rarely needs to access his mail from anywhere else, he uses POP3; Bert, who is always on the move, needs his mail to be available wherever he is, so he uses IMAP.
Figure 10.5. Comparing the main difference in email collection between POP3, which works on a simple connect, collect, and disconnect relationship, and the more capable IMAP
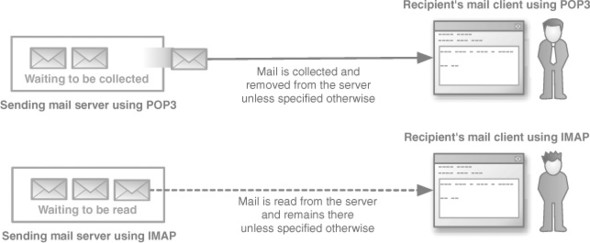
POP3 could be seen as the older and dumber of the two protocols, and it works on a connect, collect, and disconnect relationship, with the mail user agent (email client) having most of the responsibility. On the other hand, the fact that it’s so simple, is widely supported, and makes minimal use of server resources is the reason it’s so widely used.
IMAP, in comparison, is a more capable protocol, and it has more responsibility in the relationship with the email client. Mail is kept on the server, and the email client requests a copy, which it will cache locally. Unlike POP3, IMAP allows an ongoing connection with the server, multiple client access to the same mailbox, email folders, server-side searches, partial mail retrieval, and more.
If you, like Bert, need to access your mail from multiple locations or multiple devices, such as a PDA, mobile phone, and laptop, IMAP would be a better solution, because each device would simply be accessing the mail rather than collecting it.
Email Storage
In contrast to the official internet standards we have described so far, such as MIME, SMTP, POP3, IMAP, and the email format outlined in RFC 2822, the file format for email storage isn’t standardized. Instead it’s left to the developers of email clients.
Zend_Mail currently supports the Mbox and Maildir formats, and the key difference between the two is that the former requires application-level file locking to maintain the integrity of the message. There isn’t much benefit going into great detail about the formats, so we can get back to working on our application.
10.4.2. Reading Email with Our Application
We’ll first jot down a few requirements for this additional work before we start. This list will make it easier to see exactly what we’re trying to achieve and how Zend_Mail can help us accomplish it. So far, these are the requirements we’ve put together:
- It should periodically read mail from a designated mail account and store it in the support table.
- It should recover and store some details about the reporter.
- It should save the original email as a file attachment.
Before we can do anything with the stored mail, we first need to open a connection to it.
Opening A Connection
For the production version of our support tracker, it’s most likely that we’d connect to a local storage location with either Zend_Mail_Storage_Maildir or, as in the following example, with Zend_Mail_Storage_Mbox:
$mail = new Zend_Mail_Storage_Mbox(
   array('filename' => '/home/places/mail/inbox')
);
For our example, we’ll use remote storage because it’s the one most readers will have access to and can start using right away with minimal setup. We could do so using Zend_Mail_Storage_Imap or Zend_Mail_Storage_Pop3. We’ll choose the latter for its ubiquitousness, and connect using this code:
$mail = new Zend_Mail_Storage_Pop3(array('host'     => 'example.com'
                              'user'   => 'support',
                              'password' =>'support123'));
Our mail object now has a connection open, and we can start fetching messages.
Fetching and Storing the Support Messages
Because Zend_Mail_Storage_Abstract implements one of the standard PHP library iterator classes, it can be iterated over easily, so let’s start with the first requirement of our application and look at storing the messages in our support table. Listing 10.11 shows the first implementation without filtering.
Listing 10.11. Turning the support email into a row in the support table

Combine this code with some way to run it periodically, such as with cron, and we’ve pretty well covered the first requirement. There are a few points to mention, the first being that we’ve not done anything about the body_formatted field of our support table.
When we entered the body information with the web form, it was put through the Markdown text-to-HTML markup filter. In this case, the body of the email could be plain text or HTML or both, which is referred to as multipart. If we enter an HTML or multipart email body directly into the body field, it’s going to be a mess, so in listing 10.12 we’ll check for that and reduce the body to the plain text content.
Listing 10.12. Reducing a multipart email to its plain text component

In theory, we could also insert any HTML part into the body_formatted field of our support table, but we’d then need to do some careful filtering of the data, and even after doing so we’d have to deal with all the varieties of HTML markup from the various email clients. Instead, we’ll just pass the plain-text version to the text-to-html Markdown filter in Support::saveIssue() to give it basic but clean formatting.
This leaves us with the following adjustment and addition to the code in listing 10.12:
$data['body'] = $plainTextContent;
Even if we store a well-formatted version of the support email body text, there is the possibility that the issue, itself, may not provide us with all the information we need. For that reason, we’ll also store the sender of the email so we can contact her for any further clarification.
In figure 10.6, we’ve added a reported_by field in our support table to hold this information and we’ll need to add the following code to our Support::saveIssue() method in listing 10.4:
$row->reported_by = $filterStripTags->filter($data['from']);
Figure 10.6. The support table with the new reported_by field which allows us to record the details of the sender of the support email

We’ll also need to add the sender to the code in listing 10.12 with this addition:
$data['reported_by'] = $message->from;
We could spend a bit more time breaking up that sender string into the sender’s name and email address if we needed to, but for now it’s sufficient for our needs.
Our support table can now include tickets sent via email, but, as one last measure, we’re going to save the email as a file attachment just in case we need to refer to it for whatever reason.
Saving the Fetched Mail to File
When we loop through the support mail messages in listing 10.12, we recover all the text from the email we need and store it in the $message variable, ready to write out to a file. listing 10.13 shows the code to do that, fulfilling the third requirement.
Listing 10.13. Writing the message out to a file

This final addition means that not only are these stored text files a useful backup in case there are problems with the database insert, but they’re also useful to pass around to other team members if needed. Let’s now take a look at the full code.
The Final Readmail() Method
Just to wrap up properly, listing 10.14 brings together all the code we’ve written so far, so you can see how it all fits together. While you’re looking over it, note that the filtering that occurs in Support::saveIssue() provides a level of security against any malicious code that could be included in the emails. We also use type hinting to ensure that the method is passed the mail connection we established at the beginning of this section, most likely by way of a controller action.
Listing 10.14. Adding read mail functionality to our Support class
public function readMail(Zend_Mail_Storage_Abstract $mail)
{
   foreach ($mail as $messageNum => $message) {
      $part = $message;

      while ($part->isMultipart()) {
         $part = $message->getPart(1);
      }

      if (strtok($part->contentType, ';') == 'text/plain') {
         $plainTextContent = $part->getContent();
      }

      $data['priority'] = isset(
         $message->xPriority) ?
         $message->xPriority :
         3;

      $data['status']   = 'open';
      $data['title']    = $message->subject;
      $data['body']    = $plainTextContent;
      $data['reported_by'] = $message->from;
      $id = $this->saveIssue($data);

      $messageString = '';
      foreach ($message->getHeaders() as $name => $value) {
         $messageString .= $name . ': ' . $value . "
";
      }
      $messageString .= "
" . $message->getContent();
      file_put_contents(getcwd() . '/support/' . $id . '/email.txt',
                $messageString
      );
   }
}
We have satisfied all three requirements of our support tracker feature addition, and we’ve also given a short practical demonstration of some of Zend_Mail’s read functionality.
10.5. Summary
Having read this chapter, you may well have discovered that email is a much deeper subject than you had anticipated. Since almost all web applications use email to one degree or another, we’ve attempted to give enough background so that you’ll come away with not only a better understanding of Zend_Mail itself, but of how it fits into the bigger picture.
Adding Zend_Mail to the components we’ve covered in previous chapters also provides us with a good basic toolset we can use to build web applications. Before we continue adding to our arsenal, our next chapter on deployment will take a detour into some practices that will improve the way we develop such applications.