3. Ten Strategies to Quickly Improve Your Picture-Taking Skills
In This Chapter
![]() Discover ways to enhance your photographer’s eye to take better pictures
Discover ways to enhance your photographer’s eye to take better pictures
![]() Learn to use the “Rule of Thirds” when framing shots
Learn to use the “Rule of Thirds” when framing shots
![]() Make the best use of available light
Make the best use of available light
![]() Choose the best shooting angle and perspective
Choose the best shooting angle and perspective
Back in Chapter 1, “Prepare Your iPhone or iPad to Take Awesome Photos,” you read that becoming a good digital photographer is both a skill and an art form. Then, in Chapter 2, “Snap Photos Using the Camera App,” you started to develop the skill and knowledge needed to best use the Camera app to take pictures using your iPhone or iPad. Now, let’s focus on some of the artistic and creative aspects of picture taking.
One core concept you should understand is that when it comes to using creativity in photography, there are very few rules. Instead, there is plenty of opportunity to make your own creative or artistic decisions. In fact, every time you take a picture, you can adopt a slightly different strategy to wind up with an ever-growing personal photo library that contains images you’ll enjoy looking at again and again, and that you’ll be proud to share with others.
Whether you’re using an iOS mobile device to take pictures or you’ve invested thousands of dollars in a cutting-edge digital SLR camera, the concepts and strategies you’ll want to incorporate as you take photos are virtually the same. In fact, what you’re about to discover are core picture-taking strategies that professional photographers use every day in a wide range of shooting situations.
By implementing some or all of the strategies you’re about to discover, whenever you take digital photos using your iPhone or iPad, you’ll quickly notice a dramatic improvement in the quality and professionalism of your shots. Now, let’s take a look at 10, easy-to-implement photography strategies that will quickly enable you to improve your picture-taking abilities.
Note
Throughout the book, numerous references to the focal point of particular images are made. This refers to the area or subject of the photo that the photographer intended for the photo’s viewer(s) to focus in on first and pay the most attention to. It’s the part of the image that captures the attention of its viewers. Thus, it’s the focal point within your images that should always be in focus, even if what’s in the foreground or background, for example, is slightly blurred.
Let Your Photos Tell a Story
One goal you should have as a digital photographer is that each of your photos should tell its own story to the people looking at it. A photo should not require a long explanation or wordy caption to communicate a message or emotion.
Likewise, if you’re putting together a photo album, photo book, scrapbook, online gallery collage, or animated slideshow to showcase your images, those images together should tell a story with a beginning, middle, and end—whether it’s a wedding album, a recap of your vacation, your child’s soccer game, or photos from the day you spent at the zoo.
As you’re taking pictures, each photo, or your collection of images that will be shown together, should speak for itself and answer questions like who?, what?, where?, when?, why?, and how?.
There are many ways to communicate this; for example, through the expressions on your subjects’ faces, what you showcase in the backgrounds in your photos, the actions of your subjects, the interactions between your subjects, the props your subjects are holding, the poses of your subjects, and your use of light and shadows.
In some cases, your photos might take on a purely artistic approach and not necessarily have an obvious message. They might simply be beautiful to look at or evoke some emotion or thought in the viewer’s mind. It all comes down to what your goals are as the photographer and how you want to use each of your photos to communicate with the people who will ultimately view them.
Tip
Don’t forget, once you take photos and they’re stored in your iPhone or iPad, you have a wide range of options when it comes to editing and enhancing those images. Often, with a few taps on the smartphone or tablet’s screen when using a photo editing or enhancing app, it’s possible to dramatically alter or improve the look and quality of an image.
Before sharing your photos, it’s also possible to transfer them to your Mac or PC and then use full-featured photo editing software, such as iPhoto, Aperture, Photoshop Elements, Windows Photo Gallery, Google’s Picasa, or the software that makes up Adobe’s Creative Cloud suite, to edit and/or enhance your images.
Ten Strategies Used by Professional Photographers That You Can Quickly Learn
Simply by implementing some or all of the strategies you’re about to discover, whenever you take digital photos using your iPhone or iPad, you’ll quickly notice a dramatic improvement in the quality and professionalism of your shots. Now, let’s take a look at 10 easy-to-implement photography strategies that will quickly enable you to improve your picture-taking abilities.
Note
Some of the sample photos featured in this chapter were shot using a digital SLR camera and then transferred to an iPhone 5s to be edited and shared using the Photos app.
#1—Avoid the Most Common Mistake Made by Amateur Photographers
Most amateur photographers pick up their digital camera—in this case, their iPhone or iPad—and continuously adopt the same shooting strategy to each and every one of the photos they take. This strategy includes standing directly in front of the intended subject, centering the subject in the viewfinder, and taking a photo of that subject from a head-on perspective. Does this sound familiar?
Later, when that same photographer goes back to look at his or her images, the images might, in fact, all be in focus, but they also all look exactly the same, even though the subject(s) might be different. As a result, the photos are extremely boring to look at, especially if they’re presented in a photo album, online gallery, digital slideshow, or photo book, where dozens of images are shown together.
Step one to becoming a more skilled digital photographer is to break this habit! There are many ways to do this. For example, you can change your shooting angle as the photographer; utilize the Rule of Thirds; frame your subject using objects in the foreground, background, and/or to the sides; utilize your camera’s zoom; and make full use of the available light.
Regardless of which strategies you ultimately adopt, the one thing you definitely want to do, in the majority of the photos you take from this point forward, is to avoid always centering your subject in the viewfinder and shooting that subject from a head-on perspective (although once in a while, this is perfectly okay).
Tip
When holding your iPhone or iPad and preparing to snap a photo, make sure your fingers are not accidentally covering the camera lens (and on the iPhone, the flash). This might seem obvious, but it’s also one of the most common mistakes photographers make when using a smartphone or tablet. Practice holding your iPhone or iPad in a way that’s comfortable and that allows you to keep the device very steady, without obstructing the lens or flash.
#2—Use the Rule of Thirds When Framing Your Shots
One quick and easy way to get out of the habit of centering your subject(s) in the dead center of the viewfinder and then snapping photos from a head-on perspective is to utilize the Rule of Thirds. The goal behind this photography strategy is simply to force you, the photographer, to frame your shots so that your subject does not wind up in the dead center of the frame.
To best utilize the Rule of Thirds, turn on the Camera app’s Grid feature so that the tic-tac-toe board grid is superimposed on the viewfinder. How to do this when using the Camera app was covered in the previous chapter. However, if you’re using another app to take photos, you might need to imagine the grid displayed in your viewfinder, if this feature isn’t built in to the app you’re using to take or edit your photos.
Now, as you look at the grid displayed in the viewfinder, it’s easy to see that the center box is the dead center of the frame (see Figure 3-1).
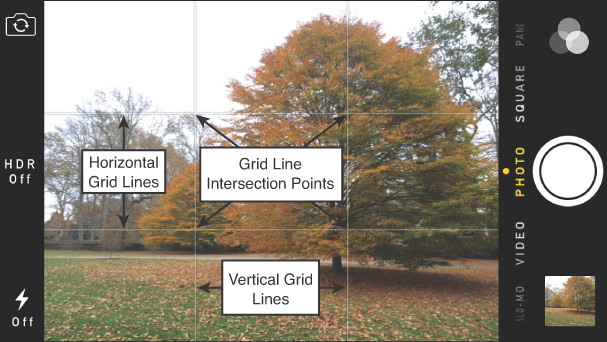
FIGURE 3-1 Utilizing the Rule of Thirds when taking pictures is easier when the Grid feature of the Camera app is turned on.
The grid is composed of two horizontal lines and two vertical lines, each of which is off-center. Within this grid, the lines intersect at four distinct points, each of which is also off-center.
Each time you frame your image (after choosing your subject and positioning yourself as the photographer to be able to capture your shot from the best possible shooting angle and perspective), position your subject along one of the horizontal or vertical lines, or make the intended focal point of your image one of the grid’s intersection points, and position your subject within the frame (viewfinder) accordingly. Keep in mind that this involves moving or repositioning the camera (your iPhone/iPad) just slightly. Your intended subject does not have to move. By placing your intended subject off-center, your images almost always immediately become more interesting.
Now, get into the habit of figuring out the best way to frame your images using the Rule of Thirds, while constantly choosing what will be the image’s best main focal point as you’re shooting. This might be aligning your subject(s) along one of the horizontal or vertical lines of the grid, or positioning the subject(s) at one of the grid lines’ intersection points.
The Rule of Thirds can and should be used when taking pictures of anything—people, places, or things (or any combination thereof). You’ll also definitely want to combine this shooting strategy with the others that are described in this chapter.
Let’s take a look at a few examples of how the Rule of Thirds can be put into practice.
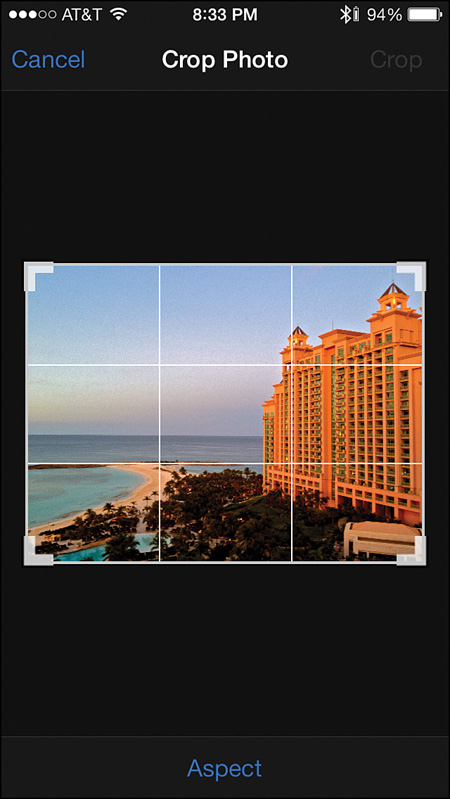
In Figure 3-2, the main subject in the photo is the Atlantis Resort, located in the Bahamas. As you can see, the building itself is positioned along the rightmost vertical line of the grid, whereas the rest of the image helps set the scene and shows that this resort is located along a tropical beach.
Tip
Using the Crop tool that’s built in to the Editing mode of the Camera app, as well as in to the Photos app, you can sometimes reframe an image after it’s been shot so that you can better utilize the Rule of Thirds. To demonstrate this, have a look at Figure 3-2, Figure 3-3, Figure 3-4, Figure 3-5, and Figure 3-6, which all have the Crop tool turned on in the Photos app.
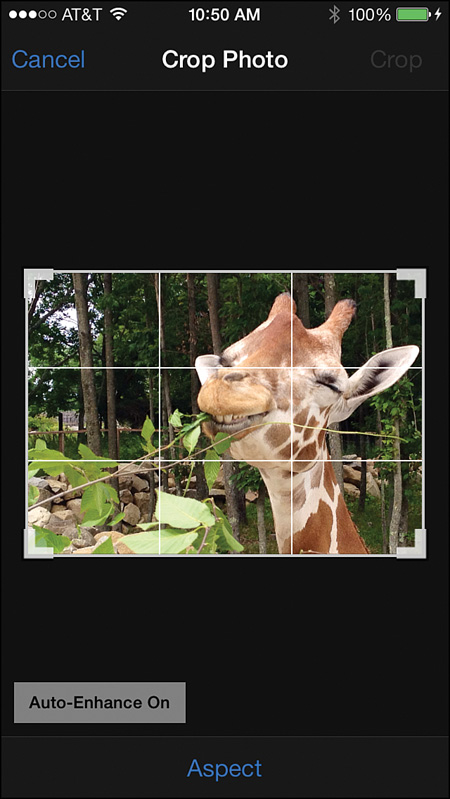
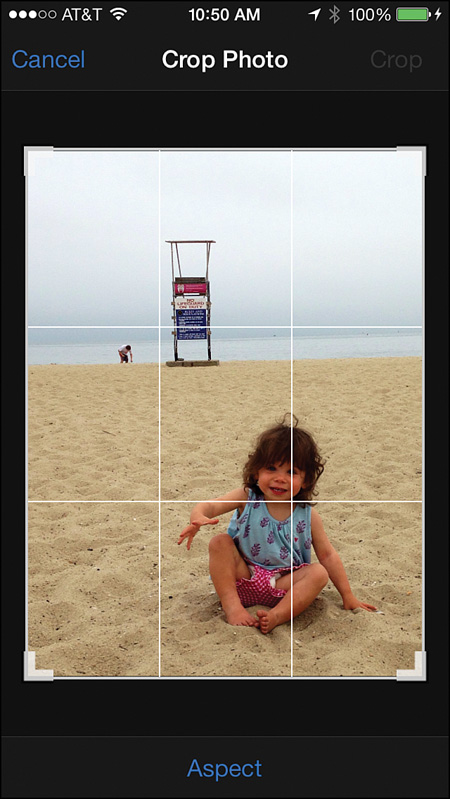
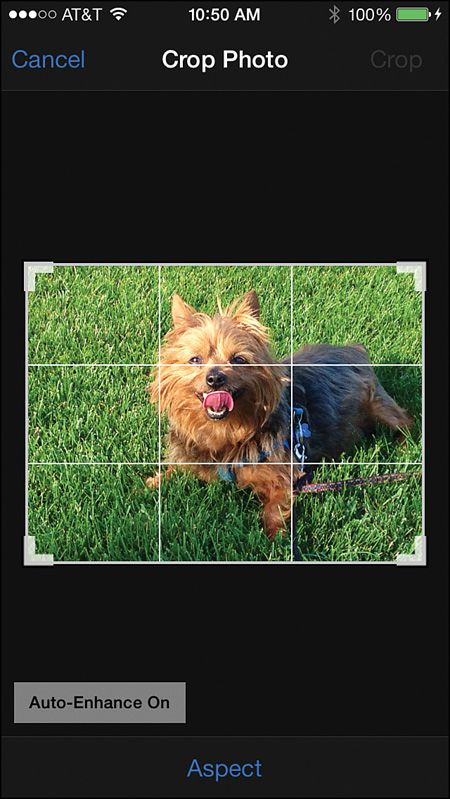
FIGURE 3-5 The dog’s eyes are the focal point of this image. Here, they’re positioned along the topmost horizontal line of the grid.
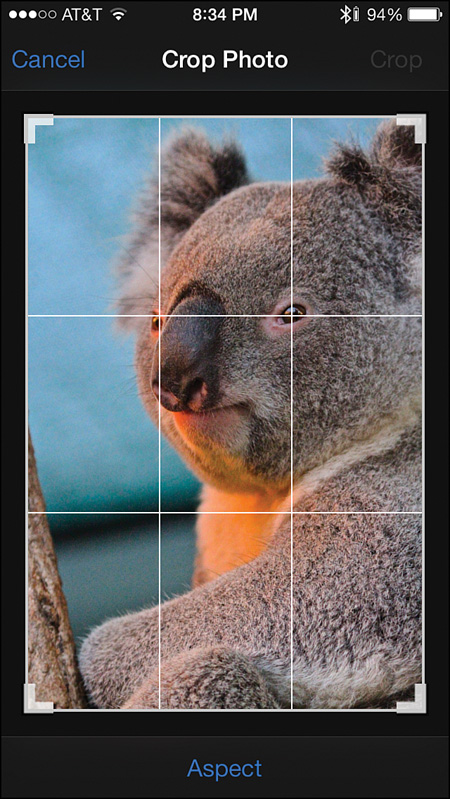
FIGURE 3-6 As you can see here, the koala bear’s eyes are lined up with the top horizontal line on the grid, plus the majority of the subject is lined up along the rightmost vertical grid line.
As you’ll see, when you activate the Crop tool, a movable grid is automatically superimposed over your image. Chapter 6, “View, Organize, Edit, and Share Pictures Using the Photos App,” explains how to properly use this tool.
In Figure 3-3, the giraffe is also positioned off-center within the frame. This image shows how the subject is facing into the frame, not out of it, which is another useful photography strategy to utilize.
Tip
Whenever possible, you want to position your primary subject in the frame so if any motion is involved, the subject is looking or moving into the frame, toward the person viewing the image. The subject should not be moving or facing out of the frame.
If you look at Figure 3-4, the child is positioned within the bottom-right corner of the image, near one of the grid’s intersection points.
The dog in Figure 3-5 might look centered (which is a no-no), but when you take a closer look, his eyes, which are the focal point of the image, are positioned along the topmost horizontal line of the grid.
Figure 3-6 also shows how to use an animal’s eyes as the focal point of your image. Here, the koala bear’s eyes are lined up with the top horizontal line on the grid, plus the majority of the subject is lined up along the rightmost vertical grid line.
Anytime you’re taking photos of an animal, whether it’s a pet, a wild animal, or a creature from the zoo, always try to focus in on its eyes, as opposed to its face. Unlike people who showcase facial expressions, animals convey emotion through their eyes. Thus, when it comes to shooting animals so they are looking directly into the camera, timing and patience are essential.
Taken at Waikiki Beach in Honolulu, Hawaii, the photo in Figure 3-7 uses the lifeguard station (which is positioned off-center, along the leftmost vertical line of the grid) to add a sense of depth to the beach image. The palm trees in the foreground are also used to frame the image.
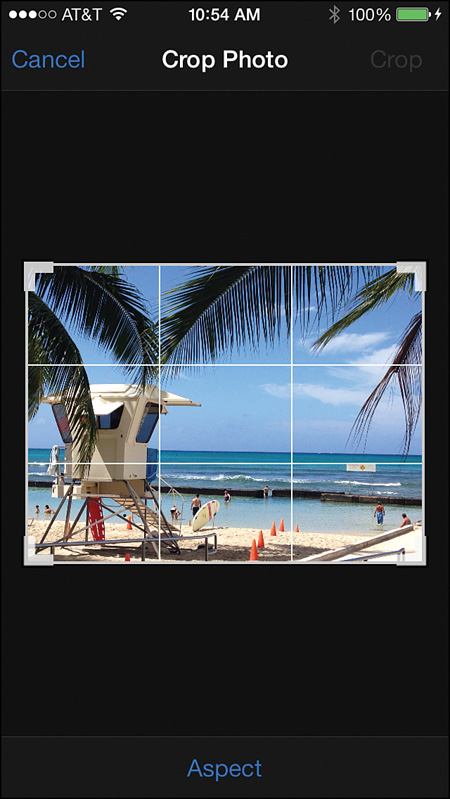
FIGURE 3-7 This image showcases the lifeguard station offset to the left, along the leftmost vertical line of the grid. Combined with the palm trees, the lifeguard station also adds a sense of depth to the image.
Tip
Using your subject’s surroundings to frame the image can help add a sense of depth to a photo.
#3—Pay Attention to Your Primary Light Source and Use It to Your Advantage
Whether you’re taking photos outside in the sun or indoors, there’s always a primary light source. As the photographer, it’s your responsibility to pinpoint the primary light source and use it to your advantage, while at the same time, not allowing unwanted light to ruin an otherwise great photo.
As a general rule, your primary light source, whether it’s the sun outside, overhead indoor lighting, a lamp, or even a candle, should be positioned in front of your primary (intended) subject (and potentially behind you, the photographer), so that the light is shining evenly over your subject with little or no annoying shadows being cast.
Tip
Sometimes, it’s possible to trick the Camera app’s AE/AF sensor to make better use of lighting situations that are less than optimal if you lock in the AE/AF sensor on your intended subject, but then tap randomly on the screen, and then tap again near (not directly on) your intended subject. This causes the AE/AF sensor to refocus, often with slightly different results.
Remember, you can also enhance the lighting and contrast within images as you’re shooting by turning on the HDR mode of the Camera app.
If the primary light source winds up being positioned in front of the camera, it’s likely that too much light will be captured in your photo. This can easily cause an overexposed and washed-out image, or it can cause unwanted and annoying glares (as shown in Figure 3-8).
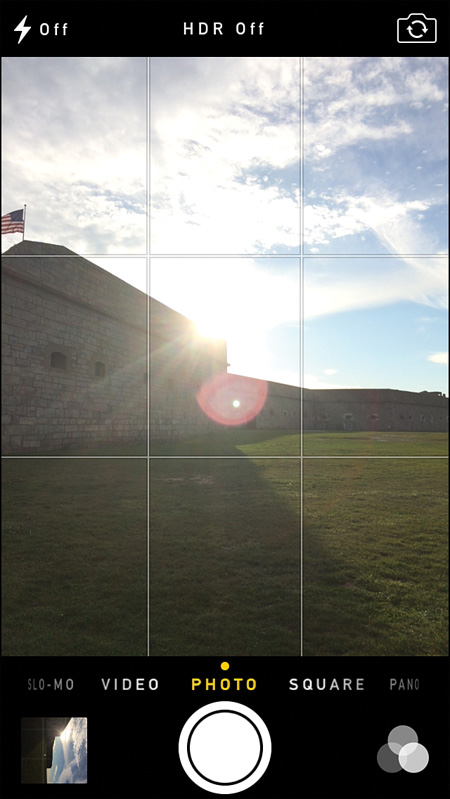
FIGURE 3-8 When the sun, for example, is positioned in front of you (the photographer), you’ll often wind up with distracting glares in your shots. These glares could easily wash out or overexpose your image altogether.
Based on the position of the primary light source, it can also cause unwanted shadows over your subject or around your subject, which detracts from the professional quality of the image and ultimately is annoying to look at for people viewing your photos. As you’re framing your shots, pay attention to the location of your primary light source, and position yourself and your subjects accordingly to capture the best possible shot in the best available light.
Tip
In situations where you can’t control the position of the primary light source, you can often reduce the amount of light being captured by the camera’s lens by placing your hand or an object over the iPhone/iPad to deflect some of the light.
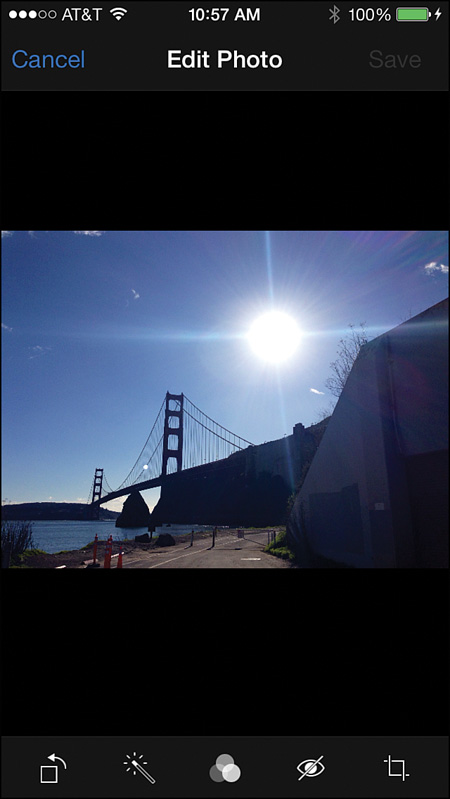
Watch out for glares, but at times, you can use them to your advantage, for artistic purposes. As you can see in Figure 3-9 of the Golden Gate Bridge in San Francisco, the glare from the sun works well in this photo, although too much glare can easily become a distraction. How much is too much glare is a matter of your own personal taste as the photographer.
There are two situations when you want to break the rule of having your primary light source behind you. First, when you want to capture a sunrise or sunset, you want to position yourself so your camera lens is pointed directly at the primary light source—the rising or setting sun. Second, when you want to incorporate silhouettes into your photo for artistic reasons, you want the primary light source to be behind your subject and in front of you, the photographer.
As you can see in Figure 3-10, the primary light source is the setting sun; the couple on the beach and the photographer are in front of the sun, which results in the silhouette effect.
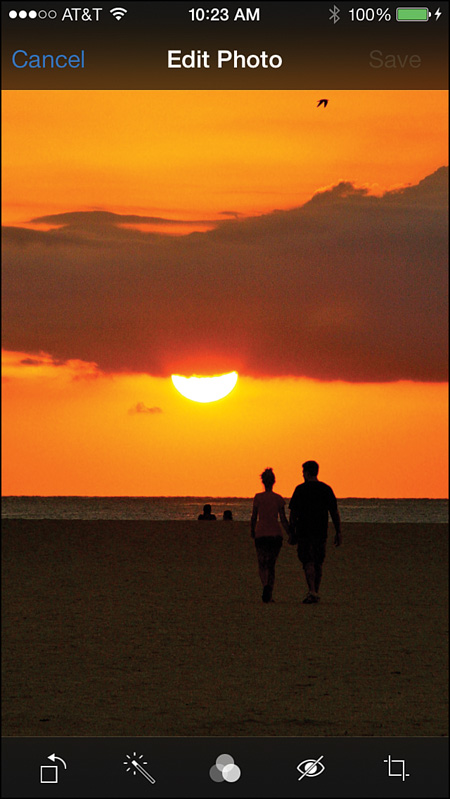
FIGURE 3-10 Sometimes, utilizing a silhouette effect can be used for creative and artistic purposes to your advantage as the photographer. Here, both the subjects and the photographer were in front of the primary light source.
Tip
While a silhouette can be used for artistic purposes, if you take a picture of someone standing in front of a window (during daylight hours), for example, this often causes the person you’re photographing to appear as a silhouette because the primary light source is behind them. Be mindful of what causes this silhouette effect and use it when you want to, but know how to prevent it when it’s unwanted in your photos.
Consider Using a Polarizing Lens or Filter When Shooting Outside
When shooting outside, one way to rid yourself of unwanted glares caused by the sun, and at the same time enhance the vibrancy of the natural colors in your photos, is to utilize an optional polarizing filter or lens.
Several companies, including OlloClip (www.olloclip.com), offer optional polarizing lens accessories for the various iPhone models. One of OlloClip’s offerings is the OlloClip Telephoto + Circular Polarizing Lens ($99.99), for example. You’ll learn more about this useful accessory in Chapter 10, “Use Optional Accessories to Improve Your Pictures.”
Some photo-editing and enhancement apps also include a digital polarizing filter, which can be added after the fact to digital images shot with an iPhone or iPad. Whether you use an actual polarizing lens or add a digital filter that offers a polarizing effect to your images, the end result is crisper and more colorful outdoor images, with less sun-induced glare and reflection.
Note
The camera built in to your iPhone or iPad is designed to detect and capture whatever light is in the area when you’re taking pictures. Thus, it’s your job to identify the light sources and use them to your advantage, eliminate unwanted light as needed, or reposition yourself to capture your subjects in the best possible light.
#4—Change Your Shooting Angle and/or Perspective
Using the Rule of Thirds is one way you can get out of the habit of centering your subjects(s) in the viewfinder and shooting them from a head-on perspective in all of your photos. However, in addition to utilizing the Rule of Thirds, you also have the option to alter your shooting angle and perspective.
In other words, instead of standing directly in front of your subjects when snapping photos, you can shoot them from an angle. For example, as the photographer, you can crouch down and shoot in a slightly upward direction. You can climb up on something so that you’re higher than your subject and then shoot in a downward direction, or you can take one or two steps to the side and take photos from a slight angle.
Of course, it’s also possible to mix and match shooting perspectives and angles, along with using the Rule of Thirds, to take visually more interesting photos. As you do this, pay attention to what’s surrounding your subject(s), as well as the position of the primary light source.
In Figure 3-11, this area of Faneuil Hall in Boston was too large to capture simply by standing in front of the building and taking a photo in Portrait mode with the iPhone. However, by standing at a diagonal to the building and then crouching down and shooting in an upward direction (see Figure 3-12), not only is it possible to capture more of this historic landmark within a photo, it also makes for a more interesting photo to look at.
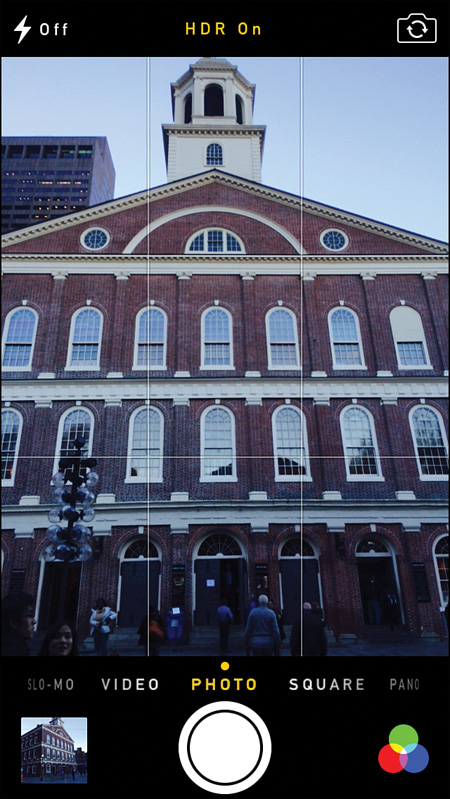
FIGURE 3-11 This image was shot using an iPhone 5s while standing directly in front of Faneuil Hall and taking a picture of this historic landmark from a head-on perspective.
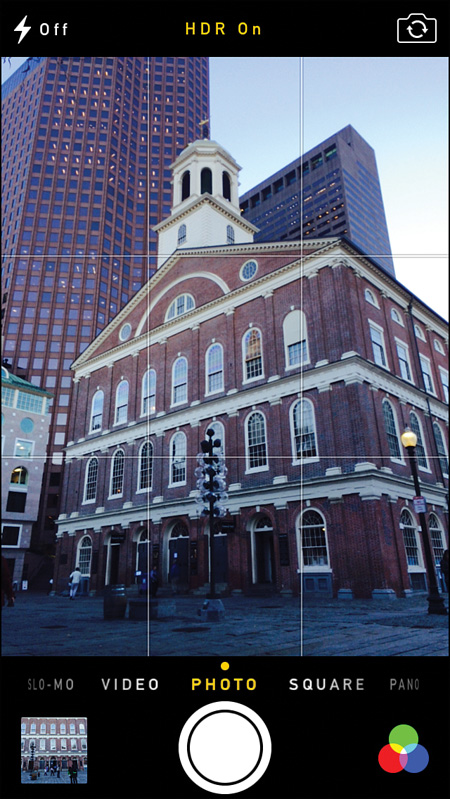
FIGURE 3-12 By standing at a diagonal to the building and then crouching down and shooting in a slightly upward direction, a more visually interesting photo is easily taken.
Tip
The strategy of adjusting your shooting angle or perspective also works with people, and just about anything else you might want to photograph. Be creative as you take more visually interesting pictures by shooting your subject(s) from either a slight angle, or by purposely shooting from a sharp angle to create a more dramatic visual.
#5—Take Advantage of What’s in the Foreground, the Background, and to the Sides of Your Intended Subject
Sometimes, the visual impact of a photo that would otherwise just feature your intended subject in the frame can be dramatically enhanced by taking advantage of what’s in the foreground, the background, and to the sides of your intended subject and somehow framing your subject using those surroundings.
In some cases, purposely adding objects into the foreground or background of an image, for example, can also add a sense of depth to a photo. Once again, these are situations when your creativity comes into play, in terms of how you utilize what surrounds your subject(s) in your photos. Keep in mind that your subject doesn’t necessarily need to interact with his or her surroundings to add this sense of depth or to make the image more visually interesting. This strategy can be used when taking photos involving people or when taking pictures of objects or landscapes, for example.
Refer to Figure 3-7, and notice how the palm trees in the photo help to naturally frame the lifeguard station and the Hawaiian beach.
You can see an additional example of how you can and should utilize what’s in the foreground, the background, and/or to the sides of your intended subject in Figure 3-13.

FIGURE 3-13 The coin-operated binoculars add a sense of depth to this image of the Newport, Rhode Island, coastline.
#6—Timing Is Critical: Be at the Right Place, at the Right Time, and Be Ready to Take Pictures
When it comes to taking pictures of people, if you want to capture their natural emotion or spontaneous reaction to something, you need to take a candid picture. This means that, as the photographer, you wait for something photoworthy to happen and you position yourself at the right place, at the right time, to catch the perfect shot. Timing is essential!
Candid photos are great because they’re able to showcase natural and true emotions or responses, whereas posed pictures typically feature one or more people with a fake smile, in an uncomfortable or unnatural-looking pose. Most people become extremely self conscious when you put a camera in front of them with the intention of taking photos.
As a photographer, being able to take candid photos in a wide range of situations, and then mix and match those images with posed photos, makes for a much more compelling photo album, digital slideshow, photo book, or scrapbook, for example.
Being able to take really good candid photos requires planning and good timing. As the photographer, you must be extremely observant and anticipate when something that’s photoworthy is about to happen. You also need to position yourself in the right place, at the right time, without being intrusive, to capture a truly candid image.
Tip
One trick to capturing great candid photos is to stay at a distance from your intended subject and utilize the zoom that’s built in to the Camera app (or whichever app you’re using to take pictures). If you’re not close to your intended subject, he or she is less apt to be aware of your presence and will continue acting naturally. This allows you, the photographer, to be less intrusive.
Candid images are all about spontaneity and capturing emotion—whether it’s your kids at play, a couple having a romantic walk on the beach, or your dog doing something that’s particularly adorable. Try to capture candid shots of real-life moments in creative and visually interesting ways.
Note
Candid photos enable you to capture raw emotions and memories as they spontaneously happen; for example, if you snap a photo of the guest of honor at a surprise party and manage to capture his expression at the precise moment everyone in the room yells, “Surprise!”
Posed photos enable you to manufacture memories the way you want to remember them. For example, you can create a posed shot if you walk up to a group of friends and say, “Put your arms around each other, look at me, smile, and say cheese.”
When working with a group of kids that need a little direction, it sometimes helps to let them take a couple of goofy photos first, under the condition they let you take a couple “nicer” photos afterward.
#7—Take Pictures of Signs to Set the Scene and Show Where You’ve Been
If you’re on vacation, for example, and know you plan to put together a photo album, scrapbook, or photo book to showcase and share your vacation memories, one way you can set the scene and show where you’ve been, without having to utilize photo captions, is to take photos of interesting signs during your travels.
Once again, be creative as you take pictures of signs. For example, you can pose people in front of the signs to personalize them. Or, you can look for words that somehow describe your location on unusual objects. It’s also possible to create your own signs. For example, if you’re vacationing on a beach, you can take a stick and write your location in the sand (as shown in Figure 3-14).
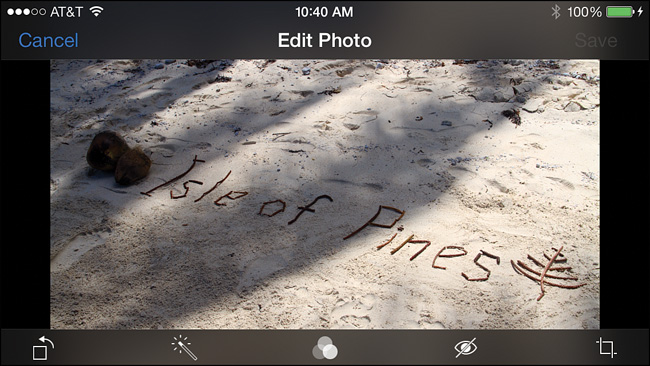
FIGURE 3-14 It’s easy to create your own sign photos that can be used in slideshows, photo albums, photo books, or scrapbooks, for example, to set the scene and describe where you’ve been.
If you’re putting together a group of photos taken at a birthday party, for example, the image you use as your “title” can be the birthday cake that clearly says, “Happy Birthday, Rusty.”
As you explore your surroundings when you’re out and about, you’ll find all sorts of interesting signs that you can shoot creatively, and then incorporate into however you plan to present your photos.
#8—Take Advantage of the Zoom
Often, a wide-angle shot can be used to show a location, just as taking a normal photo in Landscape mode enables you to showcase your subject but also see plenty of background in the image so the location is more obvious to the people viewing your photos. Sometimes, however, you’ll be able to capture more visually interesting or compelling shots if you take full advantage of the zoom to get extremely close to your intended subject(s).
In situations when you have time to take lots of photos and experiment a bit, consider taking some wide-angle or even panoramic shots that can be used in a photo album, slideshow, online gallery, scrapbook, or photo book to set the scene, but then utilize the zoom at different intensities to capture images of the same subjects from a close-up perspective.
#9—Watch Out for Unwanted Shadows
As a digital photographer, one of your worst enemies is often unwanted and annoying shadows. These shadows can be caused by the sun, by artificial lighting indoors, or by your iPhone’s own flash. Depending on the cause, there are a variety of ways you can rid yourself of these photo menaces, or at least diminish the negative impact they have in your photos.
Typically, the easiest thing to do is adjust your lighting or the position of your primary light source. In some situations, adding more light to a situation helps get rid of shadows.
In other situations, repositioning yourself or your subject(s) can also go a long way toward ridding yourself of unwanted shadows. However, the time to be concerned about shadows is while you’re actually taking pictures, not after the fact when it’s too late to do anything about them.
Note
Chapter 4, “Take Awesome Pictures in Low Light,” offers tips and strategies for using the iPhone’s flash, while eliminating unwanted shadows and red-eye caused by the flash.
Sometimes, when to use the flash and when to avoid using it can be counterintuitive. For example, if you’re taking pictures outside on a bright and sunny day, but your subject is standing under a tree and is partially covered in annoying shadows, one way to reduce the negative impact of the shadows is to move your subject so he or she is not impacted by the shadows, or you can try turning on and using the iPhone’s built-in flash to light up your subject and drown out the shadows.
Meanwhile, if you’re taking photos inside and the lighting is dim, try taking photos using natural light, instead of turning on the flash and using it. (Also, take advantage of the HDR mode when using the Camera app.) Especially if your subject is positioned close to a wall behind them, for example, using the flash can cause unwanted shadows behind your subject, plus drown out the ambient light with a harsh bright light.
#10—Use the AE/AF Sensor to Your Advantage
The autoexposure/autofocus sensor that’s built in to the Camera app (and most other photography apps that can be used for taking pictures with the iPhone or iPad) is designed to ensure that the subject of your photo is captured in focus, utilizing the available light in the best possible way.
By default, the Camera app uses its artificial intelligence and attempts to automatically determine who or what your intended subject is within every photo you take. This is easier for the Camera app when you’re taking pictures of people because the app is designed to recognize up to 10 faces at a time within a single picture.
However, as you begin to utilize the Rule of Thirds, take photos from different angles and perspectives and, at the same time, take advantage of what’s in the foreground, the background, and/or to the sides of your subject to help frame your shots, the AE/AF sensor could easily get confused and automatically select the wrong object to be the subject of the image.
Keeping in mind that whatever the AE/AF sensor locks onto in your viewfinder is what will be in focus when a picture is taken, it’s your responsibility to make sure this sensor knows what your intended subject is in every photo.
Especially if there are objects in front of or to the sides of your intended subject, it is often necessary to adjust the AE/AF sensor by framing your image in the viewfinder and then tapping on the screen on your intended subject. Otherwise, when you look closely at your photos after the fact, you might notice that the object to the side or in front of your intended subject is what’s perfectly in focus, and your intended subject is actually slightly blurry.
When using the AE/AF sensor, it’s essential that when holding your iPhone or iPad, your fingers don’t accidentally touch the screen (viewfinder) as you’re about to snap a photo. Any unwanted contact with the touch screen could cause the AE/AF sensor to refocus on wherever your finger accidentally touches, resulting in your intended subject becoming out of focus.
As the Photographer, Be Aware of Everything
To consistently capture well-lit, in-focus, visually interesting, and creative digital photos using your iPhone or iPad, as the photographer, you must pay careful attention to everything around you, tap your creativity, and at the same time, make sure you utilize the right features and functions of the photography app you’re using to take pictures.
This might sound like an overwhelming task, but with just a little bit of practice, mastering the use of the Camera app, for example, while simultaneously using some or all of the strategies outlined in this chapter, will soon become second nature.
From a creative standpoint, here’s a quick recap of what you need to do as you take each photo:
1. Remember to frame your shots using the Rule of Thirds. Avoid shooting your subject from a head-on perspective and always centering it within the frame.
2. Take advantage of an interesting shooting angle or perspective. This includes deciding whether to use Portrait or Landscape mode when taking a picture, and then positioning yourself at the best angle to capture your subject from an interesting point of view.
3. Pay attention to the primary light source and work with it.
4. Utilize what’s in the foreground, the background, and to the sides of your subject, when possible, to frame your subject and add a sense of depth to each photo.
5. Watch out for unwanted and annoying shadows.
6. Make sure the AE/AF sensor locks on to your intended subject.
7. Be observant and ensure that you position yourself, as the photographer, in the right place, at the right time, to take the best possible photos as events unfold around you.
Whether you’re taking pictures of people, places, or things (or a combination of different subjects), you’ll always be faced with challenges as a photographer.
Be sure to read Chapter 5, “Overcome Common Picture-Taking Challenges,” to discover strategies for overcoming common obstacles, such as shooting through glass, taking pictures of fast-moving subjects, capturing in-focus images when you (the photographer) are in motion, taking pictures of animals, and capturing the perfect group photos when the people in the photo don’t want to cooperate.