In This Chapter
Browsing your iTunes library
Changing options for viewing your content
Sorting content by view options
Searching for content in the library
Finding pesky duplicates
Deleting items from the library
You rip a few CDs, buy some songs and movies from the iTunes Store, and you're hooked. You keep adding more and more content to your library and forget how to find items you added last month. It's time to discover how to organize your content and navigate your iTunes library.
The iTunes library can hold an unlimited number of files, depending on how much space you have on your hard drive. But even if you keep your iTunes library down to the size of what fits on your iPod or iPhone, you still have a formidable collection at your fingertips. If your content collection is getting large, organize it to make finding songs, audio books, podcasts, and videos easier. After all, finding U2's "I Still Haven't Found What I'm Looking For" is a challenge, even in a library that fits on an 8GB iPod nano.
This chapter shows you how to search, browse, and sort your iTunes library. You can find any content item in seconds. You can also change the viewing options to make your library's display more useful, such as displaying songs sorted by artist, album, genre, or other attributes, or sorting TV shows by season or episode.
As you know, the iTunes window provides the List pane on the right side and the Source pane on the left side (refer to Chapter 6 for figures showing Mac and Windows versions). The List pane offers a view of your library and content, depending on which sources of content you choose in the Source pane on the left side. The choices in the Source pane are as follows:
Library section: Select Music, Movies, TV Shows, Podcasts, Audiobooks, Applications, Ringtones, or Radio. By default, iTunes doesn't display iTunes U. To see iTunes U, or to change the options listed in the Library section, choose iTunes

Music: Lists the entire library of songs and music videos purchased, downloaded, ripped, or copied into the library.
Movies: Lists the movies downloaded from the iTunes Store and movie files you've added to your library.
TV Shows: Lists TV shows downloaded from the iTunes Store. (This list includes video files you've imported and then changed to TV Show in the Media Kind popup of the Options pane of the Info dialog — see Chapter 12 for details on adding or changing the content information.)
Podcasts: Lists the podcasts you've subscribed to. (See Chapter 8 for details on subscribing to and browsing podcasts.)
Audiobooks: Lists the audio books downloaded from the iTunes Store or from
Audible.comor other sources. (This list includes audio files you've ripped or imported and then changed to Audiobook in the Media Kind popup of the Options pane of the Info dialog — see Chapter 12 for details on adding or changing the content information.)Applications: Lists the iPod touch and iPhone applications downloaded from the App Store or iTunes Store, and iPod games downloaded from the iTunes Store.
Ringtones: Lists the ringtones downloaded from the iTunes Store or from other sources, as well as those created in GarageBand on a Mac and added to your iTunes library.
Radio: Lists the Web radio stations you can play. Radio station content is streamed to your computer but not stored in your library.
iTunes U: Courseware, lectures, and other items downloaded from or subscribed to in the iTunes U section of the iTunes Store.
Store section: The iTunes Store (see Chapter 7).
Devices section: Your iPod, iPhone, and Apple TV appear listed here when connected, as well as an audio CD when inserted into your computer. When you select a device such as an iPod, iTunes displays the summary page with synchronization options. See Chapter 9 for details on navigating the library on an iPod set for managing content manually.
Shared section: Shared iTunes libraries on your home network appear here, as I describe in Chapter 7.
Genius section: The Genius Mix and any the Genius playlists you generate appear in this section. See Chapter 14 for details on using the Genius Mix and Genius playlists.
Playlist section: Smart playlists and regular playlists appear in this section. Also appearing in this section is iTunes DJ, which lets you continually change a playlist of random songs. See Chapter 13 for details on iTunes DJ, and Chapter 14 for the player's guide to playlists.
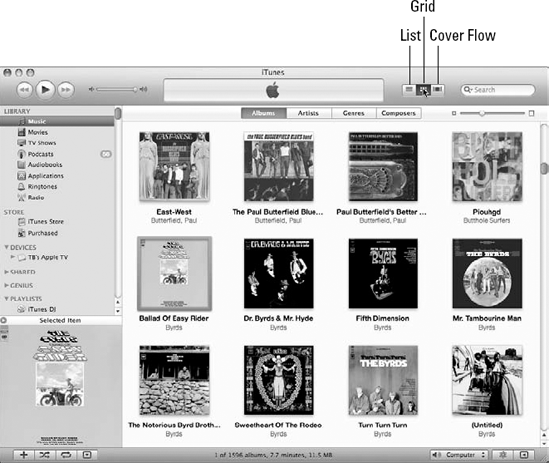
Overwhelmed by all the content in the List pane? Try browsing. iTunes offers three View buttons in the upper-right corner for browsing your content in the List pane:
List (the left button, or choose View
Grid (the center button, or choose View
Cover Flow (the right button, or choose View
Tip
In List view, choose View
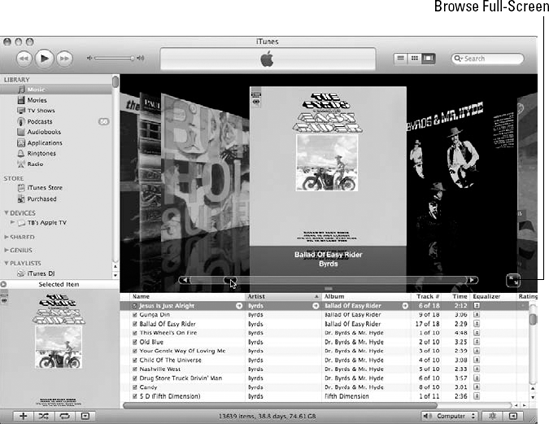
Does viewing a cover whet your appetite for the music, story, or video inside? Of course it does. Covers provide a context that simply can't be put into words or conveyed by sound. One fantastic innovation of iTunes is how it integrates cover art from albums, books, podcasts, and videos with your library so that you can flip through your content to find items based on the artwork. Figure 11-2 shows the iTunes window using Cover Flow view to display the Music portion of the iTunes library.
To select Cover Flow, click the rightmost of the three View buttons in the upper-right corner of the iTunes window. You can also show the cover browser by choosing View
Cover Flow lets you flip through your cover art to select music, movies, TV shows, podcasts, and audio books. (The cover browser doesn't work with ringtones or radio stations.) Just drag the slider to scroll swiftly through your library or click to the right or left of the cover art in the foreground to move forward or backward, respectively. When you scroll or click through cover art, the content items in the List pane also change. Double-click the foreground cover art to start playing the first item — whether it's an album's first song, a movie, the first chapter of an audio book, or the first episode of a TV show.
Click the Browse Full-Screen button to display Cover Flow, um, full-screen. You can still click a cover to select an album, click within each cover to move forward and backward, and use the cover browser's slider to navigate your library. iTunes also offers a volume control slider to set the audio volume while browsing full-screen cover art. Press Esc (Escape) or click the Browse Full-Screen button (with its arrows pointing inward) in the lower-right corner of the display to stop displaying the cover browser full-screen and return to the iTunes window.
To fill your library automatically with cover art, get yourself an iTunes Store account (if you don't already have one). Log in to your account; then choose Advanced
You can also get your cover art from other places that sell CDs, audio books, and DVDs (including Amazon.com) or even scan it from the actual CDs, DVDs, or books. You can then add cover art from a scanned or downloaded image file to any content item in your iTunes library, as I describe in Chapter 12. The optimal size for cover art is 300 × 300 pixels.
To select List view, click the leftmost of the three View buttons in the upper-right corner of the iTunes window. You can also choose View
To browse music in your library in List view, select Music in the Source pane in the Library section. The List view shows the title of each song in the Name column, the artist or band name in the Artist column, and the title of the album in the Album column. To browse the list, choose View
The Column Browser in List view organizes music content into Genres, Artists, Albums, Composers, and Groupings columns — you can choose which columns to display by choosing View
The Column Browser appears in the leftmost column by default or if you choose View
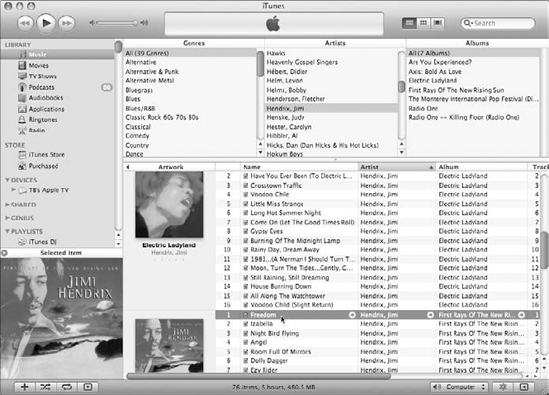
You can switch the Column Browser to appear in the top part of the List pane, as shown in Figure 11-3, if you choose View
Select a genre in the Genres column to see artists in that genre in the Artists column, or select All at the top of the Genres column to see all artists for all genres. When you select an artist in the Artists column (refer to Figure 11-3), the album titles appear in the Albums column (on the right). When you select an album, iTunes displays only the songs for that album in the List pane below the Column Browser.
Tip
To see more than one album from an artist at a time, press
After selecting an album in the Albums column, the songs in the List pane are listed in the proper album track order, just as the artist, producer, or record label intended.
If you don't get track information from the Internet for each song on a CD that you're ready to rip (as I show dramatically in Chapter 6), or if you don't add the track information yourself via the content item's information dialog (as I describe in wondrous detail in Chapter 12), iTunes displays only a blank space for the artist and album name along with Track 01 and so on for each track. That makes browsing for a song or artist by name difficult, to say the least.
Tip
To see all the songs in the library in the browser, select All at the top of each of the columns — Genres, Artists, and Albums. You can also switch to Grid (refer to Figure 11-1) or to Cover Flow view (refer to Figure 11-2) to show the album cover art.
If you don't see Audiobooks in the Library section of the Source pane, choose iTunes
To browse the audio books in your library, select Audiobooks in the Source pane. You can browse audio book titles and authors with the Column Browser in List view, or browse cover art in Grid or Cover Flow view. The List view shows the title of each book with its part number (long books typically have multiple parts) in the Name column and the author's name in the Authors column. If you add the Albums column heading to the Column Browser or to List view (as I describe in the section "Changing the List view options," later in this chapter), the title of the book appears in the Albums column.
To browse podcasts, select Podcasts in the Library section of the Source pane. You can browse podcast episodes with the Column Browser in List view, or browse cover art in Grid or Cover Flow view. You can then see the episodes of a podcast by clicking the podcast, and in List view, clicking the triangle next to the podcast name. For details on playing episodes, see Chapter 13.
The List view shows the title of each podcast and its episodes in the Podcast columnThe mysterious blue dot next to a podcast means that you haven't played one or more episodes of the podcast yet. (The same blue dot appears next to each unplayed episode.) As soon as you start listening to or watching a podcast, the dot turns into a half-moon until you complete the episode (accompanied by the theme of The Twilight Zone).
You can click the i icon on the far-right podcast listing margin in List view to display separate information about the podcast's newest episode.
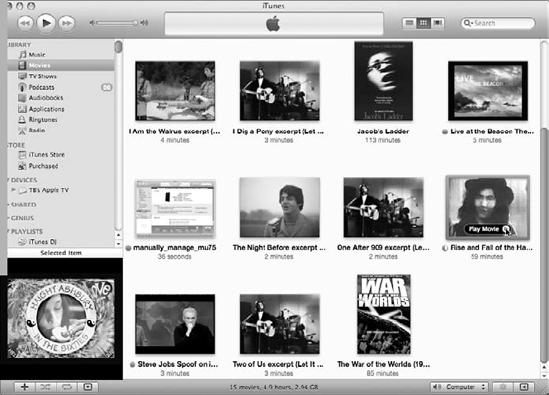
To browse movies, select Movies in the Library section of the Source pane. Any video files you add to your library from sources other than the iTunes Store are classified as movies — but you can change their media type as I describe in Chapter 12 so that, for example, a video shows up as a TV show rather than a movie. You can also find in the Movies listing those movies and short films you downloaded from the iTunes Store.
You can browse movies, TV shows, and videos with the Column Browser in List view, or browse cover art in Grid or Cover Flow view. The Grid view (as shown in Figure 11-4) and the Cover Flow view show the first key frame of the movie or the box cover art for the movie.
You can browse TV shows by selecting TV Shows in the Library section of the Source pane. The List view shows the episode title, show title, and season number. The Column Browser in List view organizes TV shows by Genres, Shows, and Seasons. The Grid and Cover Flow views show the promotional cover art for the TV show.
The applications you download for your iPod touch or iPhone, along with the games you download for your iPod classic or iPod nano (or older model iPod), show up in the Applications section of your iTunes library. Applications for the iPod touch and iPhone are available in the App Store, and games for the iPod nano, iPod classic, and older models are in the iTunes Store (see Chapter 7 for glorious details). And although you can't run the applications or play the games in iTunes, you can browse the list of applications and games you downloaded.
If you don't see Applications in the Library section of the Source pane, choose iTunes
To browse iPod touch or iPhone applications, or iPod classic and iPod nano "click wheel" games, select Applications in the Source pane. Applications are classified by genre according to the App Store categories, and these genres appear in the Genre category in List view. The iPod Games genre refers to any "click wheel" games you download for your iPod classic or iPod nano (or older model iPod). The applications in Grid view are separated into two sections: one for iPhone and iPod touch Apps, and the other for iPod Games. The Grid and Cover Flow views show the promotional cover art for the application.
To display your content in the List pane as a list, click the left View button (refer to Figure 11-1) or choose View
iTunes displays a playlist as a song list in the List pane, even if it includes other content items. The column headings for playlists have different meanings for the following types of content:
Songs and music videos: The Name is the title of the song; the Artist is the band, artist, or performer. The Album is the title of the CD or vinyl record on which the song appeared. For music videos, the Name is typically the title of a song in the music video.
Podcasts: The Name is the title of the podcast episode (as in "Ballad Roots of California Folk-Rock"), the Artist is the name of the podcast author (as in Tony Bove) or producer (such as Chicago Public Radio), and the Album is the name of the podcast (as in Rockument).
Audio books: The Album is typically the book's title (as in Fear and Loathing in Las Vegas), and the Name is typically the title of one of the parts (as in Fear and Loathing in Las Vegas–Part 1 of 3).
TV shows: The Name is the name of the TV show episode (as in "Mr. Monk and the Airplane"), the Artist is the name of the show (as in Monk), and the Album is the season (as in Monk, Season 1).
iTunes lets you customize the List view in the List pane for each type of content. For music, the list starts out with the Name, Time, Artist, Album, Genre, Rating, and Play Count columns. You might have to drag the horizontal scroll bar along the bottom of the song list to see all these columns. You can display more, less, or different information in your song list.
Customize your List view in the following ways:
Make a column wider or narrower. While you move your cursor over the divider between two columns, the cursor changes to a vertical bar with opposing arrows extending left and right; you can click and drag the divider to change the column's width.
Change the order of columns. Click a column heading and drag the entire column to the left or right.
Note
You can't change the position of the Name column and the narrow column to its left, which displays indicators and shows the playlist order.
Add or remove columns. You can add or remove any column except Name and the playlist order:
Select the type of content in the Source pane in the Library section (Music, Movies, TV Shows, iTunes U, Podcasts, Audiobooks, Ringtones, or Radio) and choose View
Select the columns that you want to appear in the list from the View Options dialog (as shown in Figure 11-5 for Music).
Tip
You can also change which columns are visible by Control-clicking (on a Mac) or right-clicking (in Windows) any column heading in the list in either Browse view or List view.

With just a little know-how, you can use the List view options to sort the listing of content items. You can sort items not only by name or album but also by composer, the date the items were added to the library, or other information that you can add to an item (as I describe in Chapter 12).
At the very least, you can sort the content by the column headings you now use in the List view. You can also add other column headings to your List view (as I describe in the previous section) and sort with them.
For example, clicking the Time heading reorders the items by their duration in ascending order, from shortest to longest. If you click the Time heading again, the sort is in descending order, which is reversed, starting with the longest item. You can sort by any column heading, such as Artist, Album, Track, Date Added, and Ratings.
You can tell whether the sort is in ascending or descending order by the little arrow indicator in the heading. When the arrow points up, the sort is in ascending order; when pointing down, it's in descending order.
Tip
You can always sort a list using the old standby, alphabetical order. Click the Artist heading to sort the items in the list by artist name in alphabetical order (arrow pointing up). Click it again to sort the list in reverse alphabetical order (arrow pointing down).
iTunes also lets you sort the song list via the Album column. Each time you click Album, the heading cycles through each of the following options:
iTunes keeps track of the songs, audio books, and podcasts you skip — not to be polite, just to be useful. You can use this feature to sort the Music and Audiobooks lists of your library in List view, thereby making it easier to select and delete the items you skip.
Because your iTunes library will most likely grow, you might find the usual browsing and scrolling methods that I describe earlier in this chapter too time-consuming. Let iTunes find your content for you!
Note
If you want to search the entire library with the Colum Browser open in List view, select All at the top of the Genres and Artists columns to browse the entire library before typing a term in the Search field. Or, if you prefer, choose View
Locate the Search field — the oval field in the upper-right corner — and follow these steps:
Click in the Search field and enter several characters of your search term.
Use these tips for successful searching:
Specify your search with a specific title, artist, or album.
Narrow your search by typing more characters. Using fewer characters results in a longer list of possible songs.
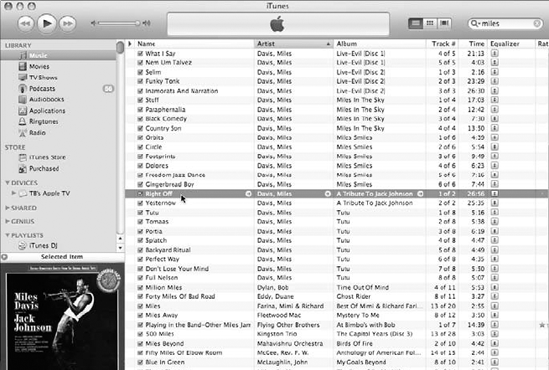
Case doesn't matter, nor do whole words. The Search feature ignores case. For example, when I search for miles, iTunes finds a long list that includes "Eight Miles High," "Forty Miles of Bad Road," and "She Smiles like a River," as well as everything by Miles Davis.
Look through the results, which display while you type.
The search operation works immediately, as shown in Figure 11-6, displaying any matches in the Name, Artist, and Album columns.
Scroll through the search results and then click an item to select it.
To back out of a search so that the full list appears again, you can either click the circled X in the Search field (which appears after you start typing characters) or delete what you typed. You then see the entire list in the List pane, just like before you began your search. All the items are still there and remain there unless you explicitly remove them. Searching manipulates only your view of the items.
Getting lost in a large library is easy. While you browse your library, you might want to return quickly to view the current item playing. While your file plays, choose View
You can also show the location of the media file for any content item. This trick comes in handy when you want to open the media file's folder. On a Mac, choose File
Because your library will grow, you'll probably want to check for duplications. Some songs that appear on artist CDs also appear on compilation or soundtrack CDs. If you rip them all, you could have duplicate songs that take up space on your hard drive. You might even have duplicate videos and audio books.
On the other hand, maybe you want to find different versions of the same song by the same artist. Even when the songs appear on different albums, iTunes can quickly find all the songs with the same title by the same artist.
To show duplicate items in the list, choose File
To stop showing duplicate items and return to your previous view, click the Show All button below the list of duplicates.
Deleting content might seem counterproductive when you're trying to build your iTunes library, but sometimes you just have to do it. For example, you might want to delete the following:
Versions of songs: You might have ripped a CD twice — say, once in AIFF format to burn the songs onto another CD and once in AAC format for your library and iPod or iPhone. You can delete the AIFF versions in your library after burning your CD (see Chapter 15 for burning instructions).
Items from playlists: You can delete items from playlists yet keep the items in your library. When you delete an item from a playlist, the item is simply deleted from the list — not from the library. You can delete entire playlists as well without harming the content in the library. You have to select a media category in the Library section in the Source pane first, to delete content from the library. (See Chapter 14 for more information about playlists.)
Anything you are embarrassed to have in your library or simply don't want.
You can select any content item and remove it from your iTunes library. You then have a choice of keeping the item's file on your hard drive in the same folder, or transferring it to the Trash (on a Mac) or Recycle Bin (on a Windows PC) to delete it entirely.
To delete a song, ringtone, Web radio station, podcast, iTunes lecture, video, audio book, application, or an entire album or artist, select the media type (Music, Movies, TV Shows, Podcasts, iTunes U, Audiobooks, Applications, Ringtones, or Radio) and then select the item (or select an artist for the artist's entire oeuvre, or an album to select the entire album). Press Delete/Backspace (or choose Edit
Tip
You can select a single TV show episode and then choose Edit
Tip
You can select a single episode of a podcast and then choose Edit
Deleting a content item from the iTunes library removes the item from your library, but it doesn't remove it from your hard drive until you agree. In the first warning dialog that appears, click the Remove button to remove the selected items from the library or click the Cancel button. iTunes then displays a second warning about moving the files that are still in the iTunes Music folder to the Trash (Mac) or Recycle Bin (Windows). You can click the Move to Trash button on a Mac, or the Move to Recycle Bin button in Windows, to trash the item. Click Keep File to keep it in your music folder, or click Cancel to cancel the operation.
If you choose to move the content to the Trash or Recycle Bin, the content is not yet deleted from your hard drive — you can recover the files by copying them out of the Trash or Recycle Bin, or you can empty them to delete them permanently.
Tip
You can delete multiple items in one clean sweep. Press Shift while you click a range of items. Alternatively, press