
If you like to entertain folks by spinning tunes and playing videos at home or at parties, iTunes could easily become your media jockey console. With iTunes, your computer is a mean multimedia machine that can mix sounds, photos, and videos. And even if you've never mastered a stereo system beyond adjusting the bass, treble, and volume, you can quickly and easily fine-tune the sound in iTunes, and even adjust the volume and equalizer settings for each song, video, audio book, and podcast.
But that's not all: You can also use iTunes to play video on your computer's display, or you can send it to a larger television or display monitor — even a video projector — to get a bigger picture. And if you've integrated Apple TV with your home audio system and television, you can use iTunes to feed music and video to Apple TV wirelessly, as I describe in this chapter.
Note
To find out more about Apple TV, visit this book's companion Web site.
You can control the volume and other characteristics of the sound coming from your computer's speakers, headphones, or external speakers. Even if you connect your computer to a home audio system with its own volume and equalizer controls, it's best to get the volume correct at the source — your computer and iTunes — and then adjust the output volume as you please on your audio system or external speaker unit.
You control the volume by using your computer system's audio controls. iTunes also controls the volume, but that control is within the limits of the computer's volume setting. For example, if you set your computer's volume to half and set iTunes volume to full, you get half volume because the computer limits the volume to half. If you set your computer volume at half and also reduce the iTunes volume to half, you actually get one-quarter volume — half the computer's setting. After the sound leaves your computer, you can adjust it further with the volume controls of your stereo system or external speakers.
The appropriate volume depends entirely on your preferences for hearing music, audio books, or video soundtracks. In general, though, the maximum level of output from your computer is preferable when connecting to a stereo system or speakers with volume controls. After setting your computer to the maximum volume, adjust the iTunes volume or your stereo or speaker volume (or both) to get the best sound. When using the computer's speakers or headphones, the computer's volume and the iTunes volume are the only volume controls that you have, so after adjusting the volume on your computer to the maximum level (or lower if you prefer), adjust the iTunes volume.
The Mac was built for sound from the very start. Making and playing music have been part of the Mac culture since the day that Steve Jobs introduced an audience to the original Mac with sound coming from its small speaker. (It played synthesized speech and simple tones, but it was the first personal computer with built-in sound.)
Today's Macs come with built-in or external speakers and at least one headphone/line-out connection that you can use to connect external speakers or a stereo system. Mac OS X lets you configure output speakers and control levels for stereo speakers and multichannel audio devices.
Note
If you use external speakers, headphones, or a stereo system, make sure that you connect these devices properly before adjusting the volume.
To adjust the volume on your Mac, follow these steps:
Choose System Preferences from the Apple menu or the Dock and then click the Sound icon.
Otherwise, press Option and a volume control key on your keyboard simultaneously as a shortcut. You can have iTunes open and playing music while you do this.
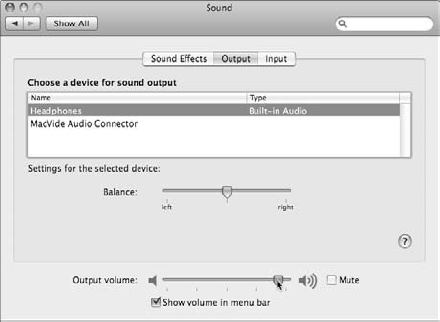
In the Sound preferences window that opens, click Output and select the sound output device.
If you have headphones or external speakers attached to the headphones connection on your Mac, a Headphones option appears in the list of sound output devices, as shown in Figure 13-1. The External Speakers or Internal Speakers option may also appear for speakers connected through a line-out connection or built into the Mac.
Adjust the volume.
You can do any of the following:
Drag the slider to adjust the volume while you listen to music.
Select the Mute check box to silence your Mac.
Drag the Balance slider to put more music in the left or right channel.
Close the Preferences window, either by choosing System Preferences

The Sound preferences window isn't like a dialog: When you change settings, you can hear the effect immediately without having to click OK. (There isn't an OK button, anyway.)
Windows 7, Windows Vista, Windows XP, and Windows 2000 let you configure output speakers and control levels for stereo speakers and multichannel audio devices.
Use the Sounds and Audio Devices Properties dialog to change the volume. To open this dialog, choose Start
As shown in Figure 13-2, the Sounds and Audio Devices Properties dialog offers the Device Volume slider, which you drag to set the volume. You can also silence your PC by selecting the Mute check box.
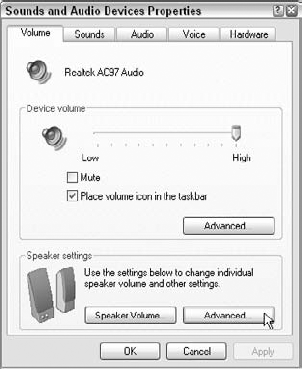
If you select the Place Volume Icon in the Taskbar option and your sound card supports changing the volume with software, a sound icon appears in the notification area of Windows. You can then change the volume quickly without having to open the Sounds and Audio Devices Properties dialog. Simply click the speaker icon and drag the slider that pops up. For more information about adjusting sound on a PC, see PCs For Dummies, 11th Edition, by Dan Gookin (published by Wiley).
You want to play the music in your iTunes library, but your stereo system is across the room or in another room, and you don't want to extend wires to the stereo system. What you need is a wireless connection from your computer to your stereo system.
You can use an Apple AirPort Wi-Fi network in your home — such as AirPort Express by itself, or Apple TV with AirPort Extreme or Time Capsule. AirPort Express and Apple TV work with Apple's AirTunes technology, which lets you play your iTunes music through your stereo or powered speakers in any room of your house, without wires. The only catch is that your computer must be within range of the Wi-Fi network or connected by an Ethernet cable.
Apple's AirPort technology provides Wi-Fi networking for any AirPort-equipped Mac or wireless-capable PC that uses a Wi-Fi-certified IEEE 802.11b, 802.11g, or 802.11n wireless card or offers built-in Wi-Fi. For more about AirPort, see Mac OS X Snow Leopard All-in-One For Dummies, by Mark L. Chambers (published by Wiley).
If you already have a wireless network in place, you can add AirPort Express without changing anything. The AirPort Express wirelessly links to your existing wireless network without requiring any change to the network. You can even use several AirPort Express units — one for each stereo system or set of powered speakers, in different rooms.
All by itself, AirPort Express creates a Wi-Fi network. You can attach your Internet cable modem or other Ethernet network to AirPort Express to link your ready-made Wi-Fi network to the outside world. You can also take AirPort Express on the road to use in hotel rooms to share an Internet connection among wireless computers.
To use AirTunes and AirPort Express, follow these steps:
Follow the instructions to install the software supplied with AirPort Express.
Connect your stereo or a set of powered speakers to the AirPort Express audio port.
You can use an optical digital or analog audio cable. (Both are included in the AirPort Express Stereo Connection Kit available from the Apple Store.) Which cable you use depends on whether your stereo or set of powered speakers has an optical digital or analog connection.
Plug AirPort Express into an electrical outlet.
Use the AC plug that came with AirPort Express or the power extension cord included in the AirPort Express Stereo Connection Kit. AirPort Express turns on automatically when connected to an electrical outlet. The status light glows yellow while AirPort Express is starting up. When it is fully up and running, the light turns green.
On your computer, set your iTunes preferences to look for speakers connected wirelessly with AirTunes.
Choose iTunes
Click the Devices tab to show the Devices pane.
Select the Look for Remote Speakers Connected with AirTunes check box in the Devices pane, as shown in Figure 13-3.
You also have these options in the Devices pane:
To control volume from a stereo: Select the Disable iTunes Volume Control for Remote Speakers check box to control speakers separately (a setting you should use if connecting to a stereo with a volume control).
To control volume from iTunes: Leave this option deselected (the default) to control the volume from within iTunes.
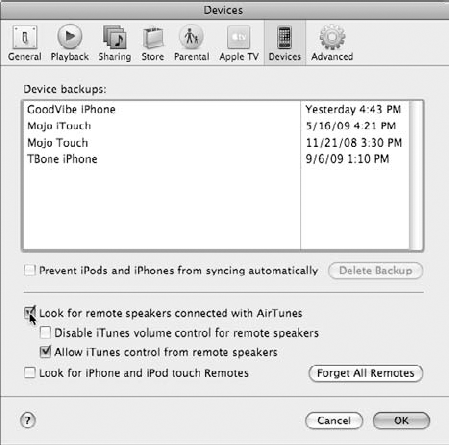
Figure 13-3. Select the option to look for remote speakers connected to your computer using AirTunes.
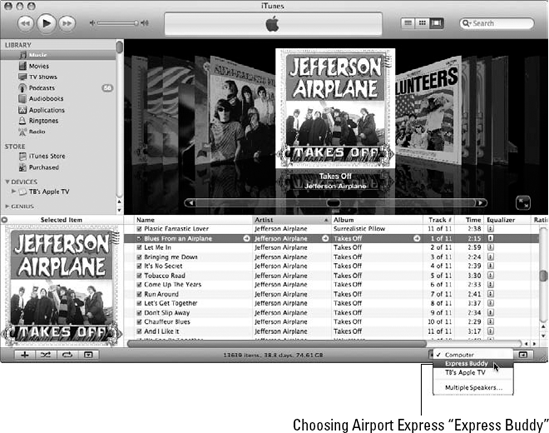
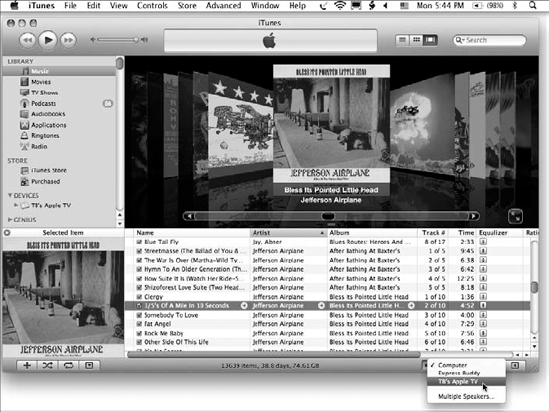
After selecting the option to look for AirTunes-connected speakers, the Speakers pop-up menu appears in the lower-right corner of the iTunes window. Note: The menu will probably be set to Computer, the default option.
Choose AirTunes-Equipped Network from this new pop-up menu.
The Speakers pop-up menu includes the computer itself as well as any available wireless AirTunes networks, as shown in Figure 13-4. You can select the AirTunes network to play music ("Express Buddy" in Figure 13-4). From that point, iTunes plays music through the AirTunes network rather than through the computer. To get back to playing music through speakers connected to the computer (or through the computer's built-in speakers), choose Computer from the Speakers pop-up menu.
The AirPort Express is small enough to fit in the palm of your hand, and it travels well because all it needs is a power outlet. You can take your laptop and AirPort Express to a friend's house or party, connect the AirPort Express to the stereo system and a power outlet, and then use your laptop anywhere in its vicinity to play DJ. You can even use portable powered speakers in a hotel room without wires and use a hotel room's LAN-to-Internet access with an AirPort Express to connect your wireless computer and other wireless computers in the room to the Internet.
To play music through speakers connected to your Apple TV, choose Apple TV from the Speakers pop-up menu, as shown in Figure 13-5. You can use any computer with iTunes to play its library content (audio and video) through Apple TV to your home entertainment system without your having to synchronize that library's content — meaning that you don't have to change the content that is already synchronized with your Apple TV. That way, if you invite a friend over with her laptop, you can quickly play any tune in her laptop's library without changing the synchronized content from your computer. You can play anything in an iTunes library, even if your Apple TV is already filled with synchronized content.
Tip
If you set up your Apple TV to work with an Apple AirPort-based network, you can choose the Multiple Speakers option in the Speakers pop-up menu (refer to Figure 13-5) and play your iTunes content through both the computer and Apple TV speakers at the same time.
When you've found a song you want to play (see Chapter 11 for browsing and searching details), simply select it in the List pane and then click the Play button. The Play button toggles to a Pause button while the song plays.
When the song finishes, iTunes continues playing the songs in the list in sequence until you click the Pause button (which then toggles back into the Play button) or until the song list ends. This setup is useful if you select an album, but not so great if you select a song at random and don't want to hear the next one. (Fortunately, you can arrange songs in playlists so that they play back in exactly the sequence you want; see Chapter 14 for details.)
You can skip to the next or previous song by pressing the right- or left-arrow key, respectively, or by clicking the Forward or Back button next to the Play button. You can also double-click another song in the list to start playing it.
Tip
Press the spacebar to perform the same function as the Play button; press the spacebar again to pause.
Tip
If you want to see the rest of your computer screen while playing music, you can minimize the iTunes screen to just the playback controls. On a Mac, choose Window
Playlists, as I describe in Chapter 14, are great for organizing music in the order that you want to play it, but you can have iTunes serve up songs at random. iTunes DJ (formerly Party Shuffle) is a dynamic playlist that automatically generates a semirandom selection in a list that you can modify on the fly. With iTunes DJ, you might even find songs in your library you forgot about or rarely play. iTunes DJ always throws a few rarely played songs into the mix.
To use iTunes DJ, follow these steps:
Select iTunes DJ in the Playlists section of the Source pane.
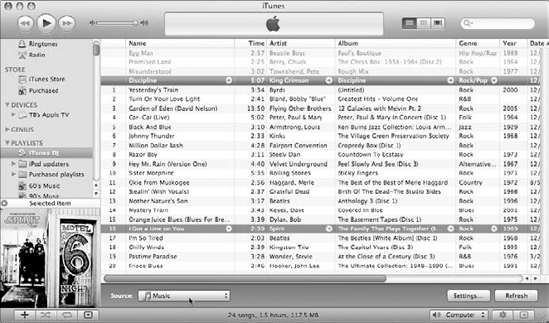
The iTunes DJ track list appears in place of the List pane, with the Source pop-up, Settings, and Refresh buttons at the bottom, as shown in Figure 13-6.
Choose a source from the Source pop-up menu below the track list.
You can select Music (refer to Figure 13-6) to use the entire music portion of your library, or select any playlist as the source for music (including a smart playlist; see Chapter 14 for details). If you select a playlist, iTunes DJ limits its choices to songs from that playlist.
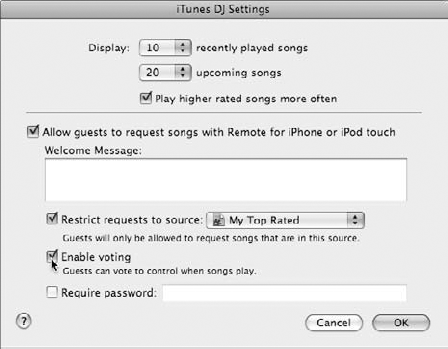
Click the Settings button, and set the following options in the Settings dialog as shown in Figure 13-7:
Recently Played Songs: Choose how many songs should remain in the Party Shuffle list after they're played. You can drag already-played songs (even though they're grayed out after playing) to a spot later in the list to play them again.
Upcoming Songs: Choose how many songs should be listed as upcoming (not yet played). By displaying upcoming songs first, you can decide whether to rearrange the list or delete songs from the Party Shuffle playlist before they're played.
Play Higher Rated Songs More Often: Select this option to have iTunes add more high-rated songs to the random list. Using this option, you weight the randomness in favor of higher-rated songs. See Chapter 12 to find out how to add ratings to songs.
Allow Guests to Request Songs with Remote for iPhone or iPod touch: Select this option to let your guests use Apple's Remote app for the iPod touch or iPhone to connect to your iTunes library and request songs, which are added to the iTunes DJ playlist. You can enter a welcome message for your guests that appears in Remote, and if you also select the Enable Voting check box, your guests can use Remote to vote on songs — songs with more votes are automatically promoted to the top of the iTunes DJ list. You can restrict access to a specific playlist or other source in the Source pane (such as Genius playlists) by selecting the Restrict Requests to Source option and choosing a source from the pop-up menu (for example, I chose the My Top Rated playlist in Figure 13-7). You can control access via Remote by selecting the Require Password check box and entering a password.
(Optional) If you don't like the order of songs, you can rearrange them. If you dislike any songs, you can remove them.
You can rearrange the order of songs in the iTunes DJ playlist by dragging songs to different positions in the list. Remove songs by selecting them in the iTunes DJ playlist and pressing Delete/Backspace (or choosing Edit
Play the iTunes DJ playlist by selecting the first song (or any song) and then clicking the Play button or pressing the spacebar.
You can start playing the first song or any song on the list. (When you pick a song in the middle to start playing, the songs before it are grayed out to show that they won't play.)
Add, delete, or rearrange songs, even while iTunes DJ plays.
While the iTunes DJ list plays, you can add songs in one of two ways:
Open iTunes DJ in a separate window by double-clicking iTunes DJ in the Source pane. You can then drag songs from the main iTunes window — either from the Music portion of your library (select Music in the Library section of the Source pane) or from a playlist in the Source pane — directly into position in the iTunes DJ track list.
Without opening iTunes DJ in a separate window, you can switch to the music portion of your library or a playlist and drag the song over iTunes DJ in the Source pane. When you add a song to iTunes DJ, it shows up at the end of the track list. You can then drag it to a new position.
You can add one or more albums to the iTunes DJ track list by dragging the albums; the songs play in album order. You can also add all the songs by an artist by dragging the artist's name. iTunes DJ acts like a dynamic playlist — you add, delete, and change the order of songs on the fly.
Tip
Cool DJs mix the iTunes DJ window with other open playlist windows. Just double-click the playlist item in the Source pane to open it in a separate window. You can then drag songs from different playlist windows to the iTunes DJ window while iTunes DJ plays, adding songs in whatever order you want in real time.
Tip
If you have songs in your library that you never, ever want to have appear in your iTunes DJ playlist, select the song, choose File
You can often hear a song on the radio fade out while another song immediately fades in over the first song's ending — a cross-fade. With iTunes, you can smoothly transition from the ending of one song to the beginning of the next one. Ordinarily, iTunes is set to have a short cross-fade of one second (the time after the fade-out of the first song to the fade-in of the second), but you can adjust that if you like.
What's totally cool is that you can cross-fade two songs in iTunes even if they're from different sources. The songs could be in your library, in a shared library, on CD, or even on one (or more) iPods connected to your computer and playing through iTunes. You can play DJ at a party with a massive music library on a laptop and enlarge that library with one or more iPods and any number of CDs, and have the songs cross-fade.
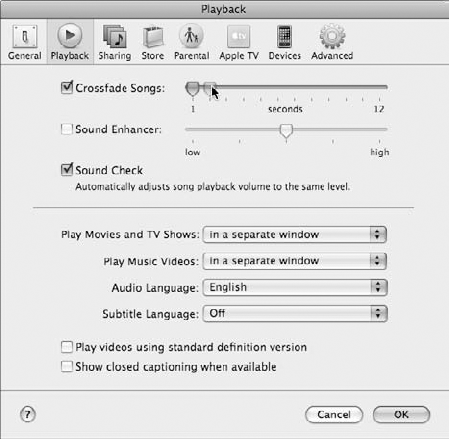
You can change the cross-fade by choosing iTunes
In the Playback preferences dialog, select the Crossfade Songs check box and then increase or decrease the cross-fade by dragging the slider. Each notch in the slider represents one second. The maximum amount of cross-fade is 12 seconds. With a longer cross-fade, you get more overlap from one song to the next; that is, the second song starts before the first one ends. To turn off the cross-fade, deselect the Crossfade Songs check box.
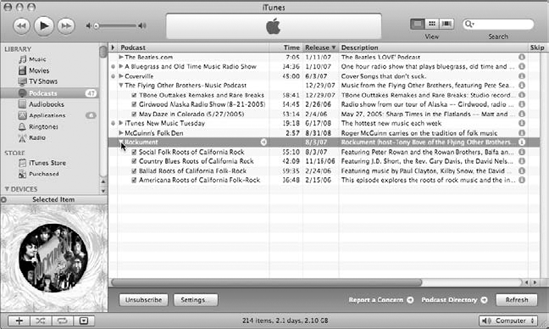
A podcast transfers audio or audio/video episodes, such as weekly broadcasts, automatically to your iTunes library from the Internet or through the iTunes Store (as I describe in episodic detail in Chapter 8). Podcasts that you subscribe to appear in the List pane when you select the Podcasts option in the Library section of the Source pane. You can add podcast episodes to your library by subscribing to them in the iTunes Store (see Chapter 7) or on a Web site (see Chapter 8).
To play the most recent podcast episode, select the Podcasts item in the Library section of the Source pane, select a podcast in any view, and then click the Play button. To play a specific podcast episode, follow these steps:
Select the Podcasts item in the Library section of the Source pane, and choose List or Cover Flow view.
Select a podcast in List view or in the list under the Cover Flow view, and then click the triangle to see its episodes.
The triangle rotates, and a list of episodes appears beneath the podcast, as shown in Figure 13-9 (using List view).
Select the podcast and then click the Play button.
You can use the iTunes playback controls to fast-forward or rewind the podcast or play it from any point. The blue dot next to a podcast means that you haven't yet played it. As soon as you start listening to a podcast, the dot disappears.
When you play a podcast, iTunes remembers your place when you stop listening to it, just like it remembers when you place a bookmark in an audio book or pause during a movie — even after quitting and restarting iTunes. iTunes resumes playing from that playback position when you return to the podcast to play it.
Some podcasts are enhanced to include chapter marks and photos. When you play an enhanced podcast in iTunes, a Chapters menu appears on the iTunes menu bar. Choose this menu to display the podcast's chapter marks, artwork, and chapter start times.
If the podcaster embedded a photo in an audio podcast file or included a link to a video from the file, the photo or video content appears in the Artwork pane.
Although you can drag a podcast into a playlist to include it in that playlist, you can also drag a podcast to the Source pane to create a new playlist, as long as you drag it to an empty space in the Playlist section of the Source pane (and not into another playlist). The new playlist takes on the name of the podcast. You can also add other podcasts to the new playlist and rename the playlist. For more information about playlists, see Chapter 14.
You can store and play audio books, articles, and spoken-word titles just like songs in iTunes, and you can download titles from the iTunes Store (as I describe prolifically in Chapter 7). Choose Audiobooks in the Library section of the Source pane to see them.
To play an audio book, select it just like you would a song (see details on browsing and listing content in Chapter 11) and then click the Play button. You can use the iTunes playback controls to fast-forward or rewind the audio book or play it from any point.
Audio books from the iTunes Store are enhanced to include chapter marks. When you play any of these audio books in iTunes, the Chapters menu appears on the iTunes menu bar, just like it does for a podcast with chapters. Choose the Chapters menu to display and select the audio book's chapter marks.
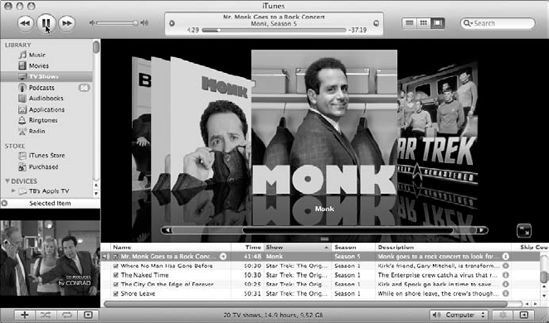
iTunes is versatile when it comes to playing videos — the TV shows, movies, video podcasts, and music videos you downloaded from the iTunes Store (see Chapter 7) as well as the video files you imported into iTunes from other sources (see Chapter 8).
To watch a video in iTunes, select it in your library (see details on browsing and listing movies, TV shows, and videos in Chapter 11) and then click the Play button. Use the iTunes Previous/Rewind, Play/Pause, and Forward/Next buttons to control playback and the iTunes volume slider to control the volume, just like with songs.
By default, the video appears in the Artwork pane in the lower-left corner of the iTunes window, as shown in Figure 13-10. If the Artwork pane isn't visible, playing the video makes it appear. You can also make the Artwork pane appear or disappear by clicking the Show/Hide Artwork button.
To watch a video in a separate window, click the video while it plays in the Artwork pane. A separate window appears that includes a transparent QuickTime controls pane with buttons for controlling video playback, as shown in Figure 13-11. Click the Play button at the center of the pane to play or pause, and then drag the slider to move forward or backward through the video. Click the Rewind or Fast Forward button on either side of the Play button in the controls pane to move backward or forward through a video. Click the red "close window" button in the upper-left corner to close the window.

The transparent QuickTime controls pane disappears while the video plays, but you can make it reappear at any time by moving the cursor to the bottom center of the video window. The controls pane also offers a volume control slider to set the audio volume of the video, and the Full-Screen Video button to change the video display to full-screen. (See the section "Playing a video full-screen," later in this chapter.)
You can resize the separate video window by dragging the lower-right corner of the window. You can also choose fixed window sizes by choosing them from the View menu. For example, choose View
To change your iTunes preferences for playing movies, TV shows, and music videos, choose iTunes
In the Artwork Viewer, as described above and shown in Figure 13-10.
In a Separate Window, as described above and shown in Figure 13-11.
In the iTunes Window, as shown in Figure 13-12, with a transparent QuickTime controls pane that offers buttons for controlling video playback. Click the Play button at the center of the QuickTime controls pane to play or pause, and then drag the slider to move forward or backward through the video. Click the Rewind or Fast Forward button on either side of the Play button in the controls pane to move backward or forward through a video. Click the circled X to stop playing the video and return to the normal iTunes window.
Full Screen or Full Screen (with Visuals), which fills the entire computer display. See the next section, " Playing a video full-screen" for details.
After choosing the Full Screen option from the Play Movies and TV Shows pop-up menu and/or the Play Music Videos pop-up menu as described in the previous section (refer to Figure 13-8), those videos fill the screen when they play, with a transparent QuickTime controls pane offering buttons for controlling video playback.

Warning
Some videos look good when displayed full-screen, but others may not. Videos purchased from the iTunes Store look fine, but video from other sources may look pixilated at full-screen resolution.

When you're playing a video in full-screen view, the following controls are available:
Esc (Escape): Press to stop full-screen playback and return to the iTunes window.
Spacebar: Press to pause playback. (Pressing the spacebar again resumes playback.)
Your mouse or pointing device: Simply move these to display the transparent QuickTime controls pane and then click the Full-Screen Video button (now with its arrows pointing inward) to stop full-screen playback and return to the iTunes window.
Tip
A cool party trick is to seamlessly mix music videos and music with visuals. (See Chapter 6 to find out about displaying visuals.) To display a mixed playlist of music and videos (see Chapter 14 to create playlists), choose iTunes
For many, the computer display is just fine for viewing videos full-screen. However, if you want to connect your PC to a television, the easiest way is through Apple TV. Apple TV lets you connect an HD-compatible television and audio system wirelessly (or by wired Ethernet) to any computer running iTunes in the network and store content for playback.
Note
To find out more about Apple TV and details about connections to home video and stereo equipment, visit this book's companion Web site.
Some songs are just too loud. I don't mean too loud stylistically, as in thrash metal with screeching guitars; I mean too loud for your ears when you're wearing headphones or so loud that the music is distorted. And some songs are just too soft; you have to increase the volume to hear them and then lower the volume to listen to louder songs. Videos, podcast episodes, and audio books can also vary greatly from loud to soft. To remedy these problems, you can set the volume in advance for these items. You can also sound-check your entire music library to bring it in line, volume-wise.
With songs, audio books, podcast episodes, and videos that you already know are too loud (or too soft), consider setting the volume for those items in advance so that they always play with the desired volume adjustment. You can even set the volume for entire albums or podcasts.
To adjust the overall volume of a particular item in advance so that it always plays at that setting, perform the following steps:
Select one or more items in your iTunes library.
Tip
To set the volume in iTunes for multiple songs, you can select an entire album in Browse view or you can select all the songs. To set the volume for a whole podcast, select it instead of individual episodes.
Choose File
The information dialog appears.
Drag the Volume Adjustment slider left or right to adjust the volume lower or higher, as shown in Figure 13-13. You can do this while playing the file.
Click the OK button to finish.

The Beach Boys were right when they sang "Good Vibrations" because that's what music is — the sensation of hearing audible vibrations conveyed to the ear by a medium, such as air. Musicians measure pitch by the frequency of vibrations. When you increase the bass or treble, you're actually increasing the volume, or intensity, of certain frequencies. iTunes provides an equalizer to fine-tune the sound spectrum frequencies in a more precise way than with bass and treble controls. It increases or decreases specific frequencies of the sound to raise or lower highs, lows, and midrange tones.
You can use the iTunes equalizer (EQ) to customize playback for different musical genres, listening environments, or speakers. iTunes comes with more than 20 EQ presets of the most commonly used settings, including ones for specific music genres, such as classical and rock.
To choose an equalizer preset for a song, video, podcast, or audio book, select the item in the iTunes library, choose File
For even finer control, you can open the iTunes Equalizer window by choosing Window
Note
Find out more about tweaking the sound with the equalizer by visiting the Tips section of my Web site (www.tonybove.com).
Because music CDs are manufactured inconsistently, discrepancies occur in volume. Some CDs play louder than others; occasionally, even individual tracks on a CD might vary.
You can standardize the volume level of all the songs in your iTunes library with the Sound Check option. This option has the added benefit of applying the same volume adjustment when you play the songs back on your iPod or iPhone, as I describe in Chapter 16.
To enable Sound Check, follow these steps:
Drag the iTunes volume slider to set the overall volume for iTunes.
The volume slider is located in the upper-left corner of the iTunes window, to the right of the Play button.
Choose iTunes
The iTunes Preferences dialog appears.
Click the Playback tab.
The Playback preferences appear (refer to Figure 13-8).
Select the Sound Check box.
iTunes sets the volume level for all songs according to the level of the iTunes volume slider.
The Sound Check option sets a volume adjustment based on the volume slider on all the songs so that they play at approximately the same volume.
The operation runs in the background while you do other things. If you quit iTunes and then restart it, the operation continues where it left off when you quit. You can switch Sound Check on or off at any time.
You can also improve the depth of the sound by enhancing high and low frequencies. Audiophiles and sound purists would most likely use the equalizer to boost frequencies, but you can use this brute-force method to enhance the sound. Follow these steps:
Choose iTunes
The iTunes Preferences dialog appears.
Click the Playback tab.
The Playback preferences appear (refer to Figure 13-8).
Select the Sound Enhancer check box and adjust the slider:
Increase the sound enhancement. Dragging the Sound Enhancer slider to the right (toward High) is similar to pressing the loudness button on a car stereo or the equivalent of boosting the treble (high) and bass (low) frequencies in the equalizer.
Decrease the high and low frequencies. Drag the slider to the left toward Low.
Note
The middle setting is neutral, adding no enhancement — the same as disabling Sound Enhancer by deselecting its check box.