Chapter 1
Getting Started with jQuery
Key Skills & Concepts
![]() What You Need to Know
What You Need to Know
![]() What Is jQuery?
What Is jQuery?
![]() Why jQuery Is Useful
Why jQuery Is Useful
![]() Begin Using jQuery
Begin Using jQuery
![]() Downloading jQuery
Downloading jQuery
![]() Including jQuery in an HTML Document
Including jQuery in an HTML Document
![]() Your First jQuery Script
Your First jQuery Script
Welcome to jQuery: A Beginner’s Guide ! You’ve probably heard the word jQuery numerous times by now, and perhaps you’ve even been told you need to learn it for your job. This chapter discusses the things you should know before starting with jQuery, what jQuery is, and how to begin using it in your Web site code.
jQuery has become an immensely popular tool for adding dynamic effects to Web pages, such as adding, removing, or moving elements. It uses a syntax that is often easier to learn than JavaScript programming, since it makes use of HTML/CSS syntax as a basis for accessing page elements. This syntax is something most Web designers and developers are familiar with already, which is a nice feature when you are learning something new.
What You Need to Know
Before you begin using jQuery, you should have (or obtain) knowledge of the following:
![]() HTML and Cascading Style Sheets (CSS)
HTML and Cascading Style Sheets (CSS)
![]() Text editors and Web browsers
Text editors and Web browsers
![]() Basic JavaScript
Basic JavaScript
If you have been asked to learn jQuery, you likely have some or all of this knowledge already. If you don’t know some or all of the aforementioned topics, a closer look at each of them may help you decide where to begin.
Basic HTML and CSS Knowledge
Ideally, you will want to have previous experience with HTML (Hypertext Markup Language) and CSS (Cascading Style Sheets), or at least have a basic understanding of how these languages work and how they help to build a Web page.
You will use HTML to create the structure of a Web page, and you will be adding, changing, or removing tags during the course of this book. For this reason, it is good to know the basics regarding the opening and closing of tags and how to add attributes to tags, as in the following code:
<div class=″news″>
If you don’t know HTML, you can learn it fairly quickly by purchasing a book or reading a Web site. A good book is HTML: A Beginner’s Guide, Fourth Edition by Wendy Willard (McGraw-Hill Professional, 2009). For good Web sites to learn HTML, try: www.scripttheweb.com/html5/ and www.w3.org/wiki/The_basics_of_HTML.
In this book, I will use HTML5 in the example code. You are free to use HTML4 or XHTML if necessary, or if you prefer to do so. You will just need to adjust the code as needed to fit the convention you will be using.
You will also need to know how to use CSS, particularly when it comes to using CSS selectors. Two good places to learn CSS are www.scripttheweb.com/css/ and www.w3.org/wiki/CSS_basics.
Basic Text Editor and Web Browser Knowledge
Before jumping in and coding with JavaScript, you must be able to use a text editor or HTML editor, and a Web browser. You’ll use these tools to code your scripts.
Text Editors
Any HTML/text editor can be used for jQuery code, just as with HTML, CSS, or JavaScript. Some examples include Adobe Dreamweaver (in code mode), NetBeans, or a plain text editor such as Notepad, TextPad, or Simple Text.
Web Browsers
jQuery is written to work in many different browsers, but the following are recommended since they will be more up to date with other technologies (such as HTML5 or CSS3):
![]() Microsoft Internet Explorer version 9.0 or later, or 8 if you are not able to upgrade on your operating system, for example, Windows XP (www.microsoft.com/ie)
Microsoft Internet Explorer version 9.0 or later, or 8 if you are not able to upgrade on your operating system, for example, Windows XP (www.microsoft.com/ie)
![]() Mozilla Firefox version 14.0 or later (www.mozilla.com/firefox)
Mozilla Firefox version 14.0 or later (www.mozilla.com/firefox)
![]() Google Chrome version 20.0 or later (www.google.com/chrome/)
Google Chrome version 20.0 or later (www.google.com/chrome/)
![]() Opera version 12.0 or later (www.opera.com)
Opera version 12.0 or later (www.opera.com)
New versions of these browsers continue to be produced, so when you download one, be sure to get the latest stable version available.
To give you an idea of what some of the aforementioned browsers look like when in use, Figure 1-1 shows a Web page when viewed in Microsoft Internet Explorer, and Figure 1-2 shows the same page when viewed in Mozilla Firefox.
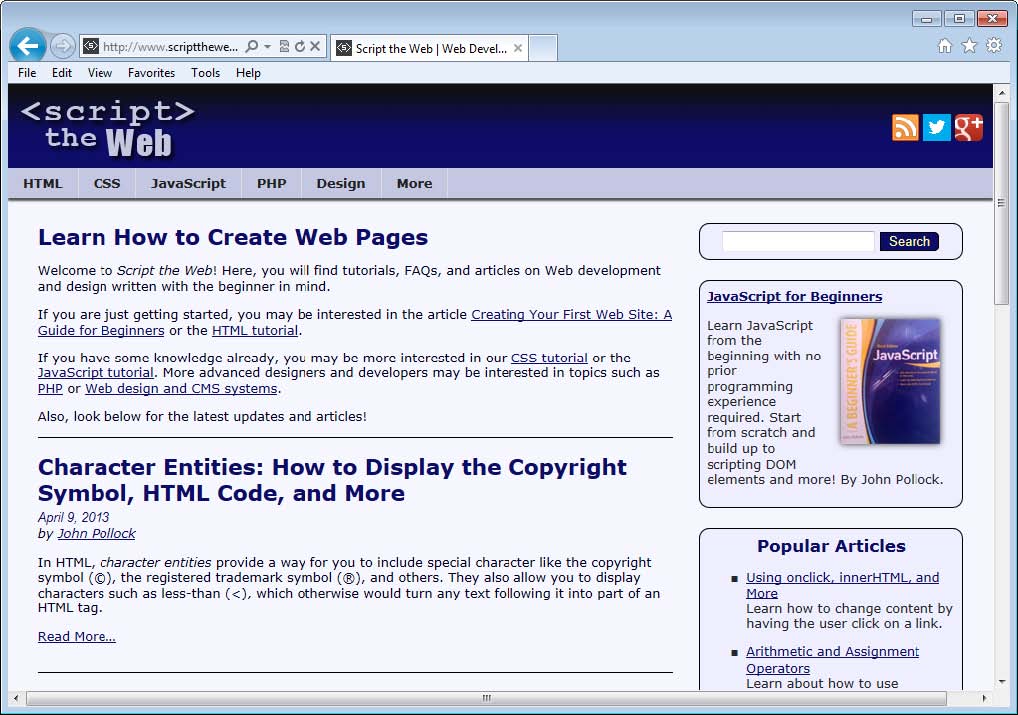
Figure 1-1 A Web page viewed in Microsoft Internet Explorer

Figure 1-2 A Web page viewed in Mozilla Firefox
Basic JavaScript Knowledge
jQuery is a JavaScript library, so it is helpful to know some of the basics of the JavaScript language, such as including JavaScript files in an HTML document, defining variables and functions, using conditional statements, and working with the dot (.) operator.
While jQuery makes many things easier, it does not always entirely replace the use of JavaScript code. For example, you may need to use an if/else statement or define a variable using JavaScript code. However, if you do not know these basics, I will provide some assistance in this book when they come up, as well as provide references for further reading.
If you decide that you would like to learn the basics of JavaScript first, these resources can help you:
![]() JavaScript: A Beginner’s Guide, 4th Edition (McGraw-Hill Professional, 2013)
JavaScript: A Beginner’s Guide, 4th Edition (McGraw-Hill Professional, 2013)
![]() https://developer.mozilla.org/en-US/learn/javascript
https://developer.mozilla.org/en-US/learn/javascript
Since this is a beginner’s guide, I will try to integrate other technologies as gently as possible into the text. However, if you don’t know the absolute basics (such as what an HTML tag is), it will be best to begin by learning the basics of the topics using the resources provided earlier in the chapter.
Ask the Expert
What Is jQuery?
Back in 2005, a programmer named John Resig came up with an idea that would streamline code in JavaScript libraries by using CSS selectors as a basis for accessing elements in the document and by creating syntax that would make event handling easier to implement. By 2006, he had implemented these ideas into his own JavaScript library, which was named jQuery.
The first stable version was released that year, and since then the library has become widely used by Web designers and developers all over the world. Additional features can be added to the library through jQuery plugins, which can be found on the jQuery Web site. Over the years, it has been optimized to be faster and more compact in order to help sites that use it load more quickly.
What Can jQuery Do?
The jQuery library can perform numerous tasks with its user-friendly access to scripting, including
![]() Accessing elements CSS syntax is used to access elements, so you do not need to learn or use all of the necessary JavaScript coding necessary to do this consistently cross-browser.
Accessing elements CSS syntax is used to access elements, so you do not need to learn or use all of the necessary JavaScript coding necessary to do this consistently cross-browser.
![]() Making changes to the document Changing the appearance of or content within elements is more intuitive than it is in JavaScript. For example, jQuery uses the append() method to add content to the end of an element, which is easy to remember when you need to perform the task.
Making changes to the document Changing the appearance of or content within elements is more intuitive than it is in JavaScript. For example, jQuery uses the append() method to add content to the end of an element, which is easy to remember when you need to perform the task.
![]() Creating effects Numerous methods for creating animations to move, show, or hide elements are available to easily implement these effects cross-browser.
Creating effects Numerous methods for creating animations to move, show, or hide elements are available to easily implement these effects cross-browser.
![]() AJAX jQuery provides methods for retrieving information from the server to ease the burden of writing cross-browser code to do so in JavaScript.
AJAX jQuery provides methods for retrieving information from the server to ease the burden of writing cross-browser code to do so in JavaScript.
In addition to this, jQuery has methods that allow you to easily work with arrays and other items in JavaScript. For example, the jQuery.inArray() method can be used to easily search for items in an array, which in JavaScript would require a special function to be written for older browsers that may not support the indexOf() method for arrays.
Who Can Use jQuery?
jQuery is open source, so it is free to be used by anyone. It has a dual license under both the GNU Public License, which allows it to be used on other open-source projects that are under the GNU Public License, and the MIT License, which allows it to be used on any Web site. This flexibility makes it an easy and cost-efficient tool to implement in order to assist with the coding of dynamic effects.
Why jQuery Is Useful
Many Web designers and developers do not have the additional time required to learn all of the details of JavaScript programming necessary to create dynamic changes or effects and have them work cross-browser.
Designers tend to be more focused on graphics, layout, HTML, and CSS. Design is a large job in itself, so it would certainly be handy to have a tool that made the addition of dynamic effects easier than outright JavaScript programming. Developers often have to know one or multiple server-side languages such as PHP, Ruby, Python, Java, and others, so it would be helpful not to be required to learn yet another language in order to perform client-side scripting tasks.
jQuery does a number of things to help those working on Web sites: It is accessible, it addresses browser inconsistencies, and it provides plugins for those who need additional functionality.
Accessible
jQuery addresses the needs of designers and developers alike by having syntax that is accessible to both programmers and nonprogrammers. Since most designers and developers are familiar with CSS code, using CSS selectors as the basis for accessing elements makes it much easier to begin adding dynamic effects without needing to work with yet another set of rules in JavaScript.
With jQuery, you can select elements via their element name, id, class name, or most any valid CSS selection method. For example, using the string “div.news-item” will select all <div> elements with a class name of news-item. This is much simpler than iterating through in JavaScript to find either all the elements with the class name of news-item and then finding the <div> elements within that set, or finding all of the <div> elements and then determining which ones have the news-item class name.
Browser Inconsistencies
While browsers have improved at the task of adhering to standards, there are still differences, which can often lead to headaches for designers and developers—especially when a client or employer wants a dynamic effect and needs it to work in all browsers. Often, an older version of a browser needs to be supported, which may require additional JavaScript coding to make a desired effect possible in that browser.
Instead of having the designer or developer bear this burden in a potentially unfamiliar language, jQuery handles the integration of coded effects into each browser so that they work consistently. As of this writing, jQuery supports most browsers in their current version and their previous version (Firefox, Chrome, Safari, and Opera). For Internet Explorer, jQuery 1.x supports version 6 and above, while jQuery 2.x supports version 9 and above.
Additional Functionality
When the core jQuery library lacks some functionality you need for your project, you can usually find that functionality available as a jQuery plugin. This flexibility allows you to extend the library when needed, while simply using the slim core library (a minified file of 32KB at the time of this writing) when additional functionality is not required.
Begin Using jQuery
To begin using jQuery, you will need to insert the script into an HTML document. You can do this by downloading the jQuery library and including the downloaded copy in your document, or you can simply include the script from a Content Delivery Network (CDN) and begin using it.
Obtaining jQuery
If you want to use your own copy of jQuery, which is advantageous if you are going to need to use it in an environment that isn’t always connected to the Internet, then you will need to download it from the jQuery Web site.
Download the Library
First, go to the jQuery Web site at http://jquery.com/download/. You will be given two options: to download the compressed production version or to download the uncompressed development version. At this point, you may choose either one.
If you are curious and would like to see the code within the library, you can download the development version. However, before you place it live on a Web site, you will want to replace it with the production version so that the library will load faster for your visitors.
Inserting jQuery into a Document
Once you have it downloaded, you will need to insert it into the HTML code of any documents that will be using it. This is done in the same way that you insert any other JavaScript file into a document, by adding a <script> element that points to the jQuery file.
The following <script> element shows how this can be done when the jQuery file is located in the same directory as your HTML file:

If you keep your JavaScript files in a particular folder, you can adjust the src attribute as needed to point to the proper place.
The jQuery site recommends placing the <script> element that calls the jQuery library within the <head> element of a document. I would recommend placing it after your style sheets are included and before your other JavaScript files are included (at least before the JavaScript file you will use for writing your jQuery code). So, if you have a CSS file named styles.css, and you have a JavaScript file named mycode.js that you will use for your jQuery code, your HTML code would look similar to this test page:
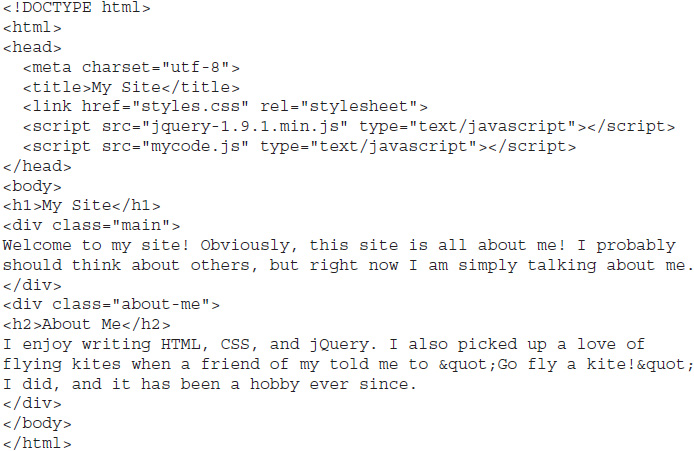
As you can see, the CSS file is added via the <link> element, and then the jQuery file and the JavaScript file are included via the <script> element. The remainder of the page is simply HTML and content that can be manipulated using jQuery.
With this in place, you are now set up to use jQuery! All you will need to do is add code to your CSS file for styling and write jQuery code in your mycode.js file to begin. First, however, you will need to make sure you want to include jQuery using this method rather than using a CDN.
Using a CDN
An alternative to keeping your own copy of jQuery is to use a copy from a CDN, which is an external network that allows content to be delivered all over the world. The most widely used CDN for jQuery is Google, but there are numerous others, including Microsoft and MediaTemple.
Loading the jQuery library from a CDN offers two advantages:
![]() The file is loaded from the server that is closest to the user, improving the speed of the file download.
The file is loaded from the server that is closest to the user, improving the speed of the file download.
![]() If the user has downloaded the file from the same CDN previously, then it can be loaded from the browser’s cache, eliminating the need to download it again.
If the user has downloaded the file from the same CDN previously, then it can be loaded from the browser’s cache, eliminating the need to download it again.
The main disadvantage of this method is that an Internet connection is required (since the file will be downloaded from an external source). If you need to work offline for development, you will likely want to download your own copy as described in the previous section.
Loading from a CDN
To load the jQuery file from a CDN, you simply point the src attribute of the <script> element to the external file. For example, to load the latest version (at the time of this writing) from the Google CDN, you would use the following code:
![]()
To make sure you are loading the latest version, be sure to check the Google site at https://developers.google.com/speed/libraries/devguide#jquery.
If you choose to use the Microsoft or MediaTemple CDNs, the proper URL can be obtained from their sites, which are listed here:
![]() Microsoft CDN www.asp.net/ajaxlibrary/cdn.ashx#jQuery_Releases_on_the_CDN_0
Microsoft CDN www.asp.net/ajaxlibrary/cdn.ashx#jQuery_Releases_on_the_CDN_0
![]() MediaTemple http://jquery.com/download/
MediaTemple http://jquery.com/download/
Once you have the <script> element with the proper URL in place, you are ready to begin using jQuery from the chosen CDN!
Local or CDN: Which Method Should I Use?
The method you choose will depend on your particular needs. If you are mainly developing offline, then using a local copy will likely be the best solution. If you are distributing an application live on the Web to numerous users, then a CDN may be a better choice, since it can help speed up the loading of the application.
In this book, the examples will use a local copy of jQuery downloaded from the jQuery site. Once you have downloaded the file, you will be able to use the provided code whether or not you are currently connected to the Internet.
Your First jQuery Script
To begin, you will write a jQuery script that simply updates the style of a <div> element in an HTML document. First, the code for the HTML document:

Save this file as index.html and make sure the jquery-1.9.1.min.js file is saved in the same folder as the HTML file. You will also place your CSS and JavaScript files in this folder.
Next, save the following code in a file named styles.css :
![]()
This defines a single class named special, which you will add to one of the <div> elements using jQuery.
Finally, save the following code in a file named mycode.js :

In this file, you will be writing the code that makes use of the jQuery library. This is technically JavaScript code, but the jQuery library allows you to call special functions that make the syntax simpler than typical JavaScript code.
Open index.html in your Web browser and examine the resulting page. You will notice that most of the page displays with the default style settings of the browser, but the “About Me” section is italicized. The jQuery code added the special class to that particular <div> element, giving it additional styling. Figure 1-3 shows an example of the completed Web page when viewed in a browser.
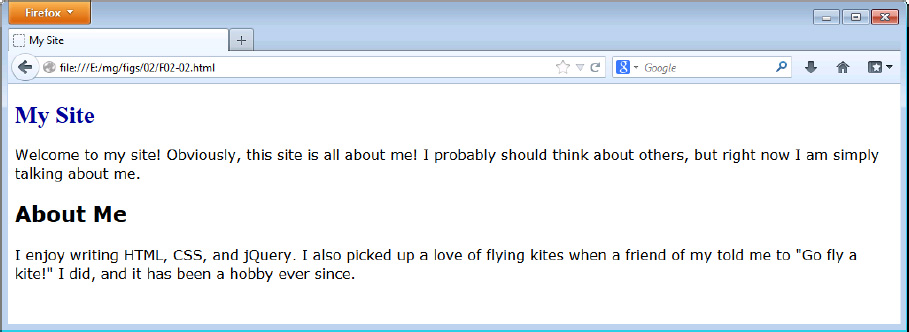
Figure 1-3 The index.html file when viewed in a Web browser
Locating the Proper Element
As a starting point, you will look at the middle line of code from the mycode.js file:
![]()
The line begins by using the $() function to make a selection from the document. This allows you to select one or more elements using CSS syntax, which is often more familiar than the corresponding JavaScript syntax. In this case, the about-me class is selected by passing the $() function a value of “.about-me”. Since only one element is using the about-me class, that element is what is selected (the second <div> element).
Next, you will see a dot (.), which indicates that a method of the $() function will be called. The method is appropriately named addClass, since it will add the styles in the specified class to the selected element(s). In this case, the styles in the special class are applied to the selected <div> element (the one with the about-me class).
Waiting for the Document to Be Ready
The middle line of code by itself would likely have no effect when the page is loaded in a browser. The browser would try to run this code before the document has finished loading all of the necessary elements due to the code being placed within the <head> element. To avoid this problem, jQuery provides a method named ready that can be applied to the document.
In this script, the outer lines of code ensure that any code within them runs only after the document is ready for changes to be made to its elements:

As you can see, the ready method allows you to define a function that will be run once the elements of the document have been loaded.
When using the ready method, you can provide what is called an anonymous function (like the one you have been using) or a previously defined function name. For example, here is the code you implemented, which uses an anonymous function:

To perform the same task by providing a defined function, you could instead use the following code:
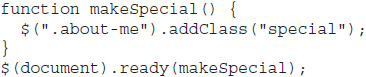
Here, a typical JavaScript function is defined, which uses the jQuery code to perform the same task. The function is then called by using the function name in the ready method.
The main difference between the two approaches is that an anonymous function is most often used when the function code is not reusable, while a defined function is used when the function will be reused at a later time.
Try This 1-1
Add Another Class
This project allows you to practice adding a class using jQuery. In this case, you will add another line of code to add another class to an element on the index.html page you have been using.
Step by Step
1. Use your current index.html page for the HTML code.
2. In the styles.css file, update the file to add a new class named main-text that will set the font size to 1.3em. Save the file. When complete, it should look like this code:
![]()
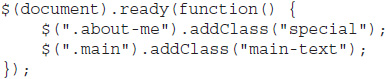
3. In the mycode.js file, add jQuery code that will add the main-text class to the div element that has a class of main. Save the file. When complete, the code should look like this:
4. Open the index.html file in your Web browser. You should see an increased font size for the text underneath the level one heading.
Try This Summary
In this project, you added a class to another <div> element, which gave the text within it a larger font size. This added another line to your CSS and your jQuery code. In the next chapter, you will learn more about using the $() function to select elements and how you can use CSS syntax to make element selection easier for you.
Resources for Help
If you find you need additional help while progressing through this book, the following resources may be useful to you:
![]() www.webxpertz.net/forums A community of developers that allows you to ask questions and discuss various Web development topics.
www.webxpertz.net/forums A community of developers that allows you to ask questions and discuss various Web development topics.
![]() www.scripttheweb.com/about/contact/ To contact me, you can send me an e-mail from this page.
www.scripttheweb.com/about/contact/ To contact me, you can send me an e-mail from this page.
![]() @ScripttheWeb To contact me on Twitter, use this handle.
@ScripttheWeb To contact me on Twitter, use this handle.
 Chapter 1 Self Test
1. Which of the following is not something you should be familiar with before beginning with jQuery?
A. CSS
B. C#
C. HTML
D. Text editors
2. Which of the following is something you should have to use jQuery?
A. A Web browser
B. A Java compiler
C. A 500GB flash drive
D. Angry Birds
3. A programmer named __________ began the jQuery library.
A. John Walker
B. John Pollock
C. John Resig
D. John Wayne
4. jQuery uses CSS selectors as a basis for accessing elements in the document.
A. True
B. False
5. jQuery is licensed under both the GNU Public License and the __________.
A. Common Project Open License
B. BSD License
C. Open Software License
D. MIT License
6. jQuery does not provide plugins for those who need additional functionality.
A. True
B. False
7. You can include jQuery in a document by using the __________ element.
A. <link>
B. <script>
C. <meta>
D. <style>
8. The jQuery site recommends placing the call to the jQuery library within the __________ element of a document.
A. <head>
B. <body>
C. <link>
D. <footer>
9. Which of the following would correctly call a locally stored version of jQuery 1.9.1?
A. <script file=“jquery-1.9.1.min.js” type=“text/javascript”></script>
B. <script src=“jquery-1.6.0.min.js” type=“text/javascript”></script>
C. <script src=“jquery-1.9.1.min.html” type=“text/html”></script>
D. <script src=“jquery-1.9.1.min.js” type=“text/javascript”></script>
10. Which of the following is an advantage of loading jQuery from a CDN?
A. It will work even when you are not connected to the Internet.
B. The file is loaded from the server that is closest to the user, improving the speed of the file download.
C. It is never cached in the user’s browser.
D. You don’t have to use the <script> element to load it.
11. The __________ function allows you to select one or more elements in the document by using CSS syntax.
A. select()
B. #()
C. $()
D. cssSelect()
12. The ready method allows you to define a function that will be run once the elements of the document have been loaded.
A. True
B. False
13. When using the ready method, you can provide a previously defined function name or a(n) __________.
A. variable
B. array
C. anonymous function
D. property
14. The __________ method will add the styles in the specified class to the selected element(s).
A. addClass
B. insertClass
C. classAdd
D. add
15. An anonymous function is most often used when the function code is not __________.
A. stable
B. correct
C. reusable
D. happy with anyone knowing its real name