Chapter 7
The Event Object
![]() The Event Object in jQuery
The Event Object in jQuery
![]() Event Properties
Event Properties
![]() Event Methods
Event Methods
In Chapter 3, you learned about handling events in jQuery. One of the pieces of this topic that was touched on was the Event object, which has properties and methods that can be used for any event that occurs.
You have been passing the Event object as an argument to many of your event handlers using event (lowercase) as a convenient name. Technically, you could use any name you like, such as ev, evt, myEvent, and so on, but you will typically see either event or e used in jQuery scripts. In this book, I use event, since it makes it as clear as possible what type of object is being passed around.
This chapter will cover the jQuery Event object in more detail by looking at how it works in jQuery, its properties, and its methods.
The Event Object in jQuery
The jQuery Event object is designed to work like the JavaScript Event object, but helps you to avoid many of the issues of using it cross-browser by working behind the scenes to ensure that the Event object is available and that properties and methods work in a consistent fashion.
Browser Inconsistencies
If you have worked with the Event object in JavaScript, you will likely have run across browser differences. When registering events using the DOM 0 method (which is often done as a fallback when addEventListener() is not available), Internet Explorer versions prior to version 9 required you to use window.event to access the Event object, while others used event. This caused the need to write an additional statement in the code to handle this so that the Event object could be used, as shown in the following code:

As mentioned, the latest versions of the major browsers all have the addEventListener() method available and allow you to access the Event object using event. However, if you need the script to work in older browsers, your JavaScript will need to adjust for the additional possibilities for obtaining the Event object and for handling events.
With jQuery, you can simply use the Event object while this other work is done by the library in the background. The event-handling methods and the Event object are designed to work cross-browser so that you do not need to worry about creating your own custom functions to handle all of the browser differences.
About the Event Object
The Event object itself is actually a straightforward JavaScript object containing properties and methods that are helpful to you when certain events are triggered. The properties contain information about the event, such as the type of event that was triggered, the target of the event, and other information, while the methods allow you to perform actions such as stopping the bubbling process or preventing the default event action.
One useful tool jQuery offers in versions 1.6 and higher is the ability to use the Event constructor to trigger an event that contains customized information in the Event object. For example, consider the following code:
![]()
Here, a keydown event is triggered, which uses 80 as the keycode. This allows it to simulate the user pressing the P key while within #my-element.
As you move through the chapter, you will learn the various properties and methods of the Event object, which will make it a useful tool when you need to perform additional customizations for events that occur on the page.
Event Properties
The Event object has numerous properties that store information about the event. The jQuery library supports a number of these that work well cross-browser naturally or through the help of jQuery.
Table 7-1 lists the properties of the Event object that are available cross-browser in jQuery (some are specific to jQuery itself).
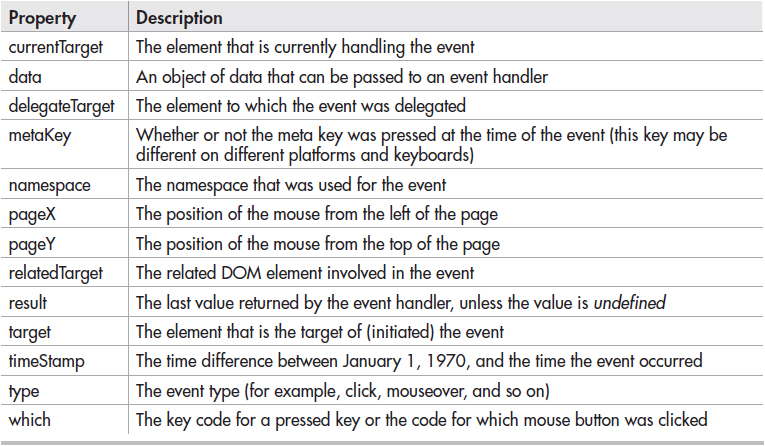
Table 7-1 jQuery Event Properties
You will learn about how to use selected properties from this list as you move through this section of the chapter. You can go to http://api.jquery.com/category/events/event-object/ to learn more about any of these properties if needed.
Other event properties are available in JavaScript, though they are not necessarily supported in jQuery. They also tend not to work cross-browser, though some can work in tandem with others as a workaround. These additional properties are listed in Table 7-2.
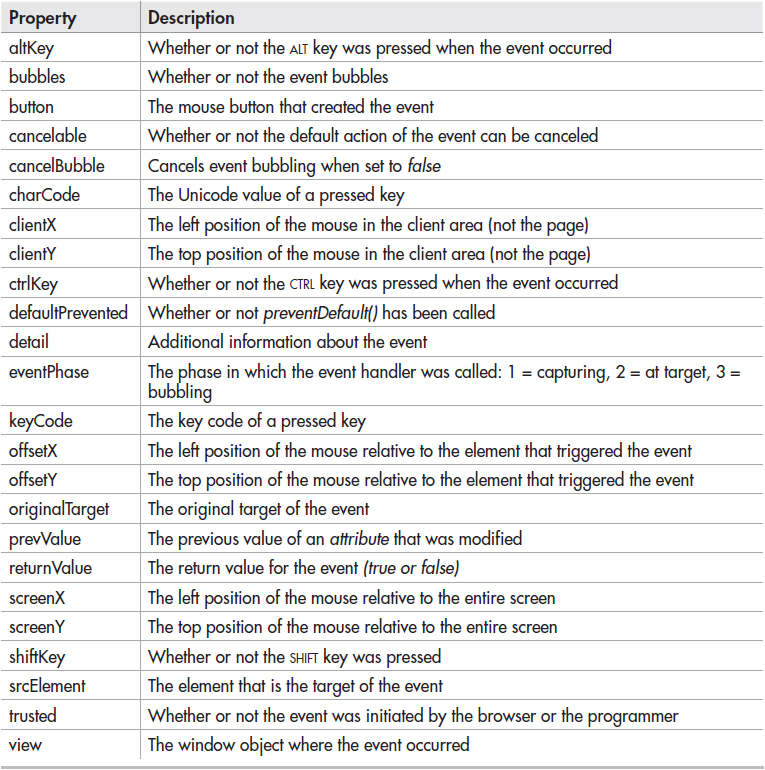
Table 7-2 Other Event Properties
While they may prove useful in some circumstances, these properties will not be covered in further detail here. Instead, you will learn how to use some of the properties from Table 7-1, which are fully supported in jQuery.
The type Property
The type property simply returns the type of event that occurred. For example, if the event was a click, click is returned; if the event was a mouseover, mouseover is returned; and so on.
As an example, the following code would show the event type to the user when it occurs:

This simply sends a pop-up alert that displays the type of event that occurred to the user.
This information can be used for other things as well. Suppose you had an element that could react to two different types of events: a click and a keypress. Save the following HTML code as event-type.html:
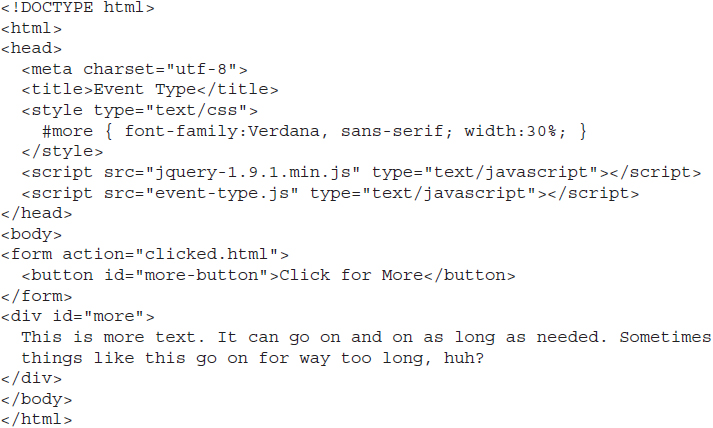
This creates a simple button to show more text, which, when clicked, or when a key is pressed while over the element, should display the text in the #more element, which will be hidden. This can easily be done by creating a function to handle both events and assigning it to each event handler. However, you want to perform a slightly different animation when the user presses a key than when the user clicks the button.
While you could simply write the different animations into the individual event handlers rather than calling the single function, a program with longer code would be better suited to the single function to avoid needing to repeat all of the additional lines of code. Thus, a single function will be used, but the type property will be used to determine the type of event that occurred and react with the appropriate event.
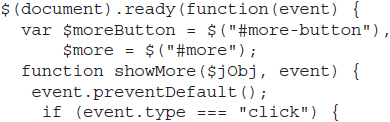
In this case, you will use fadeIn() if the button is clicked and slideDown() if a key is pressed while over the button element. Save the following code as event-type.js:
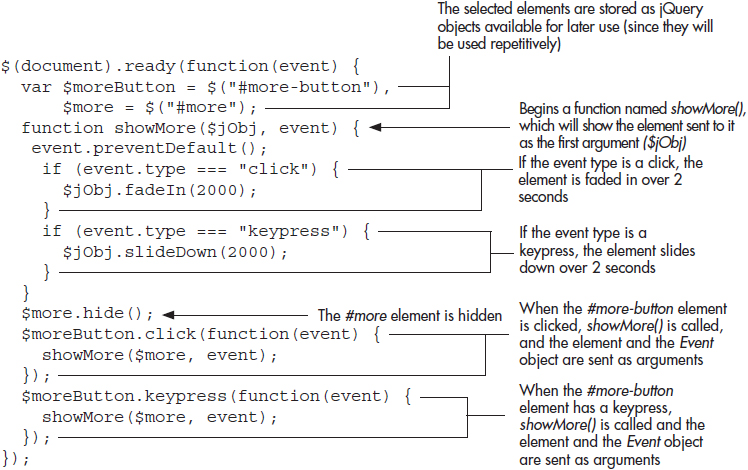
First, the selection of both elements is made, and these are assigned as jQuery objects in variables for later use, since they will be used more than once in the code. Next, the showMore() function is defined, which takes a specified jQuery object and specified Event object as arguments. Here, the jQuery object will be $more each time, which is the selection containing the #more element. This and the Event object are passed to the function when the event handlers are registered later in the script. The default action is prevented, and then the script checks the event type. If the event is a click, a fade-in occurs; if it is a keypress, a slide-down occurs. If neither is the case, then nothing happens.
The remainder of the code hides the #more element initially, then registers the event handlers for the click and keypress events, which both call the showMore() function and send it $more and the current Event object as arguments.
To try this out, open event-type.html in your browser and click the button. This will cause the element to fade in. Refresh the page and press the TAB key to reach the button and then press any other key. This will cause the element to slide down instead. Figure 7-1 shows the result of clicking the button while the fade-in is in progress, and Figure 7-2 shows the result of pressing a key while the slide-down is in progress.
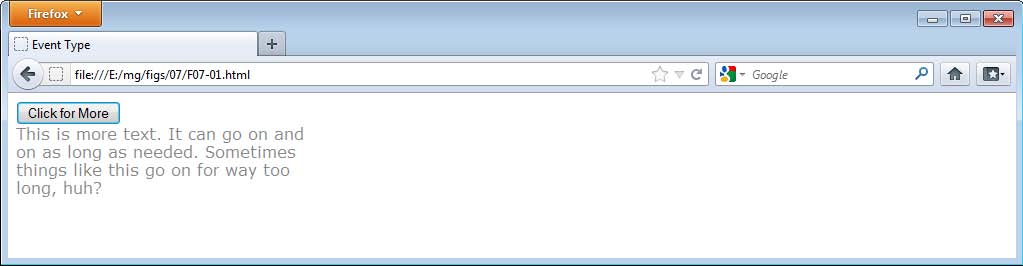
Figure 7-1 Clicking the button causes a fade-in.
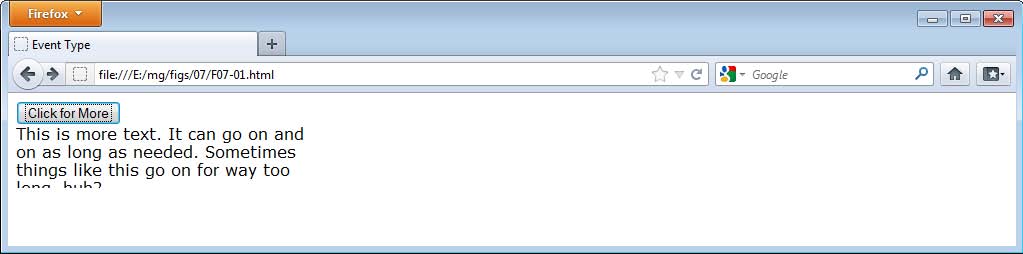
Figure 7-2 Pressing a key while over the button causes a slide-down.
To make the script more interesting, you can use the “toggle” versions of each effect. When this is done, it will toggle each time the button is clicked or a key is pressed while over the button—and the effect will be the one specified for the event that occurs. Change the code in event-type.js to the following and save the file:
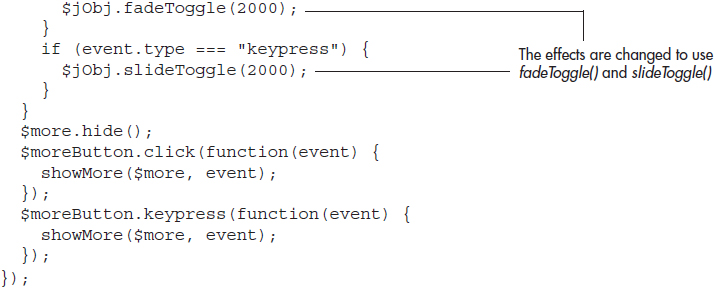
Refresh the event-type.html file in your Web browser and either click the button or press the TAB key to access it and press a key. When you click, a fade occurs, and when you press a key, a slide animation is performed.
The timeStamp Property
The timeStamp property contains the number of milliseconds that elapsed from January 1, 1970, to the time the event occurred. While this may not be of particular interest on its own, it can be used to find out the time difference between two events, which can be useful for testing where a slowdown is occurring.
The time difference between two events can also be useful if you want to create a simple game. Suppose you wanted to create a game where the user clicks a “Start” button that, when clicked, displays another button in a random position on the page for the user to click. When the user clicks the second button, the time between the two clicks is determined and displayed to the user to see how fast the second button was clicked.
You already know enough to perform most of the tasks, but there is a little extra to learn in order to get two random numbers. To do this, you can access the JavaScript Math object, which offers a random() method that will allow you to generate a random number between 0 and 1. This can be multiplied by another number to allow for additional numbers. The floor() method allows you to take off additional decimal points so that you obtain an integer as the final number. For example, this code will get a random number from 0 to 4 (the counting begins at zero, so for a range of five random numbers, you will multiply by 5 to get numbers from 0 to 4):
![]()
Here, Math.random() * 5 generates a random float between 0 and 5, which then has anything after the decimal point taken off by Math.floor() so that the number ends up being an integer from 0 to 4.
With this in mind, you can now combine this with the timeStamp property, some jQuery animations, and a little math to create the game. First, save the following HTML code as time-game.html:
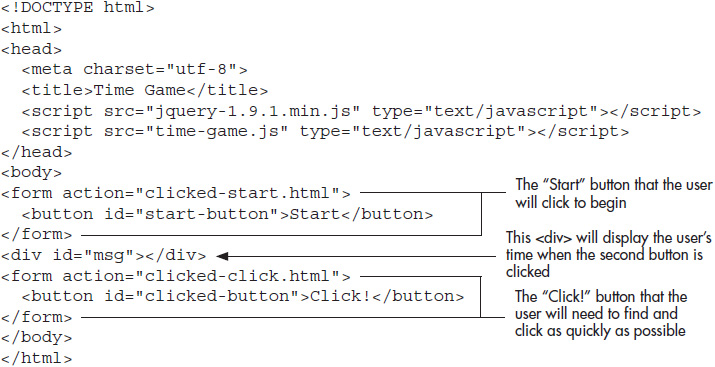
Here, you have two buttons: one to start the game and one that must be found and clicked to get a time. The #msg <div> will display the amount of time between the click on the “Start” button and the click on the “Click!” button.
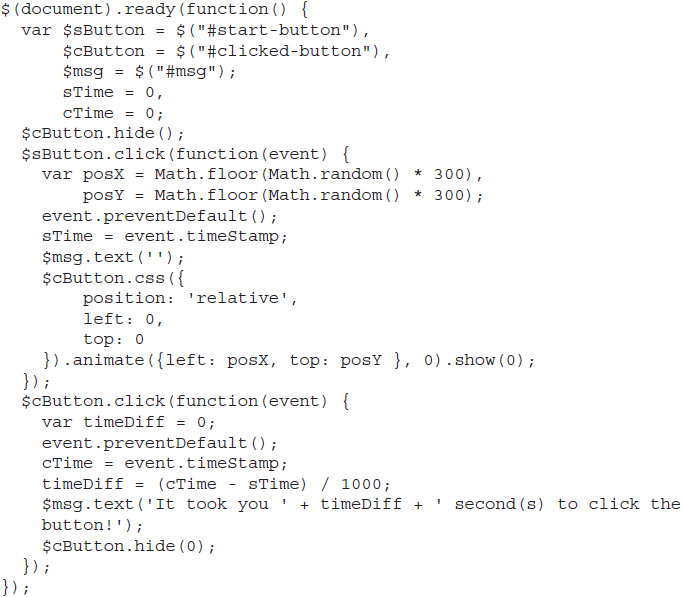
With this in place, you can begin building your script. First, start a JavaScript file and save it as time-game.js. Then you will set up some variables that will be used within the script and do an initial hiding of the “Click!” button. Place the following code into the file:
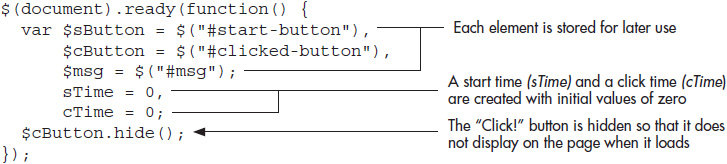
Now that the initial work is done, you need to handle the first event: a click on the “Start!” button. Add this code to your time-game.js file:

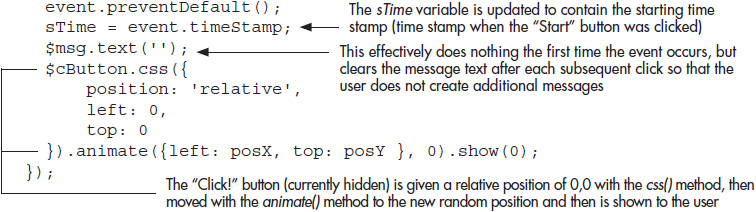
Notice that a random integer is set for the variables posX and posY. These values will be used later to set the left and top position of the button to these random values. Next, the default action is prevented. The time stamp for when the “Start” button was clicked is retrieved using event .timeStamp and stored in the sTime variable. This will be used in the event handler for the “Click!” button later. After that, the message (which will display the user’s time to click the second button) is set to be an empty string. It will be updated each time the user clicks the “Click!” button. Finally, the “Click!” button is repositioned (it needs to be relative for the animate() method) and then animated to the new position instantly (0 is used for the duration) and then shown (again using 0 for the duration). The user can now click the “Click!” button.
With this set up, you can now code the event handler for the “Click!” button, which will calculate the time between the two clicks, display the time to the user, and then hide the button until the user clicks the “Start!” button again. Add this code to your time-game.js file:
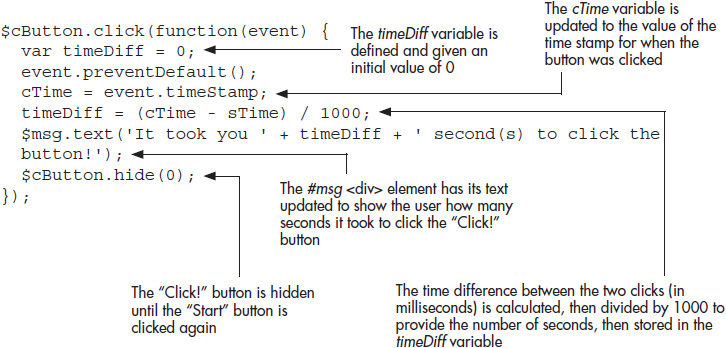
Here, you again get the time stamp, which this time will be for the “Click!” button. The time difference between the two clicks is calculated, made more user-friendly (using seconds instead of milliseconds), and then displayed in the #msg <div> for the user. Once complete, the button is again hidden until “Start” is clicked again. The full time-game.js file is shown in the following code:
Save the time-game.js file and open the time-game.html file in your browser. Click the “Start” button to begin, and try to click the “Click!” button as fast as you can! The result will be displayed once the “Click!” button is clicked. Figure 7-3 shows the initial page, and Figure 7-4 shows one possible result after the “Click!” button is clicked.

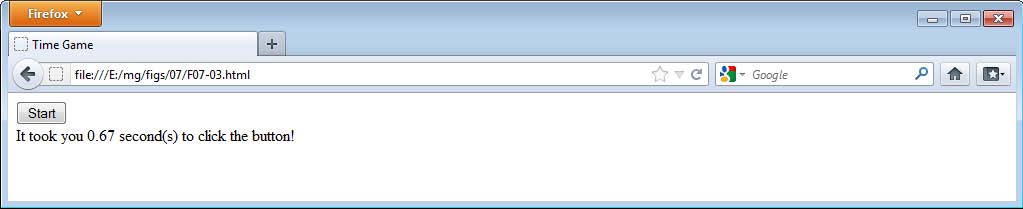
Figure 7-4 The message is displayed.
The which Property
The which property contains the code of a pressed key or the code for the mouse button that was pressed. In jQuery, it makes these codes consistent across browsers so that you can more easily write code based on the information returned.
Mouse Clicks
When used with mouse events, the which property will return 1 if the left mouse button was pressed, 2 for the middle button, and 3 for the right button. This allows you to write different code depending on which mouse button was clicked.
For example, you could alert the value of the which property when a mouse button is pressed over an element. Save the following code as mouse-button.html:
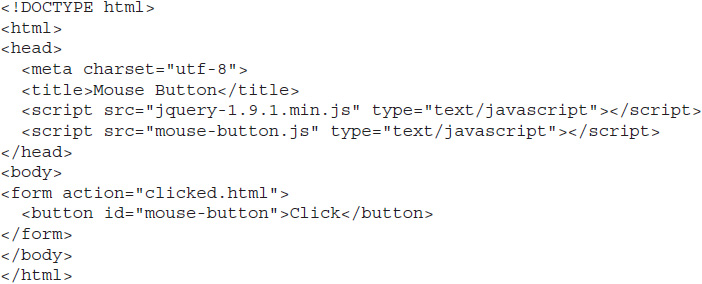
This provides a button where you can determine which mouse button was pressed while over it using the mousedown event. Save the following code as mouse-button.js:
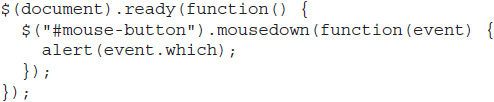
Open the mouse-button.html file in your browser and try pressing any of the three mouse buttons while over the “Click” button. You should receive a different number (1, 2, or 3) depending on which mouse button was pressed.
Key Presses
When used with keyboard events, the which property will return the key code of the pressed key. For example, if the J key is pressed, it will return 74. Other keys have their codes as well, so you can find out which key was pressed and write code to be run when specific keys are pressed.
For example, suppose you want to show/hide different <div> elements depending on which keys are pressed. By using the value of which, you can provide different results for different key presses.
To begin, save the following HTML code as keydown.html:
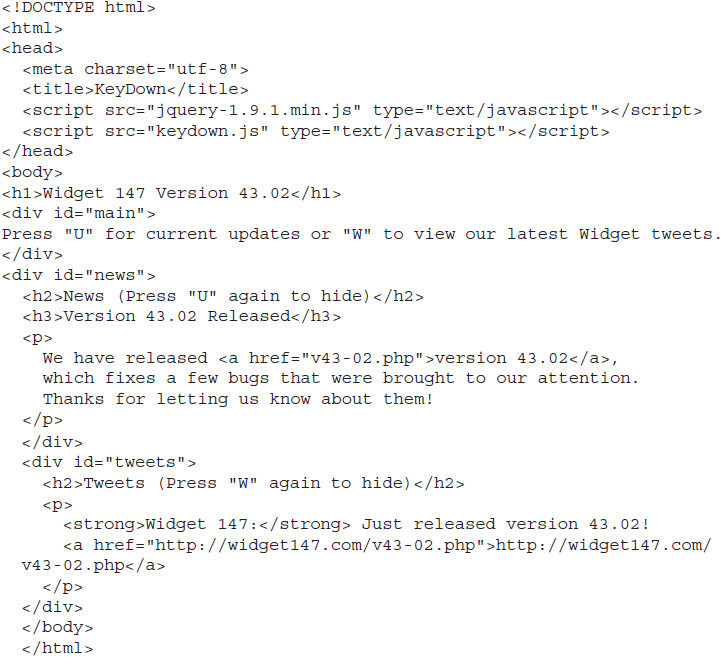
This provides the #main <div>, which gives the instructions, followed by two <div> elements that will be hidden when the page loads. These will be revealed when the user presses the specified key on the keyboard.
To do this, you can use the which property to determine which key was pressed and take the appropriate action. Save the following code as keydown.js:
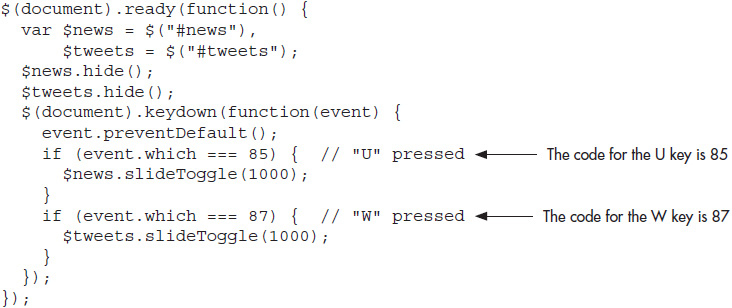
Load the keydown.html page in your browser and press either key to toggle the appropriate <div> element in and out of view. Pressing other keys that do not otherwise have functionality (for example, F3 or CTRL-F will open the Find dialog in Firefox) will simply do nothing. Figure 7-5 shows the initial page, and Figure 7-6 shows how the page would look after the W key is pressed the first time.

Figure 7-5 The initial page
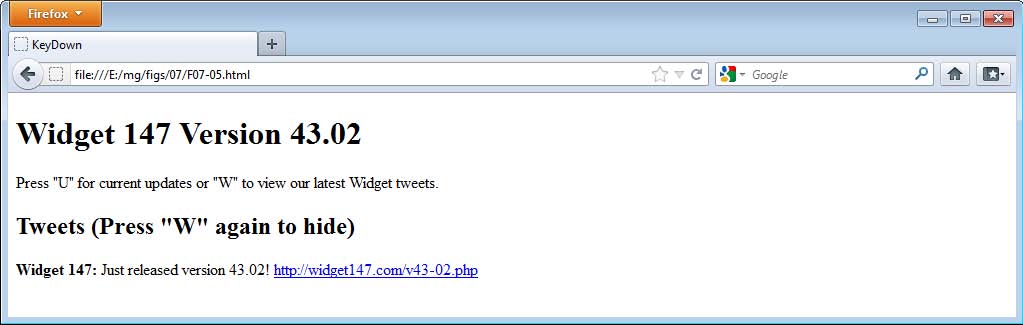
Figure 7-6 The page after the w key is pressed.
With that in mind, you have to be careful when using key presses that you use keys that are not used for essential purposes and could override important functionality. Also, if you use the accesskey attribute for site navigation, you will want to be careful not to use any of those specified keys either.
The keydown event is used in order to keep other possible codes from being used (sometimes the code for keypress or keyup is different from the target key due to the use of SHIFT or other modifiers). If you need to look up a code or want to see these differences, you can use the JavaScript and jQuery Key Code Checker tool found at www.west-wind.com/WestwindWebToolkit/samples/Ajax/html5andCss3/keycodechecker.aspx to get the codes you need.
Try This 7-1
Practice Using which
This project allows you to practice using the which property to perform different actions for different mouse buttons.
Step by Step
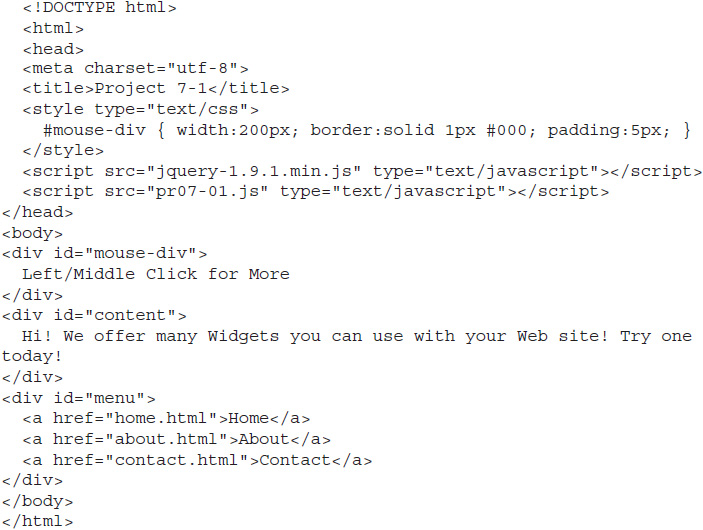
1. Place the following HTML code into your editor and save the file as pr07-01.html:
2. In the pr07-01.js file, add jQuery code that will hide the #content and #menu elements, then toggle a slide animation for each one when the appropriate mouse button is clicked (slide the #content element for a left click and the #menu element for a middle click).
3. Save the file. When complete, the code should look like this:
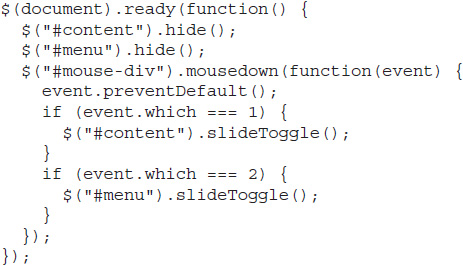
4. Open the pr07-01.html file in your Web browser. If you left-click the <div> element, the content will be toggled. Middle-clicking the <div> element will toggle the menu.
Try This Summary
In this project, you used your knowledge of the codes returned by the which property to perform different actions based on which mouse button was clicked while over a <div> element.
Event Methods
In addition to its properties, the Event object has several useful methods that can be used with jQuery. These are listed in Table 7-3.
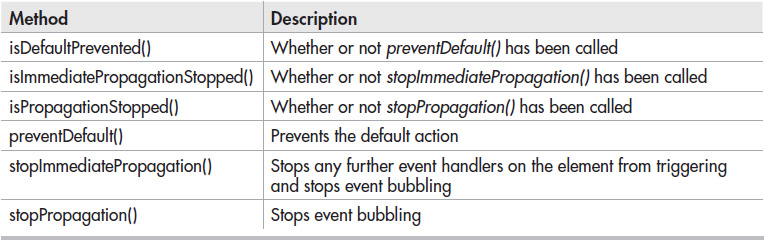
Table 7-3 Event Object Methods in jQuery
You have already used the preventDefault() method, so the following sections will cover the use of stopPropagation() and stopImmediatePropagation().
The stopPropagation() Method
The stopPropagation() method stops the event from bubbling up to any further parent elements that could handle the event. One way this bubbling can happen is with nested elements of the same type. For example, consider the following code (save as stop-prop.html):
If you wanted to append some text to each <div> element that is clicked, you might write the following jQuery code (save as stop-prop.js):
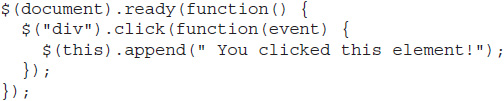
Load the stop-prop.html file in your browser and click one of the inner <div> elements. While the intention of the script was probably to simply append the text to any <div> element that was clicked, the event will bubble up to the parent (outer) <div> element as well, which causes both <div> elements to have the text appended, even though you only clicked an inner one. Figure 7-7 shows the initial page, and Figure 7-8 shows the page after the first inner <div> element is clicked.

Figure 7-7 The initial page
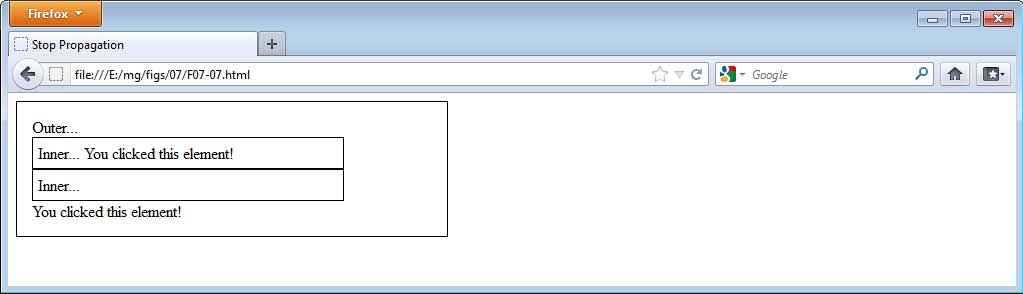
Figure 7-8 The page after the first inner <div> is clicked.
To fix this to work as intended, you can use the stopPropagation() method to prevent the event from bubbling up any further. This will keep the outer <div> element from attempting to handle the event when one of the inner <div> elements is clicked. Edit the stop-prop.js file to use the following code and save it:

Reload the stop-prop.html file in your browser and click an inner <div>. This time, it won’t cause the outer <div> to also have the text appended. The text will now only be appended to the outer <div> if you actually click within the outer <div> outside of any of the inner <div> elements. Figure 7-9 shows the result of clicking an inner <div> element with this in place.
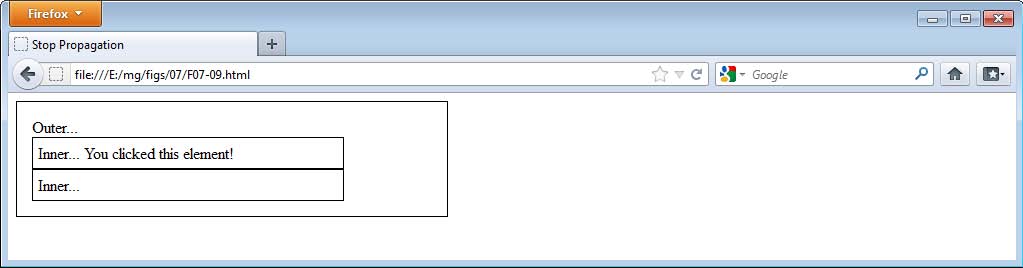
Figure 7-9 The outer <div> no longer gets the text appended when an inner <div> is clicked.
The stopImmediatePropagation() Method
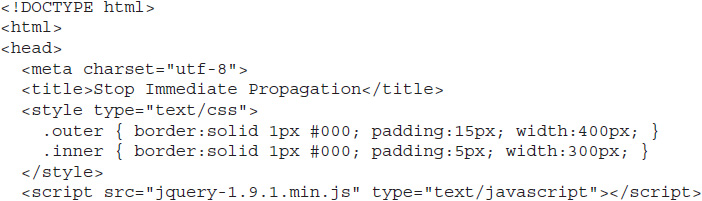
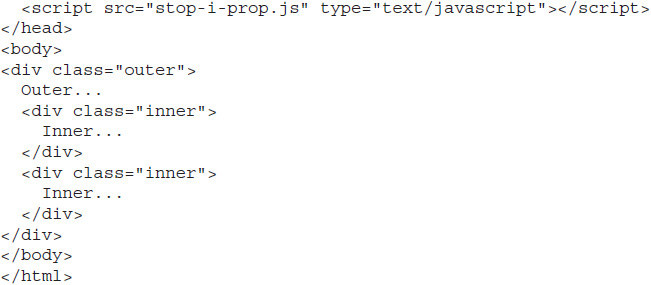
The stopImmediatePropagation() method stops the event from bubbling up further and also prevents any further event handlers for that event from running. As an example, you will build on the previous page. Save the following HTML code as stop-i-prop.html:
To see the difference between this and stopPropagation(), you will first simply add a second click event handler for <div> elements, as in the following code (save as stop-i-pro.js):
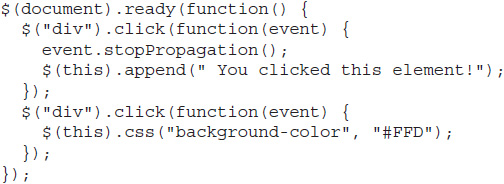
This will highlight each <div> when it is clicked by changing the background color. Since stopPropagation() is called in the first click event handler, this effect won’t bubble up and each <div> element is highlighted individually when clicked (additional clicks simply add more text since the element will already be highlighted). Figure 7-10 shows an example of this when the first inner <div> element is clicked.
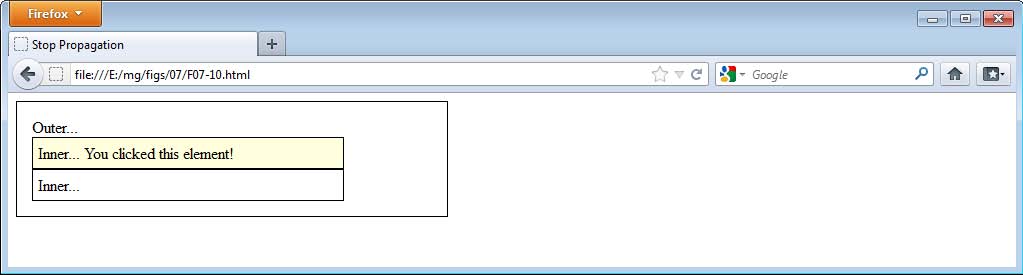
Figure 7-10 The first inner <div> element is highlighted.
Suppose, however, that you do not want the highlight effect and instead just want to run the first event handler, which adds the text. Using stopImmediatePropagation() will not only keep the event from bubbling up any further, but it will also stop all additional event handlers for that event from executing. To see this in action, change the stop-i-prop.js file to use the following code and save it:
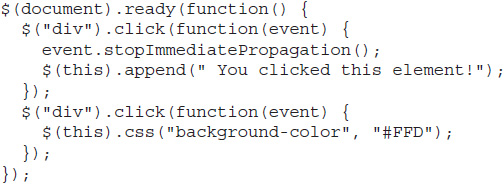
Reload the stop-i-prop.html file in your browser and click one of the inner <div> elements. It should now only add the text to the element rather than adding the text and highlighting. Figure 7-11 shows the result after the first inner <div> element is clicked.
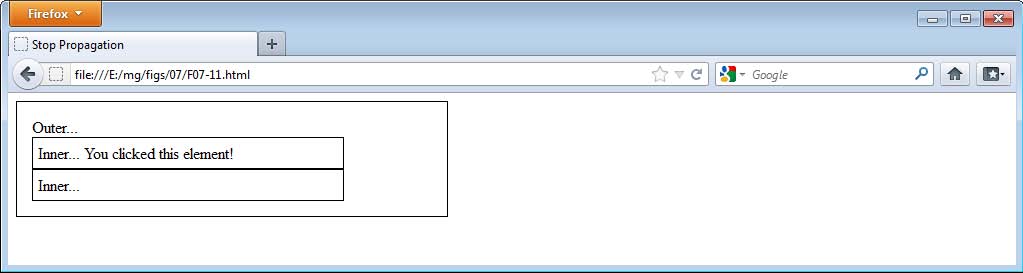
Figure 7-11 The <div> element is no longer highlighted.
The “is” Methods
The isDefaultPrevented(), isPropagationStopped(), and isImmediatePropagationStopped() methods return true or false depending on whether or not their corresponding methods, preventDefault(), stopPropagation(), and stopImmediatePropagation(), have been called.
For example, isDefaultPrevented() can be handy if you need to know whether preventDefault() has already been called. In this way, you can call it if needed, as in the following code:
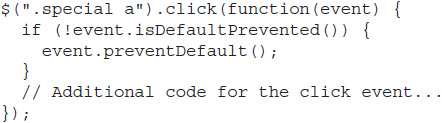
The other methods can be used in the same way to test for whether or not stopPropagation()or stopImmediatePropagation() have been called.
Try This 7-2
Practice Stopping Propagation
This project allows you to practice using the stopPropagation() method of the Event object by using it to stop an event from bubbling up to any parent elements.
Step by Step
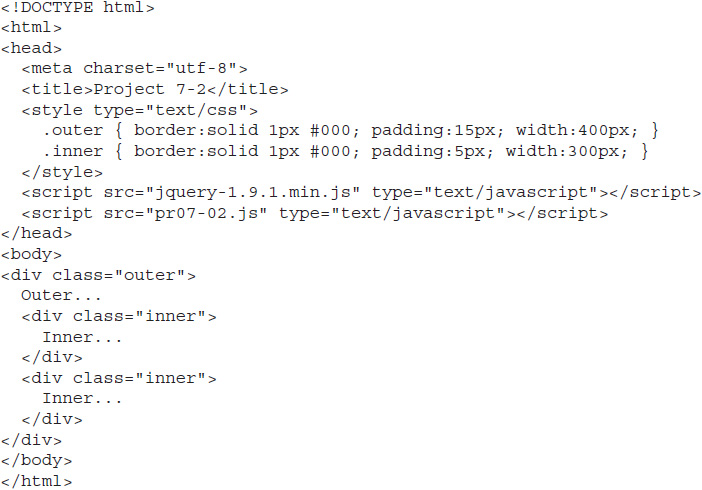
1. Insert the following HTML code into your editor and save the file as pr07-02.html:
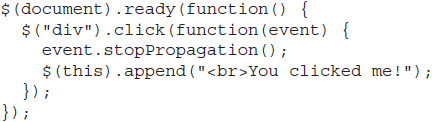
2. Create a JavaScript file and save it as pr07-02.js. Add jQuery code that will append “<br>You clicked me!” to any <div> that is clicked. Make sure this will not affect any parent <div> elements.
3. When complete, the code should look like this:
4. Open the pr07-02.html file in your Web browser. Click any <div> element to show the additional text. Clicking it again will repeat the addition of the text.
Try This Summary
In this project, you used your knowledge of stopPropagation() to keep an event from bubbling up the DOM tree to be handled by any parent elements. This allowed you to add text to one element at a time.
 Chapter 7 Self Test
1. The __________ object contains properties and methods that are helpful when certain events are triggered.
2. The __________ property simply returns the type of event that occurred.
A. kind
B. type
C. category
D. eventName
3. The timeStamp property contains the number of __________ that elapsed from January 1, 1970, to the time the event occurred.
A. seconds
B. minutes
C. milliseconds
D. hours
4. JavaScript has the __________ method, which allows you to generate a random number.
A. Number.getRandom()
B. Math.getRand()
C. Math.randomNum()
D. Math.random()
5. The Math.floor() method takes off any digits after the decimal point.
A. True
B. False
6. The __________ property contains the code of a pressed key or the code for the mouse button that was pressed.
A. which
B. code
C. mouseKeyCode
D. codeNum
7. When used with mouse events, the which property will return 1 if the right mouse button is pressed.
A. True
B. False
8. The which property allows you to determine what ________ was pressed on the keyboard.
A. note
B. type
C. key
D. function
9. The isDefaultPrevented() method returns true if:
A. there was no event
B. the user moved on to another event
C. the preventDefault() method has been called
D. the preventDefault() method has not been called
10. The __________ method returns whether or not the stopPropagation() method has been called.
A. isImmediatePropagationStopped()
B. isPropagationStopped()
C. stopPropagation()
D. isDefaultPrevented()
11. The __________ method stops the event from bubbling up to any further parent elements that could handle the event.
A. stopPropagation()
B. preventDefault()
C. stopBubbling()
D. stopBubble()
12. To prevent the default action from occurring for an event, you can use the __________ method.
A. preventUsual()
B. stopDefault()
C. preventDefault()
D. cancelDefault()
13. The stopPropagation() method stops the event from bubbling up further and also prevents any further event handlers for that event from running.
A. True
B. False
14. jQuery helps make a number of the properties and methods of the Event object work consistently cross-browser.
A. True
B. False
15. Which of the following properties of the Event object does not have cross-browser support via jQuery?
A. pageX
B. target
C. which
D. cancelable