
Chapter 6
Animations and Effects
![]() Show and Hide Animation Methods
Show and Hide Animation Methods
![]() Callback Functions
Callback Functions
![]() Creating Custom Animations
Creating Custom Animations
![]() Stopping Animations
Stopping Animations
The jQuery library gives you a number of options for animating elements in the document. These include showing, hiding, sliding, fading, and even creating your own custom animations. Since jQuery deals with any cross-browser issues, you can simply call the jQuery methods you need to use and the library will handle the animation work across the various browsers.
In this chapter, you will learn how to use the different animation methods available in the jQuery library, how to create custom animations, and how to stop animations that are currently running.
Show and Hide Animation Methods
The jQuery library provides a set of methods for common animations. These are listed in Table 6-1.
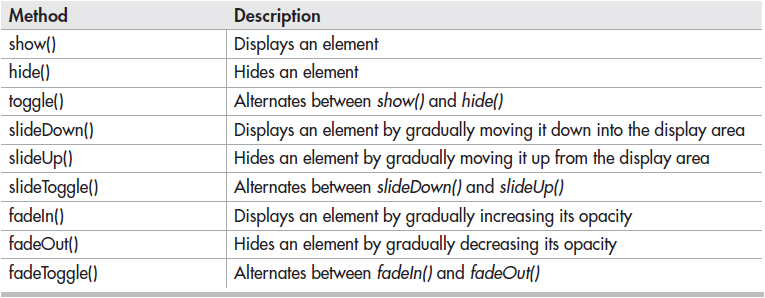
Table 6-1 Common Animation Methods
The options range from simply showing and hiding elements to sliding and fading. To begin, you will look at the show() and hide() methods.
The show() and hide() Methods
The show() and hide() methods allow you to show and hide elements in the document: show() will display hidden elements, and hide() will hide elements that are already displayed. The showing and hiding is done through the CSS display property—hide() works like display:none, while show() returns the display property to its original state (block, inline, and so on).
It is typically a good idea to display all content by default for accessibility (for those who don’t have JavaScript to uncover a hidden element, for instance). With that in mind, you will likely want to do any initial hiding via your jQuery/JavaScript code. In jQuery, this can be done using the hide() method.
As an example, suppose you had an element you wanted to be hidden initially, but it could be uncovered by clicking a link. You might, for instance, have something similar to the following HTML code snippet:
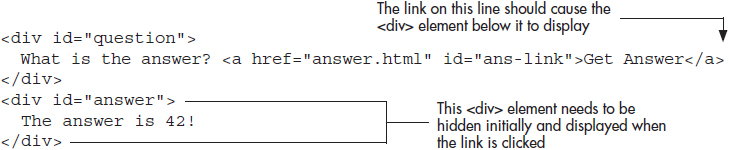
You want to hide the answer <div> element until the link is clicked to uncover it. Since you don’t want to hide it from those without JavaScript enabled, it is best not to hide it via CSS (Cascading Style Sheets). Instead, you can use jQuery code to hide it as soon as the document is ready to be manipulated, as in the following code:

This will simply hide the element immediately, which works well in this case (since you want it to appear hidden without any delay).
As you can see, calling hide() without an argument will just hide any selected elements instantly. If you want to hide an element with a gradual animation, you can supply an argument to determine the speed at which the element will be hidden. Table 6-2 lists the valid types of values for the speed argument.
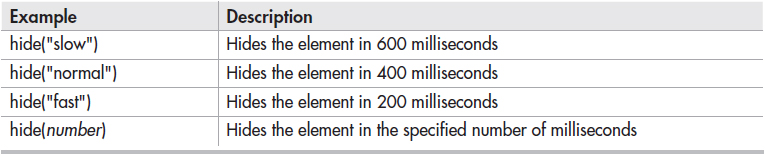
Table 6-2 Possible Speed Values
The three string values are presets that will animate over 600, 400, or 200 milliseconds. In addition, you can supply your own number of milliseconds to have the animation operate at a custom speed. For example, hide(2000) will hide the element in 2000 milliseconds (2 seconds).
The show() method will show a hidden element, restoring its original display property. In the case of the example, the default display for a <div> element (block) would be used since it was not specified in the CSS or changed before being hidden in the jQuery code.
For example, to display the hidden answer element when the link is clicked, you could use the following code:

When the link is clicked, the answer element will be displayed immediately, and will move any elements following it to fit back into its space in the document.
This will simply show the element once. If you want to alternate between show() and hide() each time the button is clicked, you can use toggle() as in the following code:
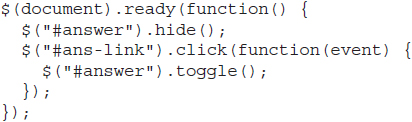
The answer will now be shown on the first click, hidden on the second click, and so on.
The show() and toggle() methods can take the same speed argument that hide() does, so they, too, can be animated if desired. When using the speed argument to animate a show/hide, the element’s height, width, and opacity will all be changed during the animation [show() causes the element to become larger and more visible, while hide() causes the element to become smaller and less visible]. If this is not the desired animation effect, you can use one of the other predefined methods or create your own custom animation (all of which will be discussed as you proceed through this chapter).
Building a FAQ Page
For the examples in this chapter, it will be helpful to have a document that you can build on in order to see the different effects in action. To begin, use the following HTML code (save as animate.html):
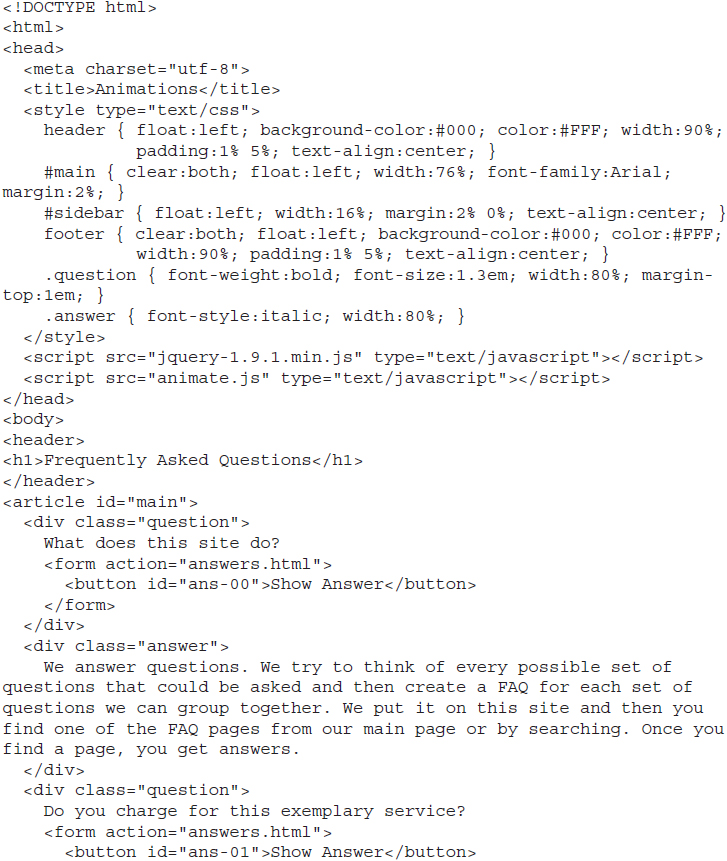
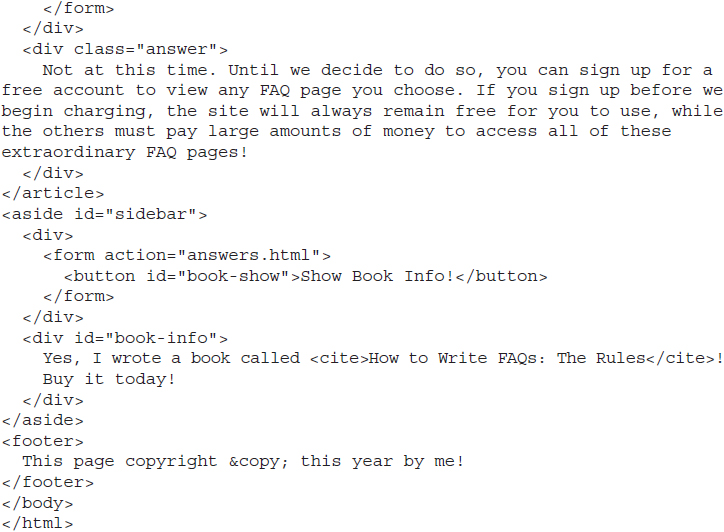
This creates a very basic page with a header, main content, sidebar, and footer. Figure 6-1 shows the page before any scripting is done. Notice that all of the elements are currently displayed.
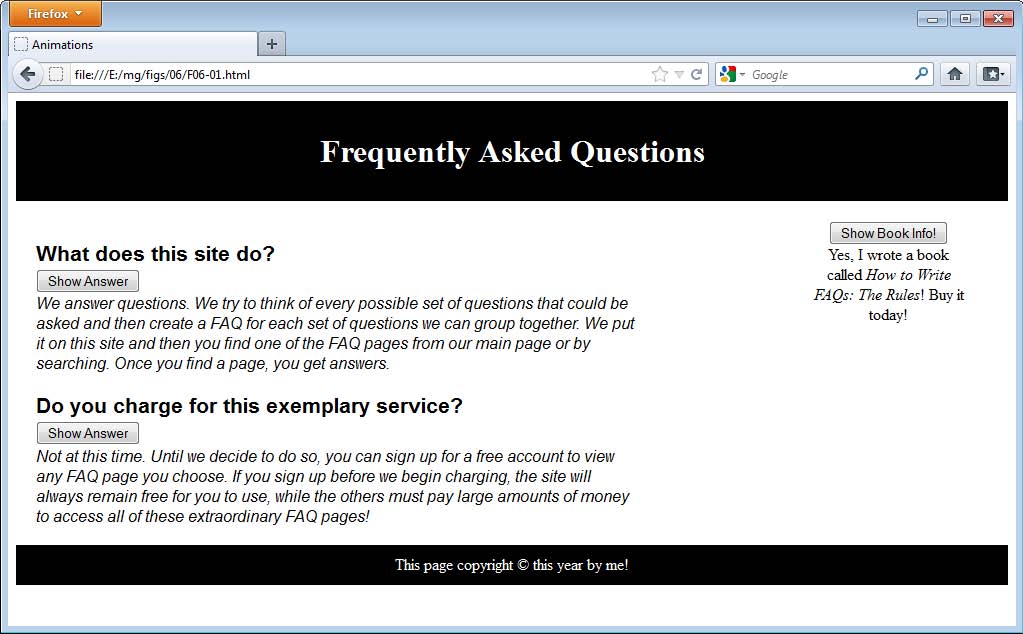
Figure 6-1 The static animate.html page
Within the page, you will be reacting to clicks on the various buttons to show or hide elements as needed. The first thing you will want to do is hide all of the elements that have the answer class. This is done easily by using the class as the selector and calling the hide() method, as in the following code (save as animate.js):

Next, you will want to hide the book-info element. This is another easy task to perform by selecting its id and using hide(). This is added in the following code:
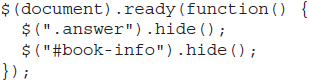
At this point, everything you need to hide has been hidden. When you load the animate.html page in a browser now, it should display as shown in Figure 6-2.
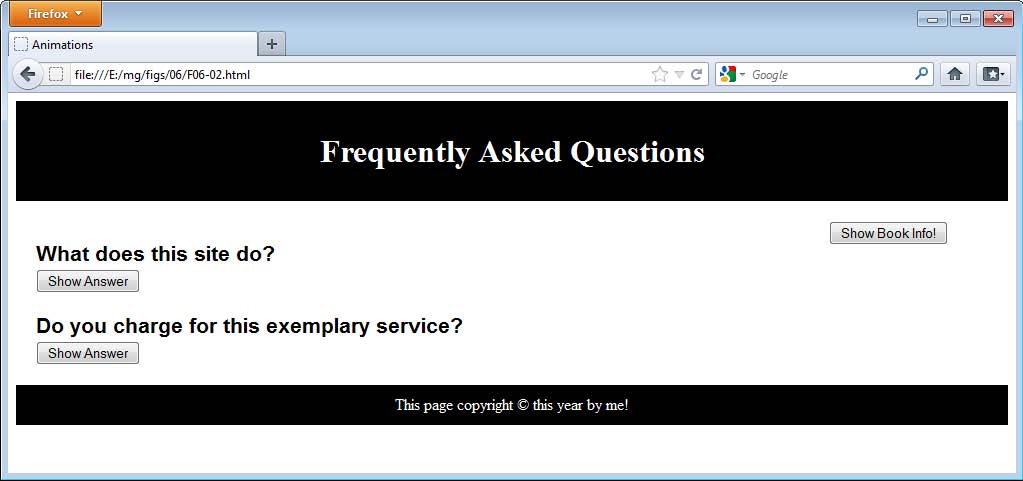
Figure 6-2 The animate.html page with the answers and book information hidden
In this section, you will write the code to toggle the first answer in the list between show and hide (the others will be dealt with as you proceed through the sections that follow). To select the first answer, you can use :eq() to get the element when selecting the answers class. This can be done as in Chapter 2, shown in the following code:
![]()
Recall that :eq() uses a zero-based index, so the first item will be at index 0, the second item at index 1, and so on.
Alternatively, jQuery provides a separate eq() method. This allows you to make a selection first, then apply the eq() method to it in order to get any element using a zero-based index. Using this, you can make the selection of the first answer <div> element with the following code:
![]()
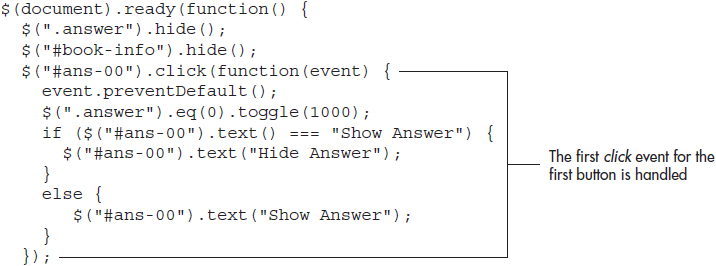
In either case, you can chain further jQuery methods to the selection, such as the one you need here, which is toggle(). To complete the code, you will need to select the show/hide button for the first answer (id ans-00), register the click event, and add the toggle to the <div> element containing the first answer. For practice, you will use 1000 as the argument to toggle(), which will animate the showing and hiding of the element over one second. The following code adds this functionality:

Refresh the answers.html page in your browser and click the button. Figure 6-3 shows the result once the button is clicked and the show animation completes.

Figure 6-3 The first answer is displayed after the button is clicked.
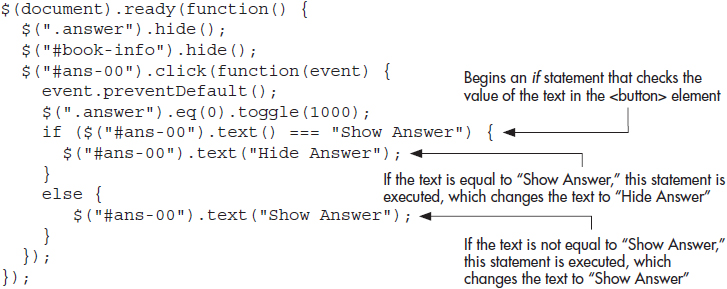
There is one final issue to deal with here. You will notice that the button is labeled “Show Answer” when the toggle is showing the element and when the element is being hidden. It would be better for the user to see which type of action will take place when the button is clicked each time.
The good news is that you can fix this by simply alternating the text of the button using the text() method you learned in the last chapter. Since it is set to “Show Answer” in the HTML code, you can use that value to alternate the text between “Show Answer” and “Hide Answer” each time the button is clicked with an if/else statement. This is shown in the following code:
Reload the animate.html page in your browser and click the button. Each time the button is clicked, its label will change to reflect what will happen the next time it is clicked. Figure 6-4 shows the page when the answer is hidden (“Show Answer” label for the button), and Figure 6-5 shows the page when the answer is displayed (“Hide Answer” label for the button).
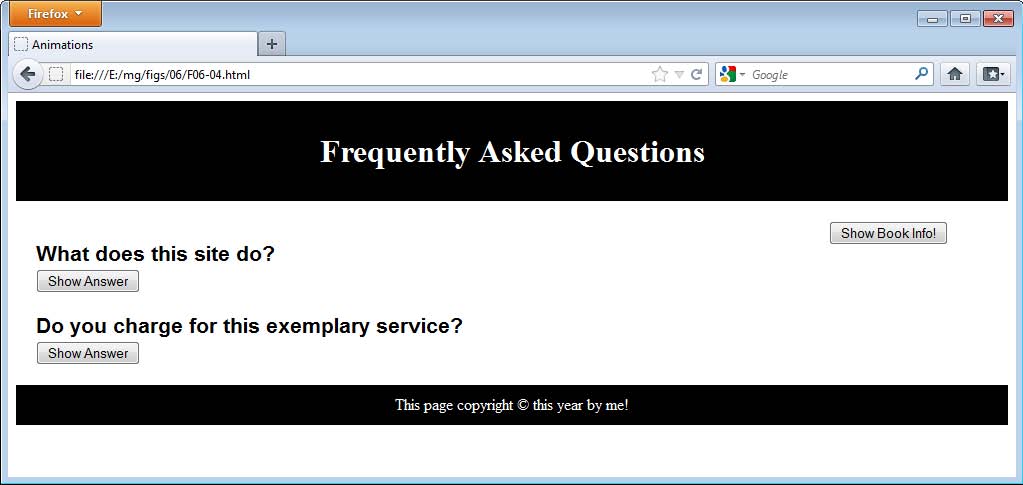
Figure 6-4 The page when the answer is hidden

Figure 6-5 The page when the answer is shown
You now have the setup complete for the first answer. To tackle the display of the second answer, you will use the methods jQuery provides for sliding elements.
The slideDown() and slideUp() Methods
In contrast to show() and hide(), the slideDown() and slideUp() methods show and hide elements by animating only the height. This makes the elements appear to “slide” in and out of the page. If you want to toggle between the two, the slideToggle() method is provided to do so.
To make use of this, you will use slideToggle() to alternate between slideDown() and slideUp() each time the button for the second answer is clicked. This will be nearly identical to the code to handle the previous answer <div>, but will register the event to the second button and display/hide the second answer <div> using slideToggle(). This is shown in the following code:

Notice here that the second <button> element (id ans-01) gets a click event registered to it. The second answer element is selected by providing 1 as the index in eq(). Finally, slideToggle() is applied with the “slow” argument, which will animate the slide animation over 600 milliseconds (a little faster than your previous element’s animation, which was set to 1000 milliseconds).
This can now be added to the code in place to animate both of the answer <div> elements when the corresponding buttons are clicked. This is shown in the following code:

This will slide the text in and out when the second button is clicked, but that pesky button text is at it again! One solution would be to rewrite the if/else statement here, as in the following code:
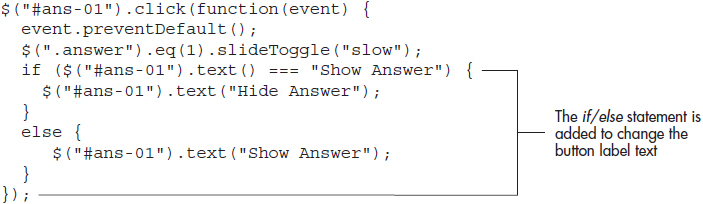
Notice that this is the same if/else statement you used for the previous button (#ans-00), with the only change being the selection of #ans-01 instead of #ans-00. It would be nice if you did not need to duplicate this code each time you want to change button label text. Instead, you could write this if/else statement into a separate JavaScript function and send it the selected element as an argument. The following code shows how this could be written as a function:
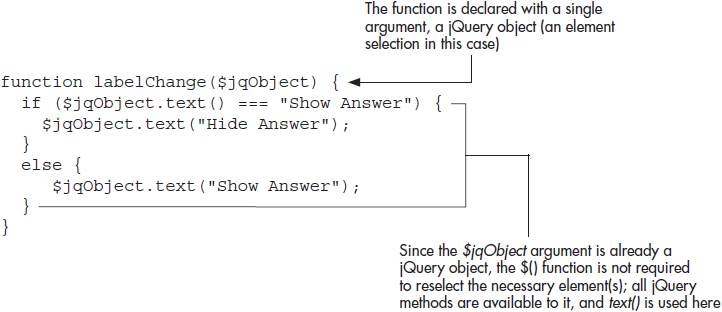
The function performs the same task, but is sent an argument to determine which <button> element is to be changed when it is called. If you go back to the click() event handler for the #ans-00 element, you could use the following code to call the function:

Here, the value of $(this) is sent as the argument to the labelChange() function. You could send it $(ans-00) specifically if preferred, but using $(this) allows the function call to remain more consistent when used in other event handlers (you won’t have to use #ans-00, #ans-01, and so on for the argument each time).
To put this all together, edit your animate.js file so that you have the following code (adds the function and both function calls):
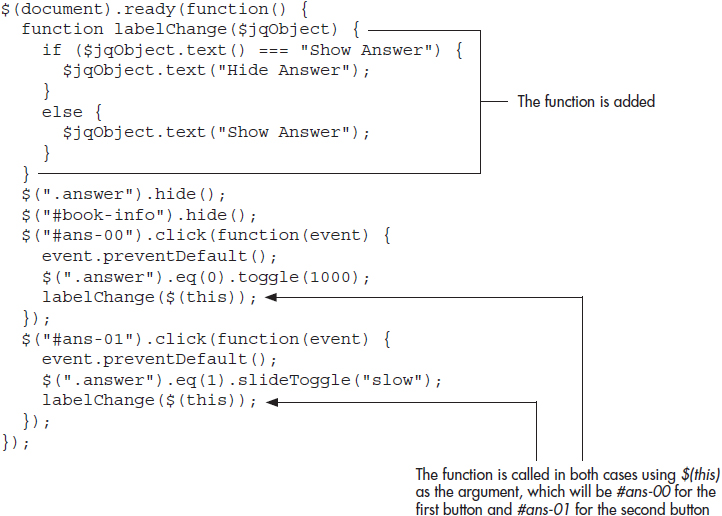
Reload the animate.html file in your browser. Both buttons should now have the label text change when clicked. The use of the function saves some duplicate coding, and each animation still works as expected. Figure 6-6 shows the page after the second button is clicked and the label text is changed.
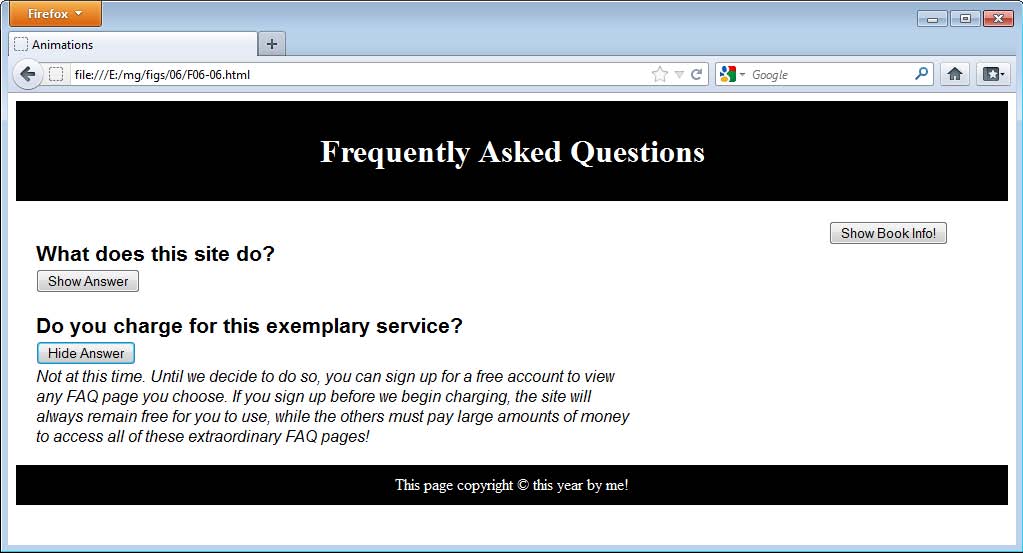
Figure 6-6 The label text for the button now changes as expected when the second button is clicked.
The fadeIn() and fadeOut() Methods
The fadeIn() and fadeOut() methods alter the opacity of the element, increasing it for fadeIn() and decreasing it for fadeOut(). To toggle between them, you can use toggleFade().
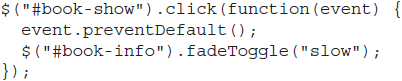
The last element to animate in your animate.html file is in the sidebar. In this case, you will use toggleFade() to fade the element in or out when the “Show Book Info!” button is clicked.
The only difference here is that this element is not part of the answers class, but has its own id (#book-info). The button element has an id of #book-show. The following code can be used to toggle the fade effect when the button is clicked:
While this is easily added, it is not altering the label text for the <button> element yet. Not only that, but you can’t simply plug in the handy function you already created as it is, because rather than “Show Answer” and “Hide Answer,” you now want to use “Show Book Info!” and “Hide Book Info!” for the label text.
Looking at the label text more closely, however, shows that there is one thing in common: Both types of label text start with either “Show” or “Hide.” If the remainder of the text can be sent as a second argument, then you just need a way to figure out whether the first word is “Show” or “Hide” and adjust that as needed.
The indexOf() Method in JavaScript
JavaScript offers a handy method for finding the starting position of any set of characters within a string: indexOf(). This method takes a string as an argument and searches for it within another string. If it is found, then the starting position of the string (zero-based) is returned. Otherwise, the value of -1 is returned.
An example of this is shown in the following code:
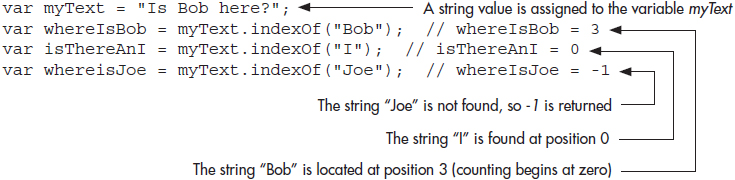
Notice that you append the indexOf() method to a string by adding a dot and then the method, just as you would use a jQuery method. It returns the position at which the string argument is found, beginning with zero.
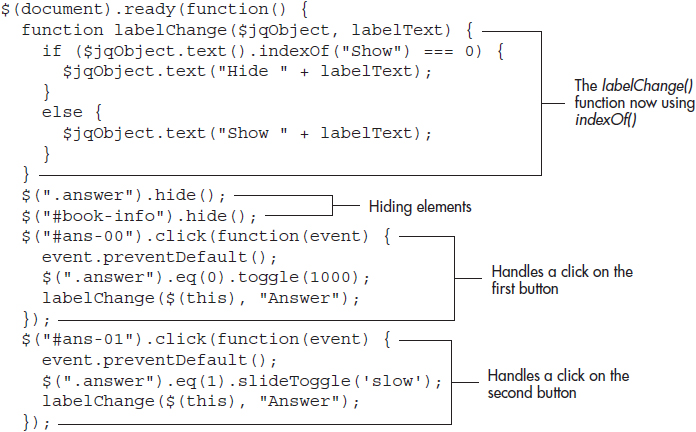
Altering the labelChange() Function
Using indexOf(), you can now alter the labelChange() function to work for all three buttons on the page. You will need to add a second argument, which will be the text for the label that will follow “Show” or “Hide” in each case.
The following code shows the altered labelChange() function:

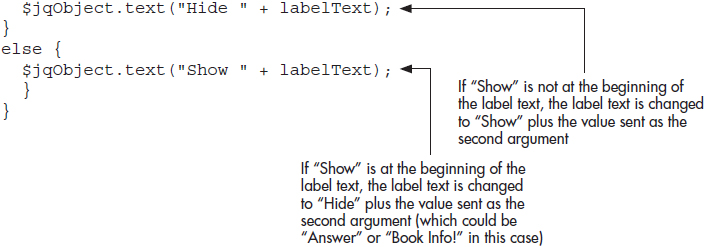
Notice that the function now looks for “Show” at the beginning of the label text for the <button> element that is sent to the function. It will then append the value of the second argument after the word “Hide” or “Show,” depending on the result. So, if the function were called from the event handler for #ans-00, using $(this) and “Answer” as the arguments, the result of the first click would be to change the label text to “Hide Answer”. Calling the function from the #book-show event handler using $(this) and “Book Info!” as arguments would result in the first click changing the button text to “Hide Book Info!”.
You can now alter your animate.js file to alter the function and update the function calls. Edit the file to use the following code and save it:

Notice that the first argument each time the function is called is $(this), since $(this) will be the <button> element that is being handled at the time in each case. The second argument is “Answer” for the first two buttons, but is “Book Info!” for the third, allowing the single function to update the button labels for all of the buttons on the page.
Reload the animate.html file in your Web browser. Clicking the buttons will now show and hide each piece of content with the specified animation and will alter the button text to assist the user. Figure 6-7 shows the page after the “Show Book Info!” button is clicked once, which fades in the additional information and changes the button label text to “Hide Book Info!”.
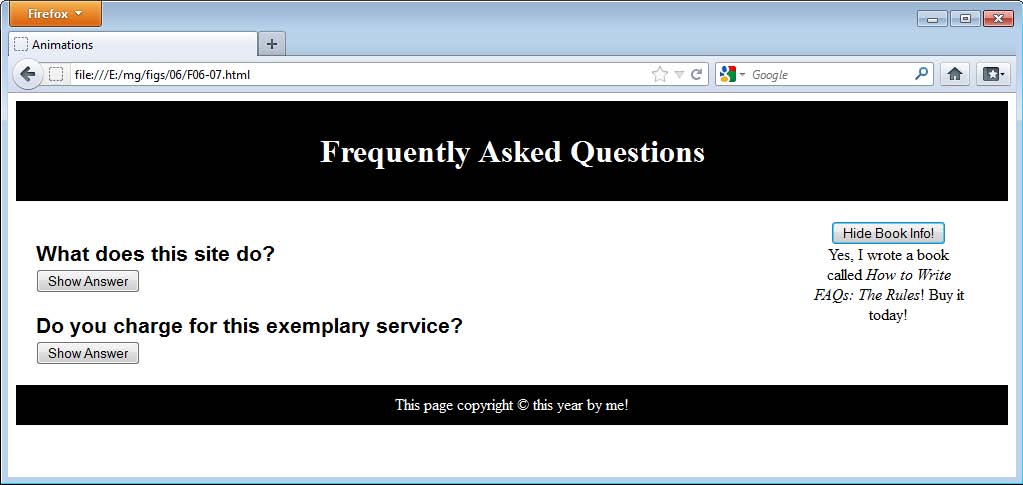
Figure 6-7 The page after the first click of the “Show Book Info!” button
Callback Functions
Each of the animation methods also allows you to include another argument, which is a callback function. The callback function executes as soon as the animation method is finished.
For example, if you run the fadeIn() method and wish to run a function when it completes, you could use code like the following:

This would simply fade out the element immediately after it had faded in, which often would not be particularly useful. In fact, if you are going to call additional animations on the same element, you can simply chain them together, as in the following code:
![]()
In such a case, the chain would be quicker and easier to write. However, you can also use the callback function to animate other elements, which will give it further use.
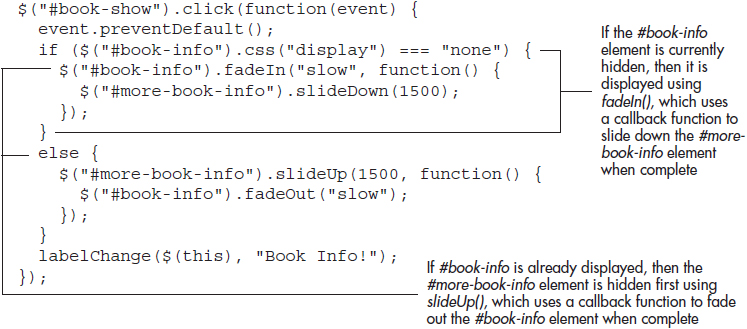
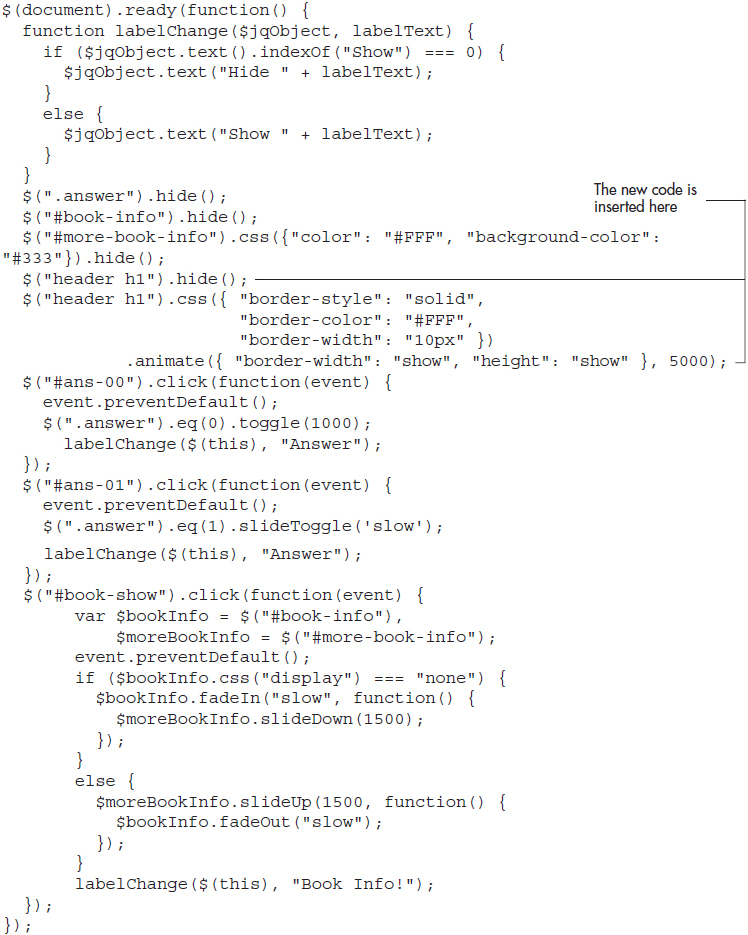
Going back to your animate.html file, suppose you wanted to add another <div> element below the #book-info <div>, have it hidden, and have it slide down only after the “Show Book Info!” button is clicked and the animation for the #book-info <div> is complete. This will create what appears to be an extended animation sequence, and can be done using the callback function to do the work.
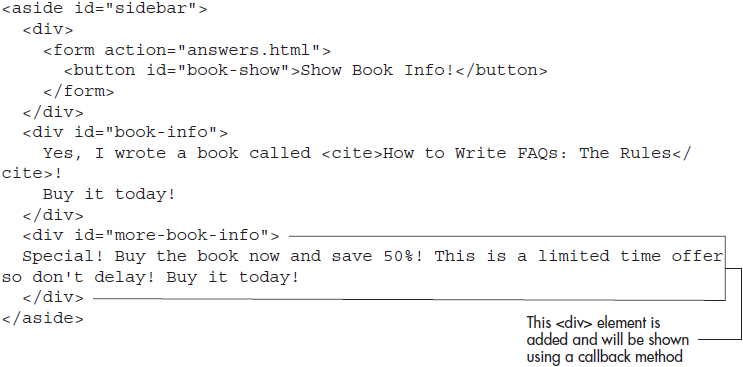
First, open your animate.html file and update it to use the following code for the <aside> element and save it:
Next, alter the animate.js file to use the following code and save it:
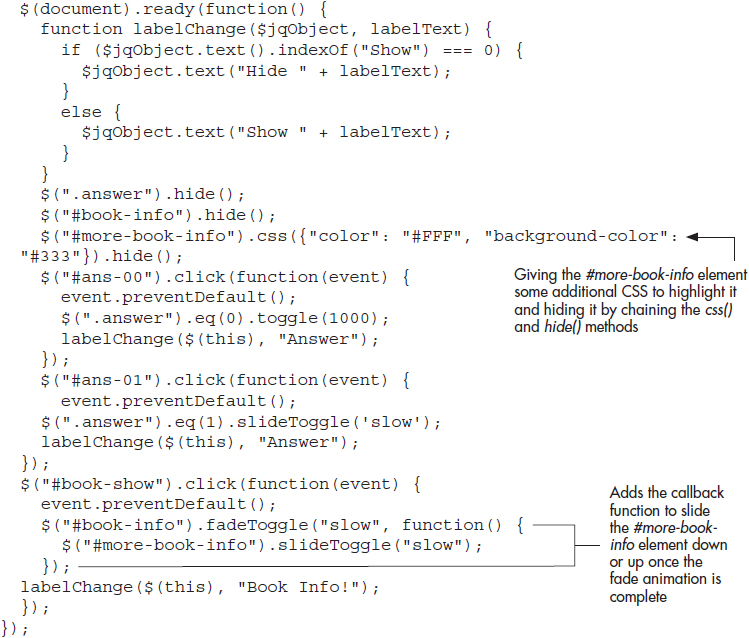
As you can see, the new element is first hidden along with the others. Within the fadeToggle() method for the #book-info element, a callback function is added as an argument, which then uses slideToggle() on the #more-book-info element once the fade is complete on the #book-info element.
Reload the animate.html file in your browser and click the “Show Book Info!” button. The first element will fade in, and the second element will slide down. Figure 6-8 shows the page once both animations have completed.
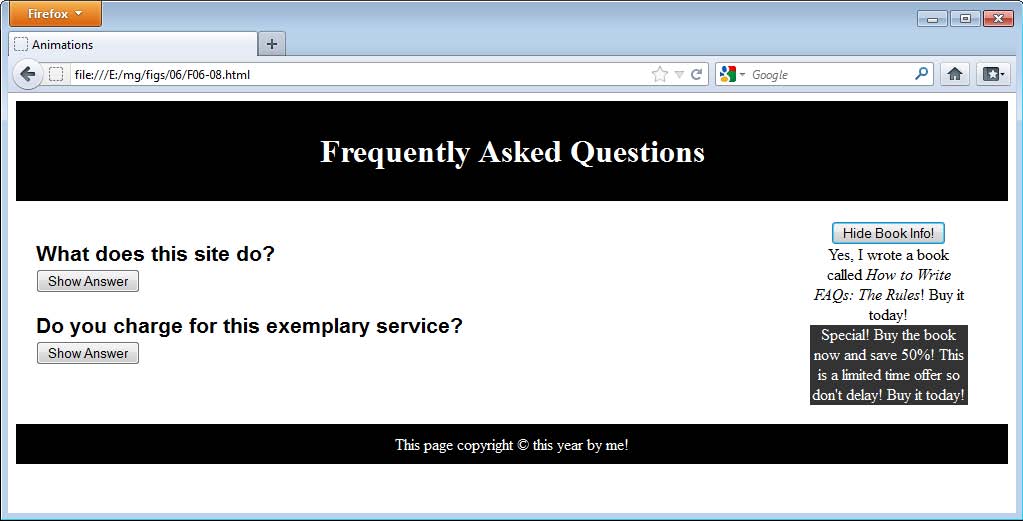
Figure 6-8 The page after the “Show Book Info!” button is clicked and the animations are complete
When you click a second time to hide the elements, you will notice that the fade occurs first, then the slide. While this order is great for showing the elements, it provides a bit of a jolt when hiding the elements since the fade out will “jump” the second <div> up the screen once the first one has faded out. It will then perform the slide up.
Instead of the current toggle, you may wish to perform the hiding of the elements in the reverse order of their showing. A slide up followed by a fade out would look like a much smoother transition. To do this, recall that when you hide an element, the CSS display property is changed to the value of none. This could be used with an if/else statement to allow you to perform the animations one way when showing and the other way when hiding. Consider the following code:

Here, the if statement uses the css method to determine the value of the display property for the #book-info element (since these are being shown and hidden together, testing one of them should be sufficient in this case, but be careful to adjust as needed if different tasks are performed). If display is none, then the elements will be shown by fading in the first <div> and sliding down the second. If they are currently visible, then the order will be reversed to hide them.
To complete this, you will need to fill in the additional code. Since toggling does not produce the desired effect here, you will need to specifically use fadeIn(), slideDown(), slideUp(), and fadeOut(). This would produce the following code for the click() method for the “Show Book Info!” button:
This works, but the repeated use of the same two selections of $(“#book-info”) and $(“#more-book-info”) require that the elements be located in the DOM (Document Object Model) for each use (which, over time and with enough calls, will cause the script to run more slowly than it otherwise could). To keep this from being necessary, you can cache the selections in a JavaScript variable. Consider the following code:
![]()
This places both selections into JavaScript variables. When this is done, the script will already know what element(s) to alter when it sees the variable, rather than needing to search the DOM for the element(s) again.
Since the variables represent jQuery objects (selections in this case), the variables use a $ symbol as the first character. This is not required, but can be a helpful convention to use in your code so that you can quickly recognize that the variable represents a jQuery object rather than a simple string or one of the other possible data types in JavaScript.
In this case, the variables can be defined at the beginning of the function that handles the click() method for the button, and can be used anywhere within that function. Thus, you could update the function to use the following code:
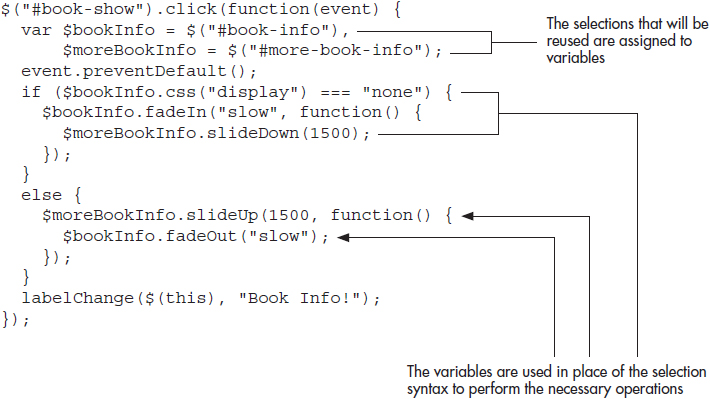
With the variables in place, you can now use them in place of the usual selection syntax. The selections are now cached and used as needed, and the animations still run in the desired order.
Try This 6-1
Practice with slideDown()
![]()
This project allows you to practice using the jQuery slideDown() method to show a hidden <div> element on the page.
Step by Step
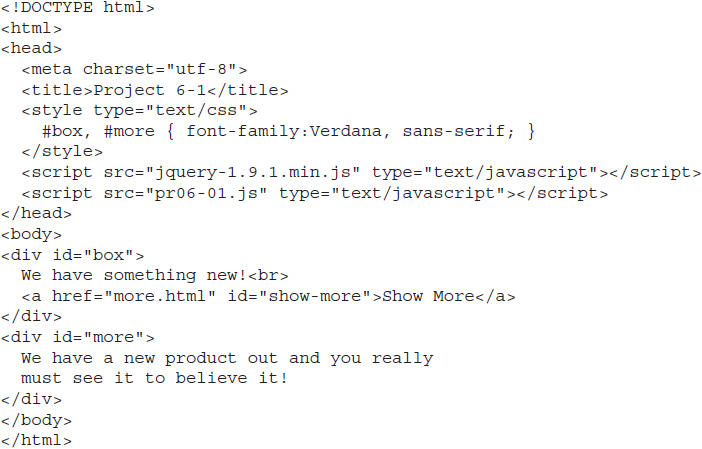
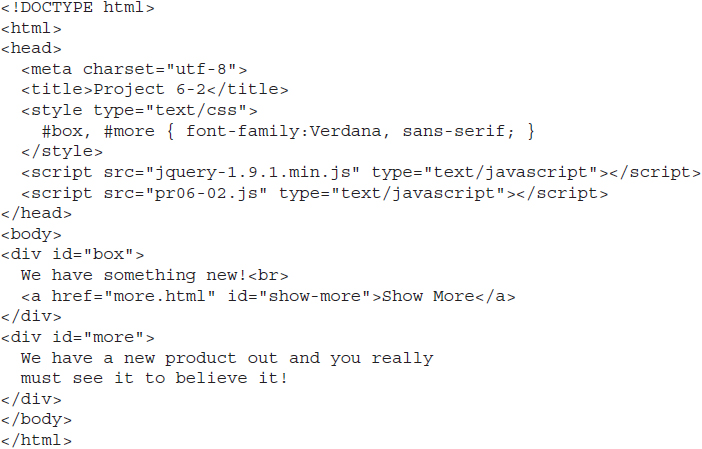
1. Place the following HTML code into your editor and save the file as pr06-01.html :
2. In the pr06-01.js file, add jQuery code that will hide the #more element, then slide down the #more element slowly when the #show-more element is clicked (“Show More” link).
3. Save the file. When complete, the code should look like this:
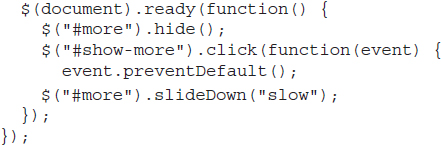
4. Open the pr06-01.html file in your Web browser. You should see the first <div> element and the link. Clicking the link should slide down the #more <div> into view.
Try This Summary
In this project, you used your knowledge of one of the preset slideDown() animation methods to show an element using a “slide down” animation when a link was clicked.
Creating Custom Animations
The jQuery library provides the animate() method, which allows you to customize what CSS properties are animated, specify the speed, specify the easing, and provide a callback function when it is run. This gives you the ability to create a custom animation to fit your needs.
The animate() method has the following basic syntax:
![]()
The last three arguments are optional and will simply use default values if one or more of them is not specified.
The arguments and their possible values are listed in Table 6-3.
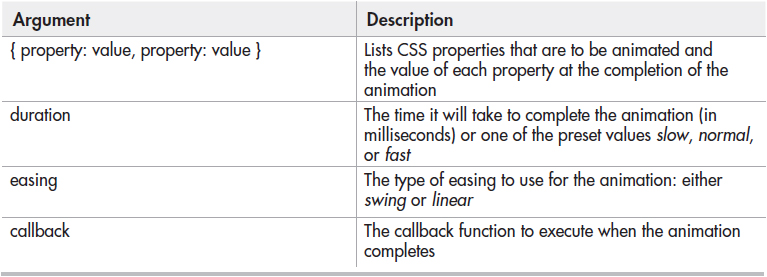
Table 6-3 Arguments for the animate() Method
Property/Value Map
The first argument is a property/value map, which is simply a list of properties and values in object literal notation. The properties are the CSS properties to be animated, and the values are the target values for each property when the animation is complete.
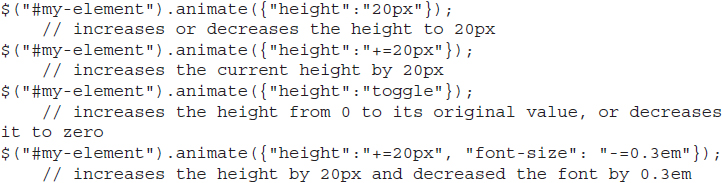
You can animate one property or as many as you need using this method. The limitation is that only properties with numeric values can be animated, such as width, height, top, left, font-size, margin, padding, border, and so on. The values can be a target number or a relative target number using += or -= followed by the value. They can also be one of the preset values of show, hide, and toggle. Some examples of this are shown in the following code:
As you can see, you can come up with any number of combinations within the map. This can be used to customize the properties and values that are animated according to your specific needs.
Duration Values
Just like the other animation methods, the animate() method itself can use the preset values of slow, normal, and fast, as well as define a specific number of milliseconds that the animation should last.
Some examples of providing the duration argument are shown here:

As with the other animation methods, specifying this argument is fairly straightforward.
Easing Values
There are only two values for the easing argument: swing and linear. The swing value is used by default if the argument is not specified. Other values are possible, however, using jQuery plugins, which will be discussed in Chapter 10.
The easing defines the speed of the animation at different points in the animation sequence. For example, the linear setting keeps the speed constant throughout the animation, while swing will start, speed up a bit, and then slow down a bit as the animation progresses.
Some examples are shown in the following code:

Callback Function
As with the other animation methods, you can provide a callback function to be executed when the animation completes. An example of this is shown next:

The Second Form of animate()
In addition to the standard form with four arguments, you can call animate() using a second form, which uses the first argument (the property/value map), then moves the other arguments to a map to provide the second argument. The map for the second argument adds the ability to provide special easing for specific properties, specify whether the animation should run in queue or at the same time as the previous animation, and provide a step function that is called for each animated property and element.
The following code shows the general syntax for this form of the animate() method:
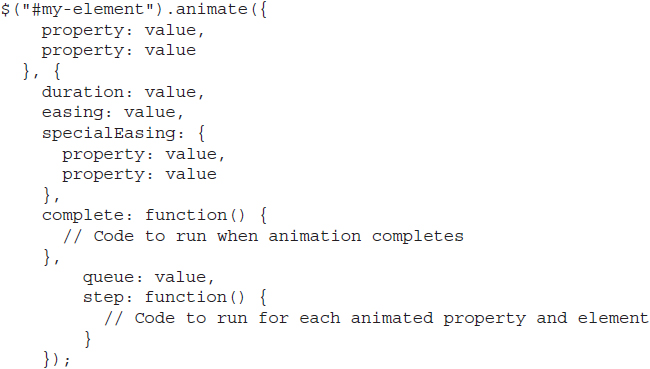
The key new elements here are the specialEasing map within the second map, the queue property, and the step function.
Special Easing
The specialEasing map allows you to define the easing for each animated property individually, rather than having all of the properties use the same easing. So, if you want to animate both the height and border width of an element but use swing for the height and linear for the border width, you could write the specialEasing map as in the following code:

Queue
The queue property can be set to true or false. If set to true, the animation will run in its normal position in the queue (after all previous animations). If set to false, then the animation will run at the same time as the animation prior to it in the normal queue, and the normal queue will then resume again afterward.
Step Function
The last new option is a step function, which allows you to execute code at each step of the animation for each animated element. This can be useful if you wish to alter the animation at each step or need to make additional customizations.
Updating the FAQ Page
Now that you have seen how the animate() method works, you can use it to update your animate.html and animate.js files. Suppose you want to provide a custom animation when the page loads that will hide the <h1> element, add a border around it, and then show it by animating both the border width and height of the element.
This can all be done in your jQuery code, so no updates are needed to the HTML file. The first part of this is straightforward. The element can be hidden by simply calling the hide() method, as in the following code:
![]()
Next, you can chain together the css() method (to add the border) and the animate() method to create the animation:

Here, the CSS is altered to add a 10px border around the <h1> element while it is hidden. The animate() method then uses show as the value for the border-width and height properties, which allows the element to show the animation.
CAUTION
Unless an element is already visible, the animate() method will run while the element is hidden and be invisible to the user unless either show() is called on the element before animate() or the properties are animated using the value show, as in this example.
You can now add this to your JavaScript file. Update animate.js to use the following code and save it:
Reload the animate.js file in your Web browser. When the page loads, the heading will animate itself into the page. Figure 6-9 shows the page once the animation is complete.
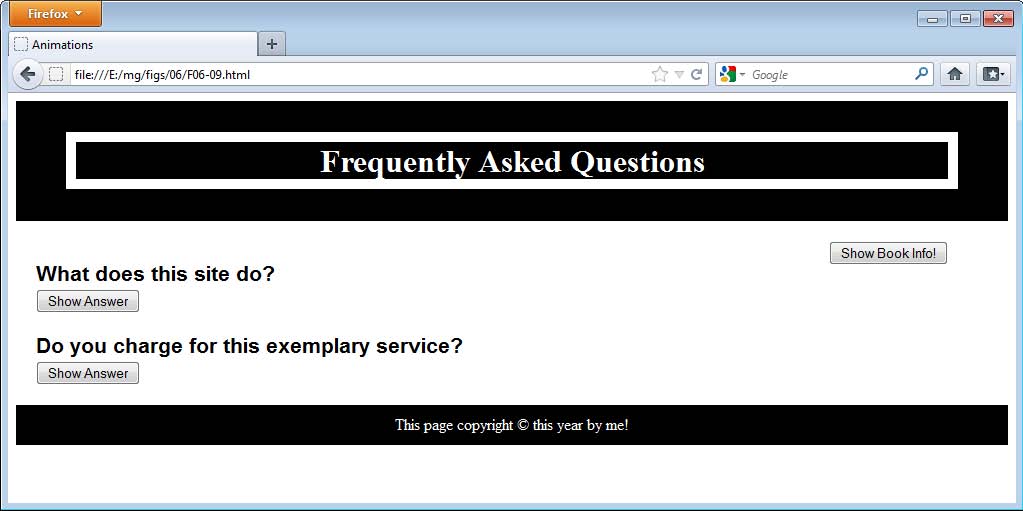
Figure 6-9 The completed animation, which showed the heading by animating its height and border width
Try This 6-2
Chain on a Custom Animation
![]()
This project allows you to practice adding a custom animation by chaining on to the end of the preset animation from Try This 6-1.
Step by Step
1. Insert the following HTML code into your editor and save the file as pr06-02.html (this is the same code used in Try This 6-1):
2. Copy your jQuery code from the pr06-01.js file from the previous project and save it as pr06-02.js. Add jQuery code that will animate the font size of the element to 2em larger than its current size once the slide down is complete.
3. Save the file. When complete, the code should look like this:
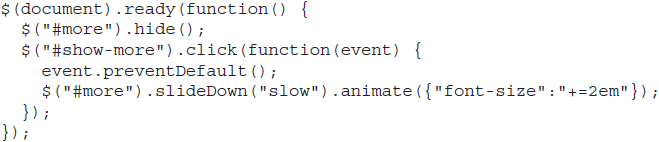
4. Open the pr06-02.html file in your Web browser. Click the link and the <div> will slide down, and then the font size will grow very large!
Try This Summary
In this project, you used your knowledge of animate() to create a custom animation that was placed in the queue after a preset animation was complete. This added another effect to the animated element.
Stopping Animations
There are times where stopping an animation can be helpful, such as when many animations could end up in the queue, all happening one after another while the user is trying to do other things.
This is most common with mouse hover effects, where an animation often lasts longer than the amount of time the mouse is over the element. Often, the user will have moved the mouse over another element, and if it has an animation, this is also placed in the queue but not run until the first one completes. With enough of these in place, the page could become quite jumpy for the user.
To avoid this type of behavior, jQuery provides the stop() method, which stops an animation in its tracks. When used without any arguments, it will stop the animation “in-place” immediately. For example, an element being shown will still show the portion of the element that made it into view before stop() was called.
To provide additional stopping options, jQuery gives you two arguments you can send to the stop() method: The first one specifies whether to clear the animation queue for the selected element(s), and the second specifies whether or not to jump to the end of the animation before stopping it [which will completely show an element animated using show() or completely hide an element animated using hide()].
The following code shows some examples of the stop() method at work:
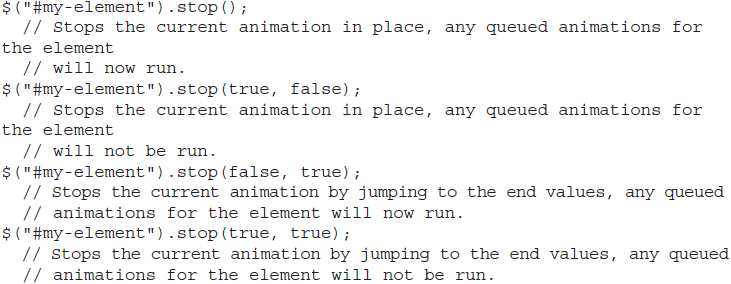
As you can see, the optional arguments provide you with the ability to customize the way in which the animation is stopped.
A common use for this is to stop any animations occurring on mouseenter/mouseleave on an element before queuing another animation on it. For example, if you were animating the height of an element when the mouse moves over it, then back when the mouse moves away, you might use the hover() method to provide a custom animation for these events, as in the following code:
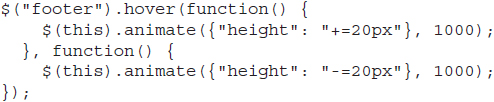
This looks perfectly normal on the surface. If the user moves the mouse over the footer element, it will expand by 20px in height, then returns when the mouse moves away. However, an unexpected result occurs when the mouse moves back over the element before the animation completes.
To see what happens, update the code to your animate.js file as shown here and save it:
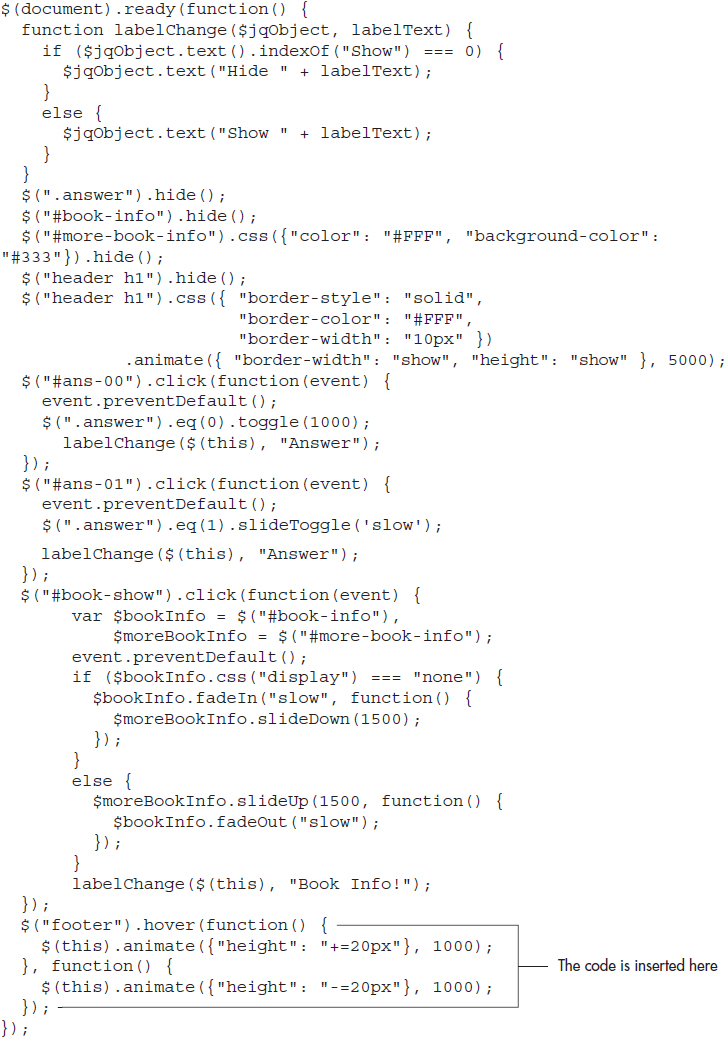
Reload the animate.html file in your browser and move your mouse in and out of the footer element several times. The animation gets queued again each time you do this, causing it to run the animation for each of the mouse hovers in sequence before stopping, which is likely to be a good while after you have stopped!
To keep this from happening, you can cause the animation to stop, be removed from the queue, and then start again when the mouse moves in or out of the affected area. To do this, simply alter the hover() method in animate.js as shown here and save the file again:

Reload the animate.html file in your browser and move the mouse in and out of the footer element several times again. It may be a little jumpy if you do so rapidly, but once you have left the element for good, the animation will simply complete and stop, rather than running over and over again until it reaches the number of times it would have otherwise been queued.
 Chapter 6 Self Test
1. The __________ method displays an element by increasing its width, height, and opacity.
2. What method is used to alternate between show() and hide() when called?
A. alternate()
B. switch()
C. toggle()
D. showOrHide()
3. Which method hides an element by gradually moving it up from the display area?
A. slideDown()
B. fadeout()
C. hide()
D. slideUp()
4. The fadeIn() method displays an element by gradually increasing its __________.
A. opacity
B. width
C. height
D. width and height
5. To alternate between fadeIn() and fadeOut(), you can use fadeToggle().
A. True
B. False
6. The keyword __________ can be used to show or hide an element in 200 milliseconds.
A. slow
B. normal
C. fast
D. ultraFast
7. If you want to customize how long an animation runs, you can supply the duration argument using the number of seconds it should take.
A. True
B. False
8. Which method allows you to select an element based on its index in a selection?
A. eq()
B. atIndex()
C. indexOf()
D. location()
9. A ________ allows you to reuse similar code by placing it in one location and sending it arguments.
A. code saver
B. function
C. block
D. if statement
10. JavaScript has the __________ method for finding the starting position of any set of characters within a string.
A. indexAt()
B. indexOf()
C. startPos()
D. where()
11. Each animation method allows you to use a __________ __________, which executes when the animation is complete.
A. completion function
B. done function
C. next method
D. callback function
12. You can create custom animations using the __________ method.
A. animate()
B. custom()
C. animation()
D. customAn()
13. You can specify the easing method to use when using animate().
A. True
B. False
14. You cannot specify the speed of an animation using animate().
A. True
B. False
15. The __________ method ends an animation.
A. stop()
B. end()
C. quit()
D. theEnd()