
Chapter 7. Modifying Interop Assemblies
In This Chapter
• How to Change an Assembly’s Contents
• IL Assembler Syntax
• Changing Data Types
• Exposing Success HRESULTs
• Arrays
• Custom Attributes
• Adding Methods to Modules
We’ve seen in previous chapters that an Interop Assembly produced by the type library importer might not always be appropriate for the COM component you wish to use. This chapter describes a relatively easy way to modify the metadata inside an Interop Assembly to suit your needs. You’ll see examples of the types of changes that can be made, and the types of changes that typically need to be made. Such changes are desirable or even necessary for a variety of reasons, which fall into three main categories:
• Limitations of type library expressiveness. For example, the type library importer can’t do a sensible conversion for C-style arrays because they look no different inside a type library than a pointer to a single type. Furthermore, the type library contains no information about the size for such arrays.
• Limitations of the importer. Examples of this are ignoring methods in a type library module, always hiding an HRESULT return type, and ignoring IDL custom attributes.
• Errors or omissions in the type library. This is the most rare of the three categories, but sometimes type libraries can contain errors that affect proper behavior or they may omit useful types. This, of course, isn’t the fault of the type library importer—if you put garbage in, you get garbage out.
This chapter is different from the others in that we’re going to look at several small examples that focus on taking advantage of two important tools in the .NET Framework SDK—the IL Assembler (ILASM.EXE) and the IL Disassembler (ILDASM.EXE). We’ll be looking at mostly “raw metadata” as shown by ILDASM.EXE and understood by ILASM.EXE, rather than at signatures in higher-level languages like C#, Visual Basic .NET, and C++.
Modifying an Interop Assembly isn’t the only way to work around limitations in the type library importer—you could write the types and signatures manually in a higher-level language. This technique works even when you don’t have a type library, and can be handy for more complex modifications. Whereas defining the type information in a higher-level language is an optional and advanced technique covered in Chapter 21, “Manually Defining COM Types in Source Code,” the technique of modifying an Interop Assembly produced by the importer is easier and often necessary for ease of use in .NET applications. Hence, we cover this topic now in Part II rather than in Part VII, “Advanced Topics.”
Tip
None of the techniques in this chapter are necessary for customizing behavior specific to an ActiveX Assembly produced by this ActiveX Control importer. That’s because the AXIMP.EXE utility makes it easy with its /source command-line option. This option generates C# source code that can be customized as you see fit. Since the ActiveX Assembly depends on an Interop Assembly, however, customizations may still need to be done to dependent assemblies.
Hopefully the COM component you wish to use in managed code already has a Primary Interop Assembly (PIA) with any necessary customizations made by its author. If you wrote the COM component, then following the techniques in this chapter helps you create a good PIA. For more information about creating PIAs, see Chapter 15, “Creating and Deploying Useful Primary Interop Assemblies.”
How to Change an Assembly’s Contents
Any time you want to modify the contents of an assembly, there are three fundamental steps to follow:
1. Disassemble the assembly, and output its contents to a text file (typically given a .il extension). This can be done with ILDASM.EXE as follows:
ildasm MyAssembly.dll /out:MyAssembly.il
3. Change the contents of the text file (sometimes called an IL file) using your favorite text editor. The rest of this chapter gives examples of how to make specific changes, highlighting any changes you’ll likely want to make.
4. Reassemble the assembly, using the updated text file as the source code. This can be done with ILASM.EXE as follows:
ilasm /dll MyAssembly.il
These steps are pictured in Figure 7.1.
Figure 7.1. The IL Disassembler and IL Assembler, when used together, enable easy modifications of binary assembly files.

This technique can be leveraged in COM Interoperability by using an Interop Assembly produced by the type library importer in step 1.
Caution
If you plan to double-check your changes to an assembly by disassembling the modified assembly created in step 3 and comparing the resultant text file to the text file created in step 1, you’ll find that comparing the two text files isn’t so easy. Many differences often appear between two such semantically equivalent files because the order in which ILDASM.EXE emits multiple custom attributes on the same element varies. Because Interop Assemblies are filled with custom attributes, many meaningless differences show up when performing this check due to attribute re-ordering.
An Interop Assembly always contains an unmanaged resource with the Win32 file version information (the information seen when viewing its properties in Windows Explorer) copied from the original type library file. Therefore, when disassembling an Interop Assembly, ILDASM.EXE prints out something like:
// WARNING: Created Win32 resource file MyAssembly.res
To include this same unmanaged resource information in the modified assembly, you can use the /resource command-line switch on ILASM.EXE. Thus, step 3 should really be the following when working with Interop Assemblies (or any assemblies with an embedded unmanaged resource):
ilasm /dll MyAssembly.il /resource:MyAssembly.res
This whole process of taking an assembly apart and putting it back together might sound like a scary thing to do (or a major hack), but it’s really not that bad when you see how it’s done.
Just as TLBIMP.EXE has command-line options for digitally signing an Interop Assembly (covered in Chapter 15, “Creating and Deploying Useful Primary Interop Assemblies”), ILASM.EXE has a command-line option for digitally signing the “re-engineered” assembly. If your key pair resides in a file called MyKey.snk, you can use the /key option as follows:
/key:MyKey.snk
This is the same as using TLBIMP.EXE’s /keyfile option. If your key pair resides in a container called MyContainer, you can use the /key option with the @ symbol as follows:
/key:@MyContainer
This is the same as using TLBIMP.EXE’s /keycontainer option.
To summarize, the complete sequence of steps for modifying an Interop Assembly are typically:
1. Generate the original Interop Assembly:
TlbImp MyTypeLib.tlb /out:MyAssembly.dll
3. Disassemble the Interop Assembly:
ildasm MyAssembly.dll /out:MyAssembly.il
5. Change the contents of the text file.
6. Reassemble the assembly, giving it a strong name and including the unmanaged resources:
ilasm /dll MyAssembly.il /resource:MyAssembly.res /keyfile:MyKey.snk
There’s no need to digitally sign the original Interop Assembly if you’re immediately going to disassemble and reassemble it. As long as you digitally sign the assembly produced by the IL Assembler, the result is the same whether the original one was signed or not.
Tip
The IL Assembler produces a lot of output when assembling an IL file, reporting each class it assembles along the way. Because of this, any warnings or errors that are reported can get scrolled off the screen by the time the assembler finishes, leaving you with the following frustrating message:
*****FAILURE*****
To have ILASM.EXE only report errors and warnings, use its /quiet option, as follows:
ilasm /dll /quiet MyAssembly.il /resource:MyAssembly.res /keyfile:MyKey.snk
Caution
When performing the final step of assembling the modified assembly, do not change the name of the output file to anything other than the original assembly filename. If you want to save the original assembly, you should move or rename it before performing this final step. The reason is that the assembly’s filename should match its simple assembly name, which appears inside the IL file you’re assembling.
If you renamed the output file and still had the original assembly in the same directory, the original one might be used by clients, even if you recompiled them while referencing your renamed assembly. That’s because only the assembly reference gets persisted into client assemblies, and at run time your modified assembly could be ignored if its filename didn’t match the assembly name.
If you want to change the output filename, you also must change the assembly’s name inside the IL file and be sure to recompile any clients of your assembly so they reference the new name.
IL Assembler Syntax
Before looking at how to change the information in the IL text file, let’s look at what you can expect to see inside the file. The contents are sometimes referred to as “raw IL,” but that term is a little misleading. An assembly contains both metadata (describing the types and signatures) and IL (the source code containing the actual implementation). Furthermore, although Interop Assemblies contain IL for managed event-related members, there’s never a compelling reason to change this IL. For Interop Assemblies, the importance is in the metadata. Because the contents of the IL file use a syntax recognized and assembled (or compiled) by ILASM.EXE, we’ll refer to this as IL Assembler syntax. Listing 7.1 displays snippets of the IL file for the Microsoft Word Interop Assembly. The contents were generated by running TLBIMP.EXE on the MSWORD.OLB file that ships with Office XP, then using ILDASM.EXE.
Listing 7.1. Snippets of Word.il, the File Produced by ILDASM.EXE for Microsoft Word’s Interop Assembly

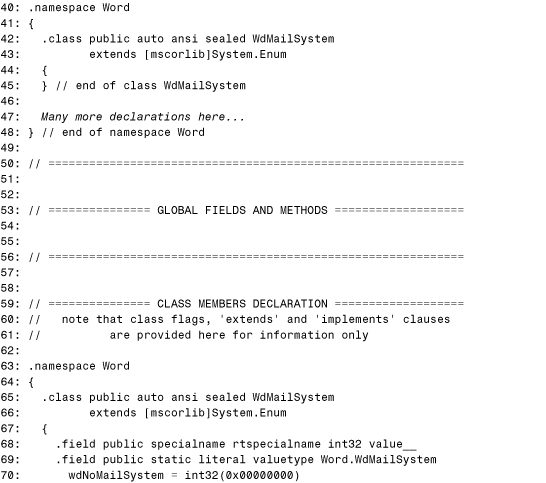

The first thing to notice at the beginning of the IL file is the C++-style comments beginning with //. Lines 4–16 list the assemblies referenced by the current one in the three .assembly extern blocks. Each block contains all information necessary to identify the assembly, such as its name, version number, and public key token (for strong-named assemblies). Every Interop Assembly has a reference to the mscorlib assembly, and the Microsoft Word Interop Assembly also references VBIDE and Office for additional types.
Lines 17–29 contain a .assembly block with the same sort of information for the current Word assembly. In this block, Interop Assemblies always contain an ImportedFromTypeLibAttribute custom attribute containing the type library name and a GuidAttribute custom attribute containing the LIBID. The syntax of custom attributes is explained in more depth later in the “Custom Attributes” section. Lines 30–36 list information for the current module, which we never need to worry about.
Line 40 begins a section of the IL file containing declarations of all types in the assembly, not including their members. All types appear in a .namespace block which contains all the types in the Word namespace. The listing omits all but one class, which happens to be an enumeration. In IL Assembler syntax, this looks like a regular class that derives from System.Enum.
Line 53 marks a section for global fields and methods, which imported Interop Assemblies do not contain. Line 63 begins the declaration of the members and implementation of any types. The declarations of classes (such as the one in Lines 42–45) are repeated in order to associate members with their containing types. The IL Assembler associates these duplicate definitions with the previous ones by type name only, so if the definition of WdMailSystem in Lines 65–77 said private instead of public or omitted the fact that it derives from System.Enum, it would have no effect as long as the initial class declaration was not changed.
Looking at the members of WdMailSystem in Lines 65–77, we see four values (represented as static fields of the class): 0, 1, 2, and 3. Every managed enum has a value__ field hidden by higher-level languages that contains the current value for each instance of the enum. The remaining members are omitted from the listing, so Line 80 marks the end of the Word namespace and Lines 82–83 add any ILDASM.EXE warning messages to the end of the file as comments.
Tip
Do you want to combine multiple assemblies into one? ILASM.EXE supports specifying a list of files at the command line, and compiles them all into the same single-file assembly. These input files could be the result of running ILDASM.EXE on several separate assemblies. The only special requirement is that there can only be one .assembly block in all the files to specify the output assembly’s name, version, and so on, so you’d need to delete all but one in the input files. You can still have multiple .assembly extern blocks for referencing external assemblies (and you can even have duplicate references without consequences).
This same technique could be used to create a single-file assembly whose source code was originally written in multiple languages, such as C# and Visual Basic .NET.
In an Interop Assembly, only the event-related members generated by the importer (discussed in Chapter 5, “Responding to COM Events”) contain IL instructions. Here’s an example of the IL Assembler syntax for the constructor (indicated with .ctor) for the ApplicationEvents_SinkHelper class that appears in the Interop Assembly from Listing 7.1:
.method assembly specialname rtspecialname
instance void .ctor() cil managed
{
// Code size 24 (0x18)
.maxstack 4
IL_0000: ldarg 0
IL_0004: call instance void [mscorlib]System.Object::.ctor()
IL_0009: ldarg 0
IL_000d: ldc.i4 0x0
IL_0012: stfld int32 Word.ApplicationEvents_SinkHelper::m_dwCookie
IL_0017: ret
} // end of method ApplicationEvents_SinkHelper::.ctor
Data Types
Chapter 1, “Introduction to the .NET Framework,” listed the aliases for each of the primitive System types in C#, VB .NET, and C++. Table 7.1 shows what the same System types look like in IL Assembler syntax.
Table 7.1. The IL Assembler Types That Correspond to the Fundamental System Types in the mscorlib Assembly
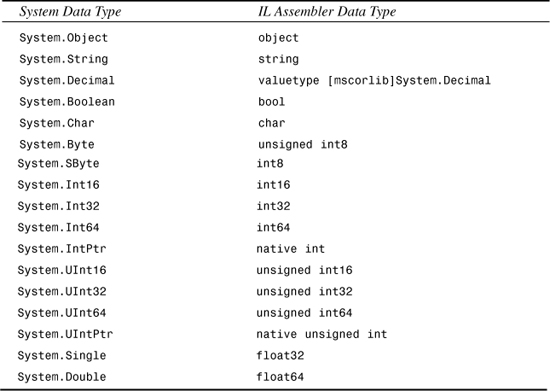
Notice that unlike C#, VB .NET, and C++, the IL Assembler has keywords for the size-agnostic IntPtr and UIntPtr types. If you’re wondering about the funny looking syntax for expressing System.Decimal, IL Assembler doesn’t have a keyword for the System.Decimal type. Instead, the syntax shown is the syntax used for any user-defined type.
This syntax for user-defined data types begins by classifying the type as a value type (with the valuetype keyword) or as a reference type (with the class keyword). It then specifies the assembly’s simple name in square brackets, followed by the type name qualified with its namespace. The assembly name inside the square brackets must match one of the names listed in the file’s .assembly extern statements, otherwise the type cannot be found. The Microsoft Word Interop Assembly from Listing 7.1 uses one type from the VBIDE assembly—the _VBProject interface. You can find this in a few places of the IL file as the following:
class [VBIDE]VBIDE.VBProject
The assembly also uses many types in the Office assembly; for example:
class [Office]Microsoft.Office.Core.Assistant
Tip
Don’t get confused by the word class in an IL file. In IL Assembler syntax, this is any kind of reference type—even an interface. An interface is treated as a special type of class.
Passing Parameters
Whereas by-reference parameters are indicated with ref in C# and ByRef in VB .NET, the IL Assembler notation for a by-reference parameter is an ampersand (&) after the type name. (Pointers, as in C# unsafe code, are represented as * after the type name.) Thus, the Quit method on the Word._Application interface, which has three by-reference object parameters, looks like the following:
.method public hidebysig newslot virtual abstract
instance void Quit([in][opt] object& marshal( struct) SaveChanges,
[in][opt] object& marshal( struct) OriginalFormat,
[in][opt] object& marshal( struct) RouteDocument
) runtime managed internalcall
{
.custom instance void [mscorlib]
System.Runtime.InteropServices.DispIdAttribute::.ctor(int32) =
( 01 00 51 04 00 00 00 00 ) // ..Q.....
} // end of method _Application::Quit
Notice the [in] and [opt] markings. These correspond to the InAttribute and OptionalAttribute pseudo-custom attributes. The OutAttribute pseudo-custom attribute is denoted similarly with [out]. In IL Assembler syntax, these attributes always go directly in front of the type name. Every parameter in an Interop Assembly usually has at least one of these attributes because parameters in a type library are usually marked with the [in] and/or [out] IDL attributes.
MarshalAsAttribute Syntax
Besides InAttribute, OutAttribute, and OptionalAttribute, another pseudo-custom attribute that is used throughout an Interop Assembly is MarshalAsAttribute. In IL Assembler, this looks like marshal(type), as shown in the following signature for the Item method of the FontNames class:
.method public hidebysig newslot virtual abstract
instance string
marshal( bstr)
Item([in] int32 Index) runtime managed internalcall
{
.custom instance void [mscorlib]
System.Runtime.InteropServices.DispIdAttribute::.ctor(int32) =
( 01 00 00 00 00 00 00 00 )
} // end of method FontNames::Item
The marshal keyword, when used, appears as follows:
• Between the type name and variable name when applied to a parameter, for example:
.method public hidebysig newslot virtual abstract
instance void MyMethod(string marshal( bstr) s) cil managed
• Immediately before the type name when applied to a field, for example:
.field public marshal( bstr) string MyField
• Between the return type name and method name when applied to a return value, as seen previously in the FontNames.Item method.
For each possible UnmanagedType value that can exist inside MarshalAsAttribute, IL Assembler has a special keyword. The syntax for each value is shown in Table 7.2. The meaning of each of the UnmanagedType enumeration values is explained in Chapter 12, “Customizing COM’s View of .NET Components.” The important ones for this chapter are explained as they are used.
Table 7.2. Every Value Used with MarshalAsAttribute Corresponds to Custom IL Assembler Syntax
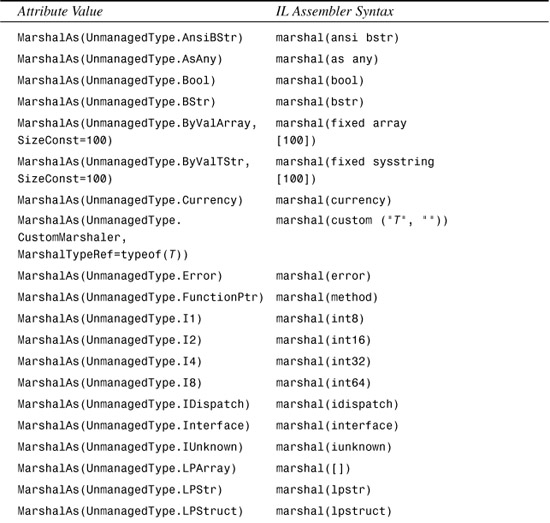

There are two special cases to point out—UnmanagedType.LPArray and UnmanagedType.SafeArray. UnmanagedType.LPArray means that the parameter it is attached to is a C-style array in the unmanaged signature. It can be used in conjunction with an ArraySubType named parameter set to a value of the UnmanagedType enumeration. This sub type is the type of the array’s elements. The IL Assembler syntax for using UnmanagedType.LPArray with the ArraySubType is [] appended to whatever the type for ArraySubType is. For example, the following in C#:
[MarshalAs(UnmanagedType.LPArray, ArraySubType=UnmanagedType.Currency)]
is equivalent to the following in IL Assembler:
marshal(currency[])
If no ArraySubType parameter is specified (as in Table 7.2), the Interop Marshaler uses the default unmanaged type that corresponds to the managed array’s element type.
UnmanagedType.SafeArray means that the parameter it is attached to is a SAFEARRAY in the unmanaged signature. It can be used in conjunction with a SafeArraySubType named parameter set to a value of the VarEnum enumeration, also defined in the System.Runtime.InteropServices namespace. Just like ArraySubType, SafeArraySubType specifies the type of the array’s elements. For example, specifying the following in Visual Basic .NET:
<MarshalAs(UnmanagedType.SafeArray, SafeArraySubType:=VarEnum.VT_CY)>
is equivalent to the following in IL Assembler:
marshal(safearray currency)
Caution
In version 1.0 of the .NET Framework, Decimal array parameters marked with SafeArraySubType equal to VT_CY don’t correctly marshal as a SAFEARRAY with CURRENCY elements in both directions. Such a SAFEARRAY can be marshaled from COM to .NET (via a return type marked with marshal(safearray currency)) but any attempt to pass a .NET Decimal array to COM via such a parameter fails with a SafeArrayTypeMismatchException. If you require passing CURRENCY SAFEARRAYs across the Interop boundary, you’ll need to resort to do-it-yourself marshaling, described in Chapter 6, “Advanced Topics for Using COM Components.”
The reason that the named parameter requires a separate enumeration is that a SAFEARRAY’s element type is a VARIANT type represented by a subset of the VarEnum enumeration. The element type of a C-style array, on the other hand, can be just about anything represented by the UnmanagedType enum.
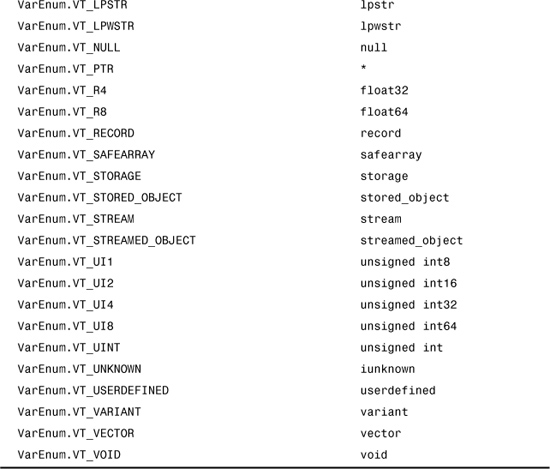
Just as the IL Assembler has special syntax for the values of the UnmanagedType enumeration, it has special syntax for the values of the VarEnum enumeration. Only about half of the values of VarEnum are valid when describing the type of a SAFEARRAY, but for completeness all the values are listed in Table 7.3 with the corresponding IL Assembler syntax. These words or symbols should be placed immediately after safearray, as in the previous safearray currency case.
Table 7.3. Every Value of the SafeArraySubType Named Parameter Used with MarshalAsAttribute Corresponds to Custom IL Assembler Syntax
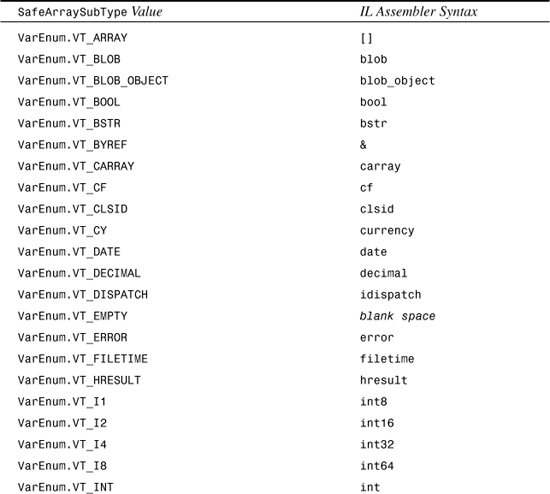
Some of the values are meant to be bitwise-ORed with others, such as VarEnum.VT_BYREF. The IL Assembler syntax for doing this is simply appending one to the other. For example, the following in C#:
[MarshalAs(UnmanagedType.SafeArray,
SafeArraySubType=(VarEnum.VT_CY | VarEnum.VT_BYREF))]
looks like the following in IL Assembler:
marshal(safearray currency&)
That ends our whirlwind tour of IL Assembler syntax, except for the syntax of custom attributes, which is covered in the upcoming “Custom Attributes” section. To get a better feel of what IL Assembler syntax looks like, disassemble any assembly and peruse the contents of the IL file produced.
Tip
If you don’t know how to represent a higher-level language construct in IL Assembler syntax, the easiest way to find out is to write a small program that contains this construct in a higher-level language, then open the compiled assembly and inspect it with ILDASM.EXE.
Changing Data Types
Now it’s time to look at some of the useful changes one can make to the IL file for an Interop Assembly before reassembling it. Once you understand how to represent the various data types in IL Assembler, swapping them (as allowed by the Interop Marshaler) should be easy.
For example, the previous chapter used an example for which an IntPtr parameter needed to be changed to a by-reference or out-only IntPtr parameter. This could be accomplished by changing the following signature:
.method public hidebysig newslot virtual abstract
instance void GetObjectAttributes(
[in] string& marshal( lpwstr) pAttributeNames,
unsigned int32 dwNumberAttributes,
native int ppAttributeEntries,
[out] unsigned int32& pdwNumAttributesReturned
) runtime managed internalcall {}
to:
.method public hidebysig newslot virtual abstract instance void GetObjectAttributes(
[in] string& marshal( lpwstr) pAttributeNames,
unsigned int32 dwNumberAttributes,
[out] native int& ppAttributeEntries,
[out] unsigned int32& pdwNumAttributesReturned
) runtime managed internalcall {}
The ampersand makes it by-reference, and the [out] makes it out-only (out IntPtr in C#). Another Chapter 6 example required changing a by-reference integer to an IntPtr type. This can be done by changing:
.method public hidebysig newslot virtual abstract
instance void Read(native int pv,
unsigned int32 cb,
[out] unsigned int32& pcbRead
) runtime managed internalcall {}
to:
.method public hidebysig newslot virtual abstract
instance void Read(native int pv,
unsigned int32 cb,
native int pcbRead
) runtime managed internalcall {}
The Chapter 6 example that required changing a by-reference System.Object parameter to an IntPtr type to perform manual VARIANT marshaling could be accomplished by changing:
.method public hidebysig newslot virtual abstract
instance void FillRect(
[in][out] object& marshal( struct) v
) runtime managed internalcall {}
to:
.method public hidebysig newslot virtual abstract
instance void FillRect(
native int v
) runtime managed internalcall {}
The [in] and [out] attributes aren’t necessary on by-value IntPtr types because the Interop Marshaler doesn’t do any marshaling besides passing the integral value.
Changing the IntPtr in the previous signature to a void* type to be used by C# unsafe code would look like the following:
.method public hidebysig newslot virtual abstract
instance void FillRect(
void* v
) runtime managed internalcall {}
No kind of unsafe marking is necessary; designating code in such a way is enforced by the C# compiler but does not exist at the MSIL level.
Another change you could make is to take advantage of marshaling support that bridges OLE_COLOR and System.Drawing.Color. The importer creates a signature like the following for a method with an OLE_COLOR parameter:
.method public hidebysig newslot virtual abstract instance void
GiveMeAColor([in] unsigned int32 c) runtime managed internalcall
{
.custom instance void [mscorlib]
System.Runtime.InteropServices.DispIdAttribute::.ctor(int32) =
( 01 00 00 00 03 60 00 00 ) // .....`..
.param [1]
.custom instance void [mscorlib]
System.Runtime.InteropServices.ComAliasNameAttribute::.ctor(string) =
( 01 00 10 73 74 64 6F 6C 65 2E 4F 4C 45 5F 43 4F // ...stdole.OLE_CO
4C 4F 52 00 00 ) // LOR..
}
Because the Interop Marshaler supports it, this parameter could be changed to use System.Drawing.Color as follows:
.method public hidebysig newslot virtual abstract instance void
GiveMeAColor([in] valuetype [System.Drawing]System.Drawing.Color c)
runtime managed internalcall
{
.custom instance void [mscorlib]
System.Runtime.InteropServices.DispIdAttribute::.ctor(int32) =
( 01 00 00 00 03 60 00 00 ) // .....`..
}
as long as you also reference the System.Drawing assembly:
.assembly extern System.Drawing
{
.publickeytoken = (B0 3F 5F 7F 11 D5 0A 3A ) // .?_....:
.ver 1:0:3300:0
}
Exposing Success HRESULTs
With the metadata produced by the type library importer, there is no way for a .NET client to distinguish between any success HRESULTs returned by a COM method because no exception is thrown. By altering metadata signatures, you can expose the HRESULT return value to .NET clients so the exact value can always be checked.
Caution
A side effect of exposing an HRESULT return value is that the value always needs to be checked whether it’s a success code or an error code. In essence, exposing the HRESULT return value “turns off” the mapping of HRESULTs to .NET exceptions. Calling such a method never causes an exception to be thrown unless something external to the method causes it (such as StackOverflowException).
For an example of altering a signature to expose the HRESULT return value, let’s look at two methods in the Microsoft Word Interop Assembly—Documents.Add and _Application.Quit. These signatures are displayed in Listing 7.2.
Listing 7.2. Metadata Definitions of Documents.Add and _Application.Quit Produced by the Type Library Importer

You should recognize both of these methods from the spell checker example in Chapter 3, “The Essentials for Using COM in Managed Code.” Although they don’t return success HRESULTs other than S_OK, they serve as instructive examples because one managed signature returns void whereas the other returns an object. Documents is an interface, and because none of the coclasses in Word’s type library claim to implement it, its signature only shows up once in the Interop Assembly. On the other hand, the type library’s Application coclass lists _Application as one of the interfaces it implements, so the Quit signature occurs twice in the Interop Assembly: inside the _Application interface and inside the ApplicationClass class.
Tip
When changing a signature in an Interop Assembly, remember to change the definition in the interface and any class that implements the interface. Failure to update all occurrences of the same signature in the same way usually results in a TypeLoadException, but could instead produce subtle incorrect behavior depending on the type of change.
If you’re changing the signature for an imported event’s delegate (which can only be done in limited scenarios), there are at least four places to change: the source interface method, the generated delegate’s Invoke signature, the sink helper’s method (since it implements the source interface), and the call to the delegate’s Invoke method inside the sink helper implementation.
Three metadata changes must be made when transforming a signature to expose its HRESULT return value:
1. If the return type is not void, add a by-reference parameter to the end of the parameter list with the type of the return value. This can be given any name that doesn’t conflict with the other parameter names. Be sure to move any custom attributes (pseudo or otherwise) that are applied to the return type to the new parameter. If the return type is void, you can skip this whole step.
2. Change the return type of the method to int32, and mark it with marshal(error) to indicate that the integer is really an HRESULT type.
3. To make these signature changes work, the signature must be marked with preservesig to indicate that the metadata signature preserves the “raw” unmanaged signature. The preservesig keyword corresponds to the PreserveSigAttribute pseudo-custom attribute.
The transformed versions of the two Word signatures are shown in Listing 7.3.
Listing 7.3. Metadata Definitions of Documents.Add and _Application.Quit After Making Manual Changes to Expose HRESULT Return Values
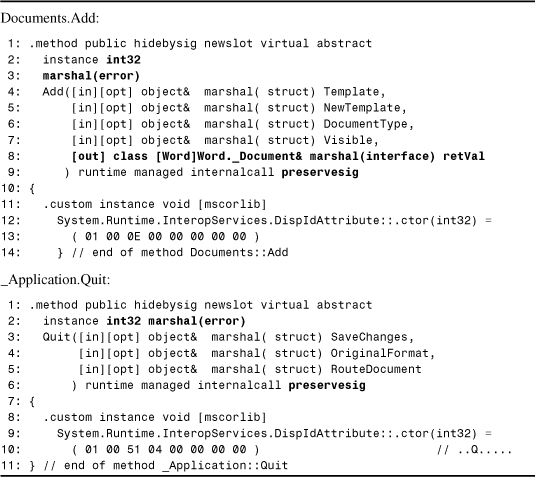
You could make the int32 return type an unsigned int32 instead, but it’s a good idea to stick with int32. You should already know the two reasons for this: the unsigned int32 type isn’t in the CLS (and unusable from VB .NET) and the COMException class exposes its HRESULT as an int32 type. The marshal(error) is not really necessary, because it’s only useful when late binding to a method with SCODE parameters. It’s a good idea to use it, however, just for informational purposes.
Listing 7.4 shows what a .NET client might look like if using the original Microsoft Word Interop Assembly, and what the same client might look like if using the modified Interop Assembly.
Listing 7.4. Two Versions of a C# Client—One That Uses the Original Assembly and One That Uses the Assembly with Modifications from Listing 7.3
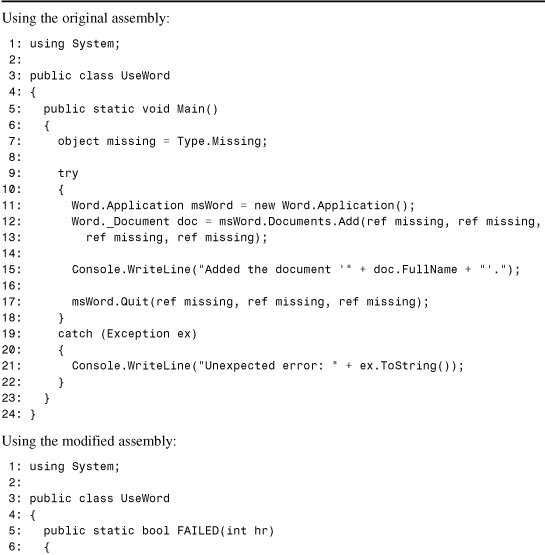
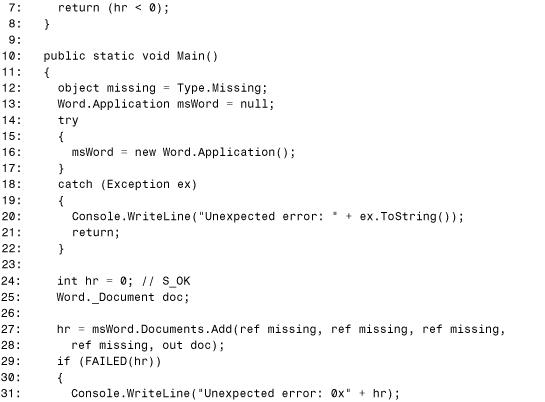
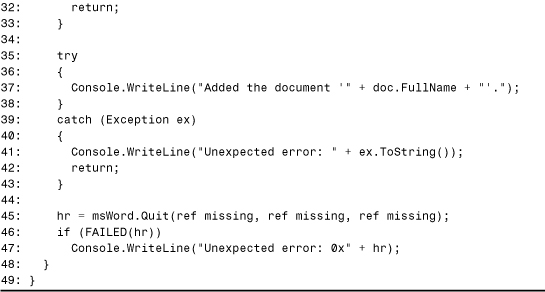
The first version of the client contains nothing new. The three main actions—instantiating the Application object, adding a document, and calling Quit—are all done within the try...catch block because they all throw exception on failure. This is not the case in the second code snippet. Notice the definition of FAILED in Lines 5–8 of the second client. This method is used like the FAILED macro prevalent in unmanaged C++ programs, returning true for any failure HRESULT and false for any success HRESULT. For a signed integer, if the severity bit is set then the number is less than zero.
Lines 29 and 46 call the FAILED method to check for success or failure in lieu of exception handling. On failure, Lines 31 and 47 print the value of the HRESULT return value. The _Document interface “returned” by the Add method now shows up as an out parameter in C#, as can be seen in Lines 27 and 28. No additional error information (such as a message) is automatically available, but could be obtained via a PInvoke call to the Windows GetErrorInfo API, or by calling Marshal.ThrowExceptionForHR (in System.Runtime.InteropServices) with the returned HRESULT. This method internally calls GetErrorInfo to populate the thrown exception with information.
Another option for creating an Interop Assembly with exposed HRESULT return types is to copy a type library and modify it before running the importer. In the IDL file (which you may have to obtain by running OLEVIEW.EXE on the type library), simply change each method’s HRESULT return type to an int or long type. Now create a new type library by running MIDL.EXE or MKTYPLIB.EXE on the new IDL file. Running the type library on this modified type library produces an Interop Assembly full of methods marked with PreserveSigAttribute. The only thing missing from the Interop Assembly is the marshal(error) marking on the int return types, but we already know that this doesn’t really matter. If you decide to try this, make sure that you’re changing a copy of the type library then throwing it out after running the type library importer.
Tip
Marking a method with PreserveSigAttribute can be useful for more than just exposing success HRESULTs. If a COM object exposes information from an error object via customized interfaces (in other words, implementing an interface like IAdditionalErrorInfo in addition to IErrorInfo on an object passed to SetErrorInfo), then marking methods with PreserveSigAttribute is necessary to prevent the CLR from calling GetErrorInfo and swallowing the custom error object when a failure HRESULT is returned. After calling such a method marked with PreserveSigAttribute, managed code could then make a PInvoke call to GetErrorInfo, cast the returned object to a .NET definition of your customized interface (as in IAdditionalErrorInfo), then extract the desired information. When error objects only expose information via IErrorInfo, then changing signatures to use PreserveSigAttribute is not required because all the information (except the GUID returned from IErrorInfo.GetGUID) is copied to members of the .NET exception thrown by the CLR.
Arrays
Chapter 4, “An In-Depth Look at Imported Assemblies,” outlined all the different types of arrays and the problems when attempting to use the metadata produced by the type library exporter. We’ll look at the two main types of arrays separately—SAFEARRAYs and C-style arrays.
Exposing SAFEARRAYs Differently
A SAFEARRAY parameter, which looks like the following in a type library:
SAFEARRAY(long)
is either transformed into a single-dimensional array with a lower bound of zero (int32[] in IL Assembler syntax) or to a generic System.Array type (class [mscorlib]System.Array in IL Assembler syntax) so it can be used as a multi-dimensional array or as an array with non-zero lower bounds. The importer generates System.Array types for all SAFEARRAYs by default in Visual Studio .NET (or with the /sysarray option with TLBIMP.EXE).
It’s sometimes helpful to have more fine-grained control over the transformation of SAFEARRAYs in metadata, deciding on a case-by-case basis. The change you can make to a single array parameter depends on how the array is used. If you know the number of dimensions of the array will always be the same and each dimension has a lower bound of zero, define it as type[] but place commas inside the brackets. The number of dimensions is one more than the number of commas, so whereas:
int32[]
is a one-dimensional array,
int32[,]
is a two-dimensional array,
int32[,,]
is a three-dimensional array, and so on.
If the number of dimensions can vary or if non-zero lower bounds are used, then the array type should be defined as the generic System.Array defined in the mscorlib assembly. This looks like the following:
class [mscorlib]System.Array
The mscorlib assembly is always referenced in an Interop Assembly, so no additional work is needed besides changing the parameter.
Adding Size Information to C-Style Arrays
As discussed in Chapter 4, C-style arrays look no different than a pointer to a single instance in a type library. Thus, a C-style array parameter looks like a by-reference type, for a method such as the following unmanaged C++ method:
STDMETHODIMP CArrayClass::ArrayParameter(long *a, long size)
{
for (int i = 0; i < size; i++)
printf("a[%d] = %d
", i, a[i]);
return S_OK;
}
The corresponding signature would look like the following in IL Assembler syntax:
.method public hidebysig newslot virtual abstract
instance void ArrayParameter([in] int32& a,
[in] int32 size) runtime managed internalcall
{
.custom instance void
[mscorlib]System.Runtime.InteropServices.DispIdAttribute::.ctor(int32)
= ( 01 00 01 00 00 00 00 00 )
} // end of method IArrayClass::ArrayParameter
Such a signature should be changed to a simple one-dimensional zero-lower-bound array as follows:
.method public hidebysig newslot virtual abstract
instance void ArrayParameter([in] int32[] marshal([+1]) a,
[in] int32 size) runtime managed internalcall
{
.custom instance void
[mscorlib]System.Runtime.InteropServices.DispIdAttribute::.ctor(int32)
= ( 01 00 01 00 00 00 00 00 )
} // end of method IArrayClass::ArrayParameter
The rule for converting this array is to simply replace & with [], and mark the parameter with a variation of marshal([]). This attribute specifies that the array is a C-style array (UnmanagedType.LPArray) and is necessary so the marshaler doesn’t treat the parameter as a SAFEARRAY. If the signature contains a parameter with the size of the array, this information should be added to the managed signature using MarshalAsAttribute’s SizeParamIndex named parameter. This value, valid only with UnmanagedType.LPArray, can be set to the index of the parameter (counting from zero) containing the size of the array. That is why the previous signature has:
marshal([+1])
This odd-looking syntax is equivalent to:
<MarshalAs(UnmanagedType.LPArray, SizeParamIndex:=1)>
in Visual Basic .NET. The plus sign distinguishes the number as a parameter index rather than the number of elements in the array. Using the SizeParamIndex feature is only supported on by-value array parameters, and the parameter containing the size must be a by-value integral parameter. If you have a signature that uses a by-reference size parameter or a by-reference C-style array, you should convert the array parameter to be an IntPtr (native int) type instead. (If the array has more than one level of indirection, you should pass the IntPtr as a by-reference parameter.)
The client for the previous transformed signature could look like the following in C#:
int [] a = {1, 2, 3, 4, 5};
ArrayClass o = new ArrayClass();
o.ArrayParameter(a, a.Length);
Tip
The easiest way to use a multi-dimensional C-style array in managed code is to define the signature just as you would for a one-dimensional C-style array. You can then treat it as a “flattened” array, with a length equal to the sum of all of its elements across all dimensions.
There’s no support for defining C-style arrays as multi-dimensional in metadata because UnmanagedType.LPArray only works with one SizeParamIndex value and/or one SizeConst value. There’s no way to specify individual sizes of multiple dimensions.
There’s no way to express varying array functionality (passing only a slice of the C-style array) in a managed signature, unless you replace it with an ArrayWithOffset type. See Appendix A, “System.Runtime.InteropServices Reference,” for information about this value type.
Custom Attributes
Some of the earlier examples showed custom attributes in IL Assembler syntax. Unlike pseudo-custom attributes, which each have their own syntax, all real custom attributes are structured as follows:
.custom instance void AttributeName::.ctor() = ( contents )
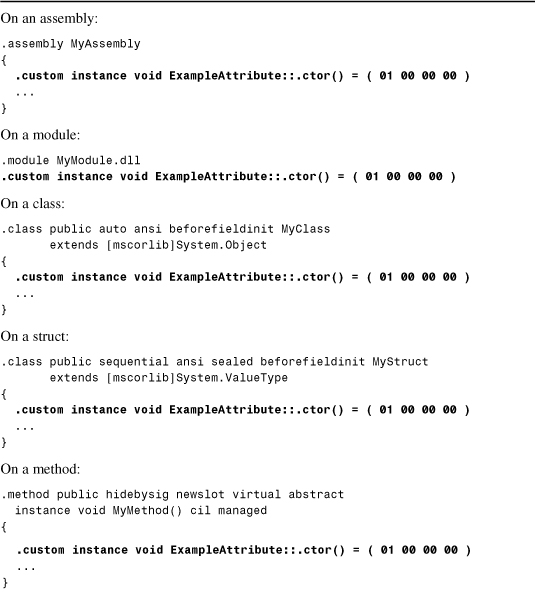
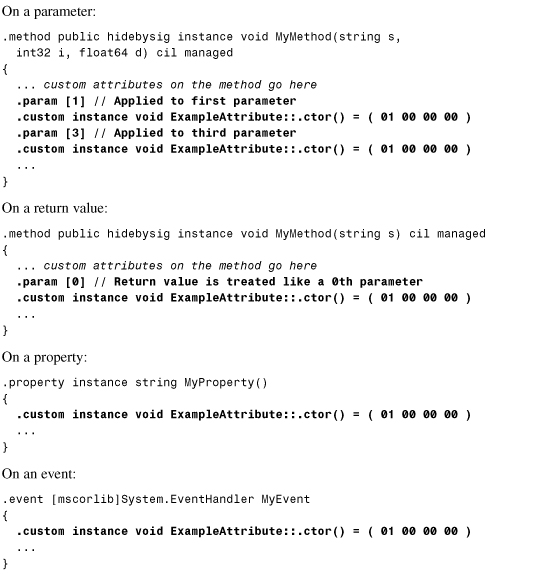
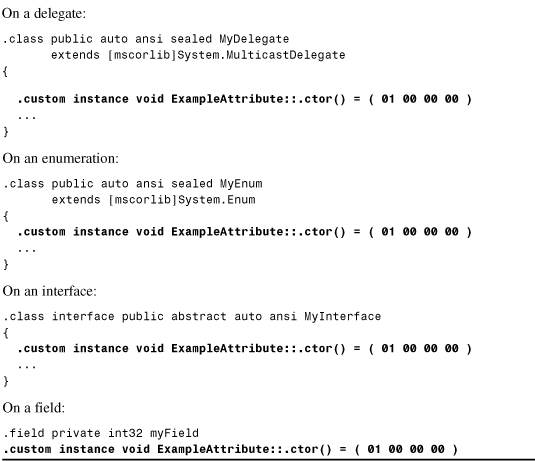
Unlike C#, Visual Basic .NET, and C++, you must not leave off the Attribute suffix from the name. Chapter 1 showed where to place custom attributes in C#, VB .NET, and C++ programs using an ExampleAttribute custom attribute. Listing 7.5 shows the placement of this attribute on all target types, but this time in IL Assembler syntax. Some of these are never seen in Interop Assemblies (for example the importer doesn’t put any custom attributes on a module and never generates fields), but all are shown in the listing for your information.
Listing 7.5. The Placement of the ExampleAttribute Custom Attribute on Any Type of Target Using IL Assembler Syntax
Now that you’ve seen what custom attributes look like wherever they appear, let’s look at how to make some custom attribute modifications to make Interop Assemblies work better.
Changing Attribute Contents
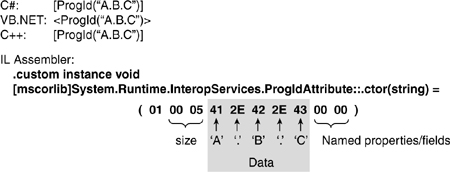
How do you know what an attribute’s contents should look like (such as the 01 00 00 00 in the previous examples)? As pictured in Figure 7.2, custom attribute contents always start with 01, followed by four bytes containing the size of the remaining data. This data could be a number, a boolean value (where 01 is true and 00 is false) or Unicode characters comprising a string. After the data, four bytes typically end the custom attribute to specify the number of named properties or fields that the attribute contains. This explains why a custom attribute with no additional data, such as ExampleAttribute, has the contents of 01 00 00 00. The count of named properties or fields is optional, so it might not always be present.
Figure 7.2. Custom attribute contents are comprised of three parts and are shown as hexadecimal digits in IL Assembler syntax.
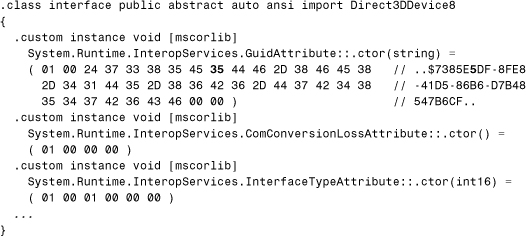
When an input type library contains incorrect information, fixing it in metadata might require you to change a custom attribute’s contents. The previous chapter mentioned a problem in the original DirectX 8 for Visual Basic type library, in which the Direct3DDevice8 interface was marked with this IID:
7385E4DF-8FE8-41D5-86B6-D7B48547B6CF
instead of the correct one:
7385E5DF-8FE8-41D5-86B6-D7B48547B6CF
To make such a change in metadata, you simply need to find the definition of Direct3DDevice8 in its IL file:
.class interface public abstract auto ansi import Direct3DDevice8
{
.custom instance void [mscorlib]
System.Runtime.InteropServices.GuidAttribute::.ctor(string) =
( 01 00 24 37 33 38 35 45 34 44 46 2D 38 46 45 38 // ..$7385E4DF-8FE8
2D 34 31 44 35 2D 38 36 42 36 2D 44 37 42 34 38 // -41D5-86B6-D7B48
35 34 37 42 36 43 46 00 00 ) // 547B6CF..
.custom instance void [mscorlib]
System.Runtime.InteropServices.ComConversionLossAttribute::.ctor() =
( 01 00 00 00 )
.custom instance void [mscorlib]
System.Runtime.InteropServices.InterfaceTypeAttribute::.ctor(int16) =
( 01 00 01 00 00 00 )
...
}
Then change the first 34 (the hexadecimal value representing the “4” character in GuidAttribute’s string) to 35 (the value representing “5”). Making this change looks like the following:
Of course, updating the comment containing the IID’s string representation is not necessary. You’d see it updated automatically if you later disassembled the modified Interop Assembly.
Marking Classes as Visual Basic Modules
As explained in Chapter 4, although type libraries can have both modules and coclasses, the .NET Framework combines these into the single notion of a class. Visual Basic .NET, however, has the notion of a module that can contain static (shared) members. In metadata, a VB .NET module is simply a class with a custom attribute—Microsoft.VisualBasic.CompilerServices.StandardModuleAttribute defined in the Microsoft.VisualBasic assembly.
All you need to do to turn any class in an Interop Assembly into a module is to mark it with this attribute. Because members of modules can be used in VB .NET without being qualified by the module name (as in Visual Basic 6), this is a nice alteration to make to classes that were originally type library modules. For an example, let’s look at the DINPUT8STRINGCONSTANTS class in the DirectX 8 Interop Assembly (imported from DX8VB.DLL):
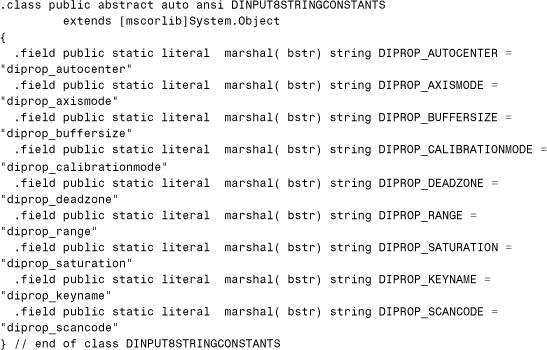
DINPUT8STRINGCONSTANTS is a module in the original type library, so Visual Basic 6 clients can refer to DIPROP_AUTOCENTER rather than the more cumbersome DINPUT8STRINGCONSTANTS.DIPROP_AUTOCENTER. To mark this as a VB .NET module, add the following text:

The data inside the custom attribute—01 00 00 00—indicates that the attribute has no parameters. One more addition is needed for the previous change to work. We need to add a reference to the Microsoft.VisualBasic assembly, otherwise ILASM.EXE would give the following error when reassembling the IL file:
DxVBLibA.il(8532) : error — Undefined assembly ref 'Microsoft.VisualBasic'
To add a reference to the assembly, add the following .assembly extern block in the same location as the other .assembly extern blocks, for example after the reference to mscorlib:
.assembly extern mscorlib
{
.publickeytoken = (B7 7A 5C 56 19 34 E0 89 ) // .zV.4..
.ver 1:0:3300:0
}
.assembly extern Microsoft.VisualBasic
{
.publickeytoken = (B0 3F 5F 7F 11 D5 0A 3A ) // .?_....:
.ver 7:0:3300:0
}
The .publickeytoken, and .ver values must correspond to the desired version of the Microsoft.VisualBasic assembly. The easiest way to get this information is to disassemble an assembly that references it. If you don’t know of any, it’s trivial to create one that does. Compiling any simple Visual Basic .NET program automatically references the assembly.
That’s all there is to it. Of course, this change only benefits VB .NET clients. Other languages ignore this VB-specific attribute and see such classes as regular classes whose static members still need to be qualified with the class name. Also, because the type library importer only preserves a module’s constants and not its methods, no .NET clients are able to call a module’s methods. In the “Adding Methods to Modules” section, you’ll see a way to fix this.
Adding Back helpstring Information
One of the sorely missed pieces of type library information that is not preserved in an Interop Assembly is the contents of IDL helpstring attributes. The helpstring attribute can be found on anything in a type library, and contains a description of the item it’s attached to. For example, the Microsoft Internet Controls type library (SHDOCVW.DLL) defines the following ISearch interface with documentation in these attributes:
[
odl,
uuid(BA9239A4-3DD5-11D2-BF8B-00C04FB93661),
helpstring("Enumerated Search"),
hidden,
dual,
oleautomation
]
interface ISearch : IDispatch {
[id(0x60020000), propget, helpstring("Get search title")]
HRESULT Title([out, retval] BSTR* pbstrTitle);
[id(0x60020001), propget, helpstring("Get search guid")]
HRESULT Id([out, retval] BSTR* pbstrId);
[id(0x60020002), propget, helpstring("Get search url")]
HRESULT URL([out, retval] BSTR* pbstrUrl);
};
Here the helpstring attributes provide (arguably) helpful descriptions of the interface and each one of its properties. Clients like Visual Basic 6 can use these strings to display helpful information. You can see this information in the Visual Basic 6 property browser and object browser.
The closest equivalent to the IDL helpstring attribute in the .NET world is System.ComponentModel.DescriptionAttribute. Visual Studio .NET uses this attribute to display helpful information in its property and event browser. Although DescriptionAttribute is meant for properties and events, it’s marked with AttributeUsage(AttributeTargets.All). Thus, we can apply this attribute to anything in an Interop Assembly—using it wherever the helpstring attribute exists on the corresponding element in the type library. It’s a time-consuming task to do this manually for large assemblies, but can be done nonetheless to provide built-in documentation.
Adding DescriptionAttributes manually isn’t hard, but generating the right contents manually can be tedious because the strings must be expressed as a list of hexadecimal Unicode values. Probably the easiest way to get each attribute’s contents is to write each attribute with each string in a higher-level language, compile a temporary assembly that you can disassemble, then copy the attributes in IL Assembler syntax.
For example, the following temporary C# source:
using System.ComponentModel;
[Description("Enumerated Search")]
public interface ISearch {}
gives us the necessary syntax for ISearch’s helpstring after compiling it and disassembling the assembly:
.custom instance void [System]
System.ComponentModel.DescriptionAttribute::.ctor(string) =
( 01 00 11 45 6E 75 6D 65 72 61 74 65 64 20 53 65 // ...Enumerated Se
61 72 63 68 00 00 ) // arch..
Listing 7.6 contains the original metadata produced by the type library importer for the ISearch interface, and Listing 7.7 shows how to modify the metadata to add in DescriptionAttributes with the type library’s helpstring information.
Listing 7.6. Original Metadata Produced for the ISearch Interface in the Microsoft Internet Controls Type Library
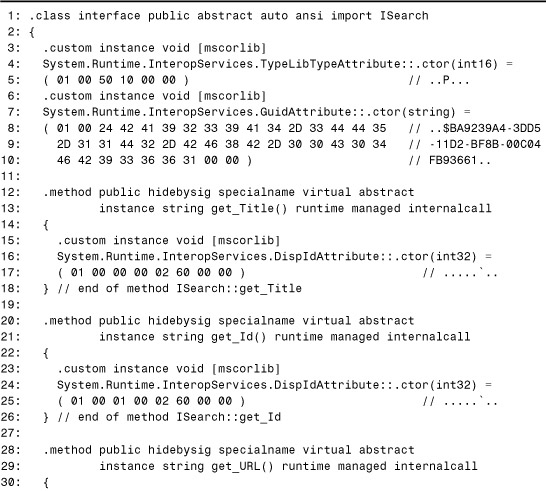

Listing 7.7. Metadata for the ISearch Interface with Added DescriptionAttributes
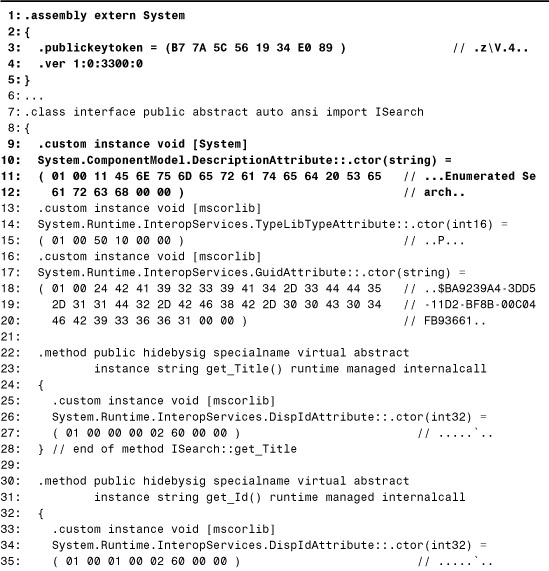


First, a reference to the System assembly needed to be added in Lines 1–5 because that’s the assembly containing System.ComponentModel.DescriptionAttribute.
Notice that the attributes were only added to the interface and its properties, not their associated accessor methods. Because the accessor methods are usually hidden from any IDE that may take advantage of DescriptionAttribute information, there’s no point in marking them. Adding all of this information manually for an entire assembly can be quite time-consuming, so writing a program to scan a type library and add these attributes might be in order for those serious about adding them.
Adding Custom Marshalers
Custom marshaling is an advanced topic discussed in Chapter 20, “Custom Marshaling.” The bottom line is that you can write a custom marshaler to transform any COM interface type into any .NET reference type when used as a parameter, field, or return type. The problem with the custom marshaling mechanism is that the managed signature must be marked as using a custom marshaler. The type library importer only recognizes a handful of built-in custom marshalers, and there’s no standard mechanism to plug-in your own. As a result, the disassemble/reassemble technique must be used to apply user-defined custom marshalers to types in an Interop Assembly.
For an example, let’s look at the DirectX 7 for Visual Basic type library. In this type library the DirectDrawSurface7 interface has the following SetFont method:
HRESULT _stdcall SetFont([in] IFont* font);
This looks like the following in an IL file:
.method public hidebysig newslot virtual abstract
instance void SetFont([in] class DxVBLib.IFont marshal( interface) font)
runtime managed internalcall
{
} // end of method DirectDrawSurface7::SetFont
Let’s assume that there’s a special custom marshaler class called FontMarshaler contained in the namespace MyCompany.CustomMarshalers in an assembly called MyCustomMarshalers that can transform any COM IFont type into the .NET System.Drawing.Font type. (An example of writing such a class is shown in Chapter 20.) This custom marshaler can be applied to the signature by changing it to something like the following:
.method public hidebysig newslot virtual abstract
instance void SetFont([in] class [System.Drawing]System.Drawing.Font
marshal(custom("MyCompany.CustomMarshalers.FontMarshaler, MyCustomMarshalers, Version=1.0.0.0, Culture=neutral, PublicKeyToken=e1a867530915b145", "")) font)
runtime managed internalcall
{
} // end of method DirectDrawSurface7::SetFont
The first string inside marshal(custom(...)) must contain the fully-qualified type name and the complete assembly identity. It’s okay to completely change the type of the parameter, because the custom marshaler class is invoked at run time to handle the transformation between the new type and the original type. For a transformation such as this, you’d need to add a reference to the System.Drawing assembly at the top of the IL file so the definition of System.Drawing.Font could be found. For example, this might look like:
.assembly extern System.Drawing
{
.publickeytoken = (B0 3F 5F 7F 11 D5 0A 3A ) // .?_....:
.ver 1:0:3300:0
}
The type library importer only marks IEnumVARIANT and IDispatchEx types as marshaled with a custom marshaler, as mentioned in Chapter 4. If you don’t like this behavior, perhaps because of performance concerns, you could remove the custom marshaler marking by replacing, for example:
System.Collections.IEnumerator marshal(custom(
"System.Runtime.InteropServices.CustomMarshalers.EnumeratorToEnumVariant, CustomMarshalers, Version=1.0.3300.0, Culture=neutral, PublicKeyToken=b03f5f7f11d50a3a", ""))
with simply:
[stdole]stdole.IEnumVARIANT
and adding a reference to the stdole Primary Interop Assembly if one doesn’t already exist.
Caution
Removing custom marshaler usage in an Interop Assembly is not recommended, because custom marshalers help enable COM components to behave as .NET clients expect. In addition, every custom marshaler that the type library importer uses provides a mechanism for communicating with the original COM interface (such as IEnumVARIANT). This is discussed in Chapter 20.
Adding DISPIDs
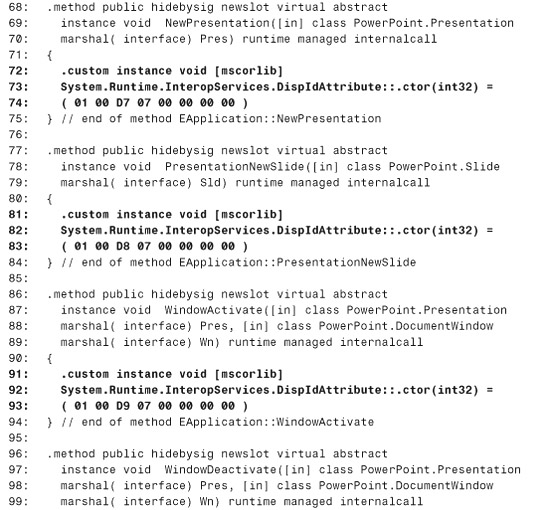
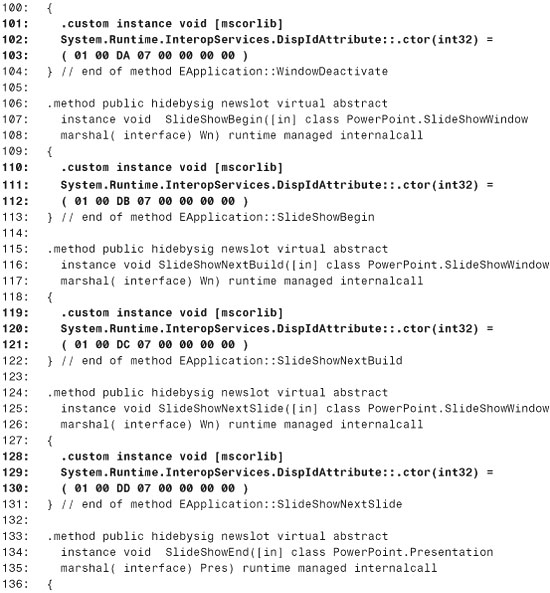
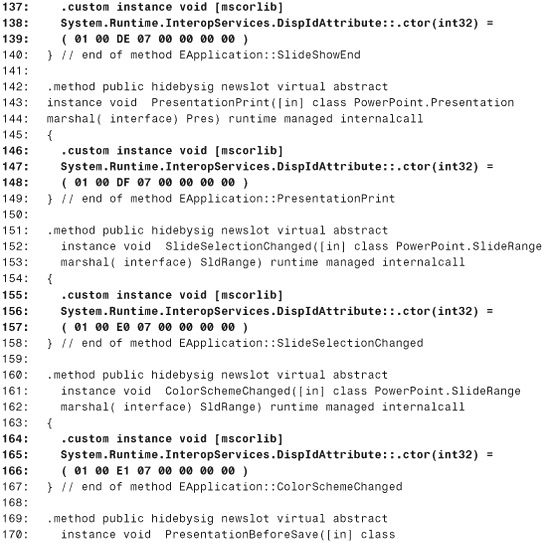
Chapter 5 described a source interface in the Microsoft PowerPoint 2002 type library that does not mark its members with DISPIDs. To handle these events using an Interop Assembly generated by the type library importer, each member of the PowerPoint.EApplication interface should be marked with the DISPID that PowerPoint uses to call each member. Listing 7.8 shows an updated interface with all the correct DISPIDs. If a PIA for this type library is made available, it should already contain this customization.
Listing 7.8. Manually Added DISPIDs for the EApplication Interface in the Microsoft PowerPoint Interop Assembly


Tip
As mentioned in Chapter 5, another metadata change that can be important to event handling is turning the private sink helper classes generated by the type library importer into public classes. This helps whenever an event source calls QueryInterface for IDispatch on the sink object returned via IConnectionPoint.Advise. The change can be done by changing a class like the following:
.class private auto ansi sealed ApplicationEvents_SinkHelper extends [mscorlib]System.Object implements Outlook.ApplicationEvents
to:
.class public auto ansi sealed ApplicationEvents_SinkHelper extends [mscorlib]System.Object implements Outlook.ApplicationEvents
Adding Back IDL Custom Attributes
Type library attributes such as restricted or noncreatable are stored in the three attributes TypeLibTypeAttribute, TypeLibFuncAttribute, and TypeLibVarAttribute, depending on what they’re applied to. IDL has its own extensible custom attributes, however, that are ignored by the type library importer.
An IDL custom attribute has the following format:
[custom(guid, value)]
Unlike a .NET custom attribute, which is uniquely identified by its assembly, namespace, and name, IDL custom attributes are uniquely identified by a GUID. The value portion contains the attribute’s data—anything that can fit inside a VARIANT.
If you use COM components that make use of these custom attributes and would like to preserve them in Interop Assemblies, you could define your own .NET custom attribute that can contain this information. In C#, such an attribute might look like the following:
using System;
[AttributeUsage(AttributeTargets.All)]
public class IdlCustomAttribute : Attribute
{
private object value;
private Guid guid;
public IdlCustomAttribute(Guid guid, object value)
{
this.guid = guid;
this.value = value;
}
public object Value { get { return value; } }
public Guid Name { get { return guid; } }
}
Instances of this attribute could then be sprinkled throughout a disassembled Interop Assembly wherever the IDL custom attributes existed in the original type library. Of course, because there’s no official universally recognized attribute that plays this role, doing this has limited applications.
Adding Methods to Modules
Because the type library importer ignores methods in any type library module, adding these methods to an Interop Assembly manually is often desirable. This can be done as follows:
1. If the module only contains methods (in other words, no constants) then the class needs to be added to the metadata because the importer skips it altogether. If the module contains any constants, the class is already present in the metadata and you can skip this step.
2. Mark the class as a Visual Basic module, as shown earlier in the “Marking Classes as Visual Basic Modules” section. This isn’t necessary, but nice for VB .NET clients.
3. Add each method to the class. Because a module’s methods are static entry points into a DLL, this uses PInvoke technology, covered in Part VI of this book. Therefore, the details of creating the appropriate method signatures won’t be covered here.
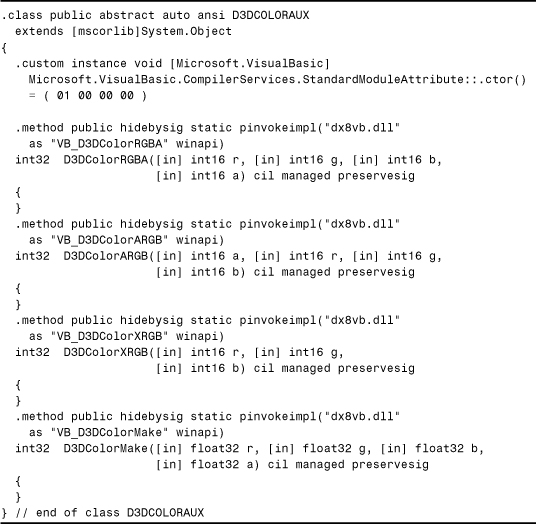
Listing 7.9 shows the definition of a module in the DirectX 8 for Visual Basic type library with four methods. Listing 7.10 shows what the corresponding .NET class would look like if the class and its methods were manually added to the Interop Assembly.
Listing 7.9. The IDL Definition of D3DCOLORAUX, a Module in the DirectX 8 for Visual Basic Type Library
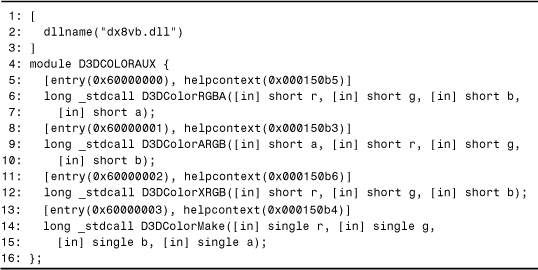
Listing 7.10. The Hand-Crafted Metadata Definition of D3DCOLORAUX from Listing 7.9
Conclusion
After reading this chapter, you should be armed with the necessary techniques to handle whatever Interop Assemblies the type library importer might throw at you. Any changes you make must adhere to the rules of the CLR and the Interop Marshaler. The type library importer knows how to generate “correct” metadata, despite the fact that it may not suit your needs. If you change it to suit your needs, be sure you stay within the rules.
With all these modifications to metadata and a compiler (ILASM) much less restrictive than higher-level languages, how do you know if you make mistakes or break the rules? Fortunately, many mistakes are caught by ILASM when attempting to reassemble the IL file. Other errors can show up at run time when loading a type or calling a modified member, depending on the nature of the change. Common exceptions thrown for metadata changed in an inappropriate way are TypeLoadException, InvalidCastException, and MarshalingDirectiveException. The best advice to avoid such mistakes is to follow the guidelines in this chapter and be careful. Save an original copy of the type library and/or Interop Assembly (in a different directory or with a different name) just in case things go wrong.
Tip
The .NET Framework PE Verifier (PEVERIFY.EXE) ships with the .NET Framework SDK and can be run on modified assemblies to detect errors that the IL Assembler would not detect. This utility detects unverifiable code, which can easily be a result of an incorrect modification to an Interop Assembly. The type library importer almost never produces unverifiable code on its own.
Remember that using ILDASM.EXE and ILASM.EXE to modify an assembly isn’t always the only option. If you’re starting with IDL file to generate a type library, it’s easiest just to modify the original source so the type library and the Interop Assembly contain the appropriate information. If starting with a type library, you could obtain an IDL representation from a tool like OLEVIEW.EXE (with the caveats mentioned in Chapter 4), modify it, then compile it (with MIDL.EXE or MKTYPLIB.EXE). Such techniques mainly serve as alternatives for the following sections of this chapter, because they rely on the type library importer exhibiting the desired behavior:
• Changing data types (for the most part)
• Changing attribute contents
• Adding DISPIDs
Sometimes modifying the type library might be easier for those people familiar with the MIDL compiler and all of its switches. Plus, as long as the IDL correctly reflects your COM component, you can be sure that the metadata you get from the type library importer is correct. For COM novices who just want to get the component working, modifying the assembly is usually much easier.
Another change that could either be made to the input type library or the output assembly is to add helpful types that were excluded from the original type library. Sometimes types such as enums can be useful for a COM component’s APIs but are defined in a C++ header file rather than a type library. In this case, it’s often easy to paste the C++ type definition into a temporary C# file, make minor syntax changes, then compile and disassemble it. This disassembled definition can then be inserted in your Interop Assembly.
When changes must be made to work around limitations of type library expressiveness or the importer’s conversion process, then you have no choice but to modify the assembly. This applies to most of this chapter’s sections, which described:
• Exposing success HRESULTs (to some extent)
• Exposing SAFEARRAYs differently
• Adding size information to C-style arrays
• Marking classes as Visual Basic modules
• Adding back helpstring information
• Adding custom marshalers
• Adding back IDL custom attributes
• Adding methods to modules
Caution
Visual Studio .NET users should be extra careful when modifying an Interop Assembly because there may be multiple copies of it under your project folder. For example, there could be one in a Debug folder, a Release folder, and also a separate bin folder. Make sure that you replace all of the original Interop Assemblies with your new one.