
Chapter 8. The Essentials for Using .NET Components from COM
In This Chapter
• A Sample .NET Component
• Using a .NET Component in Visual Basic 6
• Using a .NET Component in Unmanaged Visual C++
• Using a .NET Component in Unmanaged JScript
• Assembly Registration
• The Type Library Exporter
• .NET Class Interfaces
• Interacting with a .NET Object
• Deploying a COM Application That Uses .NET
• Hosting Windows Forms Controls in Internet Explorer
It’s time to switch gears and take our first glimpse at the other half of COM Interoperability—.NET components and the COM clients that use them. This chapter is structured similarly to Chapter 3, “The Essentials for Using COM in Managed Code.”
First, we look at three quick examples—using a .NET component in a Visual Basic 6 application, in an unmanaged Visual C++ application (version 6.0 or 7.0), and from unmanaged script. After that, we examine some important concepts related to the exposure of .NET components to COM, then cover the basic interactions that can be done with .NET components from unmanaged code.
A Sample .NET Component
For the first examples of using a .NET component in COM applications, we’ll use a simple .NET class written in C#, shown in Listing 8.1.
Listing 8.1. StringValidator.cs. A Simple .NET Class We’ll Use from COM Clients
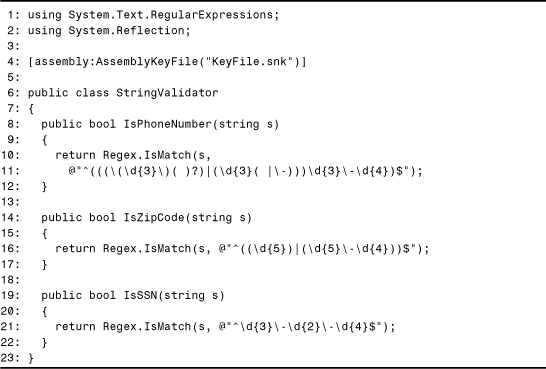
To compile this code, first generate a key file using the .NET Framework Strong Name Utility (SN.EXE) as follows:
sn –k KeyFile.snk
Then use the C# command-line compiler as follows, in the same directory as KeyFile.snk:
csc /t:library StringValidator.cs /r:System.dll
Line 4 uses the assembly-level AssemblyKeyFileAttribute custom attribute to give the StringValidator assembly a strong name. This makes it easy to globally share the assembly with COM clients.
This StringValidator class uses a single .NET regular expression API (Regex.IsMatch) available in the System.Text.RegularExpressions namespace in the System assembly. (If you’re not familiar with regular expressions, then just trust that these methods do what they claim to do.)
IsPhoneNumber returns true if the input string represents a U.S. phone number; false otherwise. It accepts numbers in the following form, where n is a digit:
nnn nnn-nnnn
nnn-nnn-nnn
(nnn) nnn-nnnn
(nnn)nnn-nnnn
IsZipCode returns true if the input string represents a U.S. zip code; false otherwise. It accepts five-digit zip codes (nnnnn) or nine-digit zip codes (nnnnn-nnnn). IsSSN returns true if the input string represents a Social Security number (nnn-nn-nnnn) and false otherwise.
Tip
Notice the strings prefixed with @ in Lines 11, 16, and 21 in Listing 8.1. These are called verbatim string literals. Such a string is processed verbatim, meaning no escape characters are recognized—except for two quotes (“”) representing one (“). Verbatim string literals can even span multiple lines, such as:
string s = @"Line 1 Line 2Line 3 with a ""quoted"" word";
Verbatim string literals in C# are much like string literals in Visual Basic except for the fact that they can span multiple lines. Verbatim string literals are quite handy for strings that contain several backslashes, such as regular expressions, Windows directory names, or Windows Registry key names. With regular strings, every backslash would need to be escaped with an additional backslash.
Using a .NET Component in Visual Basic 6
We’ll briefly run through the steps of using a .NET component in Visual Basic 6 in this section, saving detailed explanations for the remainder of the chapter after these first three examples. To use the StringValidator class from Visual Basic 6, do the following:
1. Register the assembly using the .NET Framework Assembly Registration Utility (REGASM.EXE) as follows:
regasm StringValidator.dll /tlb
3. The /tlb option creates and registers a type library with the name StringValidator.tlb.
4. Start Visual Basic 6 and create a new project, such as a Standard EXE project.
5. Add a reference to the desired type library by selecting Project, References... from the menu. This dialog was first shown in Figure 3.1 (in Chapter 3) but is shown again in Figure 8.1, highlighting the entry for our StringValidator type library.
Figure 8.1. The Visual Basic 6 References dialog.

Tip
Often, type libraries for .NET assemblies do not contain a library-level helpstring to describe their contents, so they appear in the Visual Basic 6 References list with their simple assembly name (with underscores replacing periods). For example, the StringValidator assembly appears in the list simply as StringValidator. Other assemblies, such as mscorlib, customize their description with the System.Reflection. AssemblyDescriptionAttribute custom attribute. Therefore, the mscorlib.tlb type library appears in the list as Common Language Runtime Library. Don’t confuse this with the Common Language Runtime Execution Engine 1.0 Library entry, a type library that describes COM types exposed by the CLR execution engine for advanced users such as CLR hosts (discussed in Chapter 10, “Advanced Topics for Using .NET Components”).
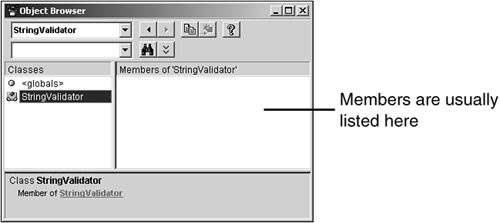
10. Click the OK button. If adding the reference succeeds, the type library’s contents appear in the Visual Basic 6 object browser, shown in Figure 8.2. You can access the object browser by selecting View, Object Browser from the menu or by pressing F2. Notice that none of StringValidator’s methods appears in the object browser. Similarly, when you try to use the class, you won’t get any help from IntelliSense. This is expected because StringValidator exposes an auto-dispatch class interface, discussed in the “.NET Class Interfaces” section.
Figure 8.2. The Visual Basic 6 object browser.
13. Install the assembly into the Global Assembly Cache (GAC) using the .NET Framework Global Assembly Cache Utility (GACUTIL.EXE) as follows:
gacutil –i StringValidator.dll
15. The reason we gave StringValidator a strong name in Listing 8.1 was so that we could install it in the GAC, because the GAC allows only strong-named assemblies to be installed.
16. Create three TextBox controls on the Visual Basic 6 form called PhoneText, ZipText, and SSNText, and a button named SubmitButton. The source code for this is on this book’s Web site, but the form is pictured in Figure 8.3.
Figure 8.3. The Visual Basic 6 client form.
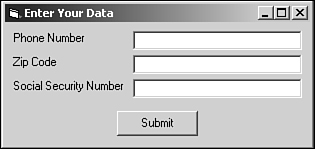
19. Place the code in Listing 8.2 inside the form’s code window, then select Run, Start or press F5 to run the program. You can then try out each of the three methods by typing in text and pressing the submit button.
Listing 8.2 contains the code for the Visual Basic 6 COM client that uses the StringValidator class.
Listing 8.2. Visual Basic 6 Code Using a .NET Class

Notice that the code to create and use the .NET object is no different from code to create and use a COM object. The validator variable must be declared as StringValidator. StringValidator rather than just StringValidator simply because the library name matches the class name. Had the assembly been compiled with a different filename, this would not have been necessary.
The calls on the validator variable end up being late-bound calls via IDispatch even though nothing in the code indicates it. This takes advantage of the fact that Visual Basic 6 allows you to call non-existent members on dual interfaces (such as the empty auto-dispatch interface implemented by the StringValidator coclass), and transparently handles it with calls to IDispatch.GetIDsOfNames and IDispatch.Invoke.
Using a .NET Component in Unmanaged Visual C++
The steps for using a .NET component in unmanaged Visual C++ code are shorter than the steps for Visual Basic 6 because referencing a type library is done in source code. (If you tried out the example in the previous section, you can skip the first two steps here.) To use the StringValidator assembly in unmanaged C++ code, you should do the following:
1. Register the assembly using the .NET Framework Assembly Registration Utility (REGASM.EXE) as follows:
regasm StringValidator.dll /tlb
3. The /tlb option creates and registers a type library with the name StringValidator.tlb.
4. Install the assembly into the Global Assembly Cache (GAC) using the .NET Framework Global Assembly Cache Utility (GACUTIL.EXE) as follows:
gacutil –i StringValidator.dll
6. Create a new Visual C++ project with the code from Listing 8.3.
Listing 8.3 contains unmanaged C++ code that uses the StringValidator class as if it were a COM class.
Listing 8.3. Unmanaged Visual C++ Code Using a .NET Class

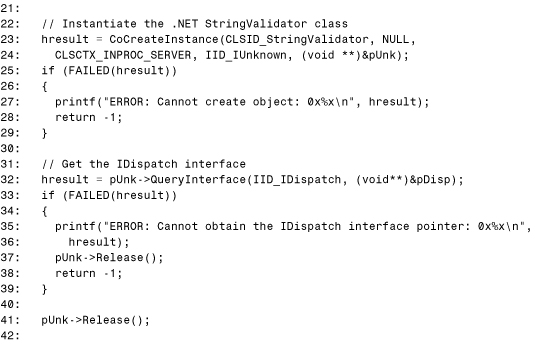

Line 6 imports StringValidator’s type library using the Visual C++ #import statement and a few directives that make its use easier:
• no_namespace—Doesn’t enclose the type library types in a separate namespace. Without this, they would be in a namespace equal to the library name.
• named_guids—Defines constants for the LIBID, IIDs, and CLSIDs. These have the form LIBID_LibraryName, IID_InterfaceName, and CLSID_CoclassName.
• raw_interfaces_only—Suppresses Active Template Library (ATL) smart pointers and wrappers that expose failure HRESULTs as C++ exceptions.
You’ll either need to ensure that StringValidator.tlb is in the same path as the C++ project or change the string in Line 6 appropriately. Line 15 initializes COM, and Lines 23–24 instantiate the COM-Callable Wrapper (CCW) for the StringValidator class using the familiar CoCreateInstance function. The CLSID_StringValidator constant is defined thanks to using named_guids with the #import statement. An IDispatch pointer is obtained via QueryInterface in Line 32.
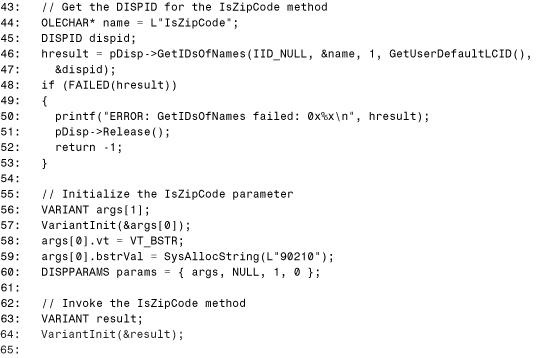
Lines 46–47 retrieve the DISPID for the IsZipCode method so it can be used in a call to IDispatch.Invoke.
Caution
Never hard-code DISPIDs in your C++ code, especially if they aren’t described in the interface’s type library definition. Instead, always call IDispatch.GetIDsOfNames before calling IDispatch.Invoke at least once for a given instance to obtain the DISPID for the desired member’s name. DISPIDs for members obtained via an auto-dispatch class interface (explained in the “.NET Class Interfaces” section) are not guaranteed to stay the same from one version of a .NET class to another. Plus, authors of .NET classes may inadvertently change their CLR-generated DISPIDs from one version of a component to the next if they don’t fully understand their interactions with COM.
Lines 56–60 prepare the string parameter to pass to the IsZipCode method, and Lines 66–67 call IDispatch.Invoke. If the call succeeds, Line 74 checks to see whether the return value is true or false and prints an appropriate message. Because the returned VARIANT contains a VARIANT_BOOL type, VARIANT_TRUE represents true (with a value of –1), and VARIANT_FALSE represents false (with a value of 0).
Caution
When calling a member via IDispatch.Invoke that has more than one parameter, the array of parameters inside the DISPPARAMS structure must be passed in reverse order. This is the way all IDispatch implementations must behave, and is not specific to .NET.
Using a .NET Component in Unmanaged JScript
Using a .NET component in unmanaged JScript is not much different from using it in Visual Basic 6. (If you tried out either of the previous two examples, you can skip the first two steps here.) To use the StringValidator assembly in unmanaged JScript, you should do the following:
1. Register the assembly using the .NET Framework Assembly Registration Utility (REGASM.EXE) as follows:
regasm StringValidator.dll /tlb
3. The /tlb option creates and registers a type library with the name StringValidator.tlb.
4. Install the assembly into the Global Assembly Cache (GAC) using the .NET Framework Global Assembly Cache Utility (GACUTIL.EXE) as follows:
gacutil –i StringValidator.dll
6. Create a text file called Client.js with the code such as the following:
var validator = new ActiveXObject("StringValidator")
validator.IsZipCode("16146")
8. Run the script using Windows Script Host from a command prompt as follows:
wscript Client.js
10. or simply:
Client.js
And that’s all there is to it. The JScript code creates the .NET object via its registered ProgID using ActiveXObject, then calls its IsZipCode method which internally uses the CCW’s IDispatch implementation. Using the .NET object from VBScript works the same way.
By always being forced to late bind, unmanaged script can encounter limitations of the IDispatch implementations of .NET objects. For example, the default IDispatch implementation exposed for .NET objects does not enable COM clients to call members with user-defined value type (UDT) parameters. These limitations, and others, are discussed in Chapter 14, “Implementing COM Interfaces for Binary Compatibility.”
Once registered, .NET objects can be created and used in script embedded in a Web page just like COM objects are used. The following Web page demonstrates the use of the StringValidator class, created using the <object> tag and its CLSID:
<html>
<script>
function CheckZipCode()
{
result.value = validator.IsZipCode(t.value)
}
</script>
<body>
<object
id="validator" classid="clsid:4EB55600-64CF-30EC-8616-9B6D3FA24EC2">
</object>
<br><input type="text" id="t">
<input type="button" id="b" value="Zip Code?" onclick="CheckZipCode()">
<br><input type="text" id="result"> Result
</body>
</html>
When any .NET class is registered, a CLSID is automatically generated if the class doesn’t choose its own via a custom attribute in source code. (Furthermore, this CLSID doesn’t change as long as the class or its containing assembly doesn’t change.) To figure out the CLSID for any .NET class, you could search in the Windows Registry or use REGASM.EXE’s /regfile option. This option generates a file that displays the entries that would be added to the registry if REGASM.EXE is run without this option. For the StringValidator assembly, this can be done as follows:
regasm StringValidator.dll /regfile
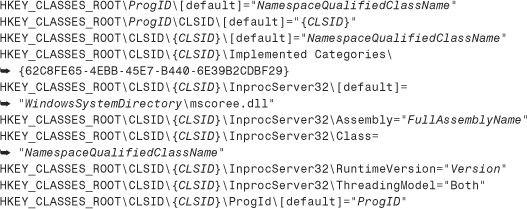
This generates a StringValidator.reg file that contains the desired CLSID in entries such as the following:
[HKEY_CLASSES_ROOTStringValidatorCLSID]
@="{4EB55600-64CF-30EC-8616-9B6D3FA24EC2}"
When using this option, no registration occurs, so you’ll still want to run REGASM.EXE without the /regfile option. REGASM.EXE is covered further in the “Assembly Registration” section and Appendix B, “SDK Tools Reference.”
Caution
The registration files generated by REGASM.EXE are for informational purposes only. They do not necessarily contain all of the registry entries that would be added by registering an assembly with REGASM.EXE, for reasons described in Chapter 12, “Customizing COM’s View of .NET Components.” Furthermore, the InProcServer32 default values contained in these files do not properly escape the backslashes in the path. Using this file for registration (by running REGEDIT.EXE on the file, for example) would add empty InProcServer32 default values to the registry, causing activation of any .NET object described inside to fail.
.NET objects can be used from unmanaged script without any registration, however, and with many other benefits compared to ActiveX controls. This is accomplished with a new form of the <object> tag, and is covered in the “Hosting Windows Forms Controls in Internet Explorer” section.
Assembly Registration
Before using a .NET class from a COM client, as done in Listings 8.2 and 8.3 and the script examples, it must be registered in the Windows Registry. There are three easy ways to register an assembly so that it can be used by COM clients:
• Using the Register for COM Interop project option in Visual Studio .NET (Visual C# and Visual Basic .NET projects only).
• Using REGASM.EXE, a command-line utility that is part of the .NET Framework SDK and .NET Framework redistributable package.
• Using the RegistrationServices class in the System.Runtime.InteropServices namespace.
All three of these techniques do the same registration, but each option gives more flexibility than the previous one. The first option is covered in Chapter 11, “.NET Design Guidelines for Components Used by COM Clients,” because this would be used by the developer of the .NET component, not the COM client. REGASM.EXE was used in the earlier example, and all of its options are covered in Appendix B. REGASM.EXE is included on any computer that has just the .NET Framework redistributable package, because registration is a task that needs to be done on an end user’s computer. The RegistrationServices class gives you the ability to register an in-memory assembly. The use of this class is demonstrated in Chapter 22, “Using APIs Instead of SDK Tools.”
When used with no options, REGASM.EXE adds the following registry entries for each coclass in a regular assembly (in other words, not an imported Interop Assembly):
When used with its /tlb option, as done in the StringValidator example, REGASM.EXE creates and registers a type library. (Creating type libraries for assemblies is discussed in the next section, “The Type Library Exporter.”) The type library registration performed by REGASM.EXE is the same as calling the OLE Automation LoadTypeLibEx API with the REGKIND_REGISTER flag; it is not specific to .NET. See Appendix B for the entries that standard COM type library registration adds to the Windows Registry.
Notice that the default value for the InprocServer32 key is set to the filename of MSCOREE.DLL, a component of the CLR execution engine, rather than the filename of the assembly. In MSCOREE.DLL, the CLR exposes a DllGetClassObject entry point that creates class factories for CCWs.
When this DllGetClassObject method is called, the CLR checks the Class value registered under the passed-in CLSID to determine which .NET class needs to be instantiated. If the assembly containing the class is not already loaded, the CLR loads the assembly specified with the Assembly value the same way that it would for a .NET client application. This means that the assembly must be placed somewhere where the CLR can find it. For example, it could be placed in the Global Assembly Cache (GAC), in the same directory as the client executable, or somewhere specified in a configuration file. The StringValidator assembly used at the beginning of the chapter was given a strong name and installed in the GAC. This is the recommended approach because all assemblies are effectively shared once registered in the Windows Registry, and the GAC is where shared assemblies should be stored.
Tip
Installing assemblies in the Global Assembly Cache gives the best performance compared to any other location. The GAC is the first place the assembly resolver searches when loading an assembly. Furthermore, the CLR validates an assembly’s digital signature when it is installed in the GAC. For assemblies not in the GAC, the CLR must validate the signature every time an assembly is loaded.
Caution
When running a compiled Visual Basic 6 COM client outside the VB6 IDE, the executable directory is simply the directory containing the compiled client executable. In this scenario, an assembly could be placed in the same directory and used by the COM client without problems. When running a Visual Basic 6 COM client within the VB6 IDE, however, the executable directory becomes the directory containing Visual Basic itself—VB6.EXE. Clearly you don’t want to make a habit of copying assemblies to the directory containing VB6.EXE, so using an alternative, such as installing the assembly in the GAC, works well.
A similar situation occurs when using .NET objects from unmanaged script. If you run the script using the Windows Script Host, the executable directory is the directory containing WSCRIPT.EXE. Placing assemblies in the same directory as the script files does not help the CLR find them.
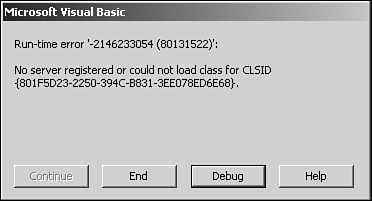
Failure to place an assembly in an appropriate place is the Number One cause for errors when people first attempt to use .NET objects from COM clients. We’re accustomed to COM objects getting registered with their path and filename, but assemblies are different. Figure 8.4 shows what this common error looks like from a Visual Basic 6 project. The failure manifests as a TypeLoadException, so COM clients see the HRESULT COR_E_TYPELOAD (0x80131522).
Figure 8.4. Failure to load an assembly from a Visual Basic 6 project.
Developers sometimes view the process of giving an assembly a strong name and installing it in the GAC as too laborious, especially when the assembly is still being developed and constantly being changed. REGASM.EXE has a shortcut that enables you to place an assembly wherever you’d like and have it be found and loaded without the help of configuration files. This shortcut is its /codebase option. When using this, REGASM.EXE places an additional entry for each coclass registered, for example:
HKEY_CLASSES_ROOTCLSID{CLSID}InprocServer32CodeBase= file:///C:/.../MyAssembly.dll
With this value registered, the CLR can locate assemblies anywhere in the file system. Or, the CodeBase value could even be a URL! In this case, the assembly is automatically downloaded on demand.
The CodeBase value is only used as a hint, however. If an assembly can be found in the usual places, then it gets loaded as if the CodeBase value doesn’t exist. Configuration files aside, the GAC is searched first, then the local directory, and finally the CodeBase value if it exists. If you’re familiar with the System.Reflection.Assembly class, then you can think of CodeBase as enabling an Assembly.LoadFrom call after a failed call to Assembly.Load. Be aware that this search order differs from regular .NET applications. If a .NET application uses a configuration file that specifies a CodeBase value, then the GAC is searched first, followed by the CodeBase, followed by the local directory.
If you use /codebase on an assembly without a strong name (which is the simplest and quickest way to enable the use of .NET components from COM), REGASM.EXE emits the following warning:
RegAsm warning: Registering an unsigned assembly with /codebase can cause
your assembly to interfere with other applications that may be installed on
the same computer. The /codebase switch is intended to be used only with
signed assemblies. Please give your assembly a strong name and re-register it.
Caution
Using /codebase to register an assembly without a strong name should only be done for testing purposes. Ordinarily, private assemblies should reside in the same directory or a subdirectory of an application, but /codebase enables you to circumvent this rule. If multiple applications have assemblies without strong names that contain types with the same names, subtle incorrect behavior can occur by the wrong types getting loaded.
The /codebase option is intended for developer scenarios, rather than for use by applications distributed to end users. Using a codebase hint is often a handy shortcut when registering .NET objects to be used within the Visual Basic 6 IDE or from Windows Script Host. When registered with a CodeBase value, assemblies can be found even if they are not in the GAC or in the directory containing VB6.EXE or WSCRIPT.EXE.
The Type Library Exporter
Although registering an assembly is required for standard COM usage, creating a type library for an assembly is optional. Type libraries aren’t required to use .NET objects from COM, because you could perform late binding (or hand-craft an appropriate IDL file for C++ clients) just as you could for a COM object without a type library. Type libraries, however, are usually desired because they make .NET types readily available to COM applications with minimal effort. The mechanism that creates a type library describing types in a .NET assembly is known as the type library exporter. The type library exporter is the inverse of the type library importer; it takes an assembly as input and produces a standalone type library (a .tlb file) as output.
An exported type library contains definitions of COM-Callable Wrappers (CCWs). The term exported class is synonymous with a CCW. As with type library importing, none of the implementation of a .NET component is translated to unmanaged code; the appropriate type definitions in metadata are simply translated to COM type definitions. Unlike Interop Assemblies, exported type libraries (or Interop Type Libraries) usually work “out of the box” because the input metadata is rich enough to tell the exporter everything it needs to know to produce the appropriate signatures.
There are four ways to use the type library exporter to generate a type library:
• Using the Register for COM Interop project option in Visual Studio .NET (Visual C# and Visual Basic .NET projects only).
• Using REGASM.EXE, a command-line utility that is part of the .NET Framework SDK and .NET Framework redistributable package, with its /tlb option.
• Using TLBEXP.EXE, a command-line utility that is part of the .NET Framework SDK.
• Using the TypeLibConverter class in System.Runtime.InteropServices.
All four of these methods produce the exact same type library by default, although each option gives more flexibility than the previous one. Again, the first option is covered in Chapter 11. The second option of using REGASM.EXE was done in the StringValidator example. TLBEXP.EXE, the third option, is a utility analogous to TLBIMP.EXE, and its sole purpose is to export a type library; it does no registration. All of its options are covered in Appendix B. The TypeLibConverter class gives you the ability to export a type library from an in-memory assembly, and also gives you the chance to perform customizations before saving the type library. The use of this class is demonstrated in Chapter 22.
Tip
The following sequence of commands:
tlbexp MyAssembly.dll regasm MyAssembly.dll
is not equivalent to the following command:
regasm MyAssembly.dll /tlb
because the latter registers the type library that gets exported. Type library registration is useful for having the type library appear in lists, such as Visual Basic 6’s References dialog, and also necessary for cross-context COM marshaling. Therefore, using the TLBEXP.EXE utility is often not necessary.
Some assemblies, such as mscorlib, ship with type libraries. Such type libraries should always be used rather than exporting new ones because they may contain customizations.
.NET Class Interfaces
Classes defined in Visual Basic 6 have automatic class interfaces that expose their members. CCWs for .NET classes usually implement automatic class interfaces, too. Such class interfaces aren’t exactly the same as VB6 class interfaces, but are essentially the same idea.
Sometimes a CCW does not implement a class interface for its corresponding .NET class. For example, the TypeLibConverter coclass (representing System.Runtime.InteropServices. TypeLibConverter) implements a real .NET interface (ITypeLibConverter) as its default interface:
[
uuid(F1C3BF79-C3E4-11D3-88E7-00902754C43A),
version(1.0),
custom(0F21F359-AB84-41E8-9A78-36D110E6D2F9,
"System.Runtime.InteropServices.TypeLibConverter")
]
coclass TypeLibConverter {
interface _Object;
[default] interface ITypeLibConverter;
};
Whether a .NET class exposes its own class interface is controlled with a custom attribute explained in Chapter 12.
If a CCW does implement a class interface, it is always the default interface. This is important for Visual Basic 6 clients because the default interface determines which members appear to belong to the class type. There are two kinds of class interfaces a CCW could expose:
• An auto-dispatch class interface. This is the most common, because it is the default behavior for .NET classes (as seen with the StringValidator class in Listing 8.1). Such a class interface is easily identifiable by the fact that it’s a dual interface whose definition contains no members. By calling its inherited IDispatch members, you can late bind to public members of the class and its base classes (except for members marked as COM-invisible). This was demonstrated in Listings 8.2 and 8.3 and the script examples, and looks no different than using an auto-dual interface in VB6—except that you don’t get IntelliSense for the members.
• An auto-dual class interface. This dual interface contains all the public COM-visible members of the class and its base classes. These are the same members that can be invoked on an auto-dispatch class interface; the only difference is that type information for these members is available in the exported type library, and COM clients can v-table bind to the members rather than being restricted to late binding.
The “auto” in both of these names refers to the fact that the CLR automatically fabricates these class interfaces at run time. Here’s what the auto-dispatch class interface for the StringValidator class from Listing 8.1 looks like in its exported type library (as seen in OLEVIEW.EXE):
[
odl,
uuid(C286EFF2-D7C4-3712-B8EE-BC7A7F84A823),
hidden,
dual,
oleautomation,
custom(0F21F359-AB84-41E8-9A78-36D110E6D2F9, "StringValidator")
]
interface _StringValidator : IDispatch {
};
CCWs always implement interfaces that are implemented by the corresponding .NET class’s base classes, and this includes class interfaces if the base classes expose them. Because System.Object exposes a class interface (_Object) and every .NET class derives from System.Object, every exported .NET class lists _Object as an implemented interface. This can be seen in the definition of the exported StringValidator coclass (as seen in OLEVIEW.EXE):
[
uuid(4EB55600-64CF-30EC-8616-9B6D3FA24EC2),
version(1.0),
custom(0F21F359-AB84-41E8-9A78-36D110E6D2F9, "StringValidator")
]
coclass StringValidator {
[default] interface _StringValidator;
interface _Object;
};
Interacting with a .NET Object
Just as in using a COM object from managed code looks like using a .NET object, using a .NET object from unmanaged code looks like using a COM object, because you’re really interacting with a CCW. This section provides an overview of the common interactions you can perform with a .NET object through its CCW.
Creating a .NET Object
Listings 8.2 and 8.3 and the script examples demonstrated that .NET objects can be created just like COM objects. All CCWs support aggregation, and implement several well-known COM interfaces, discussed in Chapter 14.
The one major limitation with object creation is that only .NET classes with public default constructors can be instantiated by a COM client via CoCreateInstance. COM has no built-in way to create an object and pass parameters simultaneously. Instead, a COM client could instantiate a different .NET object that has a public default constructor (like a factory object) and call a member that returns the desired instance. The object’s CCW is created as soon as you obtain a .NET object this way.
Because .NET classes with public default constructors are registered with ProgIDs by default, they can also be created using them. For example, in Visual Basic 6:
Dim o As Object
Set o = CreateObject("StringValidator")
If o.IsZipCode("16146") Then ...
This approach of using CreateObject then late binding in Visual Basic 6 is handy because it doesn’t require a type library to be referenced. This technique can be valuable for COM objects that don’t have a type library, but because a type library can be obtained for any assembly by simply running the type library exporter, it’s no longer as important.
Calling Members on a .NET Object
The next chapter, “An In-Depth Look at Exported Type Libraries,” discusses the transformations performed by type library exporter, and this helps to understand how to call members of a CCW. In this section, we’ll briefly touch on some common surprises or limitations that face COM developers attempting to call members of a .NET object:
• Any .NET signatures that are exposed to COM with by-value UDT or by-value SAFEARRAY parameters cannot be called by Visual Basic 6 clients. This is no different than if a COM object exposed such parameters, and is an unfortunate limitation of Visual Basic 6. .NET arrays are passed by-value much more often than by-reference, and are exposed as SAFEARRAYs by default.
• System.Object types are exposed as VARIANT types by default. This can seem a little unnatural in C++ when you want to pass an interface pointer, but all you need to do is create a VARIANT with type VT_UNKNOWN or VT_DISPATCH and set its punkVal or pdispVal member to your interface pointer:
VARIANT obj;
VariantInit(&obj);
obj.vt = VT_UNKNOWN;
obj.punkVal = pMyInterfacePointer;
pMyInterfacePointer->AddRef();
• .NET fields and properties are both exposed as COM properties. When using #import in Visual C++, raw property accessors can be accessed via names such as get_PropertyName, put_PropertyName, or putref_PropertyName. The ATL wrappers have names such as GetPropertyName, PutPropertyName, or PutRefPropertyName by default. The put_ and Put prefixes often catch programmers by surprise because set_ or Set would seem more natural for .NET property setters.
• Static members (Shared in VB .NET) are not directly exposed to COM. If you require calling such members, the easiest workaround is to write some managed code that wraps calls to static members inside instance members. Chapter 10 demonstrates a different workaround that uses reflection from unmanaged C++. .NET classes can choose to expose static members via late binding, but this is rarely done. Chapter 14 has the details.
• ToString methods are exported as properties. Furthermore, they are marked as default properties for classes that don’t already have a default member. This odd-sounding transformation is done mainly for the benefit of Visual Basic 6, so you can “print an object” as follows:
Dim s As New StringValidator.StringValidator
MsgBox s
This displays “StringValidator”, the result of StringValidator.ToString, because the default property is implicitly invoked.
• .NET class interfaces contain members inherited from base classes, but .NET interfaces are not exposed with members of their base interfaces. Instead, all exported .NET interfaces derive directly from IUnknown or IDispatch and only contain the members directly defined on them. To be able to call members on base .NET interfaces, a COM client must call QueryInterface for the desired interface.
Besides these items, .NET overloaded methods are a highly-visible annoyance when used from COM. COM interfaces cannot have overloaded methods, because each member’s name must be unique. To account for this, the names of overloaded methods are decorated when exposed to COM in order to avoid name conflicts. The first overloaded method emitted in metadata (which should be the first method listed in source code, but this ultimately depends on the .NET compiler) gets to keep its name, but the remaining overloaded methods are given a suffix of _2, _3, and so on.
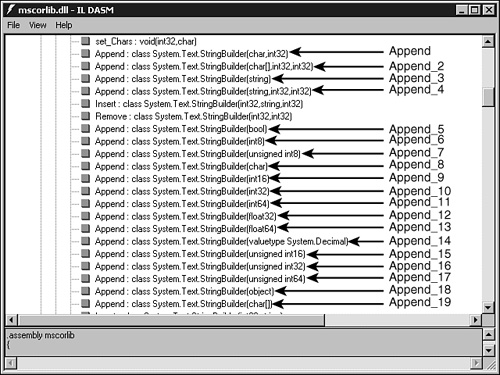
When calling an overloaded method, you need to figure out which method name to use based on the signatures in a type library. This isn’t possible when late binding to an auto-dispatch class interface, however, because the signatures don’t appear in an exported type library. For example, the System.Text.StringBuilder class has 19 public Append methods. These are exposed to COM as Append, Append_2, ..., Append_19, but they are not accessible via anything other than the empty _StringBuilder auto-dispatch class interface. Rather than figuring out which Append method has which decorated name by trial and error, you can perform the following steps:
1. Open the assembly containing the overloaded methods (in this case, mscorlib.dll) in the IL Disassembler (ILDASM.EXE).
2. On the View menu, make sure that Show Public is the only one of the Show... options checked. Non-public overloads don’t affect exported names.
3. On the View menu, make sure that Sort by name is not checked. We need to see the exact order that the members appear in metadata, because that is how the exporter processes the signatures.
4. Open the node for the class containing the overloaded methods you wish to check. The first one listed gets to keep its name when exposed to COM; the second one gets the _2 suffix, and so on.
Figure 8.5 demonstrates this process for System.Text.StringBuilder and its Append overloads.
Figure 8.5. Using the IL Disassembler to view overloaded methods in the order processed by the type library exporter.
Caution
Calling overloaded members of a .NET object is a little dangerous, because authors of .NET components may inadvertently add an overloaded method in the middle of the component’s existing overloaded methods or change the ordering of the overloaded methods. Such a change would change the methods’ names exposed to COM and likely break any COM clients using them. (.NET clients don’t notice, because the signatures and names all look the same to them.)
Authors of .NET components should not allow this to happen, but the safest action for the paranoid COM developer is to wrap all calls to overloaded methods in managed code that exposes them to COM using customized method names.
Getting Rich Error Information
.NET exceptions are exposed as COM HRESULTs because COM components are accustomed to handling errors this way. But seeing a returned error code such as 0x80131522 is not nearly as user-friendly as seeing a TypeLoadException thrown with a descriptive message. Fortunately, additional information from a thrown exception is available to COM clients.
For example, suppose the following Visual Basic 6 code attempts to use the System.Collections.Stack class in an invalid way:
Dim s As New Stack
' Attempt to pop an element off an empty stack
s.Pop
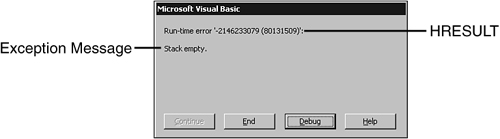
It’s illegal to call Pop on an empty Stack, so doing this in a .NET language would result in a System.InvalidOperationException thrown with the message “Stack empty.” Sure enough, running the previous code in Visual Basic 6 results in a run-time error with a dialog box containing the HRESULT for InvalidOperationException (0x80131509) but also the exception’s message. This is pictured in Figure 8.6.
Figure 8.6. A .NET exception’s message is displayed by Visual Basic 6 when an error occurs.
To run this code, you must reference mscorlib.tlb in your Visual Basic 6 project, which appears as Common Language Runtime Library in the References dialog. You must also register the mscorlib assembly as follows because it is not registered by default:
regasm mscorlib.dll
If mscorlib has not been registered, attempting to create an instance of a class defined inside it returns the REGDB_E_CLASSNOTREG failure HRESULT (0x80040154). Don’t use REGASM.EXE’s /tlb option because it already ships with a type library, and don’t use the /codebase option because the CLR doesn’t need a codebase hint in order to find mscorlib.dll.
So how is the Visual Basic 6 IDE able to display a .NET exception message, because it predates .NET? The answer is that a CCW makes common exception information available through standard COM mechanisms. The mechanisms differ depending on whether you’re late binding (such as calling Stack.Pop through its class interface) or v-table binding. Visual Basic 6 hides these mechanisms from the programmer, but we can see them in unmanaged C++ code.
Tip
Rich error information is always available for failure HRESULTs caused by .NET exceptions. You should make it a habit to use the techniques described in this section to extract this information (at least the exception’s message) whenever an error occurs. Some COM examples in this book don’t perform this extra step for the sake of brevity.
Late Binding in Unmanaged C++
Listing 8.4 demonstrates how to get error information besides an HRESULT from an invalid call to Stack.Pop in unmanaged C++. Because the Stack class doesn’t implement an interface exposing the Pop method nor does it expose a class interface with type information, we must perform late binding. The rich error information is obtained by passing an EXCEPINFO structure to IDispatch.Invoke. (EXCEPINFO stands for exception information.)
Listing 8.4. Unmanaged C++ Code That Obtains Rich Error Information When Late Binding
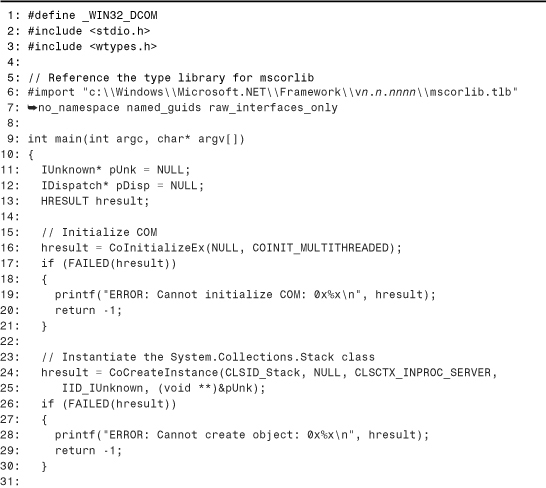

Lines 6–7 import the type library for the mscorlib assembly. (You should replace the path for this file as appropriate for your computer’s settings.)
Tip
When referencing mscorlib.tlb using #import in a Visual C++ 6 application, the following warning might be emitted by the compiler, depending on your settings:
mscorlib.tlh(6946) : warning C4146: unary minus operator applied to unsigned type, result still unsigned
In a Visual C++ 7 application, you may get the following warnings instead:
Listing8_4.cpp(6) : warning C4278: 'ReportEvent': identifier in type library 'pathmscorlib.tlb' is already a macro; use the 'rename' qualifier Listing8_4.cpp(6) : warning C4278: 'ReportEvent': identifier in type library 'pathmscorlib.tlb' is already a macro; use the 'rename' qualifier
These warnings stem from the mscorlib.tlh file produced by the Visual C++ type library importer, which contains C++ definitions of types described in the imported type library. (TLH stands for type library header.)
You can safely ignore such warnings, or disable them by placing a #pragma directive before the #import statement. For example, to disable warning C4146, you could do the following:
#pragma warning( disable : 4146 ) // Turns off warning 4146
You could then restore the default handling of the warning after the #import statement as follows:
#pragma warning( default : 4146 )
The CCW for the System.Collections.Stack class is instantiated in Lines 24–25 using CoCreateInstance, and an IDispatch pointer is obtained via QueryInterface in Line 33. Alternatively, we could have obtained a _Stack interface pointer, but IDispatch is just as good because we can only call the inherited IDispatch methods on _Stack anyway.
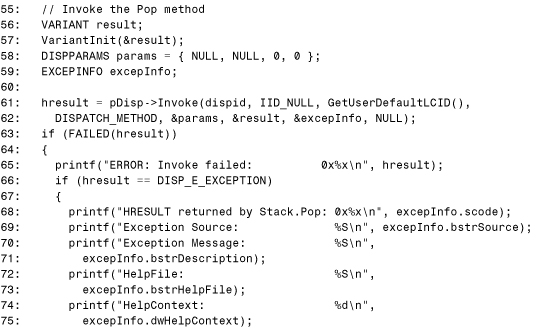
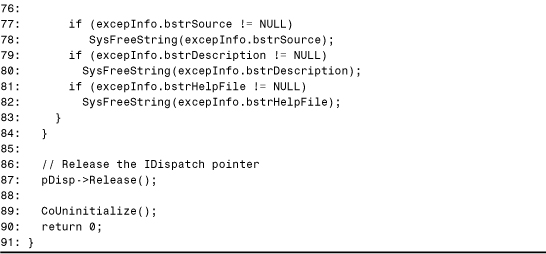
Lines 46–47 call GetIDsOfNames to retrieve the DISPID for Stack.Pop, and Lines 61–62 invoke the method. Notice that a reference to an EXCEPINFO structure declared in Line 59 is passed as the second-to-last parameter to Invoke. If the Invoke call fails with the DISP_E_EXCEPTION HRESULT, then the member was invoked but it returned a failure HRESULT. The failure HRESULT that the member returned and additional information can be extracted from the fields of the passed-in EXCEPINFO structure, but only when Invoke returns DISP_E_EXCEPTION. Therefore, Line 66 checks to see if the call fails with this HRESULT then proceeds to display the failure information in Lines 68–75.
The output of running this code is:
The first HRESULT is DISP_E_EXCEPTION, and the second HRESULT is COR_E_INVALIDOPERATION, the HRESULT for System.InvalidOperationException, found in Appendix D.
The EXCEPINFO structure has the following fields, which contain the following information when a .NET exception is thrown:
• wCode—Always set to 0.
• wReserved—Always set to 0.
• bstrSource—A string set to the contents of the exception’s Source property.
• bstrDescription—A string set to the contents of the exception’s Message property.
• bstrHelpFile—A string set to the contents of the exception’s HelpLink property. If the HelpLink string ends with # followed by a number, only the string contents before the # are copied.
• dwHelpContext—Set to 0, unless the exception’s HelpLink string ends with # followed by a number. In this case, dwHelpContext is set to that number.
• pvReserved—Always null.
• pfnDeferredFillIn—Always null.
• scode—The value of the exception’s HResult property.
Tip
If the HRESULT returned by IDispatch.Invoke is not DISP_E_EXCEPTION (0x80020009), then the failure either occurred before or after the member was invoked. Failure before invocation can be caused by problems such as a wrong number of parameters or wrong parameter types. If the HRESULT returned is DISP_E_PARAMNOTFOUND or DISP_E_TYPEMISMATCH, then the index of the parameter causing the error is returned via Invoke’s last parameter if a reference to a valid unsigned integer is passed. Failure after invocation can be caused by attempting to marshal invalid by-reference data types or return values back to unmanaged code.
When late binding, there’s no way to extract additional information about the .NET exception thrown besides what is exposed via EXCEPINFO. For example, the exception’s StackTrace and InnerException properties can’t be read without an intermediate .NET object that catches the exception and exposes the information in a custom fashion.
V-Table Binding in Unmanaged C++
When v-table binding to a COM object, extra error information can be obtained by using the GetErrorInfo API to get an IErrorInfo interface pointer. IErrorInfo is defined as follows (in IDL):
interface IErrorInfo: IUnknown
{
HRESULT GetGUID([out] GUID *pguid);
HRESULT GetSource([out] BSTR *pbstrSource);
HRESULT GetDescription([out] BSTR *pbstrDescription);
HRESULT GetHelpFile([out] BSTR *pbstrHelpFile);
HRESULT GetHelpContext([out] DWORD* pdwHelpContext);
}
Calling GetErrorInfo works only when the member that was invoked called SetErrorInfo before returning a failure HRESULT (which is done by all CCWs when a .NET member throws an exception). To indicate whether a COM object calls SetErrorInfo on failure, it can implement the ISupportErrorInfo interface. This interface has a single method—InterfaceSupportsErrorInfo—which returns S_OK if the object uses rich error information (for the interface implementation corresponding to an IID passed to the method) or S_FALSE if it does not.
All CCWs implement this interface and return S_OK from InterfaceSupportsErrorInfo, so this check is not strictly necessary if you know you’re interacting with a .NET object. Similar to the EXCEPINFO structure in the previous example, the members of IErrorInfo return the following information when used for a .NET exception:
• GetGUID—Always returns GUID_NULL, a GUID set to all zeros. This is supposed to return the IID of the interface that defines the HRESULT, but .NET exceptions don’t have such a notion.
• GetSource—Returns a string set to the contents of the exception’s Source property.
• GetDescription—Returns a string set to the contents of the exception’s Message property.
• GetHelpFile—Returns a string set to the contents of the exception’s HelpLink property. If the HelpLink string ends with # followed by a number, only the string contents before the # are copied.
• GetHelpContext—Returns 0, unless the exception’s HelpLink string ends with # followed by a number. In this case, GetHelpContext returns that number.
An exciting thing about obtaining an IErrorInfo interface pointer after a .NET exception is thrown is that the object returned by GetErrorInfo that implements IErrorInfo is the .NET exception object! This means that .NET-aware COM clients can successfully query for any COM-visible interface implemented by the exception or any of its COM-visible class interfaces, such as _Exception (the class interface for System.Exception), and call its members to get additional information.
Tip
.NET exception objects implement IErrorInfo when exposed to COM. Therefore, when a .NET exception is thrown toward a COM client and becomes a failure HRESULT, the CLR calls SetErrorInfo with the exception object so it can be retrieved by a COM client that calls GetErrorInfo.
Using QueryInterface to obtain an _Exception interface is useful, because it’s an auto-dual class interface, so its members can be called without late binding. From _Exception, you can discover things such as the exception’s stack trace, inner exception, or exception type. For exceptions that define their own members, such as System.IO.FileNotFoundException and its FileName property, using its most-derived class interface (_FileNotFoundException) enables COM clients to get this custom data. Most of the time, this requires late binding, because it’s rare for a .NET exception to implement an interface exposing such information or exposing a class interface that isn’t auto-dispatch.
Unfortunately, the .NET exception object cannot be accessed in Visual Basic 6 because the Err object that is raised is not the same object as the one implementing IErrorInfo. Instead, it is a separate object that has been initialized with the information from the object implementing IErrorInfo, and the original object is discarded by the Visual Basic 6 runtime.
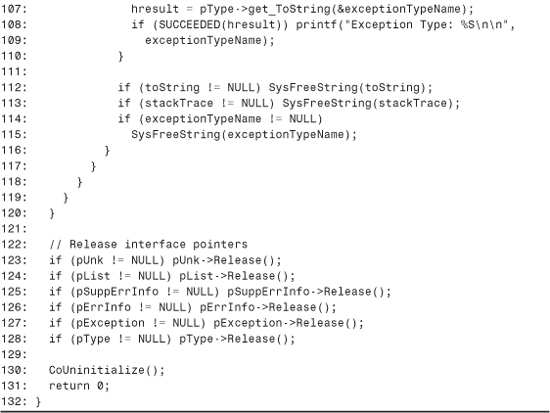
Listing 8.5 demonstrates how to get the usual rich error information from IErrorInfo and then how to get .NET-specific error information from _Exception. To provoke an exception, this listing calls the RemoveAt method on an empty System.Collections.ArrayList instance. Because RemoveAt is defined on the IList interface implemented by ArrayList, we can call it without late binding.
Listing 8.5. Unmanaged C++ Code That Obtains Rich Error Information When V-table Binding


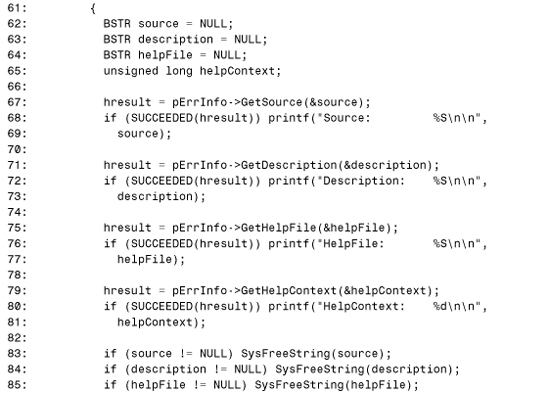

Lines 5–6 import mscorlib.tlb, just as in the previous listing. The raw_interfaces_only directive is important to prevent ATL from turning the failed HRESULT from the call to IList.RemoveAt into a C++ exception.
The CCW for the ArrayList is instantiated in Lines 27–28 and the IList interface pointer is obtained in Line 36. Line 45 contains the call to RemoveAt that intentionally fails. Once it fails, Lines 51–56 ensure that the object supports rich error information in its IList implementation by calling QueryInterface to obtain an ISupportErrorInfo interface pointer then checking for S_OK returned by InterfaceSupportsErrorInfo for IID_IList. As mentioned earlier, this is really not necessary because all CCWs implement this interface and return S_OK from InterfaceSupportsErrorInfo, but it’s done here for completeness.
Line 59 calls the GetErrorInfo API to obtain an IErrorInfo pointer, and Lines 67–81 print the information obtained from it (skipping GetGUID because it returns GUID_NULL). This is as far as .NET-unaware COM clients will go, but Lines 92–93 call QueryInterface for IID__Exception (the IID for the _Exception interface) so the program can print more information specific to the .NET exception. Lines 96–98 print the string returned by the exception’s StackTrace property, and Lines 100–102 print the string returned by the exception’s ToString method (exported as a ToString property). Line 104 calls _Exception’s GetType method (inherited from System.Object) to get an _Type interface pointer, the class interface for System.Type. On this interface pointer, Line 107 calls its ToString property to print the name of the exception’s type.
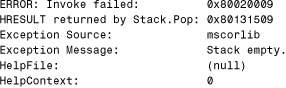
The output of running this code is
ERROR: RemoveAt failed: 0x80131502
Source: mscorlib
Description: Index was out of range. Must be non-negative and less than the size of the collection.
Parameter name: index
HelpFile: (null)
HelpContext: 0
Stack Trace: at System.Collections.ArrayList.RemoveAt(Int32 index)
ToString: System.ArgumentOutOfRangeException: Index was out of range. Must be non-negative and less than the size of the collection.
Parameter name: index
at System.Collections.ArrayList.RemoveAt(Int32 index)
Exception Type: System.ArgumentOutOfRangeException
Enumerating Over a Collection
Thanks to the transformations done by the type library exporter, enumerating over a collection exposed by a .NET object is as simple as enumerating over a collection exposed by a COM object. The For Each statement in Visual Basic 6 works on a .NET collection because a GetEnumerator method is exposed with DISPID_NEW_ENUM (a DISPID equal to –4) and appears to return an IEnumVARIANT interface. The unmanaged C++ code to enumerate over a collection isn’t very pretty, but here’s a snippet of Visual Basic 6 code that proves that .NET enumerators are exposed in the fashion familiar to COM:
Dim list As New ArrayList
Dim v As Variant
list.Add 1
list.Add 2
list.Add 3
list.Add 4
For Each v In list
MsgBox v
Next
Running this code, which must be done inside a project referencing mscorlib.tlb for the definition of ArrayList, produces four message boxes that display “1”, “2”, “3”, “4”, in that order. As with any COM client that uses types from the mscorlib assembly, you must be sure that the assembly has been registered with REGASM.EXE before running it.
Deploying a COM Application That Uses .NET
Correctly deploying a COM application that uses .NET components is not quite as simple as deploying a COM application that doesn’t. Besides satisfying the requirements of COM, you must satisfy the requirements of the .NET Framework.
The best place to install assemblies used by COM is in the Global Assembly Cache (GAC). Because they get registered globally in the Windows Registry, they become shared components from COM’s perspective even if they were intended to be used privately. Besides registering assemblies on target computers, you might also need to export type libraries and register them on target computers if your application depends on cross-context COM marshaling. If you are developing the .NET components being used by your COM clients, see Chapter 11 for more information about deploying .NET components and considerations that need to be made regarding the versioning of your components.
Speaking of versioning, the side-by-side nature of the CLR has an interesting side effect for COM clients that use multiple .NET components. Every COM-creatable class in every assembly gets registered with a RuntimeVersion value that can affect what version of the CLR is loaded when it’s instantiated by a COM client. Suppose a single COM application uses two .NET classes, A and B, each from a different assembly. It’s conceivable that each class is registered with a different version of the CLR (once more than one version of the CLR exists). Each process can only have one CLR loaded, so if the two .NET objects are created in the same process, a single version of the CLR must be chosen.
The version of the CLR that gets loaded is affected only by the registry entry accompanying the first .NET class to be activated. With this behavior, the loaded CLR version could appear to randomly change from one program execution to another, based on the order that program events occur that cause the classes to be loaded. This is pictured in Figure 8.7, in which the loaded version of the CLR is determined by which button a user clicks first in a hypothetical COM application.
Figure 8.7. The CLR version loaded is determined by the first .NET class instantiated.

Hopefully, the version of the CLR that gets loaded doesn’t make one bit of difference to your application’s behavior. Still, it’s possible that a later version of the CLR could have a bug or incompatibility that affects your application, and users might encounter the problem only at certain times, due to the seemingly random behavior of choosing which CLR gets loaded. .NET applications don’t exhibit this non-deterministic behavior, because the CLR is loaded from the start when the client application is managed.
To prevent this behavior, COM applications that use multiple .NET components should be deployed with a configuration file that specifies the desired version of the CLR. That’s right—.NET configuration files work with unmanaged executables as well as managed executables! When MSCOREE.DLL is loaded as the in-process COM server, it checks for an appropriate configuration file with the appropriate contents before checking the RuntimeVersion registry value to determine which version of the CLR to load. A configuration file overrides anything specified by RuntimeVersion registry keys, so it provides consistency in the face of multiple runtimes.
For an unmanaged executable named MyApp.exe, you should create a configuration file called MyApp.exe.config with contents such as the following:
<?xml version="1.0"?>
<configuration>
<startup>
<requiredRuntime version="v1.0.3300"/>
</startup>
</configuration>
This configuration file must be in the same directory as MyApp.exe. For more information about .NET configuration files, such as using them for Web applications, consult the .NET Framework SDK documentation.
Hosting Windows Forms Controls in Internet Explorer
Chapter 3 demonstrated that exposing ActiveX controls as Windows Forms controls is supported by the .NET Framework and fairly easy to accomplish thanks to the ActiveX Importer. The reverse action of exposing Windows Forms controls as ActiveX controls is not supported (although it was in Beta 1 of the .NET Framework). It’s still possible to expose Windows Forms controls as general-purpose ActiveX controls, but you must do so at your own risk. Chapter 10 describes how to do this. What is supported is hosting Windows Forms controls in Internet Explorer (versions 5.0 and later), as long as the client computer has the .NET Framework installed (at least the redistributable package). In fact, any .NET objects can be hosted in this manner, but this section focuses specifically on Windows Forms controls.
Web pages can use Windows Forms controls with the <object> tag and special syntax that looks like the following:
<object classid="URL/AssemblyFileName#FullyQualifiedClassName"></object>
For example:
<object id="myControl"
classid="http:MyAssembly.dll#Chapter8.MyControl"
height="200"
width="200">
<param name="Text" value="My Control">
</object>
By default, the control’s fore color, back color, and font are inherited from the Web page’s HTML. The <param> tags can be used to set properties of the control; name specifies the property’s name and value specifies the value you’re setting it to. Any .NET class can be instantiated in this manner, even ones without a user interface. The object created is a CCW, just as in all the previous interactions with .NET objects.
.NET objects created with this <object> tag syntax are fully scriptable by COM-aware script languages such as VBScript or JScript as if they are ActiveX controls. This is because all CCWs created in this fashion implement a COM interface called IObjectSafety in such a way to mark themselves as safe for scripting. This is safe to do because Internet Explorer hosts the Web page in an application domain with permissions appropriate to the zone of its URL (such as “Internet Zone”). This application domain acts as a sandbox that isolates the code such that it can’t perform tasks that aren’t allowed. Strong-named .NET components must be marked with AllowPartiallyTrustedCallersAttribute, introduced in Chapter 6, “Advanced Topics for Using COM Components,” to be hosted in a Web page.
Caution
A problematic aspect of Windows Forms controls hosted in Internet Explorer is that if you want script to respond to .NET events by hooking up event handlers, the Windows Forms control must be granted unmanaged code permission. This is necessary because when the control fires an event, the transition from the managed event source to the unmanaged event sink requires the permission. But by granting unmanaged code permission to a control, you lose the security advantage over ActiveX controls, because it would no longer be running in a semi-trusted state.
In addition, creating a Windows Forms control that exposes events in a way that COM understands is not trivial. Chapter 13, “Exposing .NET Events to COM Clients,” covers this topic.
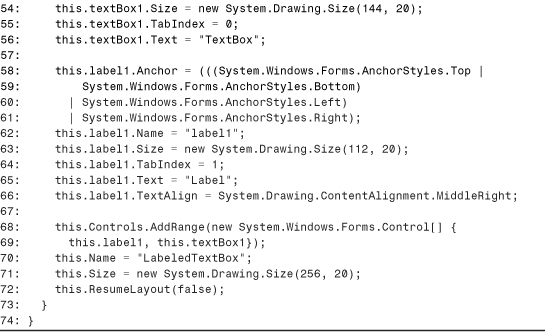
Listing 8.6 contains C# source code for a simple Windows Forms control called LabeledTextBox. This control combines two existing controls—Label and TextBox—because these simple controls are often used together. LabeledTextBox exposes two properties for setting the text of either sub-control.
Listing 8.6. A Simple Windows Forms Control


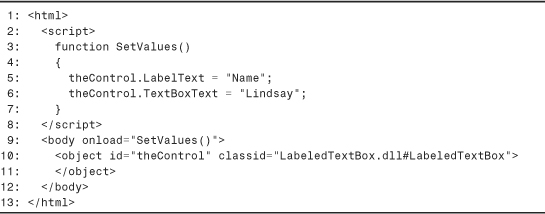
Listing 8.7 contains a simple Web page that hosts the LabeledTextBox control, with some unmanaged JScript code that interacts with it.
Listing 8.7. Hosting and Scripting a Windows Forms Control in a Web Page
To run this example, you should create a new virtual directory using Internet Information Services (IIS) and place the Windows Forms control and the HTML document inside it. The virtual directory’s execution permissions must be set to Scripts only rather than Scripts & Executables. You might need to modify the classid string used with the <object> tag depending on the location of the physical assembly file. You must also ensure that your machine policy allows managed code to run in the Internet zone.
Figure 8.8 shows the result of viewing the Web page from Listing 8.7.
Figure 8.8. A Windows Forms control hosted in a Web page.

Using unmanaged script to interact with .NET objects that are created with this custom <object> tag syntax has its limitations. Besides the limitation of calling members with UDT parameters (mentioned in the “Using a .NET Component in Unmanaged JScript” section), and besides the security restrictions preventing event handling from untrusted script, JScript and VBScript code cannot pass an instance of a .NET object as a parameter whose type is a class other than System.Object or System.MarshalByRefObject. This is because the scripting engine wraps all CCWs inside another COM object, so when such an object is passed back to managed code, it looks like a System.__ComObject instance (a generic COM object). Parameters that are defined as primitive types or interfaces are usable, but attempting to call a member with a parameter that’s a Hashtable or ArrayList, for example, fails as a type mismatch.
Conclusion
This chapter introduced the steps involved in writing COM applications that use .NET components, some of the related common issues and problems, and some good practices, such as getting rich error information accompanying failure HRESULTs and shipping configuration files with your client executables. The importance of taking advantage of rich error information can’t be stressed enough for unmanaged C++ clients. It greatly simplifies the debugging process.
Exposing Windows Forms controls as ActiveX controls was covered for the one scenario officially supported—hosting them in Internet Explorer using a new activation scheme that’s very un-COM-like. Chapter 10 examines Windows Forms controls again to show what else we can do with them that’s not officially supported.
Because COM is often an afterthought (or a “neverthought”) for authors of .NET components, using them in COM applications can often be unnatural. You’ve seen some examples of unnatural behavior in this chapter (such as odd names for overloaded methods or being forced to late bind), and will see more in the next two chapters. These problems can be more common and more serious in this direction than the reverse direction of using COM components in .NET applications. The reason for this is that the CLR bends over backwards to make existing COM components work as naturally as possible, because most were written before .NET existed. The CLR isn’t as zealous about making all .NET constructs and patterns useable from COM, however. Authors of .NET components can be given advice to make their components COM-friendly (the subject of Part IV), and have the power to fix their APIs that are hard to use for COM clients at the time that they are first designed. Therefore, .NET developers have little excuse for creating components that are hard to use from COM!